Anatomy 101

The lymphatic system

THE CLEAN UP CREW
The lymphatic system is a transport system that works as a clean up crew for the whole body. It gathers waste and toxins from our tissues and transports it to the bloodstream to be filtered and removed. It also works with the immune system to protect us from harmful pathogens by producing and transporting white blood cells, regulating inflammation, transporting nutrients and regulating fluid levels. Unlike the circulatory system, which is a closed circulatory system, the lymphatic system is an open circulatory system with no pump, and relies on internal pressure, muscle contractions, heart pulse and respiration to move the lymph through the vessels.

Within the lymphatic system there are around 600 small nodules that the lymph passes through called lymph nodes – with clusters situated in the neck, groins, armpits and behind the knees. The lymph nodes are where the white blood cells are produced and released. The nodes contain small blood vessels that continuously filter the lymph to remove waste and toxins. The lymph is also filtered in the upper chest where the lymphatic system merges with the two subclavicular veins. Once in the bloodstream the liver & kidneys filter and remove the waste.

When we inhale we increase pressure in the abdominal region and decrease pressure in the thoracic area. The increase in abdominal pressure draws lymph upwards towards the subclavicular veins, while the decrease in pressure in the thoracic region draws blood from the subclavicular vein to the heart (venous return) – giving the lymph waste an exit route. This increase in pressure is one the most efficient tools for keeping lymph flowing and is something that we can accentuate by deepening our breath in our yoga practice.

HOW YOGA CAN HELP 
All movement creates internal pressure, muscle contractions and increased heart rate – creating favourable conditions for lymph flow. But yoga includes the added benefits of focused deep breathing and the ability to direct the internal pressure and muscle contractions to specific areas of the body that will enhance lymph flow. Yoga poses that compress and release the areas where the lymph nodes cluster (neck, groins, armpits and behind the knees) stimulate the nodes with internal pressure. Similarly twists and backbends create this internal pressure. Mini flows, where you repeat two poses linked with the breath, creates internal pressure, stimulates muscle contractions, the respiratory system and increases heart rate. The lymph vessels are mainly found in the area between the skin and the muscles. Gentle MFR techniques like pinning and twisting the MFR balls on the surface of the skin or gentle rolling in the lymph node cluster areas are a very effective way to create internal pressure. The calves are considered to be a second heart and are the primary pump for lymph return from the lower extremities. Muscle contractions in the calves enhance this lymph return. Finally, inversions will help by both reversing gravity and creating an increase of heart rate.

EXPLORING THE LYMPHATIC SYSTEM IN YOUR PRACTICE
Throughout the sequence there are lots of opportunities to support lymphatic flow. For added benefits you could choose one or two of the poses and linger in them for a few breaths. This sequence starts with a row of mini flows that will create internal pressure on the lymph node clusters of the groins, armpit and behind the knees. In the first mini flow of the second row you will pump your fists open and closed three times on your inhale as indicated by the illustration. When your arms are extended behind you squeeze your arms to your body to compress the armpits. The next two mini flows will stimulate muscle contractions in the legs. Move slowly through these mini flows and link your breath with your movement. The four pose flow in row three breaks the inhale into three to create a longer inhale and generate internal pressure to optimise lymph exit. 

ALIGNMENT CUES
Have a read of the tips below and either print out the sequence or save it onto your device:

  • Use the breath guide in the sequence to help you link breath with movement in the flow. Inhale is indicated with a ‘+’, exhale is a ‘-”.

  • If there are specific poses that you would like to stay longer in, give yourself three deep breaths in those poses, and pick up the next pose with the allocated inhale or exhale as indicated by the sequence.

  • For a longer practice add in a Sun Salutations at the start of each mini flow or repeat each mini flow.

To save the images for personal use click and hold down the image until the ‘save image’ option appears; on Mac hold down ‘control’ and click the image to get the option box; on PC right click on the image to get the option box. Scroll down in the ‘option box’ and click ‘save image’.

Ruth Delahunty Yogaru

The nervous system

THE CONDUCTOR
The nervous system is the body's communication and control system. It is the most complex system and is responsible for all bodily functions and reactions to internal and external stimuli. It is the brilliant conductor that harmoises the symphony of the body into homeostasis. The nervous system is divided into two paths – the central nervous system (CNS) and the peripheral nervous system (PSNY). The central nervous system is made up of the brain and the spinal cord – it is the control centre of the nervous system. The peripheral nervous system is made up of 12 pairs of cranial nerves and 31 pairs of spinal nerves – it carries information to and from the brain to all the systems of the body. There are two nerve pathways – sensory and motor neurons. The sensory neurons send information from the nerve receptors to the CNS, while the motor neurons send information from the CNS to muscles and glands. The motor division is divided into the somatic nervous system (SoNS) and the autonomic nervous system (ANS). The somatic nervous system controls voluntary movements, like lifting your arm or walking. The autonomic nervous system controls involuntary functions that happen without us having to think about them, like breathing or digestion.

THE AUTONOMIC NERVOUS SYSTEM
The ANS manages daily activity and responds to situations. It is divided into the sympathetic nervous system (SNS), ‘fight or flight’ response, and the parasympathetic nervous system (PNS), ‘rest and restore’ response. Both actions start with sensory signals sending information to the brain. The brain accesses this information and, based on past experiences, decides if the SNS, the PNS or a combination of both are required. When the SNS is active, motor neurons travel to the muscles and glands and increase heart rate and blood pressure, open our airways, inhibit digestion and reproductive organs, stimulate adrenaline production, open our sweat glands and contract the muscles. When the PNS is active motor neurons travel to the muscles and glands and reduce heart rate and blood pressure, relax our airways, stimulate digestion and reproductive organs, inhibit adrenaline production and relax the muscles.

Although the SNS is connected to stress it is also responsible for muscle activation and everyday movement. The two systems do not work in isolation, they work together to keep all the systems of the body active and relaxed when optimally needed. Problems arise when we lean more into one than the other and the nervous system can’t adapt. Yoga helps us build a malleable nervous system that can move smoothly from doing to non-doing and appreciate the value of both.

EXPLORING THE NERVOUS SYSTEM IN YOUR PRACTICE
This sequence is built using the framework of my Move & restore method. It starts with a movement practice with simple purposeful flows to build energy, strengthen your muscles and activate the SNS. Then brings you into a replenishing restorative practice to restore energy, relax your muscles and activate the PNS. Transitioning you from ‘doing’ to ‘non-doing’, building healthy symbiotic pathways for your nervous system and creating an optimum environment for all the functions of the body. As mentioned above, it is not as simple as switching on and off the SNS and PNS responses. Within the movement part of the practice the SNS and the PNS are both activated. The effort of standing upright against gravity stimulates the SNS which contracts the muscle, while at the same time the breath and meditative flow stimulates the PNS which relaxes and calms the mind. Alternatively, within the restorative part of the practice we are purely targeting the PNS, which is what makes restorative yoga uniquely nurturing and replenishing. You can learn more about how this works in my recent article on The vagus nerve; what makes yoga calming in Finding calm; the move & restore method in Move & restore; and restorative yoga in Restorative yoga, Restorative with home props, Restorative sleepy flow, Restorative for stress relief & Rest & renew restorative.

ALIGNMENT CUES
Below are the restorative techniques used in this sequence. The props you’ll need are:
1 x bolster - or 2 towels, wrapped around a horizontally rolled pillow and tied to secure.
2 x yoga bricks - or 2 two thick similar sized dictionaries.
2 x yoga blankets - or any wool, thick cotton or fleece blanket with density.

No.1 - Supported bridge
Lie supine on your back, lift your hips up and place a bolster horizontally under your hips. Settle your hips down onto the support of the bolster. Knees bent, feet hip distance apart. Arms extended either side of the body, palms facing up. Feel a gentle opening in the front of the hips and across the chest.

No.2 - Prone twist
Place your bolster vertically along the top centre of your mat. Sit with your right hip along the short end of the bolster. Place a folded blanket between your knees. Turn to face your bolster and place your hands on the ground either side. With an inhale lengthen through the whole spine and on an exhale gently place your front spine along the centre of the bolster. Place your right cheek on the bolster. Shift your elbows away slightly from the bolster to allow the arms to gently hang out of the shoulder sockets. Feel the gentle twist in the spine and abdominal region. Repeat on the left side.

No.3 - Reclined seated
Place two bricks horizontally at the top of your mat, One at its highest height and the other at its mid height. Lie your bolster over the bricks along the centre of your mat and place a folded blanket on the far end of your bolster where your head will rest. Sit with the back of your hips along the short end of the bolster. Roll up a folded blanket and place it under your knees. Gently lie back onto your bolster. Feel a gentle opening across the chest.

No.4 - Savasana
End your practice with at least 10 minutes of Savasana or Resting Pose. Lie supine on your back, legs stretched out, arms slightly away from your body, palms facing up. Legs slightly apart, feet fall out to the sides, soften your shoulder, back of the neck long. Gently close your eyes, let the body become heavy and melt into the support of the ground. Soften the muscles across your forehead, releasing all tension, gaze inwards. Let all the muscles and bones of your body release.

To save the images for personal use click and hold down the image until the ‘save image’ option appears; on Mac hold down ‘control’ and click the image to get the option box; on PC right click on the image to get the option box. Scroll down in the ‘option box’ and click ‘save image’.

Ruth Delahunty Yogaru

Anatomy 101 - The hips

THE HUB OF ALL MOVEMENT
The hip joint is a ball and socket, synovial joint, designed for heavy duty usage and weight bearing. The hips are the joint with the most bony structural differences person to person – making them the joint with the most variety in mobility potential person to person too. Tightness in the front of the hips (hip flexors) pulls the pelvis forward into an anterior tilt – causing the lower back to overarch, the upper chest to puff and the head to tilt back. Tightness in the back of the hips (hip extensors) pulls the pelvis backwards into a posterior tilt – causing the lower back to flatten back, the upper back to overarch forward and the head to tilt forward. Balance and harmony in the hips unifies the upper and lower body and attributes to better fluid movement of the spine too. The hips like to be perfectly stacked over the foundation of our feet, to avoid unnecessary stress on the spine and allow the natural curves of the vertebrae to function properly as a shock absorption system.

THE STRUCTURE OF THE HIPS
The hips are made to be durable and to absorb the forces of gravity and body weight. The socket is much deeper than the shoulder joint which gives it slightly less mobility but much greater stability. The socket is made of several layers, each with their own important job. Starting with the deepest layer of the socket you have the bone of the hip. This bone is covered by a ‘c’ shaped fibrous lining which facilitates gliding called the cartilage. Around the edge of the socket is a rim, which creates a seal and deepens the socket, called the labrum. Then there is a tube like fibrous connective tissue, attached to the rim of the socket and around the head of the femur, which secretes synovial fluid, called the capsule. Next you have the ligaments, holding bone to bone to stabilise the joint. Finally you have many layers of tendons and muscles which facilitate movement of the hip joint.

The hips are made up of two bones – the pelvis (illium, pubis & ischium) and the leg bone (femur). The ball and socket joint is made up the top of the leg bone, called the head of the femur, and the socket which sits on the lower part of the pelvis, called the acetabulum.

THE MOVEMENTS OF THE HIPS
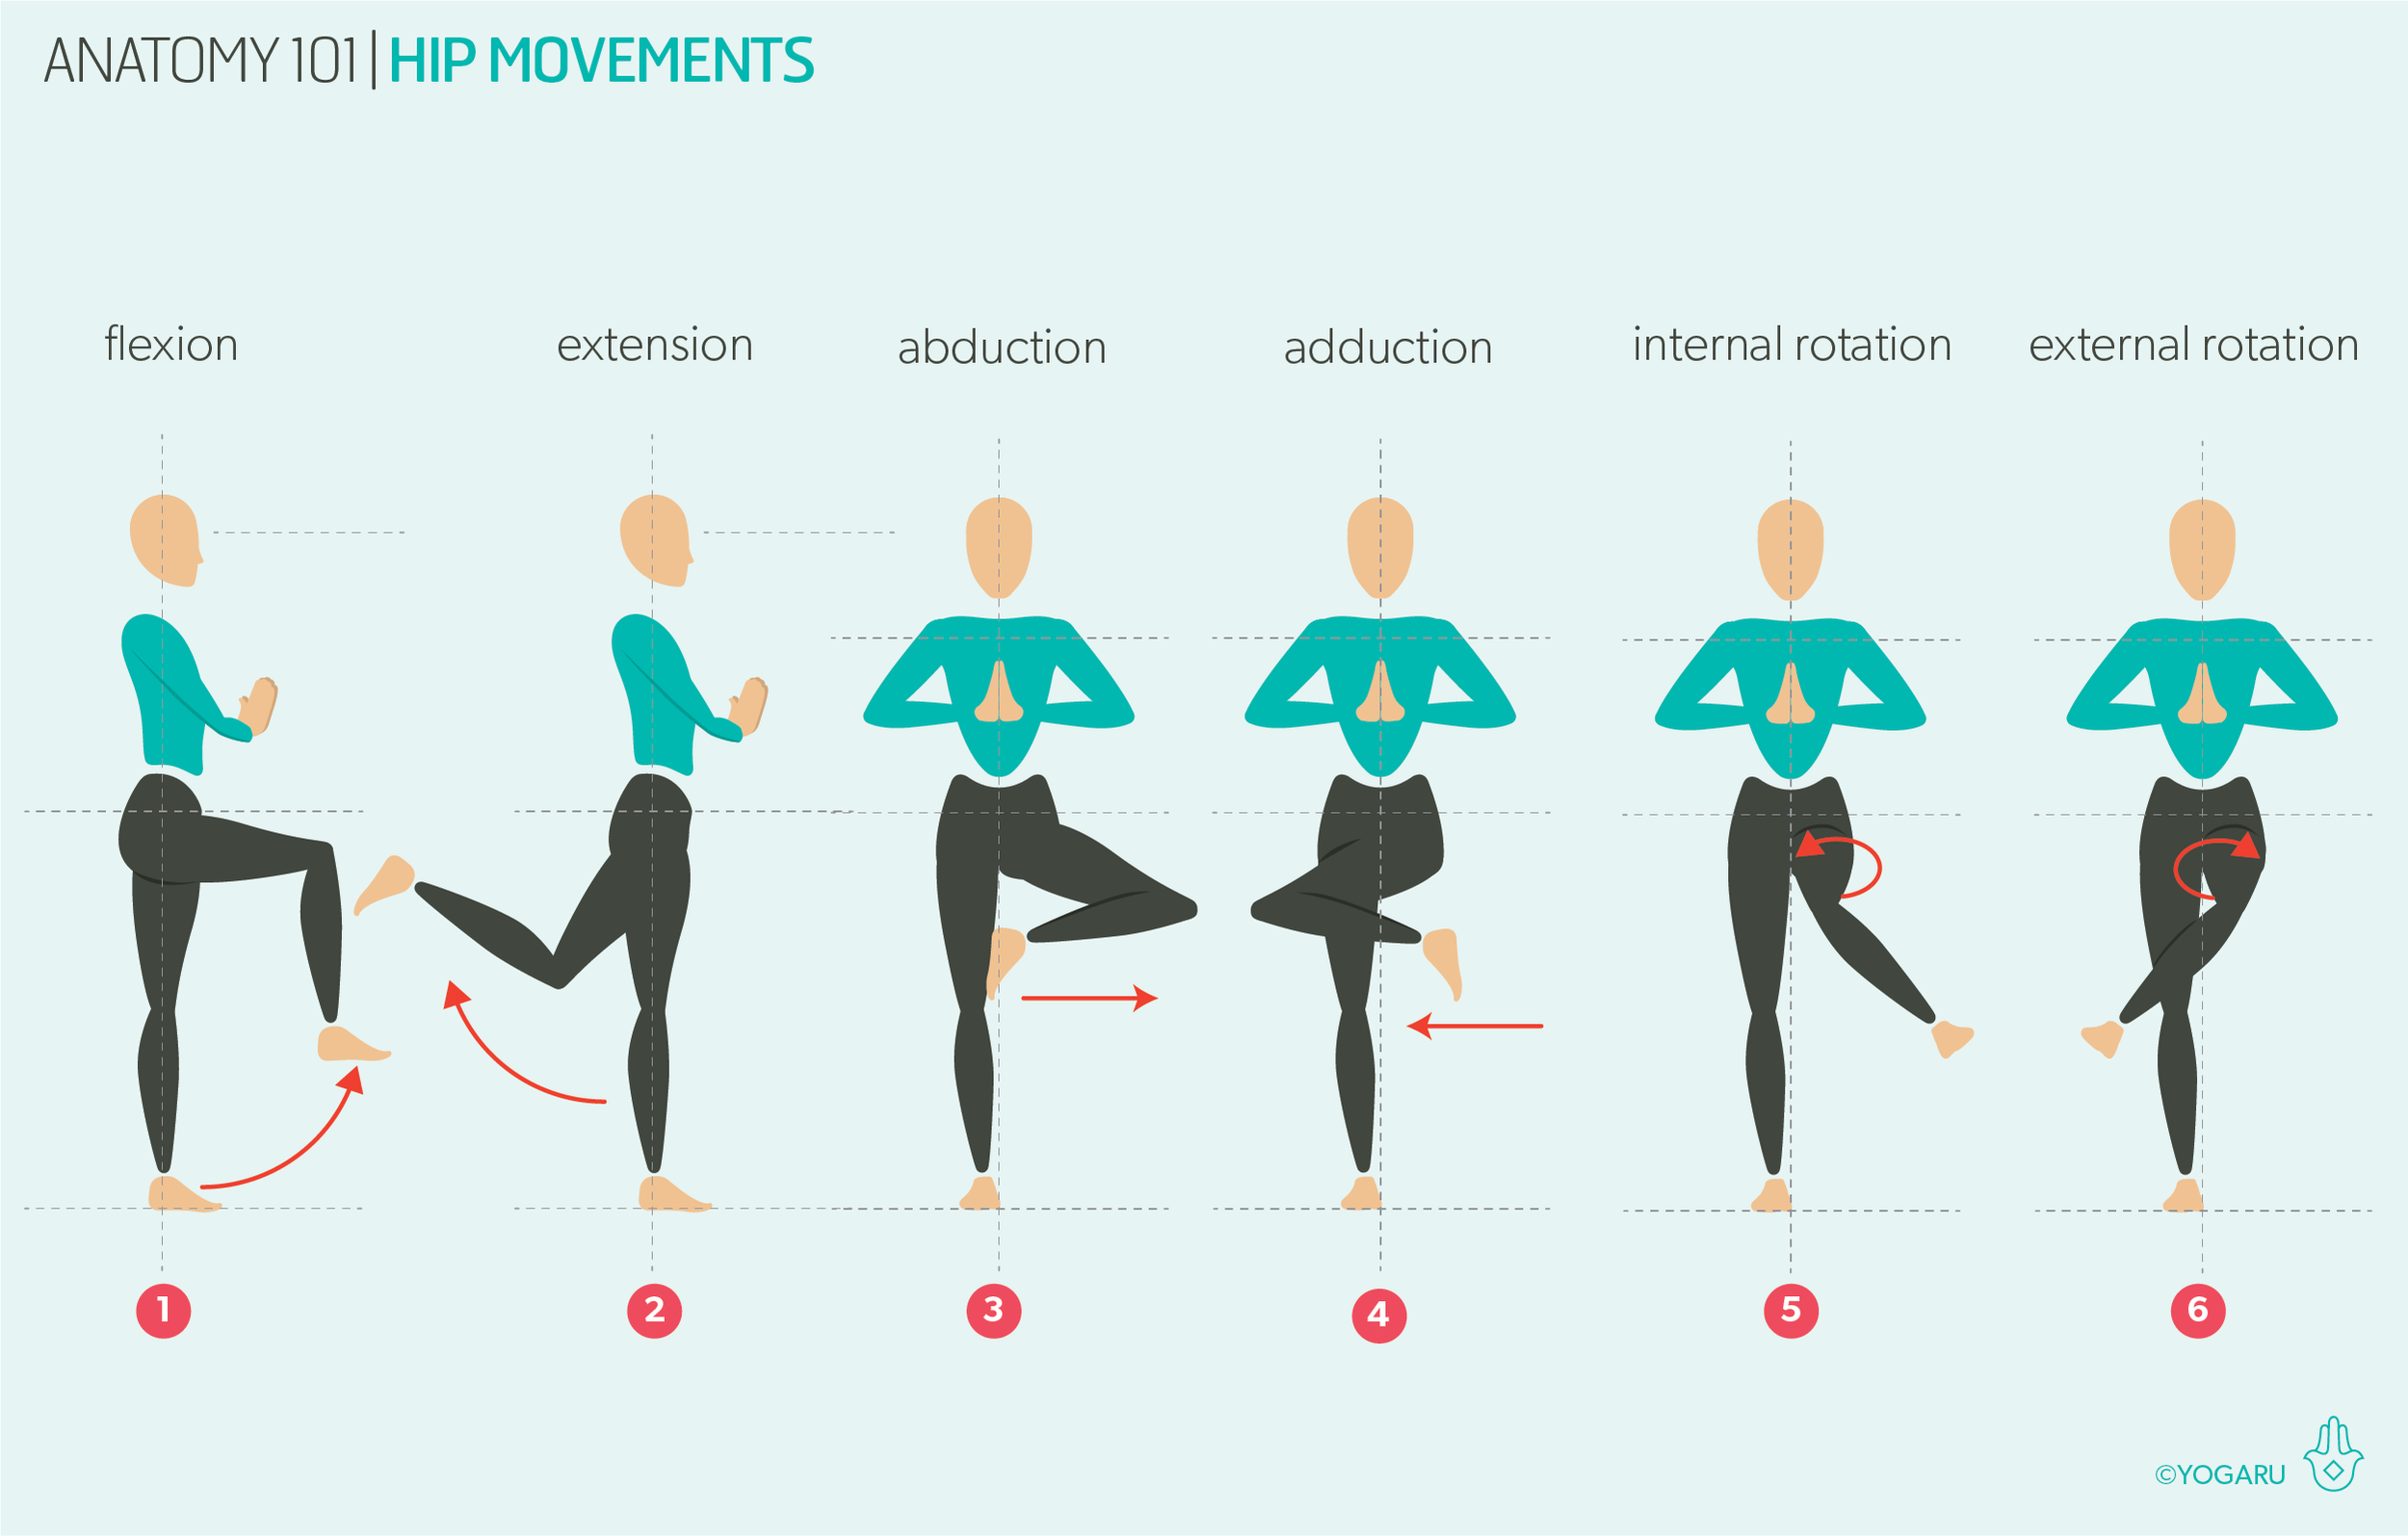
Below there is an illustration of the six movements of the hip joint:

Flexion – where the leg lifts forward and up.
Extension – where the leg reaches back and up.
Abduction – where the leg moves away from the midline.
Adduction – where the leg moves towards the midline.
Internal rotation – where the leg rotates inwards.
External rotation – where the leg rotates outwards.

THE MUSCLES OF THE HIPS
For those of you who love to go deeper into the actions of the hip joint I have also listed the six movements with their assisting muscles in the chart below. Grouping the muscles to the action rather than looking at each muscle in isolation gives a more experiential understanding.

EXPLORING THE HIPS IN YOUR PRACTICE
If you observe your habitual postural habits, in standing and sitting, you most probably find you are inclined to tip your pelvis slightly forward or back. Working with your hips in your practice will help you become more aware of your posture and help release the muscles of your hips that might be tight, and strengthen the muscles that might be weak.

This sequence will mobilise your hips in all directions and leave them feeling strong and stable, with lovely freedom of movement too. Bring your full attention to the hips as you move through the sequence. Notice what your strengths and weaknesses are with regards to the six different movements. It is very normal to have one movement that you move more freely in and one that feels a bit more sticky or challenging for you.

ALIGNMENT CUES
This sequence will bring you through the six movements of the hips – flexion, extension, abduction, adduction, internal and external rotation. Focus your full attention on your hips throughout this practice and move slowly into and out of each pose. See can you notice what areas of the hip are being stretched and which are being strengthened as you move. The sequence is numbered to highlight sample poses from each movement of the hips to give you a better understanding of the role of the hip joint in the pose. Below are the six asana which are highlighted in the sequence where you will feel the six movement of the hips:

1 – Flexion - Standing lifting the leg forward, front leg in Ashta Chandrasana/Eight Crescent Moon, Knee to chest.
2 – Extension - Standing lifting the leg back, back leg in Ashta Chandrasana/Eight Crescent Moon.
3 – Abduction - Half kneeling leg lifts, Parsvakonasana/Side Angle, Utkata Konasana/Goddess.
4 – Adduction - Ardha Matsyendrasana/Half Lord of the Fish, Gomukhasana/Cow Face
5 – Internal rotation - Back leg in deer pose.
6 – External rotation - Virabhadrasana II/Warrior II, Parsvakonasana/Side Angle, Utkata Konasana/Goddess, Gomukhasana/Cow Face.

To save the images for personal use click and hold down the image until the ‘save image’ option appears; on Mac hold down ‘control’ and click the image to get the option box; on PC right click on the image to get the option box. Scroll down in the ‘option box’ and click ‘save image’.

Ruth Delahunty Yogaru