Restorative yoga

The digestive system

THE SECOND BRAIN
The digestive system – often called the enteric nervous system or the second brain – does far more than just process food. It breaks down what we eat, absorbs essential nutrients, eliminates waste, and plays a central role in overall health and emotional well-being.

A remarkable 80% of the immune system resides in the gut, and about 95% of the body’s serotonin – commonly known as the “happy hormone” – is produced in the bowels. This deep connection between the gut and the brain explains why stress can disrupt digestion, and why gut imbalances can contribute to anxiety, depression, and mood disorders.

Emerging research is exploring how optimising gut health may support mental health and how therapies focused on the digestive system could complement treatment for emotional and psychological conditions. A healthy digestive system is not just about physical wellness – it’s also key to emotional balance and resilience.

TWISTS, FORWARD BENDS, BACKBENDS & THE DIGESTIVE SYSTEM
While many forms of movement support digestion, yoga is especially effective – particularly twists, forward bends and backbends, which stimulate the abdominal organs, boost circulation, and enhance both digestion and detoxification.

Twisting and forward bend poses gently compress the abdominal area, stimulating the digestive tract and encouraging peristalsis – the wave-like muscle movement that moves food and waste through the intestines. Upon releasing a twist or forward bend, a surge of oxygenated blood revitalises the organs, enhancing their function. Backbends lengthen and open the front of the body, including the abdomen and chest. This expansion stimulates internal organs, improves posture, and creates space for fuller breathing. While they don’t compress the digestive organs as much as twists or forward bends, backbends still improve circulation and promote digestive vitality. Twists, forward bends and backbends help support digestion by:

  • Nutrient Absorption - activate the gut to improve the absorption of nutrients.

  • Constipation Relief - compression and release help move waste through the colon, easing bloating and sluggishness.

  • Detoxification - restricted blood flow during a twist followed by a flush of circulation supports the natural detox process.

  • Stress relief - reduced stress related gut issues and constipation.

BREATH & THE DIGESTIVE SYSTEM
The diaphragm, a muscle that separates the chest cavity from the abdomen, moves down during inhalation, creating negative pressure in the chest and positive pressure in the abdomen. This pressure change helps massage the digestive organs, aiding in the movement of food through the digestive tract. Restricted diaphragm movement, due to tight muscles or improper breathing, can disrupt this process and contribute to digestive issues like constipation, bloating, and acid reflux. Proper breathing, particularly diaphragmatic breathing, can also help regulate the nervous system and reduce stress by activating the parasympathetic nervous system, also known as the ‘rest and digest’ response, which can positively impact digestion.

By caring for your “second brain,” you support both your physical vitality and emotional balance – leaving you feeling lighter, clearer, and more energized from the inside out.

The digestive system formula: diaphragmatic breath + twists + side + backbends + gentle abdominal compression + increases internal pressure.

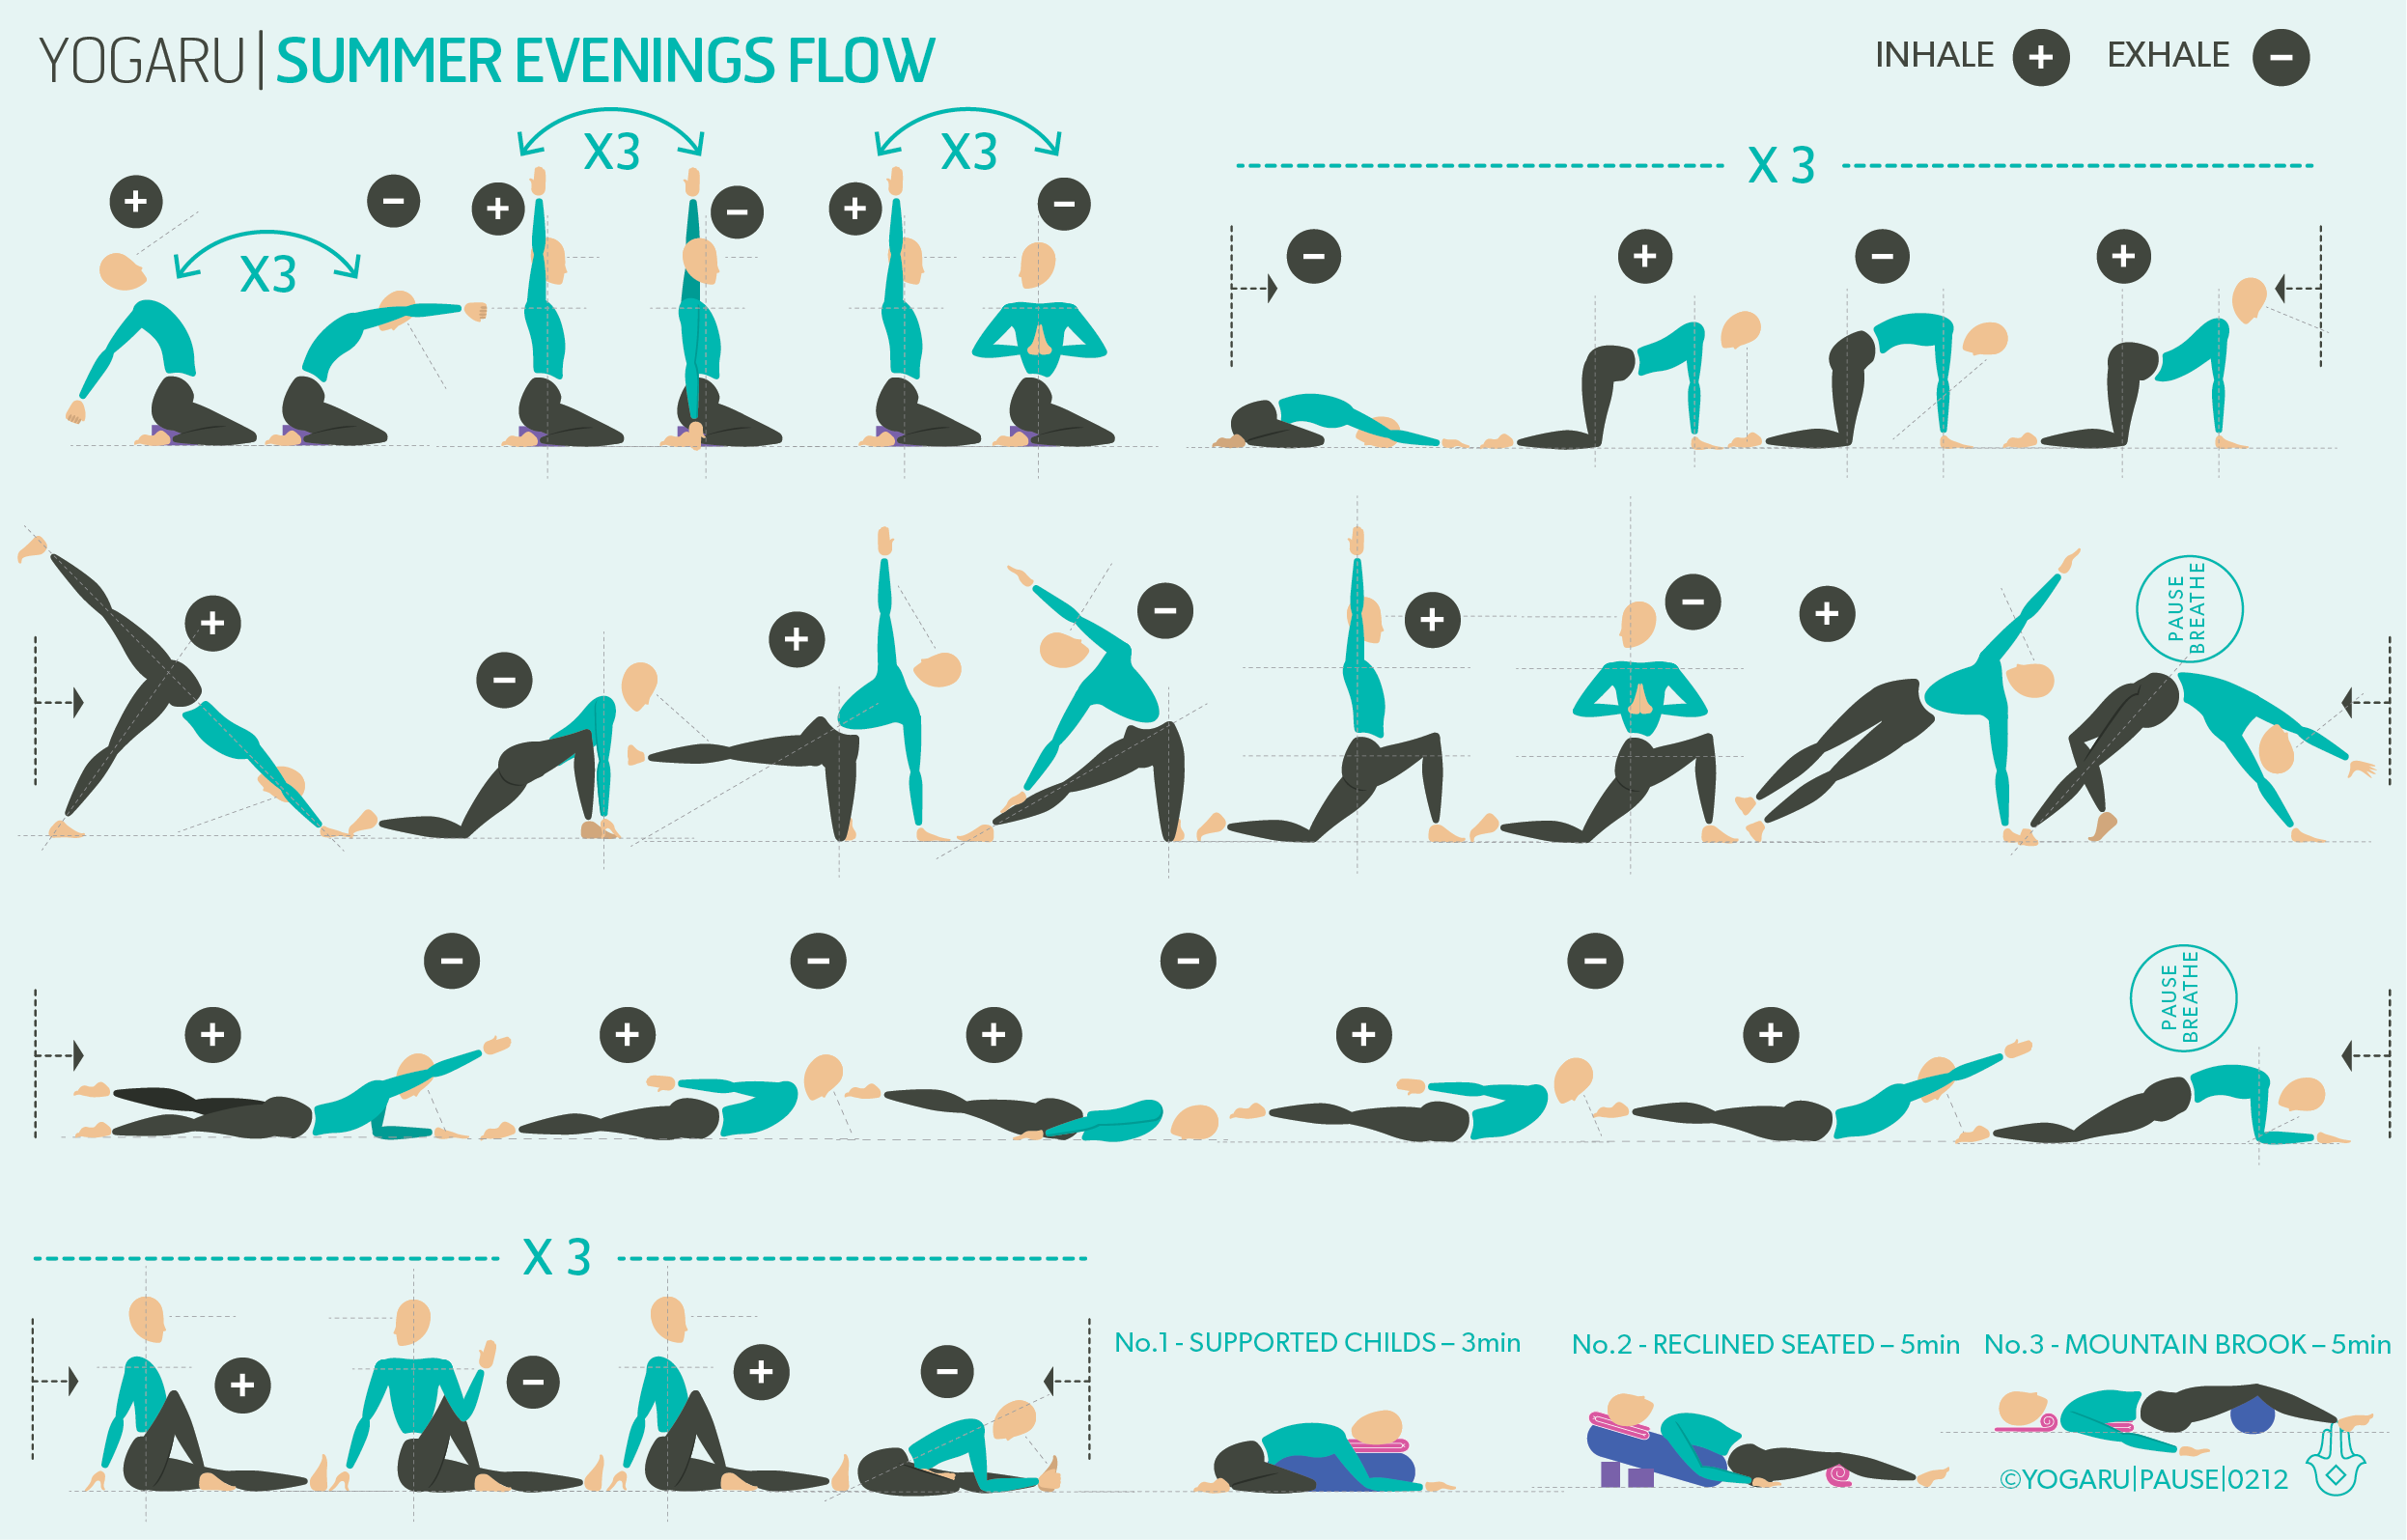
EXPLORING THE DIGESTIVE SYSTEM IN YOUR PRACTICE
This sequence mirrors the natural flow of digestion and encourages regular elimination. When practicing we twist to the right first to stimulate the ascending colon and then to the left to stimulate the descending colon. There are lots of opportunities to maximise the effects of twists, forward bends and backbends. With a gentle reminder to breathe throughout with the ‘+’ and ‘-’ breath cues throughout.

The first row starts with some supine squeezing of the digestive system, followed by a childs pose version of cat cow and tabletop crunches which continues to rhythmically press the abdominal region, using the breath to maximise its effect. The second and third row are your two standing flows which are continuous flows linked with the breath. Pause and breath for two or three breaths as indicated at the start and the end of each flow. You can extend your practice by repeating these two standing flows two or three times per side. To enhance the twist, forward bend and backbend effects on digestion pause at any of these poses and take a few more breaths than indicated in the sequence. Happy baby in the last row is the ultimate pose for moving digestion and wind along. Come into a gentle twist after and then move into your two restorative poses to finish your practice following the restorative pose guide below.

ALIGNMENT CUES
Below are the restorative techniques used in this sequence. The props you’ll need are:
1 x bolster - or 2 towels, wrapped around a horizontally rolled pillow and tied to secure.
1 x yoga bricks - or 1 thick similar sized dictionaries.
2 x yoga blankets - or any wool, thick cotton or fleece blanket with density.

No.1 - Reclined bound angle
Place a rolled up blanket in the centre of your mat and a folded blanket at the top of your mat. Lie down over the rolled up blanket with the roll under your belly and your head on the rolled up blanket. Inhale, press your belly into the blanket roll, exhale, let the blanket press up into the abdominal area.

No.2 - Reclined bound angle
Place your bolster vertically along the top centre of your mat. Place a brick at its lowest height under the far end of the bolster. Sit with the back of your hips against the short end of the bolster. Bring the soles of your feet together and let your knees drop out to the sides. Prop your legs with a rolled blanket under each thigh or use a yoga belt to secure your feet and support the legs. Gently lie back onto your bolster.

To save the images for personal use click and hold down the image until the ‘save image’ option appears; on Mac hold down ‘control’ and click the image to get the option box; on PC right click on the image to get the option box. Scroll down in the ‘option box’ and click ‘save image’.

Ruth Delahunty Yogaru

Summer evenings flow

YOUR EVENING RESET
After a full day of activity, decision-making, and stimulation, it’s normal to feel mentally wired or physically tense. A gentle evening ritual helps release the day’s buildup and prepare your body and mind for rest. Moving with intention slows the nervous system, supports deeper sleep, and creates space to ease into relaxation.

Yoga is one of the most effective ways to wind down in the evening. Gentle movement, paired with conscious breathing, activates the parasympathetic nervous system – your body’s “rest and restore” mode. This response helps lower stress hormones, eases muscle tension, and creates a sense of calm that prepares you for sleep. Evening yoga often targets areas where stress accumulates, such as the spine, hips, shoulders, and jaw, gently encouraging release.

A consistent evening yoga practice supports your body’s natural circadian rhythm. It can enhance melatonin production, aid digestion, reduce inflammation, and ease you into a more restful and regenerative sleep. Even just 15 minutes of slow, mindful movement can become a powerful signal that your day is ending and it's time to relax and reset.

EVENING YOGA IN SUMMER
Evenings offer a unique opportunity to tune inward and honour your body’s need to slow down. This is your time to let go of effort, disconnect from screens and stimulation, and shift into rest. In the warmer Summer months, evenings can be the perfect time to cool down and rebalance. With longer daylight hours and more social commitments, summer evenings may still carry a sense of stimulation well into the night. Evening yoga can help you step back from that momentum and prepare for a good night's sleep. Gentle breathing, especially with extended exhales or deep belly breathing, is especially effective in calming the nervous system.

Cooling poses – such as forward folds, hip openers and reclined poses – support relaxation and release heat from the body. These poses also support digestion and detoxification, which can be disrupted by summer’s shifting routines. Gentle twists are especially helpful after summer meals or travel fatigue, and supported poses with the arms open encourage both stillness and a sense of cool spaciousness.

Your summer evening practice offers a grounding pause in an otherwise energetic season. Roll out your mat, dim the lights, and soften into the gentle rhythms of your evening wind down – your body and mind will thank you by morning.

EXPLORING SUMMER EVENINGS FLOW IN YOUR PRACTICE
This full sequence focuses on staying lower to the ground than our regular practices to purposefully prepare for lying down in bed. This sequence starts in the first row with seated breath-led movement and child pose flow to stimulate the vagus nerve, regulate your heart rate, and ease the body into a restful state. The second row is a continuous flow to help you ease out any tension and fidgets from a busy day. The third gives the opportunity to realign the spine, stretch the front body and strengthen the back body. The final row has a four pose seated flow and three restorative poses. You can either pick one of the restorative poses or if you need more time to unwind you can do all three.

ALIGNMENT CUES
Below are the restorative techniques used in this sequence. The props you’ll need are:
1 x bolster - or 2 towels, wrapped around a horizontally rolled pillow and tied to secure.
2 x yoga blankets - or any wool, thick cotton or fleece blanket with density.
2 x yoga bricks - or two thick similar sized dictionaries

Restorative
No.1 - Supported childs
Come into a kneeling position with your hips on your heels. Nestle a bolster between your knees, vertically along your mat with a folded blanket on the far end. Place your hands either side of the bolster. With an inhale lengthen through the whole spine and on an exhale gently place your front spine along the centre of the bolster. Place your right cheek on the bolster. Feel the breath in the back of the ribs and lungs. Swap to your left cheek half way through the pose.

No.2 - Reclined seated
Place two bricks horizontally at the top of your mat, One at its highest height and the other at its mid height. Lie your bolster over the bricks along the centre of your mat and place a folded blanket on the far end of your bolster where your head will rest. Sit with the back of your hips along the short end of the bolster. Roll up a folded blanket and place it under your knees. Gently lie back onto your bolster. Feel a gentle opening across the chest.

No.3 - Mountain brook
Half roll a four fold blanket and place it at the top of your mat. Accordion fold the other blanket and place it below your top blanket where your shoulder blades will lie. Place the bolster towards the bottom of your mat where your knees will be. Lie supine on your back, nestle the rolled part of the top blanket in the curve of your neck, place the accordion folded blanket under the lower tips of your shoulder blades and the bolster under the creases of your knees. Legs and arms extended, palms facing up, feet fall out to the side. Feel the rise and fall of the props supporting your back body.

To save the images for personal use click and hold down the image until the ‘save image’ option appears; on Mac hold down ‘control’ and click the image to get the option box; on PC right click on the image to get the option box. Scroll down in the ‘option box’ and click ‘save image’.

Ruth Delahunty Yogaru

Christmas hols flow

SIMPLE AND ACTIONABLE
I’ve written lots of articles with sequences for Chritsmas  and New Years over the years. From The ultimate Christmas flow and Christmas mini flows to Step gently into the New Year and Mini flows for 2020. This year I’m going to keep it really simple and give you a sequence which includes all my favourite techniques I’ve been using recently in my own practice, my classes and with my private students. I’ll keep it short and sweet and divide it into a few different sections to make it easier for you to proactively make time to step on your mat to do the full sequence or to pick and chooses some of the different techniques if you are short on time or just need an SOS moment to yourself before resuming your festivities. You could choose to practice the breath work first thing in the morning or the standing flow, some MFR or a restorative pose in the evening to help you relax. Catching a few minutes to yourself each day makes all the difference to help you continue to enjoy your Christmas hols. 

MY FAVOURITE TECHNIQUES
We know that doing yoga makes us feel good physically and mentally. It increases our mobility and strength, helps with good posture and balance and even reminds us to breathe better. Along with yoga poses I love to add MFR (myofascial release), pranayama (breathwork) & restorative poses (relaxation) to my practice. By using this multi faceted approach I ensure that I am optimising my time on my mat in a holistic way. Pranayama and MFR are quick and potent tools for stress relief while restorative yoga can be used to build an adaptable nervous system and rewire the brain's response to stress. Pranayama breathwork is the fastest way to reduce stress. It has an immediate effect on mood and energy – increased breath rate is invigorating and energising, while decreasing breath rate is calming and relaxing. It can also be used to manage pain by stimulating the relaxation response and pain signals. MFR has many benefits but is used mainly to increase range of movement and ease aches and pains. It also stimulates receptors under the skin called ruffinis that initiate our relaxation response and can be used at the end of the day to help switch off in preparation for sleep. Restorative is considered the king of all yoga when it comes to stress resilience. It is a relaxation practice that turns down the dial on the stress response and helps you consciously relax. By practising restorative poses you teach the nervous system to recognise and deal with stress in everyday life. When stress is reduced the body can focus on the functionality of the immune, respiratory, cardiovascular and endocrine systems. Helping the body as it strives for balance.

EXPLORING CHRISTMAS HOLS FLOW IN YOUR PRACTICE
This sequence starts with a pranayama practice as described below. You can also do the pranayama at the end of your practice if you prefer. This sequence has an outer hip focus so you will start with MFR on the outer hips and the glutes, as detailed below, to prepare the area and allow you to access its strength as you flow through the standing flows. The second and third row are the two main standing flows. In row two you will step the right leg forward first, do the full flow and then repeat it with the left leg forward. Do the same for the second flow in row three. The final row starts with MFR on the shoulders as detailed below to help initiate the relaxation part of your practice. Followed by two gentle two pose flows and two restorative poses. Practice the whole sequence or mix and match sections to meet your changing demands over the festive period.

ALIGNMENT CUES
Below are the pranayama, MFR and restorative techniques used in this sequence. The props you’ll need are:
2 x MFR balls - or 2 tennis balls.
1 x bolster - or 2 towels, wrapped around a horizontally rolled pillow and tied to secure.
2 x yoga blankets - or any wool, thick cotton or fleece blanket with density.

Pranayama
Sit in a comfortable position – cross legged, sitting up on a brick or straddling a bolster.  Inhale for the count of 4, exhale for the count of 4 x 3 rounds. Inhale for the count of 4, pause for 2, exhale for the count of 4, pause for 2 x 3 rounds. Inhale for the count of 4, pause for 4, exhale for the count of 4, pause for 4 x 3 rounds. 

MFR
No.1 - Hips (gluteus medius)
Compression
- from side lying up on your forearm, stack  2 x balls behind your frontal hip bone on your outer hip, gently press down with an inhale and release on the exhale x 5 breaths.
Sheer - slowly lift and lower your leg x 5.
Roll & cross fibre - roll up and down on your outer hip.

No.2 - Glutes (gluteus maximus & piriformis)
Compression
- from supine with knees bent, place 2 x balls in the centre of each buttock muscle, gently press down with an inhale and release on the exhale x 5 breaths.
Sheer - slowly lift and lower one knee at a time towards your chest x 5. Place your right foot on your left knee and lower and lift your right knee.
Roll & cross fibre - roll around the whole buttocks area.

No.3 - Shoulders (trapezius & supraspinatus)
Compression
- from supine with knees bent, place 2 x balls in the centre of each upper shoulder, gently press down with an inhale and release on the exhale x 5 breaths.
Sheer - slowly circle arms overhead and back to the ground x 5. 

Restorative
No.1 - Supported childs
Come into a kneeling position with your hips on your heels. Nestle a bolster between your knees, vertically along your mat with a folded blanket on the far end. Place your hands either side of the bolster. With an inhale lengthen through the whole spine and on an exhale gently place your front spine along the centre of the bolster. Place your right cheek on the bolster. Feel the breath in the back of the ribs and lungs. Swap to your left cheek half way through the pose.

No.2 - Mountain brook
Half roll a four fold blanket and place it at the top of your mat. Accordion fold the other blanket and place it below your top blanket where your shoulder blades will lie. Place the bolster towards the bottom of your mat where your knees will be. Lie supine on your back, nestle the rolled part of the top blanket in the curve of your neck, place the accordion folded blanket under the lower tips of your shoulder blades and the bolster under the creases of your knees. Legs and arms extended, palms facing up, feet fall out to the side. Feel the rise and fall of the props supporting your back body.

To save the images for personal use click and hold down the image until the ‘save image’ option appears; on Mac hold down ‘control’ and click the image to get the option box; on PC right click on the image to get the option box. Scroll down in the ‘option box’ and click ‘save image’.
Ruth Delahunty Yogaru