10 tips to develop a home practice

PAUSE_0079.png

SELF SUPPORTIVE PRACTICE
My yoga practice is my comfort blanket, it reminds me that I am perfectly imperfect – I turn to it to find grounding; bring myself back to me; keep calm in the face of adversity; find space to breathe a full breath; and live a more conscious life in a world that is becoming more and more unconscious. Developing a self practice means that you have a ready to use tool at your fingertips to self support from life’s challenges. It counteracts the busy lives we lead and helps us deal with everyday situations.

For most people home practice is the natural progression of their yoga path. Starting a self practice can feel quite daunting at first. We feel secure in the safety of a led class and go blank the minute we stand at the top of the mat at home. Online yoga classes can be useful to get a feel for practicing at home, but it’s important to remember one of the best things about yoga is how it gives you a break from the busyness of modern society, and a welcome chance to step away from technology and screens. Self practice lets you take ownership of your personal practice – tailoring to your specific needs; getting the most out of your time on the mat; and is available to you anytime of the day at home or when traveling. Empowering you to react to changing circumstances and find balance again.

There is no secret formula to sequencing kept under lock and key! The best place to start with is some simple rounds of your favourite Sury Namaskara. They are designed to give you a little bit of everything to wake up the whole body. That is why you frequently find them positioned at the start of a sequence. Once you are comfortable, and you are ready to move on, add in some standing poses that you are familiar with. Getting to know your own practice – your strengths, your limitations, your favourite asana – helps you become more intune with your physical and emotional needs. It won’t be long before your intuition kicks in and you will instinctively know what poses to add to your practice for your requirements on each unique day.

The transition from class to home practice doesn’t have to be quite so overwhelming if you keep it simple and follow these 10 tips to get you started:

Tip 1 - Little and often is better than trying to get on your mat once a week and do a full hour practice. Start small with just 10 minutes, three times a week and let it naturally grow from there.

Tip 2 - Accept that you may have a few false starts – it’s ok to miss a practice, if you don’t make it onto the mat don’t beat yourself up. You need to give yourself a bit of time to train your brain into this new healthy habit.

Tip 3 - You don’t need a sacred space to practice. Anywhere your mat fits is perfect – end of your bed, kitchen floor, sitting room. From the get go politely let your housemates know that while you are practicing you are not available for them. I have an ‘unless it’s urgent’ rule for when I’m practicing or meditating.

Tip 4 - Try incorporate your home practice into your morning routine. I find getting on my mat before I start into anything else works best for me. With the best will in the world life, or housemates, can often take over and prevent you from getting onto your mat later in the day.

Tip 5 - Have very manageable time expectations. Do what feels good to you and fits into your day even if it’s just ten minutes first thing in the morning to open your lungs, stretch out the morning stiffness and focus your mind for the day ahead.

Tip 6 - At first, practice what is familiar to you. Bring a notebook to class and straight after write down a few poses that you enjoyed or are curious to explore in the comfort of your own home. Ask questions and get advice. Your yoga teacher will be delighted that you are progressing your practice.

Tip 7 - Move nice and slowly through your practice and enjoy being the boss. Get close to your breath, and take extra breaths in poses you are enjoying. Don’t panic when you need to move from one pose to the next. Keep your transitions simple and when in doubt link pose through a Downward Dog or come back to Tadasana and take a half Sury Namaskara.

Tip 8 - Keep learning and keep reading, explore the areas of yoga that interest you – asana, yoga philosophy, anatomy, breathwork. Have a look at my List of Favourites for some yoga book recommendations. I find podcasts a very handy way to keep learning while I walk and run at the same time!

Tip 9 - It doesn’t have to be a new sequence everyday. Pick a theme that will support you – a pose you’re working towards; an area of the body that needs attention; or finding support for a specific emotional need – and pick some poses that will help you achieve this. You will find info graphic to help you pick poses for specific needs on the homepage of my website. Practice the same or a similar sequence for one to two weeks. Moving on when you feel curious to try a new sequence or life has thrown a new challenge your way.

Tip 10 - Explore other ‘off the mat’ yoga lifestyle choices like mindfulness, conscious living, an eco challenge – embedding the concept of yoga into your whole life.

My 108 Asana sequencing cards are the perfect tool to help you comfortably bridge the gap between classes and home practice. You’ll also find lots of ready made free sequences in the Sequences section of my website. Download them print them out and get started. Everyone has very different strengths and weaknesses. You can decide on certain days to work with your weak areas or on other days to enjoy your strengths. The best thing about your home practice is that you get to decide, and you can get the yoga ‘feel good factor’ everyday if you choose to.

Ruth Delahunty Yogaru
Wintertime flow

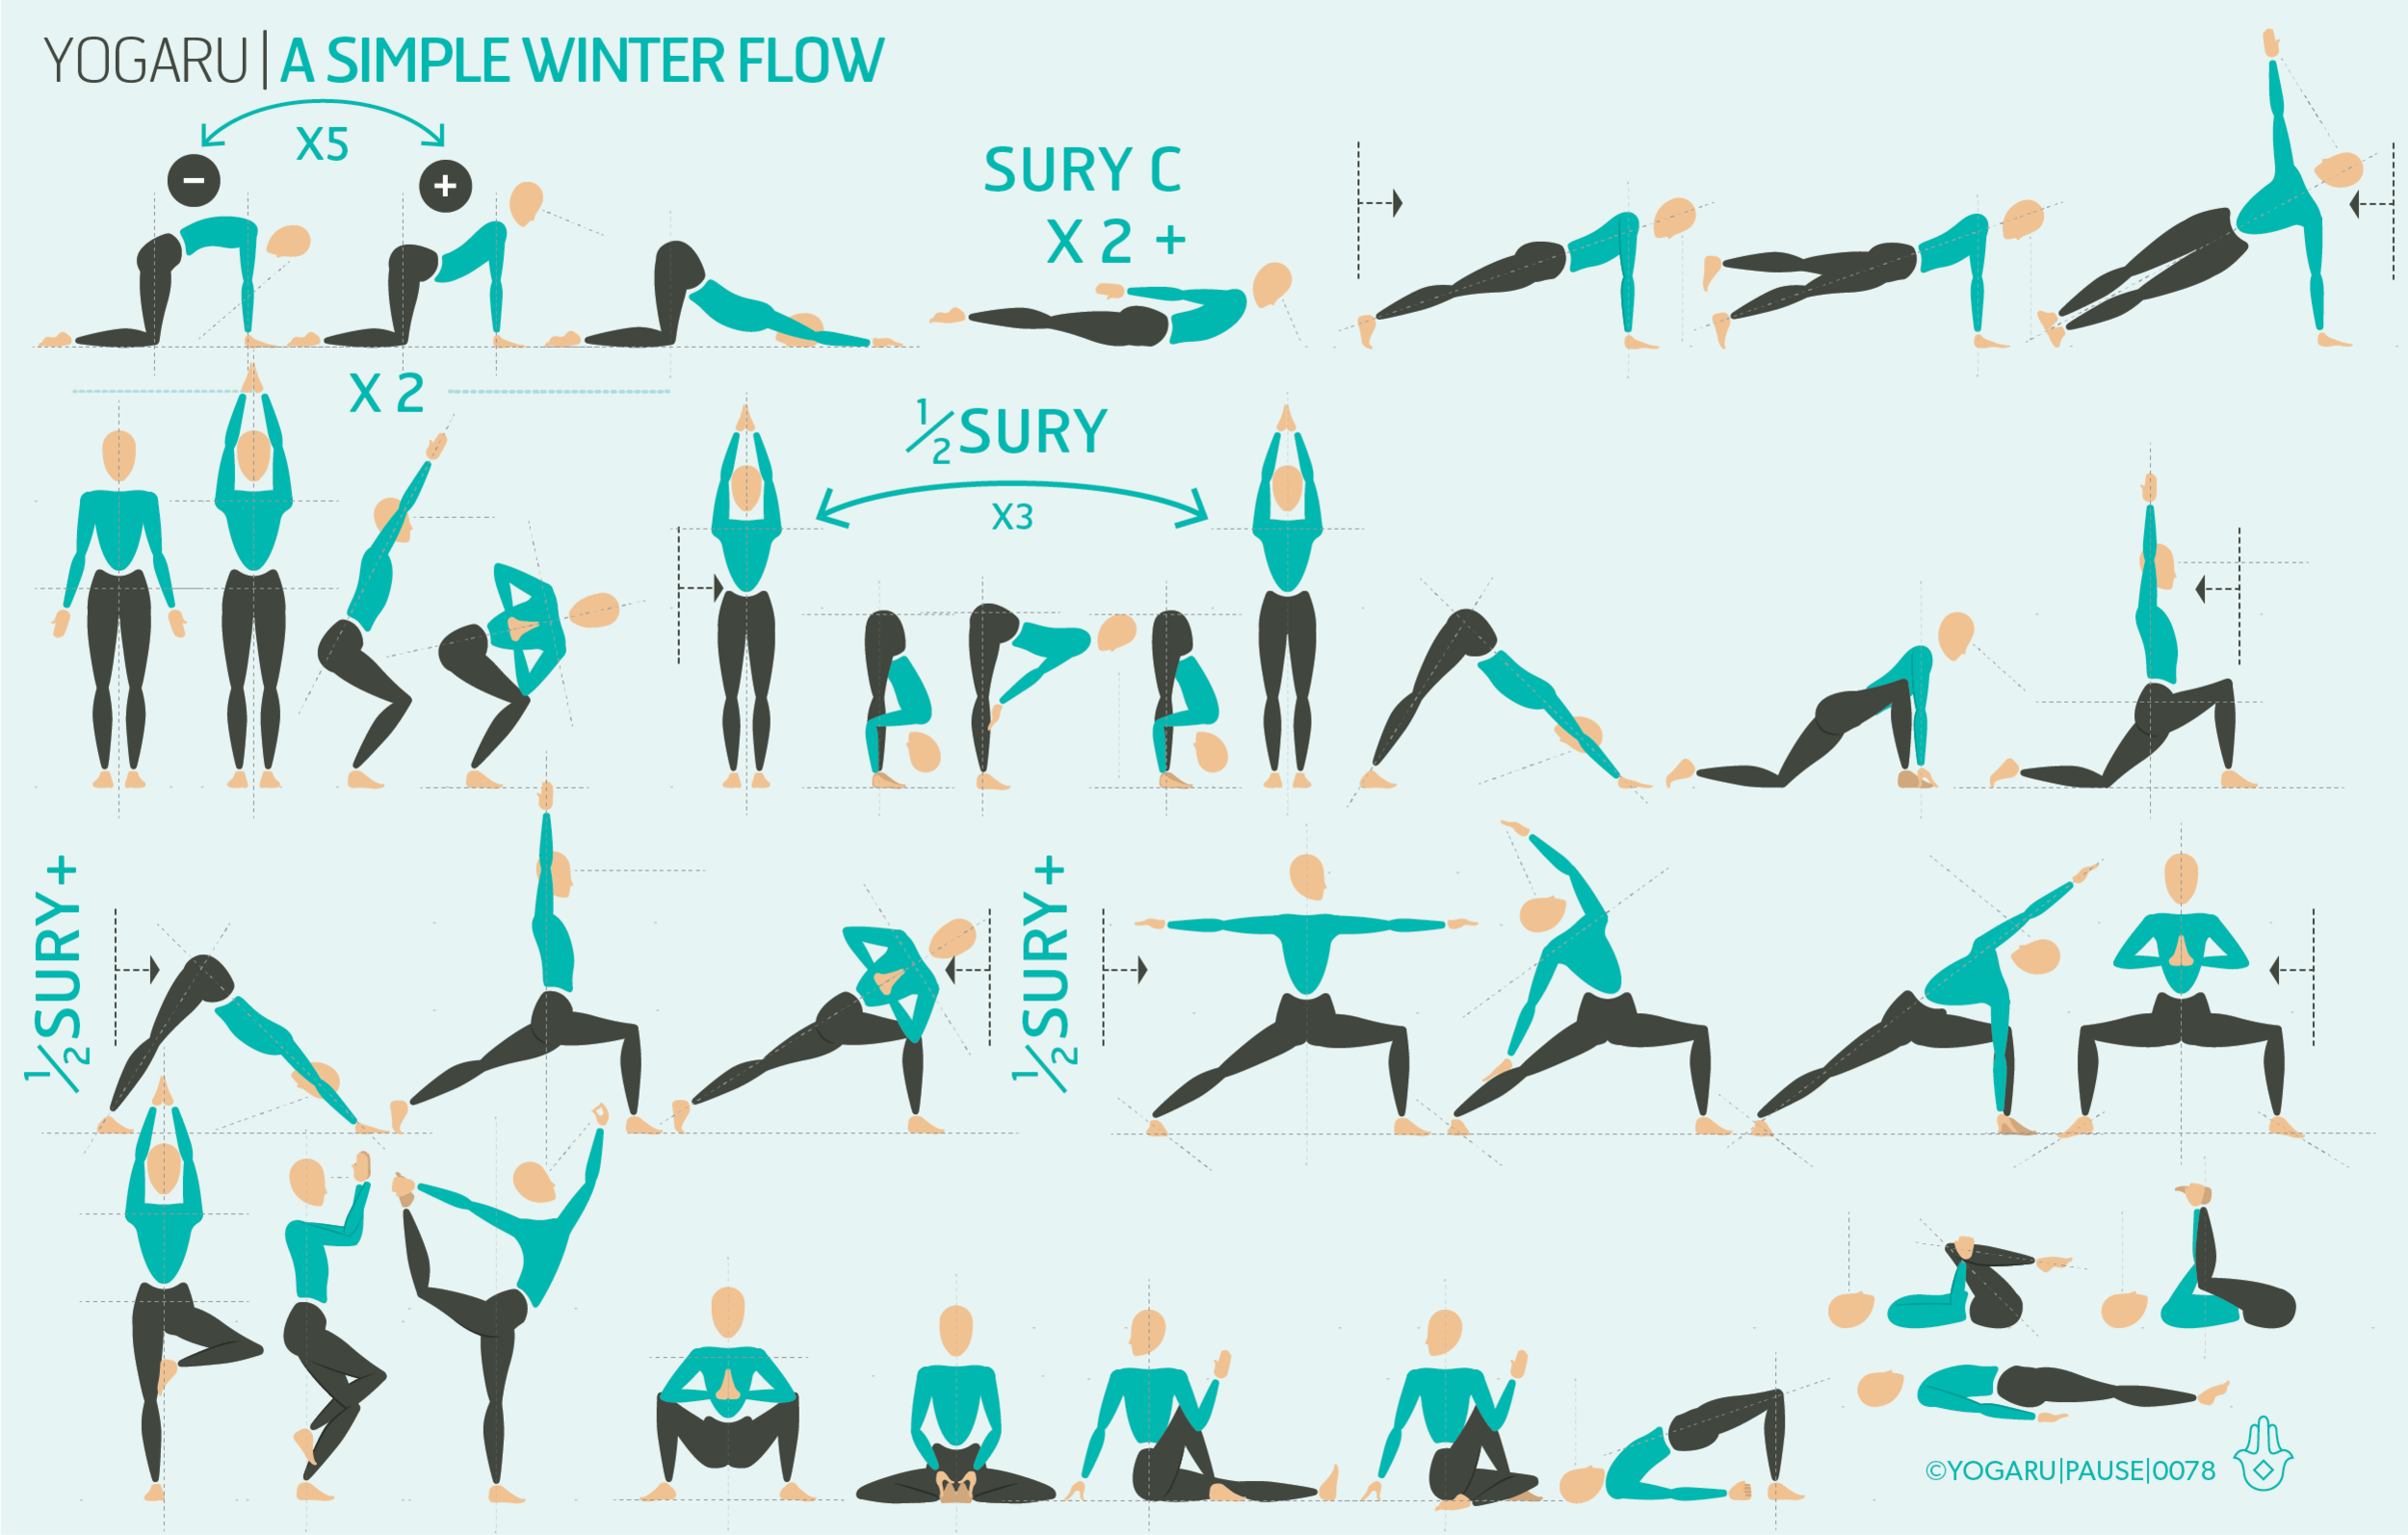
PAUSE_0078.png

COMFORT IN FAMILIARITY
Now that we’ve officially stepped into winter I find I’m looking for a slow and steady practice, full of familiarity, comfort, a nice bit of heat generation, and poses I know will nourish me. This sequence is based on a recent article I wrote for Wellfest on Mini Winter Yoga Flows – which gives you four mini flows to combat four different winter challenges. Here I have given you an option to include a bit of everything – from standing poses, twists, backbends and hip openers – all in one sequence that will help support you over the winter months.

WARMING FROM THE INSIDE OUT
The gradual change through the seasons from Summer to Winter is much harder on the system than the change from Winter to Summer. It takes a while to get used to the colder days, and to make it even harder, as the weather adjusts we often have very mild days mixed with bitterly cold days. Twists fire up your internal generator and and get your circulation going. Warming yourself from the inside out is a much healthier and sustainable form of heat than cranking up the heating. This sequence also has lots of standing poses which utilise the big muscles of the legs and quickly generate a lovely bit of extra heat too.

STAYING WELL THIS WINTER
When it comes to a strong immune system prevention is better than cure. The gut produces 80% of the immune system. Backbends and twists stimulate the lining of the gut to help boost and maintain a strong immune system, and keep you fighting off those winter bugs. This is not the time of year for embarking on extended intermitted fasting! You need all the warming winter earthy foods and spices to help fuel every cells of the body, and keep you thriving over the winter months.

WINTER BLUES
You might find you are more inclined to feel more emotional and stressed at this time of year. It may be a consequence of work pressure, family commitments or just the lack of daylight. Symptoms of stress crop up in many different way – you might feel tension in the hips or shoulders, a busyness of the mind, a lack of focus or a general lethargy and tiredness. We hold physical and emotional tension in our hips. When we are stressed the muscles of the hips tense ready for fight or flight. This causes the body to hold physical tension as a result of the emotional tension. When you release the physical tension through hip openers you release the emotional tension too.

EXPLORING YOUR WINTER FLOW IN YOUR PRACTICE
As you run through this sequence keep it slow and steady to help get the wellness benefits from the poses, soothe a busy mind and regulate your energy levels. The Surya Namaskaras are the adaptogens of the yoga world. When you need calming they calm you, when you need energy they energise you! Yoga can be your most supportive method of self care. Your time on your mat can be the answers to all that ails you over the coming months.

ALIGNMENT CUES
Print out the tips below, along with the sequence, and stay happy and healthy this winter:

  • Start by deeping and slowing down your breath with your five rounds of cat/cow.

  • For your two Sun Salutation Cs take Salabasana/Locust instead of cobra to strengthen the muscles of the back and stimulate the gut and immune system.

  • Pause in Parivrtta Utkatasana/Revolved Chair for at least five deep breaths to warm up the system, stimulate the gut and strengthen the lungs.

  • In your three standing balance poses press strongly into your standing leg and firm the muscles of the buttocks to find a strong foundation.

  • Allow yourself a restful Savasana/Corpse pose and absorb the benefits of your time invested in your wellness.

To save the images for personal use click and hold down the image until the ‘save image’ option appears; on Mac hold down ‘control’ and click the image to get the option box; on PC right click on the image to get the option box. Scroll down in the ‘option box’ and click ‘save image’.

Ruth Delahunty Yogaru

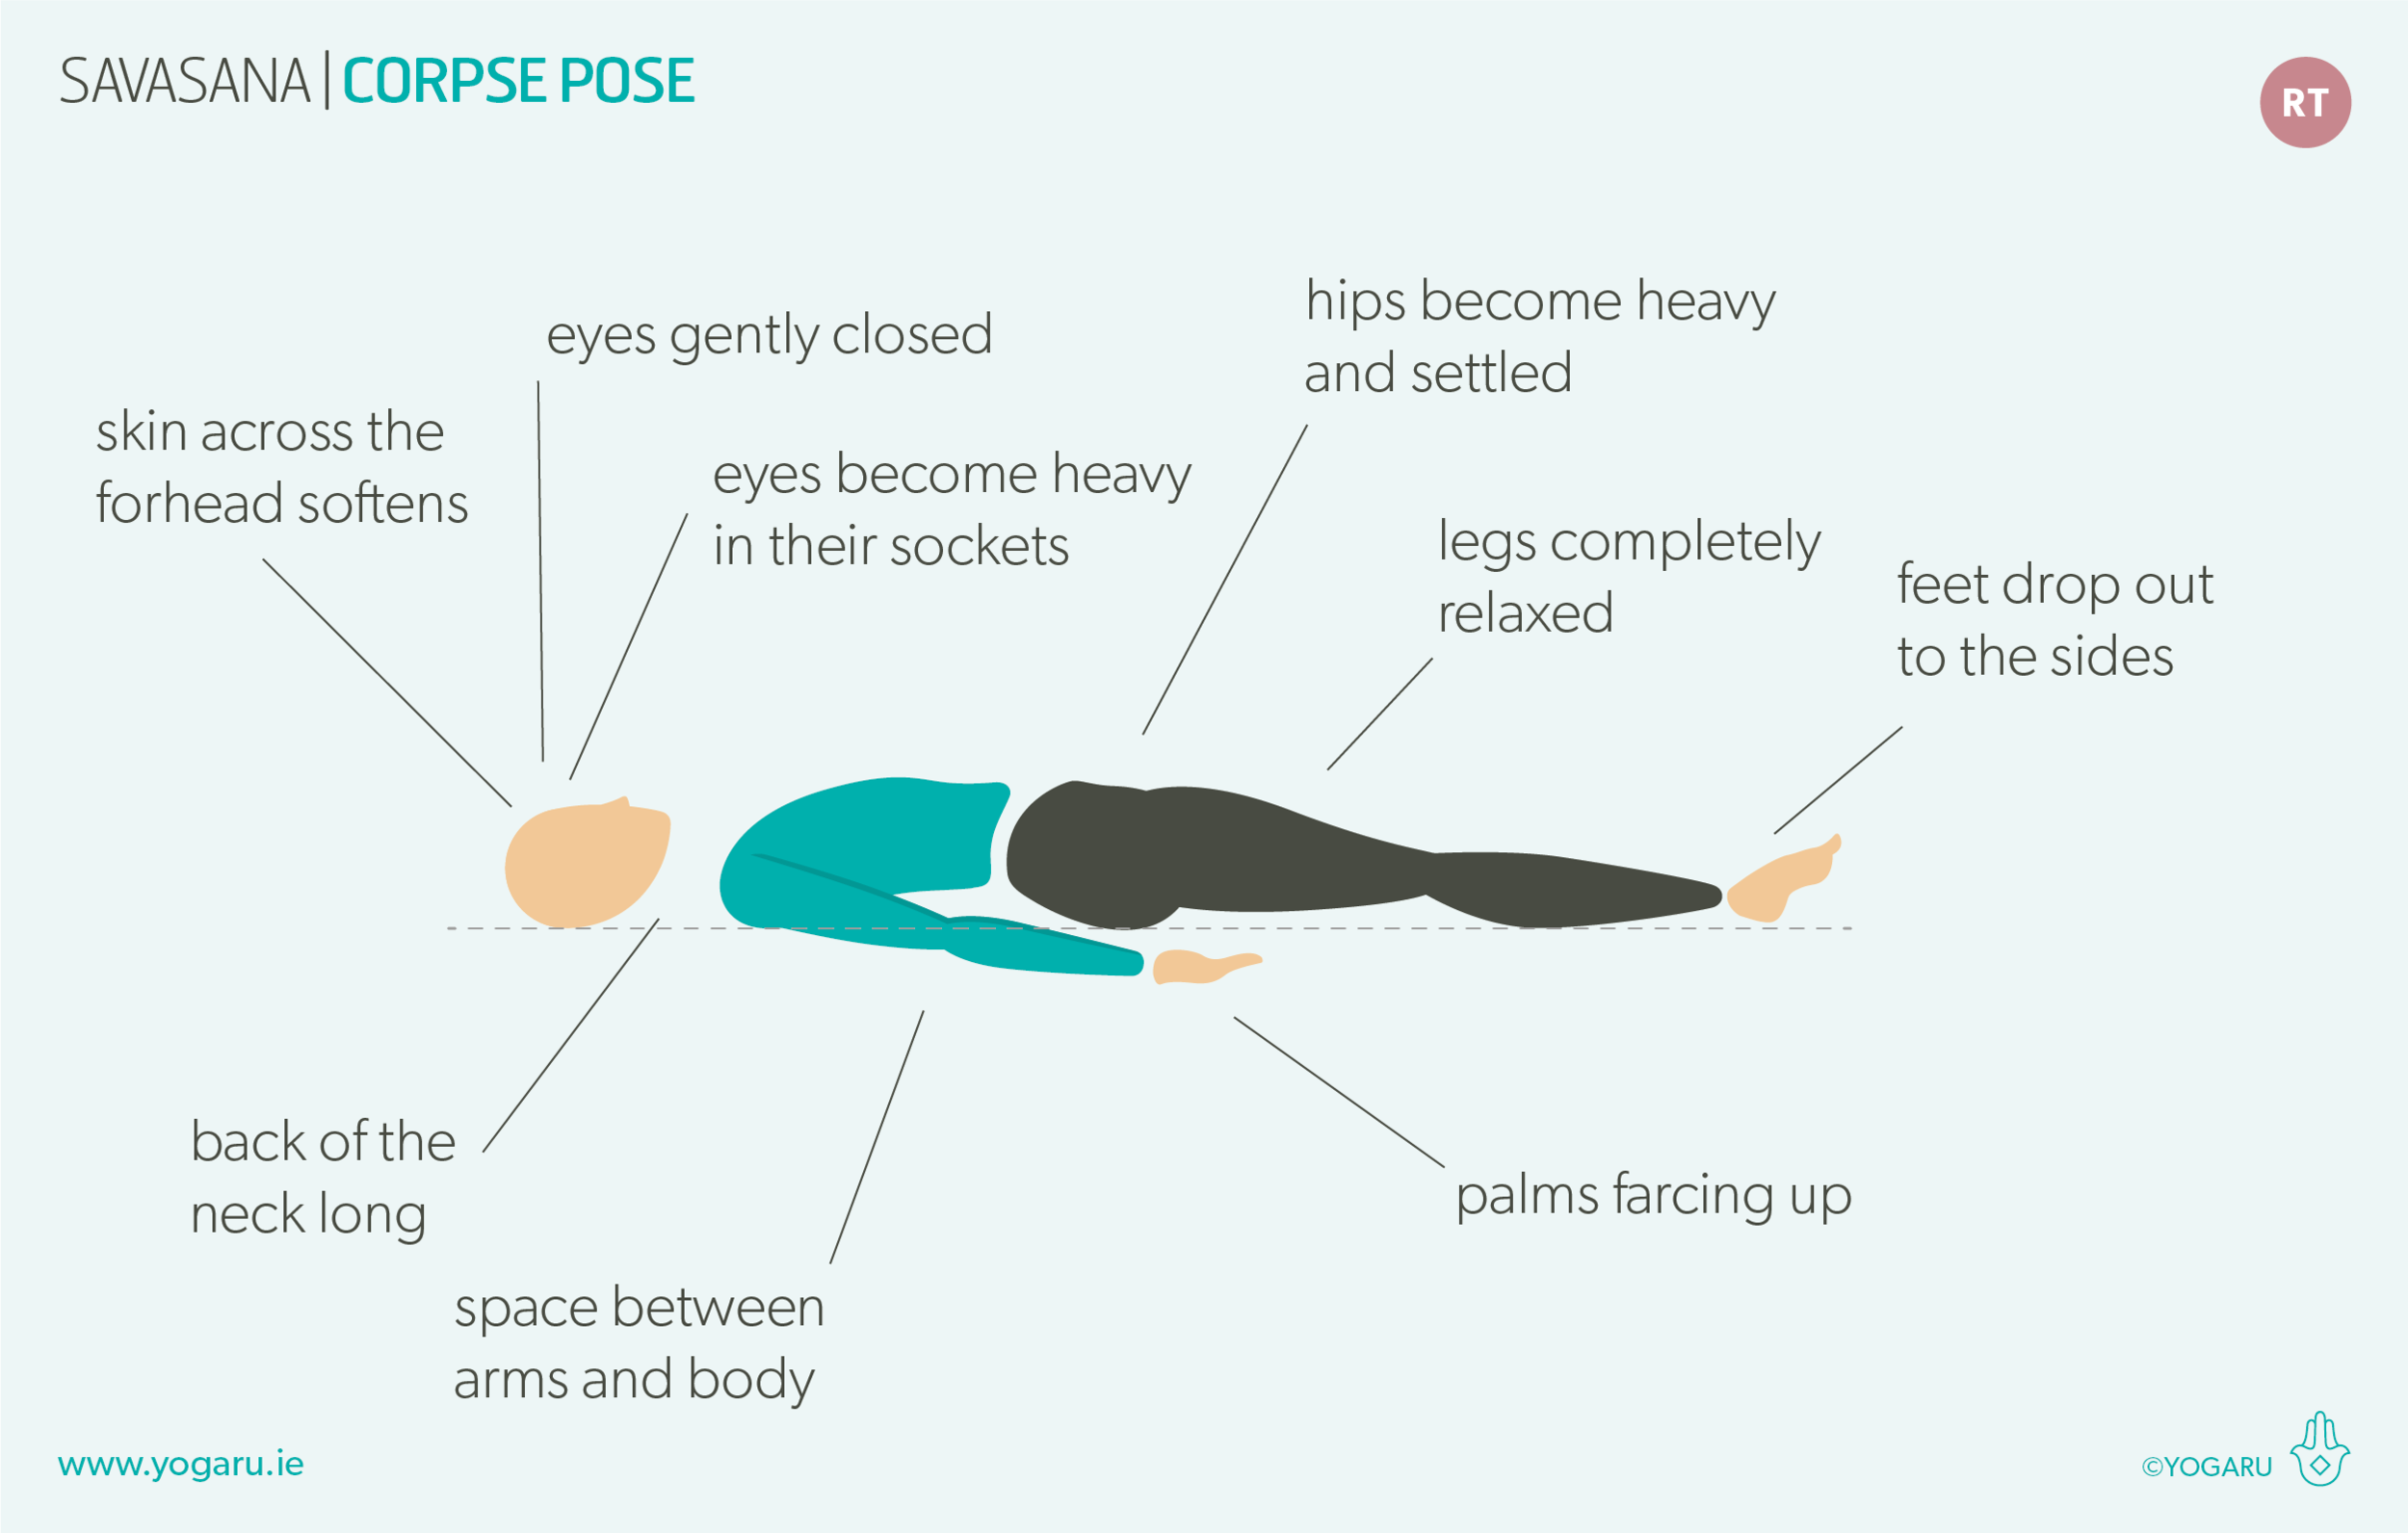
Savasana - Corpse Pose

YOGARU_Savasana_PB.png

THE POSE OF INTEGRATION
Savasana/Corpse Pose is the ultimate pose of pratikriyasana or integrating the effects of the asana. Throughout the practice we use counter poses to neutralise tension caused by the more challenging poses. Savasana/Corpse Pose is a counter pose for the complete practice. It is considered one of the hardest poses in yoga. The mind likes to stay busy and doesn’t take kindly to being asked to quieten. But without Savasana/Corpse Pose you have lost the gentle reintegration to everyday life and the ability to bring the benefits of the practice with you. It triggers the rest, digest and restore nervous system response. Savasana/Corpse Pose is the most important pose for assimilating all the work you have done on your mat.

ALIGNMENT CUES
General rule of thumb is take 10 minutes of Savasana/Corpse Pose for every hour of practice, or longer if you have the time or need extra space to reap the medicinal benefits of your practice. Consider using props if they help you release into your most comfortable Savasana/Corpse Pose. Placing a bolster under your knees will help with any hip tension and will support the lower back if you have back issues. Covering yourself with a blanket will keep you cosy and comfortable as you cool down, and tell your nervous system you are safe and secure.

Print out the tips below and use them to help you find comfort in your Savasana/Corpse Pose:

  • Lie on your back, legs stretched out, arms slightly away from your body, palms facing up.

  • Legs slightly apart and feet fall out to the side, soften your shoulder, back of the neck long.

  • Gently close your eyes, let the body become heavy and melt into the support of the ground

  • Soften the muscles across your forehead, releasing all tension, gaze inwards.

  • Let all the muscles and bones of you body release any help tension.

  • Let the thought come and go without attachment to what you should or shouldn’t be feeling in your Savasana/Corpse Pose.

  • Melt, release, soften, relax, breath.

To save the images for personal use click and hold down the image until the ‘save image’ option appears; on Mac hold down ‘control’ and click the image to get the option box; on PC right click on the image to get the option box. Scroll down in the ‘option box’ and click ‘save image’.

Ruth Delahunty Yogaru