THE WANDERING NERVE
Our nervous system is responsible for how our body reacts to external and internal stimuli. It sends ‘sensory’ messages to the brain which sends ‘motor’ messages to the glands and muscles of the body to cause a chain of reactions to the stimuli. The nervous system has two responses to this information – the sympathetic ‘fight or flight’ response and the parasympathetic ‘rest and restore’ response. Throughout our day the nervous system shifts gear from one to the other without us even noticing. We rise to challenges with the sympathetic nervous system and we settle and reset with the parasympathetic nervous system.
The sympathetic nervous system is the bodies ‘on’ switch. When the sympathetic nervous system, or the fight or flight response, is triggered the nervous system sends ‘sensory’ signals to the brain and the brain sends ‘motor’ signals to the body to increase heart rate and blood pressure, open our airways, inhibit digestion and reproductive organs, stimulate adrenaline production, open our sweat glands and tense the muscles ready for action. It helps you get jobs done, stay focused, productive and energised. When you get stuck with the switch ‘on’ the body becomes physically and menatlly exhausted and gradually starts to break down.
The parasympathetic nervous system is the bodies ‘off’ switch. When the parasympathetic nervous system, or the rest and restore response, is triggered the nervous system sends ‘sensory’ signals to the brain and the brain sends ‘motor’ signals to the body to reduce heart rate and blood pressure, relax our airways, stimulate digestion and reproductive organs, inhibit adrenaline production, stimulate endorphin productions and relax the muscles. It helps you stay calm when you are stressed, make more informed decisions and wind down after your working day is over. When you are able to flick the switch ‘off’ the body has space to create optimal conditions for the functionality of the organs, strengthen the immune system to regenerate and heal, and relieve symptoms of stress, tension and anxiety.
These two nervous system responses are autonomic which means they are involuntary and are not within our control. But we can create favourable conditions to influence which response we are in. When balanced these two responses work together and shift smoothly from one to the other. The body strives for homeostasis, it thrives with a balance of activity and rest; doing and nondoing; mental stimulation and mental space.
There are many nerves responsible for the parasympathetic ‘rest and restore’ nervous response. Most of them come from the cranial nerves with just three coming from spinal nerves. The main cranial nerve associated with 75% of the parasympathetic nerve fibres, and for regulating the parasympathetic response, is the vagus nerve. The vagus nerve is the longest nerve in the body and travels from the brainstem straight to the throat, heart, diaphragm, stomach, kidneys, liver, pancreas, gallbladder, sphincter and reproductive organs. Which is why it is often referred to as the ‘wandering nerve’. It is the only nerve that influences such a wide variety of bodily functions including our mental health, immune system, digestive system and cardiovascular system. The vagus nerve can be stimulated with deep breathing, gentle movement, meditation, singing, chanting and laughing, cold water therapy and gut health. The breath-linked, meditative flowing movement of yoga is one of the best ways to combine three of the above methods for helping your body find this delicate balance between the two nervous systems and stimulate the vagus nerve.
VAGAL TONE
When we breathe in our heart rate increases slightly and when we breathe out it decreases. The difference between your inhale rate and exhale rate is called respiratory sinus arrhythmia (RSA) and, along with heart rate variability (HRV), it is used as a way to access vagal tone. A higher measurement indicates an adaptable nervous system and high vagal tone. High vagal tone is associated with good sleep, better moods, mentally resilient, less risk of cardiovascular diseases, good gut health and less risk of inflammatory conditions. While low vagal tone is associated with poor sleep, anxiety, stress, depression, cognitive decline, cardiovascular disease, gut issues and inflammation.
YOGA BREATH, MOVEMENT & MEDITATION
The breath is part of the autonomic nervous system, which means it works automatically. But what makes the breath unique, and one of the fastest routes to the vagus nerve, is that we can also control the breath. We can extend, shorten and hold the breath depending on our desired outcomes. When we breathe, in particular an extended exhale, the diaphragm stimulates the vagus nerve which causes a chemical reaction that activates the nerve fibres and sends messages to the brain and initiates the parasympathetic response in all the parts of the body which this ‘wandering nerve’ travels to. Yjjayi breath vibrates the vocal cords and stimulates the vagus nerve in the throat.
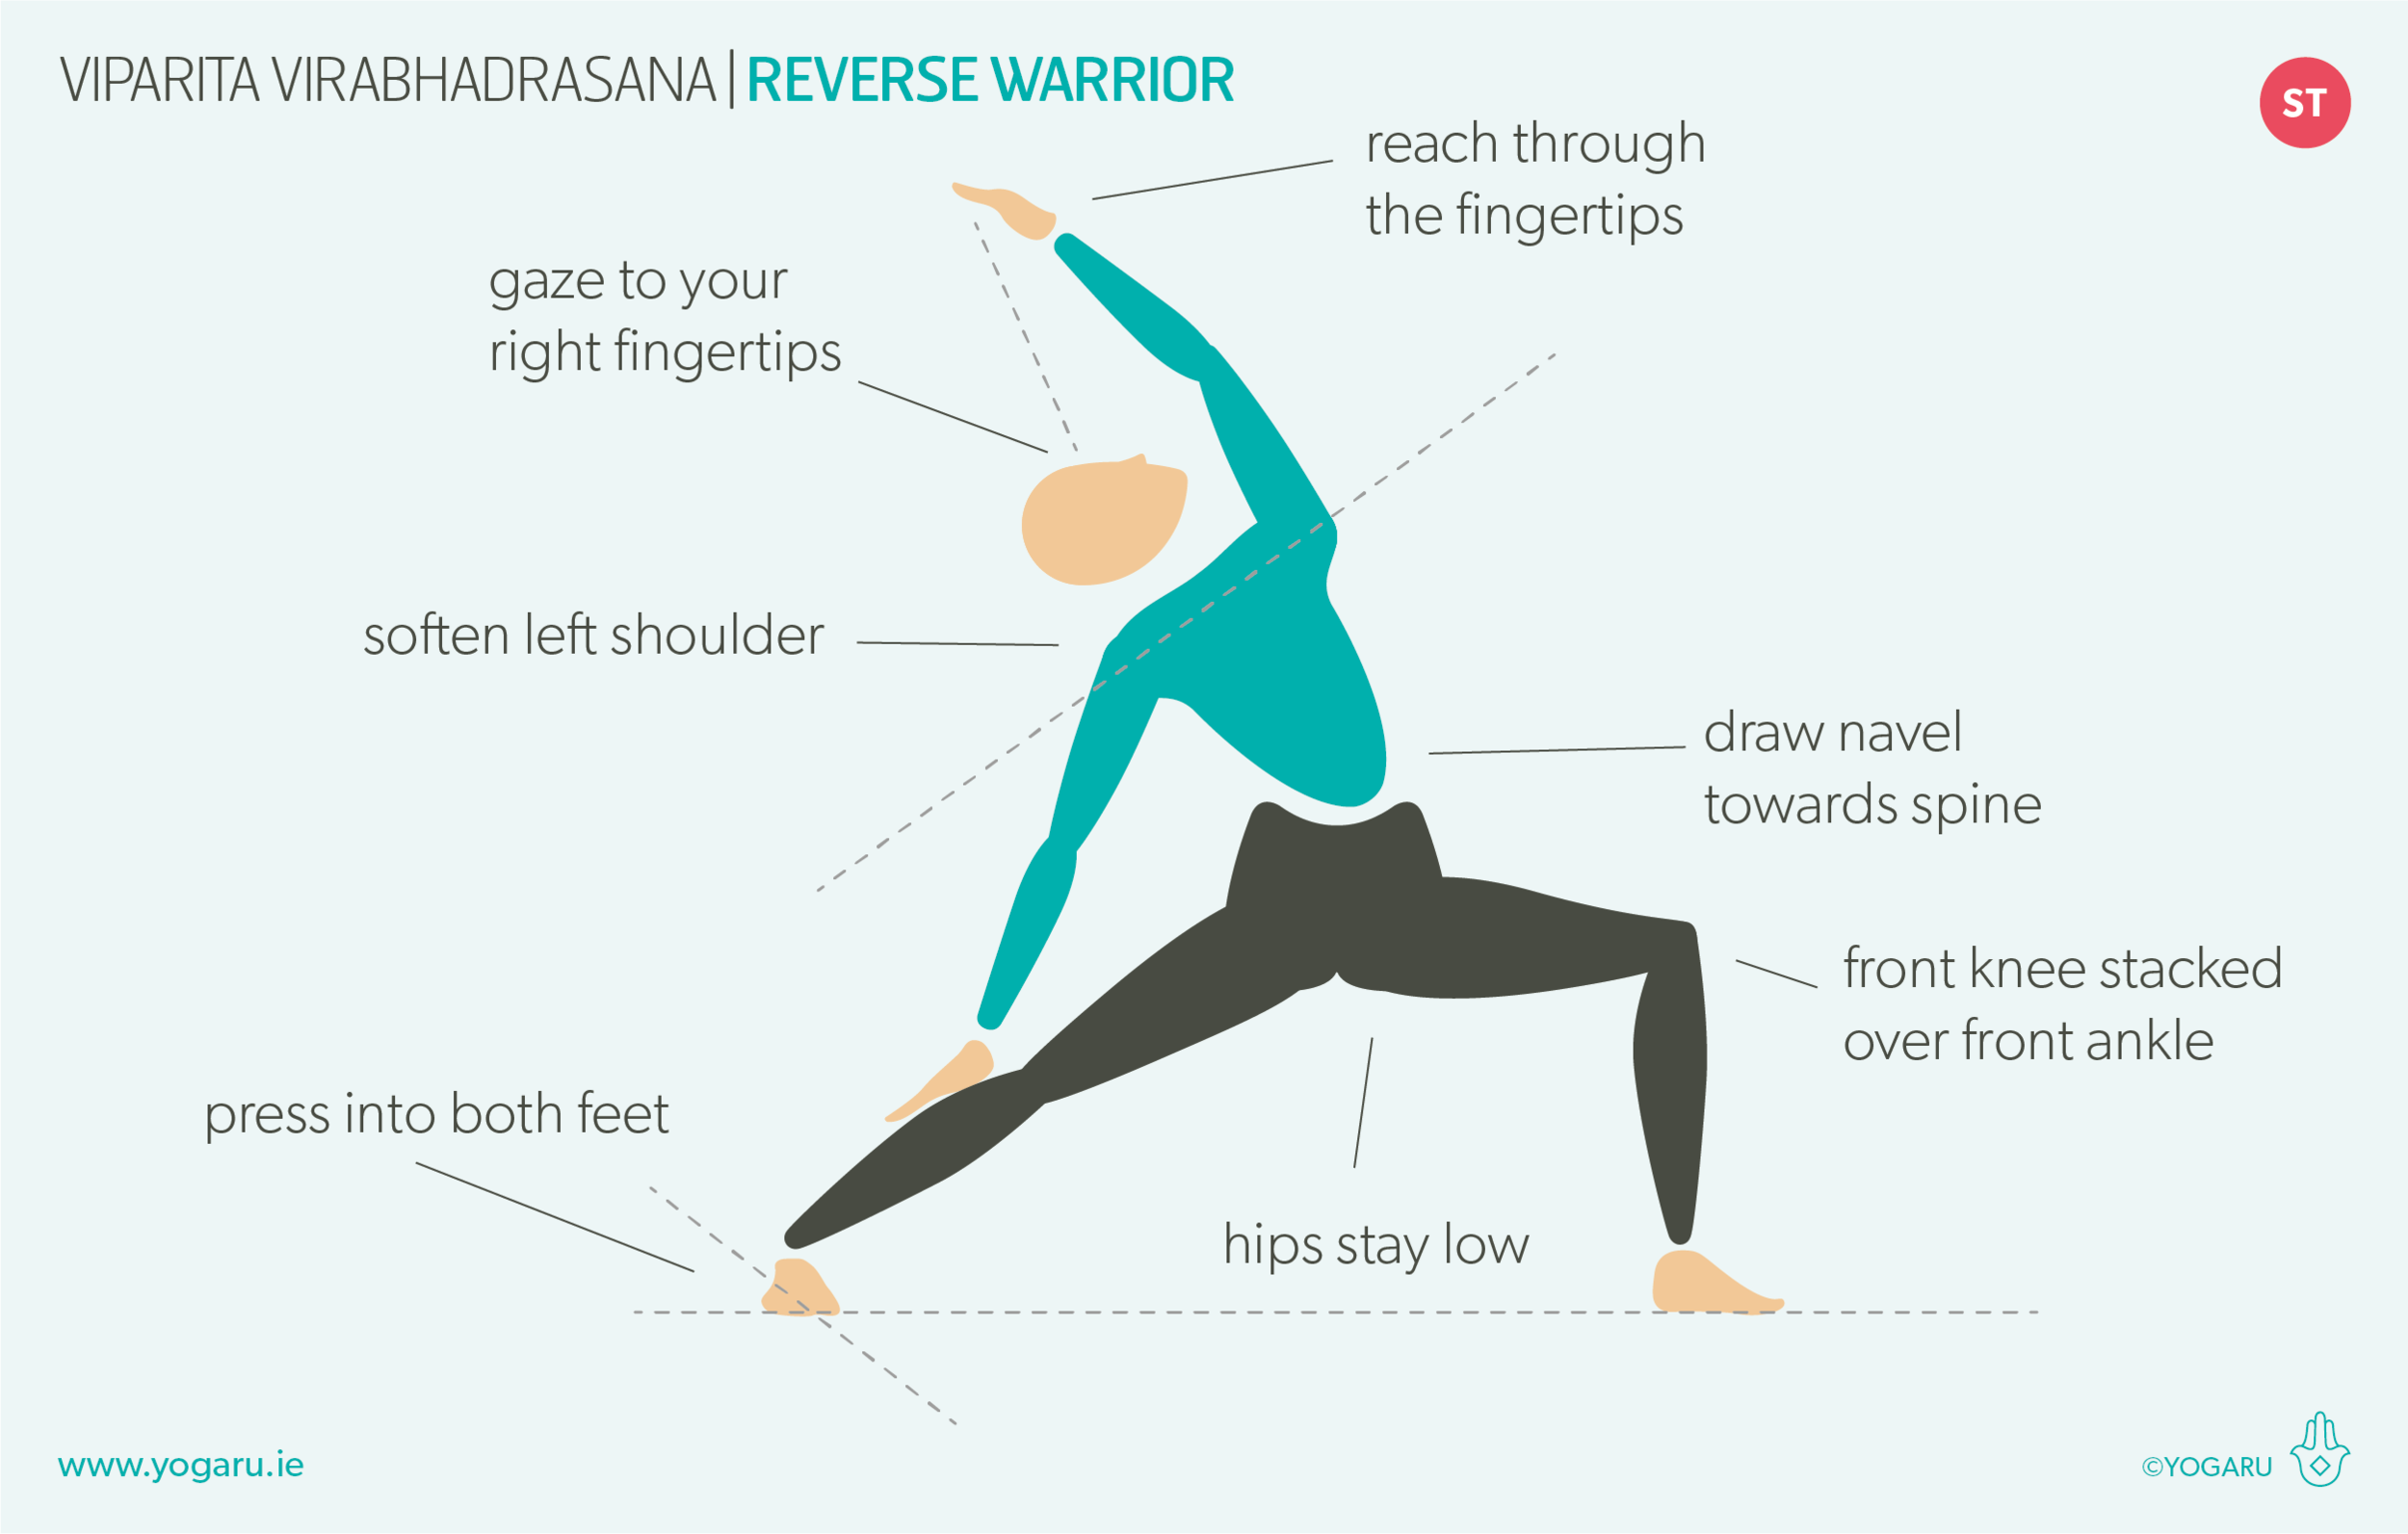
The gentle movement of yoga encourages a calm and introspective mindset and helps us stay present on our mat in meditative mindfulness. Yoga postures, which innervate the regions of the body which the vagus nerve travels to, stimulate the nerve and influence vagal tone. For example chest opening and backbend poses stimulate the vagus nerve in the throat, heart and diaphragm; twists stimulate the diaphragm, stomach and reproductive organs; forward bends stimulate the stomach and heart; and inversions stimulate the heart and stomach.
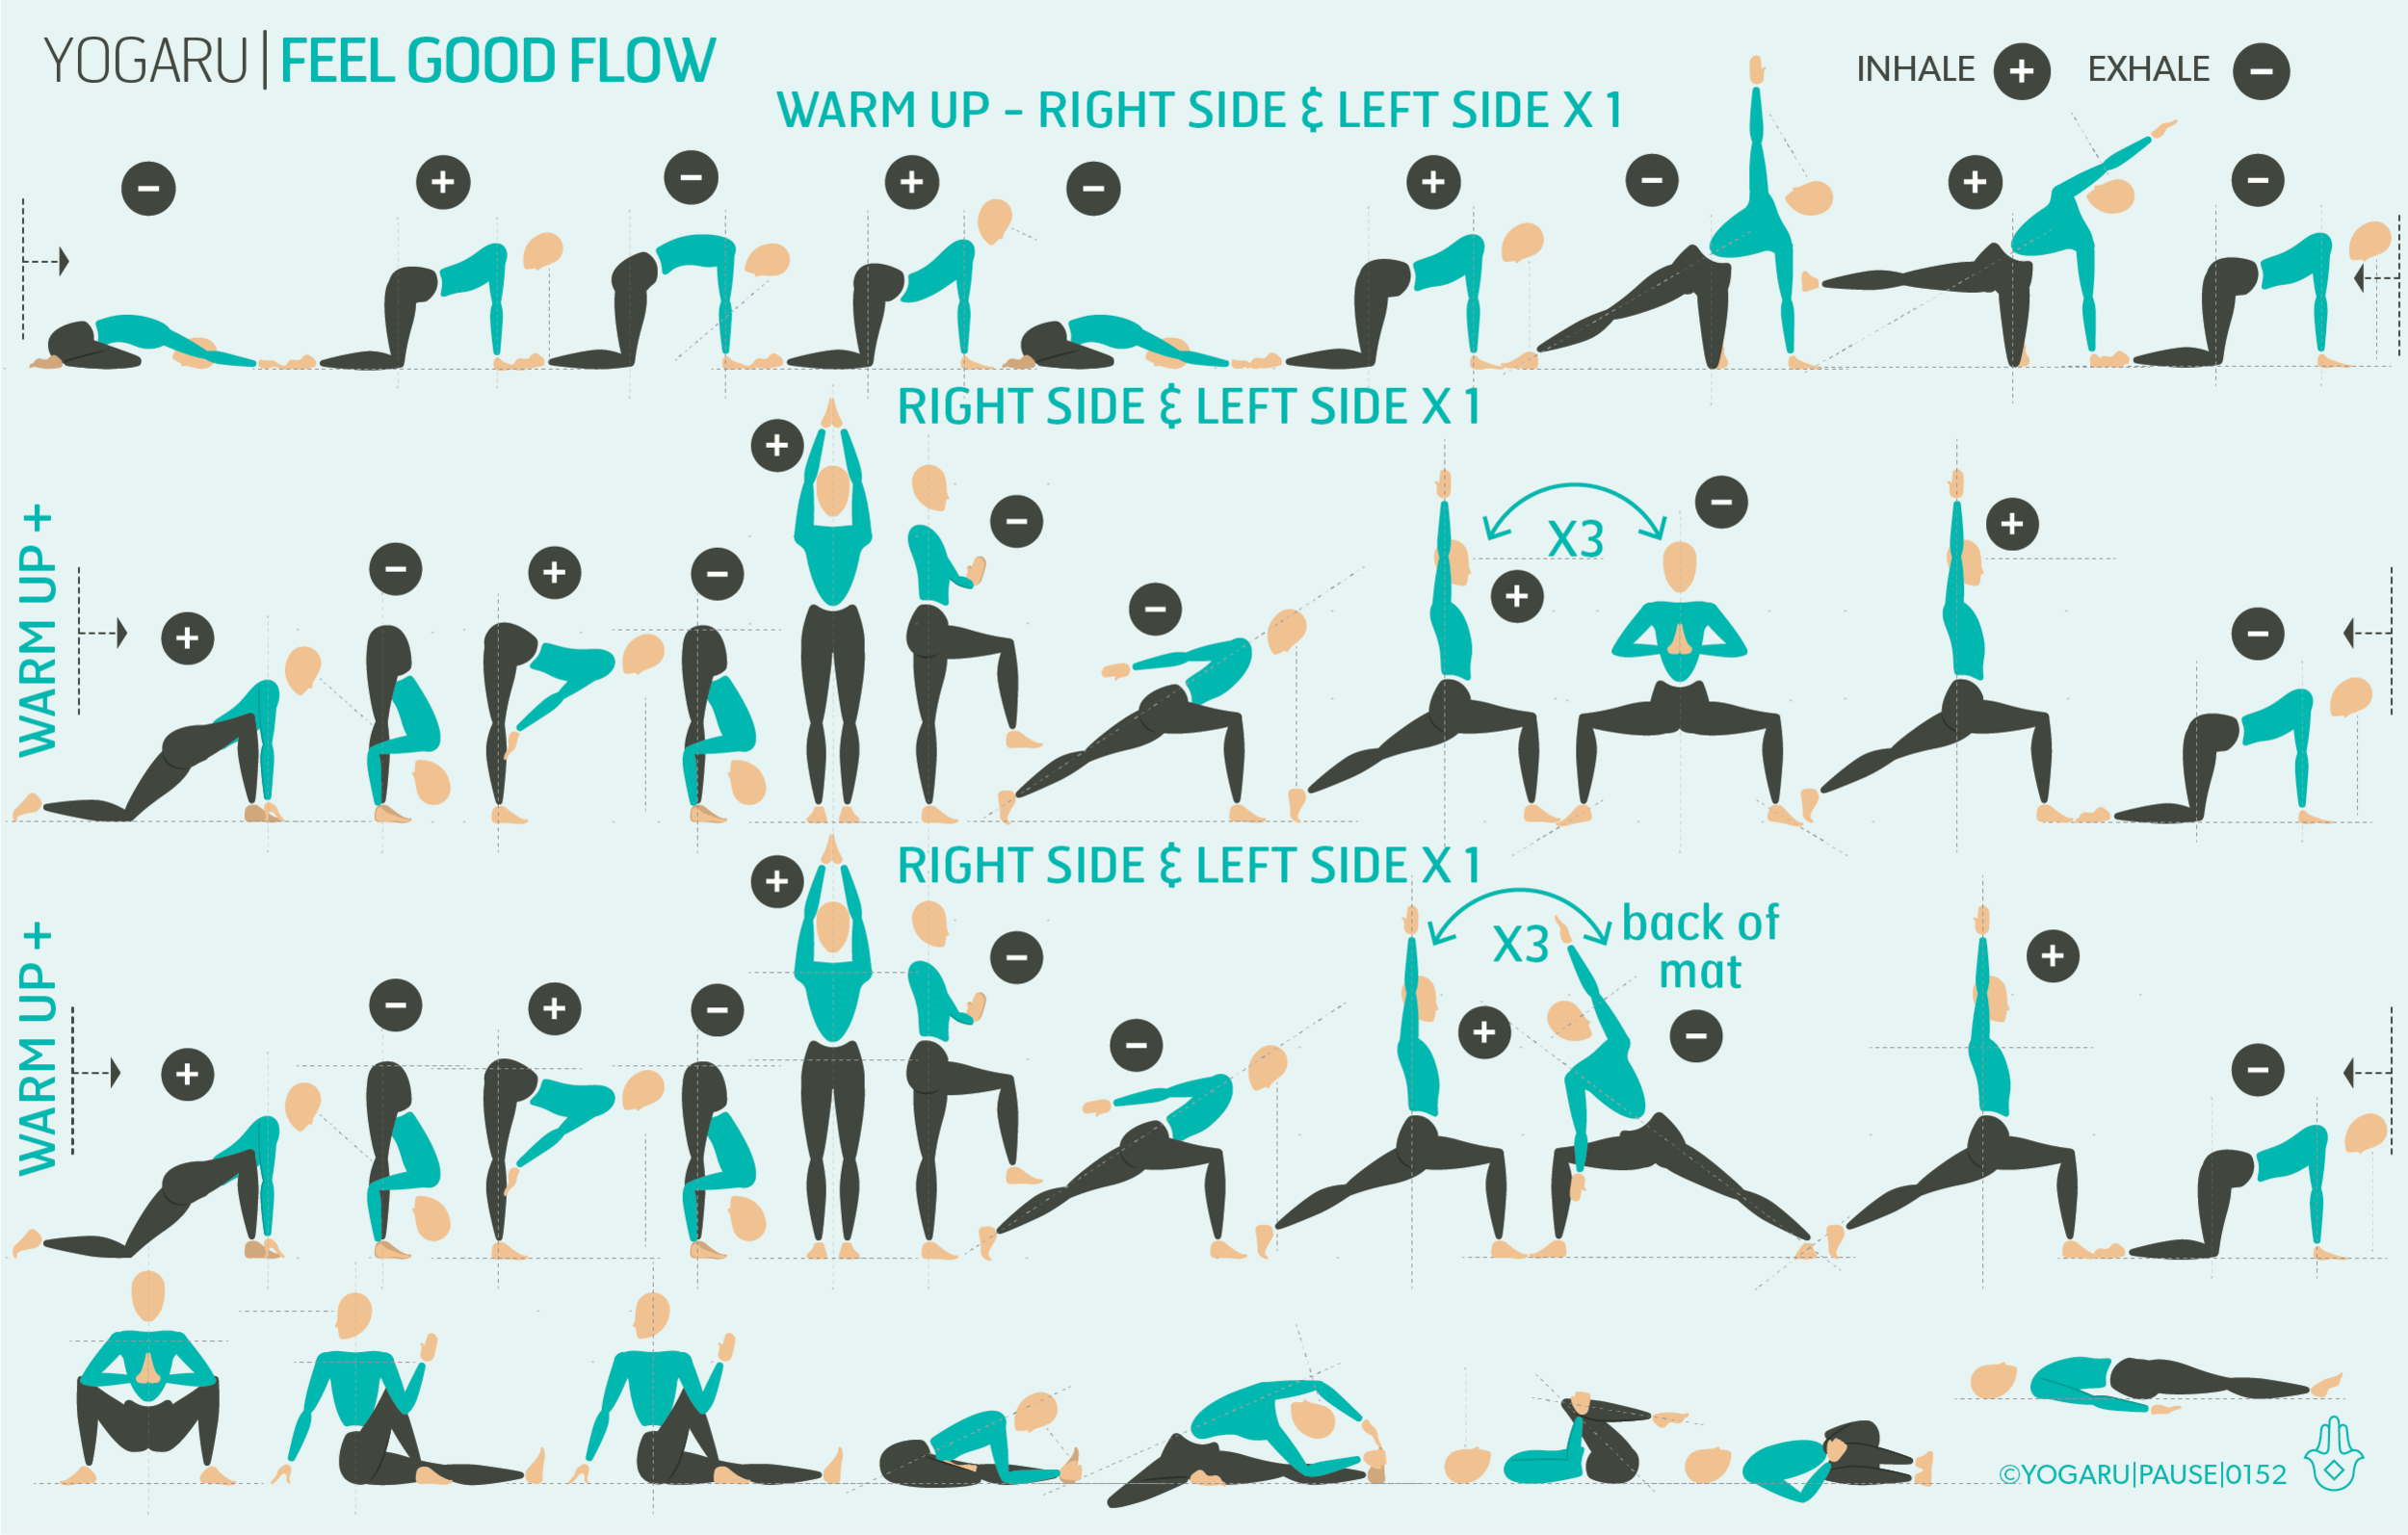
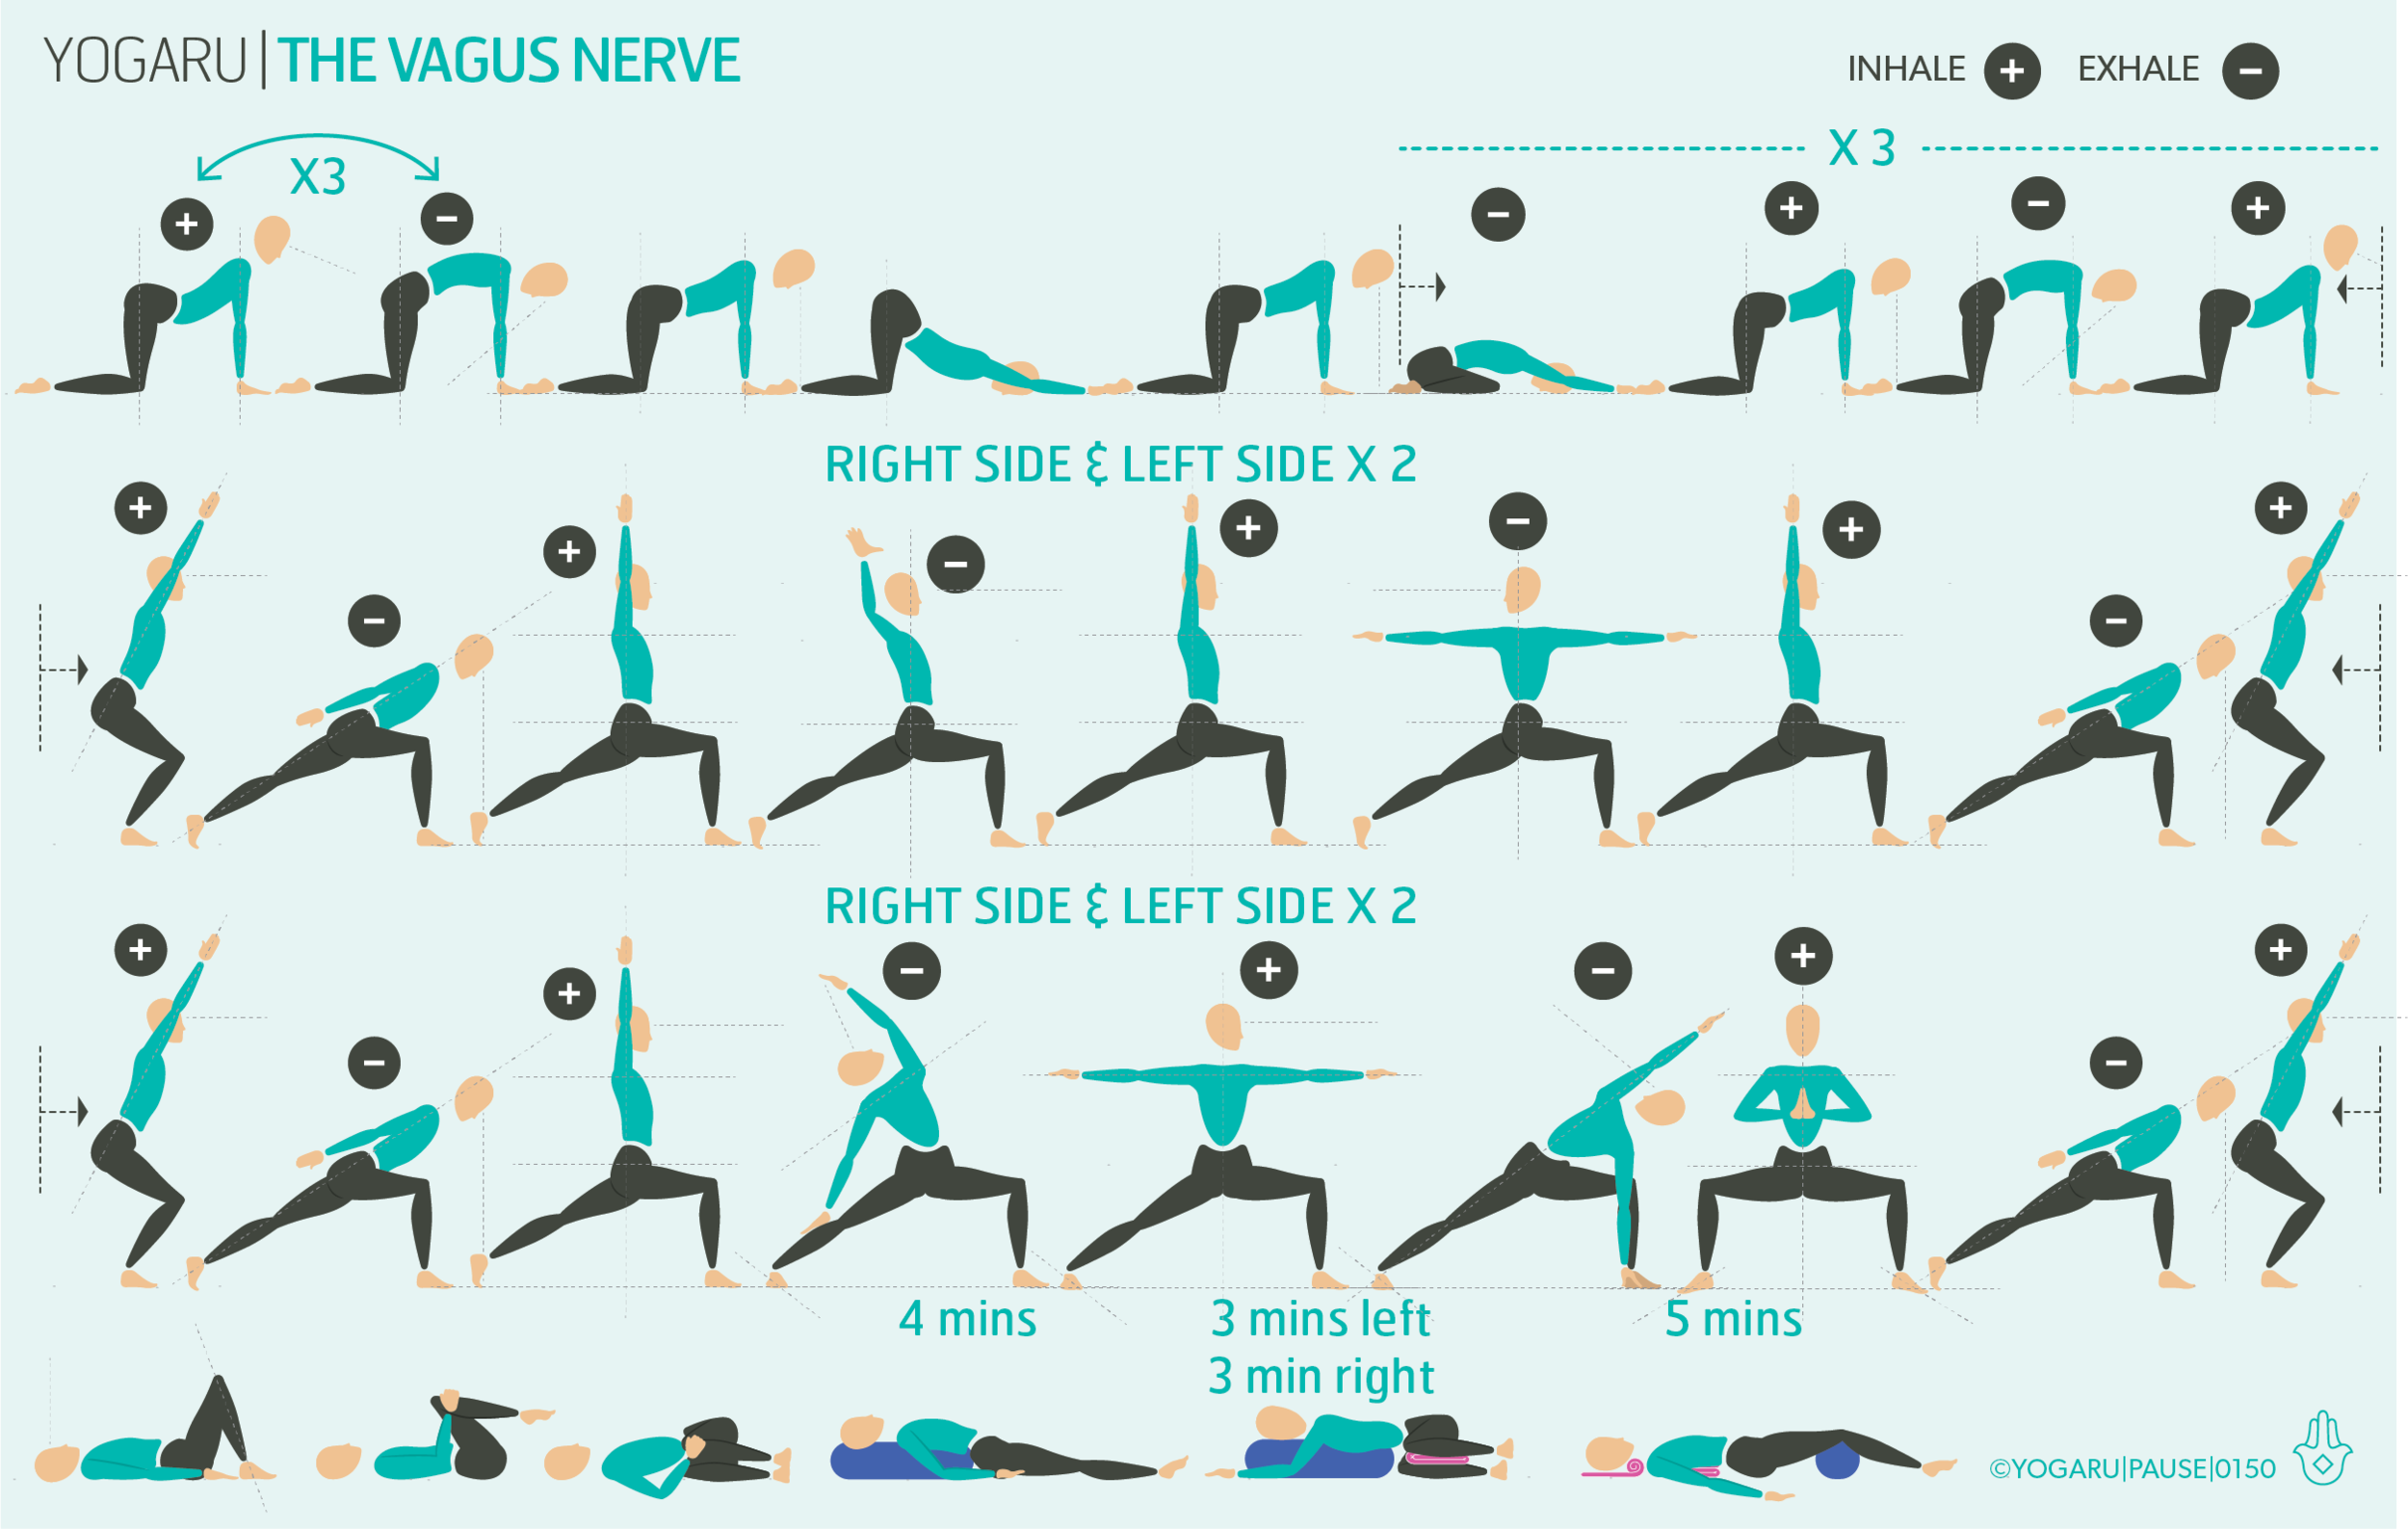
EXPLORING THE VAGUS NERVE IN YOUR PRACTICE
This blended yoga sequence trains both sides of the nervous system to help you become more skilled at tapping into your energy stores when you need them and being able to switch off and relax at the appropriate time to manage our energy bank. The sequence combines breath with movement to create a meditative flow by linking an inhale and an exhale with each pose. This little trick not only stimulates the vagus nerve in the diaphragm but gives you something simple to focus on and put aside all the unwanted chattering in the mind. You will then transition into the king of all yoga for the nervous system – restorative yoga. In restorative you consciously relax, become aware of your breath and absorb the benefits of your practice. It is important to make sure you are completely comfortable and adjust to find comfort if needed. Staying in a restorative pose when you are not totally comfortable is counterproductive to the process. The poses are held for longer periods (you will see the suggested hold times in the sequence) with the support of your blankets to help you to feel effortless comfort. You will need a bolster and two blankets for this practice.
ALIGNMENT CUES
Below are the restorative techniques used in this sequence. The props you’ll need are:
1 x bolster - or 2 towels, wrapped around a horizontally rolled pillow and tied to secure.
2 x yoga bricks - or 2 two thick similar sized dictionaries.
2 x yoga blankets - or any wool, thick cotton or fleece blanket with density.
No.1 - Elevated resting pose with chest opening
Place your bolster vertically along the top of your mat. Sit with the back of your hips against the short end of the bolster. Gently lie back onto your bolster and let your arms hang down either side of the bolster.
No.2 - Prone twist with leg support
Place your bolster vertically along the top centre of your mat with a folded blanket at the top. Sit with your right hip against the short end of the bolster. Place your hands on the mat either side of the bolster, with an inhale lengthen through the whole spine and on your exhale gently place your front spine along the length of the bolster. Place your right cheek on the folded blanket and let your arms gently hang either side of the bolster. Repeat on the left side.
No.3 - Mountain brook
Place a neck roll at the top of your mat, a narrow folded blanket under that and a bolster towards the end of your mat. Lie down on your back and adjust your three props to nestle under the curve of your neck, under your shoulder blade and under your knees.
To save the images for personal use click and hold down the image until the ‘save image’ option appears; on Mac hold down ‘control’ and click the image to get the option box; on PC right click on the image to get the option box. Scroll down in the ‘option box’ and click ‘save image’.
Ruth Delahunty Yogaru