Garudasana - Eagle

LONGEVITY OF STANDING STABILITY
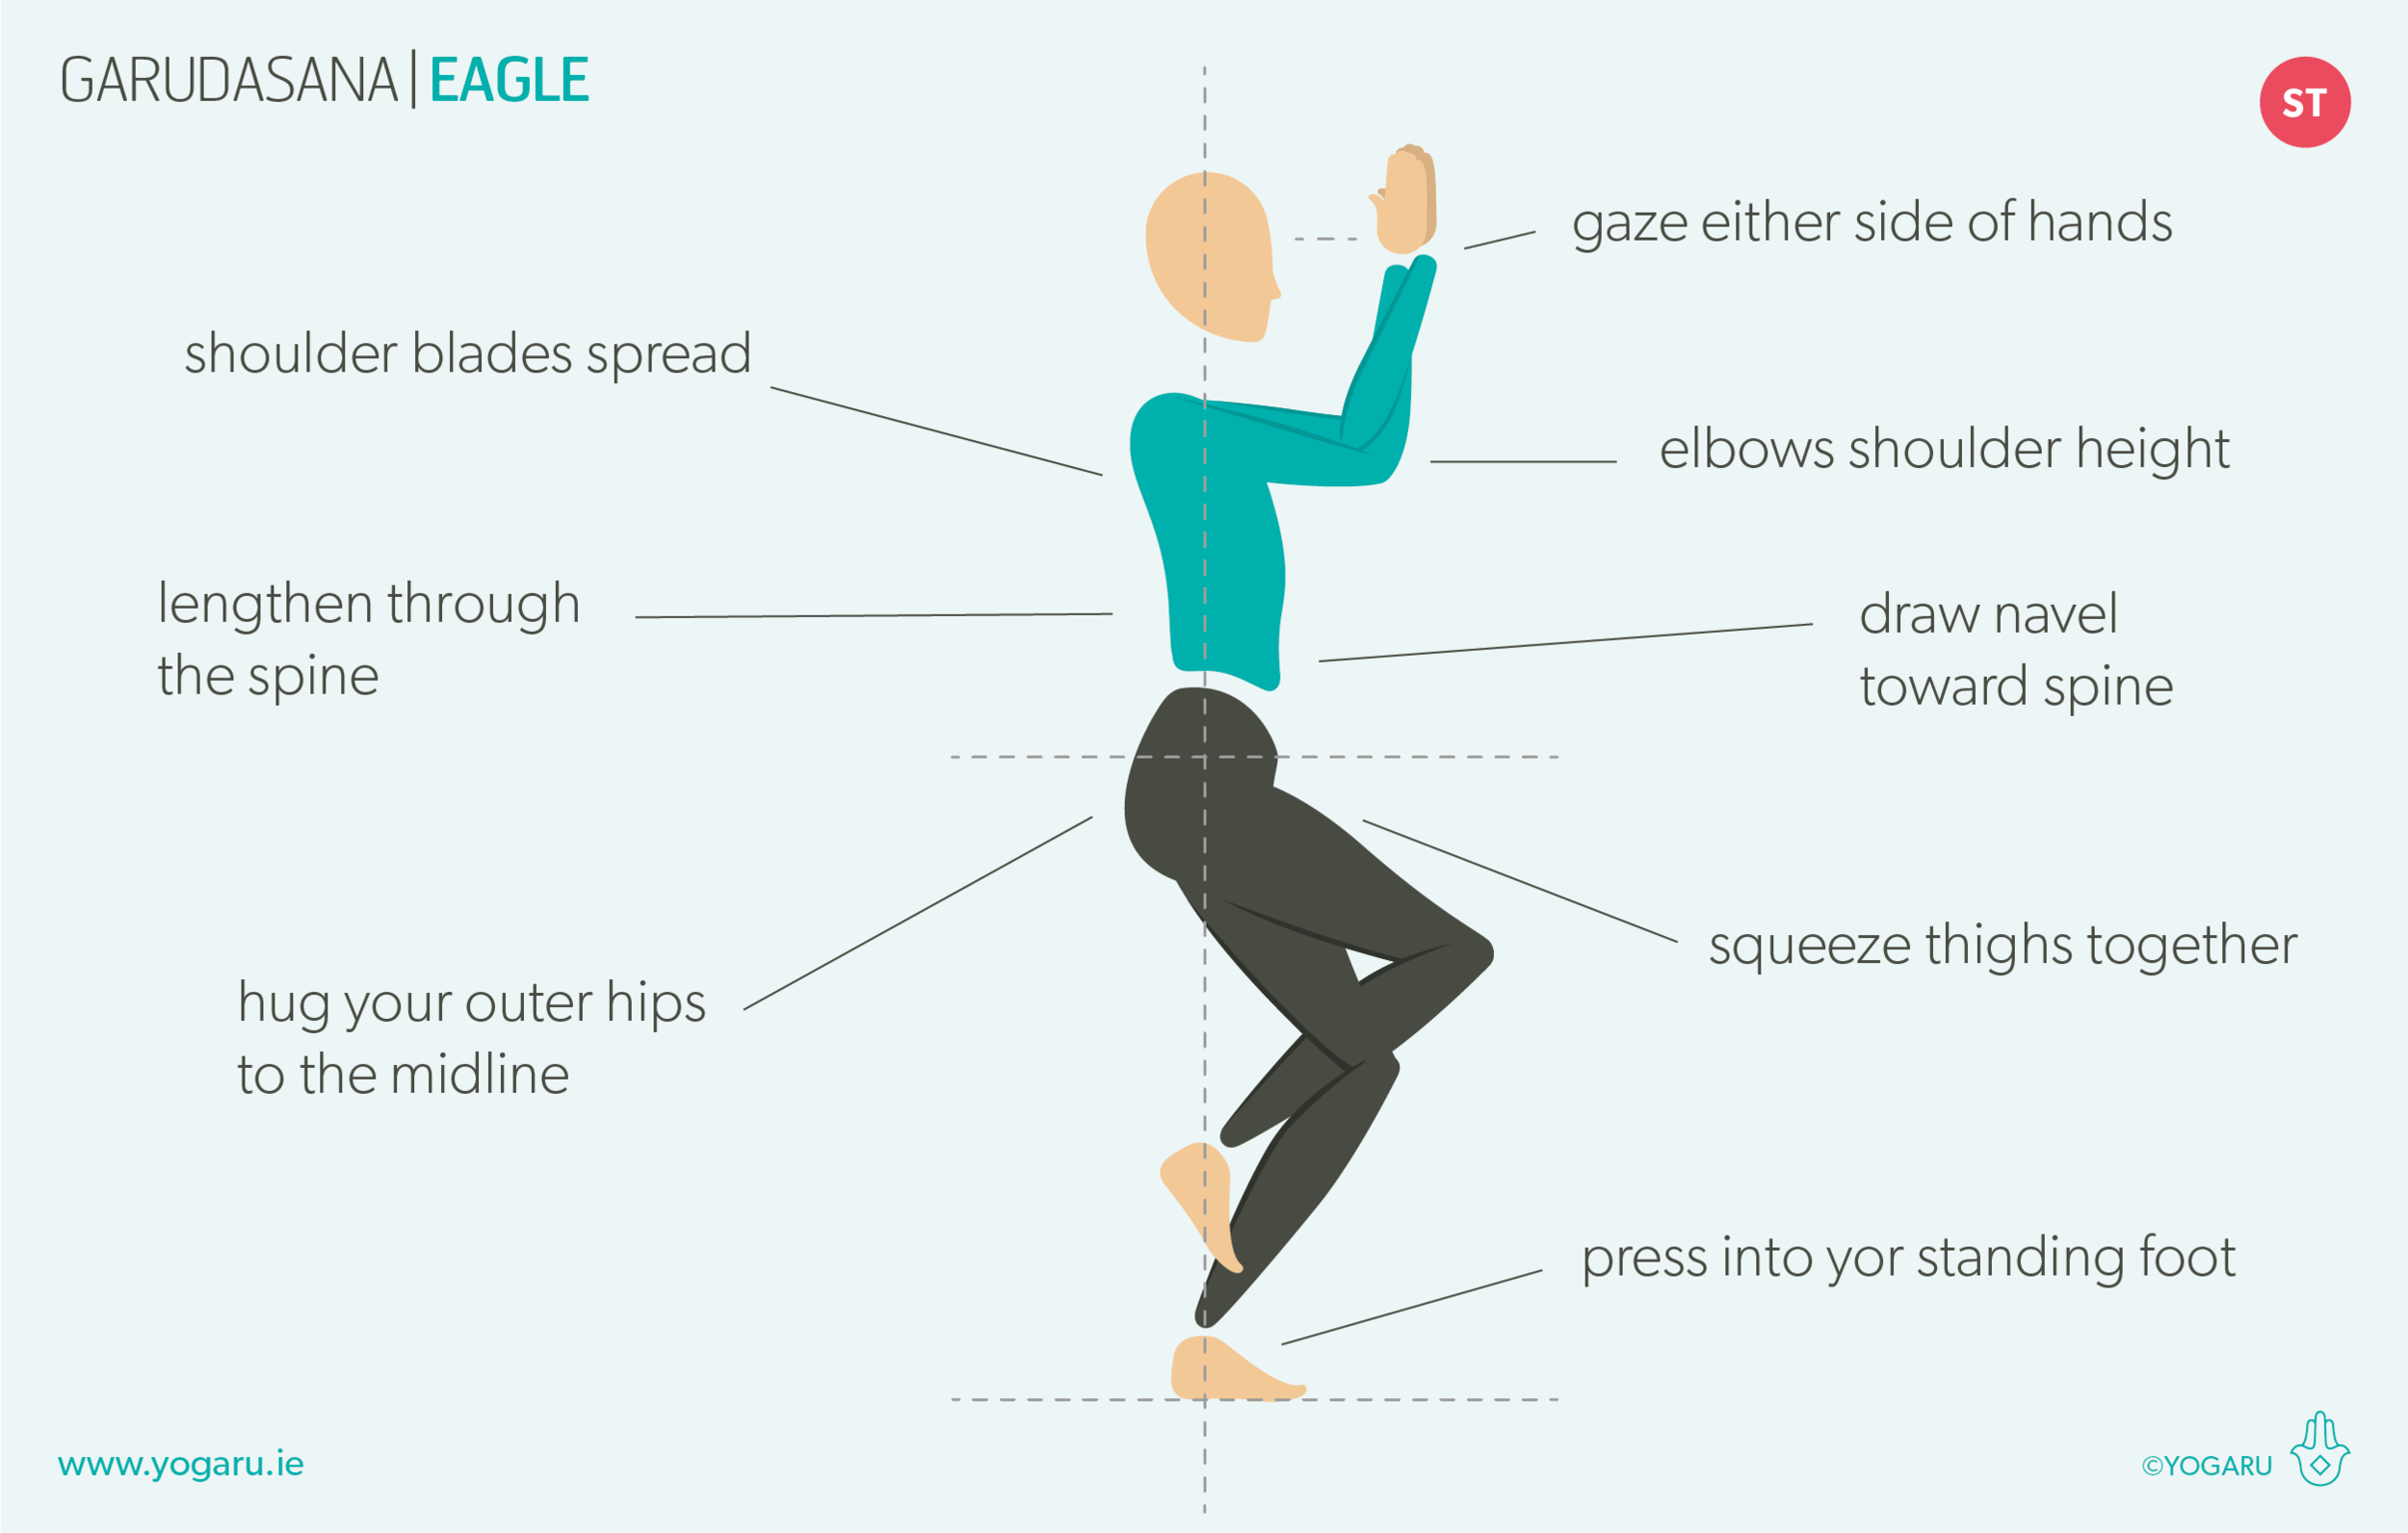
Garudasana/Eagle is a standing balancing pose which builds focus and concentration and gives a lovely stretch across the back of the shoulders. Single legged standing poses are important poses to continue to add into your practice to build ‘balance’ stamina. Fall risk and feeling a little less sturdy on our feet is part of the ageing process. This pose, and similar poses like Vrksasana/Tree and Viradhadrasana III/Warrior III, train the brain to work out the changing centre of gravity and enlist the deep stabilising muscles of the hips, core and spine to maintain standing position. Because of the angle of the hip socket, the position of the legs of adduction, and internal rotation in Garudasana/Eagle is not an easy shape for most people to take. It can expose tightness in the outer glutes, and the muscles that attach to the IT band. This makes it difficult to cross the legs sufficiently to get the wrap of the lower leg, which can put pressure on the knee joint.

THE BENEFITS OF GARUDASANA/EAGLE
Garudasana/Eagle stretches the shoulder, calves, the outer hips, the piriformis and the tensor fasciae latae. While at the same time these outer hip muscles, and the deep stabilising muscles of the hip, are contracting to help maintain balance. As with all the standing balancing poses there are more muscles strengthening than stretching – the inner groins, core; and the glutes, hip flexors, hamstrings and ankles of the standing leg. It is also a great pose to help you strengthen the spine by keeping yourself upright as you bend forward to facilitate the leg wrap.

EXPLORING GARUDASANA/EAGLE IN YOUR PRACTICE
Garudasana/Eagle is quite a human knot! There are lots of versions of the pose if either your hips or shoulders are not happy to tie themselves up into this particular pretzel shape. If the full leg wrap does not suit your hips, place a block on the outside of your standing leg and place your wrapping leg foot on the block instead of around the calf of the standing leg. If your shoulders restrict you from placing the palms of the hands together, place the back of the hands together or take it back another step and hug your arms around your shoulders which will give you the same opening to the back of the shoulders.

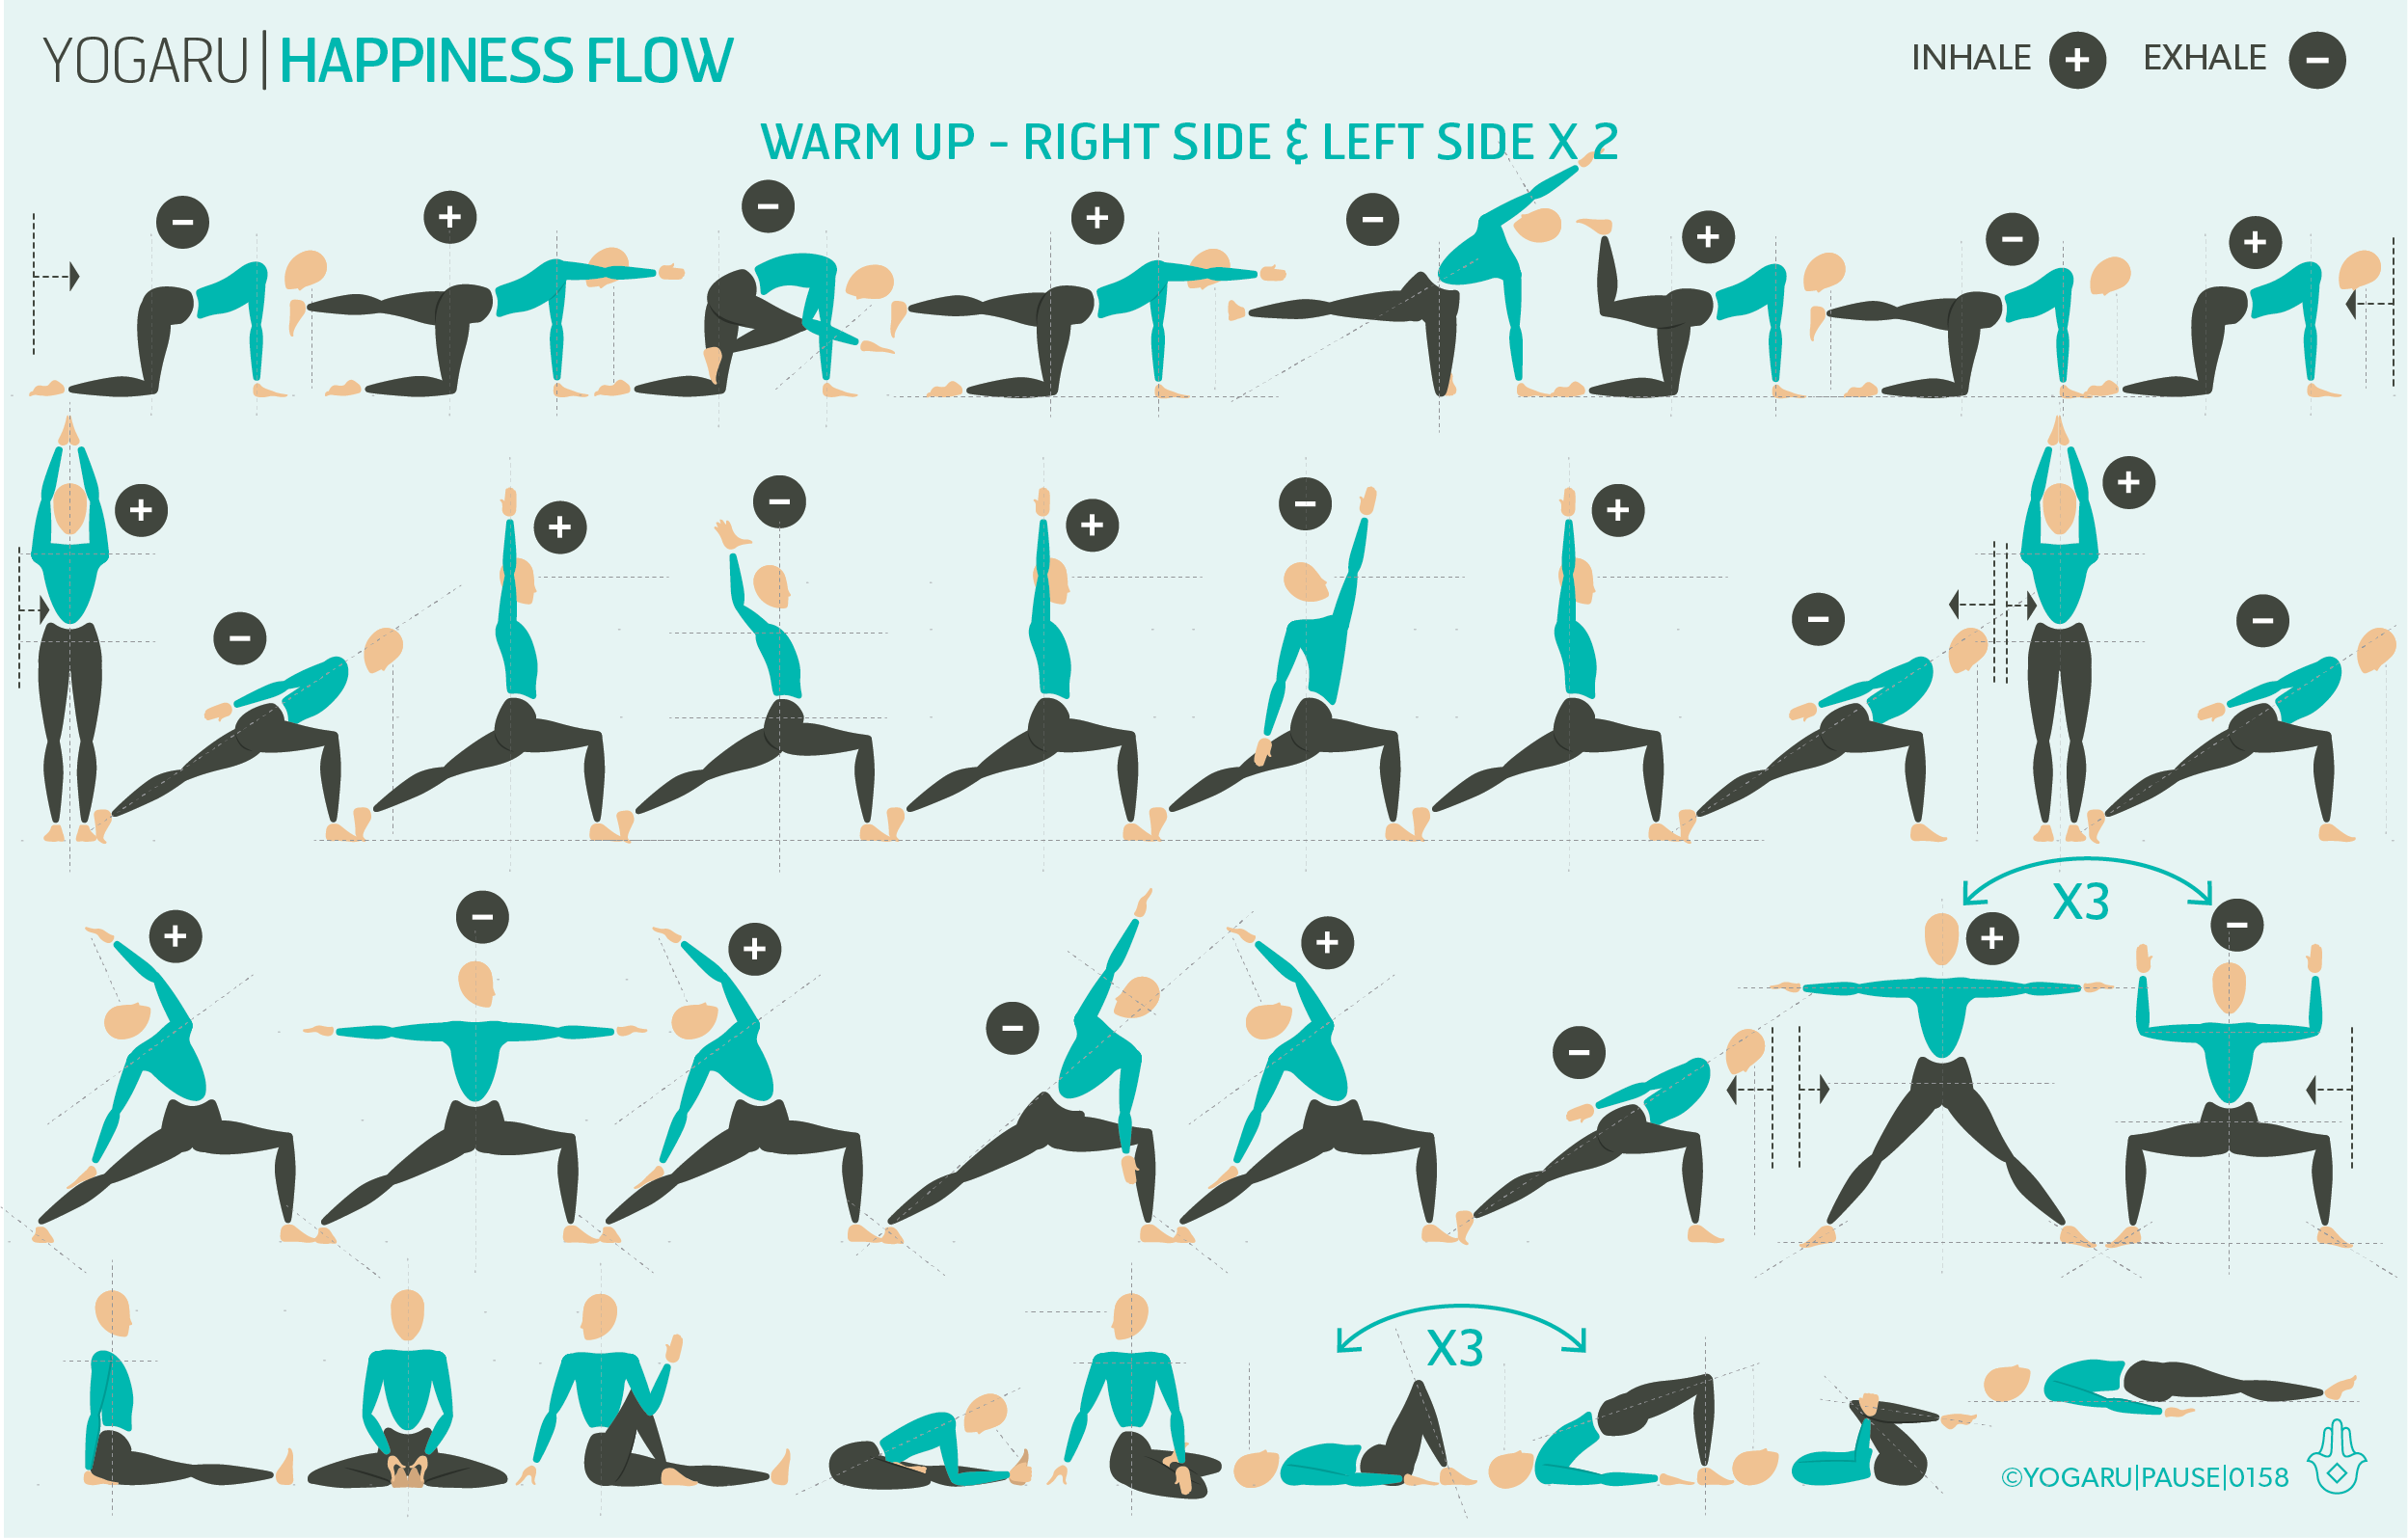
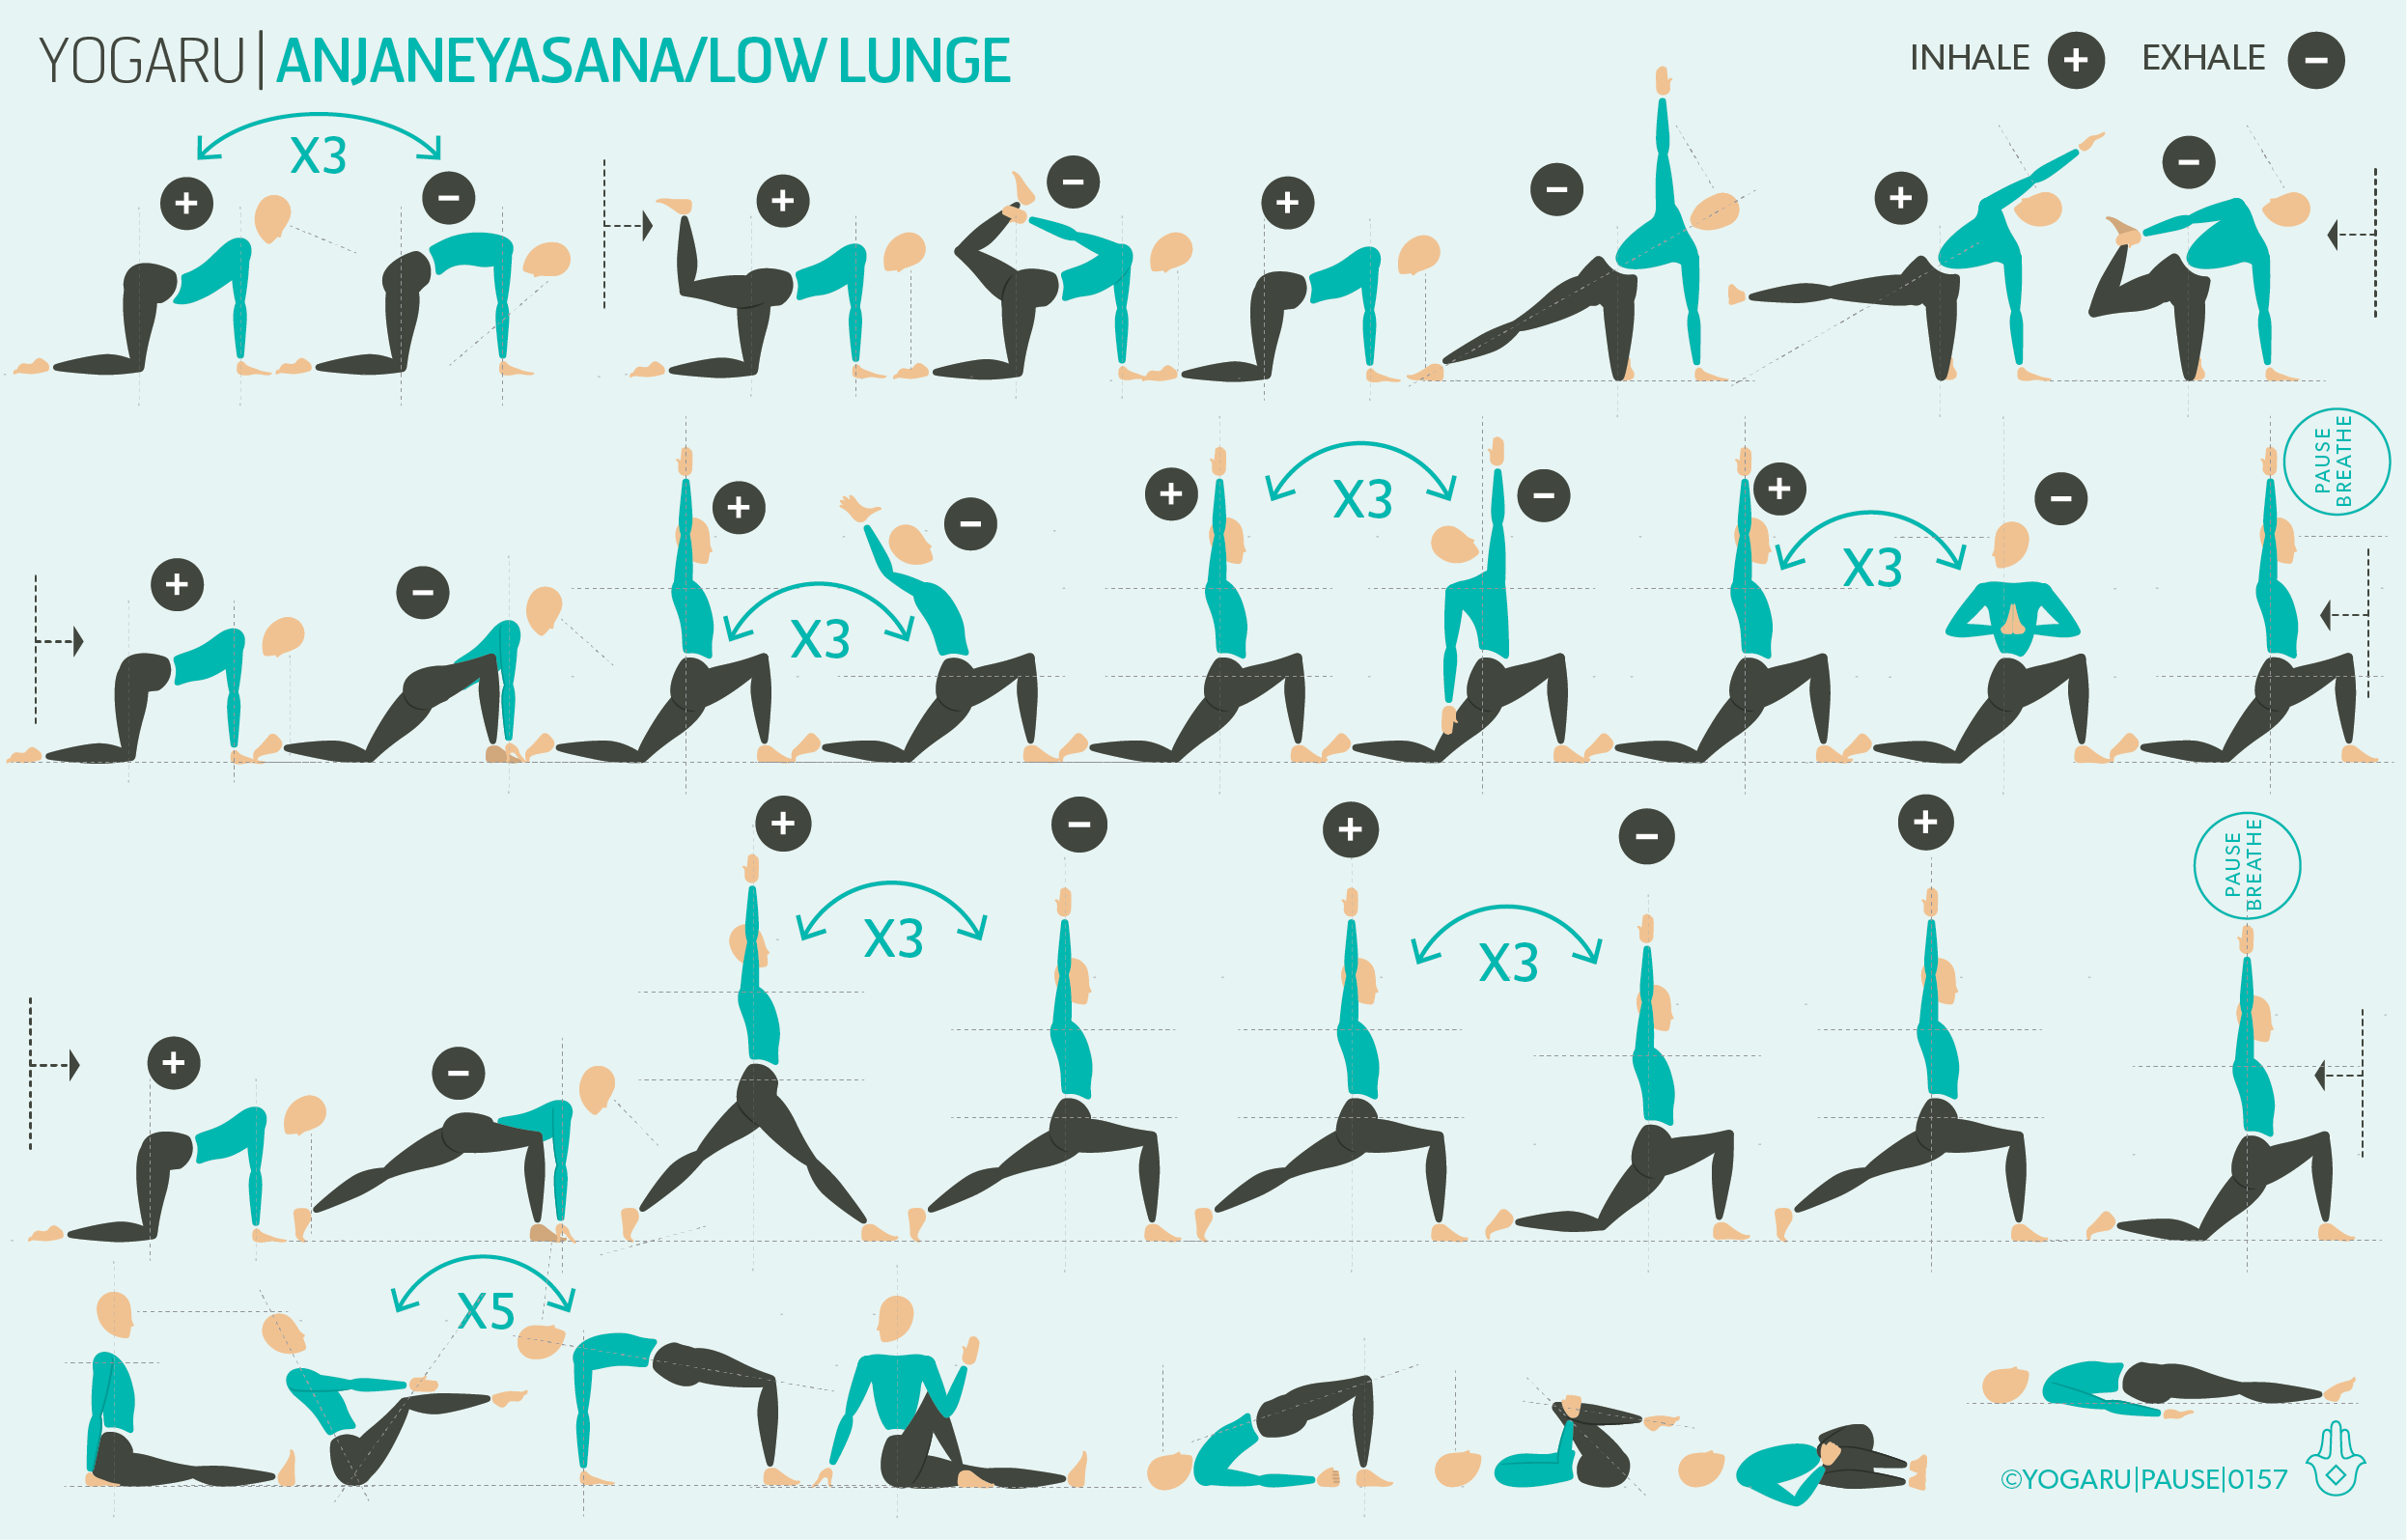
Strengthening the inner groins in adduction is not as prevalent an action in yoga poses. In this sequence you can find the strength of the inner groin by squeezing a brick between the thighs in the warm up half sun salutation on the first row which you will repeat at the start of each standing mini flow. In the second row place a brick on the inside of the front leg and press your thigh against your arm to find this same inner groin activation. In the third row continue to tap into this strength by hugging to the midline and using this action to stabilise the hips in some of these more challenging poses. Utkata Konasna/Goddess is the perfect counter pose for Garudasana/Eagle. It brings the hips into external rotation and abduction, which is the opposite to how they sit in Garudasana/Eagle, and is a more natural and secure position for the femur bone to sit in the hip socket. When you add cactus arms to Utkata Konasna/Goddess it gives the perfect unravelling counter pose for Garudasana/Eagle.
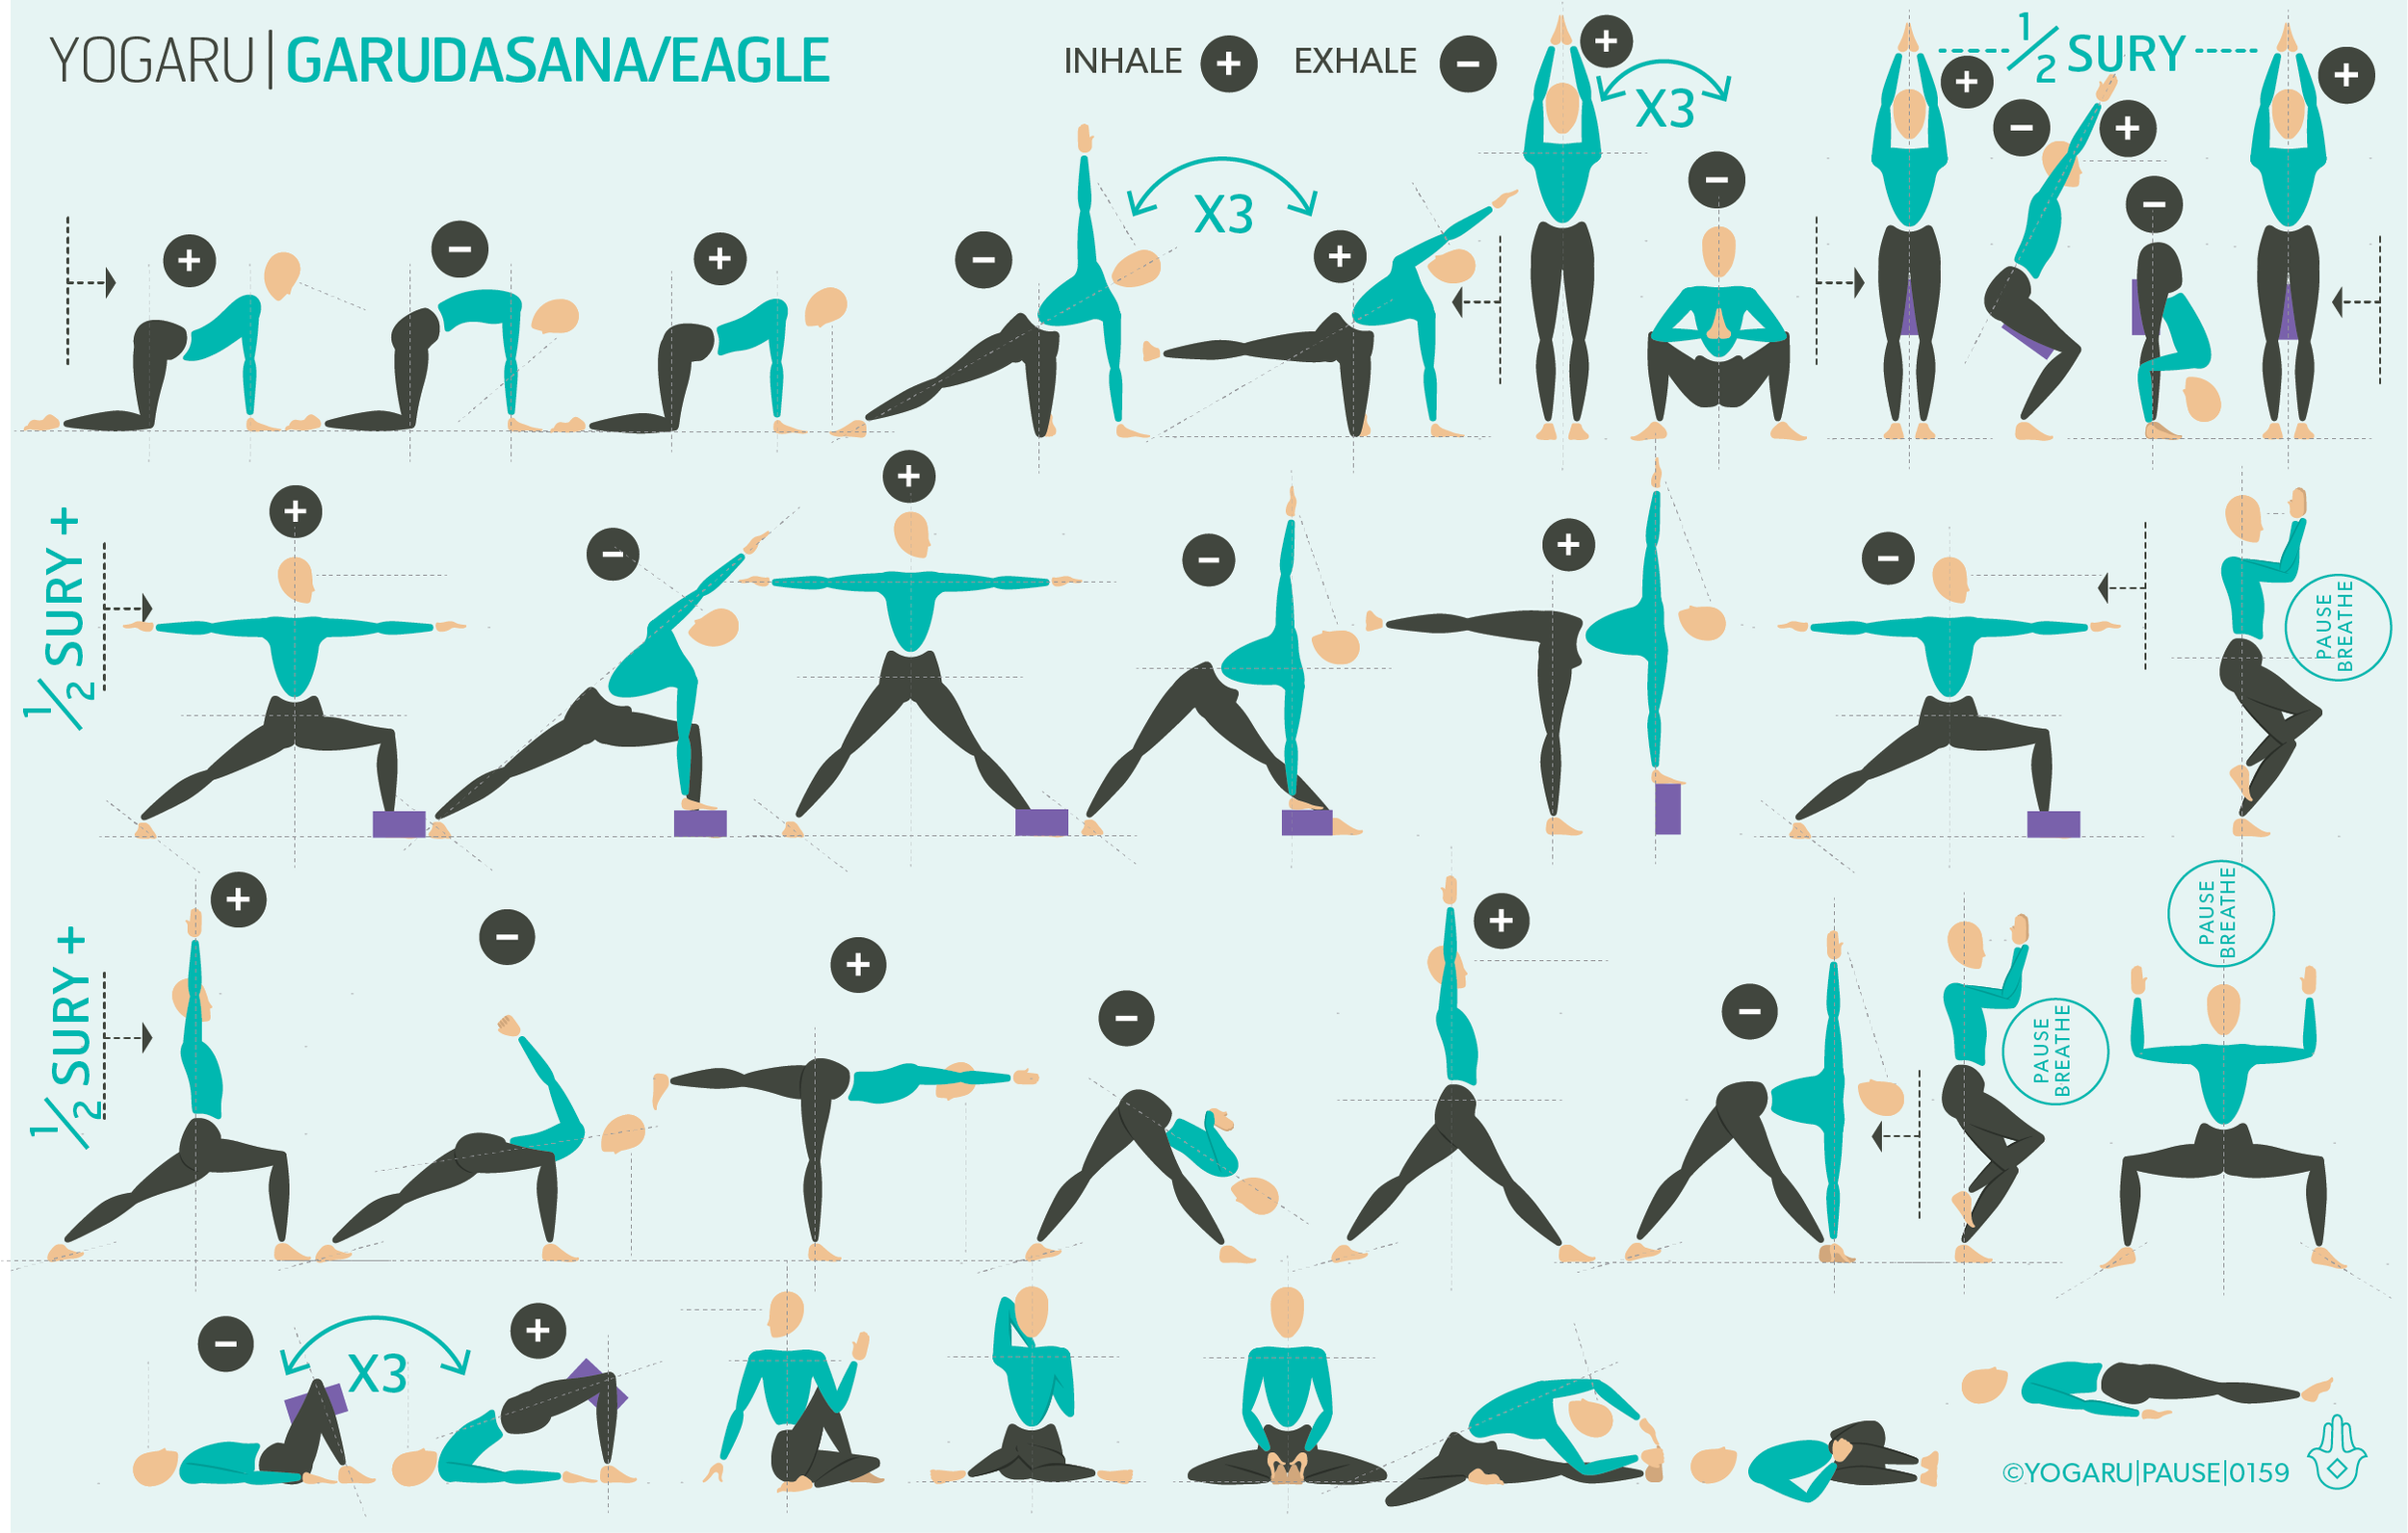
ALIGNMENT CUES
For this sequence remember to hug the outer hips to the midline in Garudasana/Eagle and squeeze to the midline.

Have a read of the tips below and either print out the sequence or save it onto your device:

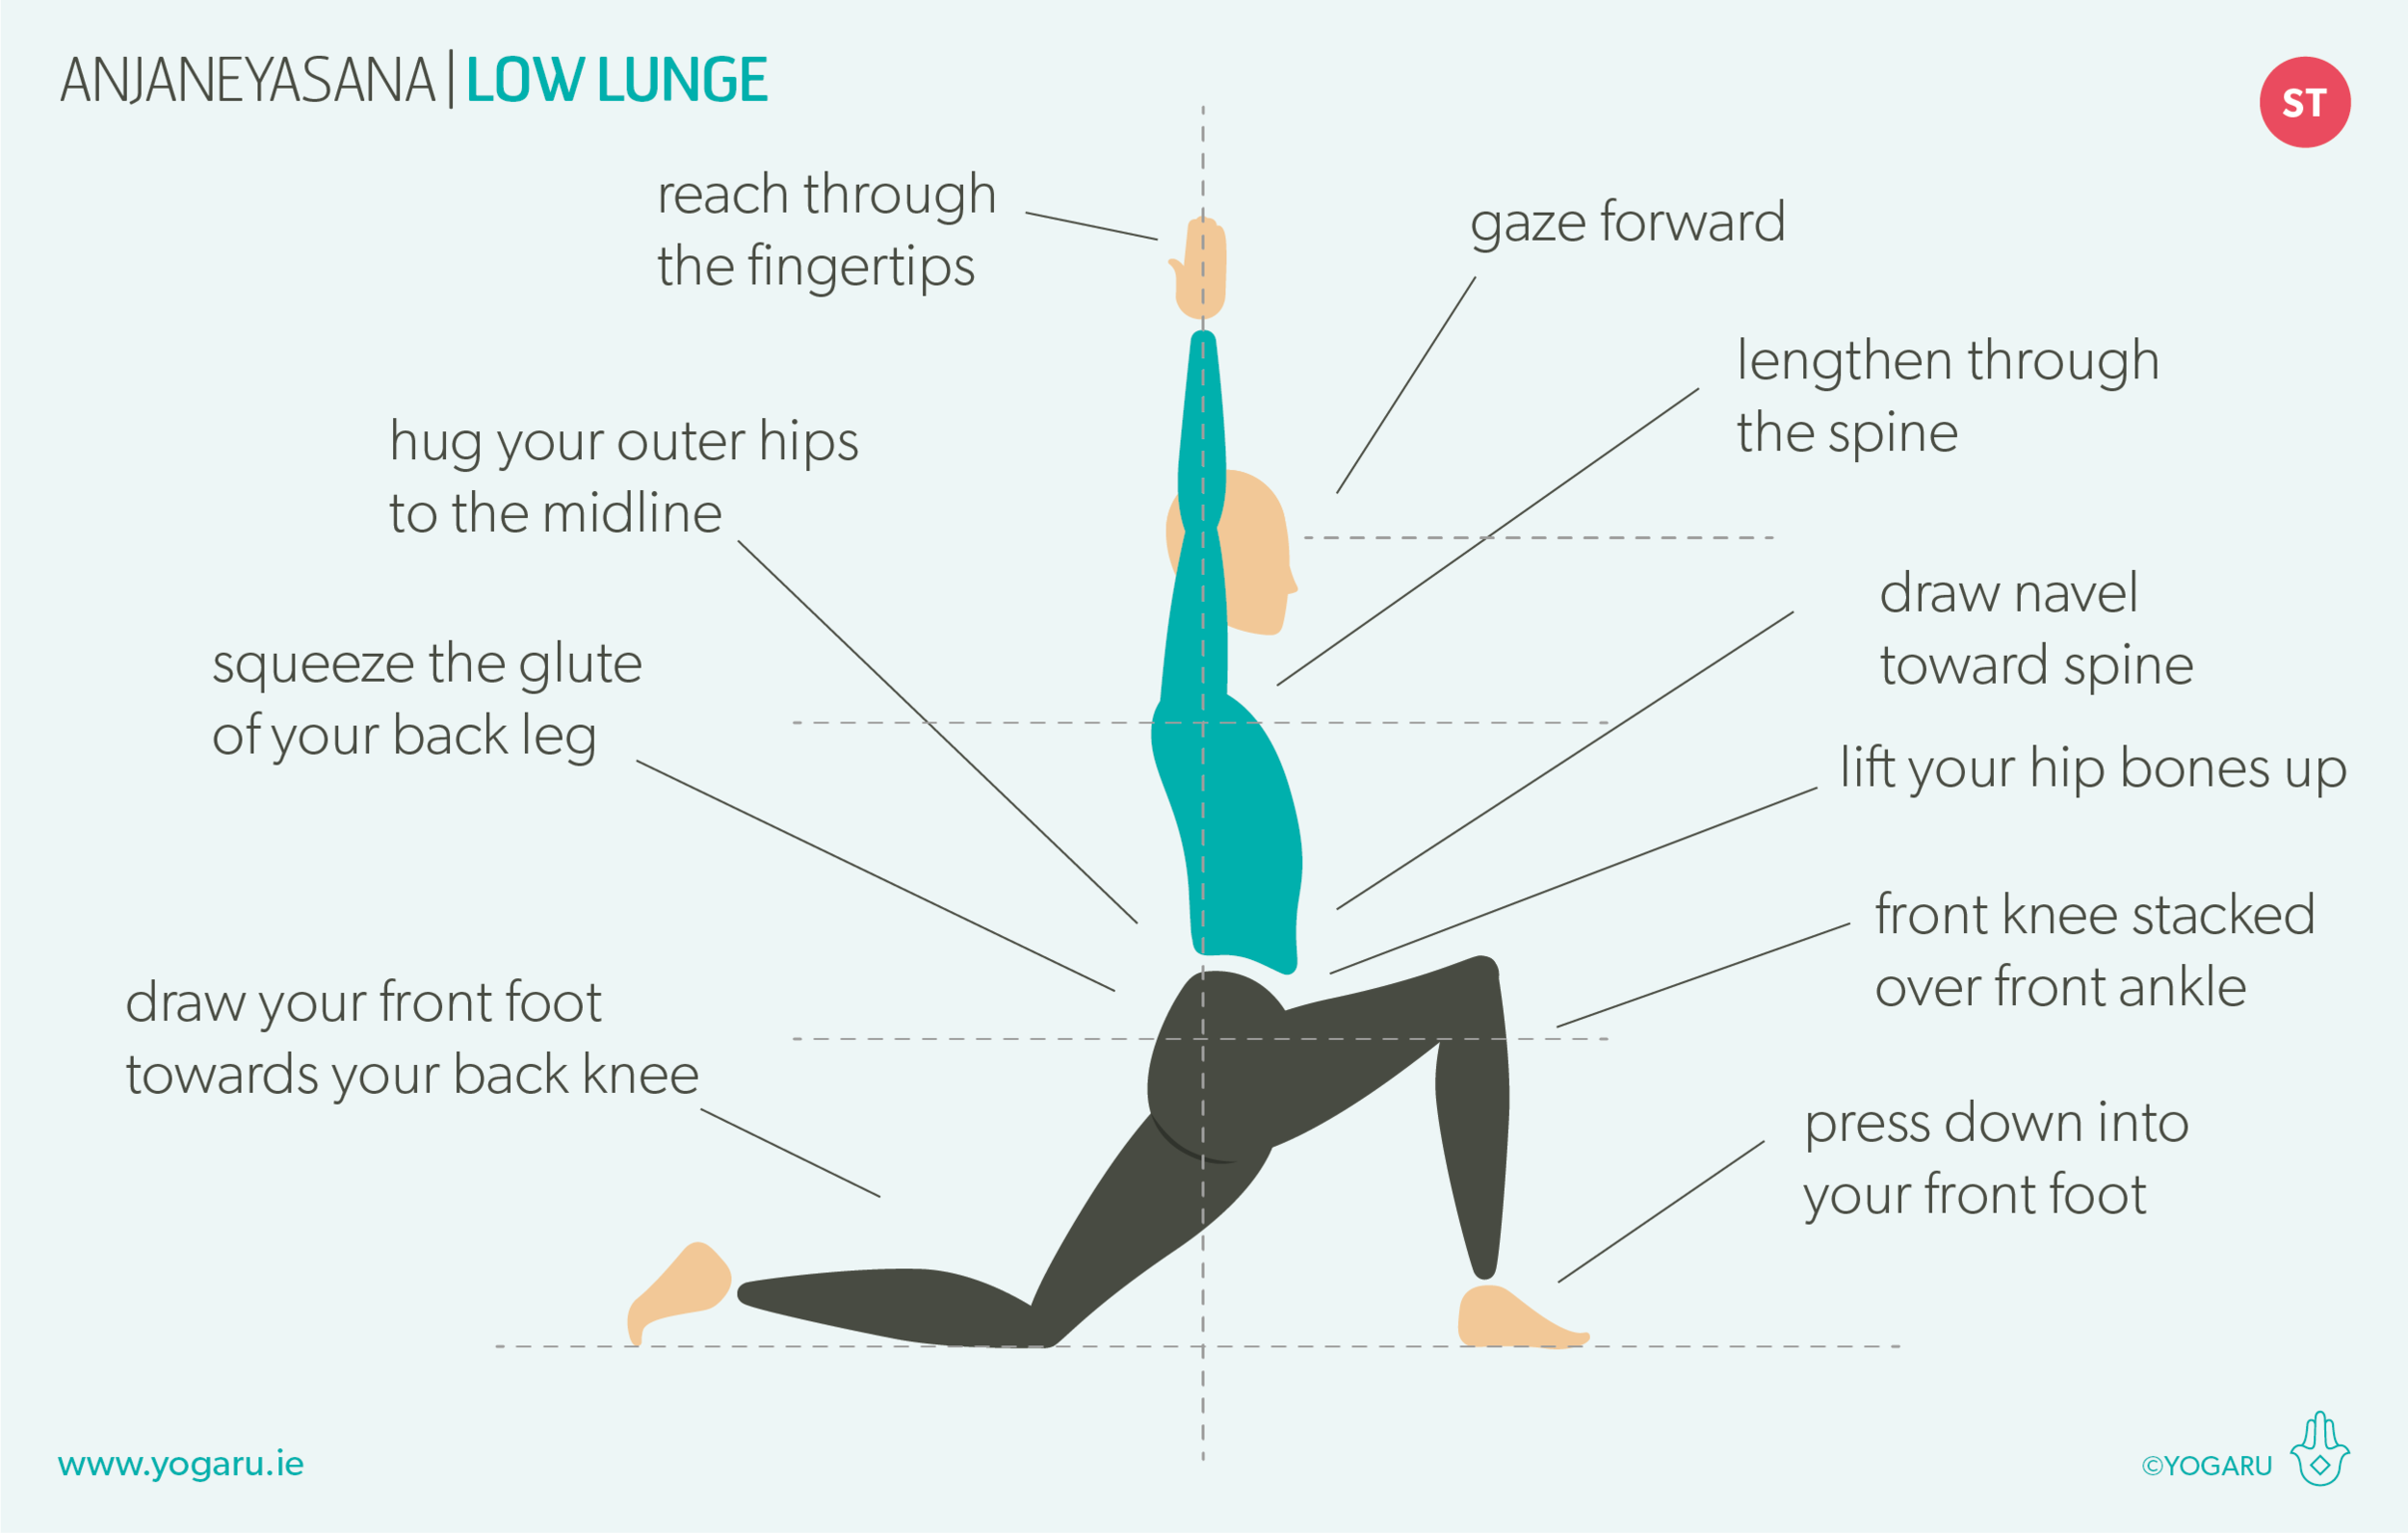
  • From Tadasana, bend your left knee, cross your right leg over your left thigh, place your right toes beside your left foot, or hook your right toes around your left calf.

  • Bend your elbows, cross your left elbow over your right elbow.

  • Press the back of the hands together, or wrap your left hand around your right hand and press your palms together.

  • Lift your upper arms up, elbows lengthen forward, fingers reaching up, shoulder blades spread.

  • Keep your left knee bent, lengthen the spine, broaden through the collarbones, squeeze your upper thighs together, gaze either side of your hands.

To save the images for personal use click and hold down the image until the ‘save image’ option appears; on Mac hold down ‘control’ and click the image to get the option box; on PC right click on the image to get the option box. Scroll down in the ‘option box’ and click ‘save image’.

Ruth Delahunty Yogaru

Happiness flow

THE HAPPINESS BUZZ
We have all experienced that post yoga pep to your step – where you step on your mat in a bit of a funk and finish wondering what it was that had you out of sorts in the first place. Sometimes when I find my head is not in the right place before I practice, I remind myself to trust in the process of yoga and, even though I might have a very valid reason to be stressed, know that I will feel much better after I practise. As we practise, our worries about the past and the future ease and our minds feel a little less cluttered. Yoga is not a cure all but it certainly helps smooth out the bumps along the way.

One of the steps to living a good life is living with a yoga principle called Santosa – or to be content with life. Happiness comes from our attitude to life, not from our life circumstances. The first step to being happy is to be content with what you have in life, no matter how good or bad it is. When we go through rough patches our attitude to this difficult situation has the power to make the situation easier to navigate or much more difficult.

THE SCIENCE BEHIND IT
Yoga is more than just a movement practice, it connects the body and brain through the nervous system. The breath is the main gateway to the power of the practice of yoga. When we consciously breathe the diaphragm stimulates one of the cranial nerves which is responsible for 75% or our ‘rest and restore’ nervous system response – the vagus nerve. When it is stimulated it sends chemical signals that reduce heart rate, blood pressure, and inhibits the stress hormones adrenaline and cortisol. Practising yoga improves vagal tone which is the body's ability to regulate through the vagus nerve. A study was done comparing the effects of yoga and cardiovascular exercise on the level of the neurotransmitter GABA, the hormone responsible for reducing anxiety. The study found that while GABA increases in both groups, there was a higher increase in the yoga group and greater improvement in mood and decreased anxiety. Yoga also increases levels of dopamine (the feel good hormone), serotonin ( the happy hormone) and endorphins (the runner's high hormone).

EXPLORING HAPPINESS FLOW IN YOUR PRACTICE
This sequence is part of a series of sequences where I look at how yoga can help regulate our moods. Each of these sequences start with the same warm up that will move all the main joints of the body – the spine, shoulders and hips. This repetition gives you ‘comfort in familiarity’ as you can practice this series, while at the same time ensuring you are warmed up and ready for the themed mini flows that follow.

The sequence has plenty of heart opening poses that are known for their uplifting quality. It also has plenty of hip opening poses to help you move with ease after you practice. As you flow through the sequence use the breath ‘inhale’ and ‘exhale’ cues to help you move fluidly and freely. You will also repeat the mini flows three times until you are moving fluidly without having to think too much. Let your body go into autopilot while you focus all your attention on your inhale and exhale. You will notice the three main standing flows have the same framework and the centre part changes. Similar to the warm up principle this will help you flow more easily and own your practice. You will finish with some simple seated poses and a backbend to round up your happiness flow.

ALIGNMENT CUES
There is no specific peak pose in this happiness flow sequence. Use the cues below to help you flow through the sequence with ease and fluidity.

Have a read of the tips below and either print out the sequence or save it onto your device:

  • Use the breath guide in the sequence to help you link breath with movement in the flow. Inhale is indicated with a ‘+’, exhale is a ‘-”.

  • In the warm up focus your attention on the area you are warming up as indicated by the sequence.

  • If there are specific poses that you would like to stay longer in, give yourself three deep breaths in those poses and pick up the next pose with the allocated inhale or exhale as indicated by the sequence.

  • For a longer practice, linger in each of the poses of the three mini flows for the first round and then move with the breath for the second and third round.

To save the images for personal use click and hold down the image until the ‘save image’ option appears; on Mac hold down ‘control’ and click the image to get the option box; on PC right click on the image to get the option box. Scroll down in the ‘option box’ and click ‘save image’.

Ruth Delahunty Yogaru

Anjaneyasana - Low Lunge

THE PSOAS MUSCLE
Anjaneyasana/Low Lunge is a lovely heart opening pose to add into your practice if you have been sitting for long periods of time and are feeling tightness in the hip flexors. When we sit we shorten the front muscles of the hips called the hip flexors or more specifically the psoas muscle. This muscle connects the upper and lower body, its job is mainly to lift the leg to walk and in movement. It is also strongly connected to the ‘fight or flight’ nervous system response as it prepares the body to fight back or take flight. When it is tight from something as simple as sitting, or repeated flexion from sports like cycling, it sends ‘fight or flight’ signals to the nervous system and causes this physical tension to become mental tension too. Lengthening out the psoas in poses like Anjaneyasana/Low Lunge helps to break this cycle and relieve this built up physical and mental tension.

Anjaneyasana/Low Lunge is also a very good pose to prepare the body for its sister pose Ashta Chandrasana/Crescent Pose. Anjaneyasana/Low Lunge is the same pose with the back knee down rather than lifted. This gives you the opportunity to explore the stretching and strengthening components of the pose without the effort of the standing and balancing.

THE BENEFITS OF ANJANEYASANA/LOW LUNGE
Anjaneyasana/Low Lunge stretches the inner groin, quad and the hip flexor of the back leg, and the glute of the front leg; and the strengthens the spine, shoulders, hip flexor and quads of the front leg; and glutes and hamstrings of the back leg. You may feel a slight stretch in the hamstring of the front leg but as the leg is bent it will mainly be the glutes stretching. Similar to Ashta Chandrasana/Crescent Moon it also builds focus, heat, stamina, strength, increases circulation, metabolism, improves posture, spinal health and coordination. There are two ways to approach Anjaneyasana/Low Lunge. The first approach, and my preferred option, stretches the front hip area of the back leg by keeping the pelvis stacked, squeezing the buttocks muscle and concentrating on lifting the pointy hip bones up. The second approach stretches the inner groin of the back leg by bending the front knee beyond the front ankle and dipping the pelvis down. In this version it is important to lengthen through the spine and ensure you distribute the backbend equally to avoid overarching into the lower back. Regardless of which version you take, it is important to support the descent of the hips with the muscles of the hips. Allowing gravity to take over in this extended position can compromise the connective tissue of the tendons at the top of the muscles. You can support your hip muscles by pressing your front foot into the ground and scissoring it back towards your back knee, you hug your outer hips to the midline and zip the seam of your core up from your public bone to your sternum.

EXPLORING ANJANEYASANA/LOW LUNGE IN YOUR PRACTICE
This sequence starts by building a blueprint for Anjaneyasana/Low Lunge with a warm up that opens the front of the hips and strengthens the spine with some poses where we hold the back leg. Adding some extended arms to the poses too to build shoulder strength. When you reach your first Anjaneyasana/Low Lunge, pause here before you start into the three mini flows, and try out the two different options of the peak pose as described above and notice where you feel a stretch and what you feel strengthening in each. At the end of each standing flow you have an opportunity to take the peak pose and pause for a few breaths, notice do you feel more at ease in the pose as you progress through the practice.

ALIGNMENT CUES
Remember to use the supportive muscles of the hips throughout this sequence to contain your Anjaneyasana/Low Lunge for strong connective tissue and muscles with longevity.

Have a read of the tips below and either print out the sequence or save it onto your device:

  • From Adho Mukha Svanasana, inhale, step your right foot forward just inside your right hand, lower your left knee to the ground, back leg firm.

  • Hug your outer hips to the midline, gently bend your front knee and lower your hips towards the ground, exhale here.

  • Inhale, reach your arm up high shoulder width apart or palms together.

  • Draw your navel towards your spine, broaden through the collarbones, lengthen through your spine to the tip of your crown, gaze forward or to your fingertips.

To save the images for personal use click and hold down the image until the ‘save image’ option appears; on Mac hold down ‘control’ and click the image to get the option box; on PC right click on the image to get the option box. Scroll down in the ‘option box’ and click ‘save image’.

Ruth Delahunty Yogaru