THE PILLAR
Bringing our attention to the spine in our practice is one of the many ways we can see how the practice positively affects our life beyond the mat. The spine sits in the centre of our body and forms the midline. This pillar holds us up against gravity, houses the spinal cord and is at the core of all movement. Our limbs and the pelvis move in a harmonious dance with the oscillation of the spine that facilitates seamless and smooth movement.
The thoracic spine (referred to as one of our primary curves) was the first curve to appear in evolution as we moved towards becoming land creatures. It is also the first curve to form prenatally, with the cervical spine (referred to as one of our secondary curves) only starting to form as the baby begins to feed and to hold their head up within a few months of birth. The lumbar spine was the last to appear in evolution to allow us to stand upright and find our centre of gravity. We start to develop our lumbar spine when we begin to walk as a toddler at 12 to 18 months.
THE STRUCTURE OF THE SPINE
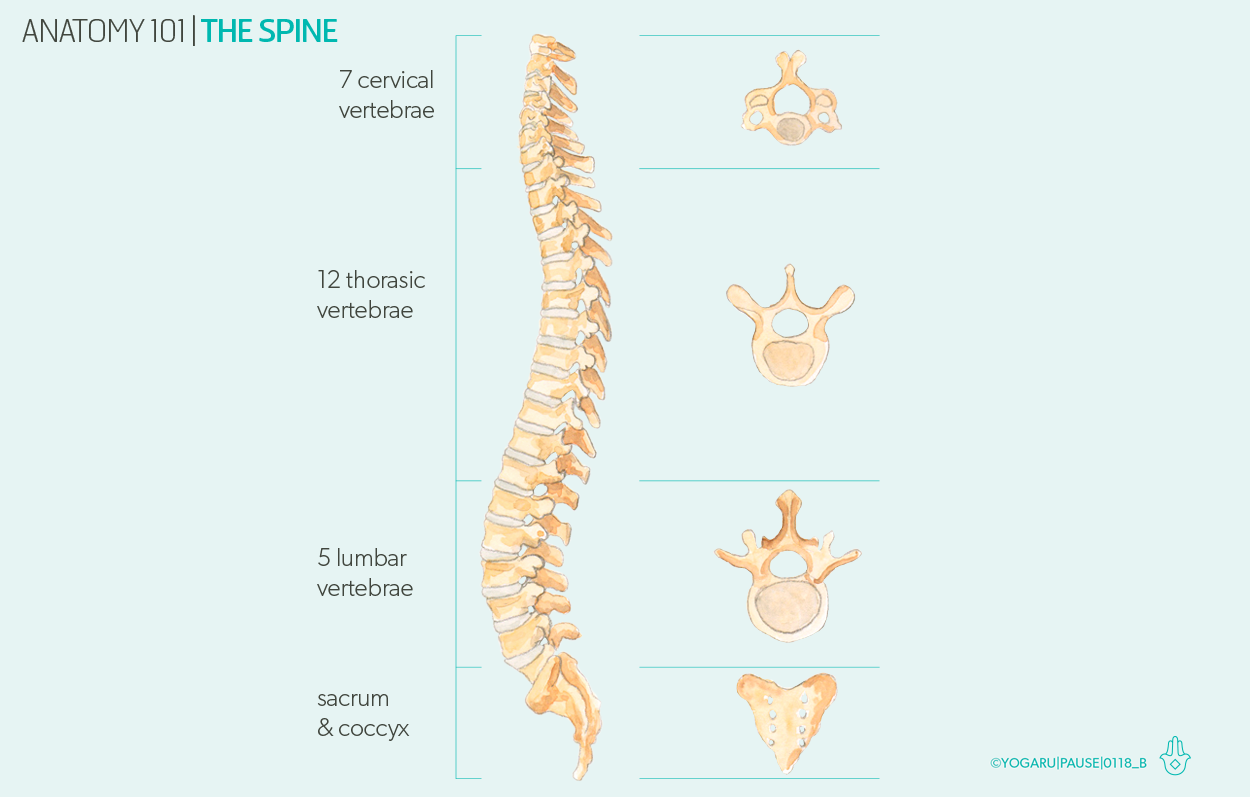
The spine is made up of 24 vertebrae and the sacrum (5 fused bones):
7 cervical vertebrae (neck) – smallest vertebrae, good rotation, flexion, extension & lateral bend.
12 thoracic vertebrae (upper back) – each attached to a pair of ribs, good rotation & lateral bend, limited flexion & extension.
5 lumbar vertebrae (lower back) – largest vertebrae, limited rotation & lateral bend, good flexion & extension.
The bone structure of the spine is complicated and fascinating. Similar to the pelvis it is a hard structure to visualise simply from a picture. The size of each vertebrae gets incrementally larger as you travel down the spine to assist in weight bearing. Although unique in shape and size, each vertebrae has a main round body at the front of the spine and three protrusions – two on the sides (transverse process) and one on the back (spinous process) of the spine. The protrusions form a circle called a foramen which contain and protect the spinal cord. As illustrated above each group of vertebrae have a different version of this formation. The body of the vertebrae mainly deals with the forces of gravity and the protruding arms deal with controlling levels of movement – both working together to protect the spinal cord and the central nervous system. In yoga forward bends bring the round body of the vertebra closer together and backbends bring the arms of the protrusions closer together. Each vertebrae is separated with a cartilage, jelly filled, shock absorption disc. If these discs rupture the protein rich jelly can leak out and cause intense pain to the surrounding tissue. Long ligaments run the length of the spine to support the discs in their position and help prevent them from bulging and rupturing. It is important to maintain these ligaments and assisting muscles to allow them to continue to do their important job for the long term health of the spine. The curves of the spine play a role in shock absorption too. If the spine was a simple column with no curves eventually gravity would compress it down. The curves work as a spring to protect the spine against the forces of gravity as we walk and run. The spine is held together with a suspension system of muscles like a web – each one reliant on the other to perform appropriately to ensure there is perfect balance in the formation and function of the spinal column. Habitual patterns can easily throw this balance and can cause postural issues and spinal conditions.
THE MOVEMENTS OF THE SPINE
Flexion – where the spine bends forward.
Extension – where the spine bends back.
Rotation – where the spine twists to either the right or left side.
Lateral flexion – where the spine bends to either the right or left side.

THE MUSCLES OF THE SPINE
For those of you who love to go deeper into the actions of the spine I have also listed the movements of the spine with their assisting muscles in the chart below. I have also added the three main stabilising muscles of the spine. Grouping the muscles to the action rather than looking at each muscle in isolation gives a better understanding of how the spine works.

EXPLORING THE SPINE IN YOUR PRACTICE
To help you find your primary and secondary curves come into Savasana. The primary curves (thoracic & sacrum) rest on the ground, and the secondary curves (cervical & lumbar) are lifted off the ground. In spinal flexion/forward bends we increase the primary curves and in spinal extension/backbends we increase the secondary curves. Taking two simple poses like cat & cow we can see the spine in action. Notice what each curve is doing – in spinal flexion of cat the curve of the thoracic spine (primary) is deepening and the curve of the lumbar spine (secondary) is flattening; in spinal extension of cow pose the curve of the thoracic spine (primary) is flattening and and curve of the lumbar spine (lumbar) is deepening.

ALIGNMENT CUES
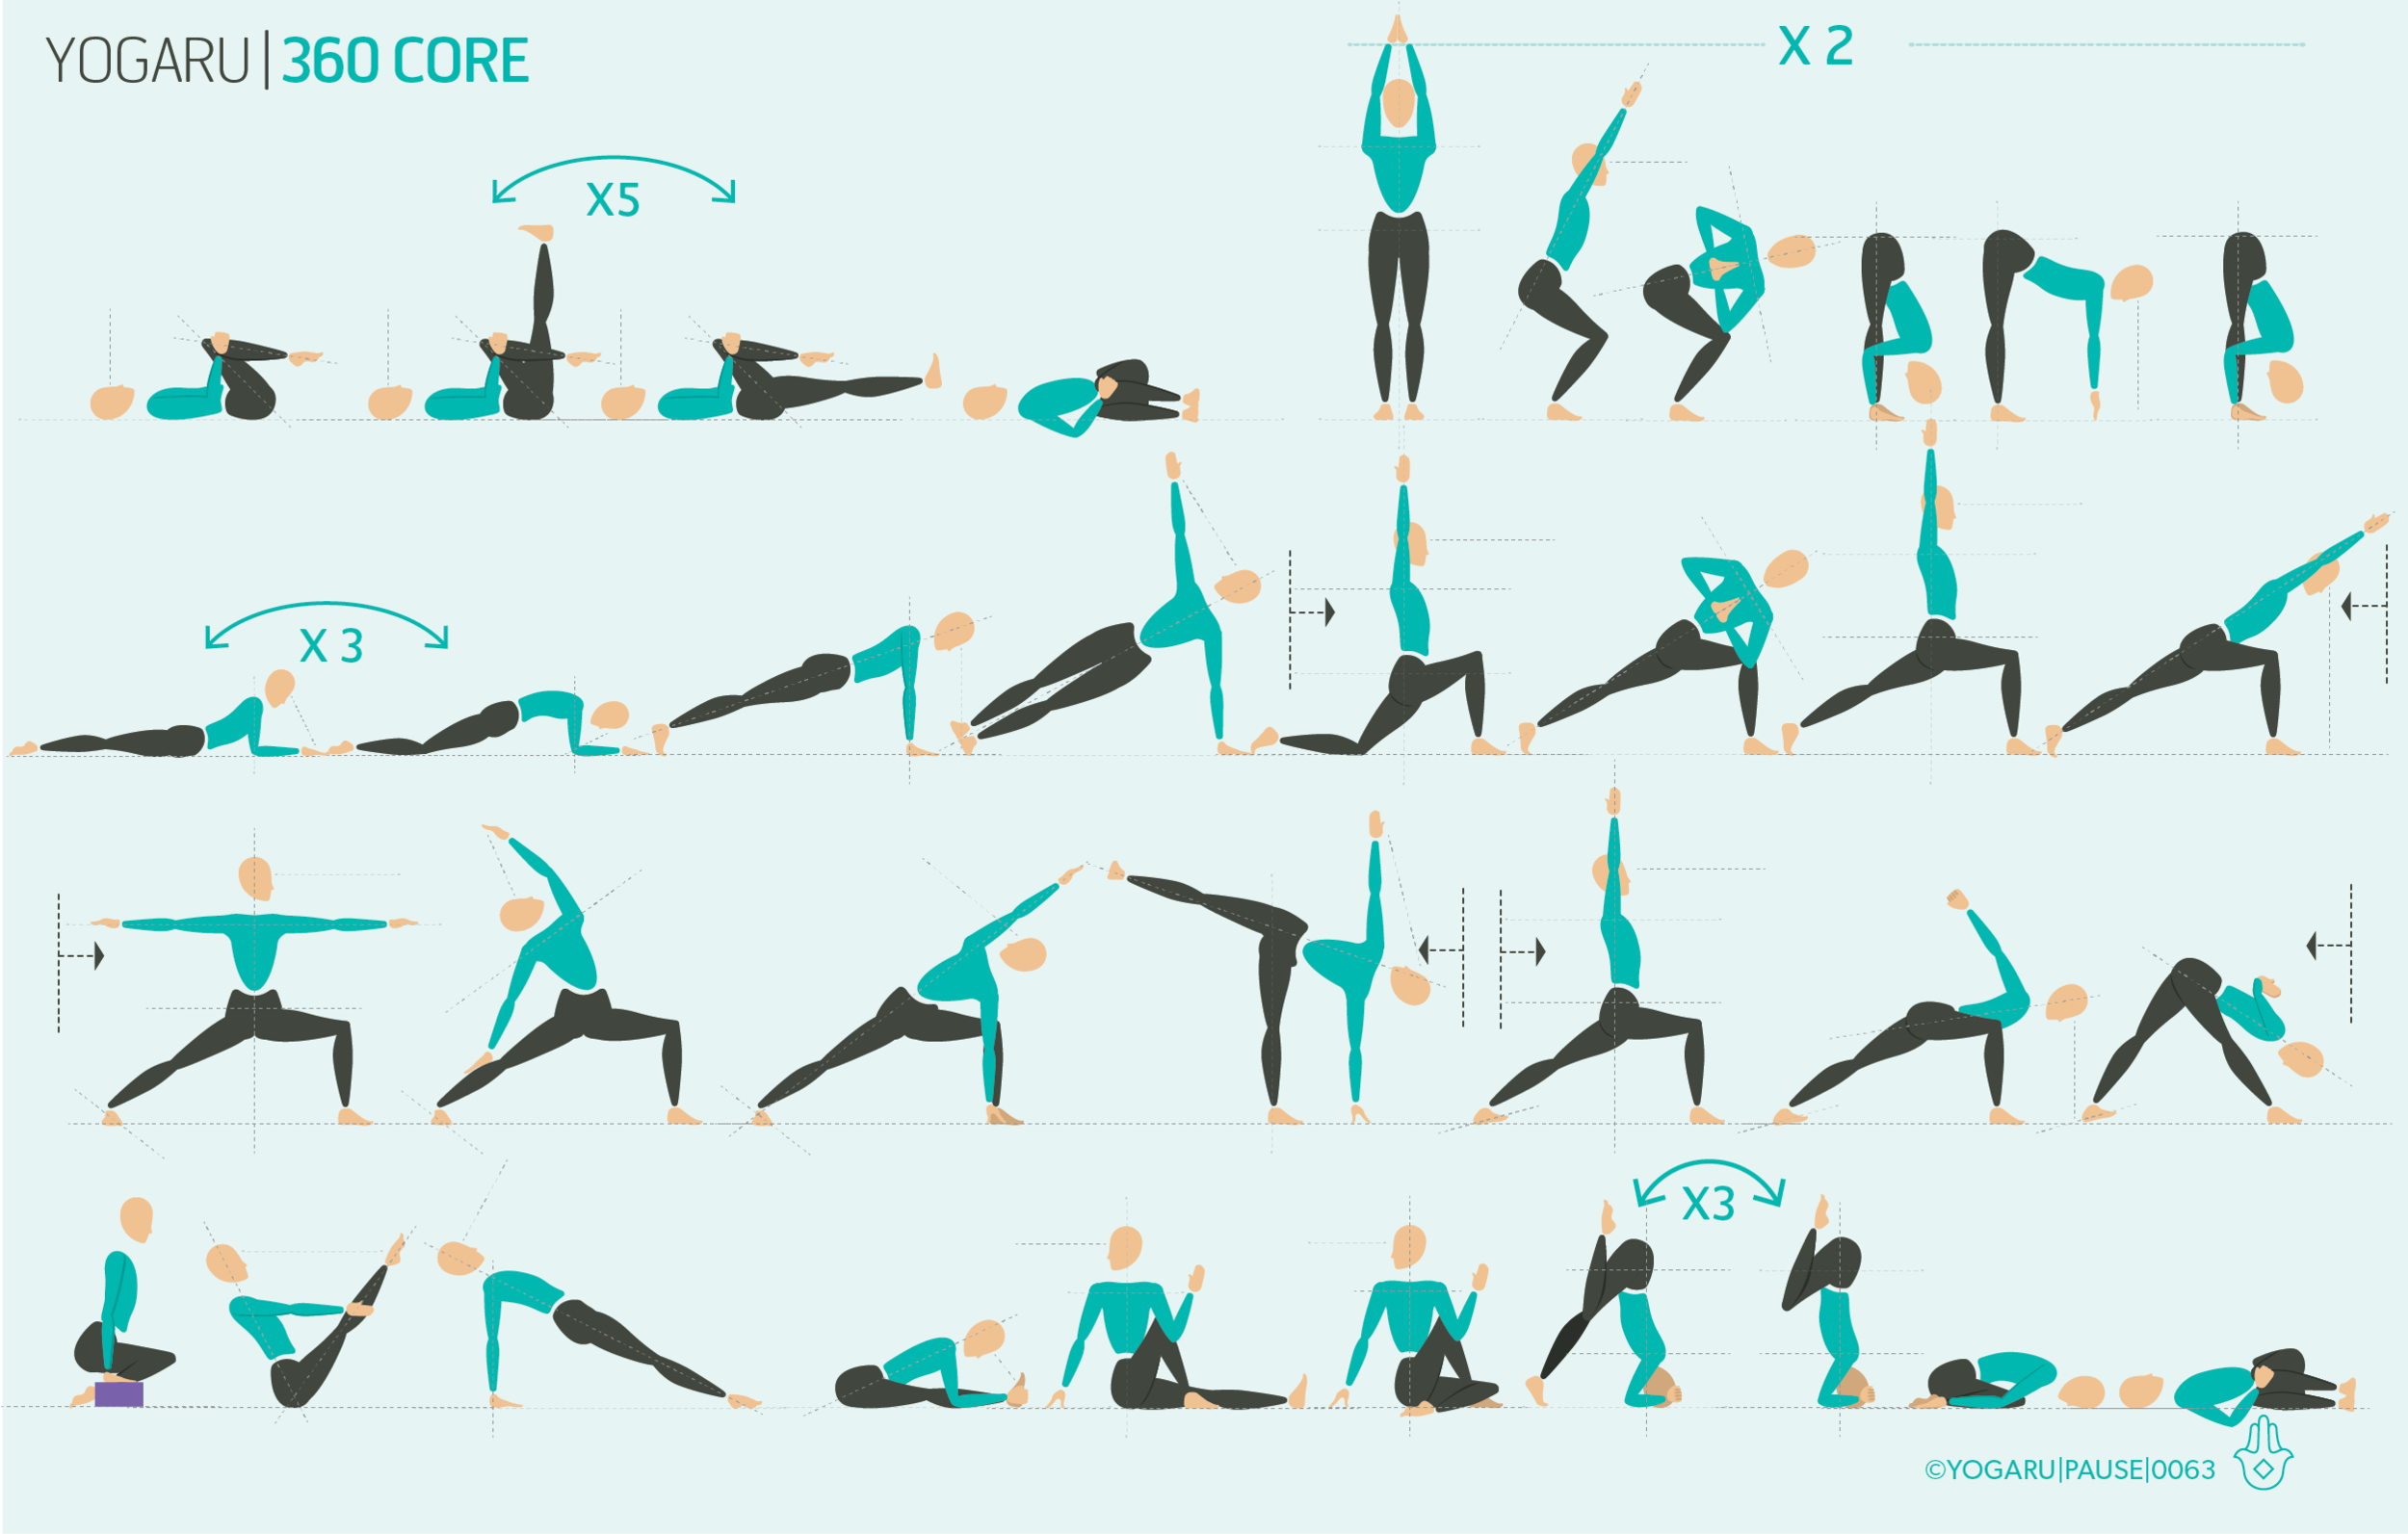
This simple sequence will bring you through the five movements of the spine – lateral (side bends), rotation (twists), extension (backbends), flexion (forward bends) and axial extension (vertical extension). As you move through the sequence bring your full attention to the position of your spine from your tailbone to the tip of your crown. Notice what the primary and secondary curves are doing in each pose. The sequence is numbered to highlight sample poses from each movement of the spine to give you a better understanding of the role of the spine in the pose. The first four seated poses bring you into gentle spinal extension, flexion, rotation and axial extension. Cat & cow are also two invaluable poses to link with the movement of the spine and warm up the supporting muscles, and are excellent poses to add at the start of any sequence. Below are a few alignment cues in each of the five spinal movements:
1 – Flexion
Flexion into forward bends can be the most challenging family of poses for most people. The action of a forward bend must come from the pelvic tilting forward first before we flex the spine forward or it will place an imbalanced load into the most vulnerable part of the spine between the last thoracic vertebrae and the first lumbar vertebrae. To round the spine or not round the spine is a personal preference in forward bends. For the purpose of this sequence I would suggest you gently allow the spine to round forward after you have found your pelvic tilt to feel the action of spinal flexion that we are looking for.
2 – Extension
The breath plays a major role in extension into backbends. We use the expansion and contraction of the breath to help us find our backbend. When we are backbending prone from our front (Salabhasana/Locust, Bhujangasana/Cobra, Urdhva Mukha Svanasana/Upward Facing Dog) we inhale into the pose. When we are backbending supine from our back (Camatkarasana/Wild Thing, Setu Bandha Sarvangasana/Bridge, Urdhva Dhanurasana/Wheel) we exhale into the pose.
3 – Rotation
As we have seen above the spine is not a simple straight column from a side view. The curves make twisting a little more complicated than the idea of a spiral staircase which is an image often used to help you visualise your twisted spine. Each section of the spine has its own unique range of twisting movement – with the cervical spine having the most and surprisingly the lumbar spine having the least. Twists are good prep and counterposes for backbends. When twisting ensure you are equally grounded on both sides so the hips can stay stable and allow the twist to come from the spine alone. Take you twist in the trunk of your body first before you include the neck to avoid over twisting into this more mobile part of the spine.
4 – Lateral flexion
For most, lateral bends are a more accessible stretch than a forward bend and backbend and a great way to prep the spine for these two families of poses too. In lateral bends press strongly through the foundation of the side you are reaching away from to anchor you down and facilitate a lovely stretch through the whole side body. Take a moment to find your natural spinal curves first enable the side stretch.
5 – Axial extension
Axial extension can be of benefit to some pose, for example twists, where a lengthened spine will give you added space to come into the pose. If you take a twist with the spine that is not lengthened you will reach your end range of motion, as bone hits bone, much sooner. When you find an element of axial extension first before you come into a twist you will maximise the space between the vertebrae and help you find a more satisfying twist within your anatomical limitation.
To save the images for personal use click and hold down the image until the ‘save image’ option appears; on Mac hold down ‘control’ and click the image to get the option box; on PC right click on the image to get the option box. Scroll down in the ‘option box’ and click ‘save image’.
Ruth Delahunty Yogaru