Pose breakdowns

Tadasana - Mountain

YOGARU_Tadasana_PB.png

STANDING BLUEPRINT
Tadasana/Mountain is a pose that may not look like much is going on from the outside but done with integrity it is a strong pose that is the foundation of all standing poses and helps us find the natural curves of the spine. It also gives us the building blocks for finding balance to incorporate into more challenging poses like Vrksasana/Tree; the principle of press & reach; and how to apply effort & ease into each pose. We often come into Tadasana/Mountain to link mini flows in a sequence but may not be giving it the time it deserves and the credit for how it help us re-centre so that we can continue with our practice. Consciously coming to into this basic standing position, and spending a bit more time exploring it throughout your practice, will build muscle memory for your spine to carry you more upright off the mat, and allow the curves to do their job as a mechanism for shock absorption, as we move through our day. For new teachers out there, Tadasana/Mountain is a great pose to have in the memory bank for coming back to as a means to linking your mini flows together and helping your students find the all important pause in the practice before they eagerly jump into the next pose.

ALIGNMENT CUES
Feet position in Tadasana/Mountain is a personal preference. In general the wider the feet are the easier it is to find balance. If you want to challenge your proprioception and your spatial awareness stand with your feet together, big toes touching. Feet hip distance apart, directly stacked under their hip joint, is also kinder if you have any lower back knee issues. Use Tadasana/Mountain throughout your practice to retune your spine and find symmetry left and right before you move on to your next mini flow of poses. Similar to Savasana you can use it to assimilate the practice and let the effects of the poses ripple through you.

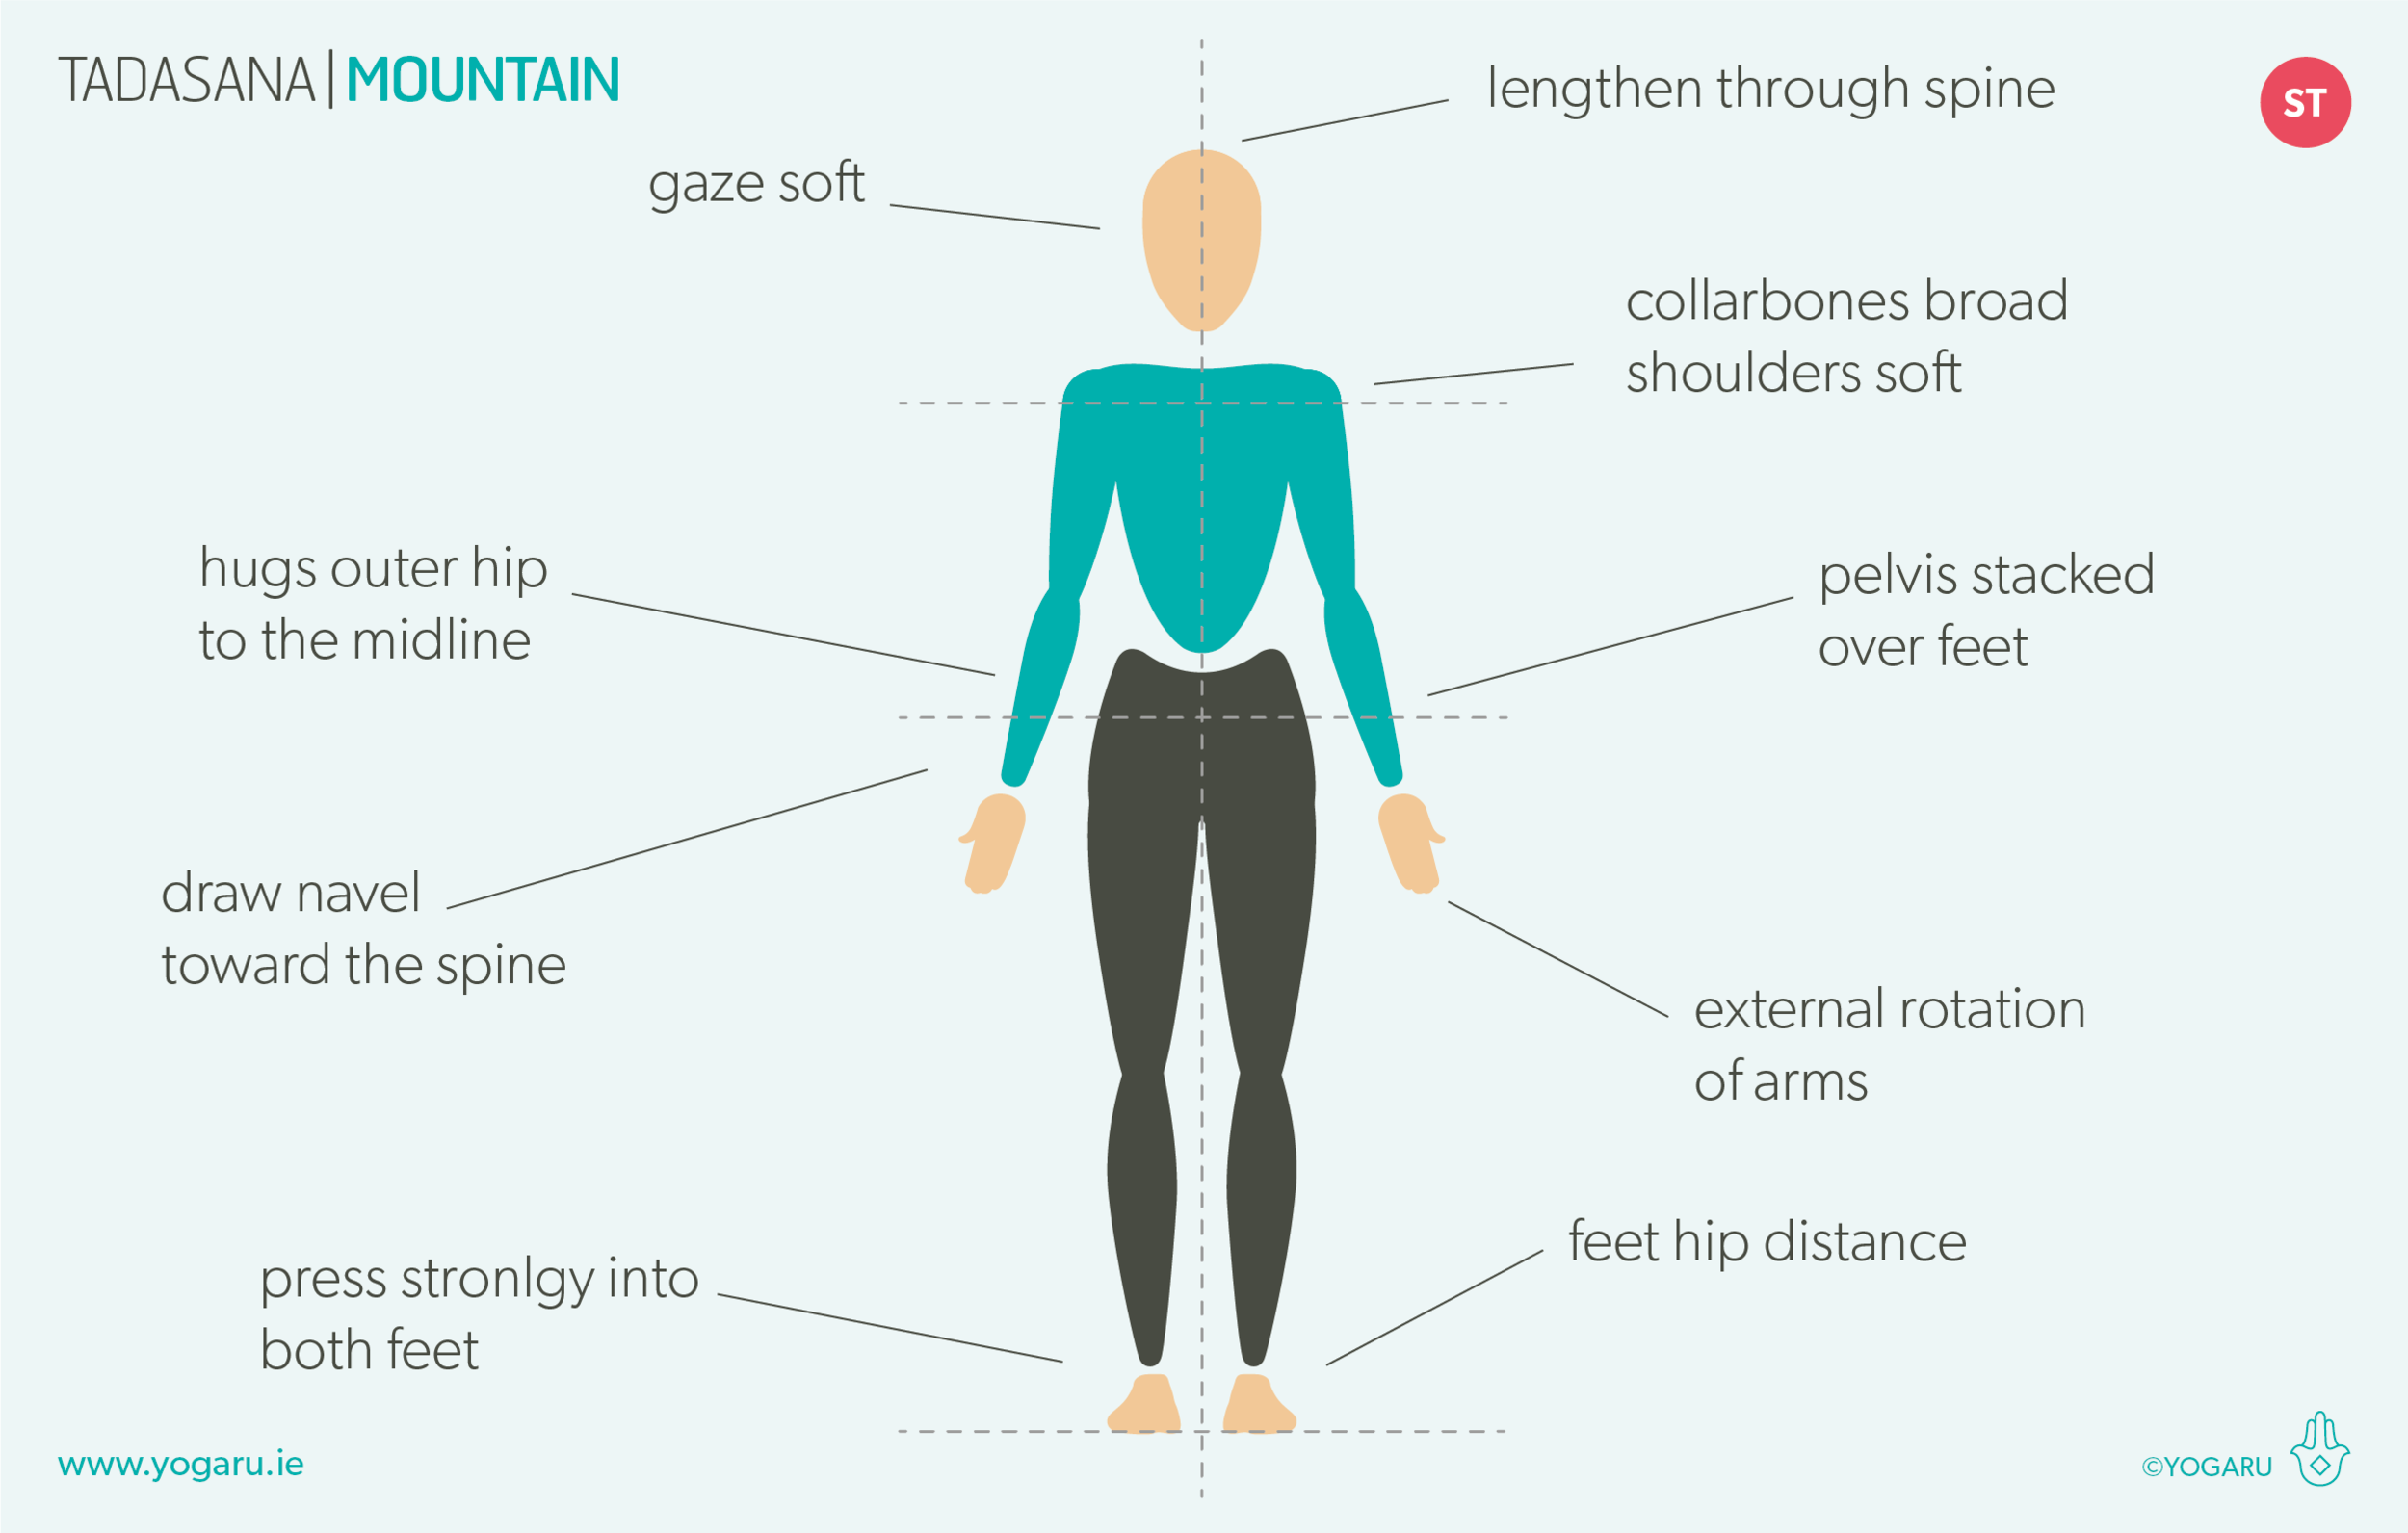
You may not think you need alignment cues for a pose that to the onlooker is essentially standing but there is lots to look for in Tadasana/Mountain:

  • Stand with your feet hip width apart or feet together.

  • Lift all ten toes up and place them down one at a time. Spread your feet like you’re trying to make the surface of contact with the ground as wide as possible.

  • Pour your weight equally into the three points of your feet - big toe mound, little toe and the centre of the heel, feel the lift of your arches and inner ankles.

  • Hug your outer hips to the midline, pelvis stacked over the foundation of your feet. Lengthen through the front, sides and back of the body. Draw your navel towards your spine.

  • Broaden through the collarbones, shoulders soften, arms hang down either side of the body, slight external rotation of the arms.

  • Lengthen through your spine to the tip of your crown, chin level with the ground, back of the neck long, gaze forward.

  • Notice the constant micro movement even within the stillness as your whole body works out how to stay upright against the force of gravity.

You can also try a slightly different version of Tadasana/Mountain from Vinyasa Krama which one of my favourite Dublin based yoga teachers Phelim May often adds into his Saturday morning class at The Yoga Room. Whenever he gently guides us into this version of Tadasana/Mountain I can’t help thinking of The Oscars, clearly I need to work a bit harder on my attention! Read the above alignment cues and add these small adjustments below:

  • Arms either side of the body, palm lightly pressing into your sides.

  • Hug your outer hips to the midline.

  • Squeeze your inner thighs together, lift up internally through the pelvic floor to your navel and draw your navel towards your spine.

  • Lift your chest up slightly and draw your shoulder blades together.

To save the images for personal use click and hold down the image until the ‘save image’ option appears; on Mac hold down ‘control’ and click the image to get the option box; on PC right click on the image to get the option box. Scroll down in the ‘option box’ and click ‘save image’.

Ruth Delahunty Yogaru

Ardha Chandrasana - Half Moon

GROUND & CENTRE
Ardha Chandrasana/Half Moon is quite the balancing act and requires strong glutes to lift the top leg and plenty of core strength to catch your balance. The trick to finding your balance is to start with a deeply bent front knee to bring your centre of gravity down while your body works out how to accommodate this seesaw arrangement you have put it in. Once your core kick in you can start to very slowly straighten out the standing leg and reach in all directions.

THE BENEFITS OF ARDHA CHANDRASANA/MOON POSE
There is nowhere to hide with this challenging pose. It builds focus and concentration and is very grounding and centering. It strengthens the core, ankles, glutes, spine and quads; and stretches the groin, hamstrings, calves and chest. It requires a lot of balancing skills and improves coordination and balance in our everyday movement. It also eases headaches, lowers blood pressure, eases back pain, relieves indigestion, constipation and menstrual cramps, and eases anxiety. Quite the selection of benefits for this simple yet strong balancing pose!

EXPLORING THE ARDHA CHANDRASANA/MOON POSE IN YOUR PRACTICE
In your full expression of your version of the pose connect with your belly button and radiate out through the standing leg into the support of the ground; through the lift leg reaching through the heel of the flexed foot; through the bottom arm, heart centre and the finger of the extended arm; and finally through your tailbone to the tip of your crown. Think of yourself as a jellyfish reaching in all directions originating from your strong core.

PAUSE_0096.png

ALIGNMENT CUES
This sequence deeply works the muscles of the glutes at the back of the hips to help you connect to these important muscles that will help you left the top leg in Ardha Chandrasana/Half Moon.

Print out the tips below, along with the sequence, and build you best version of Ardha Chandrasana/Half Moon:

  • From Utthita Trikonasana/Triangle with your right leg forward. Place your left hand on your hip and step your left foot forward a little.

  • Bend your front knee and place your right hand on a brick a foot forward to the little toe side of your right foot. Press down through the three points of your right foot and lift the inner ankle.

  • Keeping your right knee bent, Inhale, float your left leg up to hip height or slightly above, toes facing forward. When you have your balance gradually straighten your right leg.

  • Flex your left foot parallel to the ground and press out through the heel.

  • Hips and shoulders stacked, reach your left arm up high, palm facing left, gaze down or to your left fingertips.

To save the images for personal use click and hold down the image until the ‘save image’ option appears; on Mac hold down ‘control’ and click the image to get the option box; on PC right click on the image to get the option box. Scroll down in the ‘option box’ and click ‘save image’.

Ruth Delahunty Yogaru

Savasana - Corpse Pose

YOGARU_Savasana_PB.png

THE POSE OF INTEGRATION
Savasana/Corpse Pose is the ultimate pose of pratikriyasana or integrating the effects of the asana. Throughout the practice we use counter poses to neutralise tension caused by the more challenging poses. Savasana/Corpse Pose is a counter pose for the complete practice. It is considered one of the hardest poses in yoga. The mind likes to stay busy and doesn’t take kindly to being asked to quieten. But without Savasana/Corpse Pose you have lost the gentle reintegration to everyday life and the ability to bring the benefits of the practice with you. It triggers the rest, digest and restore nervous system response. Savasana/Corpse Pose is the most important pose for assimilating all the work you have done on your mat.

ALIGNMENT CUES
General rule of thumb is take 10 minutes of Savasana/Corpse Pose for every hour of practice, or longer if you have the time or need extra space to reap the medicinal benefits of your practice. Consider using props if they help you release into your most comfortable Savasana/Corpse Pose. Placing a bolster under your knees will help with any hip tension and will support the lower back if you have back issues. Covering yourself with a blanket will keep you cosy and comfortable as you cool down, and tell your nervous system you are safe and secure.

Print out the tips below and use them to help you find comfort in your Savasana/Corpse Pose:

  • Lie on your back, legs stretched out, arms slightly away from your body, palms facing up.

  • Legs slightly apart and feet fall out to the side, soften your shoulder, back of the neck long.

  • Gently close your eyes, let the body become heavy and melt into the support of the ground

  • Soften the muscles across your forehead, releasing all tension, gaze inwards.

  • Let all the muscles and bones of you body release any help tension.

  • Let the thought come and go without attachment to what you should or shouldn’t be feeling in your Savasana/Corpse Pose.

  • Melt, release, soften, relax, breath.

To save the images for personal use click and hold down the image until the ‘save image’ option appears; on Mac hold down ‘control’ and click the image to get the option box; on PC right click on the image to get the option box. Scroll down in the ‘option box’ and click ‘save image’.

Ruth Delahunty Yogaru