Slow transitions flow

JOINING THE DOTS
Whether you come to your mat once a week, everyday, or somewhere in between – we all recognise the benefits the practice of yoga brings to our lives. It might be something subtle that is hard to explain or a life changing experience. When we put time aside to practice and invest in our well-being, it’s good to feel that we’re getting the best out of our time on the mat. Yoga is a continuous flow of postures, but often we forget that the transitions from one asana to another are just as important as the asana themselves. By bringing your attention to slow and controlled transitions, we thread the asana together and help cultivate a meditative flow, which helps quieten the mind and move the attention inwards. You often see students create beautiful asana (within the ability of their bodies) but their method of moving to and from the next asana loses all sense of mindfulness and breath awareness. To get the most of your time on your mat, extend through your limbs and move with intention and awareness of where they are going next. Moving in such a way reminds us that yoga is a lifelong journey not a destination with an end point.

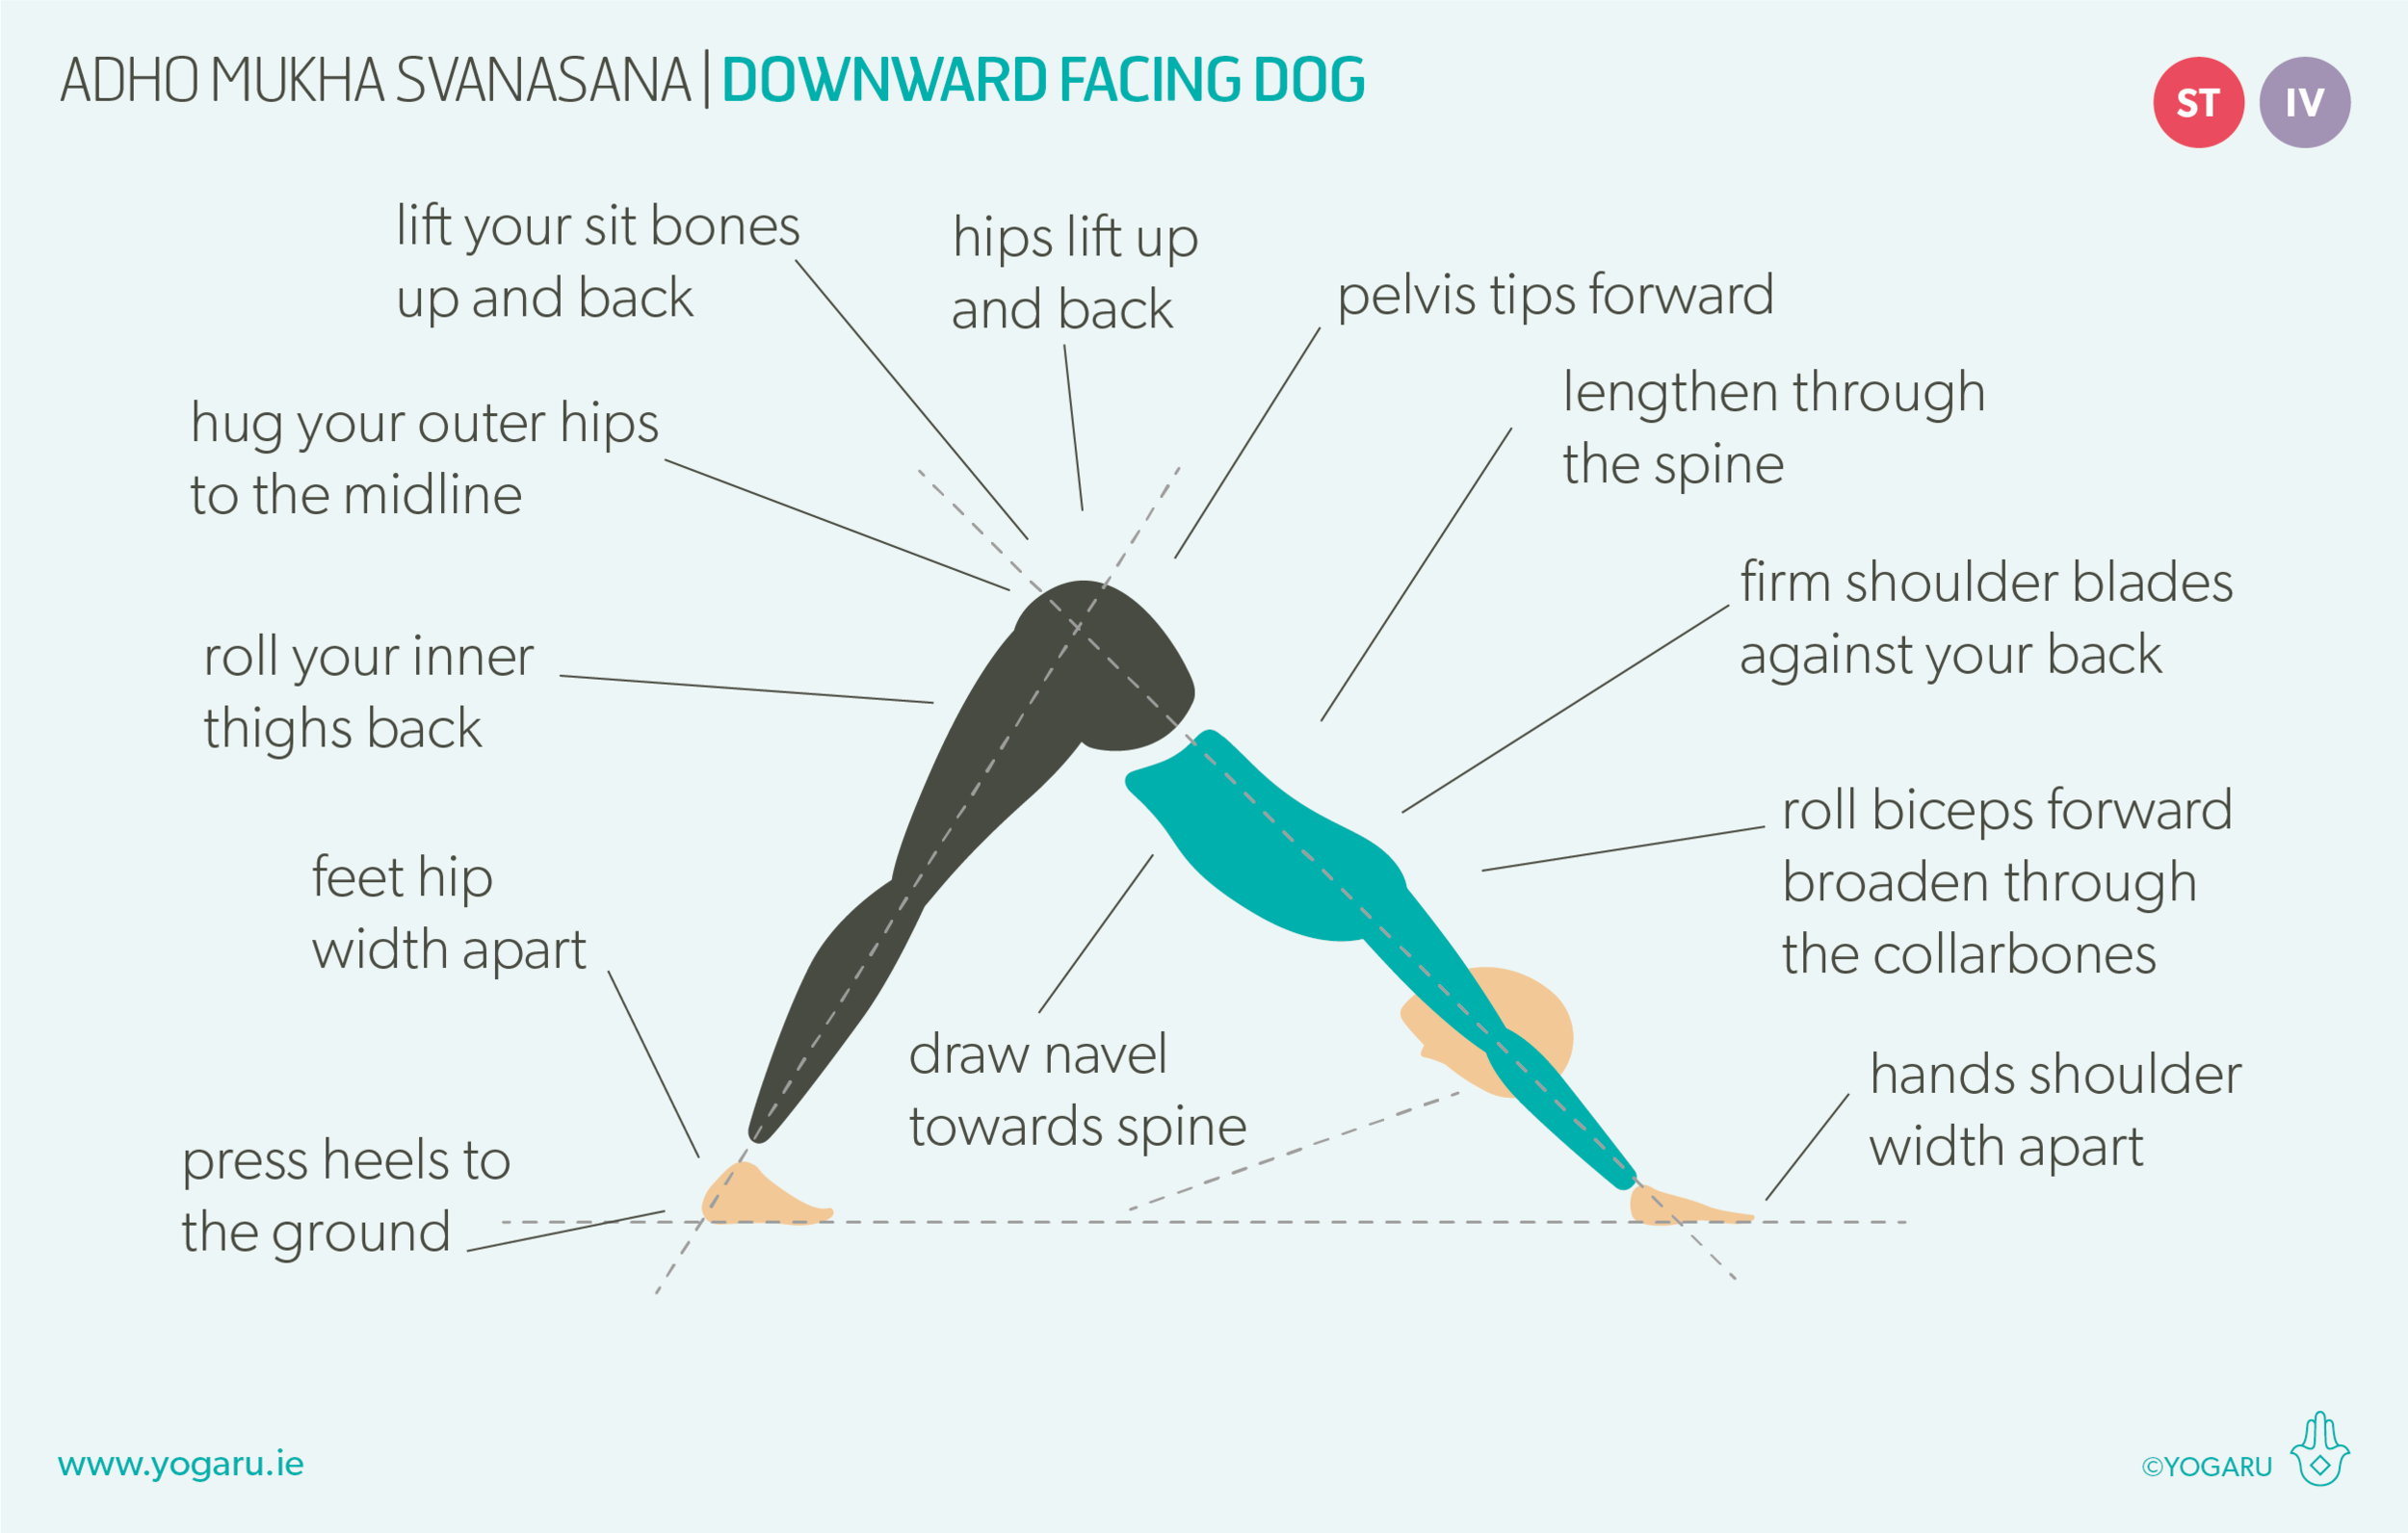
Moving slowly, in and out of the asana, is safer, builds body awareness and is more challenging for the muscles than relying purely on momentum to get you from A to B. You might also notice your alignment improves when you consider the journey – reaching to find length in the spine; extending through your fingertips; feeling the rotation in the hip joint. When we rush through our transitions we miss the in between moments and the opportunities to be ‘moved by the breath’.

PAUSE_0028_B.png

SLOW FLOW IN YOUR PRACTICE
As the pace of life speeds up around us our minds work overtime to keep up with all the overload of information. Slowing down our practice helps bring the mind to a quieter state and trigger the parasympathetic nervous system (relaxation reflex).

As someone who rushes through life, frequently taking on more tasks than hours in the day, I sometimes find it hard to consciously slow my movements down in my practice. But I’m all too aware that I’m the very type of person that should slow down the pace as much as is comfortable, to counteract my default mode. You might find some resistance in the change of pace, but the benefits both physical and mental are well worth exploring. Moving mindfully, with control, starts to peel away the layers of clutter in the mind, and gradually you start to feel a deep sense of calm and relaxation – releasing tension, stress and anxiety. A consistent practice rewires the brain to be able to access this calmer mind frame when faced with challenging moments.

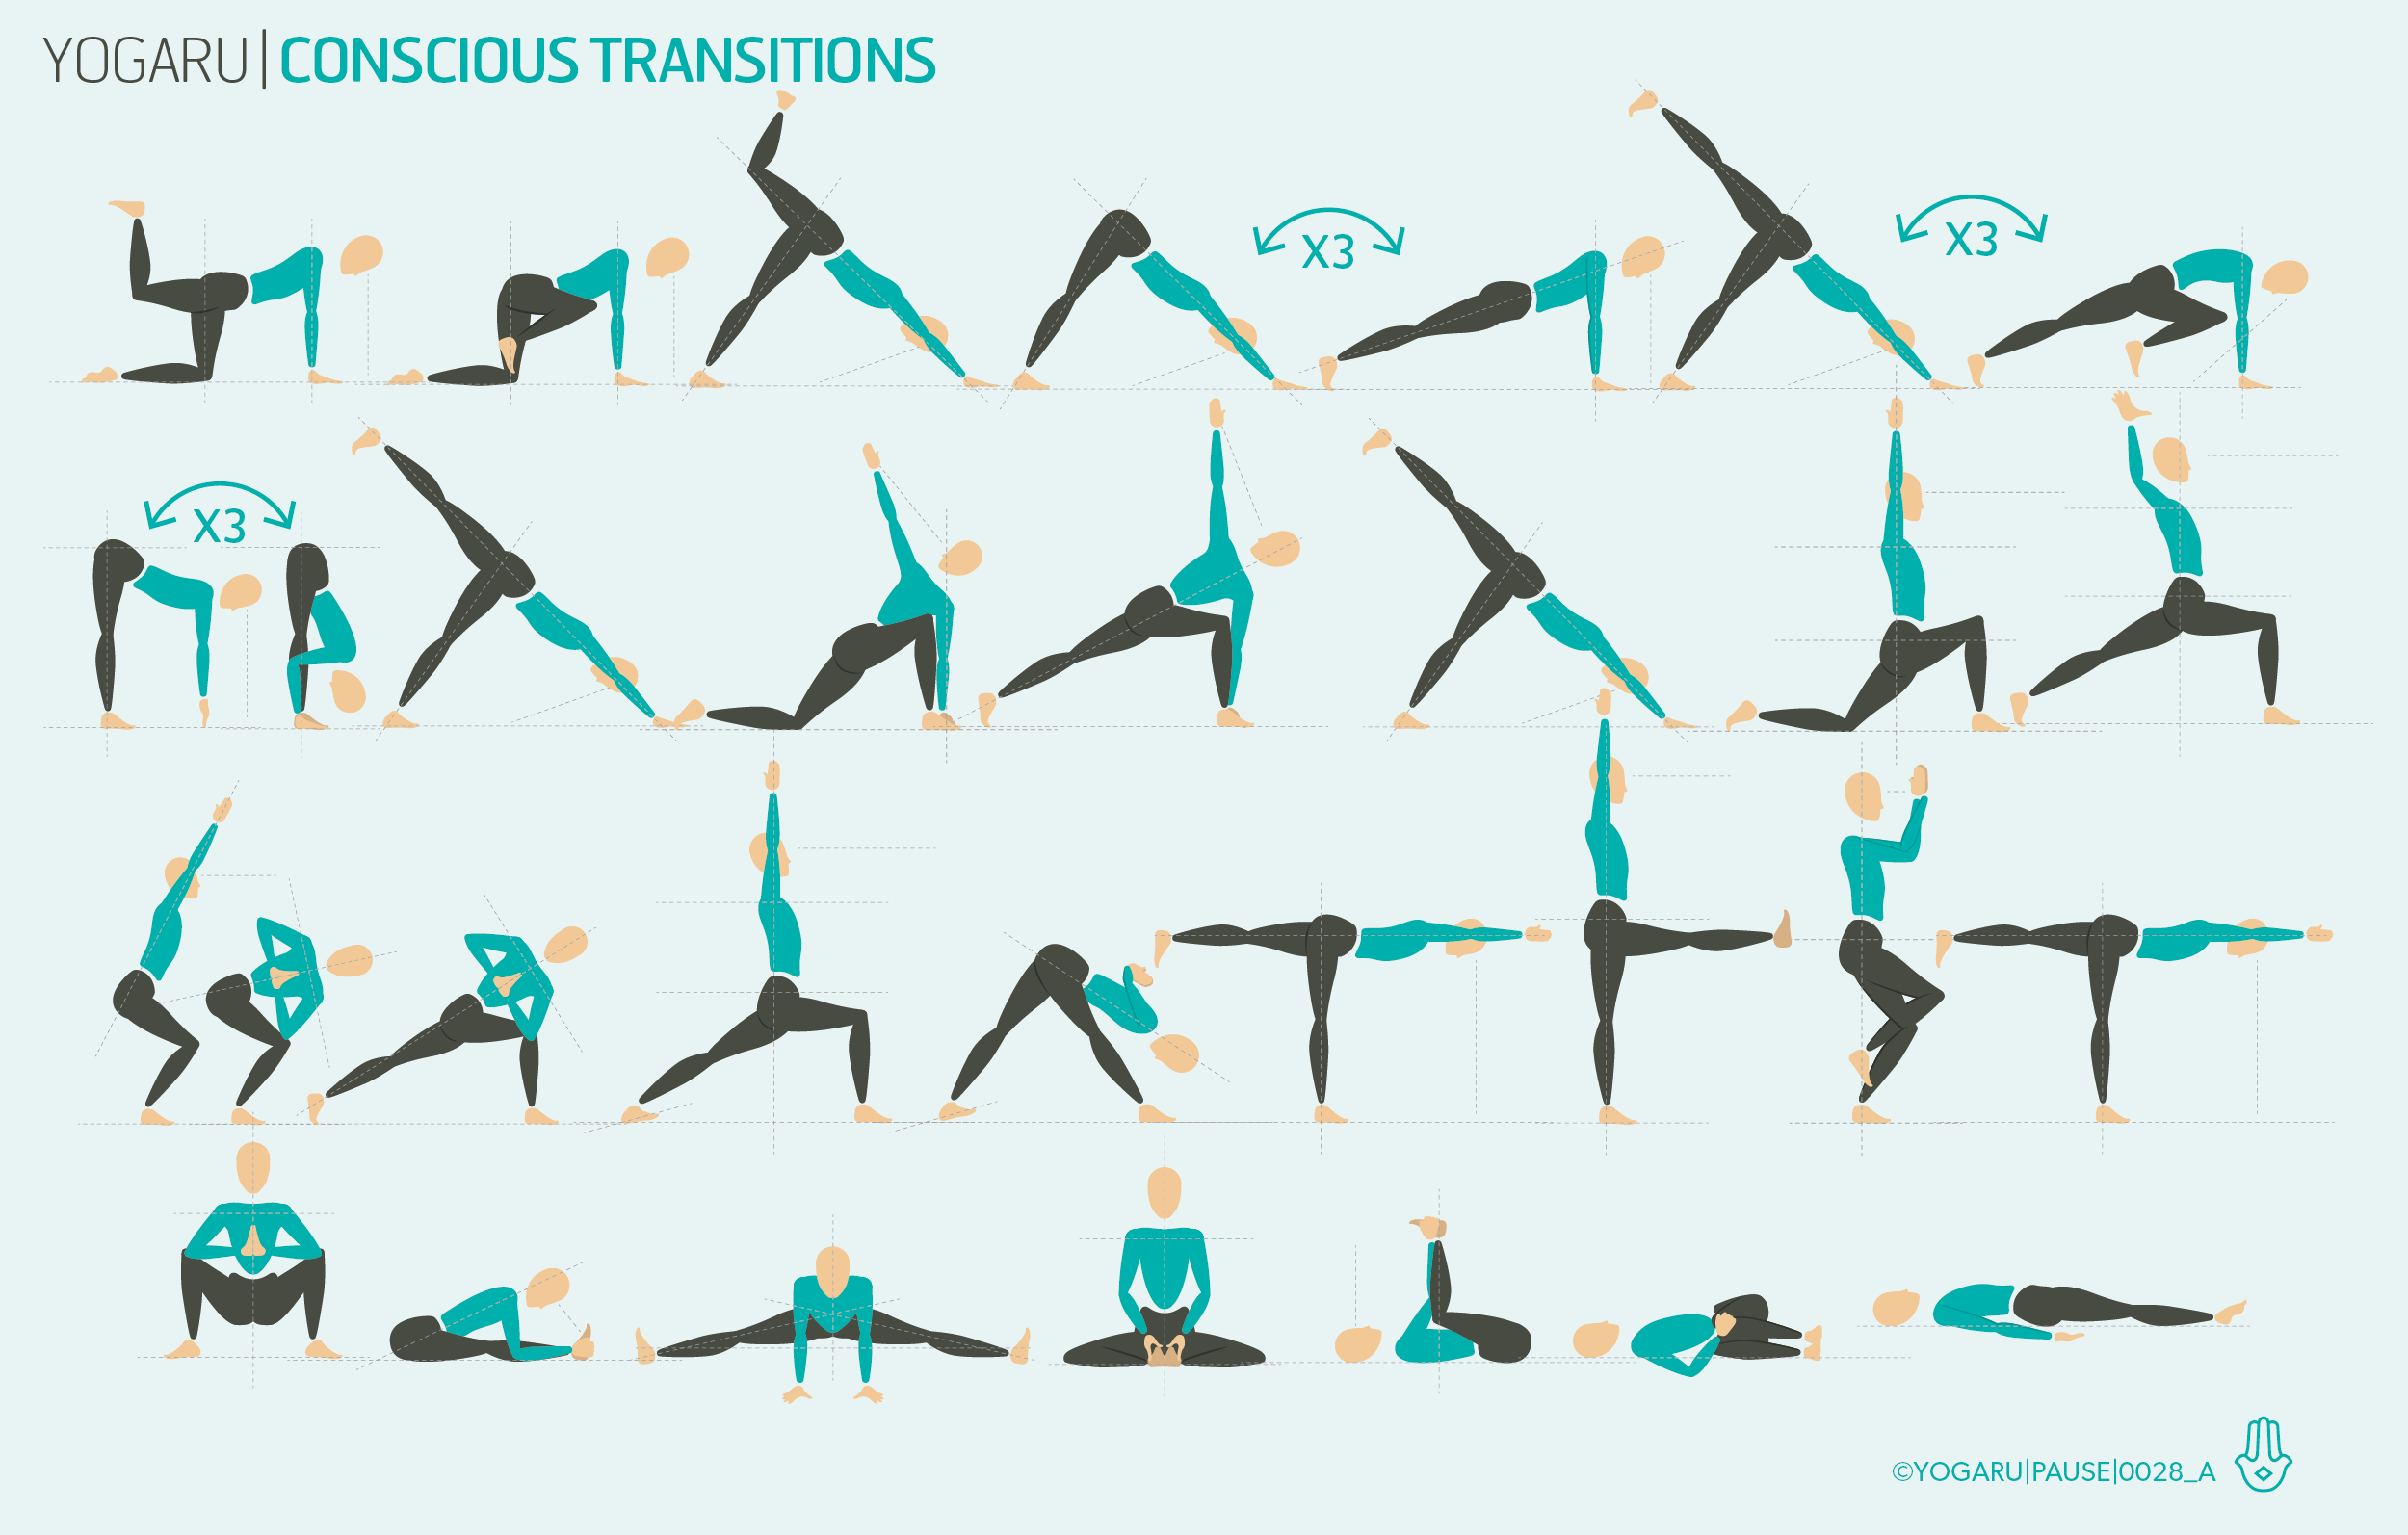
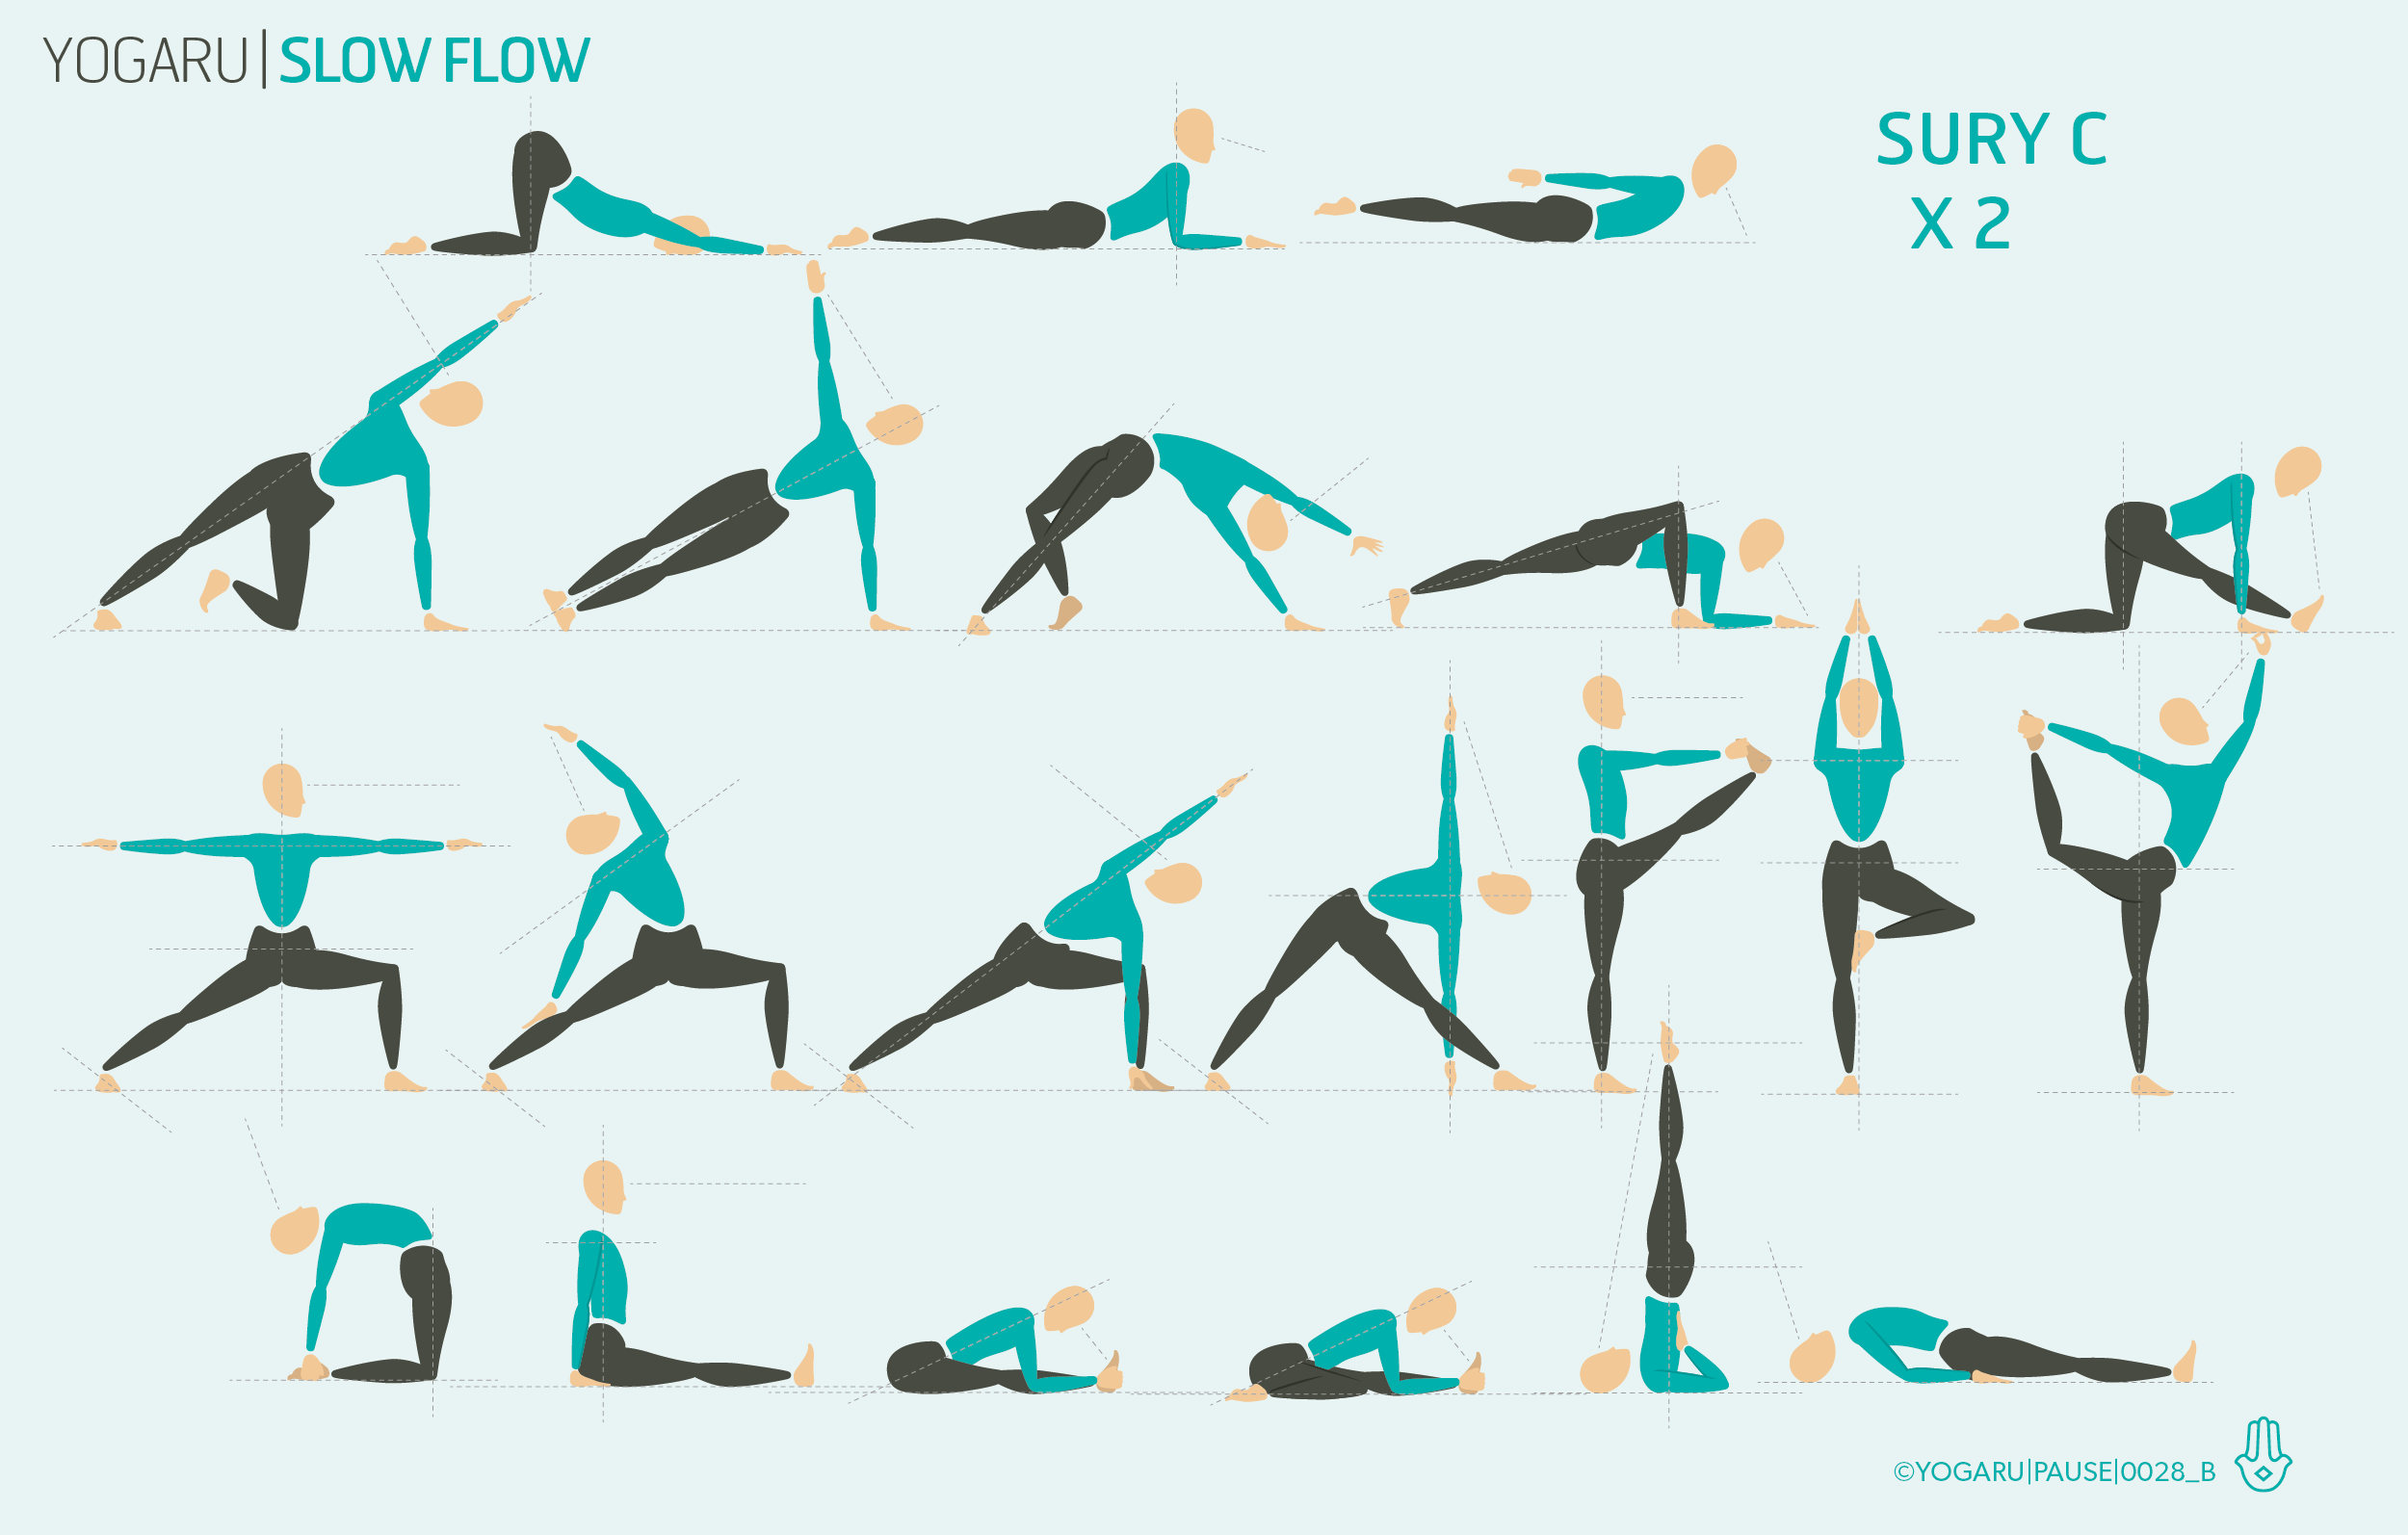
Try the two sequences above, focusing on your journey in and out of the asana. Experiment with methods of transitioning that suit your strength and ability, remembering to move with the breath rather than a held breath. Be aware of maintaining length in your limbs and minimise ‘popping up’ from asana like downward dog to your standing asana. It can sometimes help to video yourself on your phone to see how you transition. Checking to see do you have any habitual pattern in your transitions that you need to be conscious of or if you are disconnected from your external limbs.

To save the images for personal use click and hold down the image until the ‘save image’ option appears; on Mac hold down ‘control’ and click the image to get the option box; on PC right click on the image to get the option box. Scroll down in the ‘option box’ and click ‘save image’.

Ruth Delahunty Yogaru

Navel radiation

CONNECTING TO YOUR NAVEL
Navel radiation is a lovely concept created by Bonnie Bainbridge Cohen and beautifully illustrated by Donna Farhi in her book Yoga, Mind, Body & Spirit. She expanded on the method further in her yoga immersion, Origins of Alignment, which I had the honour of attending in Dublin last June. Sometimes, when we extend through our limbs they become disconnected from our body. Navel radiation explores the idea of movement rippling out from the navel to our six limbs (head, tail, arms and legs) – on an inhale, and contracting back to the navel – on an exhale. She also goes on to explain the optimum quality of the belly. It should be buoyant and elastic, rather than hard and rigid, or loose and slack.

EXPLORING NAVEL RADIATION IN YOUR PRACTICE
When you start to explore navel radiation it can help to visualise the form of a starfish, and soften your movement to reflect the simplicity of their movement.

Start by establishing your breath in the belly. It can help to lie on your back with your knees bent, feet mat distance and knees knocked together. Softly pace your hands on your belly, fingers facing down towards your pelvis. On an inhale, feel the belly expand, your hands gently part, your pelvis tilt up and you lower spine arch slightly. On an exhale, feel your belly contract, your hands join together, your pelvis tilt down and your lower spine flatten slightly.

Once you have made a connection with the breath in your navel area, start into your asana practice with some Surya Namaskara/Sun Salutations – continuing to bring your attention to the relationship between your navel and your six limbs. Observe where your movement initiates from and follow its journey and its parallel link to the breath. When your breath is calm and soft your movement follows this pattern. When your breath is held or racing the movement becomes difficult and disjointed.

Finally Donna Farhi also talks about the quality of movement within the asana. Even if we hold our asana for a few breathes there is natural oscillation of movement through the body initiated from the natural movement of the breath. Stay close to this subtle movement and continue to explore and amend your asana to find the effort and ease.

Try the sequence above, even if you only manage to find the link for one or two asana explore how it changes the quality of your practice and the relationship between breath and movement.

To save the images for personal use click and hold down the image until the ‘save image’ option appears; on Mac hold down ‘control’ and click the image to get the option box; on PC right click on the image to get the option box. Scroll down in the ‘option box’ and click ‘save image’.

Ruth Delahunty Yogaru

Adho Mukha Svanasana - Downward Facing Dog

YOGARU_Adho Mukha Svanasana_PB.png

MORE THAN MEETS THE EYE
We spend a lot of time hanging out in Adho Mukha Svanasana/Downward Facing Dog. We flow through it in our Surya Namaskara/Sun Salutations return to it when moving from one asana to another and take a few breaths in it as a recovery asana. It is a complex pose that requires both strength in the arms and legs and flexibility of your calves, hamstrings, spine and shoulders.

Adho Mukha Svanasana/Downward Facing Dog, can expose tightness in the back body. Often you will see yogis with a flattened lumbar spine (lower back) – where tight hamstring have pulled the pelvis back, and/or over rounded thoracic spine (upper back) – where tight shoulders are contracting the front of the chest.

THE BENEFITS OF DOWNWARD DOG
When attention is taken in Adho Mukha Svanasana/Downward Facing Dog, it can be a lovely asana to neutralise the spine, stretch the entire back body and take an inversion. An inversion is any asana where the heart is above the head, and Downward Dog ticks that box in a lovely gentle way.

EXPLORING DOWNWARD DOG IN YOUR PRACTICE
For your first Adho Mukha Svanasana/Downward Facing Dog keep you knees deeply bent and press strongly through the balls of your feet. This will give a bit of slack in tight calves and hamstrings, and allow you to work on tipping the pelvis forward and reaching your sit bones up. As you start to feel the muscles warm up, keeping your heel lifted, slowly straighten your legs. Working on keeping your sit bones pointing up and keeping the integrity of the lovely natural curve of your spine. To give a bit of space for tight shoulders try placing bricks under your hands and start to press your heels towards the ground. Blocks (the flatter version of bricks) can also be used to give you a surface to resist against and press your heels into – further stretching the backs of the legs.

PAUSE_0026.png

ALIGNMENT CUES
Try the above sequence and take a bit of time to explore and develop your Adho Mukha Svanasana/Downward Facing Dog. – from your first one at the start of your sequence to your last one as the body opens up and releases areas of tension.

The following are some alignment cues that you might hear in class. Print them out, along with the sequence, and play around with what makes sense to you:

  • Hands shoulder width apart, feet hip width apart, press into all five knuckles of your hands and lightly though the pads of your fingers, fingers spread.

  • Roll your biceps forward, broaden the collarbones, back of the neck long, firm your shoulder blades against your back, head in line with your ears.

  • Pelvis tips forward, lift your sit bones up, stretch your heels towards the ground, draw your hips up and back.

  • Top of the thighs pressing back, roll your inner thighs back. Hug your outer hips to the midline, gaze to the ground under your pelvis.

  • Draw your navel towards your spine to support the internal organs.

  • Look for symmetry of the whole body between right and left side joining at the midline.

To save the images for personal use click and hold down the image until the ‘save image’ option appears; on Mac hold down ‘control’ and click the image to get the option box; on PC right click on the image to get the option box. Scroll down in the ‘option box’ and click ‘save image’.

Ruth Delahunty Yogaru