A simple morning flow

PAUSE_0061.png

EARLY MORNINGS
Finally we’re starting to leave behind the colder months and see the Spring making a brave appearance with the brighter mornings. I’ve always been a morning person – I love catching a glimpse of the silent sleeping world, with the anticipation of the start of a new day. It’s definitely my favourite time of day to get on my mat and instill a bit of calm. Getting on your mat in the morning is about taking time for self care, and realigning yourself physically and mentally for the day ahead. There is a misconception that if you’re not practicing for at least an hour you’re not ‘doing it properly’. You will still get lots of benefits from a simple 10 to 15 minutes flow of some of your favourite yoga poses. You’ll find that as you get into the routine, you’ll start to naturally wake up a little bit earlier and be ready for your practice.

THERE IS BEAUTY IN SIMPLICITY
Most mornings I like to keep my practice simple, and take a few extra breaths in each pose to scan through the sensations that arise. After years of not listening I’m finally more patient with my muscles, especially my hamstrings, and give them plenty of gentle encouraging to open up. I find when I have stretched and strengthened in the morning, and have oiled up the synovial fluid in all my joints, I can sit more comfortably throughout the day with more awareness of posture, and the importance of taking breaks from sitting.

FEEL THE BENEFITS
Morning yoga stimulates the gut – waking up good digestion for the day and builds a strong immune system. A healthy happy digestive system nurtures an Ayurvedic principle of ‘ojas’ – which means vitality or glow, and is considered to be the essence of health that supports wellness. Breath awareness in yoga triggers the ‘rest, restore and digest’ nervous system. When this conscious breath is practiced as part of your daily routine it rewires your brain to naturally reach for this calmer reaction rather than a ‘flight or flight’ response. Of course there is always exceptions where a bit of fight or flight is needed, but with awareness your responses are more informed and less reactive.

EXPLORING SIMPLICITY IN YOUR PRACTICE
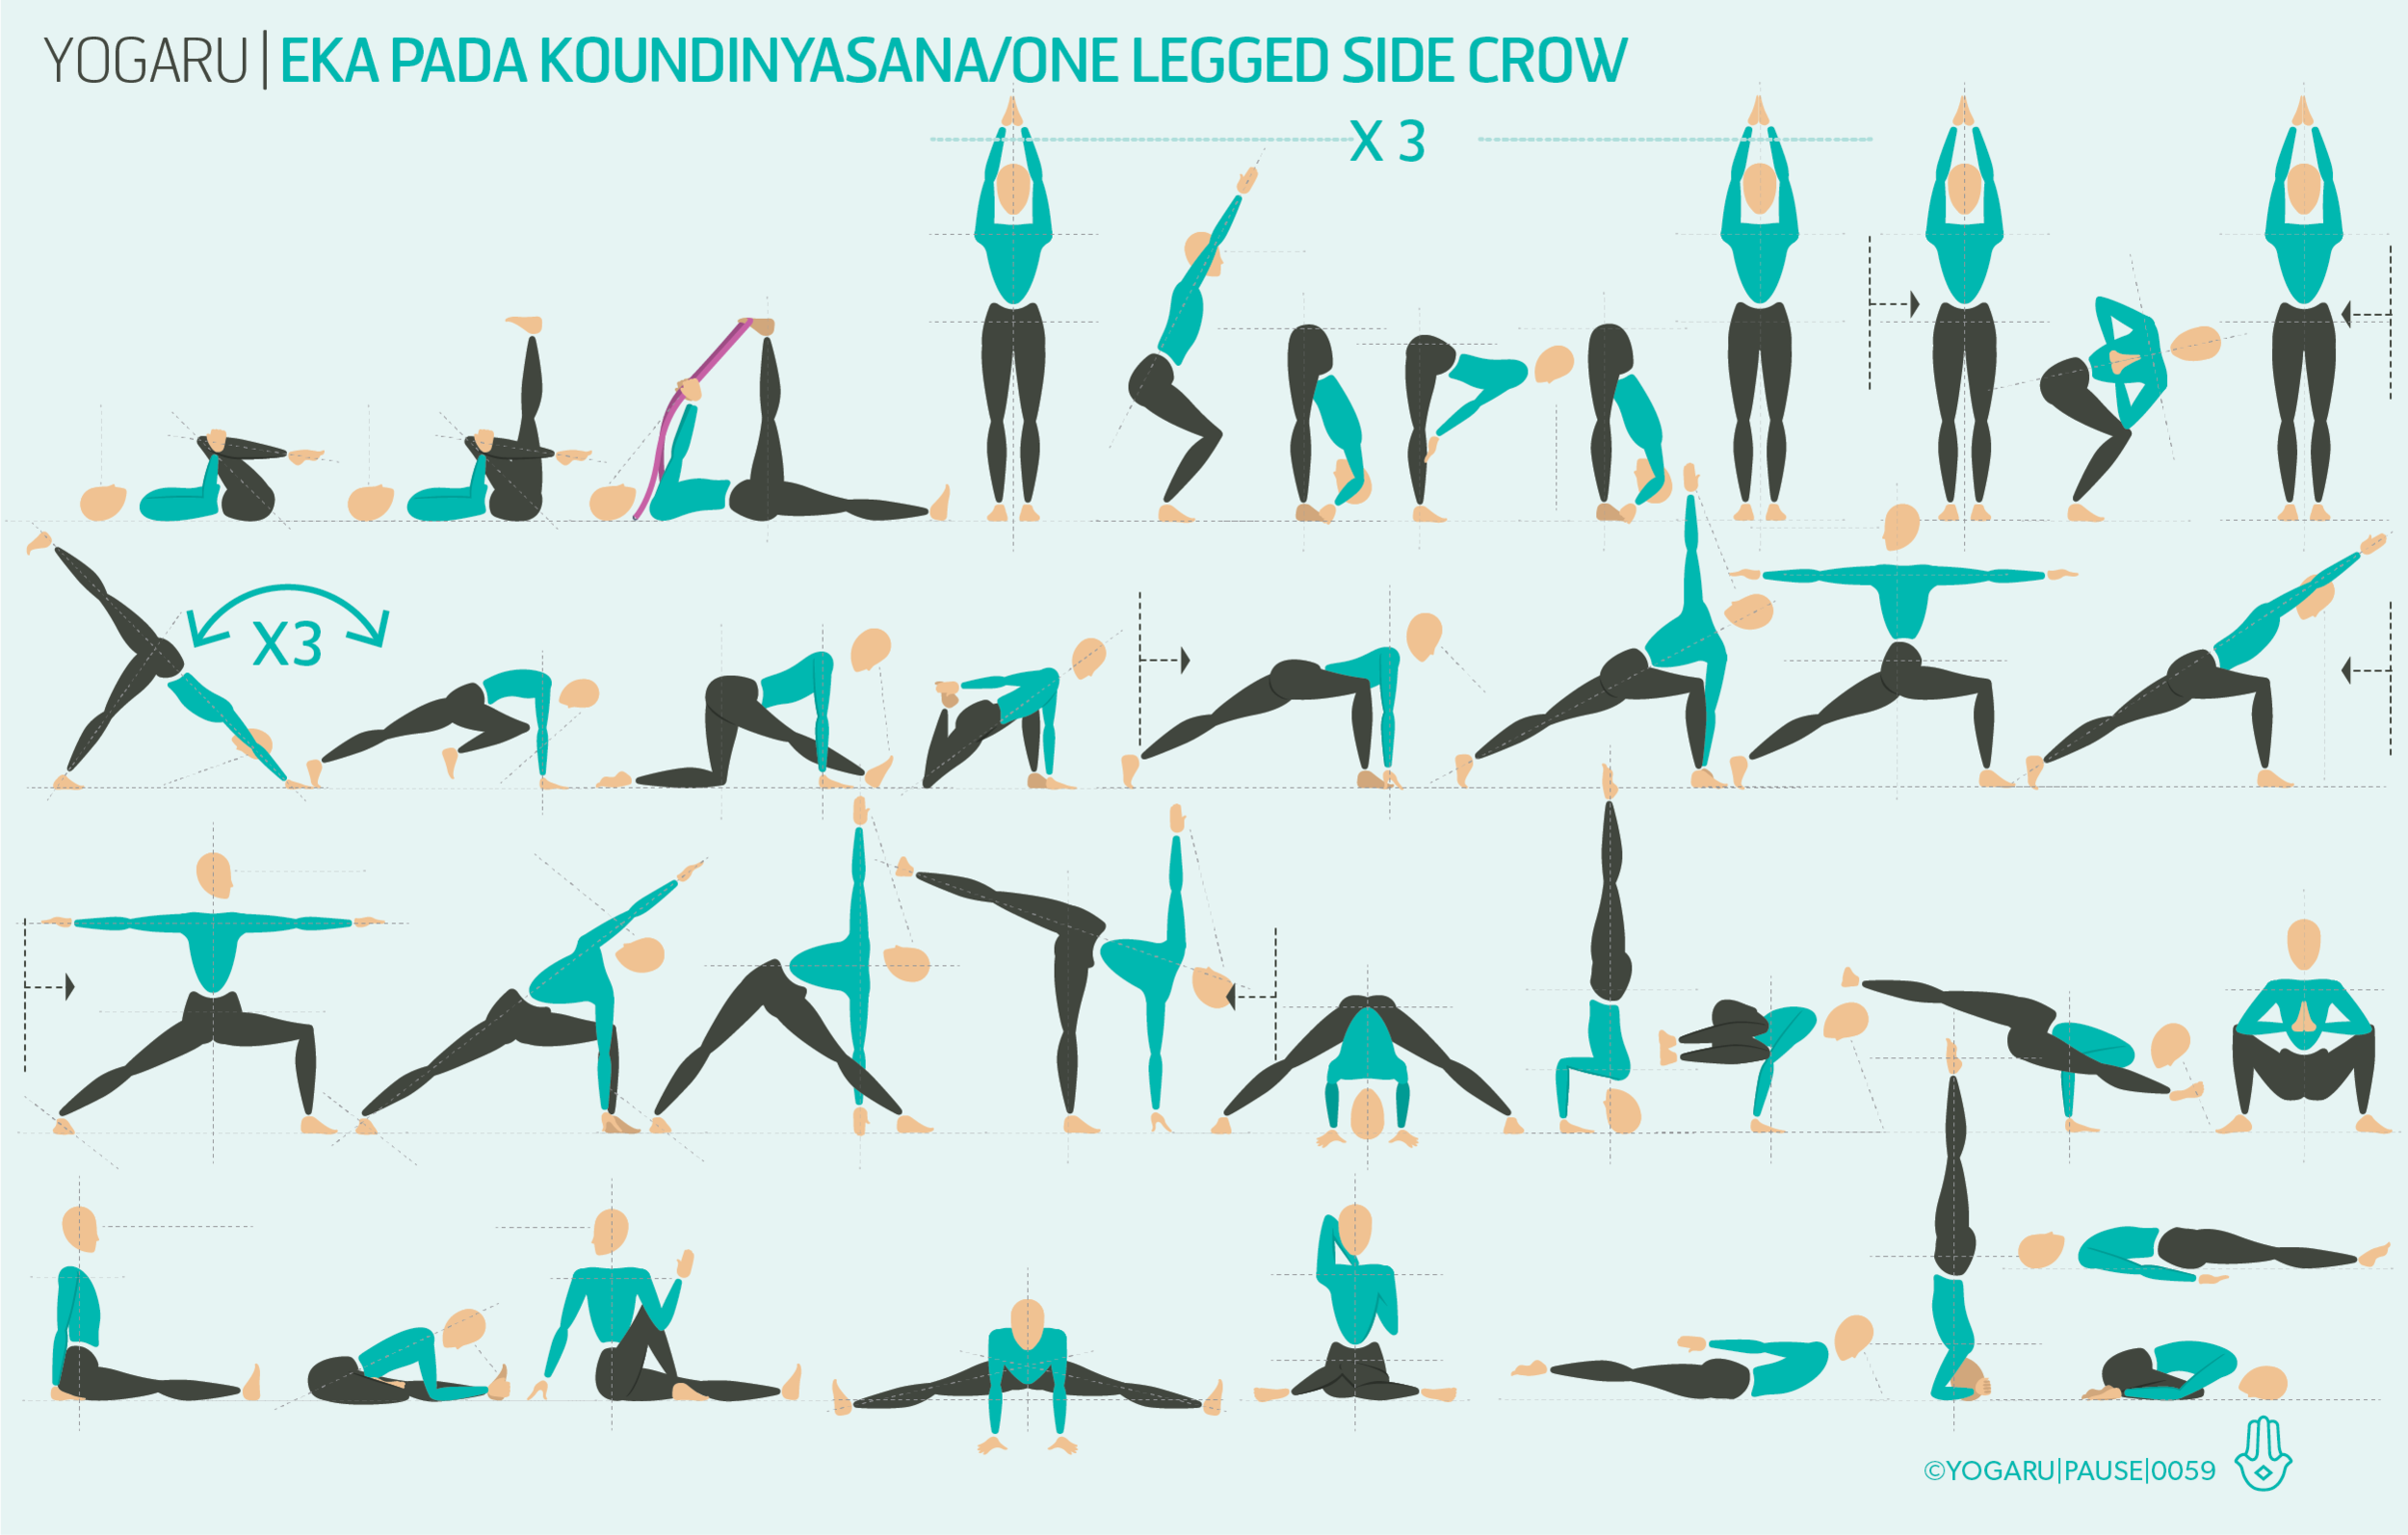
This sequence has a bit of everything that will get your day off to a great start. Move slowly through the sequence and pause to take extra breaths when you encounter tightness. You can tailor the length of your flow by picking just one of the three main standing flows, skipping the extra vinyasas which link the flows, or reducing the amount of repetitions on some of the poses. In order to feel the cumulative benefits of this sequence, and get a sense of serenity in familiarity, practice this same sequence for 2-3 weeks. If practicing everyday is daunting for you, start with aiming for a 2-3 days a week, for 10-15 mins, and let it naturally build it up from there.

ALIGNMENT CUES
The peak pose for this sequence is Virabhadrasana II/Warrior II one of the classic poses of yoga that you will likely find in most sequences. Read through these alignment cues to find your expression of Warrior II.

  • From Adho Mukha Svanasana, ground your left foot at a 45 degree angle. Inhale, step your right foot between your hands, check for front heel to back arch alignment, exhale here.

  • Inhale, press into your feet to come up, open your hips to the side of the mat, front knee bent. Left hip naturally sits forward of your right hip. Reach your arms out to shoulder height, palms facing down.

  • Stack your front knee over your front ankle, working towards your front thigh being parallel to the ground.

  • Lift your inner thighs, roll your outer left thigh down, hug your right hip in, gaze to your right fingertips.

To save the images for personal use click and hold down the image until the ‘save image’ option appears; on Mac hold down ‘control’ and click the image to get the option box; on PC right click on the image to get the option box. Scroll down in the ‘option box’ and click ‘save image’.

Ruth Delahunty Yogaru
Anatomy 101 - 360 hips

PAUSE_0060.png

THE FEEL GOOD FACTOR
Hip openers definitely have a feel good factor. They release physical and emotional tension, relieve stress and anxiety, aid digestion, and enable freer mobility to everyday activities. Incorporating hip openers into your practice releases the muscles of the hips and help you with backbends, forward bends and inversions.

HOW DO THEY WORK?
Hip openers are one of the most requested poses in a yoga class, we’re all familiar with the effect they have on us physically and mentally, but what exactly is happening in the hips to produce this effect? One of the hip flexor muscles called the psoas muscle, which connect the upper and lower body, is one of the most important muscles for mobility and is linked to the ‘fight or flight’ response. Chronically tight psoas muscles, from prolonged periods of sitting, continuously triggers the stress hormone cortisol. When there is no fight or flight required the cortisol stays in our system and becomes surplus – keeping us in a permanent state of unrest, and leaves you feeling stressed, anxious and exhausted. Hip openers release this physical hip tension, and as a result stimulates the ‘rest, restore and digest’ response. Which is why you feel a lovely freedom of movement, along with a sense of calm, after incorporating some hip openers into your yoga practice.

BALANCING MISALIGNMENTS
The hip joint is a ball and socket joint which gives us a full 360 range of motion, along with internal rotation and external rotation. With such a range of motion comes a very complicated system of muscles to facilitate mobility and stability of the joint. When there is tightness in any of these muscles it can cause back and/or hip pain – for example tight hamstrings pull on the sit bones, tilting the pelvis back and cause the lower back to loose its natural lumbar curve and compress the vertebra of the spine. The hamstrings flex the knees and so shorten in extended periods of sitting, which is one of the main cause of lower back pain.

We all have a favoured side which can cause misalignment in the pelvis and spine. Misalignments pull on the opposing muscle – this also can cause back and/or hip pain. Hip openers help realign your posture and address these imbalances. Releasing the muscles of the hips and reestablishing the curve of the lower back are particularly good for those who suffer from mild to moderate back pain.

EXPLORING HIP OPENERS IN YOUR PRACTICE
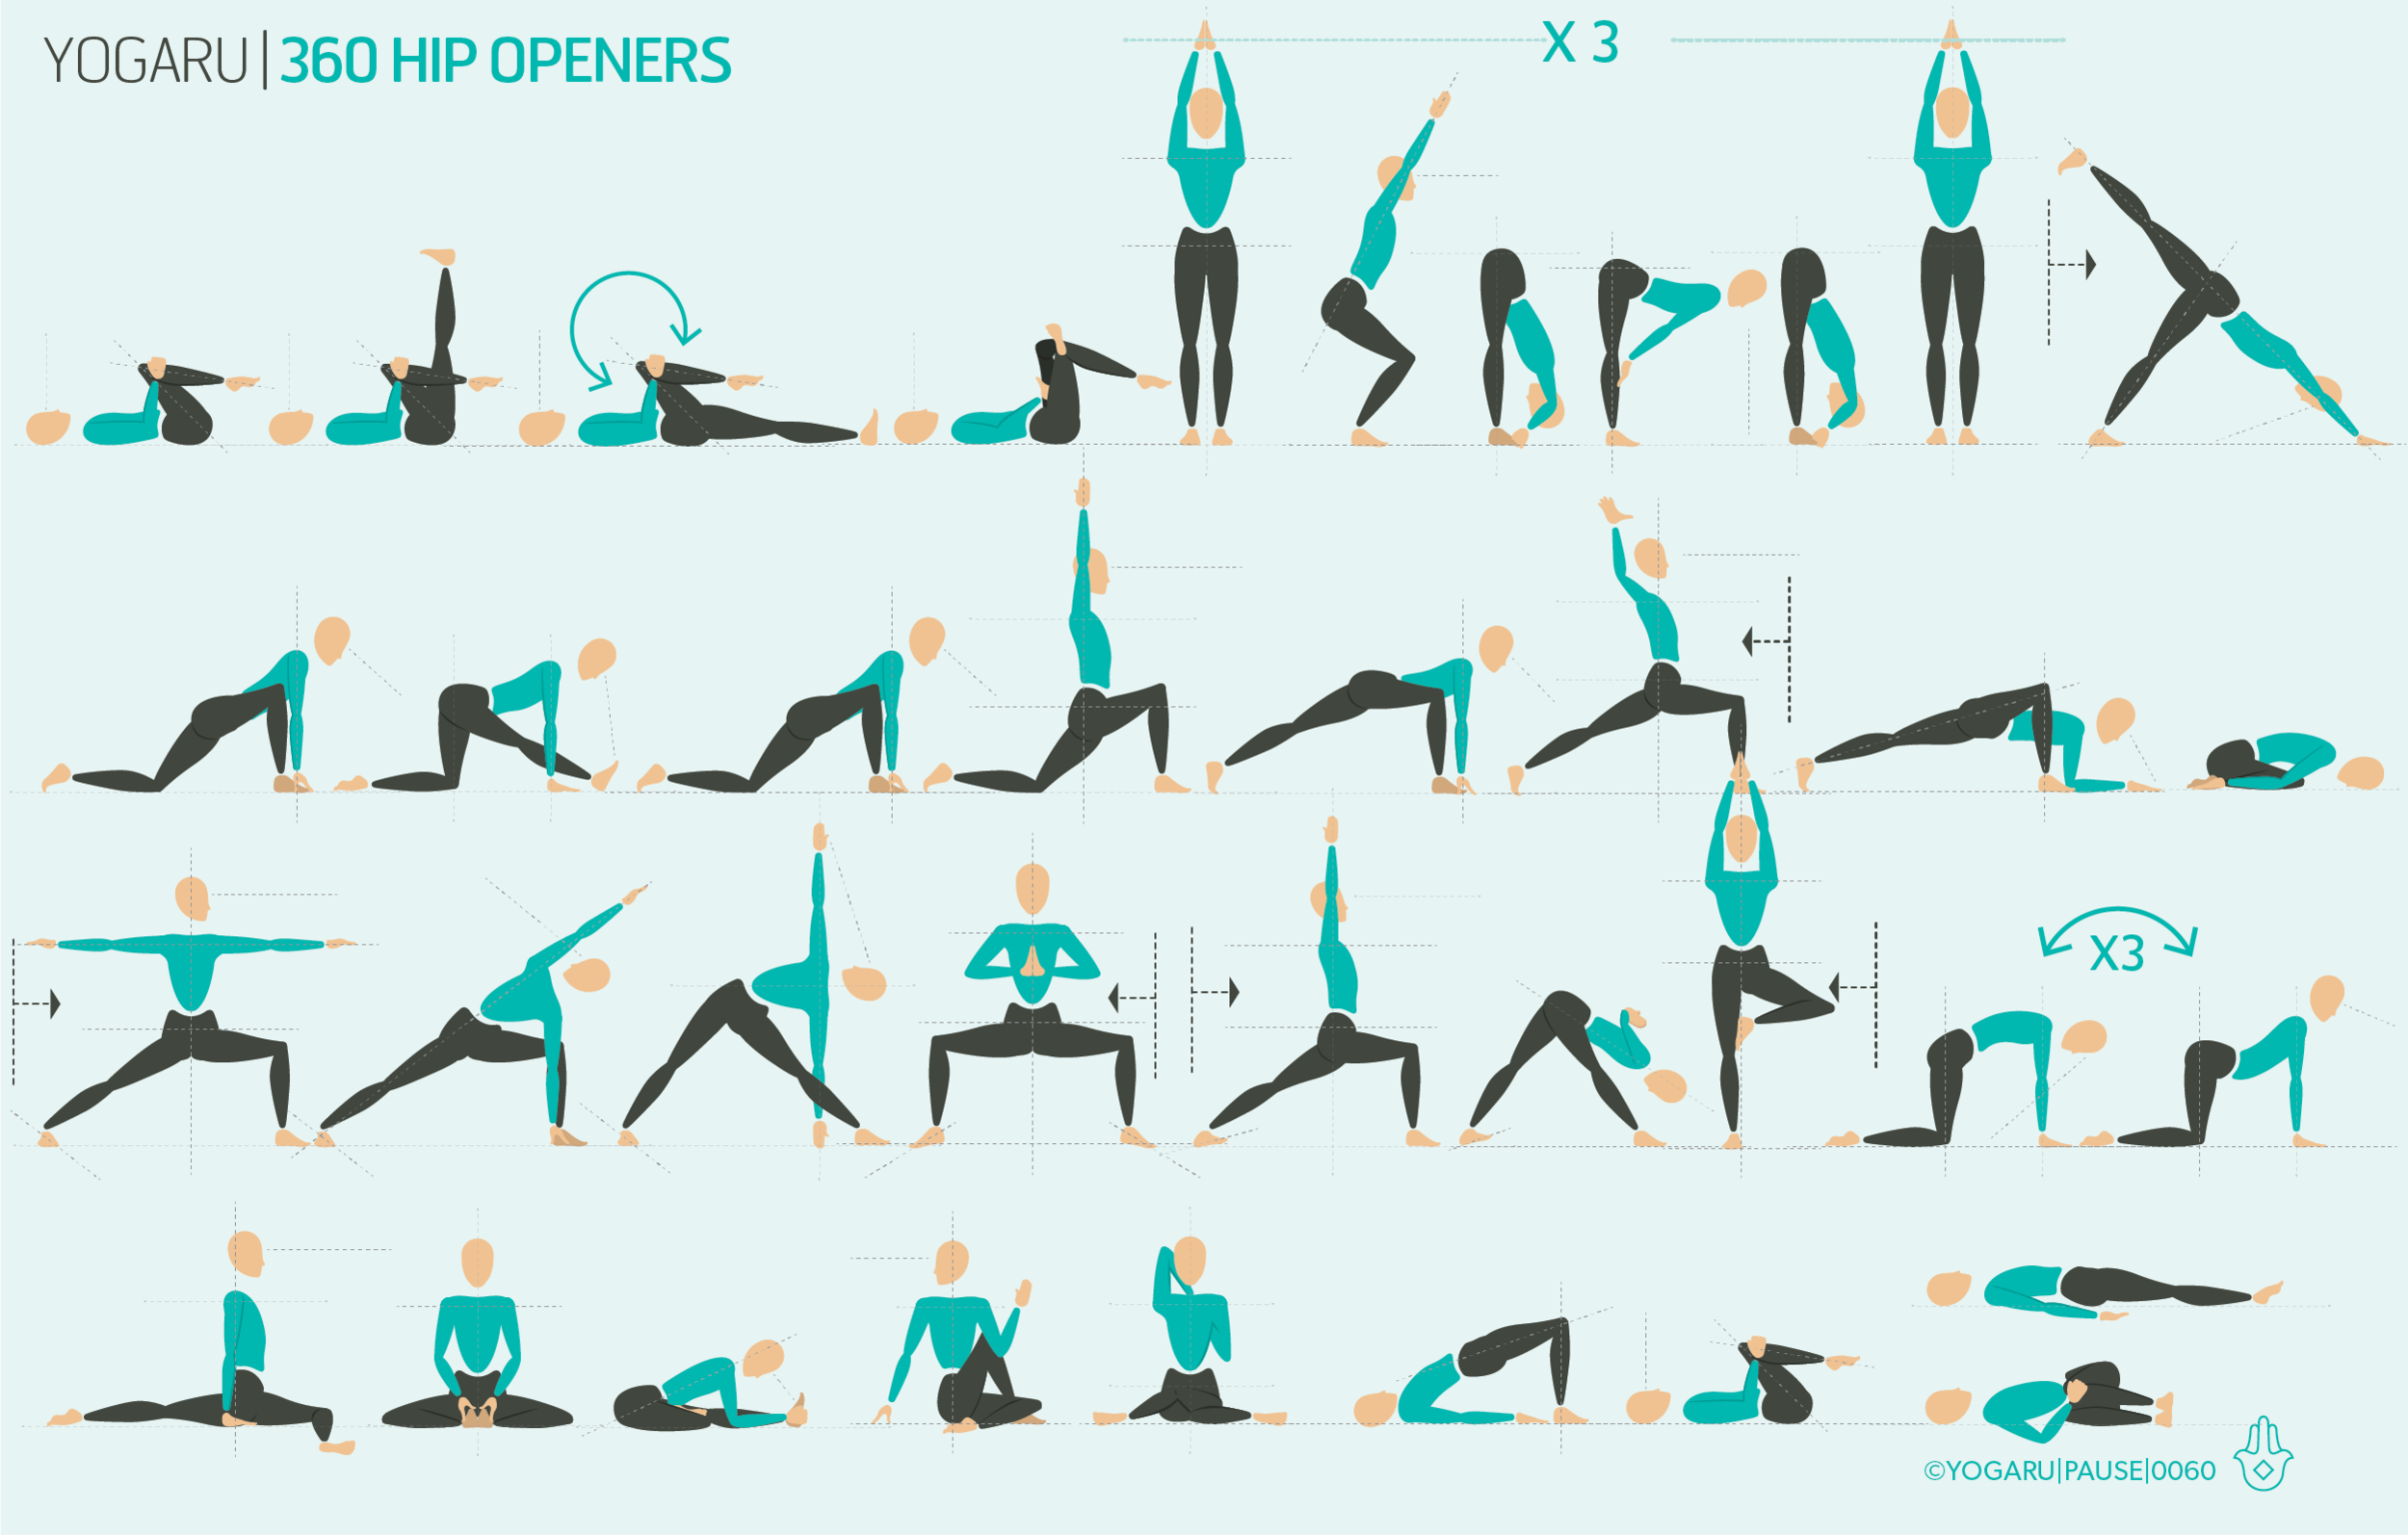
The muscles of the hips are thick multi-layered muscles and need time and patience to release. Slow down and recognise when the muscles have reached their full range of motion. At first pull back 10 percent from your maximum and allow the muscle to get used to the idea of stretching. The sequence builds up to the ultimate hip opener Eka Pada Rajakapotasana/One Legged King Pigeon. Pigeon works on many of the hip muscles – it stretches the hip flexors on the back leg, and the inner groin and outer hip of the front bent leg. They help to regulate hormones and massage all the muscles of the upper body.

ALIGNMENT CUES
Move slowly through the above sequence and take extra time when you encounter tight areas. Take some deep breaths while the muscle gently warm up.

Print out the below tips, along with the sequence, and melt into your hip openers:

  • From Adho Mukha Svanasana, place your right foot behind your left hand and your right knee behind your right hand.

  • Right foot flexed, working towards your right shin being parallel to the top of the mat.

  • Place your hands either side of your hips, walk your left leg out behind you in line with your left hip as you lower your hips down.

  • Draw your left hip forward and your right hip back, let the weight of your upper body help to gently lower your hips down.

  • Stay here, or for a stronger stretch, exhale, fold forward, interlock your hands and place your head on your hands, gaze down.

  • ‘Proprioceptive Neuromuscular Facilitation’ or PNM contract and release to get a greater release similar to the stretch reflex.

  • Squeeze your outer hip muscles your glute to open the hip out.

  • Contract your muscles, draw your front knee back and your back knee forward. Lift your pelvic floor, draw navel to spine, hold for 6 seconds.

  • Exhale and release for 30 seconds.

To save the images for personal use click and hold down the image until the ‘save image’ option appears; on Mac hold down ‘control’ and click the image to get the option box; on PC right click on the image to get the option box. Scroll down in the ‘option box’ and click ‘save image’.

Ruth Delahunty Yogaru
Eka Pada Koundinyasana - One Legged Side Crow

YOGARU_Eka Pada Koundinyasana_PB.png

HOME PRACTICE TO SUIT YOUR NEEDS
While writing an article for Wellfest on demystifying Crow, it reminded me how much I love to play around with arm balances in my home practice. Most weeks my practice centers around sequencing classes – ready to teach and write up the accompanying blog post for my students. This week I’m enjoying being light on classes, which has given me the opportunity to go deep into my own practice and really explore what poses I love, and what poses challenge me. There is nothing better than starting the day with a home practice that is exactly what you need for that particular day. This week I’m working on my arm balances. They tick both boxes – they are poses that I love and find challenging at the same time. Arm balances build focus, heat, strength and stamina. They are great for building self confidence when you manage to lift those toes for the first time; and teach you humility if you’re having a day when the feet just won’t budge off the ground. Your practice is not about ticking off poses as you ‘master’ them, it’s about revisiting the poses that sit well with you to find comfort in them, and practicing poses that challenge you physically and emotionally in order to tackle life off the mat too.

THE BENEFITS OF EKA PADA KOUNDINYASANA/ONE LEGGED SIDE CROW
If you’ve read a few of my previous sequence articles you’ll have noticed I’m all about gut health. Eka Pada Koundinyasana/One Legged Side Crow is also a twist which aids healthy digestion, detoxification and optimal elimination – and with a happy gut comes a happy immune system. They also ease stress, tension and anxiety. If you are feeling wound up, wind yourself up in a twist – the compression and massages the organs, and on releasing the twist you feel a loosening of the physical and emotional tension as the fresh oxygenated blood flows back into all the organs, and triggers the rest and restore parasympathetic nervous system.

EXPLORING EKA PADA KOUNDINYASANA/ONE LEGGED SIDE CROW IN YOUR PRACTICE
As you flow through your practice pay particular attention to your twists. Feel into the muscles that work to twist the body as they strengthen and stretch. The arm balances start with Tripod Headstand, if it is not part of your practice, skip it and go straight to Parsva Bakasana/Side Crow. If you’re finding it hard to lift up try placing your right hip on your right elbow, and your right knee on your left elbow – so that the body weight is being distributed on both elbows rather than just on your left elbow. Unlike our feet, the wrists were not made to carry full body weight, so be kind to them – rest in Balasana/Child’s Pose between Parsva Bakasana/Side Crow and Eka Pada Koundinyasana/One Legged Side Crow if your wrists need a break.

PAUSE_0059.png

ALIGNMENT CUES
The sequence is designed to warm up the core, strengthen the shoulders and wake up the hip flexors. Move slowly through the sequence and let the body warm up and be ready to play with your peak poses.

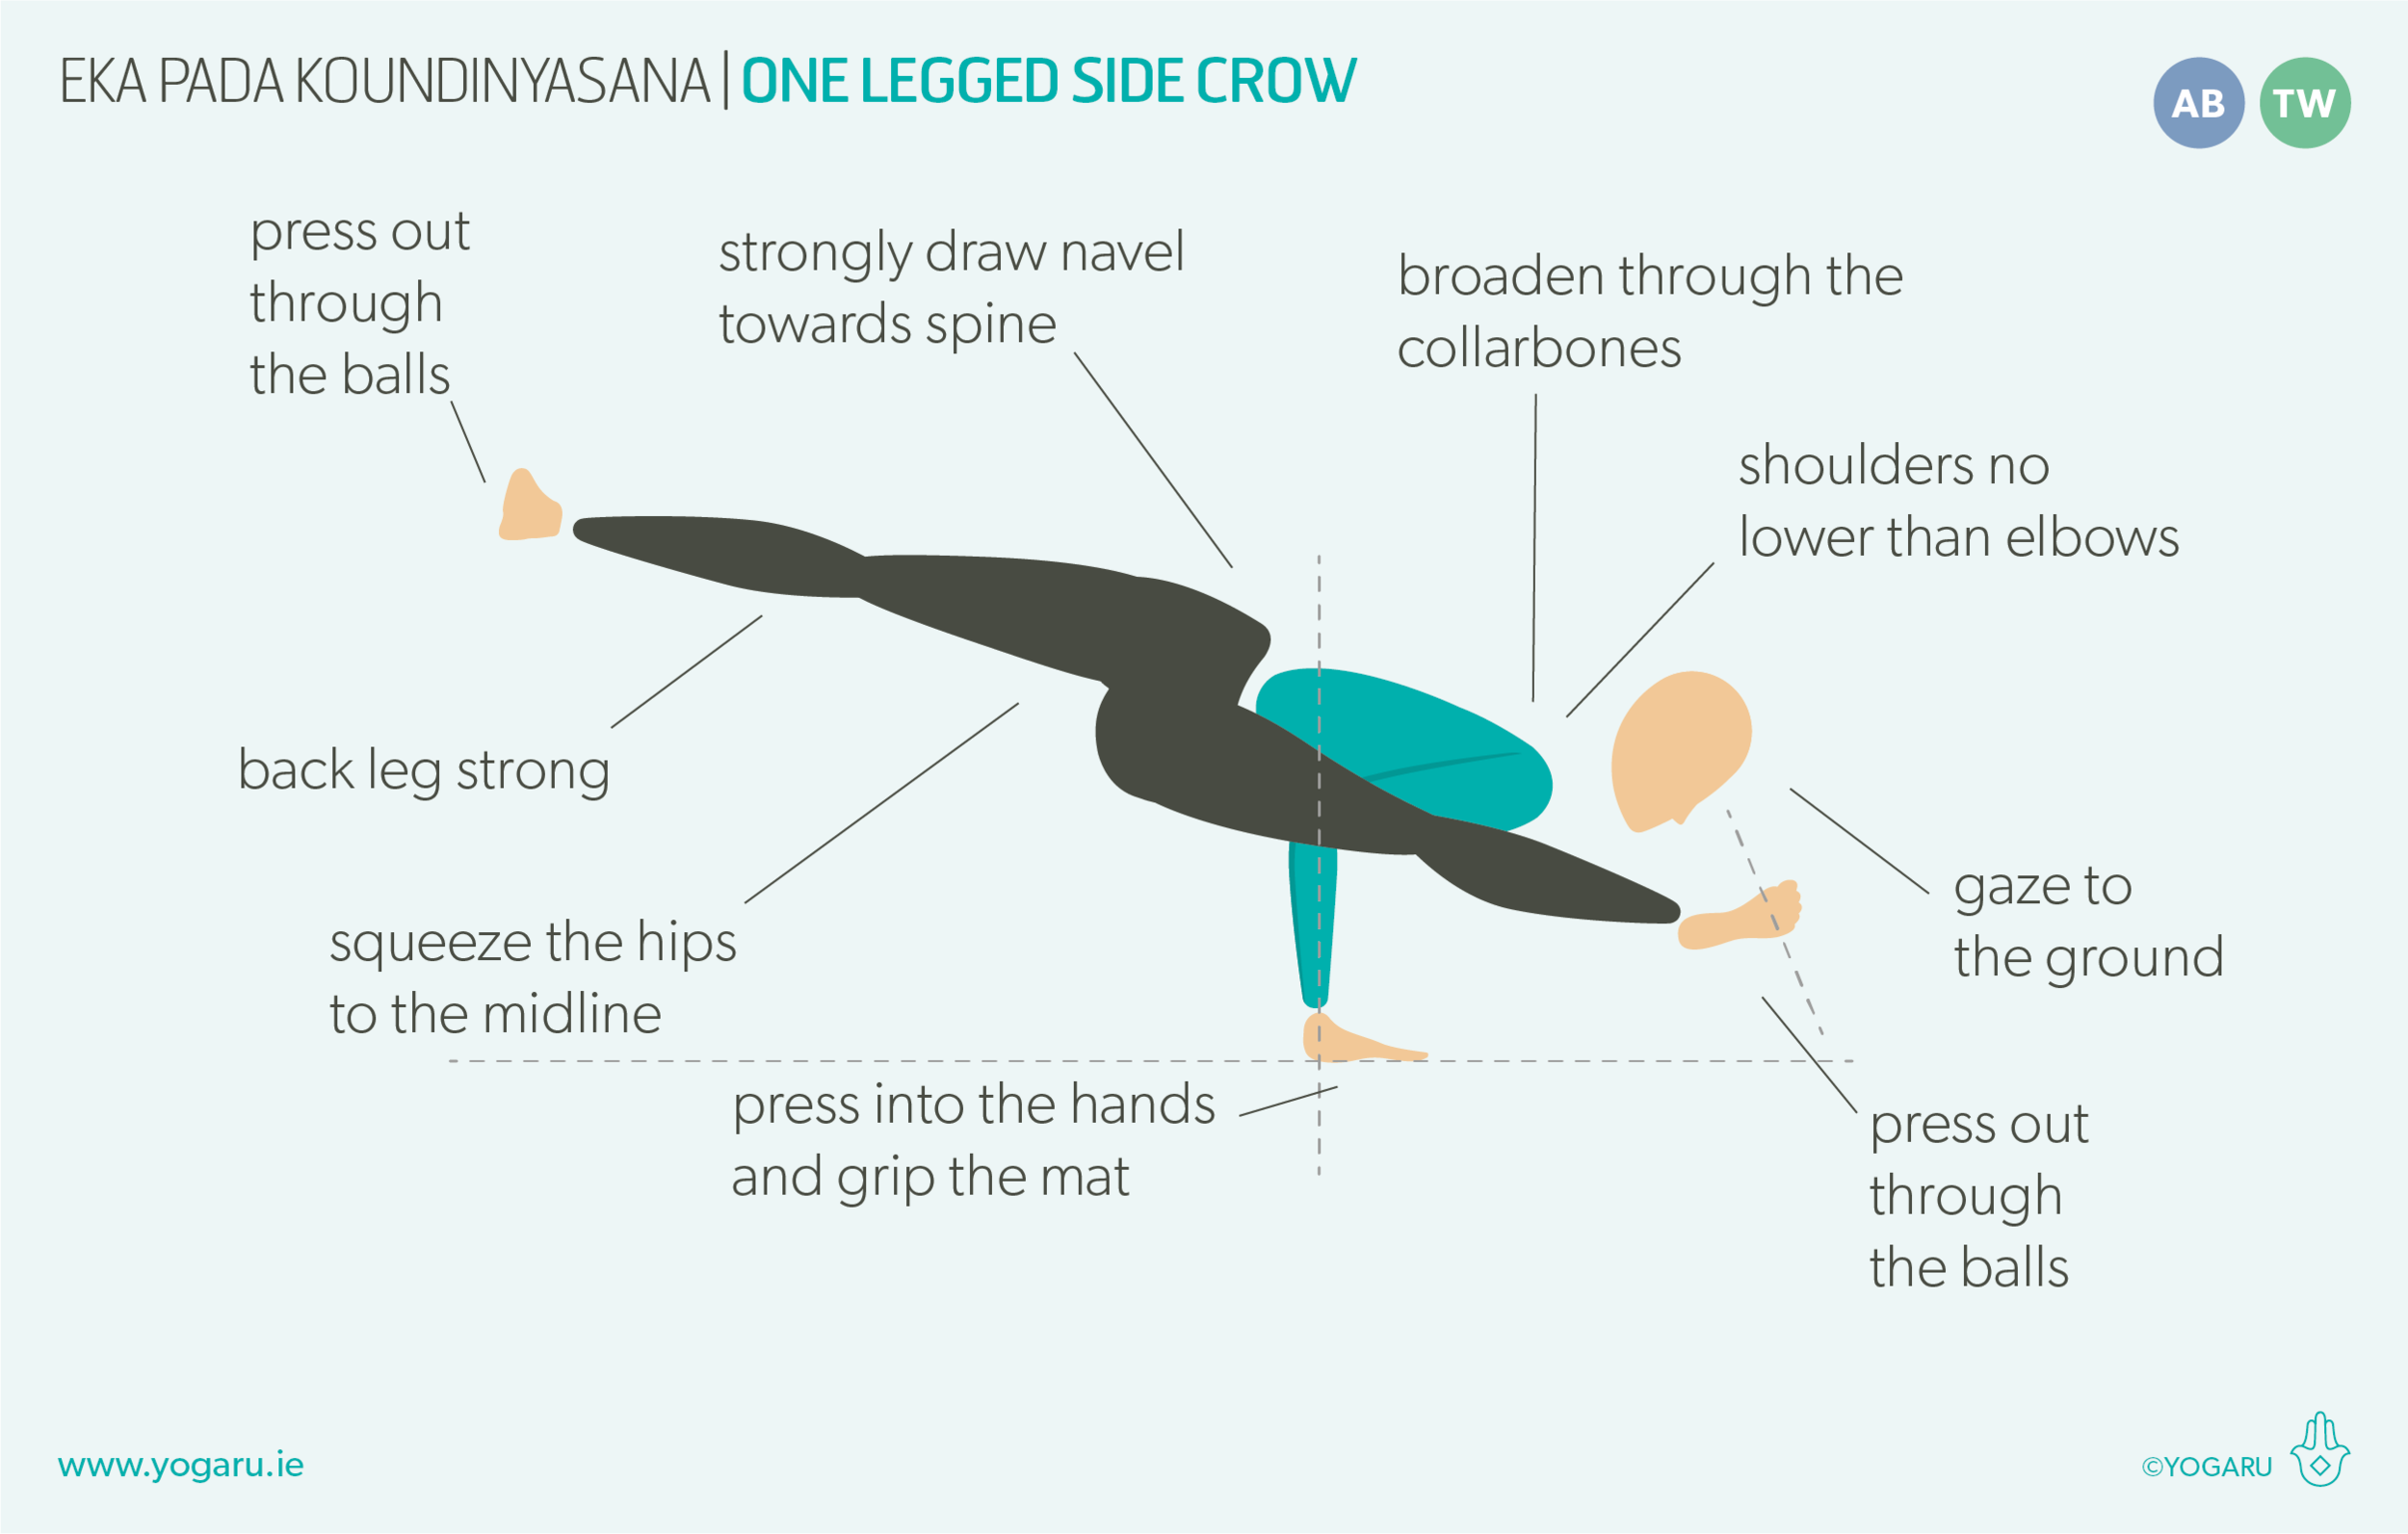
Print out the below tips, along with the sequence, and give arm balances a go with fresh eyes:

  • From Malasana, with feet together, twist to your right, place your hands on the ground to the right of your feet a little wider than shoulder width, fingers facing away from the legs

  • Bend your elbows and place your left elbow above your right knee.

  • Strongly draw your navel towards your spine, round your upper back. Lean to your right side, shift your weight into your hands.

  • Exhale, lift your feet stretch your right leg out to your left parallel to the ground, reach your left leg out behind you and press out through balls of both feet, gaze slightly forward.

Some days I’m not at my most elegant in my arm balances but it’s important to remember it’s how they make your feel inside that matters.

To save the images for personal use click and hold down the image until the ‘save image’ option appears; on Mac hold down ‘control’ and click the image to get the option box; on PC right click on the image to get the option box. Scroll down in the ‘option box’ and click ‘save image’.

Ruth Delahunty Yogaru