
Settle down to lift up

PAUSE_0088.png

MIRRORING NATURE
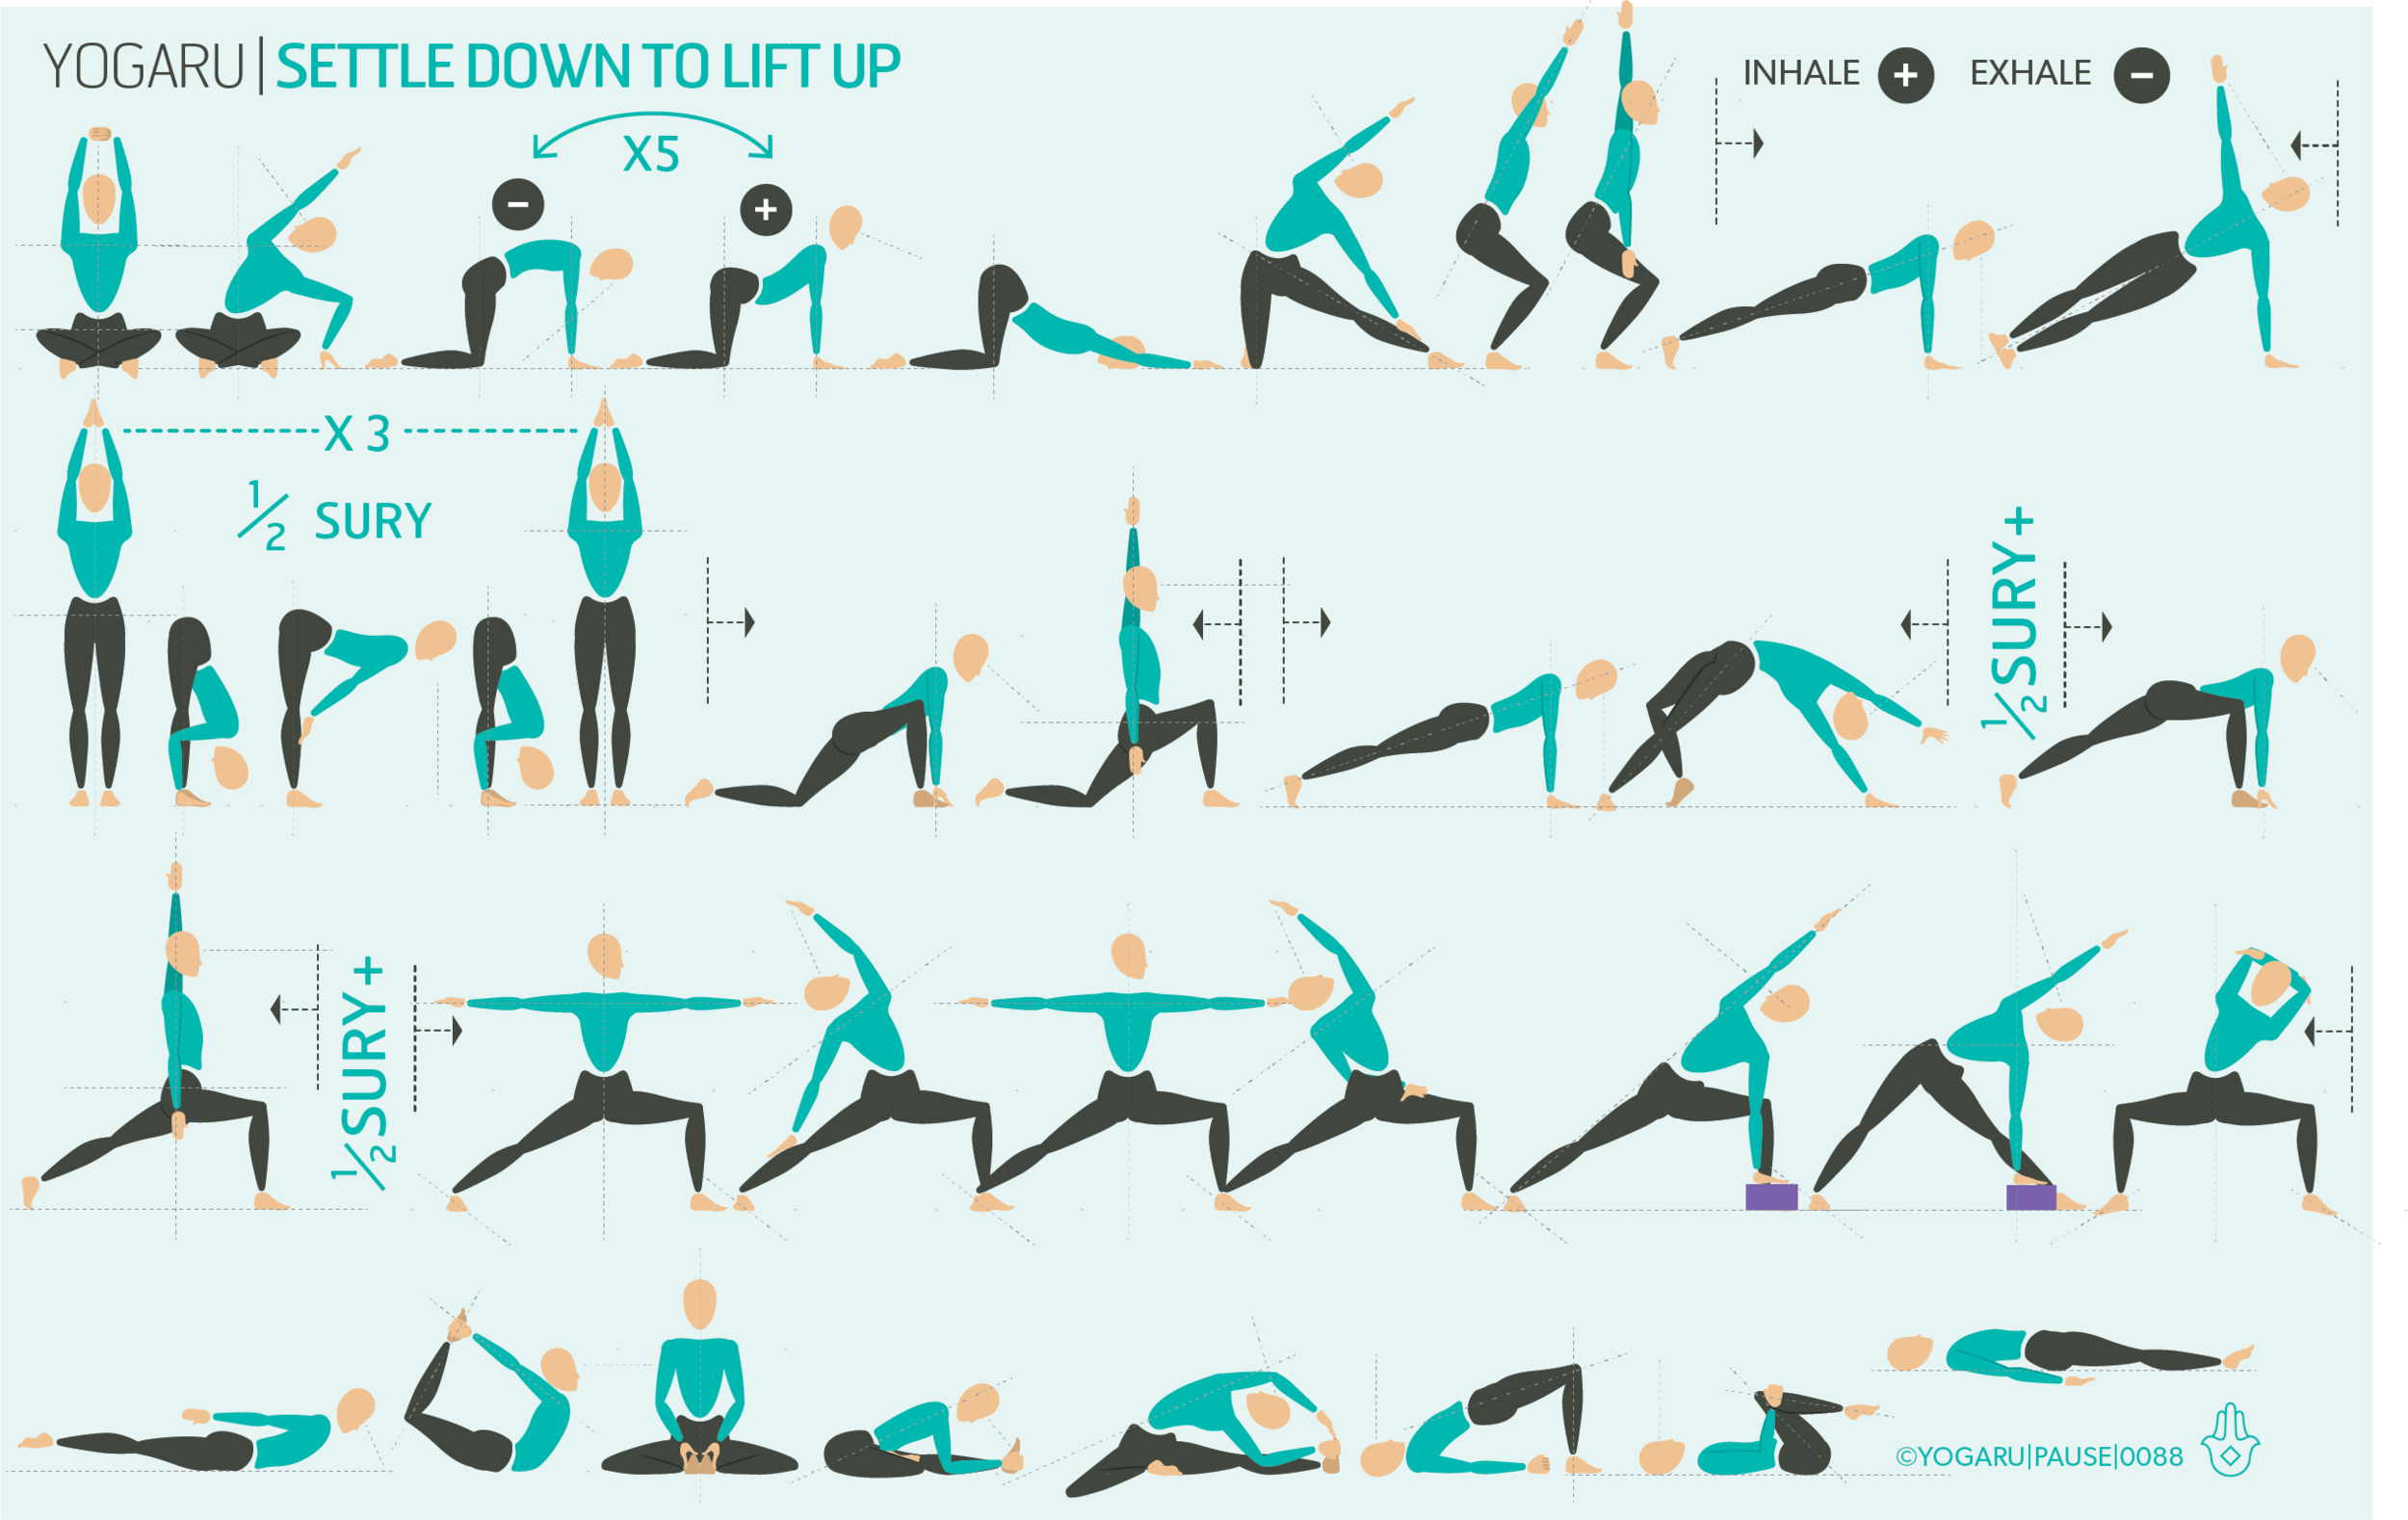
Seasonal transitions can be quite unsettling. You might notice recently you feel like you’re in limbo land and you don’t know if you’re coming or going. Especially when one day it’s showing all the signs of Spring and the next it’s snowing! But even when, to the onlooker, nature has pressed the pause button it is a hive of activity getting ready for Spring. In our practice we subconsciously follow the pattern of nature, and at this time of year nature is grounding down, growing roots, and bravely reaching up. In last week sequence we explored the stability of the pelvic bowl. This week we’re settling down through this central axis and lifting the body up out of the pelvic bowl.

CREATING SPACE
Throughout our day we naturally forward bend, twist and occasional backbend, but we rarely side bend. The spine is happiest when it’s regularly moved in all direction. Yoga, and this sequence in particular, gives the spine a chance to catch up on some quality side bends. Lengthening up through the side body with side bends tone the core, realign the lower spine, and stretches the intercostal tissues of the ribs to help deepen the breath. They also improve circulation, release compression between the vertebrae and creates space for the abdominal organs. In terms of muscle activity they stretch the glutes, lats, obliques and spine of the lengthened side; and strengthen the lats, obliques and spine of the compressed side of the stretch.

EXPLORING SETTLING DOWN AND LIFTING UP IN YOUR PRACTICE
Think of your pelvis as your anchor in each lateral bend pose. Ensure there be equal weight in each side of the pelvis, paying particular attention to the hip on the stretching side of the body. Looking for this stability first will give you a strong and secure foundation to lift from.

ALIGNMENT CUES
Our peak pose for this sequence is Parivrtta Janu Sirsasana/Revolved Head to Knee. To ensure you don’t collapse the chest towards the floor, the alignment cues below bring you through a twist prior to taking your full expression of the pose. This will help you stretch through the chest and keep the lateral position of the spine that we have been cultivating through the full sequence.

  • From Dandasana/Staff, open your legs out wide, bend your right knee and place your foot on the inner thigh of your left leg, press out through your left heel, right knee grounded.

  • To take your preporitory twist reach your right hand behind you and hold onto the upper thigh of the left leg. Lengthen through the spine on and inhale, hinge to your left on your exhale, and place your hand or your left forearm, on the ground just inside your left leg. Roll the bottom waist forward and the top waist back to ensure your upper body is moving in the same plane and the shoulders are stacked. Inhale to come up.

  • Place your right hand on your right hip. Hinge to your left from the left waist. Place your hand or your left forearm, on the ground just inside your left leg. Palm facing up if you are on the forearm, or hold onto the inside of you left foot.

  • Inhale, lift your right arm up high, palm facing left, exhale, reach your right arm up and over your right ear. Reach towards your left foot or hold onto the outside edge of your left foot. Bottom waist rolls forwards, top waist rolls back, gaze up.

To save the images for personal use click and hold down the image until the ‘save image’ option appears; on Mac hold down ‘control’ and click the image to get the option box; on PC right click on the image to get the option box. Scroll down in the ‘option box’ and click ‘save image’.

Ruth Delahunty Yogaru
Anatomy 101 - the pelvic bowl

PAUSE_0087.png

BEAUTIFUL BONES
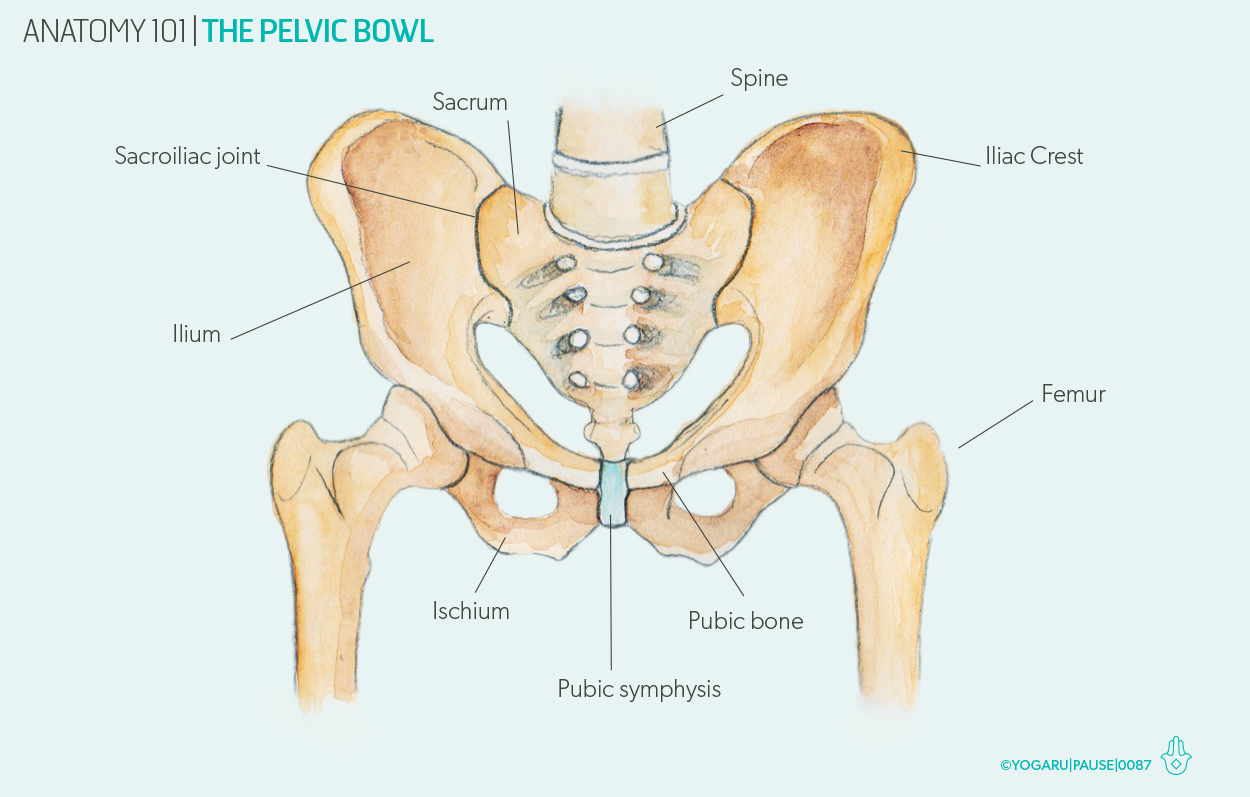
If I were to pick my favourite bone of the human body it would have to be the pelvic bowl. Although I’m not sure it’s a question I’ll get asked very often! This beautiful sculptural bone is the hub of all activity. It houses our reproductive system, lower digestive system, and in the world of yoga, Mula Bandha (energy lock), the Nadis (energy paths) and our Root Chakra Muladhara (energy junctions). All movement in the spine and hip joint is initiated from the pelvis, using a complicated network of muscles leading to and from the pelvis. Tight quads, hip flexors and inner groins pull the pelvic into a forward tilt, referred to as an anterior tilt, which can lead to an over arched lower back (hyperlordosis). Whereas tight hamstrings and glutes pull it into a backwards tilt, called a posterior tilt, which can lead to a flattened lower back (hyperkyphosis). Our pelvis likes to be perfectly stacked over the foundation of our feet, to avoid unnecessary stress on the spine and allow the natural curves of the vertebrae to function properly as a shock absorption system. Moving through our day with hips that are not balanced can bring the spine into a compensatory lateral (side) bend or a twist, potentially leading to back pain, sacroiliac joint pain or any number of referred muscular and joint issues. A strong and balanced pelvis leads to a strong and balanced upper and lower body and a unified body.

EXPLORING THE PELVIC BOWL IN YOUR PRACTICE
Observing the position of the pointy hip bones (the iliac crest) at the front of the pelvis in our practice gives us invaluable feedback on our alignment in each pose. Think of the pelvic as a bowl filled with liquid. In upright standing poses, and even upright seated poses, try keep this bowl perfectly level without spilling a drop – by not tipping the bowl forward, back or tilted to the side.

PAUSE_0087_A.png

ALIGNMENT CUES
Connect with your pelvic bowl with this sequence which will focus on the position of your pelvis. Where possible during your practice place your fingertips on the pointy hip bones at the front of your pelvis, or have a glance down at your hips, and check for level hip bones. Hug your outer hips to the midline to activate the strong stabilising muscles of the hips. This feedback will help with your alignment in many poses. Pay particular attention to the position of the pointy hip bones in the six poses below and use these cues to help you find the perfect pose for you.

  • Phalakasana/Plank Pose – Often we have a dominant side which might end up higher than the other side in plank. Extend back through the heels and forwards through the tip of your crown to help stabilise the hips. Have a glance under you to see are your hips level.

  • Ashta Chandrasana/Eight Crescent Moon – Start by bending your back knee and lifting your pointy hip bones up to stack the pelvis perpendicular to your foundation. Check for level hips with your fingertips and then reach your arms up high.

  • Virabhadrasana III/Warrior III – The hip of the lifted leg will most likely lift higher than the standing leg for most people. Check the level of your hips and if needs be lower the lifted leg to less than parallel to the ground if it is destabilising the hips.

  • Natarajasana/Lord of the Dance – Using a belt helps to keep the hips level and squared while you find the stretch in the hip flexor. Glance down and make sure the hip of the lifted leg hasn’t drifted back as the leg extends back.

  • Dandasana/Staff – When the pelvis tilts back the hip bones will stack above the sit bones. Place your fingertips on your hip bones and make sure they are sitting forward of your sit bones and the bowl of the pelvis is nicely upright.

  • Setu Bandha Sarvangasana/Bridge – Bend your elbow and place your fingertips on your hip bones to check are they level. Keep your fingertips here as you slowly lift your lower leg to hip height. Notice is one side more challenging than the other.

To save the images for personal use click and hold down the image until the ‘save image’ option appears; on Mac hold down ‘control’ and click the image to get the option box; on PC right click on the image to get the option box. Scroll down in the ‘option box’ and click ‘save image’.

Ruth Delahunty Yogaru

Gentle mindful flow

PAUSE_0086.png

MOVING MINDFULLY
How might you apply mindfulness to your practice today? The essence of mindfulness is bringing one’s attention to the present moment. Being present on your mat during your practice and moving mindfully will help you link to how you are moving, how you are breathing, and how the practice makes you feel. Slow gentle movement gives you the space to listen to what you need in this specific practice and avoid bypassing sensations and warning signs of pushing beyond your limits. Remember when you start to feel sensation, and not beyond it, is your version of the pose. As you move in this mindful way you become more aware of your breath and how you are breathing during different phases of your time on the mat.

SEARCH FOR FEEDBACK
Sometimes we forget what has brought us to our mats, and it becomes habitual as we detached from our practice. Connecting with the feedback your body gives you, with non attachment to perfection, will bring you back to the present moment in the physical body. Moving slowly is no mean feat! It builds stability in the joints as the surrounding muscles work hard to control the movement. It is much easier to quickly step forward from Adho Mukha Svanasana/Downward Dog to the top of your mat, than stepping forward as slow as possible and activating the stabilising muscle of your core and hips, and the strength of your legs to control the movement.

EXPLORING GENTLE MINDFULNESS IN YOUR PRACTICE
As you move gently with mindfulness, search for small change brought on through your practice not big changes and perfection – a gentle stretch, an opening, a quietning of the mind. Before you move from pose to pose consider how you are going to journey there – as slow and controlled as possible.

ALIGNMENT CUES
This one is about being kind to yourself and moving gently. Start your practice lying on your back, with your hands on your belly, and take a few rounds of Viloma breath. Viloma breath breaks the exhale into three and helps to naturally lengthen the breath without tension – inhale completely then exhale, pause, exhale, exhale pause the full breath. As you run through the sequence pause in each pose long enough to register how the pose makes you feel and ask yourself if you need to back off a little or go further to find an appropriate sensation. Pay particular attention to your breath. There are a few mini flows in the first two rows that will help you link breath with movement.

  • Spend plenty of time in the warm up phase of the sequence. Feel into the ball and socket hip joint as you move through some of the hip opening warm up poses in row one.

  • Find your most supportive version of Balasana/Child’s Pose either arms forward, arms back, forearms either side of the head or a bolser between the knees to support the chest and head.

  • In Ardha Uttanasana/Half Forward Fold reach your chest forward and peel your shoulders back. Feel a stretch in the chest and strength in the upper back.

  • When moving from Uttanasana/Forward Fold to Tadasana/Mountain press strongly into your feet to ground down as you rise up.

To save the images for personal use click and hold down the image until the ‘save image’ option appears; on Mac hold down ‘control’ and click the image to get the option box; on PC right click on the image to get the option box. Scroll down in the ‘option box’ and click ‘save image’.

Ruth Delahunty Yogaru