Move & restore

PAUSE_0140.png

This sequence is also available on YouTube.

DOING & NON-DOING
When I completed my recent studies on the nervous system and restorative yoga with Yoga Medicine I was curious to experiment more with the benefits of restorative yoga to the nervous system. I started including restorative poses at the end of my practice as a way to add more of this deeply heeling therapeutic practice into my day and continue to relearn how to relax. I started to notice that by adding some restorative at the end of my practice I was teaching my nervous system to be more malleable, swapping more smoothly from activity to relaxation, and appreciating the value of both. I noticed a few incidents where I was able to pause before I reacted to situations with the kids, and deal with it in a logical way rather than a knee jerk reaction. I felt less depleted at the end of a day when I felt I had given something back to my energy stores at the end of my yoga practice. On the days where I practiced a purely restorative session in the evening I noticed I would settle to sleep the minute my head hit the pillow, and better still, not experience the 4am disturbances to my nights sleep that I had slipped into.

I am currently teaching this style of class online on a Friday morning. You can practice live with me or practice in your own time with the class recording. Experience the benefits for yourself!

Here are some of the many benefits of restorative yoga: regulates the nervous system, balances emotions, balances hormones, eases stress & anxiety, boosts immune function, improves healing capacity, eases muscle tension, eases back and neck pain, reduces chronic pain, eases fatigue, improves sleep, improves overall wellbeing.

BUILDING A RESILIANT NERVOUS SYSTEM
While we can’t consciously control the nervous system we can create favourable conditions to influence our bodies response to external and internal sensory stimulus. Stress, or the sympathetic nervous response, is where we create, get our day's activities done and exercise. Resting or the parasympathetic nervous system is where the body clears out the ‘doing’ hormones, restores homeostasis balance to the body and creates an optimum environment for all the functions of the body. Both work in tandem and are a natural part of being human. This blended method of moving and restoring honours both the yin and yang within our day and helps build a resilient nervous system. To lean more about how the nervous system works and what happens when it tips into too much ‘doing’ have a read of my Finding calm article.

EXPLORING MOVE & RESTORE IN YOUR PRACTICE
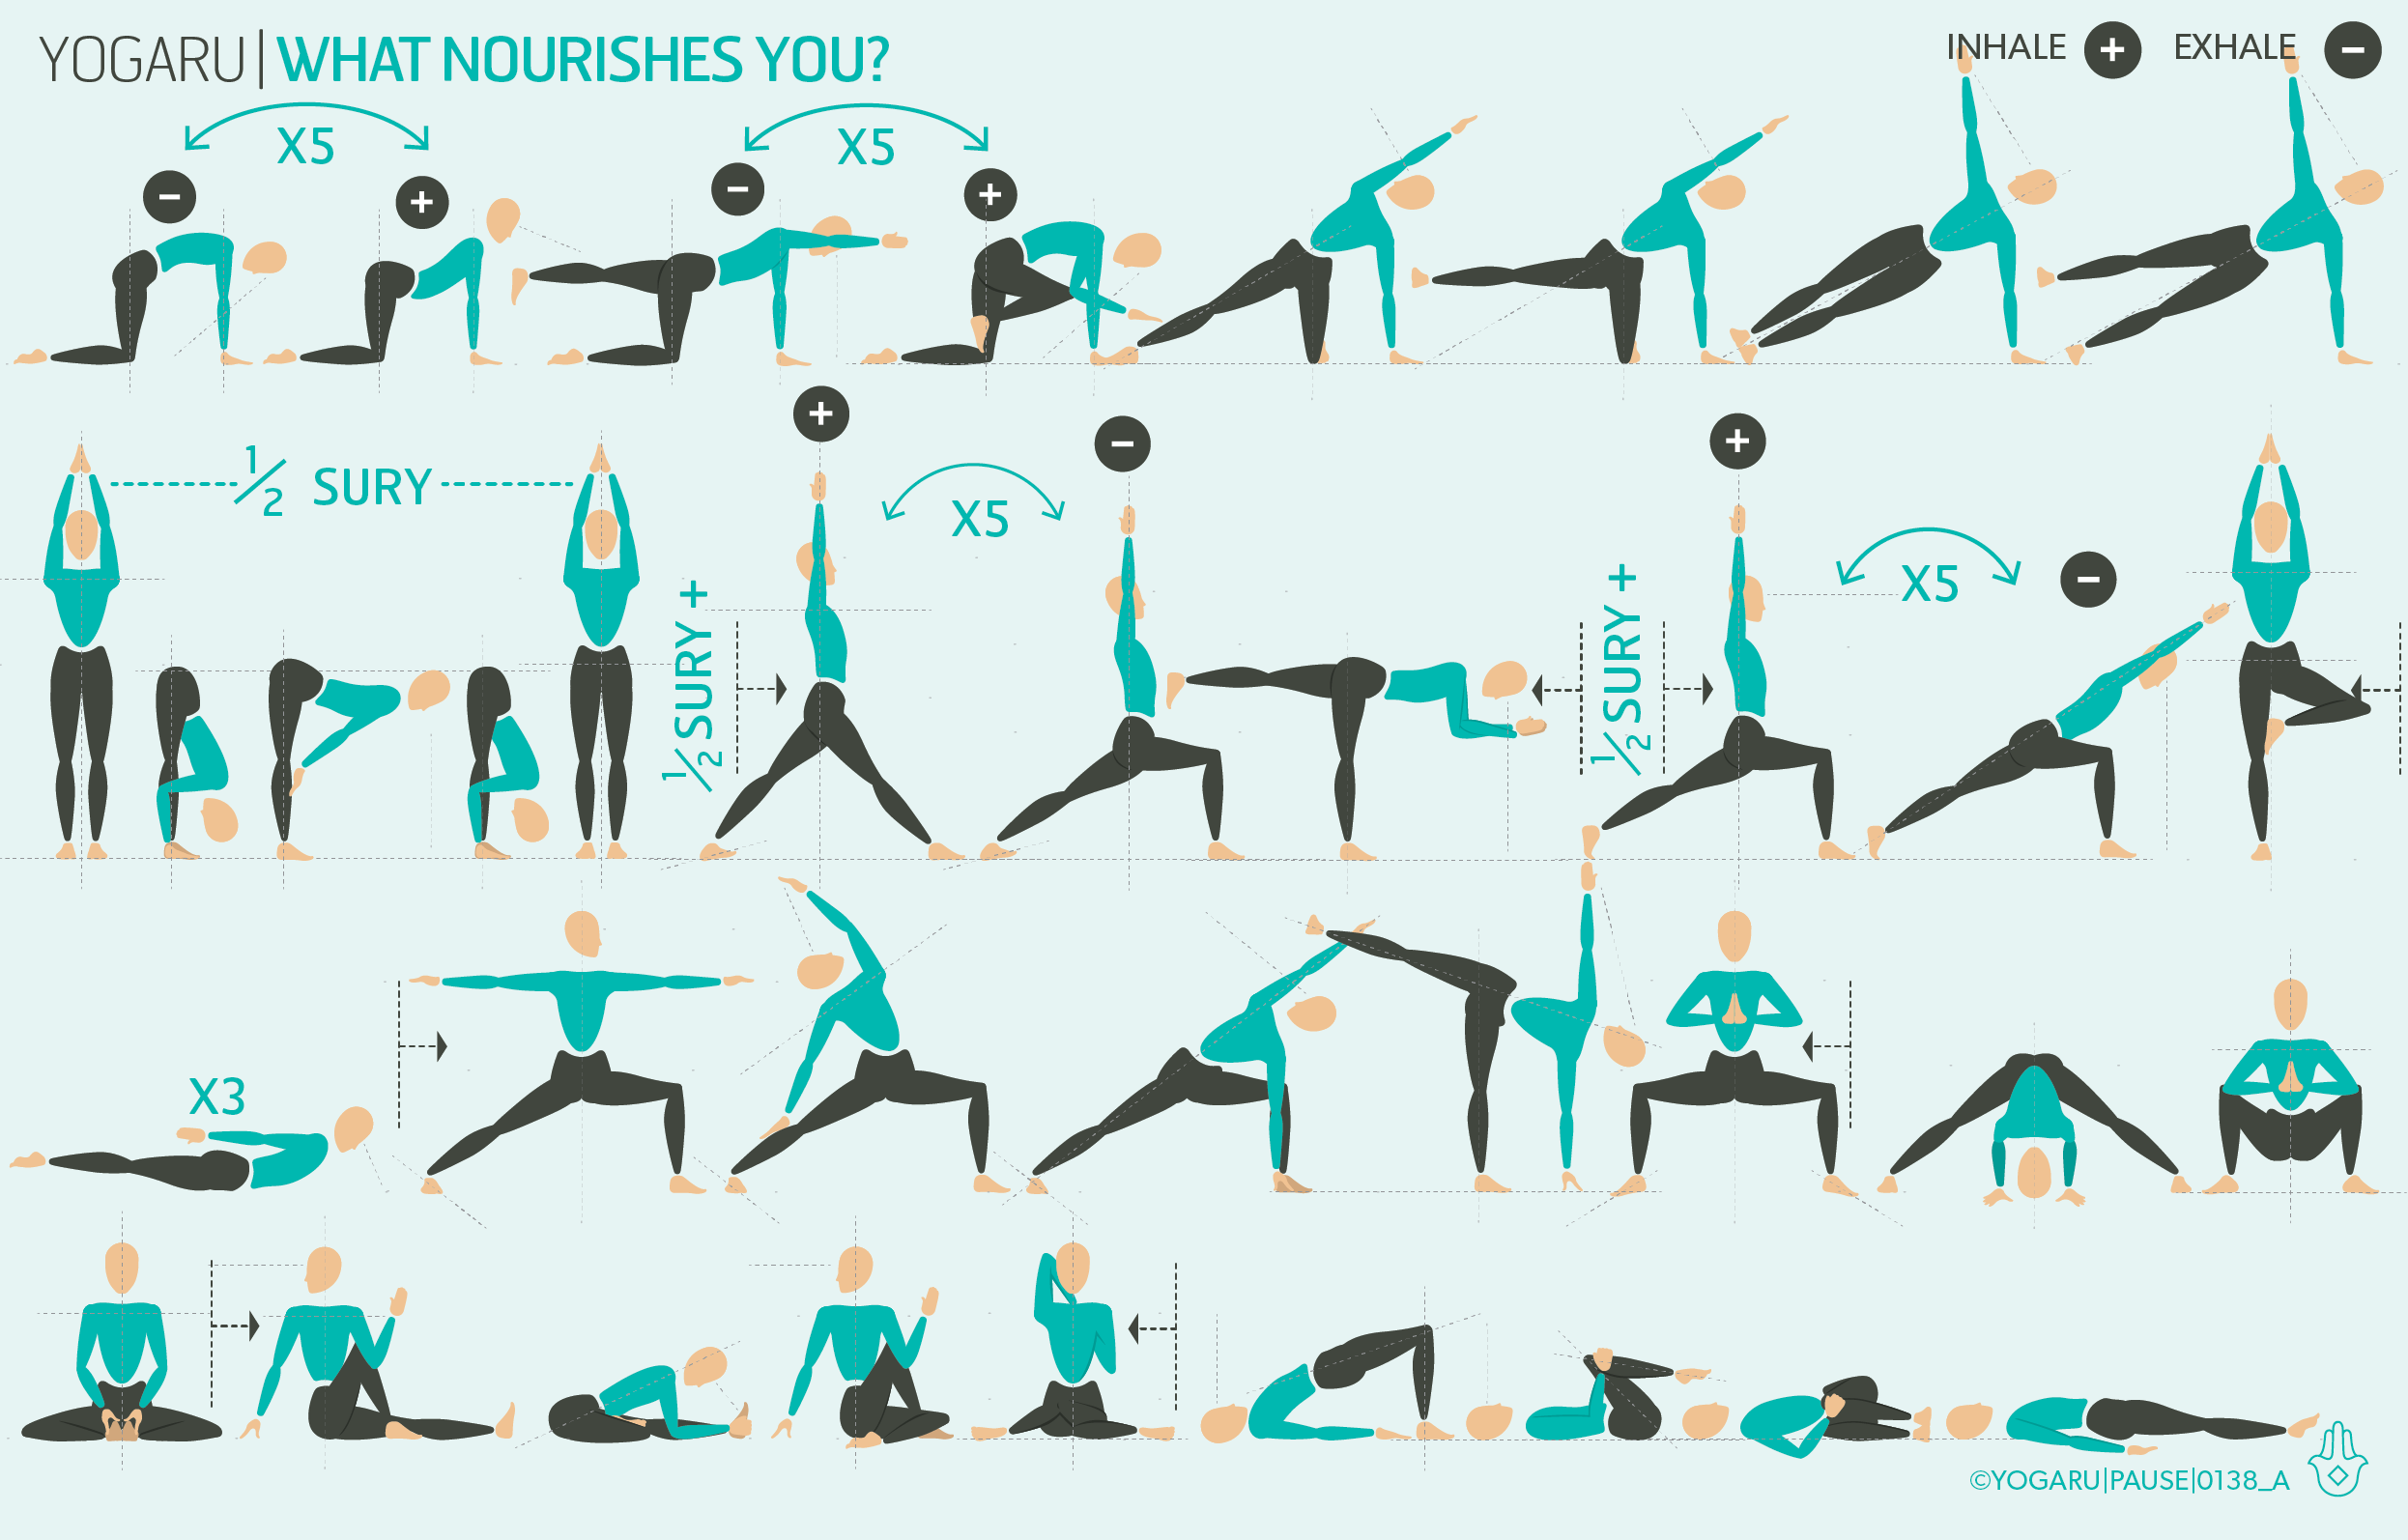
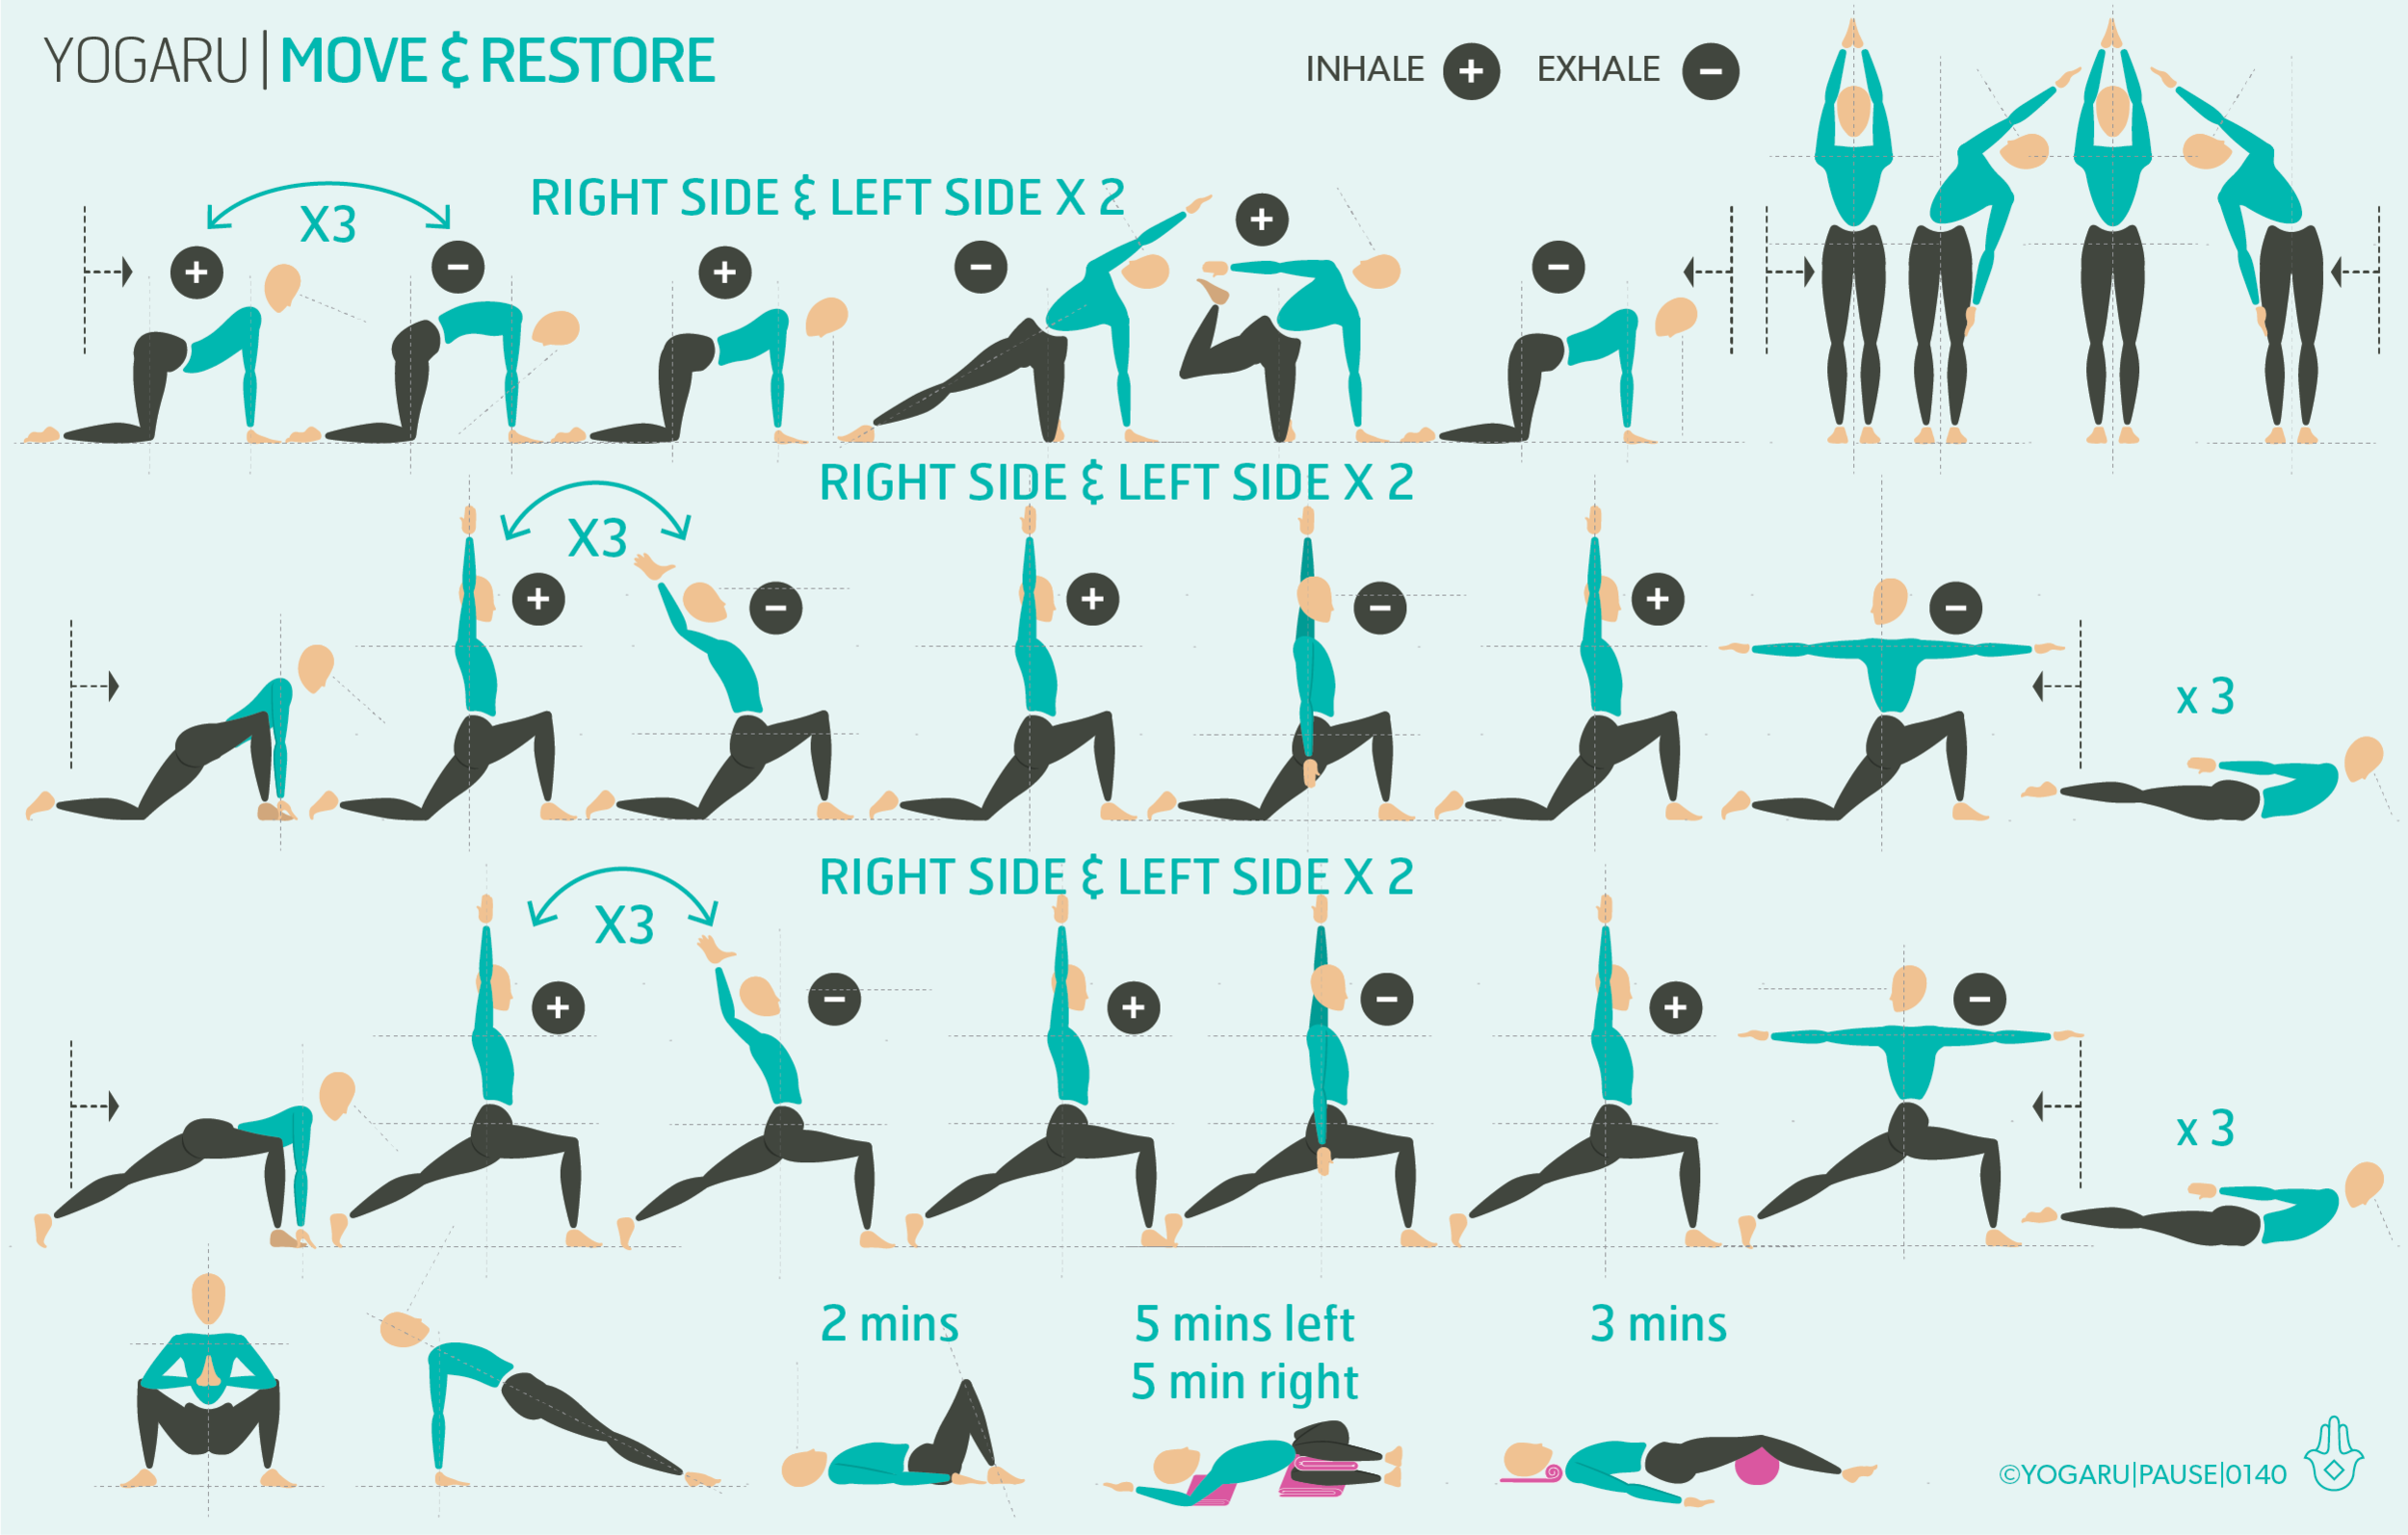
This sequence starts with a movement practice with simple purposeful flows to build mobility and strength. There are three mini flows in the movement practice. Move slowly through the poses within each flow and then repeat each one with the breath guides above the poses. The sequence then transitions from doing to non-doing with a restorative practice to target the nervous system. In restorative yoga we consciously relax the body to bring it into a deep state of rest and create a healing environment. The goal of the restorative stage of this sequence is to replenish, absorb the benefits of moving and give back to your body's energy stores. The poses are held for longer periods (you will see the suggested hold times in the sequence) with the support of your blankets to help you to feel effortless comfort. Although props are king in restorative yoga there is plenty you can achieve with just a few blankets to support you and keep you warm. You will need three blankets for this practice. See below for alignment cues on your main restorative pose.

ALIGNMENT CUES
Have a read of the tips below and either print out the sequence or save it onto your device.

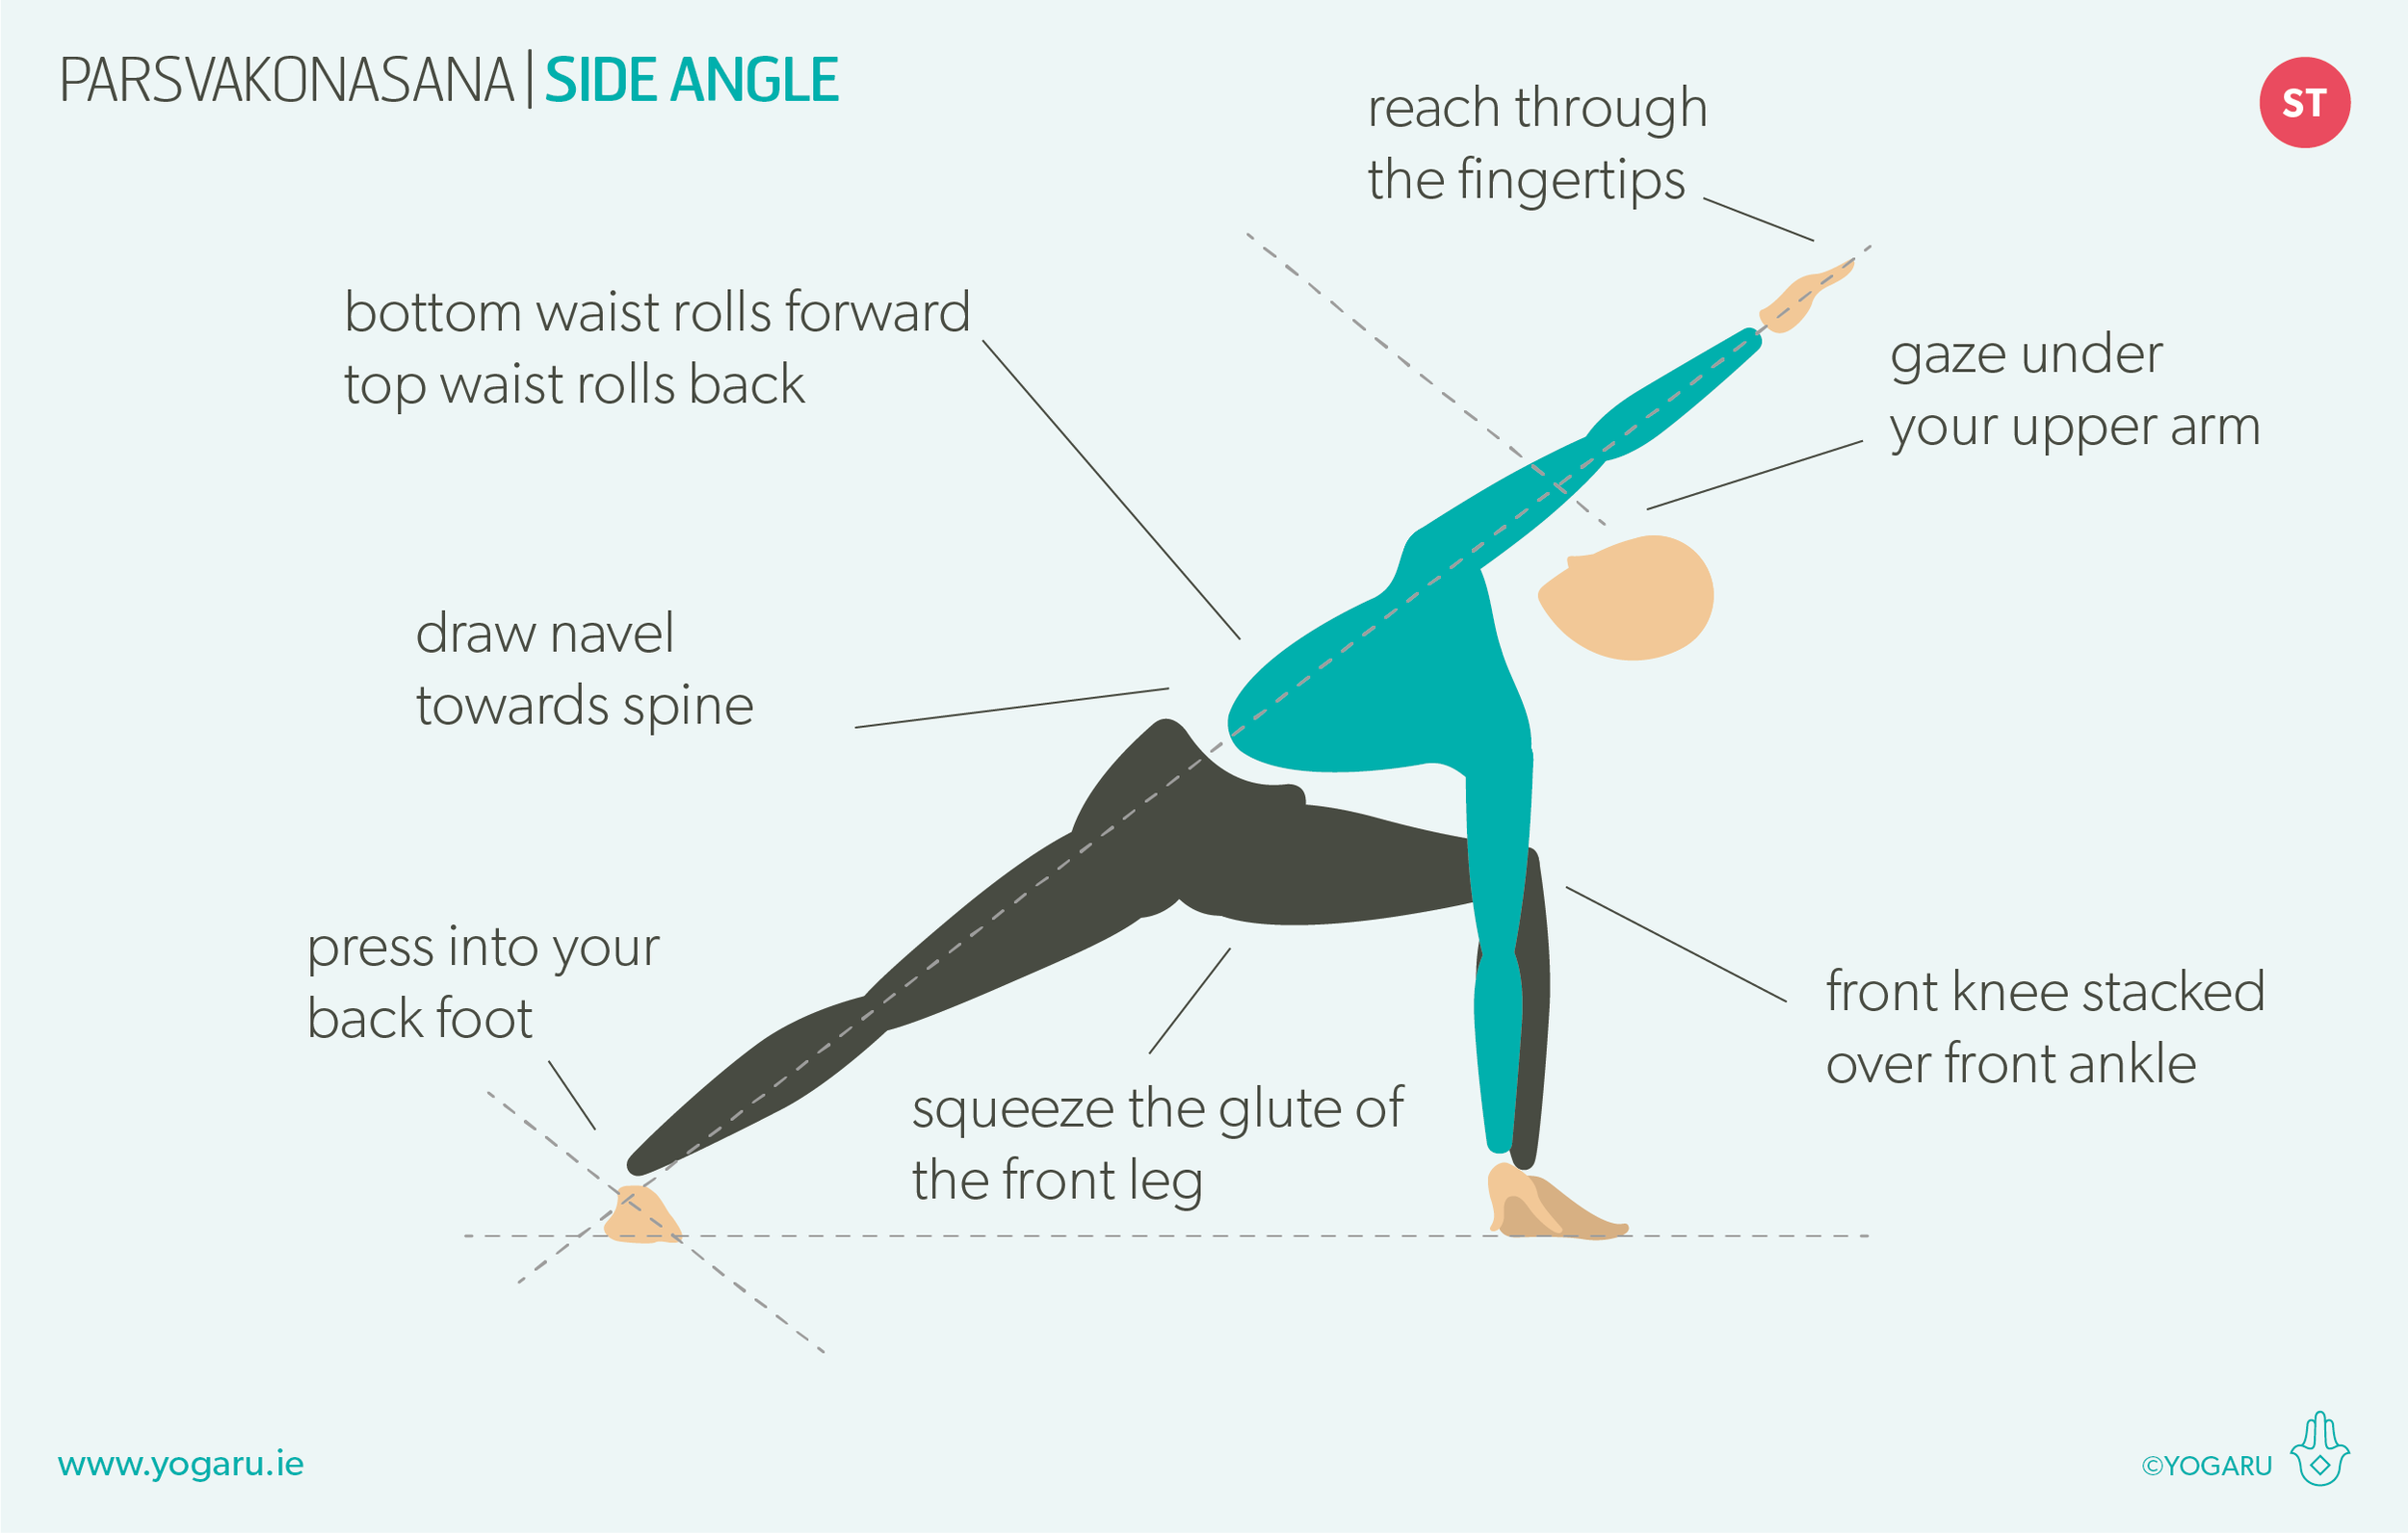
The peak pose of the movement sequence is Salabhasana/Locust, a fantastic full back body strengthener:

  • Lie on your front, arms by your sides, palms facing your body, forehead resting on the ground.

  • Inhale, press into your pubic bone, lift your head, upper torso, arms and legs, lift with the whole back. Reach your chest forward and up

  • Extend your arms towards your feet, lift your legs up and press through the balls of your feet, roll your inner thighs up.

  • Broaden through the collarbones, firm your shoulder blades onto your back, back of the neck long, gaze slightly forward.

RESTORATIVE POSE ALIGNMENT CUES
Below are the restorative techniques used in this sequence. The props you’ll need are:
1 x bolster - or 2 towels, wrapped around a horizontally rolled pillow and tied to secure.
2 x yoga blankets - or any wool, thick cotton or fleece blanket with density.

No.1 - Constructive rest
Start lying on your back, your knees bent, feet mat distant apart and knees knocked in together. Place your hands on your belly and feel the breath move through you. Take four rounds of 4/6 breath, inhaling for the count of 4 and exhaling for the count of 6. Keep the breath as gentle as possible, notice if you are holding any tension in your shoulders and upper chest. Pause after and notice any change this simple breath observation has made to your body and mind.

No.2 - Supine twist with raised hips
Fold a blanket in four, smooth it out and accordion fold it in three along the short side and place it in the centre of your mat. Place your second blanket folded at the top of your mat and a third blanket folded beside your mat. Sit your left hip and left thigh along your accordion fold blanket, place a the third folded blanket between your thighs, lie on your side. With arms in cactus position, open your right arm to your right and come into the twist. Place the second blanket under your right shoulder to ensure it is supported.

No.3 - Savasana
End your practice with at least 10 minutes of Savasana or Resting Pose. Lie supine on your back, legs stretched out, arms slightly away from your body, palms facing up. Legs slightly apart, feet fall out to the sides, soften your shoulder, back of the neck long. You can add an optional bolster under the knees or a blanket roll under the neck. Gently close your eyes, let the body become heavy and melt into the support of the ground. Soften the muscles across your forehead, releasing all tension, gaze inwards. Let all the muscles and bones of your body release.

To save the images for personal use click and hold down the image until the ‘save image’ option appears; on Mac hold down ‘control’ and click the image to get the option box; on PC right click on the image to get the option box. Scroll down in the ‘option box’ and click ‘save image’.

Ruth Delahunty Yogaru

Parsvakonasana - Side Angle

SPINAL HEALTH
Parsvakonasana/Side Angle is one of the foundational poses of yoga that you will find in many yoga classes and sequences. It partners up well with Virabhadrasana II in a standing flow and is very invigorating for the spinal connective tissue. It creates space for the abdominal organs and work to reverse the effect of gravity on our spine. You might also notice after practising this sequence that you are able to breathe more freely through your day. It stretches the intercostal muscles between the ribs and helps deepen the breath and increases intervertebral space. The more lengthened our spine feels the better we are able to take a deep breath and more more fluidly.

The spinal cord runs down the centre of the spine. The nerves branch out between each vertebra and travel around the whole peripheral body to gather sensory information for the brain to process and send back motor information to cause voluntary and involuntary actions. For this signaling system to work well there needs to be healthy lubrication and space for the nerves to travel. Adding Parsvakonasana/Side Angle to your practice will help to maintain this information highway.

THE BENEFITS OF PARSVAKONASANA/SIDE ANGLE
Parsvakonasana/Side Angle stretches the shoulders, spine, inner groins, and glutes; and strengthens the glutes, quads, core hamstrings and shoulders. It has many benefits including aiding digestion, reducing menstrual cramps, stimulates abdominal organs, strengthens lungs and boosts circulation.

This pose is a very good pose to build awareness of the core being a 360 degree wrapping muscle rather than just the front of the body. The upper body is surprisingly heavy to hold at an angle. The full 360 core is working hard in this pose to carry the weight of the upper body. When you are in the pose sinch in at the full 360 waist like a strong corset. This is the transverse abdominis muscle whose main job is to contain the organs of the abdominal region and protect the spine against gravity. You will also feel the internal and external obliques working hard on the upper side of the body to stop your spine from collapsing sideways.

EXPLORING PARSVAKONASANA/SIDE ANGLE IN YOUR PRACTICE
The mini flow in the first row of the sequence targets all the areas you will need for Parsvakonasana/Side Angle – strengthening the glutes, core and shoulders; and stretching the shoulders, spine, groin and side body. On your first round take your time, scan down through your body and check your alignment in each pose. Then run through the flow two or three times with the breath.

Although strictly speaking Parsvakonasana/Side Angle is not a side bend there is certainly plenty of stretch in the upper side body and a lovely opening in the chest. This sequence has lots of side bends built into it to make sure your side body is ready to stretch open in the peak pose. Extension through the spine and lifting up out of the pelvic bowl will help you find space to hinge over the front leg.

For your first Parsvakonasana/Side Angle you will take your elbow to your knee. Press gently into the knee to help you open the chest and spin the bottom waist forward and the top waist back. To make sure your spine and core are working to hold the weight of your upper body try reaching the arm on the knee forward for a breath. For your second Parsvakonasana/Side Angle place your upper hand on the back of your head, press gently into your supporting elbow and circle your elbow and chest open.

PAUSE_0139.png

ALIGNMENT CUES
This sequence prepares you for Parsvakonasana/Side Angle. There are two standing flows with your peak pose. If you want to extend your practice run through these two main flows twice. If you want to try a few different versions of Parsvakonasana/Side Angle have a look at my Instagram post.

Have a read of the tips below and either print out the sequence or save it onto your device:

  • From Adho Mukha Svanasana, ground your left foot at a 45 degree angle. Inhale, step your right foot between your hands, check for front heel to back arch alignment, exhale here.

  • Inhale, press into your feet to come up, open your hips to the side of the mat, front knee bent. Exhale hinge to your right from your hip joint. Place your right elbow on your right thigh, or place your right hand on a brick, or to the ground inside/outside your right foot.

  • Extend your left arm up palm facing the front of your mat, reach your arm over your ear. Press into your nig toe and squeeze into the back of the hips. Lift the arches of your back food and lift the inner seams of your thighs.

  • Draw your navel towards your spine. Bottom waist rolls forward, top waist rolls back, gaze under your upper arm.

To save the images for personal use click and hold down the image until the ‘save image’ option appears; on Mac hold down ‘control’ and click the image to get the option box; on PC right click on the image to get the option box. Scroll down in the ‘option box’ and click ‘save image’.

Ruth Delahunty Yogaru

What nourishes you?

PAUSE_0138_A.png

This sequence is also available on YouTube.

YOUR NOURISHMENT LIST
Self care and nourishment go hand in hand. Taking time to look after ourselves nourishes us physically and mentally. Nourishment can be found in lots of different ways. My nourishment list includes yoga, meditation, fresh air, long walks, short walks, mountain walks, sea swims, reading for knowledge, reading for pleasure, being creative, connecting with others and best of all a good night's sleep after a restorative yoga session! Sitting down and writing your nourishment list is time well spent. Sometimes when you’re in a bit of a spin or feeling low it is hard to believe that there is a way out of it. Just take out your list and pick one of your guaranteed nourishment ‘pick me ups’.

WHAT YOGA POSES NOURISH YOU?
You can do the same with your yoga practice by building a list of poses that feel just right for you and nourish every part of your body and mind. They don’t need to be big statement poses. They are the poses that feel like you have arrived to a familiar place. Favourite poses are very personal and highlight how amazingly different we all are physically and mentally. Some days my nourishing pose might be Bakasana/Crow to help boost my energy and other days I will come back to Tadasana/Mountain throughout my practice to help me focus and notice how my practice is sitting me that day.

Most of us have poses that are our favourite, and similarly poses that challenge us. Some days meeting yourself on your mat with one of your challenging poses can help you overcome everyday challenges in life and give you the lift you need. Alternatively it can teach you to sit with discomfort and that not everything in life is to be conquered.

One of the benefits of a personal practice is that you are addressing your needs and tailoring your practice to meet them. Investing a little bit of time to work out which poses nourish you, and how they help you, will make your time on your mat more productive. Keep your list beside you as you practice and add some of your favourite poses into your practice regardless of what sequence you are following. Below are some of the poses that nourish me and how they help me. Some of the poses tick more than one box, but to give a variety examples I have picked all different poses for each list.

PAUSE_0138.png

EXPLORING WHAT NOURISHES YOU IN YOUR PRACTICE
This sequence is a collection of some of my nourishing poses which I regularly add to my practice. You can add your nourishing poses into the mini flows in the sequence or add them as stand alone poses. If your pose is a standing pose add it into the standing section, if your pose is a seated pose add it into the end of the sequence etc. As you are running through the sequence notice how the poses are sitting with you. See what effect the poses I have picked have on you.

ALIGNMENT CUES
The peak pose of this sequence is Ardha Chandrasana/Half Moon, one of my favourite poses that helps me feel strong, focused and energised.

Have a read of the tips below and either print out the sequence or save it onto your device:

  • From Trikonasana with your right leg forward, bend your front knee. Place your right hand a foot forward to the little toe side of your right foot, on a brick, or the ground, left hand on your hip.

  • Step your left foot forward a little, press down through the three points of your right foot.

  • Inhale, float your left leg up to hip height or slightly above, toes facing forward. Flex your foot parallel to the ground, press out through the heel, firm your lifted leg.

  • Hips and shoulders stacked, reach your left arm up high, palm facing left, gaze down or to your left fingertips.

To save the images for personal use click and hold down the image until the ‘save image’ option appears; on Mac hold down ‘control’ and click the image to get the option box; on PC right click on the image to get the option box. Scroll down in the ‘option box’ and click ‘save image’.

Ruth Delahunty Yogaru