Baddha Konasana - Bound Angle

YOGARU_Baddha Konasana_PB.png

SIT WITH WHATEVER COMES
Baddha Konasana/Bound Angle is also known as cobbler's pose, named after traditional Indian cobblers who sat in this pose when they worked. In Ayurveda traditions this pose is touted to be a pose that ‘destroys all disease’. Similar to Malasana it stimulates a healthy gut which has a strong link to our moods and emotional well-being. Stress leads to gut issues and similarly gut issues lead to stress. Baddha Konasana/Bound Angle stimulates the gut and releases happy hormones which relieves stress, tension and anxiety. When we are relaxed and stress free the body functions more efficiently and can concentrate on strengthening the immune system. So unbeknownst to them these cobblers were happily boosting their immune systems as they worked!

Baddha Konasana/Bound Angle is a pose that is accessible for all but requires patience and for the ego checked at the door. Although most pose illustrations will show the knees on or close to the ground, in reality most practitioners will have their knees much further away from the ground. The pose starts the minute to move into it and finishes when you reach the point where you feel sensations. If you find you are getting frustrated by how high up your knees are, concentrate on a different element of the pose like what parts of your body are strengthening. This is not a pose to use strength to push the knees down. In my experience these muscles don’t appreciate undue force and can quite easily be overstretched. Most importantly be patient and appreciate what you can do in the pose.

THE BENEFITS OF BADDHA KONASANA/BOUND ANGLE
Baddha Konasana/Bound Angle is a strong inner thigh and groin stretch. These adductor muscles can often be very tight, particularly if you are a runner, and are often tighter in men. Baddha Konasana/Bound Angle is the perfect pose for gently softening this inner thigh tension. While the inner thighs are stretching the glutes at the back of the hips are strengthening in order to open the hips out. The muscles of the core and the spine are also working hard in tandem to keep your spine upright in this seated position.

In the category of health and wellness benefits Baddha Konasana/Bound Angle increases blood supply and tones the organs of the lower abdominals including the digestive system, reproductive organs and pelvic floor. It stimulates digestion, relieves constipation, menstrual cramps and sciatica.

EXPLORING BADDHA KONASANA/BOUND ANGLE IN YOUR PRACTICE
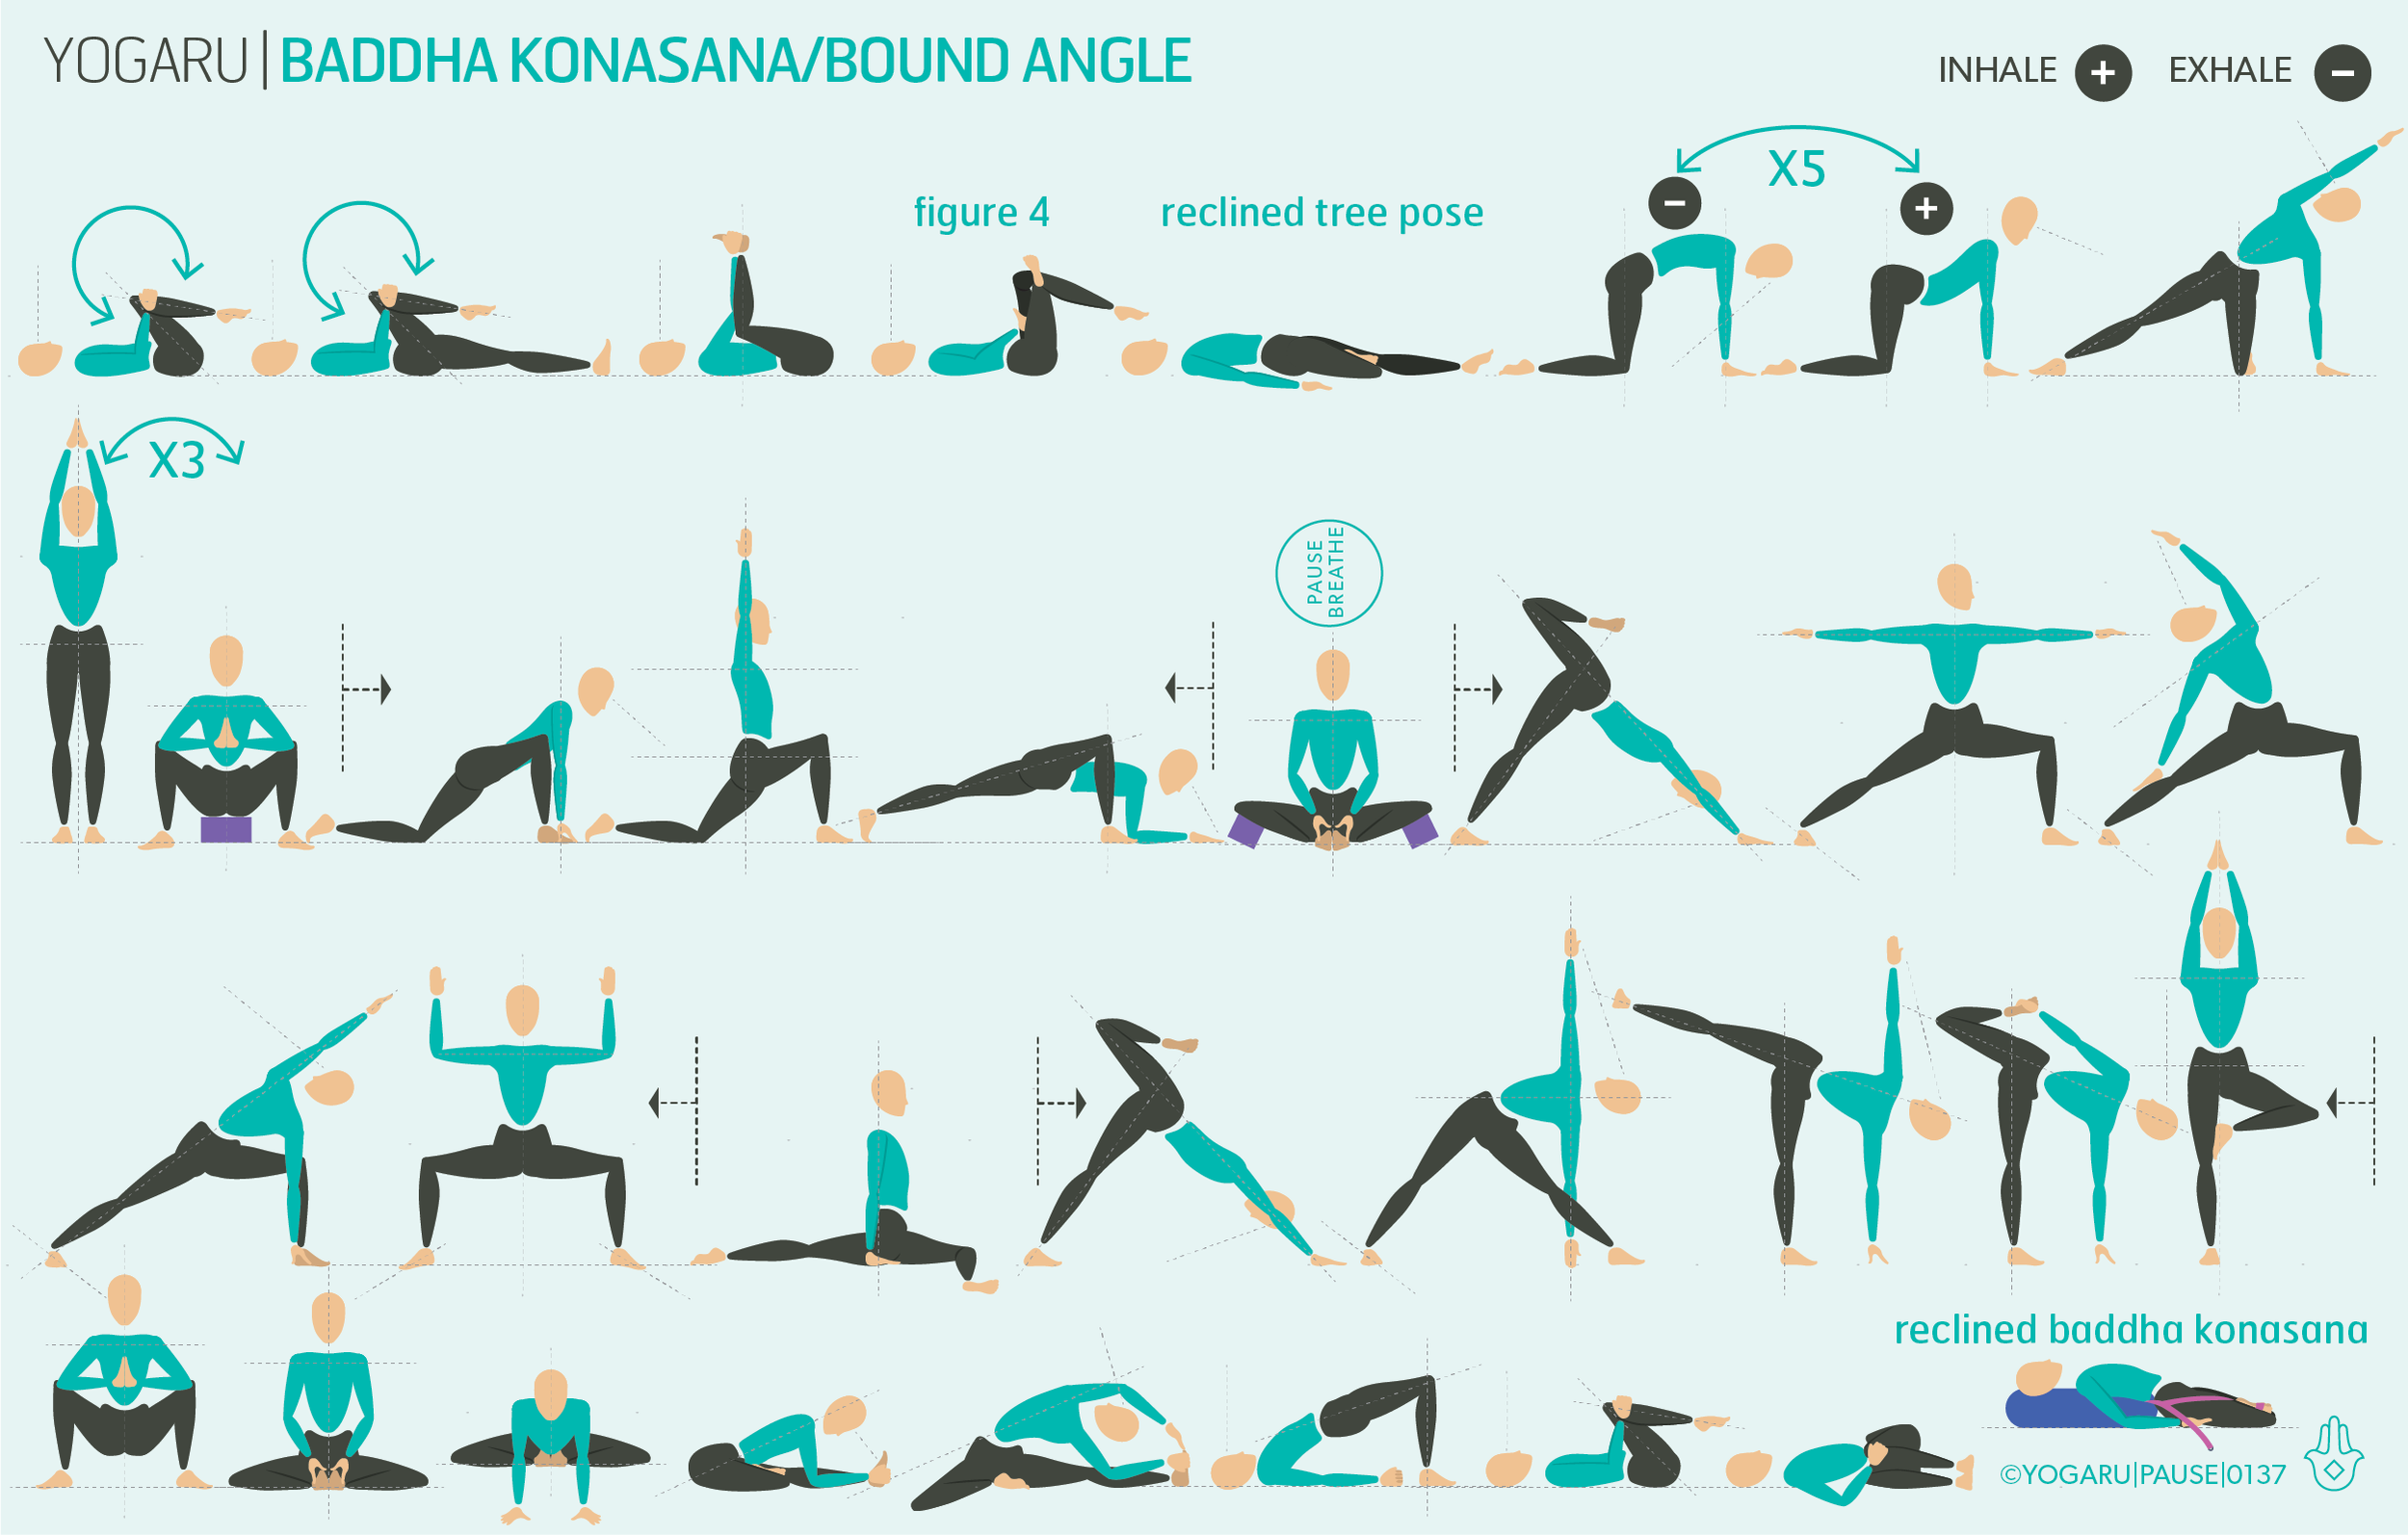
Journeying into Baddha Konasana/Bound Angle with awareness of the different areas that need to be prepared makes it easier to give it your best shot. As you run through the prep poses, notice if there are particular ones that you find more difficult, spend a bit more time on these poses and breathe deeply in them.

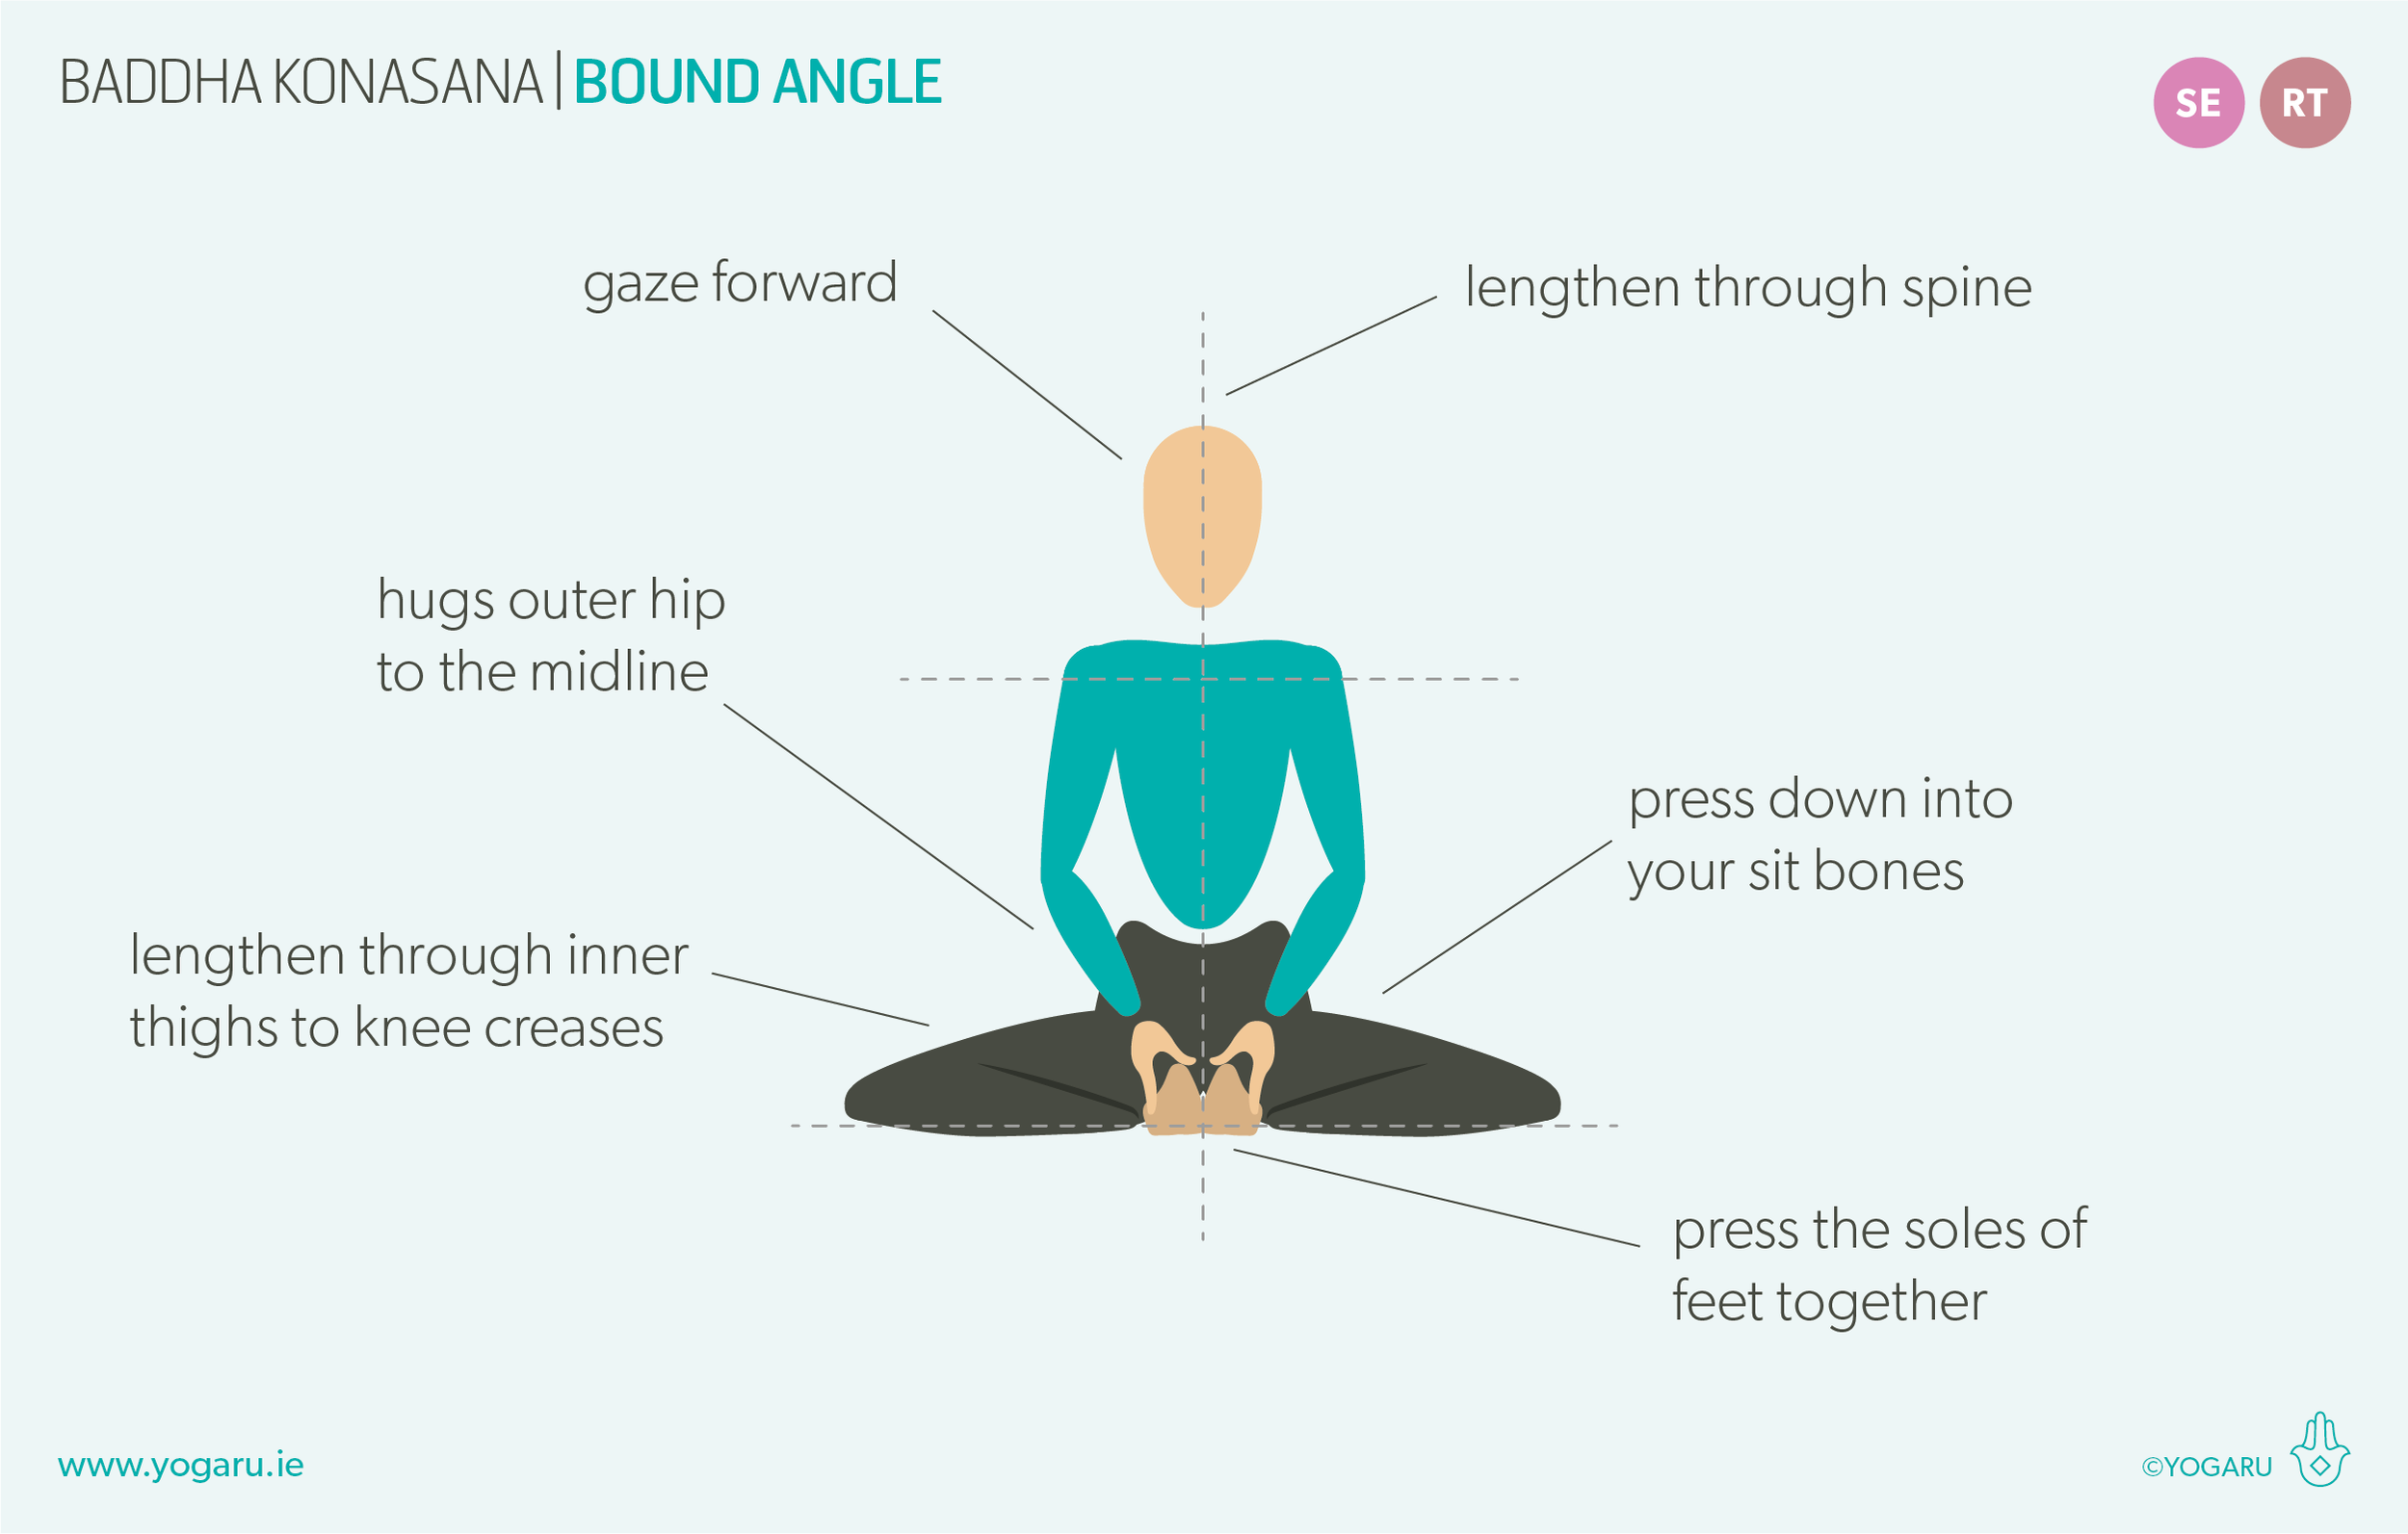
When in the pose use your arms, which are extended and holding onto your feet, as splints to rotate your pelvis into a stacked position and look for a lovely neutral spine with all its natural curves. If you find the pose bothers your knees, try pressing into the outer edge of your feet to prevent your feet from sickling and release some tension from the knee joint.

PAUSE_0137.png

ALIGNMENT CUES
You will start to prepare yourself for Baddha Konasana/Bound Angle with some gentle inner groin stretching in your warm up. Lengthening up through the spine and lateral bends will help you to find a good strong spine in your peak pose. There will also be some variations of Baddha Konasana/Bound Angle for you to try.

Have a read of the tips below and either print out the sequence or save it onto your device:

  • From Dandasana, bend your knees out to the sides, bring the soles of the feet together and place your feet close to your sit bones.

  • Hold onto the outer edge of your feet, release your legs out to the sides, press the soles of your feet together.

  • Stretch your knees away and down towards the ground, hug your outer hips to the midline.

  • Soften your shoulders away from your ears, broaden and expand the chest.

  • Inhale, press down into your sit bones to lengthen up through your spine.

  • Use your thumbs to open the soles of your feet out like a book, lengthen your inner thighs out to your knee creases, gaze forward.

To save the images for personal use click and hold down the image until the ‘save image’ option appears; on Mac hold down ‘control’ and click the image to get the option box; on PC right click on the image to get the option box. Scroll down in the ‘option box’ and click ‘save image’.

Ruth Delahunty Yogaru

Calming flow

PAUSE_0136.png

This sequence is also available on YouTube.

THE NERVOUS SYSTEM
The nervous system is our body's method of reacting to ever changing situations inside and outside the body. It sends ‘sensory’ messages to the brain, which responds by sending ‘motor’ messages to the glands and muscles of the body to cause a chain of reactions to the situation.

When we are stressed the sympathetic nervous system, or the ‘fight or flight’ response, is firing. The nervous system sends signals to the brain and the brain decides the best action to take. In this stressed state it signals the body to increase heart rate and blood pressure, open our airways, inhibit digestion and reproductive organs, stimulate adrenaline production, open our sweat glands and tense the muscles ready for action. All with the purpose of dealing with the perceived stressful situation. When the stress has eases the body clears out the stress hormones and resets the organs and systems. But when we are constantly being triggered by stress the body gets stuck in this cycle and the systems get flooded by stress hormones it can’t flush out quick enough. In an ongoing state of chronic stress the organs of the body are not working optimally – reducing the functionality of the immune system, causing inflammation and eventually leading to health issues.

When the parasympathetic nervous system, or ‘rest and restore’ response, is triggered the nervous system sends signals to the body to reduce heart rate and blood pressure, relax our airways, stimulate digestion and reproductive organs, inhibit adrenaline production and relax the muscles. This creates optimal conditions for the functionality of the organs of the body, strengthens the immune system and relieves symptoms of stress, anxiety and tension.

These two reactions are autonomic nervous system responses which means they are involuntary and not something we can switch on and off. But we can create favourable conditions to influence which response we are in, depending on what we are looking for. They work hand in hand and when strong and malleable have the ability to shift smoothly from gear to gear throughout the day. To simplify it – our sympathetic nervous system gets us out of bed and helps us get our work done, and our parasympathetic nervous system help us rest and restore at the end of the day and gets us ready for a good night sleep. The body strives for balance and will always look to come back to homeostasis. Yoga is one of the best methods for helping your body find this delicate balance between the two nervous systems.

WHY IS YOGA CALMING?
What is it about yoga that makes it so calming? A question I frequently asked and was never completely satisfied with the answer ‘because it balances the nervous system’.

There are many nerves responsible for the parasympathetic response, most of them come from the cranial nerves with just three coming from spinal nerves. The main cranial nerve associated with 75% of the parasympathetic nerve fibres, and for regulating the parasympathetic response, is the vagus nerve. It travels to and from the brainstem straight to the throat, heart, diaphragm, stomach, kidneys, liver, pancreas, gallbladder, sphincter and reproductive organs. It initiates the parasympathetic responses to slow heart rate and reduce blood pressure, relax our airways, stimulate digestion and reproductive organs, inhibit adrenaline production, stimulate endorphin productions and relax the muscles.

BREATH, MOVEMENT AND CONSCIOUSNESS
There are three pathways to tapping into the vagus nerves – the way we breathe, how we move and how present on our mat we are during our practice. The vagus nerve runs through the centre of the diaphragm. When we breathe, in particular an extended exhale, the diaphragm stimulates the vagus nerve and causes a chemical reaction which activates the nerve fibres and sends messages to the brain. The brain processes this information from the vagus nerve and initiates the parasympathetic response in all the parts of the body which this ‘wandering nerve’ travels to. The breath is one of the fastest ways to stimulate the vagus nerve which is why it is so important in yoga.

Receptors called mechanoreceptors are found in the hips, knee, shoulders and spinal joints. We activate them by gently moving and stretching the connective tissue of these joints. They respond by sending signals to the brian to inhibit the sympathetic response. When the sympathetic nervous system is inhibited the parasympathetic nervous system kicks in.

Being present on our mat as we move also has a big impact in the effectiveness of our practice in terms of calming and soothing. When we consciously take the time to switch off and include some self care into your day it helps start a positive mindset. Sometimes stress can be managed by just consciously breaking the loop. This combined with the breath and movement allows the vagus nerve to communicate with the amygdala (emotional response) and reduces its inclination towards the sympathetic ‘fight or flight’ response and rewires it towards a parasympathetic response. Think of the vagus nerve as the steady minded peacekeeper at decision times.

EXPLORING FINDING CALM IN YOUR PRACTICE
This sequence starts with some gentle repetitive flows to link movement with breath, ease out any held tension and initiate the calming process. This will gently help the mind and body to accept the idea of clearing out stress, anxiety or tension and transform to a calmer state of being.

Start your practice with a few rounds of viloma breath to help you link with your breath and naturally lengthen the exhale. You can do this lying on your back or in a comfortable cross legged seated position. Viloma breath breaks the exhale into three. When you are ready take one full breath for nothing, then inhale completely, exhale, pause, exhale, pause, and exhale the full breath.

After your standing flows you will come down for some seated poses to bring you down to a grounded practice and continue to cultivate a calming practice.

ALIGNMENT CUES
The mini flow will help you connect breath with movement. You will see a ‘+’ for the inhale and a ‘-’ for the exhale to help you establish a nice smooth breath. If you are finding it hard to shift to a lower gear continue to repeat the mini flow until you notice you are starting to flow with ease and a sense of submission to the practice.

The peak pose of this sequence is Upavistha Konasana/Wide Leg Seated Forward Fold which is a calming seated forward fold.

Have a read of the tips below and either print out the sequence or save it onto your device:

  • From Dandasana, open your legs out wide, press out through the heels, thighs pressing into the ground, toes pointing up.

  • Place your hands either side of your hips, stack your pelvis.

  • Inhale, lengthen up through your spine, exhale, fold forward from the hip joint, stretch your arms out between your legs and lengthen through the front, sides and back body, draw your navel towards your spine. Sit bones reach back.

  • Lead with your sternum, inhale, lengthen the spine, exhale, release further forward, walk your hands forward a little as you fold forward, or hold onto your big toes, gaze down.

To save the images for personal use click and hold down the image until the ‘save image’ option appears; on Mac hold down ‘control’ and click the image to get the option box; on PC right click on the image to get the option box. Scroll down in the ‘option box’ and click ‘save image’.

Ruth Delahunty Yogaru

Adho Mukha Vrksasana - Handstand

YOGARU_Adho Mukha Vrksasana_PB.png

FACE YOUR FEARS
Full disclosure, I have a turbulent relationship with Adho Mukha Vrksasana/Handstand! I used to pop up into it without a care in the world, until one of my shoulders buckelled and I exited inelegantly in a heap on the floor with a new collection of bruises to more than just my ego. For many years after I’d break out in a cold sweat at the mention of handstands in classes, until recently I decided enough was enough. It was time to make peace with the pose, tackle my demons, and build strength and trust in my shoulders again.

THE BENEFITS OF ADHO MUKHA VRKSASANA/HANDSTAND
Inversions have become very popular, and for a wide variety of very good reasons too. Inversions aid circulation and help the heart do its job of bringing fresh oxygenated blood to the brain – which is very energising, improves focus and concentration, and reduces stress and anxiety. This boost in circulation flushes out toxins from all the systems of the body and allows it to work more efficiently and build a strong immune system. They are also beneficial for good digestion; building physical strength and stamina; increasing metabolism; regulating hormones; increasing spatial awareness and coordination. Quite an extensive list for a humble upside down pose!

EXPLORING ADHO MUKHA VRKSASANA/HANDSTAND IN YOUR PRACTICE
Prep and practice is key when building up to poses like Adho Mukha Vrksasana/Handstand. Similar to headstand, strong shoulders and core are essential to the pose. I find spending a bit of time lengthening out the hamstrings help in getting you into a good set up position for kicking up. The two areas that haunted me the most were – trusting that my shoulders would stop me from buckelling forward, and having sufficient grounding in my hands to swing up from. So I devised a propped Adho Mukha Vrksasana/Handstand method to support me while I tackled these fears. The set up gradually builds you up towards the full pose. The props can be removed one at a time, as you find comfort in each step, while building strength in your shoulders and core.

PAUSE_0135.png

ALIGNMENT CUES
Approach this sequence with no expectation or self judgement. Adho Mukha Vrksasana/Handstand is a difficult pose for most, so be kind to yourself and expect to invest a bit of time if it is your first attempt at Adho Mukha Vrksasana/Handstand.

Have a read of the tips below and either print out the sequence or save it onto your device:

HOW TO USE PROPS FOR ADHO MUKHA VRKSASANA/HANDSTAND
Start from the beginning, set up and remove props to find the level you are most comfortable working with. You will need a bolster, two bricks (bricks are chunky) and two blocks (blocks are the flat ones):

  • Set your yoga mat up short end to the wall. Place your two bricks perpendicular to the wall, just narrower than shoulder width, on their mid height,. Place your bolster on top of the two bricks. Place your two blocks to the left side of your mat under where your leg foot will be. These will help lift your pelvis up higher when you are getting ready to kick up.

  • Place your hands on your mat just under the bolster, shoulder width apart, so that the bolster supports your shoulders. Press down evenly through your hands, grip the ground and lengthen up through your arms to your shoulders.

  • Walk your feet in towards your hands as far as you can to a narrow Downward Dog and stack your shoulders over the heels of your hands. Let your head reach down towards the bolser but try to not use the support of the bolster. Think of it as your fail safe.

  • Bend your left leg, lift your right leg up as high and straight as you can. Reach your pelvis forward towards the wall.

  • Send all your energy to your bent leg and spring your right leg up overhead, follow quickly with the left leg, reach your legs up high, draw your navel towards your spine.

  • Hug your outer hips and inner thighs to midline, press through the balls of your feet. To come down, lower your right legs down first and carefully place your left foot down if you have used the stacked blocks.

  • When you are comfortable kicking with this setup remove one block and try again; then the second block; then reduce the height of the bricks to their lowest; then progress to ‘How to handstand with a wall’

HOW TO USE A WALL FOR ADHO MUKHA VRKSASANA/HANDSTAND
When you’re ready to move on to full handstand stay at the wall until you are very comfortable with kicking up and balancing without the support of the wall.

  • Set your yoga mat up short end to the wall. Place your hands on your mat shoulder width apart, wrists parallel about 6 inches away from the wall. Press down evenly through your hands, grip the ground and lengthen up through your arms to your shoulders.

  • Gaze to the ground between your hands, walk your feet in towards your hands as far as you can to a narrow Downward Dog position and stack your shoulders over the heels of your hands.

  • Bend your left leg, lift your right leg up as high and straight as you can. Reach your pelvis forward towards the wall.

  • Send all your energy to your bent leg and spring your right leg up overhead, follow quickly with the left leg, reach your legs up high, draw your navel towards your spine.

  • Hug your outer hips and inner thighs to midline, press through the balls of your feet. To come down, lower your legs one at a time.

TIPS
Below are some extra tips to help you along the way.

  • Incorporate lots of Dolphin pose into your practice to build strength and stamina in your shoulders.

  • If you’ve just gone to a hip opening class try out your handstand practice when you get home. You’ll notice you can find your narrow Downward Dog easier which is half the battle to lifting your hips up over your shoulders.

  • Handstand kick up position is harder work on the shoulders than hanging out in handstand. Get into position and move promptly into your handstand before fatigue or the ‘I can’t’ mindset starts kicking in.

  • Run through your prep with your teacher and get as much tips and feedback on where you might be resisting in your kick up.

  • If you are new to handstands practice with the guidance of a yoga teacher before you incorporate them into a home practice.

  • Avoid practicing headstand if you have a back injury, neck injury, shoulder injury, high blood pressure, glaucoma, sinus infection or it’s your time of the month.

  • Handstands are definitely a tricky pose for most people. Prepare to build some handstand drills into your everyday practice if you really want to get with the handstand vibes!

To save the images for personal use click and hold down the image until the ‘save image’ option appears; on Mac hold down ‘control’ and click the image to get the option box; on PC right click on the image to get the option box. Scroll down in the ‘option box’ and click ‘save image’.
Ruth Delahunty Yogaru