Anatomy 101 - The hips

THE HUB OF ALL MOVEMENT
The hip joint is a ball and socket, synovial joint, designed for heavy duty usage and weight bearing. The hips are the joint with the most bony structural differences person to person – making them the joint with the most variety in mobility potential person to person too. Tightness in the front of the hips (hip flexors) pulls the pelvis forward into an anterior tilt – causing the lower back to overarch, the upper chest to puff and the head to tilt back. Tightness in the back of the hips (hip extensors) pulls the pelvis backwards into a posterior tilt – causing the lower back to flatten back, the upper back to overarch forward and the head to tilt forward. Balance and harmony in the hips unifies the upper and lower body and attributes to better fluid movement of the spine too. The hips like to be perfectly stacked over the foundation of our feet, to avoid unnecessary stress on the spine and allow the natural curves of the vertebrae to function properly as a shock absorption system.

THE STRUCTURE OF THE HIPS
The hips are made to be durable and to absorb the forces of gravity and body weight. The socket is much deeper than the shoulder joint which gives it slightly less mobility but much greater stability. The socket is made of several layers, each with their own important job. Starting with the deepest layer of the socket you have the bone of the hip. This bone is covered by a ‘c’ shaped fibrous lining which facilitates gliding called the cartilage. Around the edge of the socket is a rim, which creates a seal and deepens the socket, called the labrum. Then there is a tube like fibrous connective tissue, attached to the rim of the socket and around the head of the femur, which secretes synovial fluid, called the capsule. Next you have the ligaments, holding bone to bone to stabilise the joint. Finally you have many layers of tendons and muscles which facilitate movement of the hip joint.

The hips are made up of two bones – the pelvis (illium, pubis & ischium) and the leg bone (femur). The ball and socket joint is made up the top of the leg bone, called the head of the femur, and the socket which sits on the lower part of the pelvis, called the acetabulum.

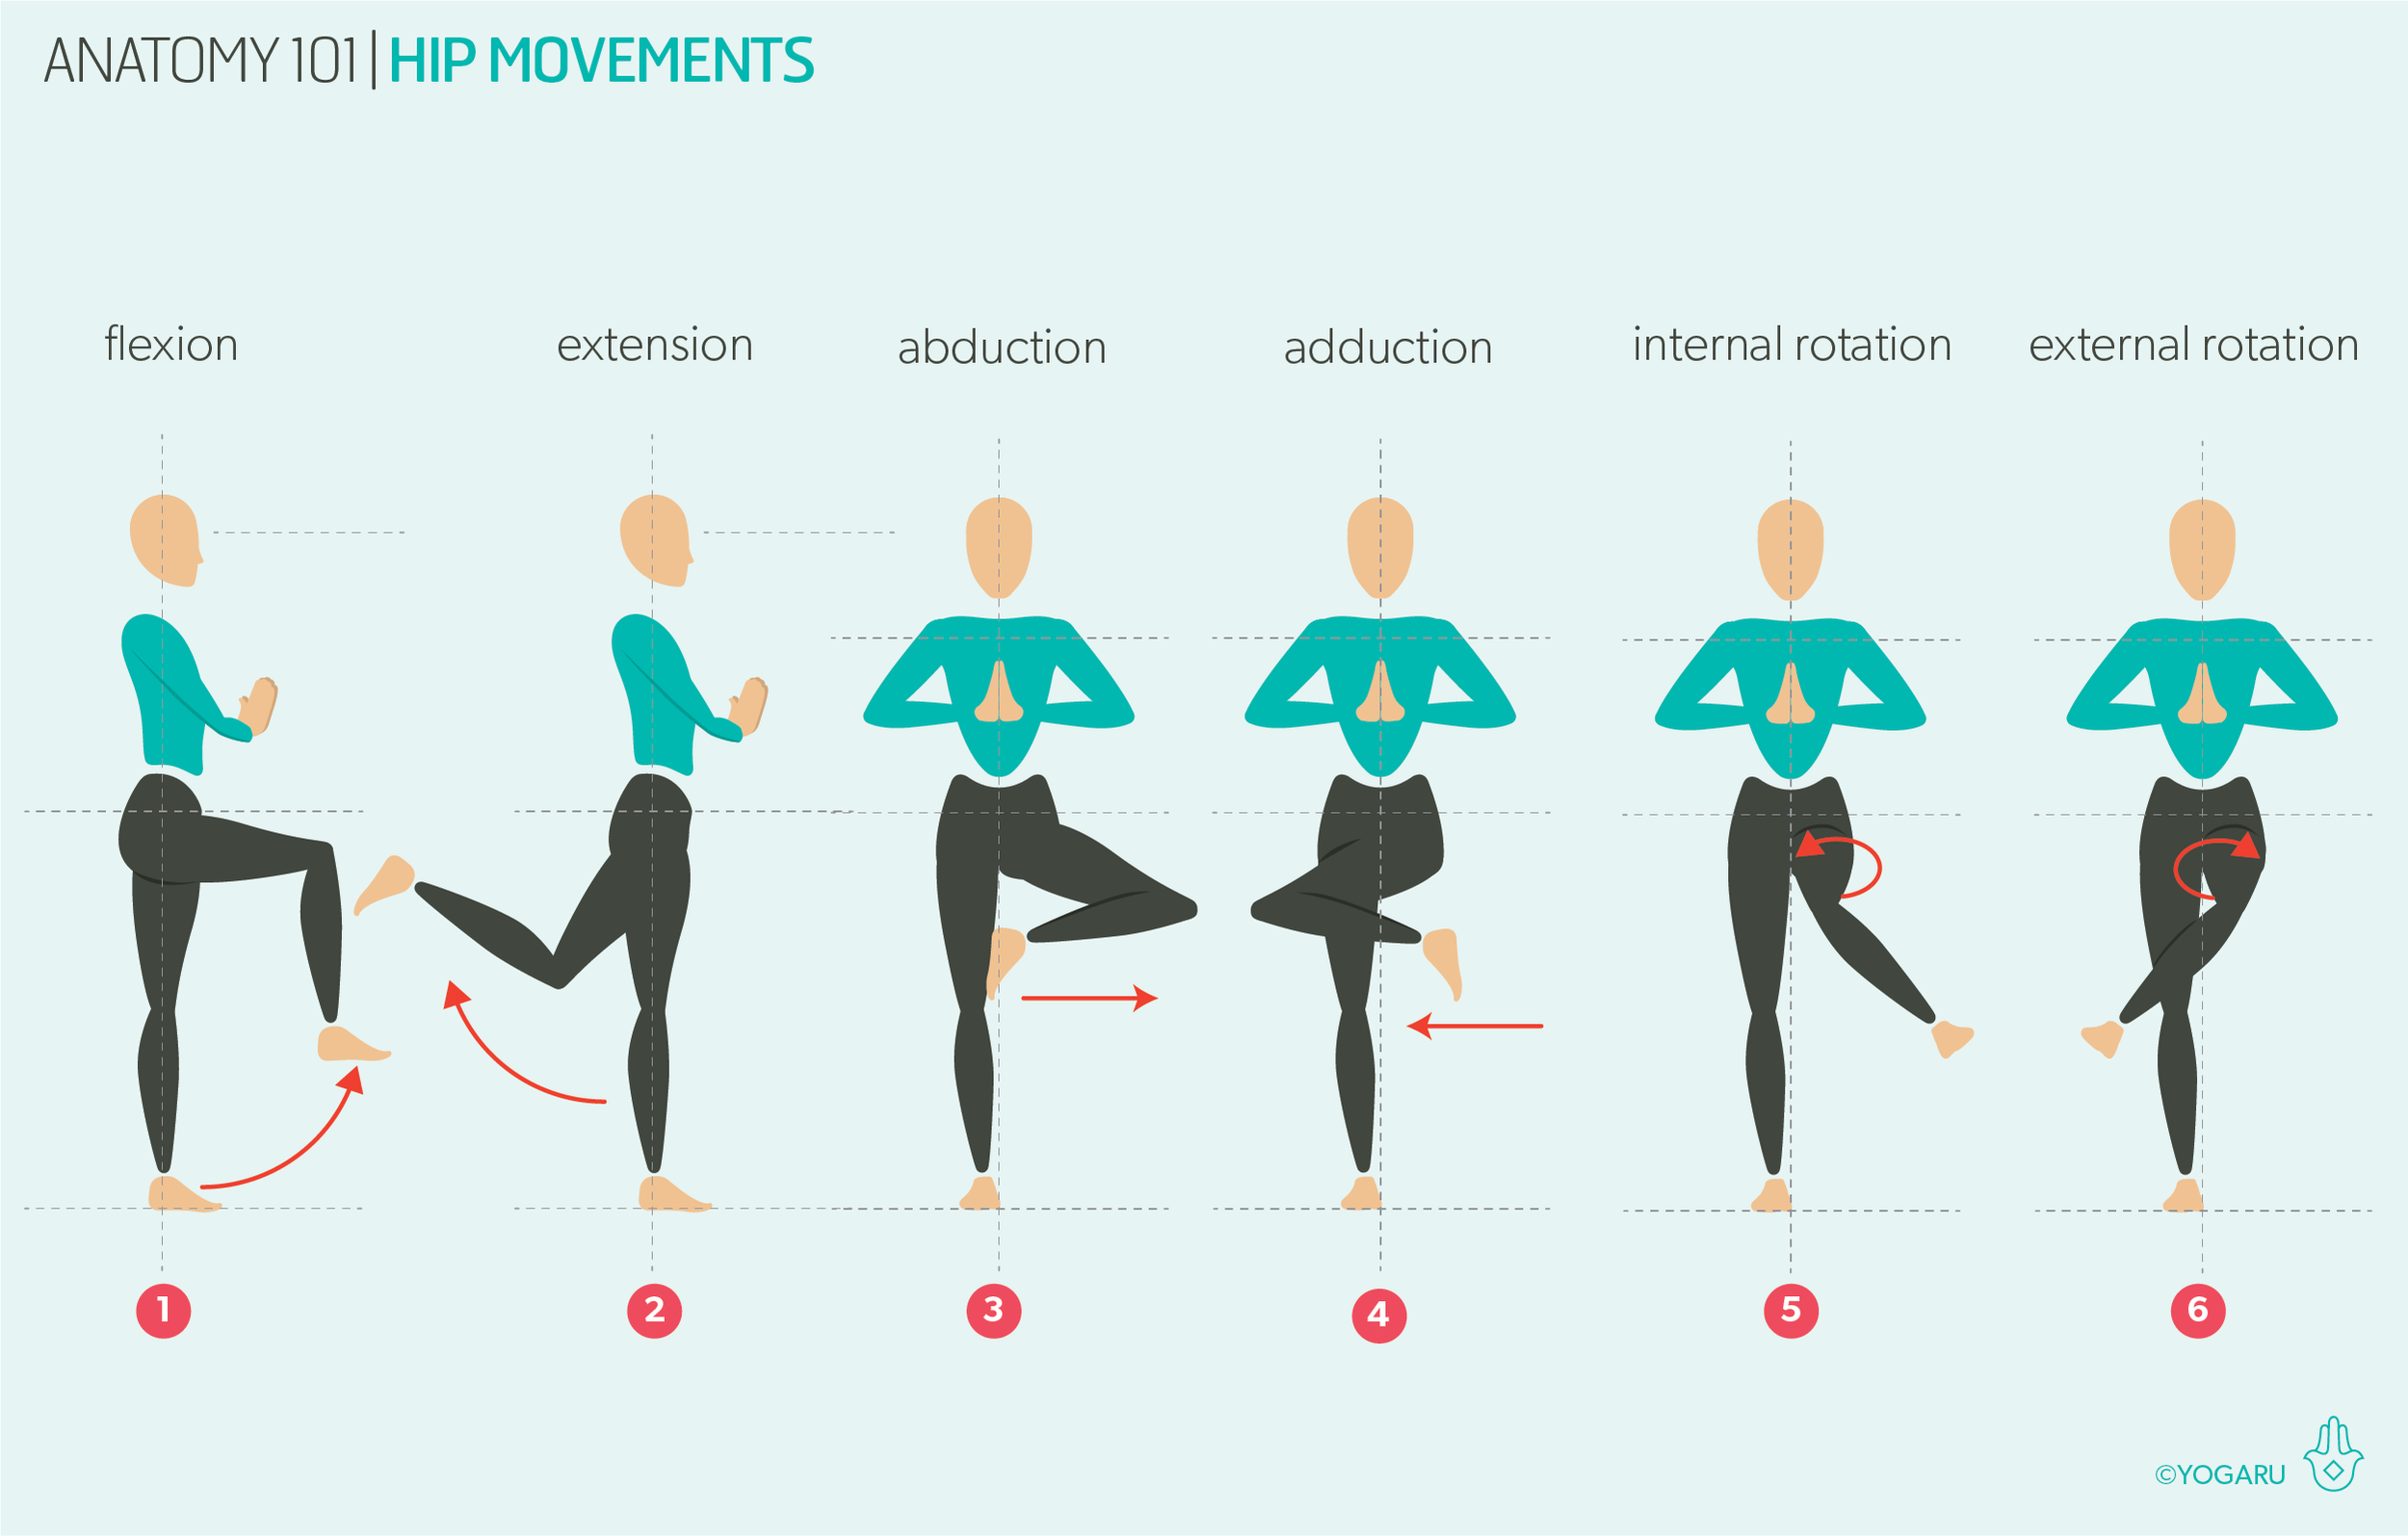
THE MOVEMENTS OF THE HIPS
Below there is an illustration of the six movements of the hip joint:

Flexion – where the leg lifts forward and up.
Extension – where the leg reaches back and up.
Abduction – where the leg moves away from the midline.
Adduction – where the leg moves towards the midline.
Internal rotation – where the leg rotates inwards.
External rotation – where the leg rotates outwards.

THE MUSCLES OF THE HIPS
For those of you who love to go deeper into the actions of the hip joint I have also listed the six movements with their assisting muscles in the chart below. Grouping the muscles to the action rather than looking at each muscle in isolation gives a more experiential understanding.

EXPLORING THE HIPS IN YOUR PRACTICE
If you observe your habitual postural habits, in standing and sitting, you most probably find you are inclined to tip your pelvis slightly forward or back. Working with your hips in your practice will help you become more aware of your posture and help release the muscles of your hips that might be tight, and strengthen the muscles that might be weak.

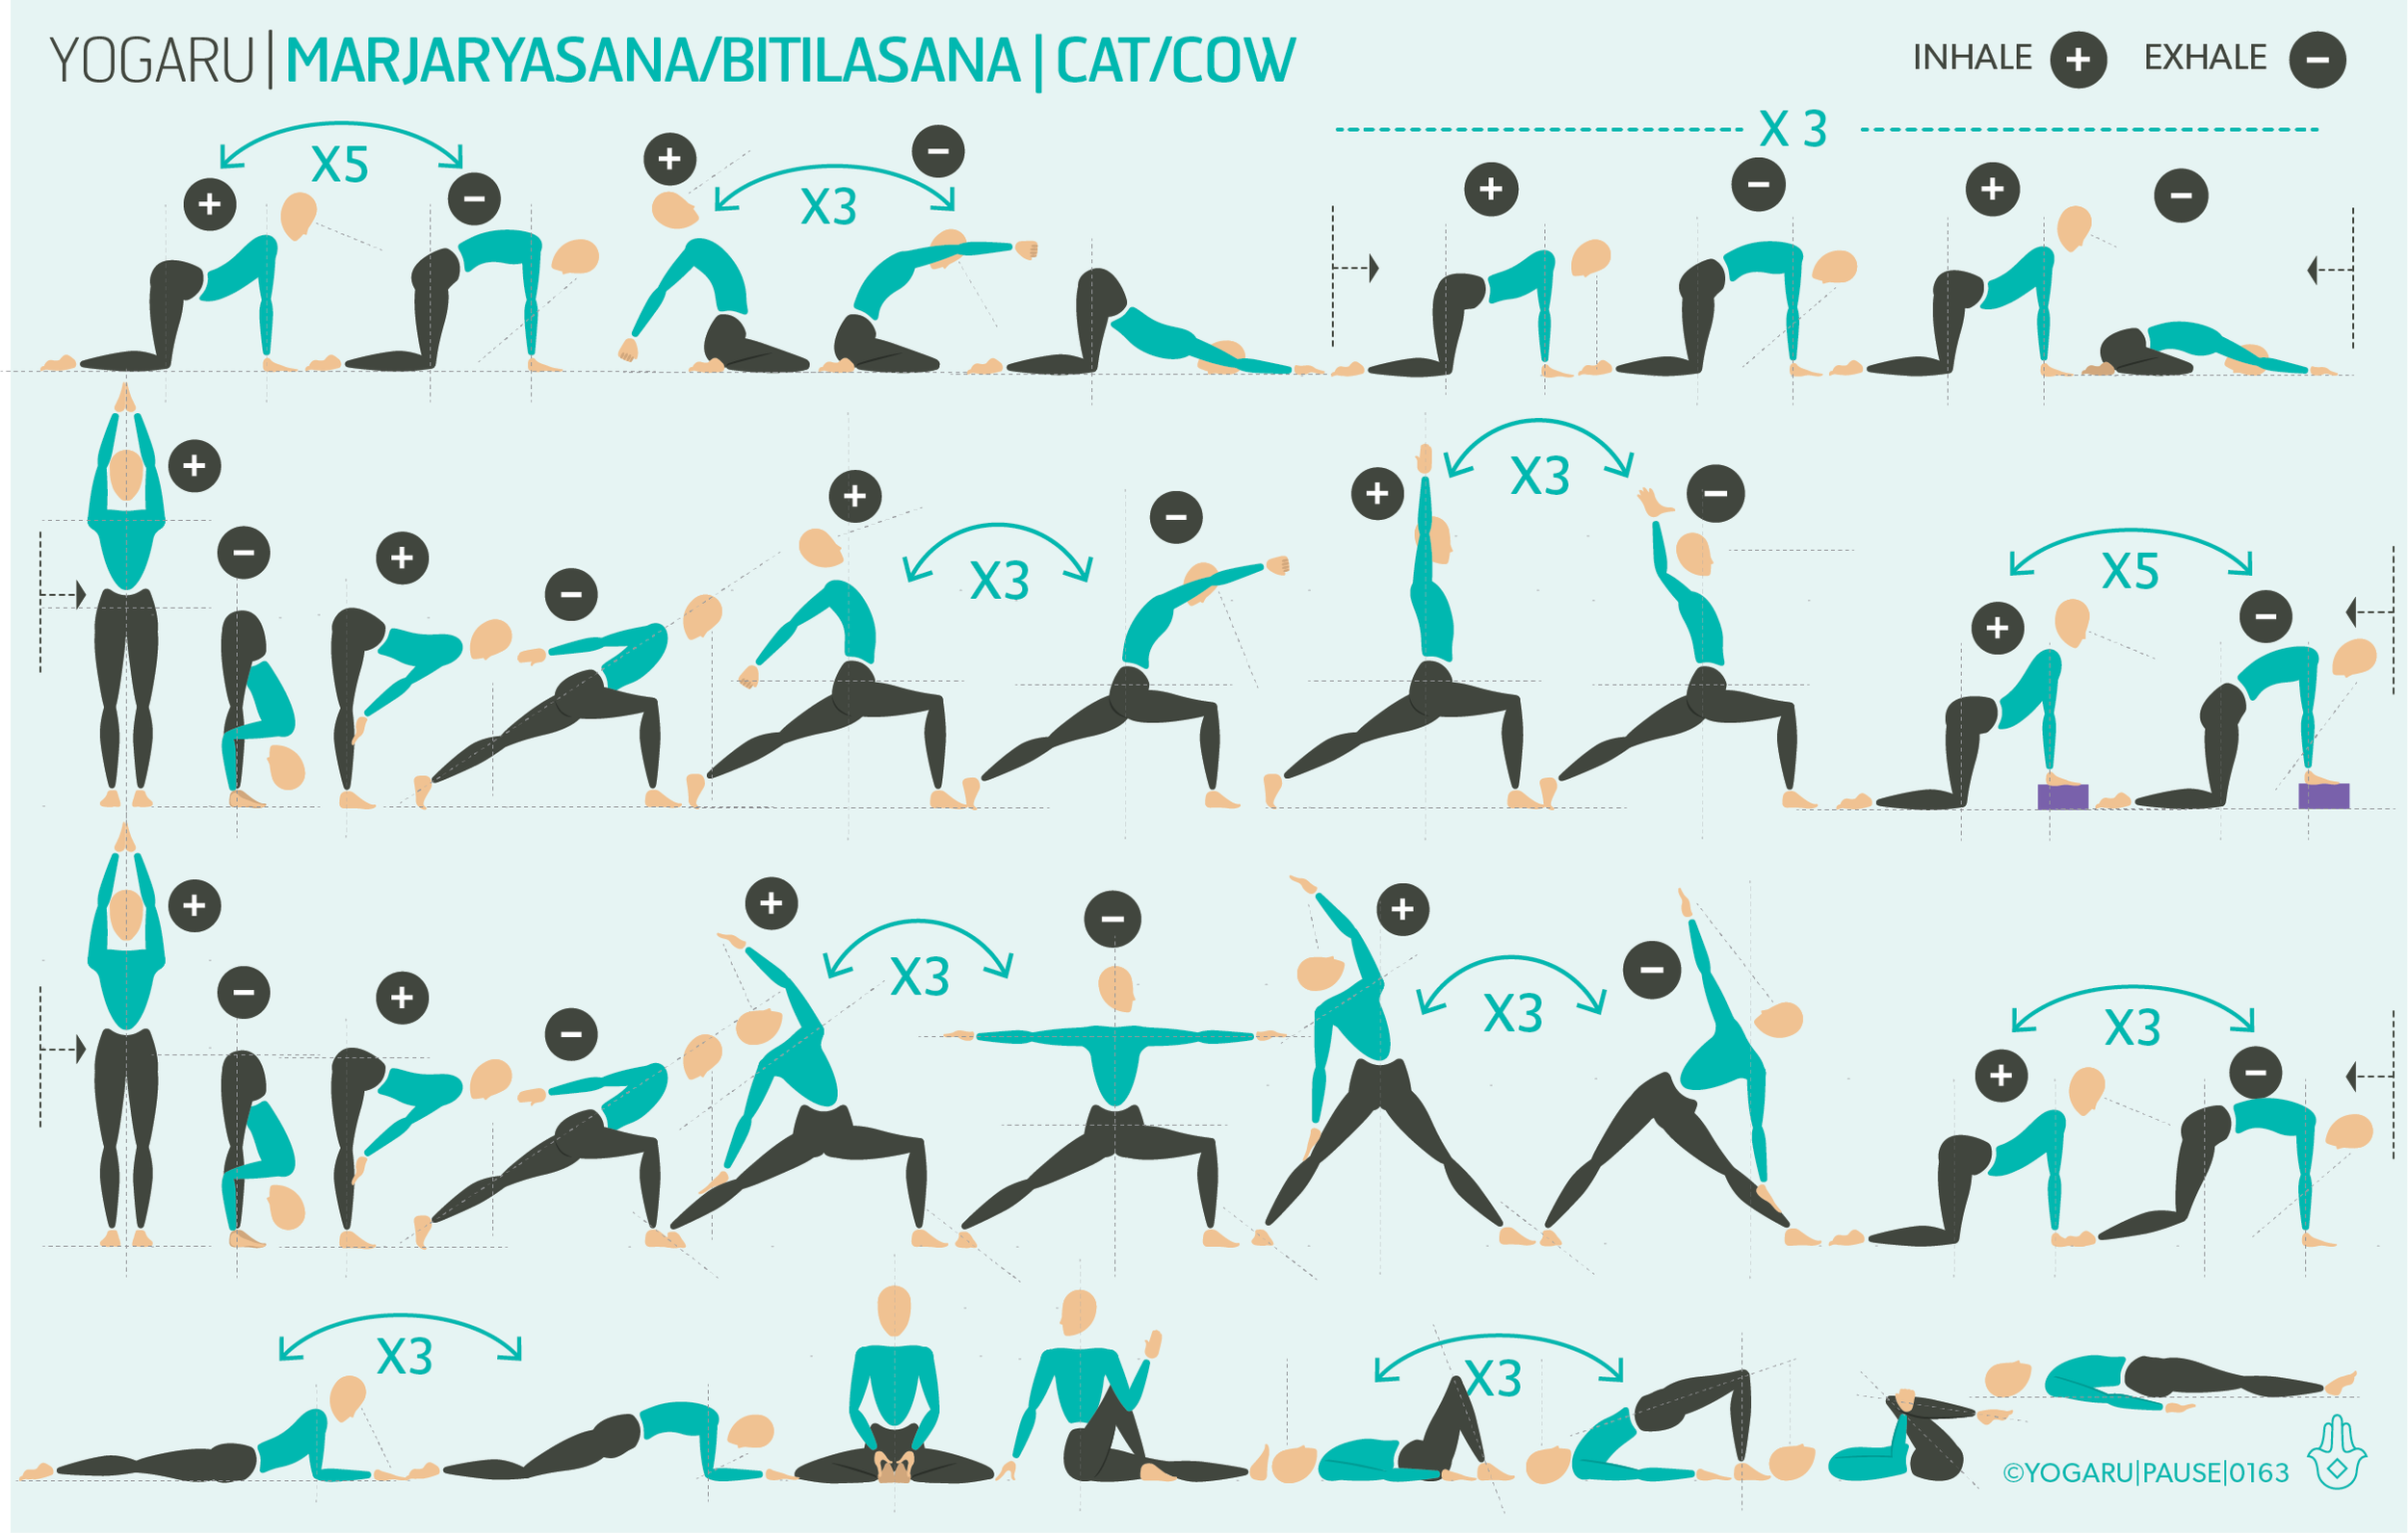
This sequence will mobilise your hips in all directions and leave them feeling strong and stable, with lovely freedom of movement too. Bring your full attention to the hips as you move through the sequence. Notice what your strengths and weaknesses are with regards to the six different movements. It is very normal to have one movement that you move more freely in and one that feels a bit more sticky or challenging for you.

ALIGNMENT CUES
This sequence will bring you through the six movements of the hips – flexion, extension, abduction, adduction, internal and external rotation. Focus your full attention on your hips throughout this practice and move slowly into and out of each pose. See can you notice what areas of the hip are being stretched and which are being strengthened as you move. The sequence is numbered to highlight sample poses from each movement of the hips to give you a better understanding of the role of the hip joint in the pose. Below are the six asana which are highlighted in the sequence where you will feel the six movement of the hips:

1 – Flexion - Standing lifting the leg forward, front leg in Ashta Chandrasana/Eight Crescent Moon, Knee to chest.
2 – Extension - Standing lifting the leg back, back leg in Ashta Chandrasana/Eight Crescent Moon.
3 – Abduction - Half kneeling leg lifts, Parsvakonasana/Side Angle, Utkata Konasana/Goddess.
4 – Adduction - Ardha Matsyendrasana/Half Lord of the Fish, Gomukhasana/Cow Face
5 – Internal rotation - Back leg in deer pose.
6 – External rotation - Virabhadrasana II/Warrior II, Parsvakonasana/Side Angle, Utkata Konasana/Goddess, Gomukhasana/Cow Face.

To save the images for personal use click and hold down the image until the ‘save image’ option appears; on Mac hold down ‘control’ and click the image to get the option box; on PC right click on the image to get the option box. Scroll down in the ‘option box’ and click ‘save image’.

Ruth Delahunty Yogaru

Marjaryasana & Bitilasana - Cat & Cow

ANIMAL MOVEMENT
Marjaryasana/Cat and Bitilasana/Cow go together like two peas in a pod and are perfect at any stage of your sequence to warm up, or ease out tension in the hips, spine and shoulders. I start off all of my own yoga practices and lots of my sequences with a few rounds of Cat & Cow. Even though they are often referred to as Cat & Cow it makes more sense to me to practice them as Cow first, with an inhale, and Marjaryasana/Cat after, with an exhale. In Bitilasana/Cow, when we inhale, the top of the pelvis tips down, the shoulder blades retract and draw together on the back, and the back of the shoulders reach towards the back of the hips. While in Marjaryasana/Cat, when we exhale, the pelvis tips up, the shoulder blades protract and spread apart on the back, and the front of the shoulders roll forward. All these opposites, in this simple two pose movement, make it a very good way to stretch and strengthen the hips, spine and shoulders joints. They are also very accessible with minimum scope for injury.

THE BENEFITS OF MARJARYASANA & BITILASANA - CAT & COW
Bitilasana/Cow strengthens the spine, and back of the shoulders, and stretches the front of the shoulders, chest, core and back of the hips. In Marjaryasana/Cat the opposite is happening – it stretches the spine, and back of the shoulders, and strengthens the front of the shoulders, chest, core and back of the hips. Bitilasana/Cow is a good prep for backbends while Bitilasana/Cow is a good prep for forward bends and poses like Bakasana/Crow. They are also very good poses for spinal health and massaging all the organs of the abdominal region. As we move from one pose to the other we are also linking the breath with movement, which is a valuable method for reduces stress and anxiety.

EXPLORING MARJARYASANA & BITILASANA - CAT & COW IN YOUR PRACTICE
Marjaryasana/Cat and Bitilasana/Cow can be added at pretty much any stage of your practice. You can even add it into other sequences to counterpose from a mini flow with lots of spinal, hip or shoulder work. In this sequence I have added them in as much as possible and added versions of Marjaryasana/Cat and Bitilasana/Cow to show how versatile they can be too. If you find your wrists are uncomfortable, place a rolled up blanket under the heels of your hands to reduce the angle at the wrist. If this doesn't relieve the discomfort, place your forearms on one or two bricks.

ALIGNMENT CUES
Below you will find the alignment cues for both Marjaryasana/Cat and Bitilasana/Cow. Even though these two poses partner together perfectly, take your time to get familiar with what you are looking for in each pose.

MARJARYASANA/CAT – EXHALE

  • From all fours, hips stacked over knees, shoulders stacked over wrists.

  • Exhale, arch your spine up, pelvis tips back, shoulder blades spread apart.

  • Press into all five knuckles of your hands, the tops of your feet and your knees.

  • Back of the neck long, gaze at the ground under your navel.

  • Inhale, into Bitilasana, repeat 5-10 rounds to warm up the spine.

BITILASANA/COW – INHALE

  • From all fours, hips stacked over knees, shoulders stacked over wrists.

  • Inhale, dip your navel down, pelvis tips forward, sit bones spread, broaden your collarbones, move your sternum forward and up, shoulder blades draw together.

  • Press into all five knuckles of your hands, the tops of your feet and your knees.

  • Back of the neck long, gaze forward to the front of your mat.

  • Exhale, into Marjaryasana, repeat 5-10 rounds to warm up the spine.

To save the images for personal use click and hold down the image until the ‘save image’ option appears; on Mac hold down ‘control’ and click the image to get the option box; on PC right click on the image to get the option box. Scroll down in the ‘option box’ and click ‘save image’.

Ruth Delahunty Yogaru

Energising flow

ENERGY = FUEL
We have two main sources of fuel to energise all functions in our bodies from movement to every metabolic chemical reaction in our cells. These two sources are food and oxygen. To get these two sources into all the cells of our bodies we need to supply them with fuel in the form of good quality food as close to nature as possible and fresh air. Below I discuss what yoga tools we will use in this sequence to help build energy. But there is another very valuable tool that can be used on and off the mat to create energy. Challenging yourself brings oxygen to the brain and wakes you up. Challenging yourself on your mat can be as simple as staying an extra breath in a strong standing pose or really focusing in a standing balancing pose. Challenging yourself off your mat might mean being comfortable with occasionally stepping out of your comfort zone and trying new things, waking yourself up and not spending your days on autopilot.

HOW TO BUILD ENERGY
In our practice we can assist the two systems that are in charge of taking in food and oxygen – the digestive system and the respiratory system – and the system that helps distribute and transport it – the circulatory system.

The digestive system, or the enteric nervous system, processes food, absorbs nutrition, and removes toxins. Moving and massaging the digestive system with twists and backbends help to maximise absorption and detoxification – feeding the cells and removing toxins that will interfere with their efficient functionality. They also bring fresh blood flow to the blood vessels in the walls of the digestive system which helps the circulatory system distribute this fuel source around the whole body. Massaging the gut helps to keep you regular by encouraging peristalsis in the walls of the gut to move the waste food along. Once the body has taken what it needs from our food it is very important to remove the waste so that it doesn’t stagnate in our gut.

The respiratory system fuels our cells with oxygen so they can grow and replicate. Breathing feeds the cells and flushes out the by-product of carbon dioxide. In our practice, when we inhale our heart rate increases, the cells receive oxygen, and we feel energised. The circulatory system then takes over and helps to distribute the oxygen to our whole body. While backbends will help to expand the lungs and bring in more oxygen, the challenge of standing poses and standing balancing poses create heat and help boost circulation.

EXPLORING ENERGISING FLOW IN YOUR PRACTICE
This sequence is part of a series of sequences where I look at how yoga can help regulate our moods. Each of these sequences start with the same warm up that will move all the main joints of the body – the spine, shoulders and hips. This repetition gives you ‘comfort in familiarity’ as you can practice this series, while at the same time ensuring you are warmed up and ready for the themed mini flows that follow.

The sequence has lots of standing poses and standing balancing poses to boost circulation, expand the lungs and wake the thinking brain up. It also has plenty of poses that will massage the digestive system. Notice your energy levels before, during and after your practice. Be open to challenges and when you encounter one breath into it. .

ALIGNMENT CUES
There is no specific peak pose in this easy going flow. Use the cues below to help you flow through the sequence with ease and fluidity.

Have a read of the tips below and either print out the sequence or save it onto your device:

  • Use the breath guide in the sequence to help you link breath with movement in the flow. Inhale is indicated with a ‘+’, exhale is a ‘-”.

  • In the warm up focus your attention on the area you are warming up as indicated by the sequence.

  • If there are specific poses that you would like to stay longer in, give yourself three deep breaths in those poses and pick up the next pose with the allocated inhale or exhale as indicated by the sequence.

  • For a longer practice, linger in each of the poses of the three mini flows for the first round and then move with the breath for the second and third round.

To save the images for personal use click and hold down the image until the ‘save image’ option appears; on Mac hold down ‘control’ and click the image to get the option box; on PC right click on the image to get the option box. Scroll down in the ‘option box’ and click ‘save image’.

Ruth Delahunty Yogaru