Runners breath flow

RUNNERS BREATH
In my previous runners article, The ultimate runners flow, I discussed what a runner needs physically in terms of strength and stability. In this article I will look at how the breath affects your ability to exercise and how yoga train your lungs to optimise your breath as you run. A good runner's breath includes belly breathing, or diaphragmatic breathing, and rhythmical breathing. Breathing consciously is one of the most important elements of yoga, and breathing exercises like belly breathing and rhythmic breathing are very much part of the yoga practice too. The breath builds strong lungs that feed all the cells of your body with fuel as you inhale – oxygen, and clean up the byproduct as you exhale – carbon dioxide. Running increases your requirement for oxygen intake and carbon dioxide output. Breathing deeply into your belly, which is where you let your belly expand with your breath, gives you a much higher respiratory volume than chest breathing and increases this intake and output. Your ability to breathe rhythmically as you run helps you control your oxygen intake and carbon dioxide output. It also helps you establish a meditative flow as you run which is more relaxing for the body and helps prevent muscle spasms and injuries.

THE RESPIRATORY & CIRCULATORY SYSTEM
The respiratory system is responsible for bringing oxygen to all the cells of the body, including the muscles where it facilitates physical movement. The breath is part of the autonomic nervous system, which means it works automatically. What makes the breath unique is that we can also control it to a certain extent. We can extend, shorten and hold the breath depending on our desired outcomes. When we inhale our heart rate increases, the cells receive oxygen, and we feel energised. When we exhale the heart rate decreases, the cells release carbon dioxide, and we are more focused. Both these qualities are essential for staying the course in a run.

The circulatory system, or the cardiovascular system, pumps blood around the body with the heart through a network of blood vessels. The blood carries oxygen, nutrients, and hormones to all the cells of the body, and removes waste products created in the metabolic functions. Think of the circulatory system as housekeeping. When the body is well serviced it is able to work more efficiently. The circulatory system distributes the oxygen to the muscles as we run and clears out the carbon dioxide.

EXPLORING RUNNERS BREATH FLOW IN YOUR PRACTICE
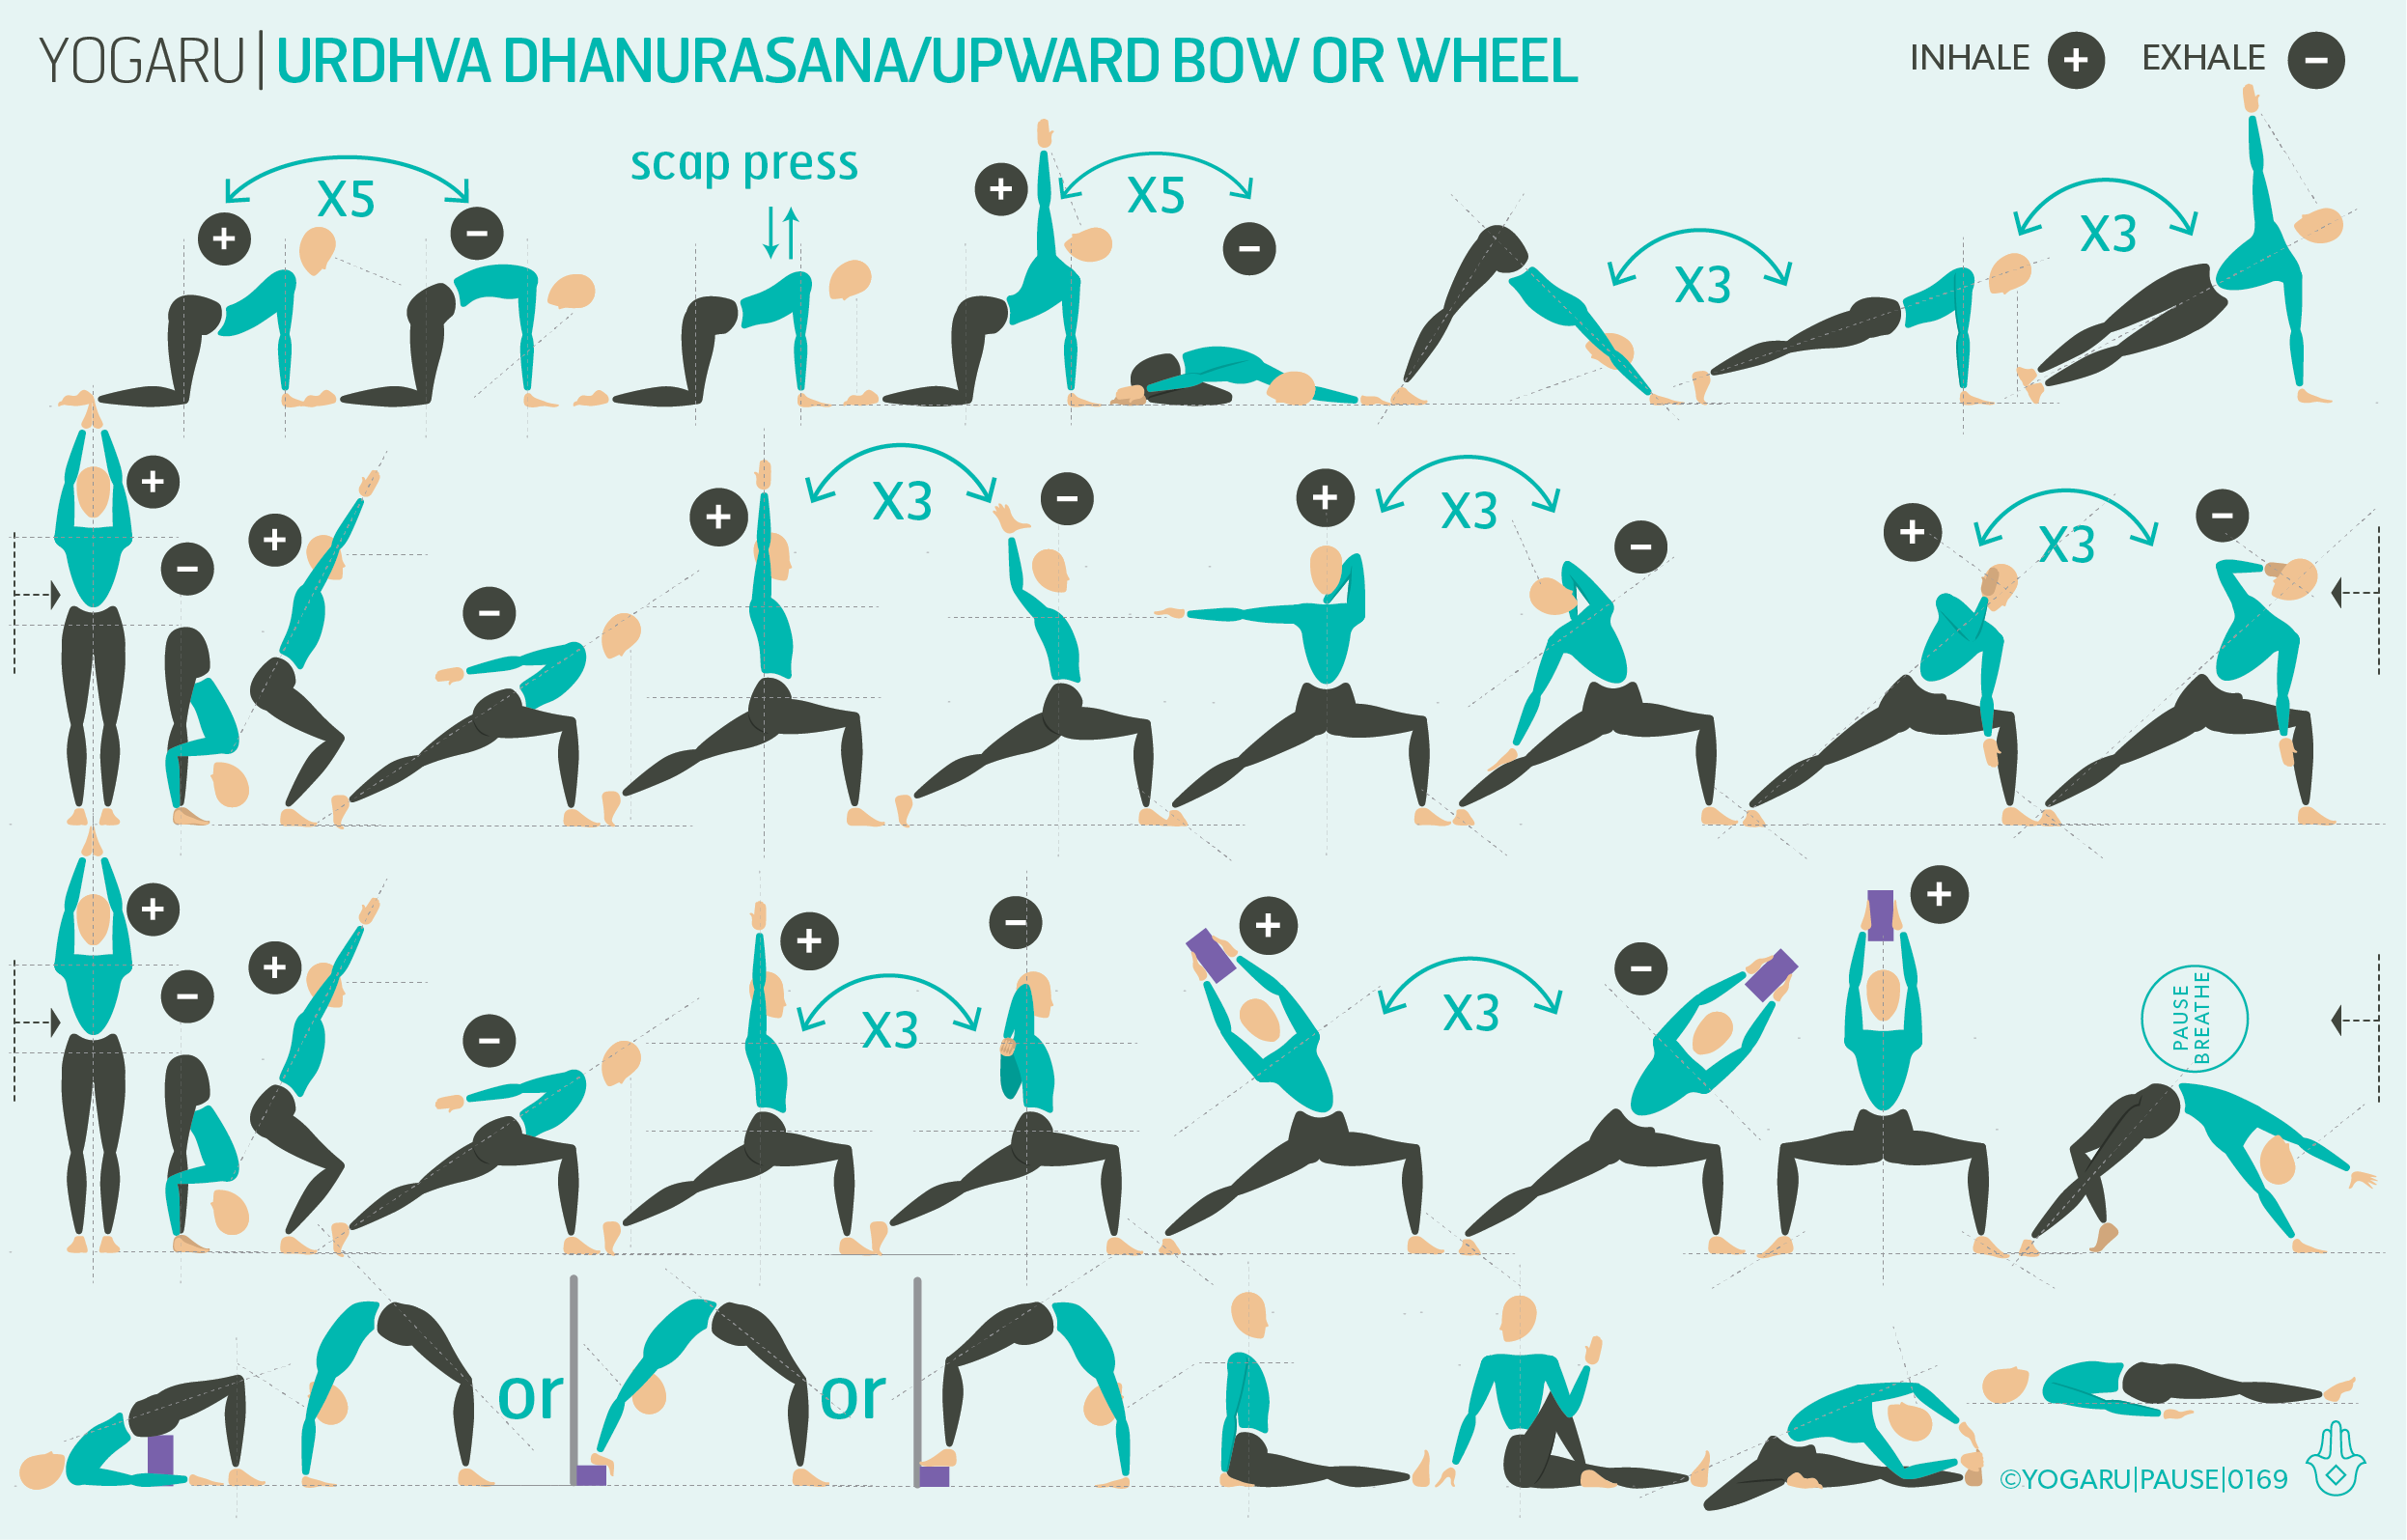
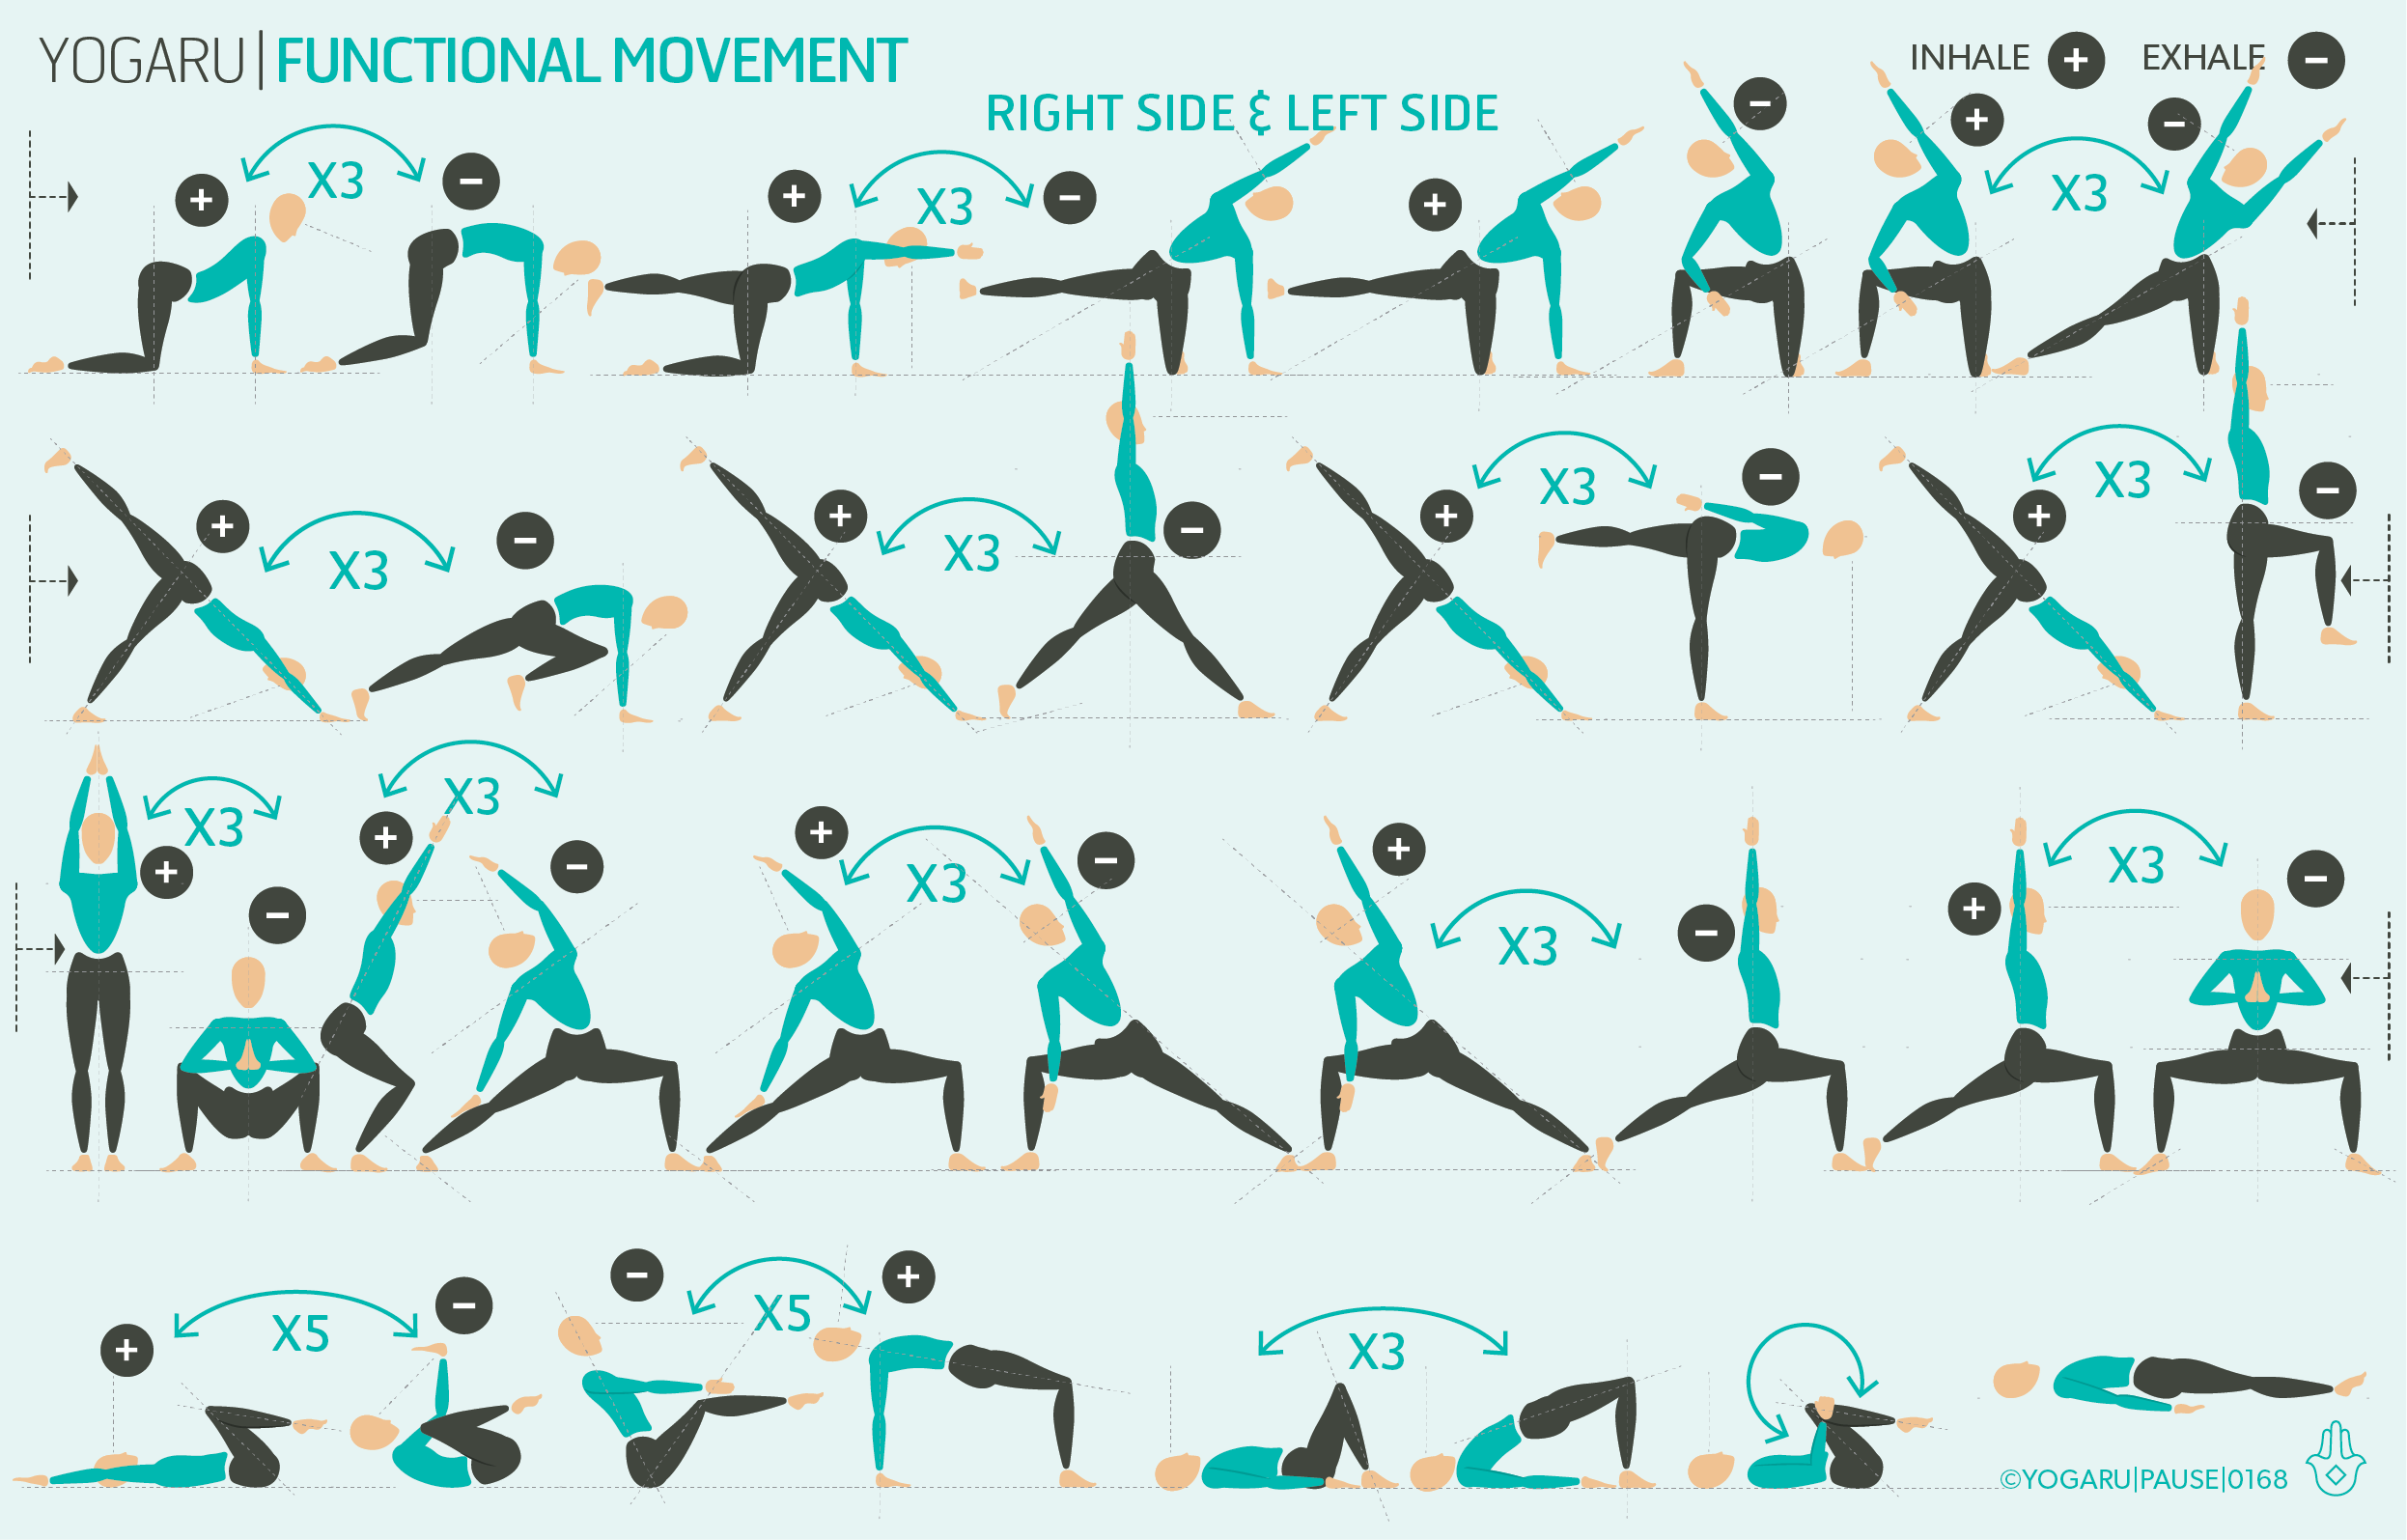
This is a simple sequence built around the Sun Salutation. It will help you focus on the quality of your breath rather than focusing on a more complex flow. To start your practice lie on your back with your knees bent, feet hip distance apart, hands on your belly, and take three to five rounds of Viloma breath – inhale for a long breath, and then exhale pause, exhale pause, exhale pause – dividing your exhale into three sections. This breathing method helps you establish belly breathing. You will then do a few rounds of Sun Salutations to flow with the breath, taking an inhale or an exhale for each pose, to help you practise rhythmic breathing. The Sun Salutations are followed by a series of mini flows linking breath with movement. Final step is to consider your posture as you practise the sequence. You are looking for a strong spine and a broad chest to facilitate the expansion of the breath during your yoga practice and as you take it outdoors on your run.
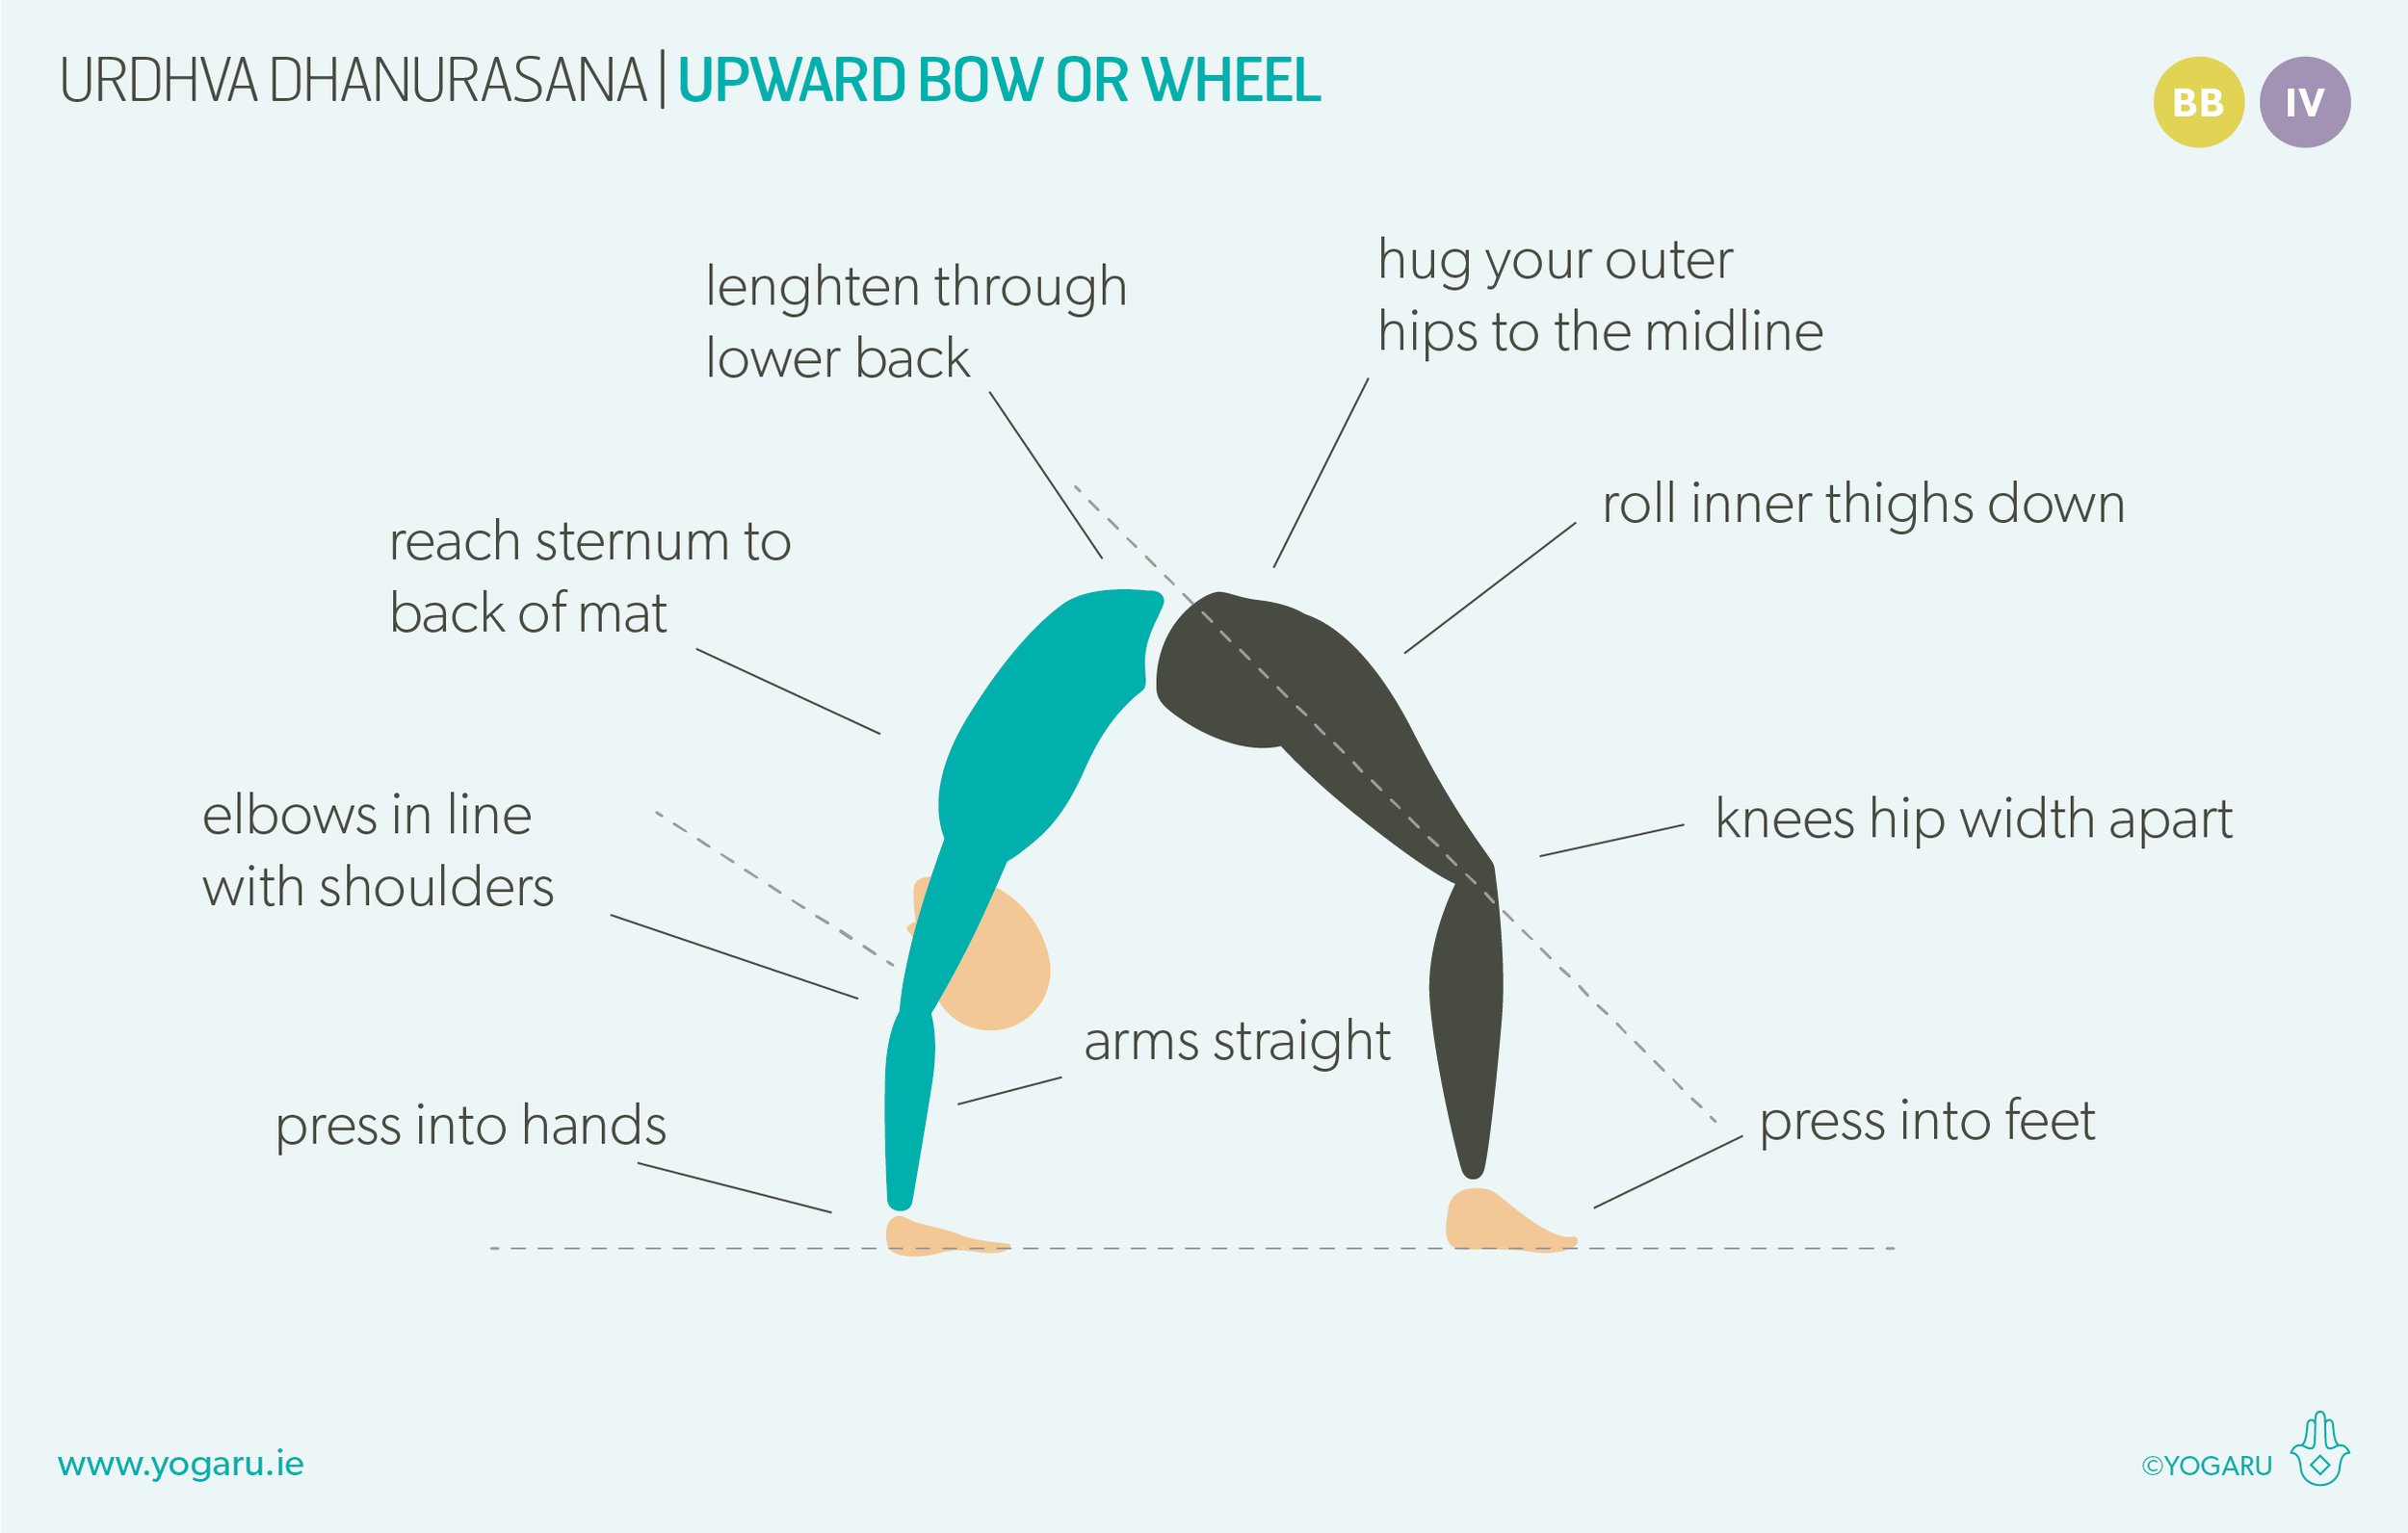
ALIGNMENT CUES
There is no specific peak pose in this runner's breath flow sequence. Use the cues below to help you flow through the sequence with ease and fluidity.

Have a read of the tips below and either print out the sequence or save it onto your device:

  • Use the breath guide in the sequence to help you link breath with movement in the flow. Inhale is indicated with a ‘+’, exhale is a ‘-”.

  • Move slowly from pose to pose. Use the first few rounds of each mini flow to work out how your body wants to transition from pose to pose then focus on the breath in the movement.

  • For a longer practice add more rounds of Sun Salutations at the beginning and repeat lines two and three with the two standing flows.

To save the images for personal use click and hold down the image until the ‘save image’ option appears; on Mac hold down ‘control’ and click the image to get the option box; on PC right click on the image to get the option box. Scroll down in the ‘option box’ and click ‘save image’.

Ruth Delahunty Yogaru

Urdhva Dhanurasana - Upward Bow or Wheel

PROP AWAY YOUR FEARS

Urdhva Dhanurasana/Upward Bow or Wheel is a challenging pose for most yogis. Considered one of the bigger backbend poses it requires open shoulders, chest, hip flexors, and a bit of gusto to lift yourself into the pose. You may think that your shoulders and hips are too tight for Urdhva Dhanurasana/Upward Bow or Wheel, but there is plenty you can do to prepare for the pose and give you a better chance to explore the pose. This sequence breaks down the components of Urdhva Dhanurasana/Upward Bow or Wheel and gives you plenty of versions of the pose, so you can enjoy all the lovely benefits of this peak pose even if it is not part of your practice. Props are a great addition to Urdhva Dhanurasana/Upward Bow or Wheel, they can be used to bring the floor up to meet you and reduce the extent of stretch required for the pose. They can be used at a wall under your hands if your shoulders are not quite reaching the ground or under your feet at a wall if your hip flexors are limiting your ability to lift up. Both theses versions are described below.

What makes it so challenging to the shoulder joint is that it requires quite a complicated series of movements in the shoulders joint (strong shoulder flexion, scapular elevation and upward rotation), and in this position we are asking the shoulder to lift up and hold our body weight. The hips can also complicate the lift for you. If the hip flexors are tight, and pulling the pelvis into anterior forward rotation, it makes it much harder to recruit the lifting muscles at the back of the hips, and to distribute the backbend throughout the whole spine when you are in the pose.

THE BENEFITS OF URDHVA DHANURASANA/UPWARD BOW OR WHEEL
Urdhva Dhanurasana/Upward Bow or Wheel strengthens the spine, hamstrings, glutes, adductors and shoulders. It stretches the arms, shoulders, chest, core, quads and hip flexors. This lovely full expression of a backbend builds strength and stamina, aids digestion, is energising, eases stress, tension, anxiety and depression. It also helps expand and the breath, promoting healthy lung capacity and ease symptoms of asthma and sleep apnea.

EXPLORING URDHVA DHANURASANA/UPWARD BOW OR WHEEL IN YOUR PRACTICE
There are many different ways to approach Urdhva Dhanurasana/Upward Bow or Wheel if you are working with tightness in the shoulders, hips or struggle to find enough strength in your arms to lift up. The feet and hand position have been the topic of many yoga debates. Where once the theory was that it was best alignment practice to have the hands shoulder width apart and feet hip width, now the conversation has shifted more appropriately to ‘what does your body need to help you lift and hold’. If you have tight shoulders it can help to have the hands slightly further than shoulder width and the palms slightly turned out, similarly if you have tight hip flexors having the feet slightly further than hip width and feet slightly turned out it can help too. These two variations can also help if you struggle to find your shoulder or hip strength to lift up.

In the last line of the sequence you will find different versions of Urdhva Dhanurasana/Upward Bow or Wheel. Take each version as stepping stones and be proud and happy with yourself to stay at the step you are most confident with. Explore the two variations above, adding bricks under hands or feet or playing around with hand and feet position, as required for your body type.

ALIGNMENT CUES
As mentioned above props are king for Urdhva Dhanurasana/Upward Bow or Wheel. Below are three versions of the first step to the peak pose.Play around and see what works for you and your unique body.

Have a read of the tips below and either print out the sequence or save it onto your device:

  • No bricks. Lie on your back, knees bent, feet parallel, hip width apart or slightly wider if you ahem tight hip flexors. Bend your elbows, place your hands on the ground beside your ears, or slightly wider if you have tight shoulders, fingers point towards your shoulders, elbow in line with your shoulders. Press firmly into your hands and feet.

  • Bricks under hands. Bring the short edge of your mat to a wall. Place the long edge of two bricks against the wall shoulder width, or slightly wider, apart. Lie on your back, head between the bricks, knees bent, feet parallel, hip width apart. Bend your elbows, place the palm of your hands on the bricks, fingers curled over the edge of the brick, pointing towards your shoulders, elbow in line with your shoulders. Press firmly into your hands and feet.

  • Bricks under feet. Bring the short edge of your mat to a wall. Place the long edge of two bricks against the wall hip width, or slightly wider, apart. Lie on your back, knees bent, place your feet on the bricks, feet parallel or slightly turned out. Bend your elbows, place your hands on the ground beside your ears, fingers point towards your shoulders, elbow in line with your shoulders. Press firmly into your hands and feet.

  • Exhale, lift your hips up and come onto the crown of your head, inhale here. Exhale, lift your head up and straighten your arms.

  • Knees hip width apart, hug your outer hips to the midline. Roll your inner thighs down, reach your chest towards the back of your mat.

  • To come down tuck your chin in and slowly come down to your head, then lower your hips down to the ground.

To save the images for personal use click and hold down the image until the ‘save image’ option appears; on Mac hold down ‘control’ and click the image to get the option box; on PC right click on the image to get the option box. Scroll down in the ‘option box’ and click ‘save image’.

Ruth Delahunty Yogaru

Functional movement

Functional movement is the cornerstone of good everyday mobility. Guest writer Sam Delahunty shares his journey from gym bro to a more well rounded approach to wellness.

THE IMPORTANCE OF FUNCTIONAL MOVEMENT
During my years training in the gym I noticed some of the exercises were not optimal for overall body health. Yes they make you more toned and fitter looking, but do they really benefit your ability to move comfortably through life? I started to explore how our body really moves naturally and found what we call ‘functional movement’. Functional movement can be described as multi-joint, multi-planar moves which are relatable to everyday life. What is meant by multi-joint, multi-planar and every day movement? Well, multi-joint is the involvement of more than one joint during a movement, for example a squat involves your ankles, knees and hips. Functional movement often moves through multiple planes of motion as well, we’ll dive deeper into that later. Finally and most important of all, functional movement is applicable to everyday life. This is why applying functional movements to your practice is so important, as the goal of any fitness journey is to be more healthy and capable in the day to day.

WHAT IS FUNCTIONAL MOVEMENT REALLY?
There are five ‘rules’ or factors to functional movement – core, basic body movements, multi-joint, multi-planar and full active range of motion. The first one is moving from the core out. Every movement starts with the engagement of your core. This creates a solid base from which to control your limbs, for max strength and ability. Then there are the seven basic body movements. These are squat, lunge, hinge, rotation, push, pull, and gait. These essentially are the core moves your body was built to carry out, and the theory is by practising these basic movements in your training you will be more physically capable throughout life. On top of multi joint movement which I’ve explained already you move through multiple planes while practising functional moves. There are three planes through which we are capable of moving. The sagittal, dividing the body into left and right sides (moving forward and back); the coronal, dividing the body into front and back sides (moving side to side); and the transverse, dividing the body into top and bottom halves (twisting movement). Finally functional movement often aims to move your body through a full active range of motion (AROM). In our everyday lives we have become more sedentary and less versatile in our movement than our predecessors. Your body was built to move to its full capacity and as the saying goes use it or lose it. When I am building my fitness programmes I make sure to combine both functional movements and muscle or joint specific movements. Functional movements maintain and improve my mobility, and muscle or joint specific movements help prevent injury by strengthening individual muscles. Through practising yoga you often move more than one joint, move fluidly through one plane to another and challenge your core as you move. You also explore your full range of movement and you will notice many of the basic body movements cropping up in your practice too.

EXPLORING FUNCTIONAL MOVEMENT IN YOUR PRACTICE
This sequence is a little different from the usual ones you will find in our articles. It is mainly built of two pose mini flows with the main focus on the transitions from pose to pose rather than the poses themselves. Creatively adding functional movement with these mini flows challenges the full body – building your repertoire of everyday mobility and longevity of the joints, muscles and connective tissue. As you practise this sequence you might feel a bit more clumsy in our movement. That is absolutely fine, remember you are building active range of movement and everyday mobility, not perfection. Remember to initiate each movement from an engaged core to stabilise our spine and help you maintain centre of gravity as you move.

ALIGNMENT CUES
There is no specific peak pose in this functional movement sequence. Use the cues below to help you flow through the sequence with ease and fluidity.

Have a read of the tips below and either print out the sequence or save it onto your device:

  • Use the breath guide in the sequence to help you link breath with movement in the flow. Inhale is indicated with a ‘+’, exhale is a ‘-”.

  • Move slowly from pose to pose. Use the first few rounds of each mini flow to work out how your body wants to transition from pose to pose.

  • For a longer practice repeat the warm up flow on the first line at the start of each of the three standing flows or repeat each of the standing mini flows three times.

To save the images for personal use click and hold down the image until the ‘save image’ option appears; on Mac hold down ‘control’ and click the image to get the option box; on PC right click on the image to get the option box. Scroll down in the ‘option box’ and click ‘save image’.


Sam’s keen interest in fitness started at an early age during his time spent playing rugby in St.Michael’s. He went on to complete an olympic triathlon at the age of 16 followed by a half marathon.

These achievements gave him the inspiration needed to set him down the health and fitness path. He learnt the importance of multidisciplinary training and incorporating yoga and functional training when creating programmes. His systematic approach to both performance and everyday health is all about building an overall ability to specialise and succeed.