Bhujangasana - Cobra

BACKBEND FOR ALL
Bhujangasana/Cobra is one of the more accessible backbends and is the perfect alternative in a Sun Salutation if Urdhva Mukha Svanasana/Upward Facing Dog is not part of your practice. It is a heart opening backbend that stretches the front upper body and strengthens the back upper body. Backbends come more easily to the lower back (lumbar spine), making it more susceptible to overarching. As with all backbends, care needs to be taken to distribute the bend though the whole spine. In Bhujangasana/Cobra you have good control of how far you come into the backbend and can easily lower back down if you start to feel any discomfort in your lumbar spine. This version of Bhujangasana/Cobra is also sometimes called Baby Cobra which is kinder on the lumbar spine than its sister pose King Cobra. In Baby Cobra the arms stay bent, bringing the upper body lower than in King Cobra, where the arms are straight, giving a more dramatic curve to the lumbar spine.

Similar to Salabhasana/Locust, Bhujangasana/Cobra is a backbend that moves against gravity – giving you the opportunity to strengthen the back, more so than backbends like Ustrasana/Camel which moves with gravity to bring you into the pose. Bhujangasana/Cobra is also a great pose to counteract long periods of sitting and support good posture. It helps to realign your spine and stretches the hip flexors which get stuck in a shortened position when sitting.

THE BENEFITS OF BHUJANGASANA/COBRA
Bhujangasana/Cobra strengthens the spine, arms, glutes and hamstrings. It stretches the chest, core and hip flexors. It helps you find your connection to the earth and ground down to grow roots. As a backbend it stimulates the nervous system, aids digestion, energising, eases stress, tension, anxiety and depression. It also helps expand and the breath, promoting healthy lung capacity and ease symptoms of asthma and sleep apnea.

EXPLORING BHUJANGASANA/COBRA IN YOUR PRACTICE
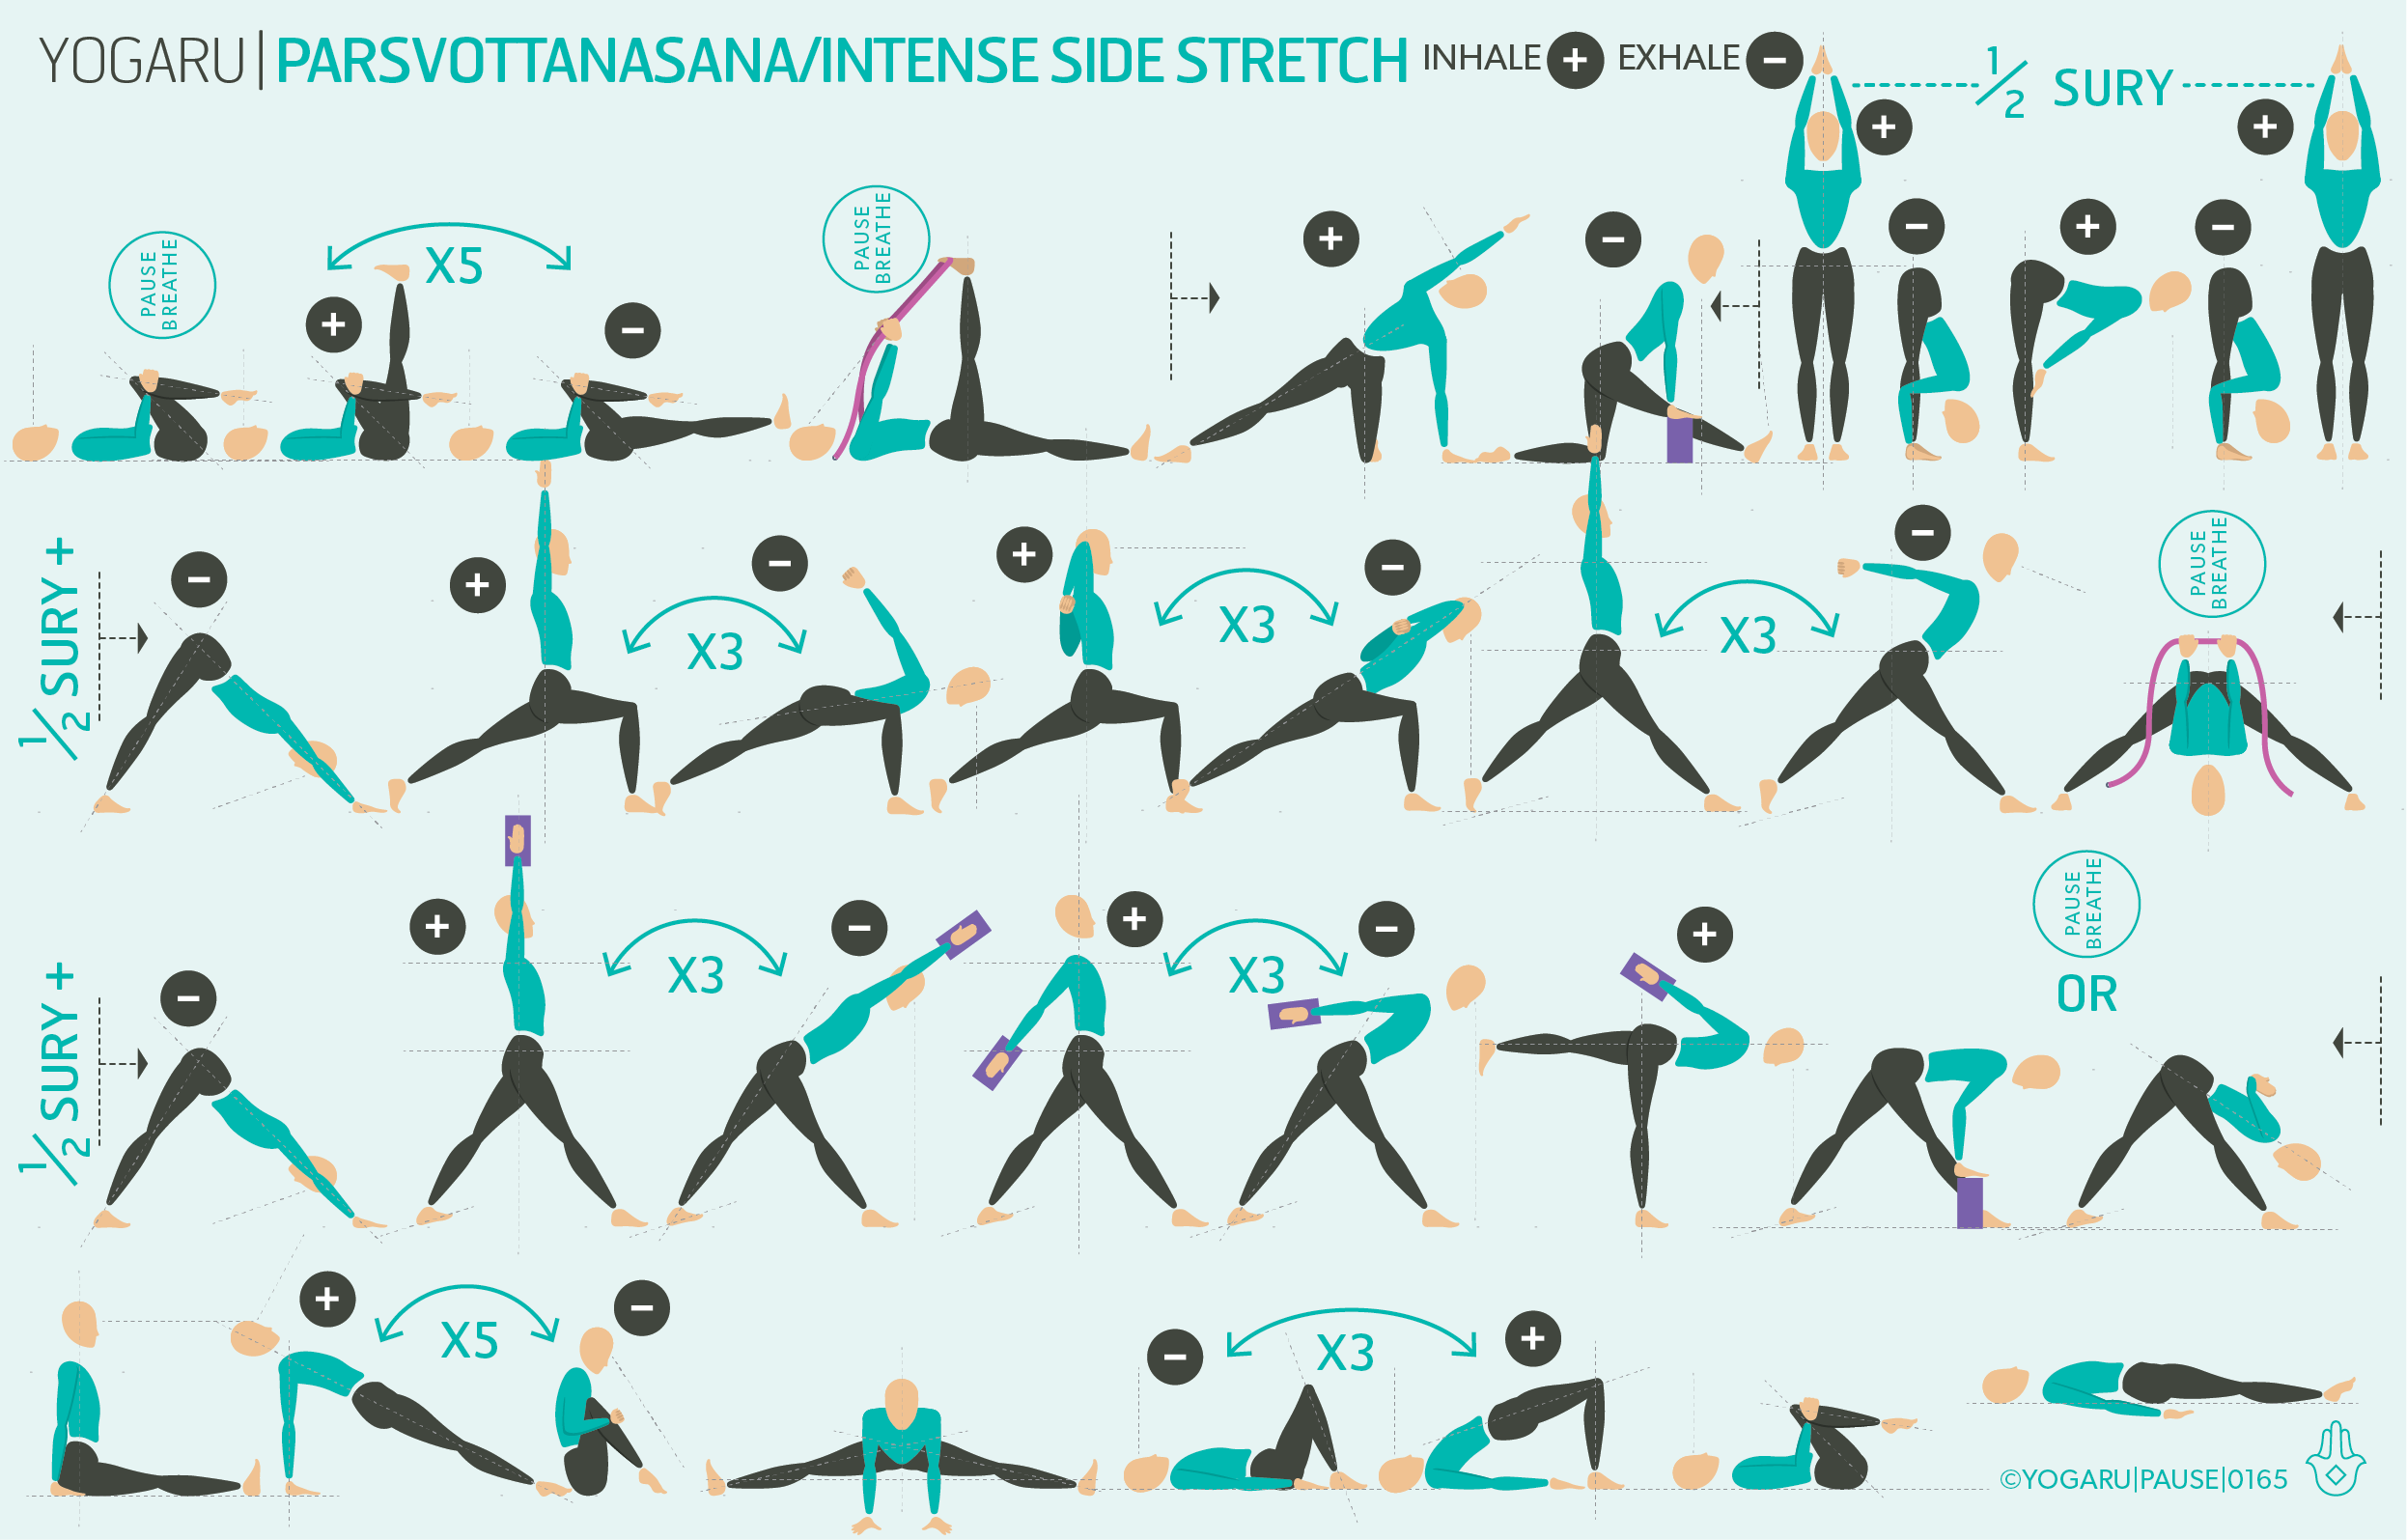
Unlike many other peak poses Bhujangasana/Cobra is gentle enough to add into your practice from early on. In the warm up on the first row you will take Naraviralasana/Sphinx to prepare for your peak pose which follows. Press your forearms into the ground and draw your chest between your shoulders until you feel a lovely stretch along the skin from your belly button all the way to your breastbone. Soften your shoulder blades down your back in preparation for the following pose of Bhujangasana/Cobra to ensure your shoulders are not bunching up to your ears.

There are two ways to approach Bhujangasana/Cobra – with the hands pressing into the ground to help pull the chest forward and up, and with the hands slightly lifted off the ground. Pressing into the hands helps you find a lovely stretch in the abdominal region and the chest. With the hands lifted you may not come up as far, but you are strengthening all the muscles along your spine as they work to lift your upper body against the weight of gravity. Towards the end of the sequence there is also an opportunity to take a slightly more passive version of Bhujangasana/Cobra using a bolster or a rolled blanket just above your frontal hip bones. Very gentle forward bends and twists are the perfect way to counterpose a backbend. The perfect way to finish this sequence would be with a restorative twist.

ALIGNMENT CUES
Pause for a few of the different versions of Bhujangasana/Cobra in this sequence, feel your lungs stretch, your ribs expand and breathe drawing you forward and up.

Have a read of the tips below and either print out the sequence or save it onto your device:

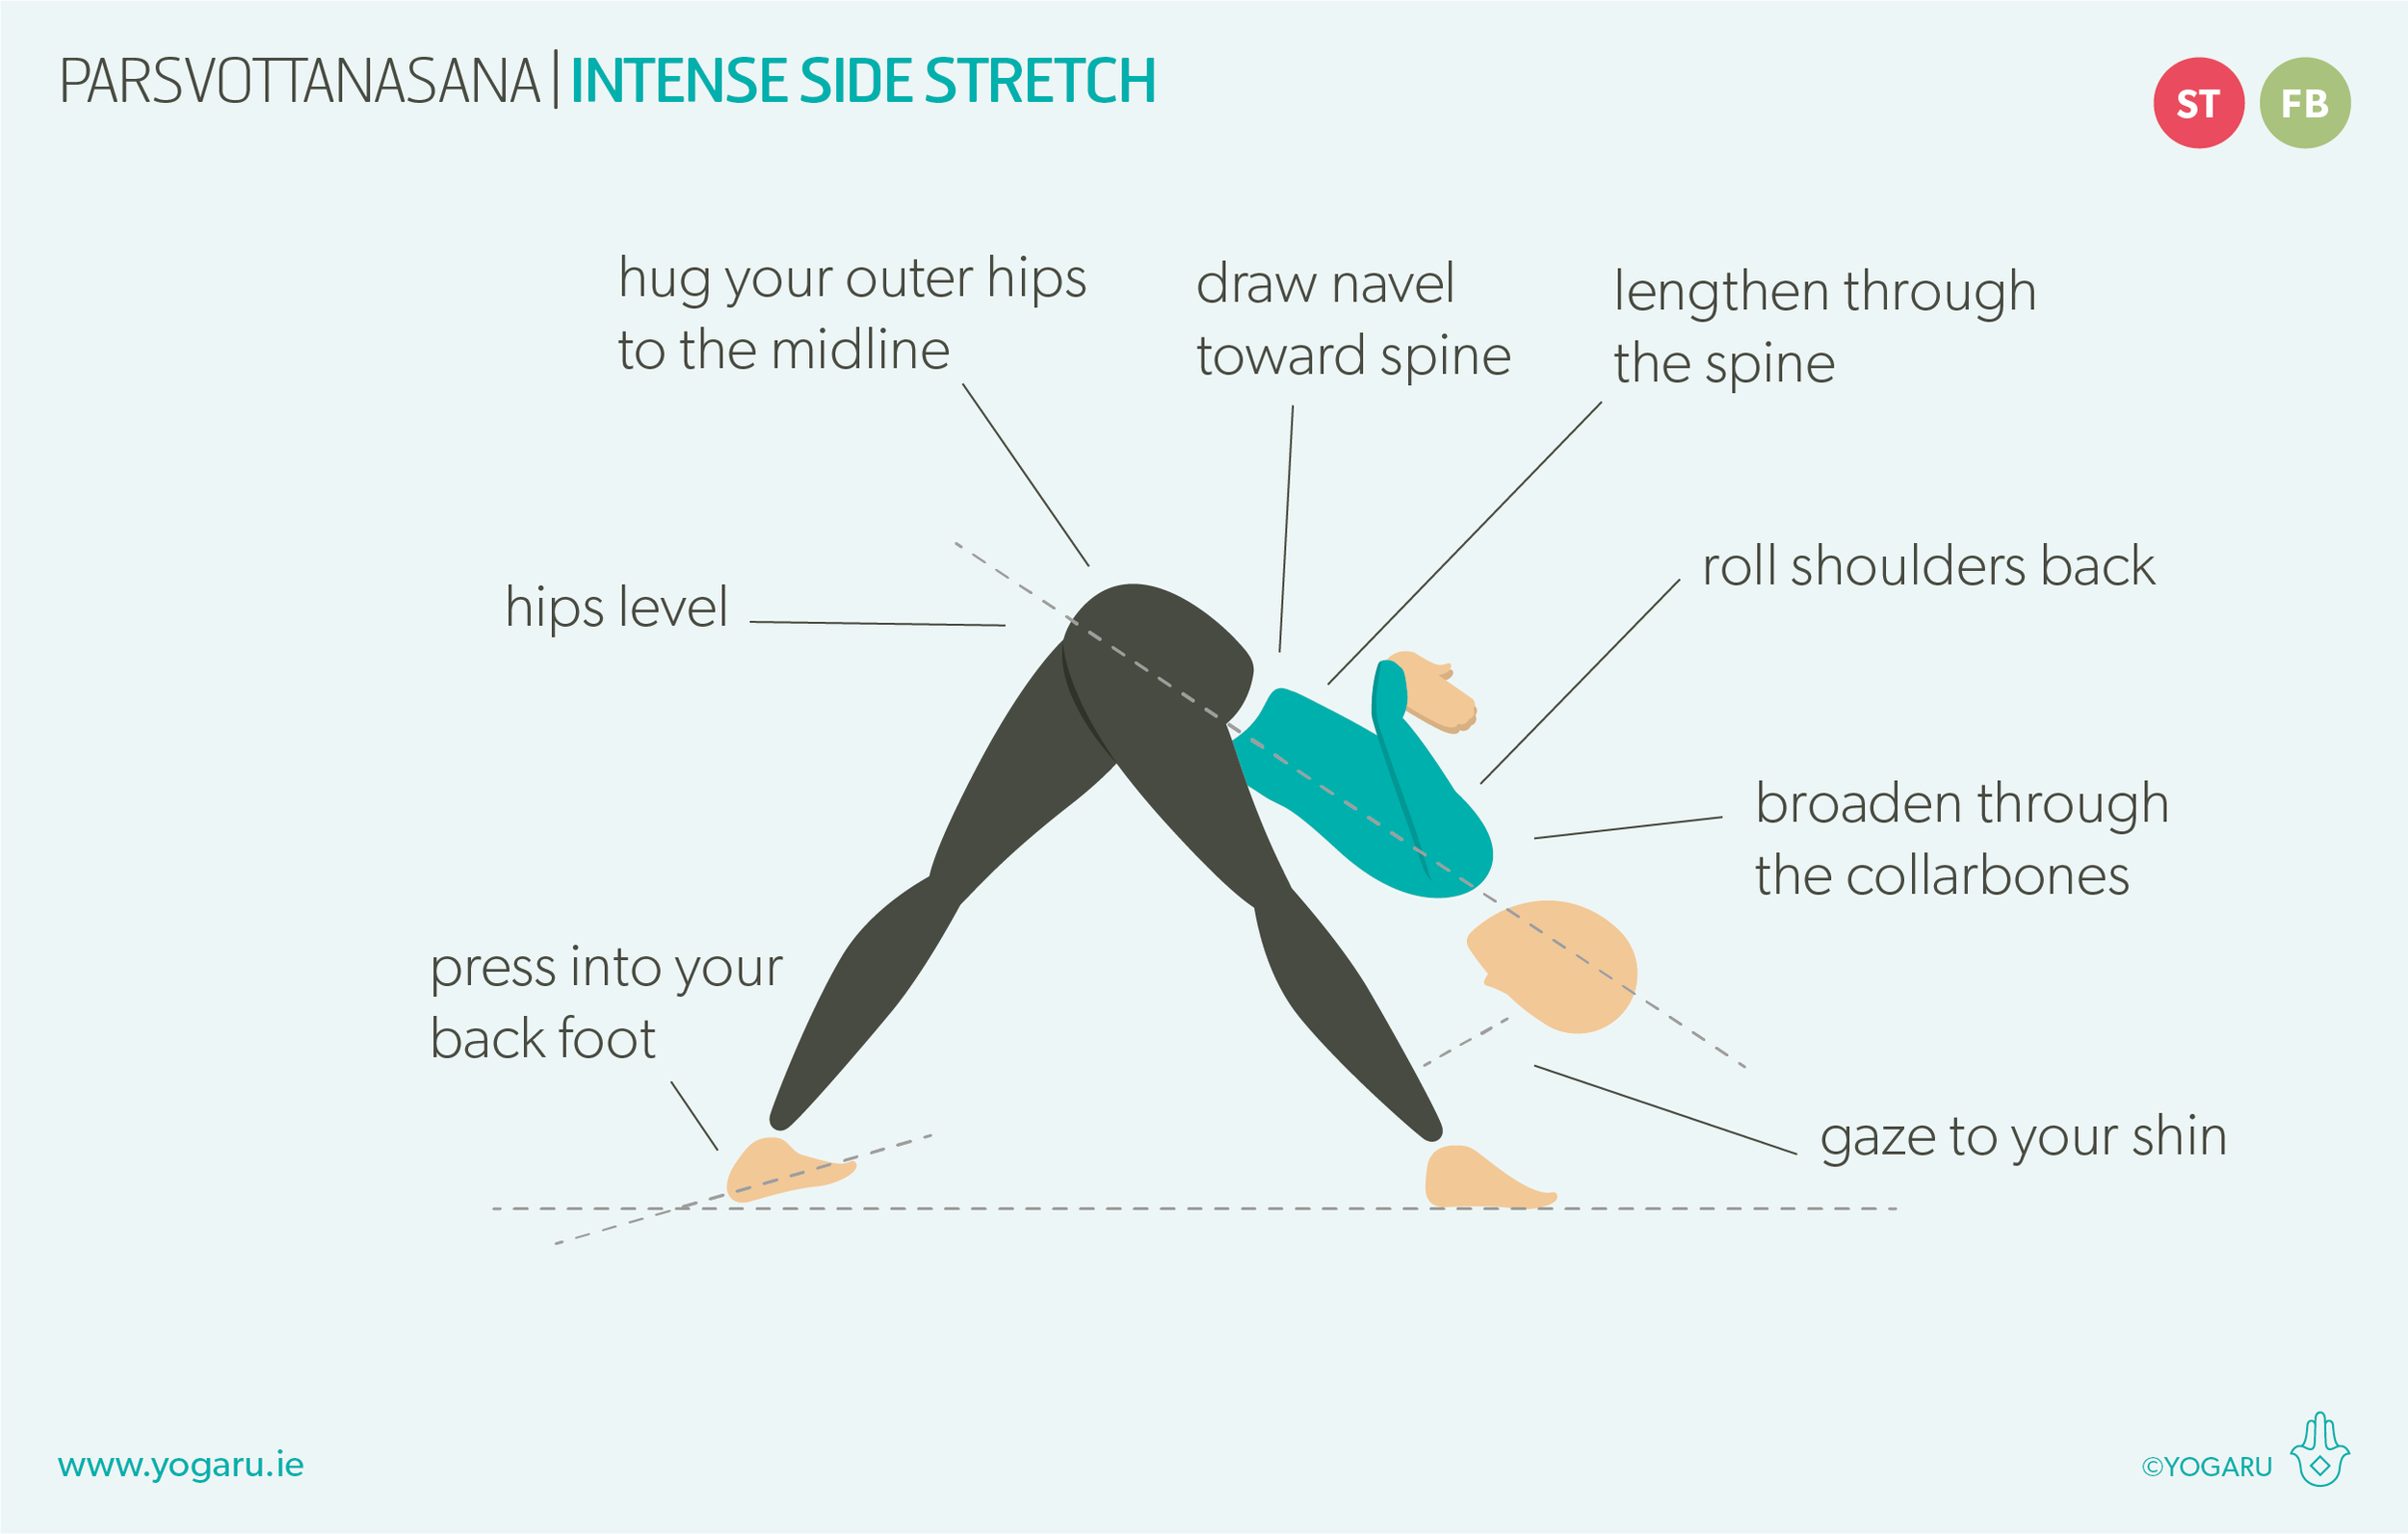
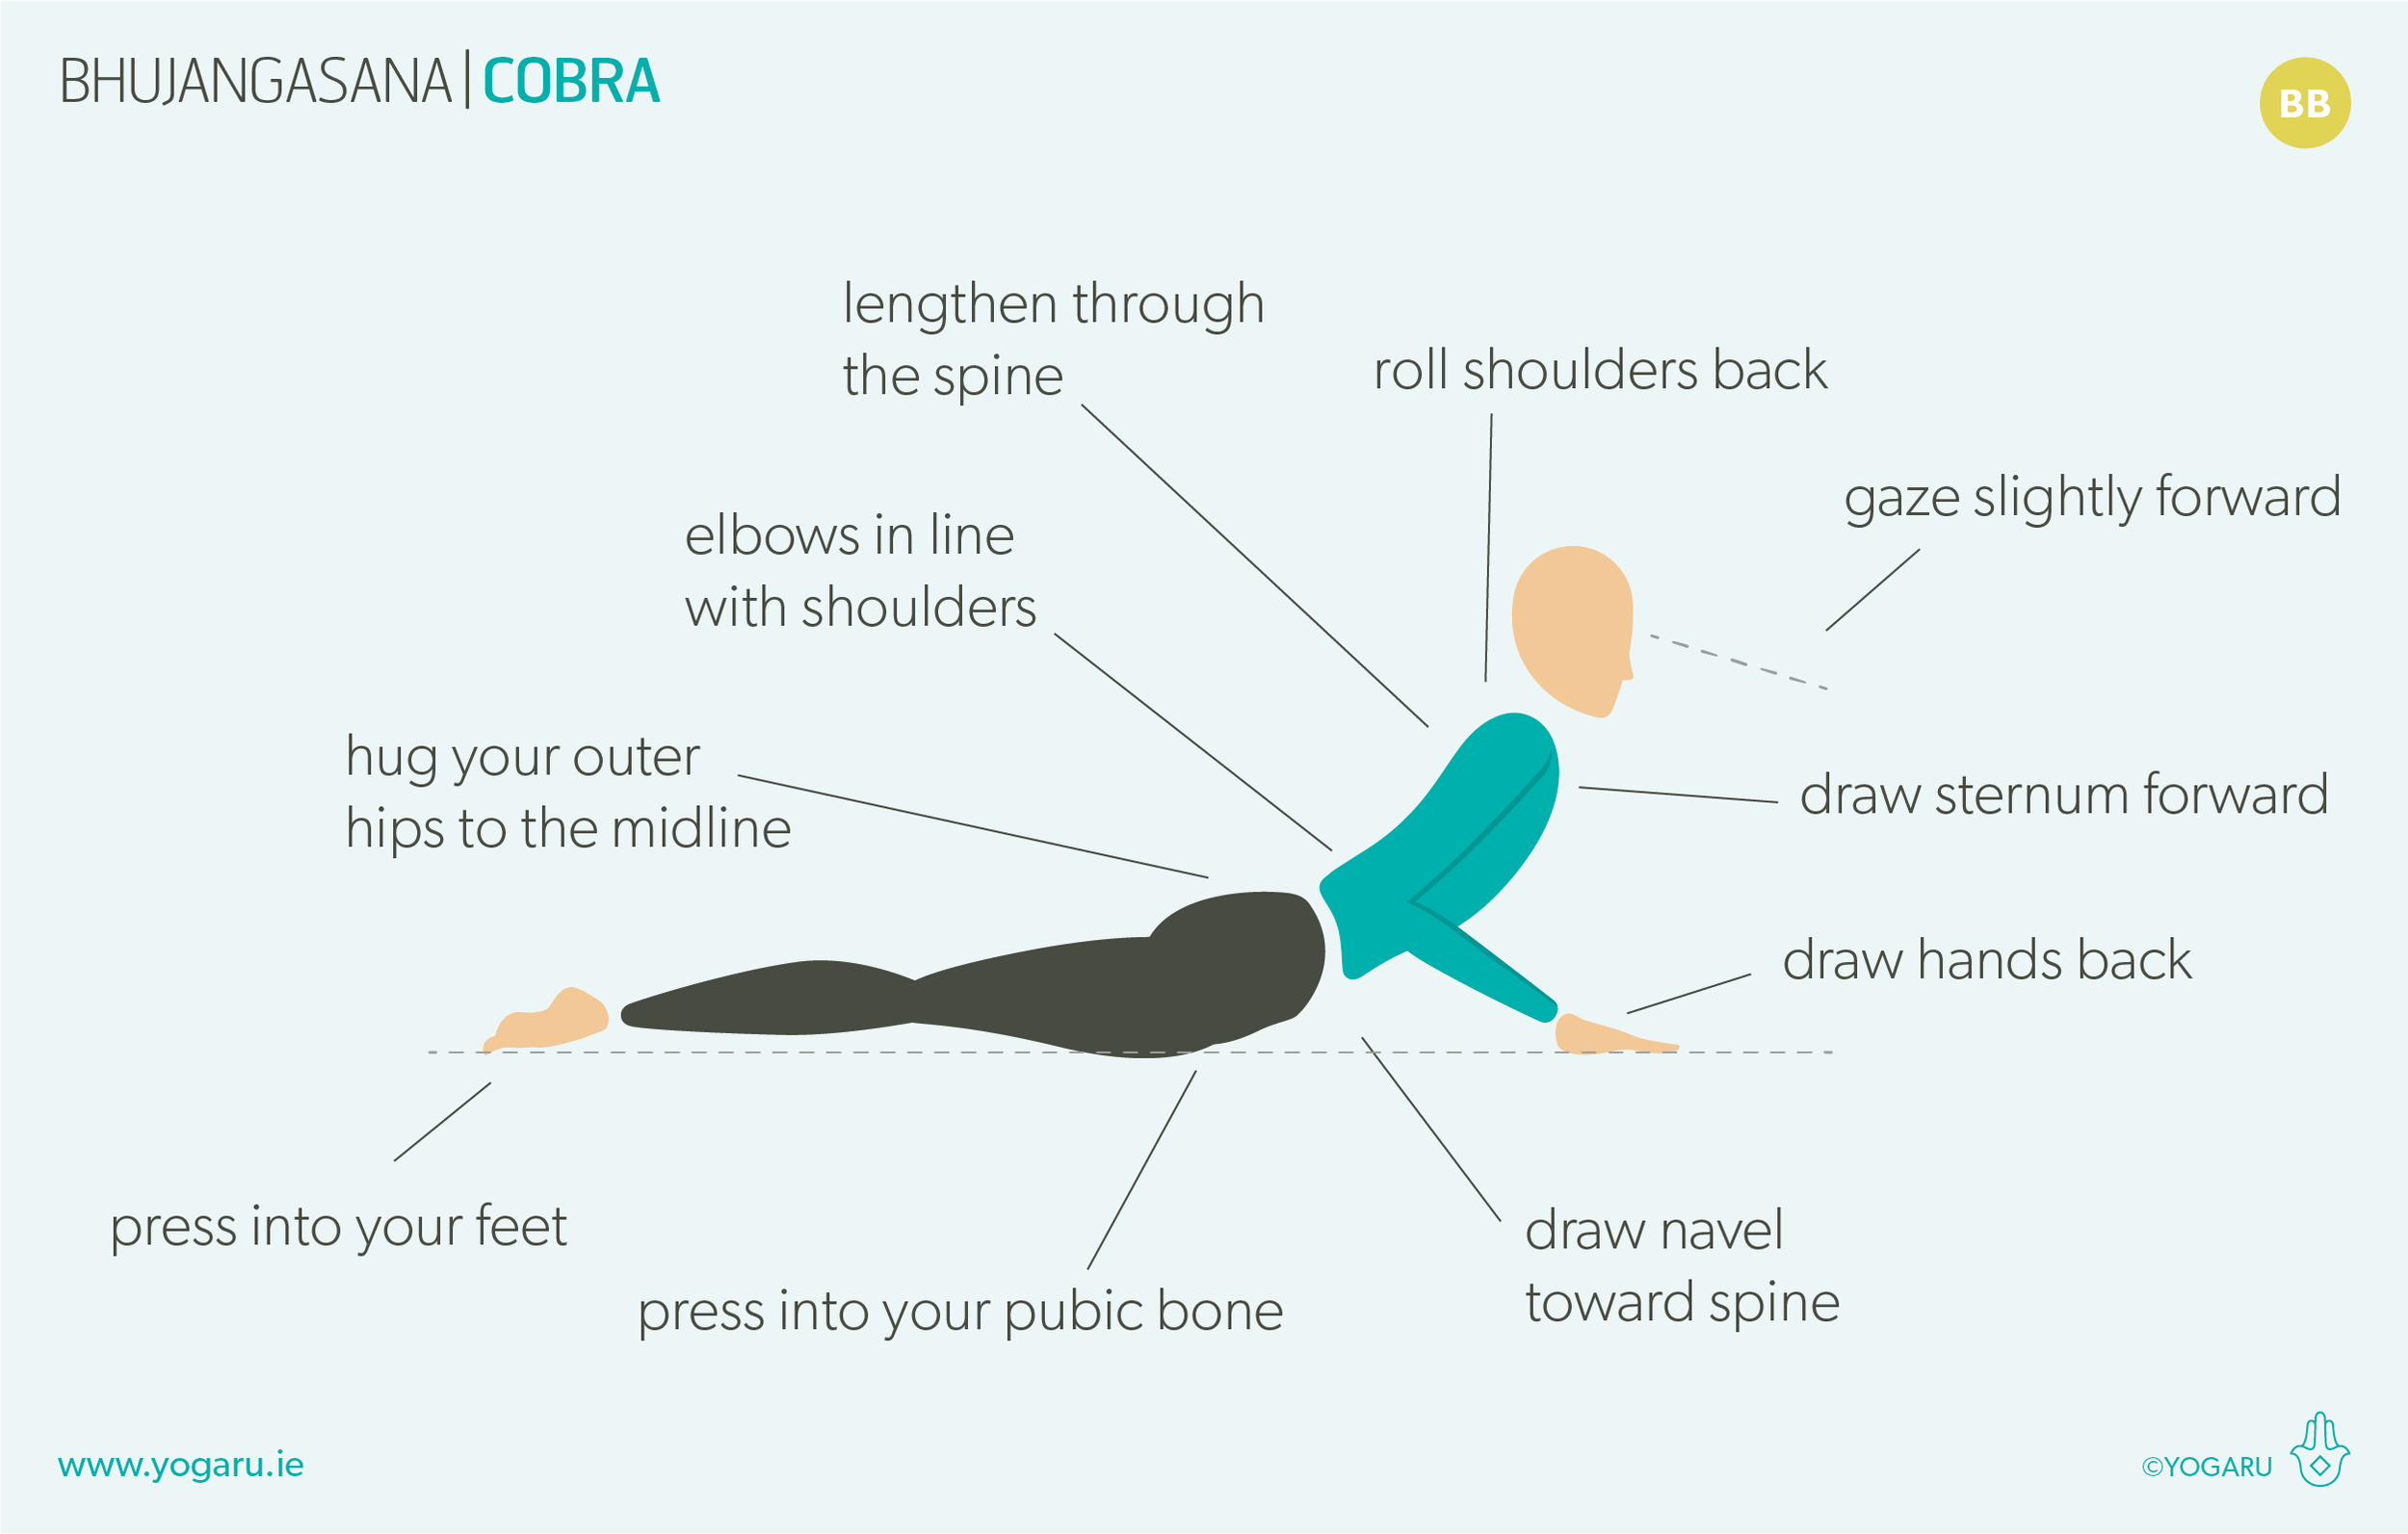
  • Lie on your front, feet hip width apart, top of the feet on the ground with your hands either side of your sternum.

  • Press your feet, thighs and pubic bone firmly to the ground, Inhale, press into your hands, lift your chest up and lengthen forward, track your elbows in line with your shoulders.

  • Reach your toes back, firm your legs, hug your outer hip to the midline, pull your hands back, draw your sternum forward and up, draw your navel towards your spine. Lifting with the whole back, gaze slightly forward.

To save the images for personal use click and hold down the image until the ‘save image’ option appears; on Mac hold down ‘control’ and click the image to get the option box; on PC right click on the image to get the option box. Scroll down in the ‘option box’ and click ‘save image’.

Ruth Delahunty Yogaru

Your deep core

At the centre of your core lies a muscle known as ‘the muscle of the soul’. Guest writer Sam Delahunty goes deep into the core.

THE INVISIBLE CORE
In today's fitness industry there is a strong focus on the ‘six pack’. While these are the visible muscles of the group that is ‘your core’, there are invisible, deeper and just as important muscles there as well. Deep in your body's centre there lies a muscle called the iliopsoas. Consisting of the psoas and the iliacus, this muscle plays a much larger role in your life than expected. Considered part of the posterior abdominal wall, the psoas originates in the lumbar spine, travels through the pelvis where it picks up the iliacus, and reaches right down to the femur leg bone. What makes it unique is that it is the only muscle that connects the upper and lower body. Its function is to lift the leg towards the body in flexion. A very common movement in an active life – think running, cycling, squatting, walking, core exercises and everyday movements. Because of its common use it can be very susceptible to tightness due to overuse.

THE PSOAS AND YOUR NERVOUS SYSTEM
Your nervous system has an ‘on’ switch (the sympathetic nervous system, fight or flight response) and an ‘off’ switch (the parasympathetic nervous, rest and restore response). Because of the psoas involvement in the action of running, it is one of the first responders in a fight or flight situation, making it strongly linked to the ‘on’ switch in the nervous system. When your psoas is at rest you are more inclined to be relaxed and when your psoas is tight you are more inclined to be stressed. A well adaptive nervous system fluidly shifts from ‘on’ to ‘off’ but when the psoas is tight we can get stuck ‘on’ and it sends signal to the body to constantly be prepared for fight or flight. This leads to an excess release of cortisol and adrenaline, in other words, stress hormones. This isn't all an overused psoas causes. With the upper section of the psoas attached to the lower lumbar spine, when it is tight it can pull your lumbar vertebrae forward and lead to back pain. The diaphragm and the psoas connect along the same vertebrate, meaning a tight psoas impacts your diaphragm's ability to expand fully, leading to shorter breaths and an activation of the nervous systems ‘on’ switch. The problems a tight psoas can cause is a perfect example of the importance of yoga in a balanced fitness journey. Through yoga you explore your body in a deeper way than other fitness avenues. You focus on the inner rather than the outer, and help fix and avoid problems caused in other activities, to create harmony.

EXPLORING YOUR DEEP CORE IN YOUR PRACTICE
Most of us sit for longer than our bodies were designed to, which causes the psoas to shorten and become stagnant. This sequence will help you identify and release the psoas. If you are a runner or cyclist this sequence will be of particular benefit to you. As you move through the sequence take a moment to bring your fingertips to your pointy hip bones. Actively lift them up to make sure your psoas, and assisting hip flexor muscles, are not pulling your pelvis and lumbar spine forward, causing an overarch in your lower back. The sequence finishes with a psoas release restorative pose where you lie with the back of your hips over a rolled blanket or small bolster. When you take this pose make sure that you actively draw the back of the top of your pelvis down towards the ground to make sure you are not overarching your lower back.

Getting familiar with your psoas, and adding some of the psoas releasing poses into your practice, will make it easier to avoid it getting tight and will help to manage the nervous system too.

ALIGNMENT CUES
There is no specific peak pose in this sequence. Use the cues below to help you flow through the sequence with ease and fluidity.

Have a read of the tips below and either print out the sequence or save it onto your device:

  • Use the breath guide in the sequence to help you link breath with movement in the flow. Inhale is indicated with a ‘+’, exhale is a ‘-”.

  • If there are specific poses that you would like to stay longer in, give yourself three deep breaths in those poses and pick up the next pose with the allocated inhale or exhale as indicated by the sequence.

  • For a longer practice repeat the warm up flow on the first line at the start of each of the three standing flows or repeat each of the standing mini flows three times.

To save the images for personal use click and hold down the image until the ‘save image’ option appears; on Mac hold down ‘control’ and click the image to get the option box; on PC right click on the image to get the option box. Scroll down in the ‘option box’ and click ‘save image’.


Sam’s keen interest in fitness started at an early age during his time spent playing rugby in St.Michael’s. He went on to complete an olympic triathlon at the age of 16 followed by a half marathon.

These achievements gave him the inspiration needed to set him down the health and fitness path. He learnt the importance of multidisciplinary training and incorporating yoga and functional training when creating programmes. His systematic approach to both performance and everyday health is all about building an overall ability to specialise and succeed.

Parsvottanasana - Intense Side Stretch

HELLO HAMS!
There is something very humbling and respectful about this Parsvottanasana/Intense Side Stretch. As you bow forward, whether your arms are in prayer or not, it feels like you are paying homage to the practice of yoga. I would take that a step further and add that you are bowing with appreciation and reverence to yourself too for turning up for yourself to your practice! For this reason this is definitely not a pose to be rushed.

Parsvottanasana/Intense Side Stretch is more of an intense back body stretch, mainly the hamstrings and the glutes, rather than a ‘side stretch’ as the name suggests! The front leg is extended and straight, which immediately brings a stretch into the hamstrings when the upper body hinges forward. When you compare Parsvottanasana/Intense Side Stretch to Baddha Virabhadrasana/ Humble Warrior the stretch is not as intense in the latter, because the hamstring is contracting to bend the knee. For this reason, if you find you hit a ‘hamstring wall’ in Parsvottanasana/Intense Side Stretch, bend the front knee as much as you need to, to give you more room to hinge forward over the extended leg. Bringing the feet slightly wider, left to right, will also give more space to extend forward with the upper body. If you are inclined to hyperextend your knees, keep a soft bend in your front leg as you fold forward.

THE BENEFITS OF PARSVOTTANASANA/INTENSE SIDE STRETCH
Parsvottanasana/Intense Side Stretch strengthens the legs, hip flexors, core and quads. It stretches the whole back body, including the shoulders, wrists, spine, hamstrings and glutes. It helps you find your connection to the earth and ground down to grow roots. As a forward fold it gently massages the organs of the abdominals; aids digestion; eases headaches, fatigue, stress & anxiety. Not only is it a forward bend but it is also an inversion, as the head is below the heart, which increases circulation and boosts the immune system.

EXPLORING PARSVOTTANASANA/INTENSE SIDE STRETCH IN YOUR PRACTICE
As with all intense poses there are plenty of versions for Parsvottanasana/Intense Side Stretch. Bringing the arms into reverse prayer can be challenging for most. It requires a lot of internal rotation and extension of the shoulders, and deep wrist extension too. If this is not for you, take one of the following options – hold your elbows behind your back; extend your arms back; bring your hands to prayer position in front of you or bring your hand to the ground or bricks either side of your front foot. Regardless of which arm position you take, remember to expand the chest and elongate both sides of your waist as you fold forward, to ensure you don’t collapse the spine forward instead of hinging from the hip joint. If you find you have very little forward rotation of the hips, simply stay more upright and work on maintaining the integrity of the spine and keeping the hips level and hugging to the midline.

There are plenty of opportunities to prepare all the strengthening muscles and stretching muscles. The sequence starts with some hamstring and glute warm ups to help release any tightness in the back of the hips. The first standing flow preps for your peak pose with the back heel lifted, and the second standing flow has the back leg grounded ready for Parsvottanasana/Intense Side Stretch. If you encounter a pose that hits a particular part of the back body that needs extra attention, take a few more breaths in there.

ALIGNMENT CUES
Ground down into both feet as you hinge forward into Parsvottanasana/Intense Side Stretch. Feel a solid connection to the ground beneath you.

Have a read of the tips below and either print out the sequence or save it onto your device:

  • From Virabhadrasana I, step your left foot forward slightly, inhale, bring your arms behind your back and clasp your elbows, or draw your palms together in reverse prayer position. Broaden through the collarbones, lengthen through your spine.

  • Exhale, hinge forward from the hip joint over your right leg, hips level, right hip draws back, left hip draws forward.

  • Inhale, broaden through the collarbones, reach the chest forward, exhale, fold forward, release your head towards the front leg, keep the legs firm, gaze to your shin.

To save the images for personal use click and hold down the image until the ‘save image’ option appears; on Mac hold down ‘control’ and click the image to get the option box; on PC right click on the image to get the option box. Scroll down in the ‘option box’ and click ‘save image’.

Ruth Delahunty Yogaru