
FACE YOUR FEARS
Full disclosure, I have a turbulent relationship with Adho Mukha Vrksasana/Handstand! I used to pop up into it without a care in the world, until one of my shoulders buckelled and I exited inelegantly in a heap on the floor with a new collection of bruises to more than just my ego. For many years after I’d break out in a cold sweat at the mention of handstands in classes, until recently I decided enough was enough. It was time to make peace with the pose, tackle my demons, and build strength and trust in my shoulders again.
THE BENEFITS OF ADHO MUKHA VRKSASANA/HANDSTAND
Inversions have become very popular, and for a wide variety of very good reasons too. Inversions aid circulation and help the heart do its job of bringing fresh oxygenated blood to the brain – which is very energising, improves focus and concentration, and reduces stress and anxiety. This boost in circulation flushes out toxins from all the systems of the body and allows it to work more efficiently and build a strong immune system. They are also beneficial for good digestion; building physical strength and stamina; increasing metabolism; regulating hormones; increasing spatial awareness and coordination. Quite an extensive list for a humble upside down pose!
EXPLORING ADHO MUKHA VRKSASANA/HANDSTAND IN YOUR PRACTICE
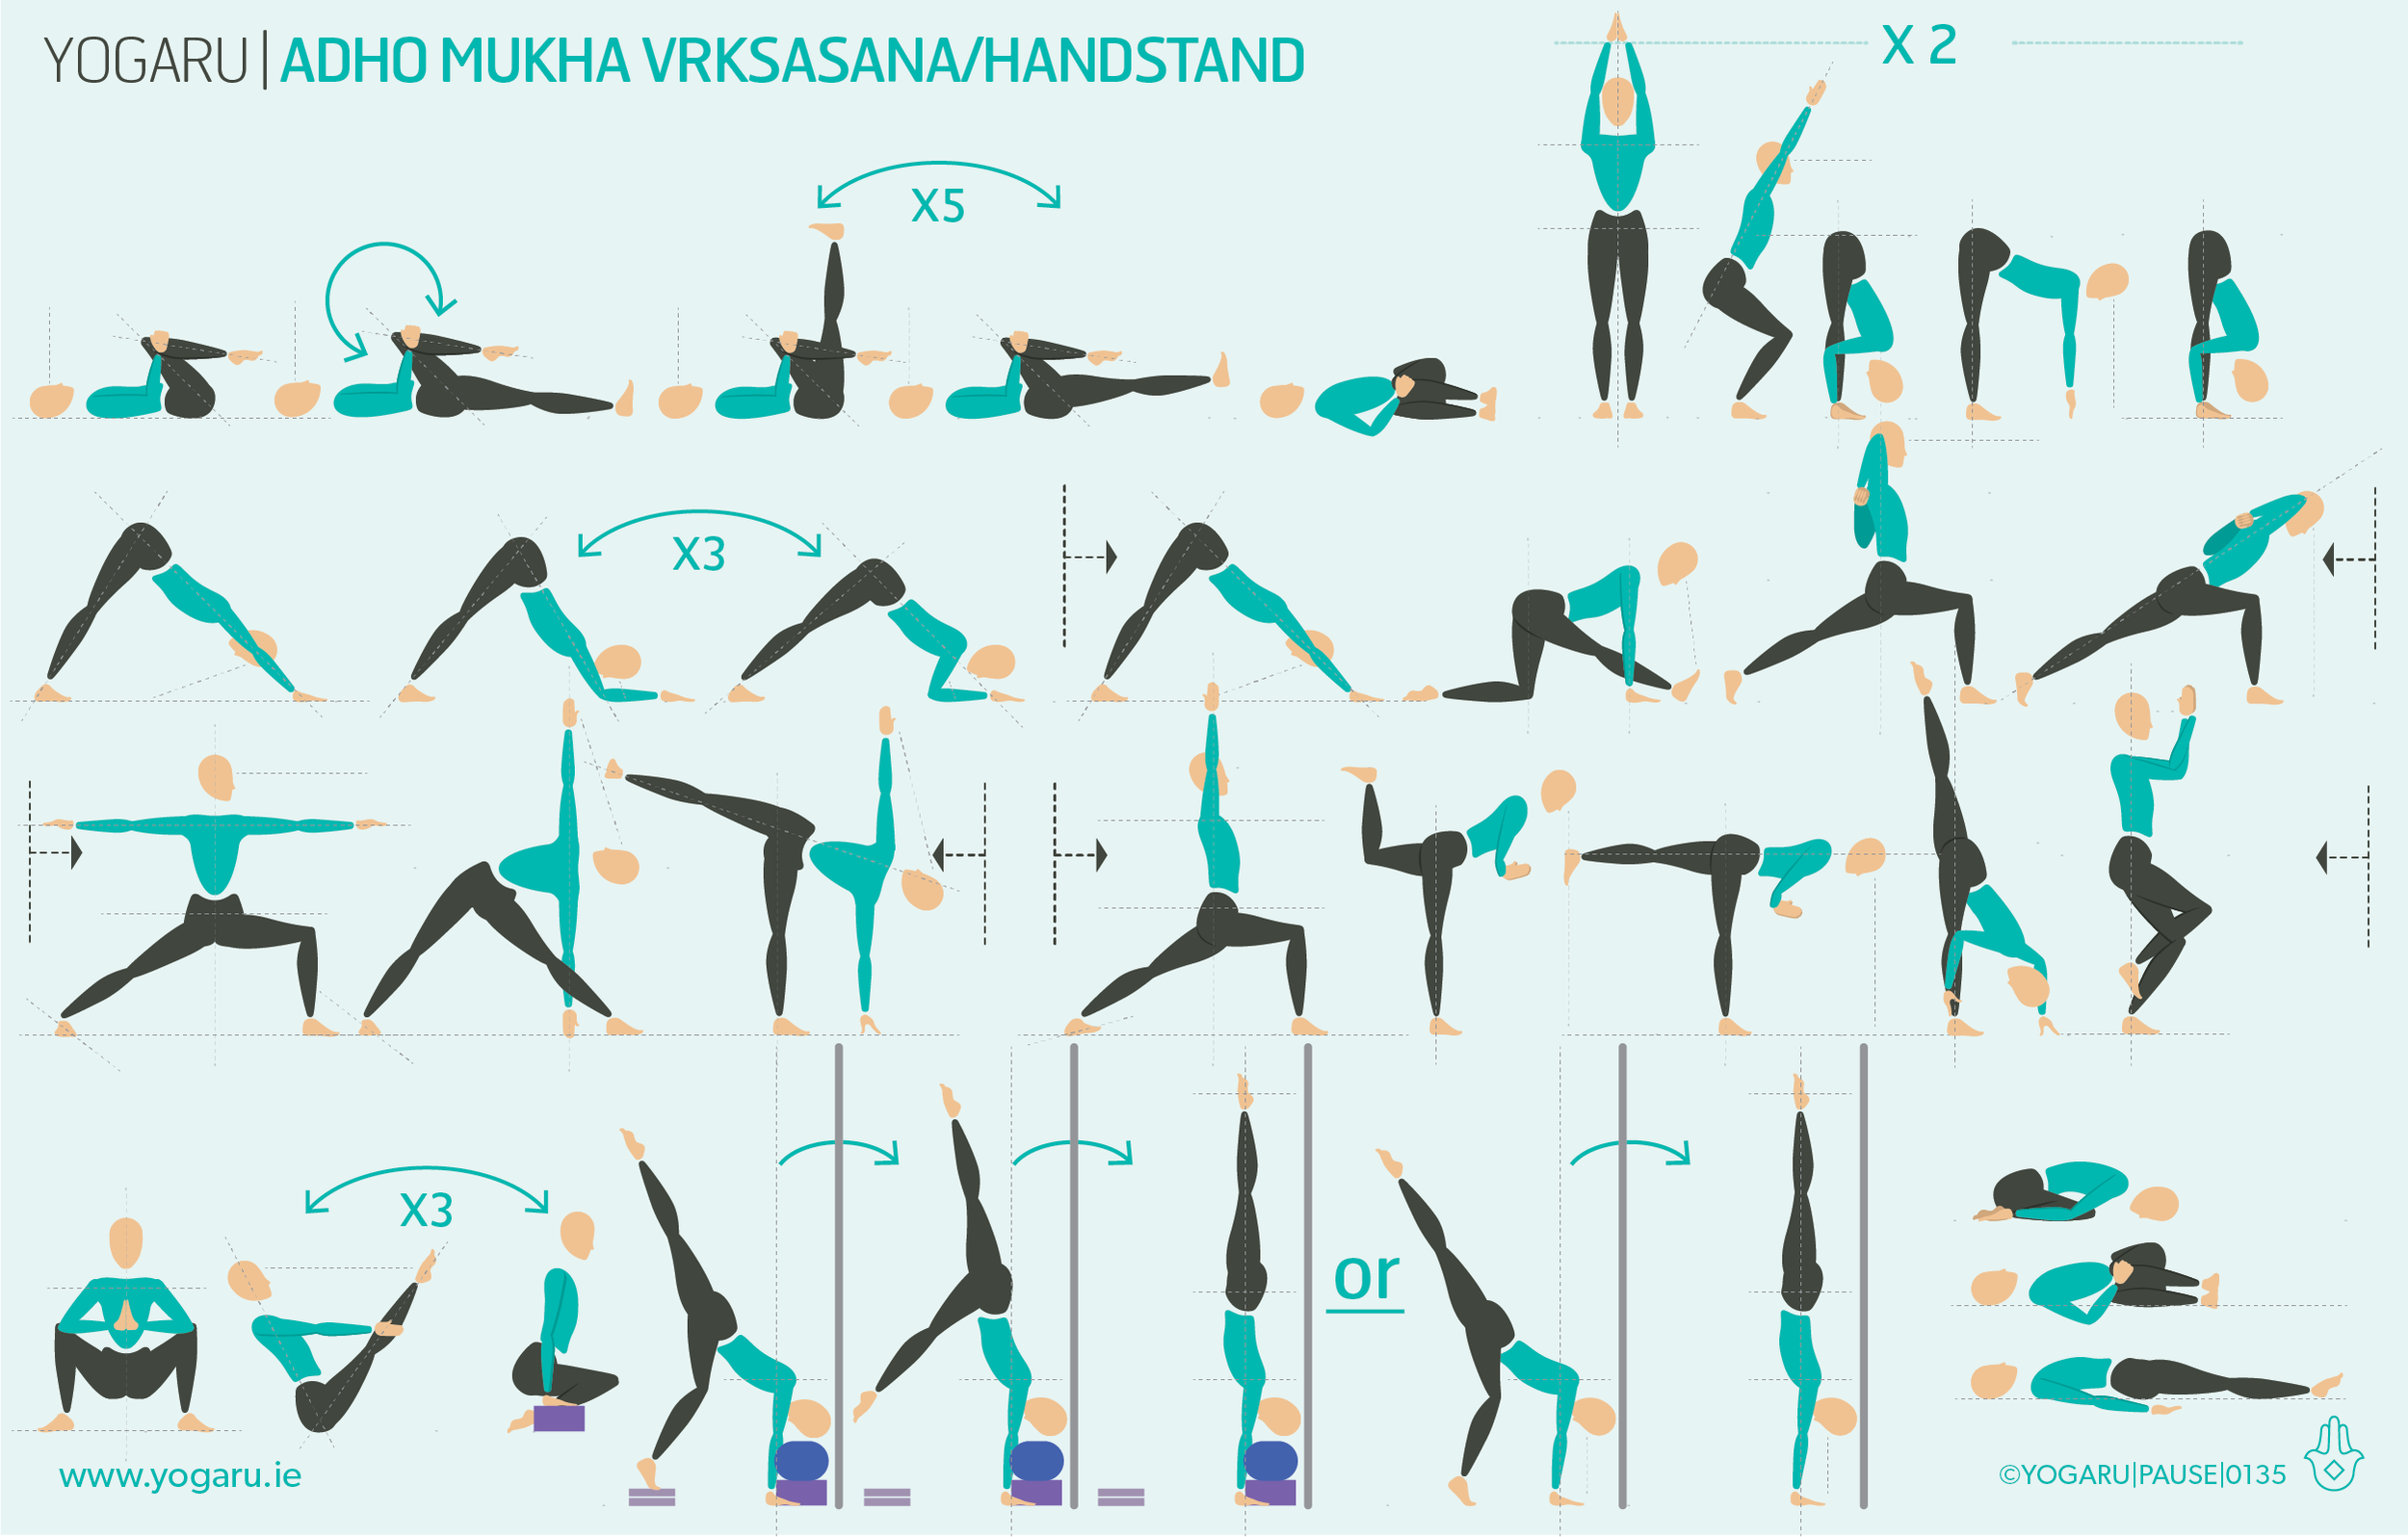
Prep and practice is key when building up to poses like Adho Mukha Vrksasana/Handstand. Similar to headstand, strong shoulders and core are essential to the pose. I find spending a bit of time lengthening out the hamstrings help in getting you into a good set up position for kicking up. The two areas that haunted me the most were – trusting that my shoulders would stop me from buckelling forward, and having sufficient grounding in my hands to swing up from. So I devised a propped Adho Mukha Vrksasana/Handstand method to support me while I tackled these fears. The set up gradually builds you up towards the full pose. The props can be removed one at a time, as you find comfort in each step, while building strength in your shoulders and core.
ALIGNMENT CUES
Approach this sequence with no expectation or self judgement. Adho Mukha Vrksasana/Handstand is a difficult pose for most, so be kind to yourself and expect to invest a bit of time if it is your first attempt at Adho Mukha Vrksasana/Handstand.
Have a read of the tips below and either print out the sequence or save it onto your device:
HOW TO USE PROPS FOR ADHO MUKHA VRKSASANA/HANDSTAND
Start from the beginning, set up and remove props to find the level you are most comfortable working with. You will need a bolster, two bricks (bricks are chunky) and two blocks (blocks are the flat ones):
Set your yoga mat up short end to the wall. Place your two bricks perpendicular to the wall, just narrower than shoulder width, on their mid height,. Place your bolster on top of the two bricks. Place your two blocks to the left side of your mat under where your leg foot will be. These will help lift your pelvis up higher when you are getting ready to kick up.
Place your hands on your mat just under the bolster, shoulder width apart, so that the bolster supports your shoulders. Press down evenly through your hands, grip the ground and lengthen up through your arms to your shoulders.
Walk your feet in towards your hands as far as you can to a narrow Downward Dog and stack your shoulders over the heels of your hands. Let your head reach down towards the bolser but try to not use the support of the bolster. Think of it as your fail safe.
Bend your left leg, lift your right leg up as high and straight as you can. Reach your pelvis forward towards the wall.
Send all your energy to your bent leg and spring your right leg up overhead, follow quickly with the left leg, reach your legs up high, draw your navel towards your spine.
Hug your outer hips and inner thighs to midline, press through the balls of your feet. To come down, lower your right legs down first and carefully place your left foot down if you have used the stacked blocks.
When you are comfortable kicking with this setup remove one block and try again; then the second block; then reduce the height of the bricks to their lowest; then progress to ‘How to handstand with a wall’
HOW TO USE A WALL FOR ADHO MUKHA VRKSASANA/HANDSTAND
When you’re ready to move on to full handstand stay at the wall until you are very comfortable with kicking up and balancing without the support of the wall.
Set your yoga mat up short end to the wall. Place your hands on your mat shoulder width apart, wrists parallel about 6 inches away from the wall. Press down evenly through your hands, grip the ground and lengthen up through your arms to your shoulders.
Gaze to the ground between your hands, walk your feet in towards your hands as far as you can to a narrow Downward Dog position and stack your shoulders over the heels of your hands.
Bend your left leg, lift your right leg up as high and straight as you can. Reach your pelvis forward towards the wall.
Send all your energy to your bent leg and spring your right leg up overhead, follow quickly with the left leg, reach your legs up high, draw your navel towards your spine.
Hug your outer hips and inner thighs to midline, press through the balls of your feet. To come down, lower your legs one at a time.
TIPS
Below are some extra tips to help you along the way.
Incorporate lots of Dolphin pose into your practice to build strength and stamina in your shoulders.
If you’ve just gone to a hip opening class try out your handstand practice when you get home. You’ll notice you can find your narrow Downward Dog easier which is half the battle to lifting your hips up over your shoulders.
Handstand kick up position is harder work on the shoulders than hanging out in handstand. Get into position and move promptly into your handstand before fatigue or the ‘I can’t’ mindset starts kicking in.
Run through your prep with your teacher and get as much tips and feedback on where you might be resisting in your kick up.
If you are new to handstands practice with the guidance of a yoga teacher before you incorporate them into a home practice.
Avoid practicing headstand if you have a back injury, neck injury, shoulder injury, high blood pressure, glaucoma, sinus infection or it’s your time of the month.
Handstands are definitely a tricky pose for most people. Prepare to build some handstand drills into your everyday practice if you really want to get with the handstand vibes!
To save the images for personal use click and hold down the image until the ‘save image’ option appears; on Mac hold down ‘control’ and click the image to get the option box; on PC right click on the image to get the option box. Scroll down in the ‘option box’ and click ‘save image’.
Ruth Delahunty Yogaru