YouTube sequence

Sun salutations

This sequence is available on YouTube.

SALUTE TO THE SUN
The Sun Salutation, or Surya Namaskar in Sanskrit, is traditionally practised in the morning as a salute to the Hindu god of sun ‘Surya’. It is an energising movement meditation traced back to the spiritual wisdom seekers of the vedic period who worshiped the sun through mantra and prostration. Today's Sun Salutation attributes its roots to the vedic period but is very different to the one they would have practiced 3,500 years ago. The Moon Salutation, or Chandra Namaskar in Sanskrit, was created to practice in the evening as a cooling and calming end to the day. Both can be practised anytime of the day depending on what you are looking for from your practice. They both stretch and strengthen all the muscle groups, increase circulation, build a strong respiratory system, aid the digestive system, boost the immune system, unwind a busy mind and release physical and mental tension.

The repetitive and meditative quality of the movements in The Sun Salutation relaxes the mind and body, reducing stress and anxiety and increasing mental clarity. As you move through each pose you take either an in-breath or an out-breath which helps you link your breath with your movement. When done slowly it establishes a conscious breath that stimulates the vagus nerve and causes a chemical reaction which activates the nerve fibres and sends messages to the brain. The brain processes this information from the vagus nerve and initiates the parasympathetic ‘rest and restore’ response.

There are three main versions of Sun Salutation, or Surynamaskara. Sun Salutation A, B and C (also called Sun Salutation Classic). Sun Salutation C is the best version to start any practice with. You step back from your first Forward Fold/Uttanasana, to Anjaneyasana/Low Lunge, which is kinder on the joints while you give your system a chance to warm up. It also offers a softer decline to the floor through Knees, Chest, Chin, rather than Chaturanga Dandasana/Four Limb Pose. Coming all the way down to the ground offers a gentler backbend with Bhujangasana/Cobra, instead of a full Urdhva Mukha Svanasana/Upward Facing Dog. You can also incorporate a soft bend in the knees for the forward folds, allowing time for the hamstrings to warm up.

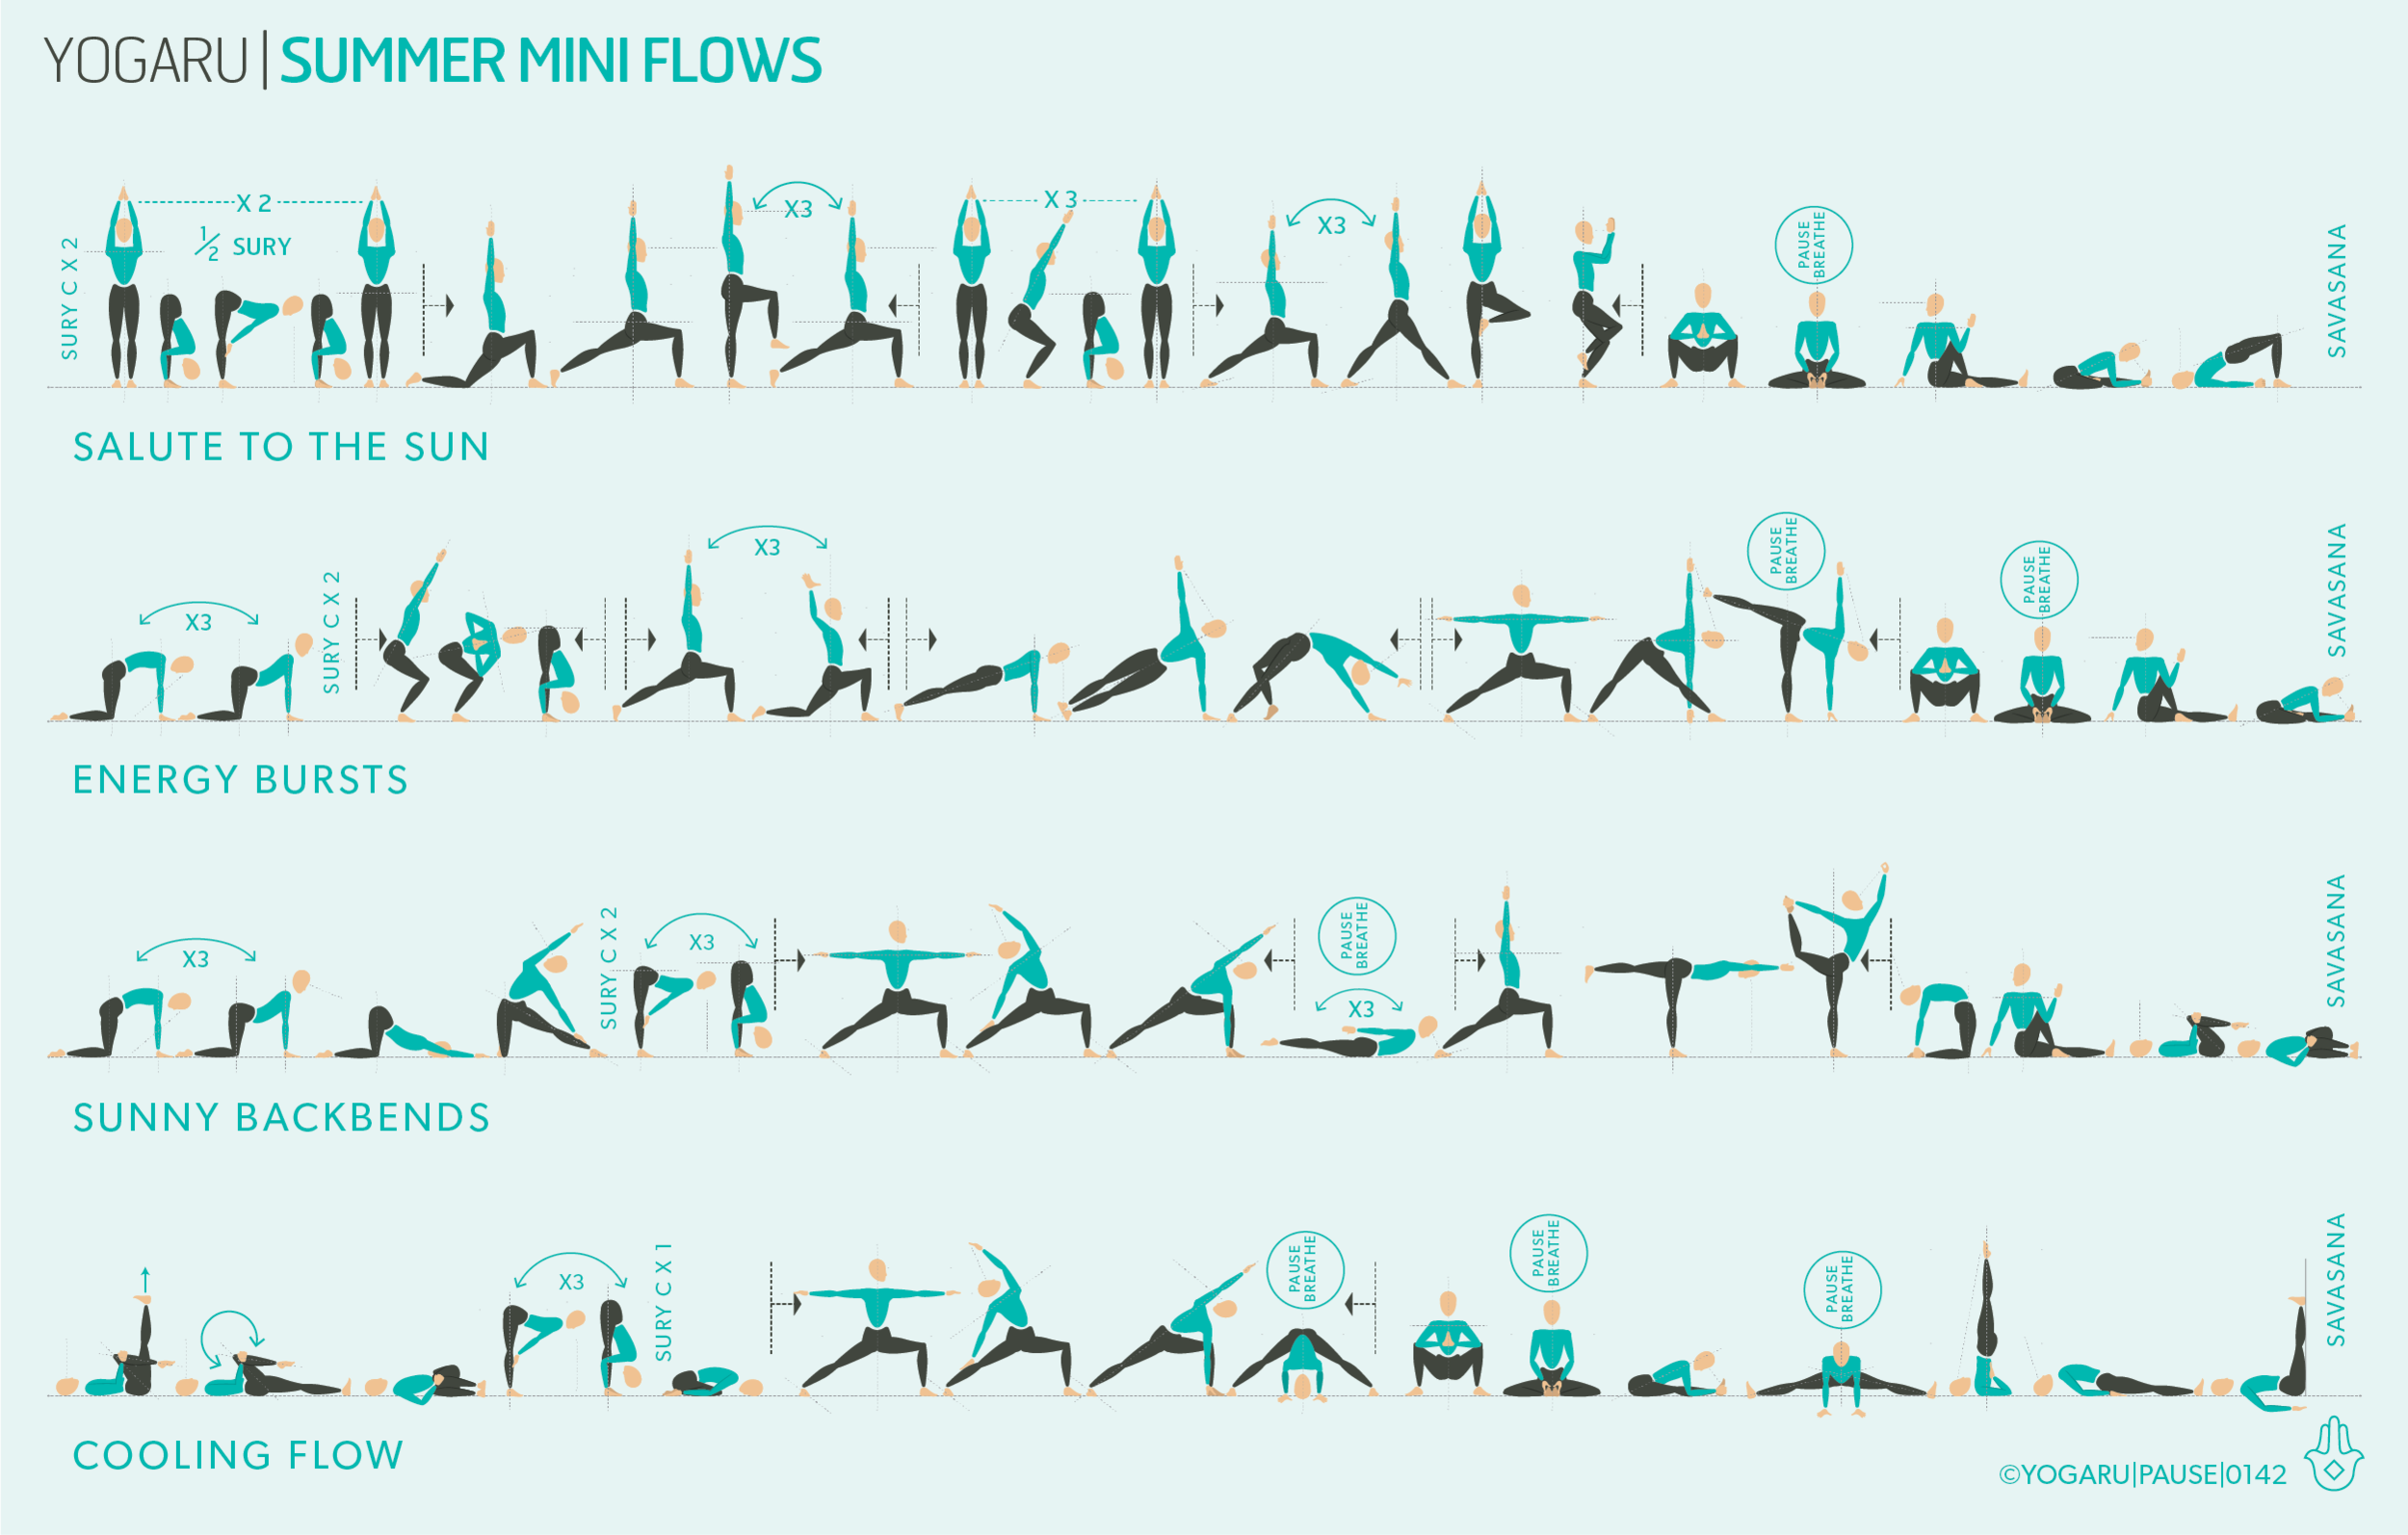
EXPLORING SUN SALUTATION IN YOUR PRACTICE
The Sun Salutation is the perfect place to start when building a home practice. It can be repeated as your whole practice or built into your flows as a warm up. For your 1st round of Sun Salutation C pause in each pose to observe your alignment. Use your second round to get used to what the breath is doing in each pose. Don’t worry if you get the breath wrong. It gradually starts to make sense – as a general rule of thumb, when you are folding down you are pressing all the air out of your lungs and when you are rising up you are filling your lungs. The third round builds in intensity by adding a small standing flow in the centre of each Sun Salutation. Finish by coming down to the ground with Malasana/Squat, pause for a few breaths in Baddha Konasana/Bound Angle and take a few minutes for your Savasana/Corpse Pose after a supine windscreen hip of the legs with bent knees.

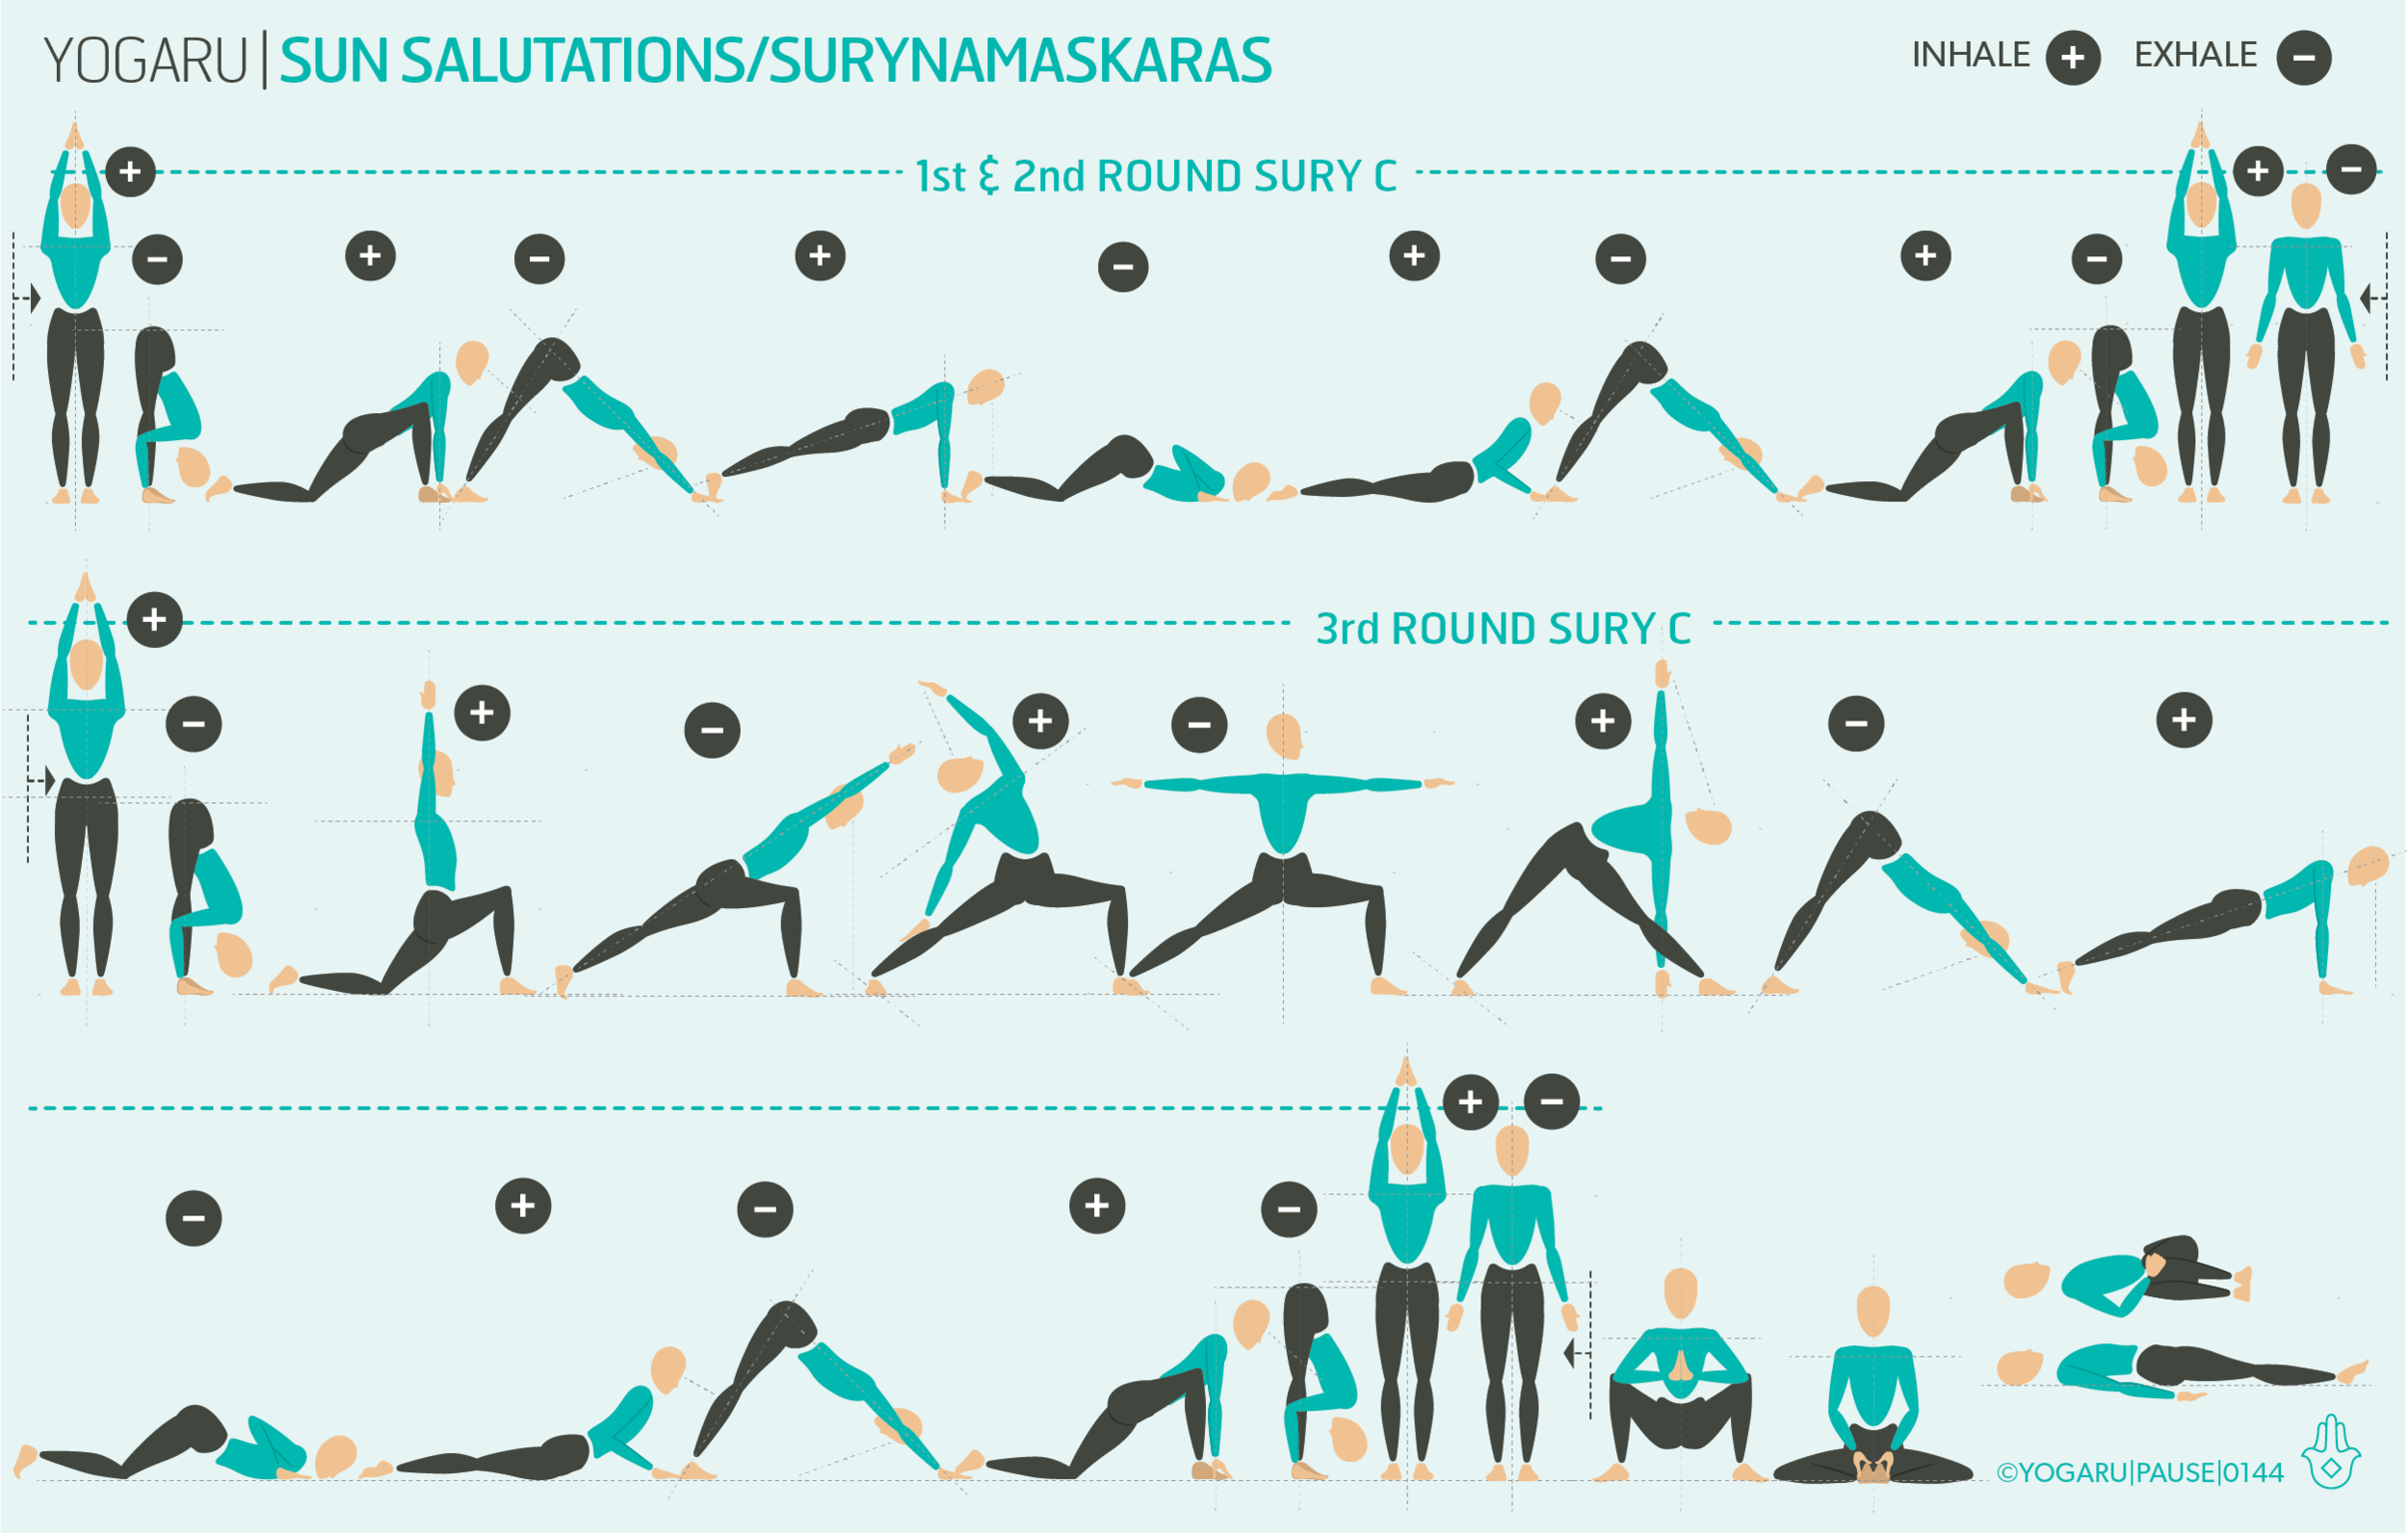
Below is a step by step guide to Sun Salutation C. Each full Sun Salutation C consists of two rounds of this flow. In the first round step your right foot back after your first forward fold, and step your right foot forward after your second downward facing dog. In the second round step your left foot back and forward.

  • Tandanana/Mountain - stand at the top of your mat with feet hip width apart.

  • Urdhva Hastasana/Upward Salute - Inhale, reach your arms up high.

  • Uttanasana/Forward Fold - Exhale, fold forward.

  • Anjaneyasana/Low Lunge - Inhale, step your right foot back, knee to the ground.

  • Adho Mukha Svanasana/Downward Facing Dog - Exhale, step your left foot back.

  • Phalakasana/Plank - Inhale reach forward to stack shoulders over wrists.

  • Ashtanga Pranam/Knees, Chest, Chin - Exhale, lower knees, chest & chin to the ground.

  • Bhujangasana/Cobra - Inhale, press into your hands, lift chest up & lengthen forward. Lifting with the whole back

  • Adho Mukha Svanasana/Downward Facing Dog - Exhale, press back to Downward Facing Dog.

  • Anjaneyasana/Low Lunge - Inhale, step your right foot forward, left knee down to the ground.

  • Uttanasana/Forward Fold - Exhale step your left foot forward, folding down.

  • Urdhva Hastasana/Upward Salute - Inhale, reach your arms up high.

  • Tandanana/Mountain - Exhale, lower your arms down by your sides.

To save the images for personal use click and hold down the image until the ‘save image’ option appears; on Mac hold down ‘control’ and click the image to get the option box; on PC right click on the image to get the option box. Scroll down in the ‘option box’ and click ‘save image’.

Ruth Delahunty Yogaru

Summer mini flows

PAUSE_0142_A.png

This sequence is also available on YouTube.

DISCOVER YOUR SUMMER HOME PRACTICE
Summer is the perfect time to take the brave step of rolling your mat out and getting your home practice going. These sequences will work anytime of the day. But starting your morning off with your practice, before the busyness of the day takes over, is a great way to build a healthy habit into your daily routine. Getting up that extra few minutes early is much more doable when the sun is shining outside! You might even find you get the taste for practicing outdoors into your garden or your local park. You can also practice these mini flows on your summer holidays. They are the perfect way to stay active, while still getting all the benefits of your relaxing holiday vibes.

THE BENEFITS OF SALUTE TO THE SUN FLOW
The sun brings out the best in us and for that we salute it. This sequence has lots of standing poses with arms reaching for the sky. Standing poses are very strengthening to the legs, core and glutes. The addition of the arms raised, wakes up the shoulders and the arms and gives you a full body workout. They are also great for getting the circulation going and building focus, concentration and stamina. The standing poses where one leg is lifted will strengthen and stabilise the ankles and knees and are valuable support if you are a seasoned runner.

THE BENEFITS OF ENERGY BURSTS FLOW
Starting the day off with this sequence will set you up for whatever the day has in store for you. It’s hard to not feel a burst of energy in the afterglow of poses like Camatkarasana/Wild Thing and Ardha Chandrasana/Half Moon. They are challenging poses that require balance, concentration and a small leap of faith! Wild Thing has the added benefit of being an inversion (where the heart is above the head) and eases stress, tension and anxiety; boosts the immune system; aids good digestion; increases circulation; and most importantly, gives you that yogi glow to your complexion! There is also a healthy splattering of twists and side bends in this sequence which are very energising. Anytime you’re feeling tired sit up tall and take a twist to wake yourself up again.

THE BENEFITS OF SUNNY BACKBENDS FLOW
Backbends are the perfect summer poses. It feels really good to open up the chest and shoulders after months of guarding ourselves from the cold weather. Backbends are energising; aid good digestion; ease stress, tension, anxiety, fatigue, depression; and boost the immune system. On top of that already impressive list of benefits they press and stimulate the colon and help you stay regular over the summer months. Look for strength in the whole extent of the back body in locust pose to counteract all the sitting you might do through your day.

THE BENEFITS OF COOLING FLOW
We may not always need cooling down on your average Irish summer day but this sequence is also very calming and soothing. Forward bends ease insomnia, stress, tension and anxiety and are very relaxing and calming. If you’ve had a busy day and your mind is rushing this is the sequence for you. It can also be practiced in the morning if you wake up feeling less than refreshed and still need to get on with your day. Spend a few minutes in your Salamba Sarvangasana/Shoulderstand and feel the effect of the reverse of blood flow through the body.

YOGARU_SSC.png

EXPLORING SUMMER MINI FLOWS IN YOUR PRACTICE
Each mini flow will take around 15mins. If you would like to practice for longer add more rounds of Surya Namaskara C illustrated above in between each standing mini flow. When flowing through the mini flows indicated between the arrows, start with the right leg forward first, and then repeat this group of poses on the left side. Keep your transitions simple and when in doubt link pose through a Downward Dog or come back to Tadasana at the top of your mat and step back into your next pose. See how it feels to practice outdoors. You will find the surface you roll your mat out on can change the sensations of the poses. Grass adds a softness, challenges your balance and works all your balancing muscles, while sand adds surfaces to dig in and press your heels against in poses like downward dog. Being outdoors also helps you to really breathe deeply during your practice in the fresh air. Take your time and enjoy the poses that nourish you, remember you are the boss of your practice.

To save the images for personal use click and hold down the image until the ‘save image’ option appears; on Mac hold down ‘control’ and click the image to get the option box; on PC right click on the image to get the option box. Scroll down in the ‘option box’ and click ‘save image’.

Ruth Delahunty Yogaru

Move & restore

PAUSE_0140.png

This sequence is also available on YouTube.

DOING & NON-DOING
When I completed my recent studies on the nervous system and restorative yoga with Yoga Medicine I was curious to experiment more with the benefits of restorative yoga to the nervous system. I started including restorative poses at the end of my practice as a way to add more of this deeply heeling therapeutic practice into my day and continue to relearn how to relax. I started to notice that by adding some restorative at the end of my practice I was teaching my nervous system to be more malleable, swapping more smoothly from activity to relaxation, and appreciating the value of both. I noticed a few incidents where I was able to pause before I reacted to situations with the kids, and deal with it in a logical way rather than a knee jerk reaction. I felt less depleted at the end of a day when I felt I had given something back to my energy stores at the end of my yoga practice. On the days where I practiced a purely restorative session in the evening I noticed I would settle to sleep the minute my head hit the pillow, and better still, not experience the 4am disturbances to my nights sleep that I had slipped into.

I am currently teaching this style of class online on a Friday morning. You can practice live with me or practice in your own time with the class recording. Experience the benefits for yourself!

Here are some of the many benefits of restorative yoga: regulates the nervous system, balances emotions, balances hormones, eases stress & anxiety, boosts immune function, improves healing capacity, eases muscle tension, eases back and neck pain, reduces chronic pain, eases fatigue, improves sleep, improves overall wellbeing.

BUILDING A RESILIANT NERVOUS SYSTEM
While we can’t consciously control the nervous system we can create favourable conditions to influence our bodies response to external and internal sensory stimulus. Stress, or the sympathetic nervous response, is where we create, get our day's activities done and exercise. Resting or the parasympathetic nervous system is where the body clears out the ‘doing’ hormones, restores homeostasis balance to the body and creates an optimum environment for all the functions of the body. Both work in tandem and are a natural part of being human. This blended method of moving and restoring honours both the yin and yang within our day and helps build a resilient nervous system. To lean more about how the nervous system works and what happens when it tips into too much ‘doing’ have a read of my Finding calm article.

EXPLORING MOVE & RESTORE IN YOUR PRACTICE
This sequence starts with a movement practice with simple purposeful flows to build mobility and strength. There are three mini flows in the movement practice. Move slowly through the poses within each flow and then repeat each one with the breath guides above the poses. The sequence then transitions from doing to non-doing with a restorative practice to target the nervous system. In restorative yoga we consciously relax the body to bring it into a deep state of rest and create a healing environment. The goal of the restorative stage of this sequence is to replenish, absorb the benefits of moving and give back to your body's energy stores. The poses are held for longer periods (you will see the suggested hold times in the sequence) with the support of your blankets to help you to feel effortless comfort. Although props are king in restorative yoga there is plenty you can achieve with just a few blankets to support you and keep you warm. You will need three blankets for this practice. See below for alignment cues on your main restorative pose.

ALIGNMENT CUES
Have a read of the tips below and either print out the sequence or save it onto your device.

The peak pose of the movement sequence is Salabhasana/Locust, a fantastic full back body strengthener:

  • Lie on your front, arms by your sides, palms facing your body, forehead resting on the ground.

  • Inhale, press into your pubic bone, lift your head, upper torso, arms and legs, lift with the whole back. Reach your chest forward and up

  • Extend your arms towards your feet, lift your legs up and press through the balls of your feet, roll your inner thighs up.

  • Broaden through the collarbones, firm your shoulder blades onto your back, back of the neck long, gaze slightly forward.

RESTORATIVE POSE ALIGNMENT CUES
The props you’ll need for the restorative poses are:
1 x bolster - or 2 towels, wrapped around a horizontally rolled pillow and tied to secure.
2 x yoga blankets - or any wool, thick cotton or fleece blanket with density.

No.1 - Constructive rest
Start lying on your back, your knees bent, feet mat distant apart and knees knocked in together. Place your hands on your belly and feel the breath move through you. Take four rounds of 4/6 breath, inhaling for the count of 4 and exhaling for the count of 6. Keep the breath as gentle as possible, notice if you are holding any tension in your shoulders and upper chest. Pause after and notice any change this simple breath observation has made to your body and mind.

No.2 - Supine twist with raised hips
Fold a blanket in four, smooth it out and accordion fold it in three along the short side and place it in the centre of your mat. Place your second blanket folded at the top of your mat and a third blanket folded beside your mat. Sit your left hip and left thigh along your accordion fold blanket, place a the third folded blanket between your thighs, lie on your side. With arms in cactus position, open your right arm to your right and come into the twist. Place the second blanket under your right shoulder to ensure it is supported.

No.3 - Savasana
End your practice with at least 10 minutes of Savasana or Resting Pose. Lie supine on your back, legs stretched out, arms slightly away from your body, palms facing up. Legs slightly apart, feet fall out to the sides, soften your shoulder, back of the neck long. You can add an optional bolster under the knees or a blanket roll under the neck. Gently close your eyes, let the body become heavy and melt into the support of the ground. Soften the muscles across your forehead, releasing all tension, gaze inwards. Let all the muscles and bones of your body release.

To save the images for personal use click and hold down the image until the ‘save image’ option appears; on Mac hold down ‘control’ and click the image to get the option box; on PC right click on the image to get the option box. Scroll down in the ‘option box’ and click ‘save image’.

Ruth Delahunty Yogaru