Restorative yoga

Yoga Therapeutics stress relief

YOGA THERAPEUTICS
Resolve pain, restore function & build strength

As a RYT500hr certified yoga teacher and a 300hr certified Yoga Medicine ® Therapeutic Specialist I offer private in person or online therapeutic programmes to students with ongoing conditions, injury recovery and injury prevention.

WHAT IS YOGA THERAPEUTICS?
Yoga Therapeutics uses a range of techniques and practises to create a prescriptive programme to support all aspects of physical and mental health. Each individualised programme includes a combination of movement practices, myofascial release, breath work and relaxation. It also looks at posture awareness in standing, sitting, while moving and balancing to help prevent recurrence of injuries or other issues arising. I work closely with students to support their progress as they integrate these holistic whole body practises into their everyday life to maintain and optimise their future health.

THE BENEFITS OF YOGA THERAPEUTICS
If you suffer from any of the following Yoga Therapeutics can help you:

- Chronic pain.
- Back pain.
- Neck & shoulder pain.
- Injury rehabilitation.
- Injury prevention.
- Sports performance.
- Balance & coordination.
- Poor posture.
- Stress & anxiety.
- Sleep management.
- Headaches & migraines.
- Menstrual & menopause symptoms.
- Supports nervous, respiratory, digestive, immune and circulatory system conditions.

YOGA THERAPEUTICS V’S PHYSIOTHERAPY
Yoga Therapeutics and Physiotherapy are complementary and have a shared goal of helping you on your road to full health. Physiotherapy focuses on the physical body whereas Yoga Therapeutics looks at the body and mind. While physiotherapy is your first port of call if you have an acute injury, studies have shown that a combination of Physiotherapy and Yoga Therapeutics significantly improves the recovery outcome.

HOW DOES YOGA THERAPEUTICS WORK?
The process starts with an intake evaluation to identify areas of concern and set goals. An individualised therapeutic programme is then created from this intake information. This prescriptive programme is built specifically for your needs and is checked regularly to ensure you are getting the best out of it. Each session includes a private class and a small home self practice to continue your progress between sessions.

EXPLORING YOGA THERAPEUTICS IN YOUR PRACTICE
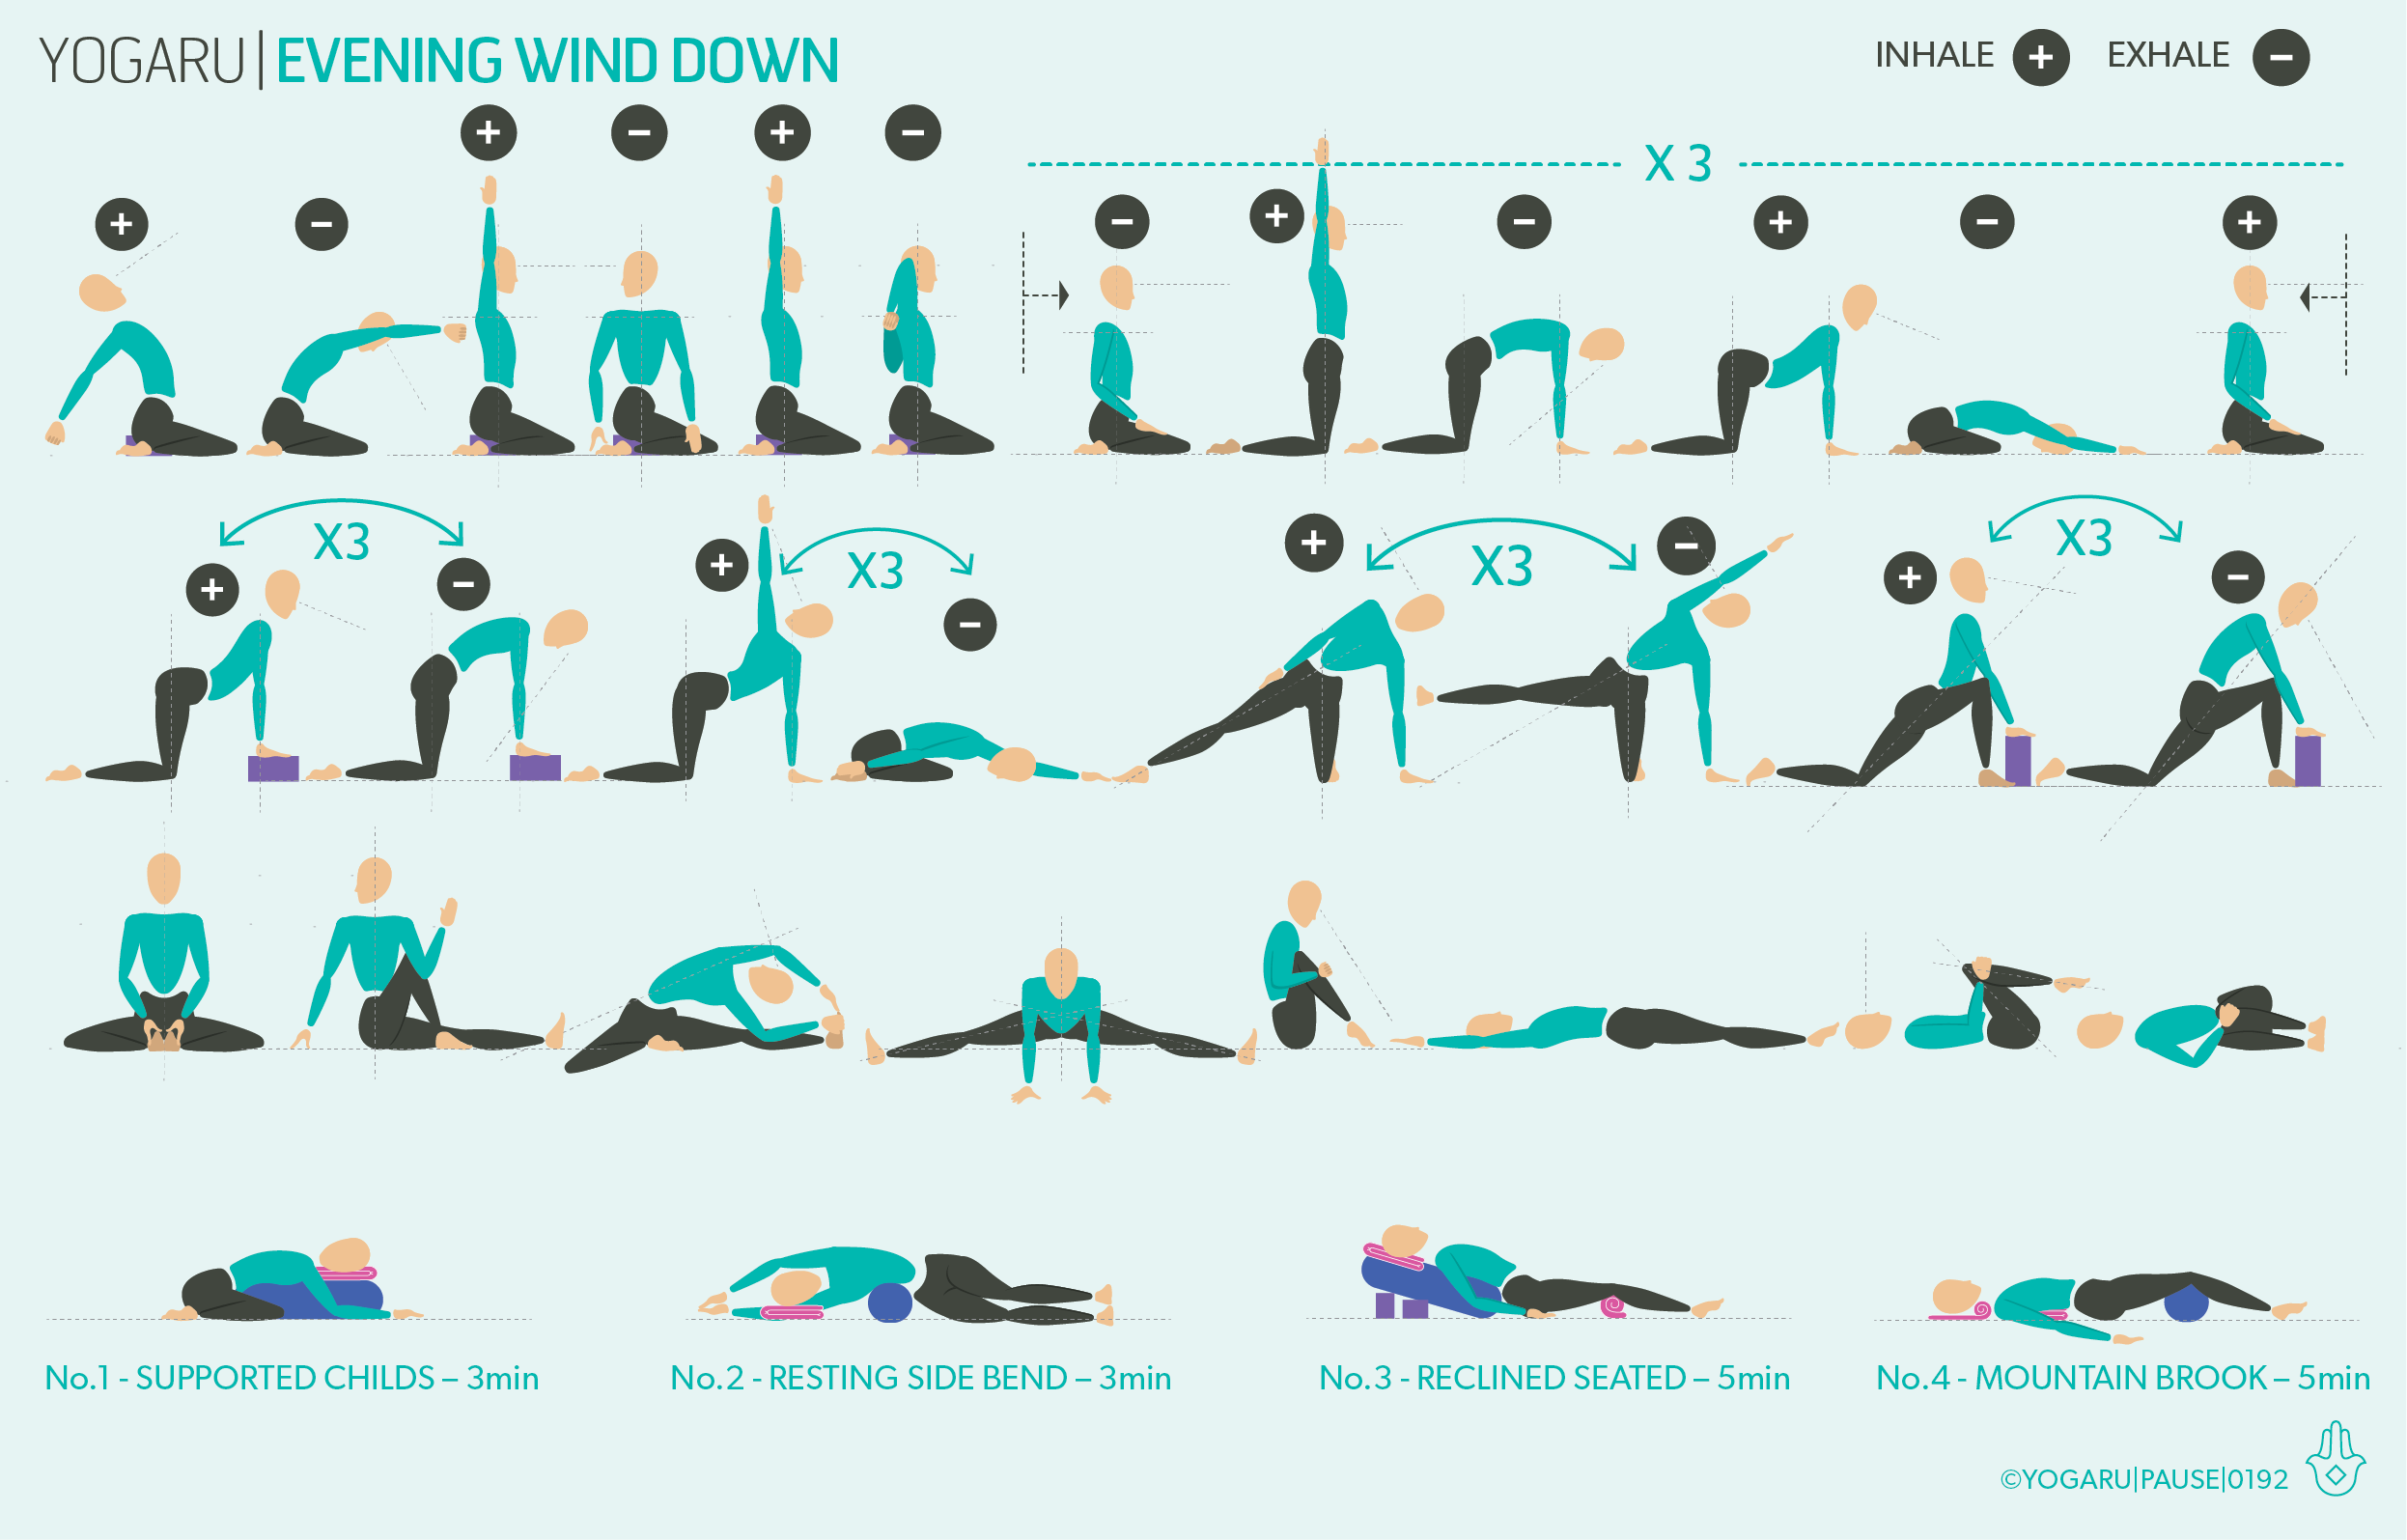
While Yoga Therapeutics are delivered as a one to one personalised programme this sequence, dealing with stress, gives you a small sample of my Yoga Therapeutics multi faceted approach. It uses movement practices, myofascial release, breath work and relaxation. You will start off with myofascial release or MFR on your feet, as detailed below, then you will move through a series of gentle mini flows, linking breath with movement, to ease physical and mental tension. You can repeat the standing flow on row three as many times as you like to lengthen your practice or you can leave it out for a more soothing grounding practice. You will end with a lovely restorative twist and a supported Savasana, with the option of a 4 inhale, 6 exhale, stress reduction breath work. 

ALIGNMENT CUES
There is no specific peak pose in this sequence. Move slowly with the breath cues and be guided by your energy levels. Spend longer in the movement or in the relaxation part of the practice depending on what you need. Yoga Therapeutics is all about focusing on what is best for you as an individual.

Have a read of the tips below and either print out the sequence or save it onto your device:

  • Use the breath guide in the sequence to help you link breath with movement in the flow. Inhale is indicated with a ‘+’, exhale is a ‘-”.

  • If there are specific poses that you would like to stay longer in, give yourself three deep breaths in those poses, and pick up the next pose with the allocated inhale or exhale as indicated by the sequence.

  • For a longer practice repeat the standing pose flow in row three.

MFR & RESTORATIVE POSE ALIGNMENT CUES
The props you’ll need for the restorative poses are:
2 x MFR balls - or 2 tennis balls.
1 x bolster - or 2 towels, wrapped around a horizontally rolled pillow and tied to secure.
1 x yoga bricks - or 1 thick similar sized dictionary.
2 x yoga blankets - or any wool, thick cotton or fleece blanket with density.

MFR FEET
Compression - from standing or seated, place 1 x ball at position No.1, gently press down with an inhale and release on the exhale x 5 breaths and move on to No.2. Continue to No.5. 
Roll & cross fibre - with the toes on the ground place 1 x ball at No.5, roll the ball across your heel x 5. Place 1 x ball at No.6, roll the ball across the knuckles of your toes x 5. Place 1 x ball at No.6, roll in one direction from toes to heel x 5. 
Scribble - roll and scribble across the sole of the foot. Repeat all steps on the other foot.

No.1 - MFR SHOULDERS
Compression - from supine with knees bent, place 2 x balls in the centre of each upper shoulder, gently press down with an inhale and release on the exhale x 5 breaths. 
Sheer - slowly circle arms overhead and back to the ground x 5. 

No.2 - MFR BACK OF SKULL 
Lie on your back and place a brick on its lowest high just below the curve at the back of your skull (occipital ridge). Extend your legs out, arms slightly away from your body, palms facing up. Legs slightly apart and feet fall out to the side, soften your shoulder, back of the neck long. Gently roll your head from side to side to ease out tension in the muscles at the back of the skull. Roll your head mid way to your right, pause and make small circles, repeat on the left side. Remove the brick, soften the muscles across your forehead, your temples, the back of your skull. Let the whole body become heavy and melt into the support of the ground.

No.3 - PRONE TWIST
Place your bolster vertically along the top centre of your mat. Sit with your right hip up against the short end of the bolster. Place a folded blanket between your legs. Place your hands either side of the bolster. With an inhale lengthen through the whole spine and on your exhale gently place your front spine along the length of the bolster. Place your right cheek on the folded blanket and let your arms gently hang either side of the bolster. Repeat on the left side.

No.4 - MOUNTAIN BROOK
Half roll a four fold blanket and place it at the top of your mat. Accordion fold the other blanket and place it below your top blanket where your shoulder blades will lie. Place the bolster towards the bottom of your mat where your knees will be. Lie supine on your back, nestle the rolled part of the top blanket in the curve of your neck, place the accordion folded blanket under the lower tips of your shoulder blades and the bolster under the creases of your knees. Legs and arms extended, palms facing up, feet fall out to the side. Feel the rise and fall of the props supporting your back body.

To save the images for personal use click and hold down the image until the ‘save image’ option appears; on Mac hold down ‘control’ and click the image to get the option box; on PC right click on the image to get the option box. Scroll down in the ‘option box’ and click ‘save image’.
Ruth Delahunty Yogaru

Evening wind down

THE AUTONOMIC NERVOUS SYSTEM
The autonomic nervous system has two branches – the sympathetic and parasympathetic. The sympathetic system, or the ‘fight or flight’ response, is our ‘doing’ – it helps us get up in the morning and gives us the drive to get work done. The parasympathetic system, or the ‘rest and restore’ response, is our non-doing – it helps us relax and creates optimal conditions for the functionality of the body to rebuild and replenish. Both systems are vital and have their role within a balanced nervous system. But often we get stuck in ‘doing’ mode and find it hard to adjust to ‘non-doing’ in the evening when the body needs time to regenerate. The autonomic nervous system is ‘automatic’. We can’t switch it on or off but, with practices like yoga, we can stimulate the ‘rest and restore’ response to ensure we shift towards parasympathetic dominance in the evening to prepare for a good night's sleep.

The body works on a 24hr sleep-wake cycle, known as the circadian rhythm. When the sun rises, we are exposed to light and the sympathetic system releases cortisol to give us energy for the day ahead. Throughout the day we move from one system to the other with periods of overlaps where both are working together. As the sun goes down, we are exposed to darkness and the parasympathetic system releases melatonin to make us drowsy and ready for sleep. Sleep is essential for our physical and mental wellbeing. Good sleep routines help with focus and concentration, mental health, a strong immune system, lower inflammation, a healthy metabolism, weight maintenance, and muscle repair. It is also important to avoid screen use (4hrs before sleep), caffeine (8hrs before sleep), alcohol (8hrs before sleep), and big or heavy meals (4hrs before sleep), which all inhibit evening melatonin production.

PARASYMPATHETIC SYSTEM ACTIVATION
There are many nerves responsible for the parasympathetic response, most of them come from the cranial nerves with just three coming from spinal nerves. The main cranial nerve associated with 75% of the parasympathetic nerve fibres, and for regulating the parasympathetic response, is the vagus nerve. It travels to and from the brainstem straight to the throat, heart, diaphragm, stomach, kidneys, liver, pancreas, gallbladder, sphincter and reproductive organs. It initiates the parasympathetic responses to slow heart rate and reduce blood pressure, relax our airways, stimulate digestion and reproductive organs, inhibit adrenaline production, stimulate endorphin productions and relax the muscles.

​​The vagus nerve can be stimulated with deep breathing, gentle movement, meditation, singing, chanting and laughing, cold water therapy and gut health. The fastest way to stimulate the vagus nerve is with a deep breath, particularly the exhale. The vagus nerve travels through an opening in the diaphragm. When we breathe the diaphragm rubs against the vagus nerve which activates the nerve fibres and sends messages to the brain to initiate the parasympathetic response. The breath is one of the most important elements of a yoga practice, making it a very effective method for down regulating the nervous system. In this sequence I have combined deep breathing, gentle movement and restorative yoga to help you settle into relaxation. Restorative yoga is the king of all yoga when it comes to targeting the parasympathetic system. The poses are held for longer periods of time and are supported with props to create effortless comfort.

EXPLORING EVENING WIND DOWN IN YOUR PRACTICE
This sequence starts with a gentle seated upper body mobility flow, linked with the breath. Start with the right side and repeat the flow on the second side, twisting to the left binding with the left elbow lifted. If binding the hands behind your back is not in your practice, you can either use a yoga strap to bridge the gap or just reach the hands towards each other. The second half of the first row is a child's flow version – slow your movement down and lengthen your breath to meet your adjusted speed. The second row gives you a series of mini flows to release any mental or physical tension from your day. You’ll notice the third has not got a breath guide. In this row stay in the series of poses for as many breaths as you need as you start to shift into the parasympathetic nervous system. Continue with a gentle extended breath with more of a focus on your exhale. You then transition into your restorative practice. It is important to make sure you are completely comfortable. Adjust and add more props and blankets if needed to find complete comfort. You will see the suggested hold times in the sequence for each pose. Props needed and alignment cues for your restorative poses are below:

You can learn more about how the nervous system works in my recent articles The vagus nerve & The nervous system. You can also try my Restorative sleepy flow sequence and any of my restorative sequences to help you build your evening wind down routine.

ALIGNMENT CUES
There is no specific peak pose in this sequence. Move slowly with the breath cues and be guided by your energy levels and business of the mind as to how much you do.

Have a read of the tips below and either print out the sequence or save it onto your device:

  • Use the breath guide in the sequence to help you link breath with movement in the flow. Inhale is indicated with a ‘+’, exhale is a ‘-”.

  • If there are specific poses that you would like to stay longer in, give yourself three deep breaths in those poses, and pick up the next pose with the allocated inhale or exhale as indicated by the sequence.

  • For a longer practice repeat the child’s pose flow at the start of each row.

RESTORATIVE POSE ALIGNMENT CUES
The props you’ll need for the restorative poses are:
1 x bolster - or 2 towels, wrapped around a horizontally rolled pillow and tied to secure.
2 x yoga bricks - or 2 two thick similar sized dictionaries.
2 x yoga blankets - or any wool, thick cotton or fleece blanket with density.

No.1 - SUPPORTED CHILDS
Come into a kneeling position with your hips on your heels. Nestle a bolster between your knees, vertically along your mat with a folded blanket on the far end. Place your hands either side of the bolster. With an inhale lengthen through the whole spine and on an exhale gently place your front spine along the centre of the bolster. Place your right cheek on the bolster. Feel the breath in the back of the ribs and lungs. Swap to your left cheek half way through the pose.

No.2 - RESTING SIDE BEND
Place a folded blanket at the top of your mat. Place your bolster horizontally on your mat with a space between your bolster and pillow. Sit with your right hip along the long edge of the bolster, knees bent. Lengthen your right side along the mat and nestle the bolster into the curve of your waist. Place your head on the blanket and reach your arms overhead. Feel a gentle opening all along the top side of your body. Repeat on the left side.

No.3 - RECLINED SEATED
Place two bricks horizontally at the top of your mat, One at its highest height and the other at its mid height. Lie your bolster over the bricks along the centre of your mat and place a folded blanket on the far end of your bolster where your head will rest. Sit with the back of your hips along the short end of the bolster. Roll up a folded blanket and place it under your knees. Gently lie back onto your bolster. Feel a gentle opening across the chest.

No.4 - MOUNTAIN BROOK
Half roll a four fold blanket and place it at the top of your mat. Accordion fold the other blanket and place it below your top blanket where your shoulder blades will lie. Place the bolster towards the bottom of your mat where your knees will be. Lie supine on your back, nestle the rolled part of the top blanket in the curve of your neck, place the accordion folded blanket under the lower tips of your shoulder blades and the bolster under the creases of your knees. Legs and arms extended, palms facing up, feet fall out to the side. Feel the rise and fall of the props supporting your back body.

To save the images for personal use click and hold down the image until the ‘save image’ option appears; on Mac hold down ‘control’ and click the image to get the option box; on PC right click on the image to get the option box. Scroll down in the ‘option box’ and click ‘save image’.

Ruth Delahunty Yogaru

Shifting stress

STRESS & THE NERVOUS SYSTEM
Stress stimulates the sympathetic nervous system (fight or flight response). In this state the brain sends signals to the body to increase heart rate and blood pressure, open our airways, inhibit digestion and reproductive organs, stimulate adrenaline production, open our sweat glands and tense the muscles ready for action. When the stress has eases the body clears out the stress hormones and resets the organs and systems. This is a natural part of our physiology and is part of life. It gets us up in the morning and drives us to be productive. But when we are unable to balance periods of stress with relaxation the body gets stuck in the sympathetic nervous system cycle and gets flooded by stress hormones it can’t flush out quick enough. In an ongoing state of stress the digestive, respiratory, cardiovascular and reproductive systems of the body are not working optimally – reducing its functionality and eventually leading to health issues.

YOGA & STRESS RELIEF
Yoga is unanimously regarded as one of the best ways to manage stress in both a therapeutic and preventative way. Yoga stimulates the parasympathetic nervous system (rest & restore response). In this system the brain sends signals to the body to reduce heart rate and blood pressure, relax our airways, stimulate digestion and reproductive organs, inhibit adrenaline production and relax the muscles. This creates optimal conditions for the functionality of the organs of the body and relieves symptoms of stress, anxiety and tension.

When we are practising yoga we are focusing on transitioning from pose to pose, and the poses themselves. This shift in focus works as a distraction which is often the best cure to help relieve stress, tension and anxieties. The repetitive flow of yoga creates a moving meditation which is very soothing to the nervous system. Taking time to switch off, and being present on our mat, breaks the stress loop and initiates a positive mindset. Yoga also makes us more aware of our breath. The breath is one of the fastests ways to stimulate the vagus nerve, which is the main cranial nerve associated with 75% of the parasympathetic nervous system response. This wandering nerve is the longest nerve in the body and travels through many of the organs of the body including the diaphragm. When we breathe, in particular an extended exhale, the diaphragm stimulates the vagus nerve and causes a chemical reaction which initiates the parasympathetic response.

EXPLORING SHIFTING STRESS IN YOUR PRACTICE
This sequence starts with a gentle warm up and then moves into a meditative flow, linking breath with movement, to help shift the unease of stress and give you enough of a distraction to soften into the idea of allowing yourself to relax into the second half of the practice of restorative poses. Restorative yoga is considered the king of yoga when it comes to stress relief. It downregulates the sympathetic nervous system and enhances the malleability of the nervous system – which is our capacity to move easily from activity to rest, and similarly from rest to activity. In your restorative practice, hold the poses for the suggested minute on the accompanying illustrated sequence. Remember to do both sides in an asymmetrical pose. Stay warm and be completely comfortable throughout your practice. The sequence finishes with my favourite relaxation technique of MFR on the back of the skull. You will need two blankets, two bricks and a bolster for this practice. You can learn more about how the nervous system works in my recent articles The vagus nerve & The nervous system, and you can try more of my restorative sequences here.

ALIGNMENT CUES
There is no specific peak pose in this sequence. The most important thing to remember is to move with the suggested breath cues indicated in the sequence. Move slowly and allow yourself time and a bit of space to unravel your stress response.

Have a read of the tips below and either print out the sequence or save it onto your device:

  • Use the breath guide in the sequence to help you link breath with movement in the flow. Inhale is indicated with a ‘+’, exhale is a ‘-”.

  • If there are specific poses that you would like to stay longer in, give yourself three deep breaths in those poses, and pick up the next pose with the allocated inhale or exhale as indicated by the sequence.

  • For a longer practice add in a Sun Salutations at the start of each mini flow or repeat each mini flow.

RESTORATIVE POSE ALIGNMENT CUES
The props you’ll need for the restorative poses are:
1 x bolster - or 2 towels, wrapped around a horizontally rolled pillow and tied to secure.
2 x yoga bricks - or 2 two thick similar sized dictionaries.
2 x yoga blankets - or any wool, thick cotton or fleece blanket with density.
Below you will find the set up for the restorative poses and the MFR skull massage:

No.1 - PRONE TWIST
Place your bolster vertically along the top centre of your mat. Sit with your right hip up against the short end of the bolster. Place a folded blanket between your legs. Place your hands either side of the bolster. With an inhale lengthen through the whole spine and on your exhale gently place your front spine along the length of the bolster. Place your right cheek on the folded blanket and let your arms gently hang either side of the bolster. Repeat on the left side.

No.2 - RECLINED BOUND ANGLE
Place your bolster vertically along the top centre of your mat. Sit with the back of your hips against the short end of the bolster. Bring the soles of your feet together and let your knees drop out to the sides. Prop your legs with a rolled blanket under each thigh or use a yoga belt to secure your feet and support the legs. Gently lie back onto your bolster.

No.3 - RESTING POSE HEAD MASSAGE 
Lie on your back and place a brick on its lowest high just below the curve at the back of your skull (occipital ridge). Extend your legs out, arms slightly away from your body, palms facing up. Legs slightly apart and feet fall out to the side, soften your shoulder, back of the neck long. Gently roll your head from side to side to ease out tension in the muscles at the back of the skull. Roll your head mid way to your right, pause and make small circles, repeat on the left side. Remove the brick, soften the muscles across your forehead, your temples, the back of your skull. Let the whole body become heavy and melt into the support of the ground. 

To save the images for personal use click and hold down the image until the ‘save image’ option appears; on Mac hold down ‘control’ and click the image to get the option box; on PC right click on the image to get the option box. Scroll down in the ‘option box’ and click ‘save image’.

Ruth Delahunty Yogaru