BEAUTIFUL BONES
If I were to pick my favourite bone of the human body it would have to be the pelvic bowl. Although I’m not sure it’s a question I’ll get asked very often! This beautiful sculptural bone is the hub of all activity. It houses our reproductive system, lower digestive system, and in the world of yoga, Mula Bandha (energy lock), the Nadis (energy paths) and our Root Chakra Muladhara (energy junctions). All movement in the spine and hip joint is initiated from the pelvis, using a complicated network of muscles leading to and from the pelvis. Tight quads, hip flexors and inner groins pull the pelvic into a forward tilt, referred to as an anterior tilt, which can lead to an over arched lower back (hyperlordosis). Whereas tight hamstrings and glutes pull it into a backwards tilt, called a posterior tilt, which can lead to a flattened lower back (hyperkyphosis). Our pelvis likes to be perfectly stacked over the foundation of our feet, to avoid unnecessary stress on the spine and allow the natural curves of the vertebrae to function properly as a shock absorption system. Moving through our day with hips that are not balanced can bring the spine into a compensatory lateral (side) bend or a twist, potentially leading to back pain, sacroiliac joint pain or any number of referred muscular and joint issues. A strong and balanced pelvis leads to a strong and balanced upper and lower body and a unified body.
EXPLORING THE PELVIC BOWL IN YOUR PRACTICE
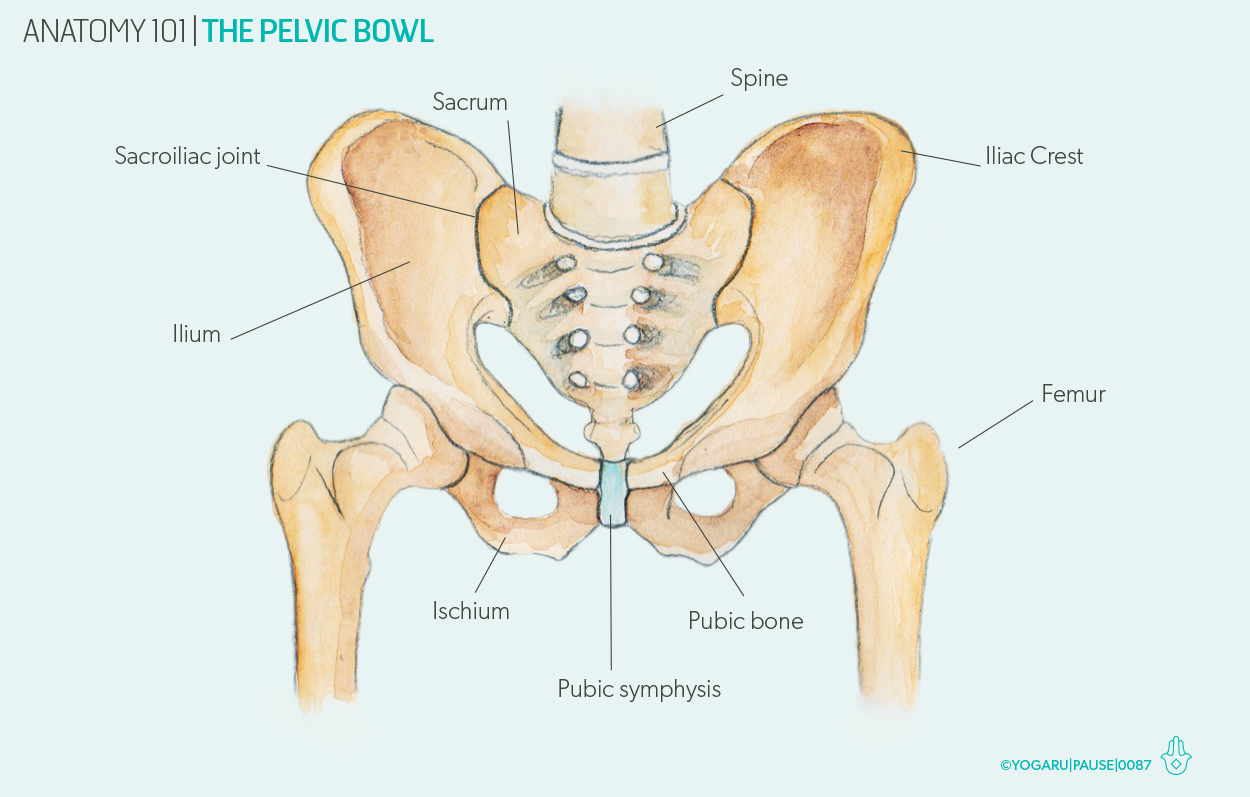
Observing the position of the pointy hip bones (the iliac crest) at the front of the pelvis in our practice gives us invaluable feedback on our alignment in each pose. Think of the pelvic as a bowl filled with liquid. In upright standing poses, and even upright seated poses, try keep this bowl perfectly level without spilling a drop – by not tipping the bowl forward, back or tilted to the side.

ALIGNMENT CUES
Connect with your pelvic bowl with this sequence which will focus on the position of your pelvis. Where possible during your practice place your fingertips on the pointy hip bones at the front of your pelvis, or have a glance down at your hips, and check for level hip bones. Hug your outer hips to the midline to activate the strong stabilising muscles of the hips. This feedback will help with your alignment in many poses. Pay particular attention to the position of the pointy hip bones in the six poses below and use these cues to help you find the perfect pose for you.
Phalakasana/Plank Pose – Often we have a dominant side which might end up higher than the other side in plank. Extend back through the heels and forwards through the tip of your crown to help stabilise the hips. Have a glance under you to see are your hips level.
Ashta Chandrasana/Eight Crescent Moon – Start by bending your back knee and lifting your pointy hip bones up to stack the pelvis perpendicular to your foundation. Check for level hips with your fingertips and then reach your arms up high.
Virabhadrasana III/Warrior III – The hip of the lifted leg will most likely lift higher than the standing leg for most people. Check the level of your hips and if needs be lower the lifted leg to less than parallel to the ground if it is destabilising the hips.
Natarajasana/Lord of the Dance – Using a belt helps to keep the hips level and squared while you find the stretch in the hip flexor. Glance down and make sure the hip of the lifted leg hasn’t drifted back as the leg extends back.
Dandasana/Staff – When the pelvis tilts back the hip bones will stack above the sit bones. Place your fingertips on your hip bones and make sure they are sitting forward of your sit bones and the bowl of the pelvis is nicely upright.
Setu Bandha Sarvangasana/Bridge – Bend your elbow and place your fingertips on your hip bones to check are they level. Keep your fingertips here as you slowly lift your lower leg to hip height. Notice is one side more challenging than the other.
To save the images for personal use click and hold down the image until the ‘save image’ option appears; on Mac hold down ‘control’ and click the image to get the option box; on PC right click on the image to get the option box. Scroll down in the ‘option box’ and click ‘save image’.
Ruth Delahunty Yogaru