DON'T STRESS ABOUT STRESS
Stress is not always a bad thing and has its time and place where it is an essential part of everyday life. Stress is the response of the sympathetic nervous system which makes us alert, energetic and increases cognitive function to create and get tasks done. When the nervous system is balanced we have periods of stress and periods of rest and we are able to move smoothly from one to the other. But when we tip the balance into constant, or chronic, stress we start to feel depleted. In a period of period the hormones adrenaline and cortisone are released to help us perform tasks. When the body completes the task the body clears these stress hormones out of our systems. In chronic stress we get caught in a loop, these hormones don’t get cleared out, our immune system is put under pressure and we become more susceptible to disease.
RESTORATIVE YOGA
Restorative yoga targets the parasympathetic nervous system, or the rest and restore nervous system response. Amongst its long list of benefits is that it helps relieve stress. It enhances the malleability of the nervous system – which is our capacity to move easily from activity to rest, and similarly from rest to activity – by rewiring the brain's response to stress and enhancing our ability to heal and find balance. It supports you physically, mentally and emotionally and can be used therapeutically or as a preventative measure. It is a practice of conscious relaxation which gives a deeper replenishment than even sleep and at the same time helps establish good sleep cycles. It comes under the umbrella of ‘non sleep deep rest’, or NSDR, which optimises brain and body functions.
Restorative is a practice of passive poses which consciously relaxes the body. The poses are held for longer periods of time and are supported with props to help you feel effortless comfort. In this practice we look for gentle openings rather than strong stretches. The nervous system responds better to gentle stimuli, less is more!
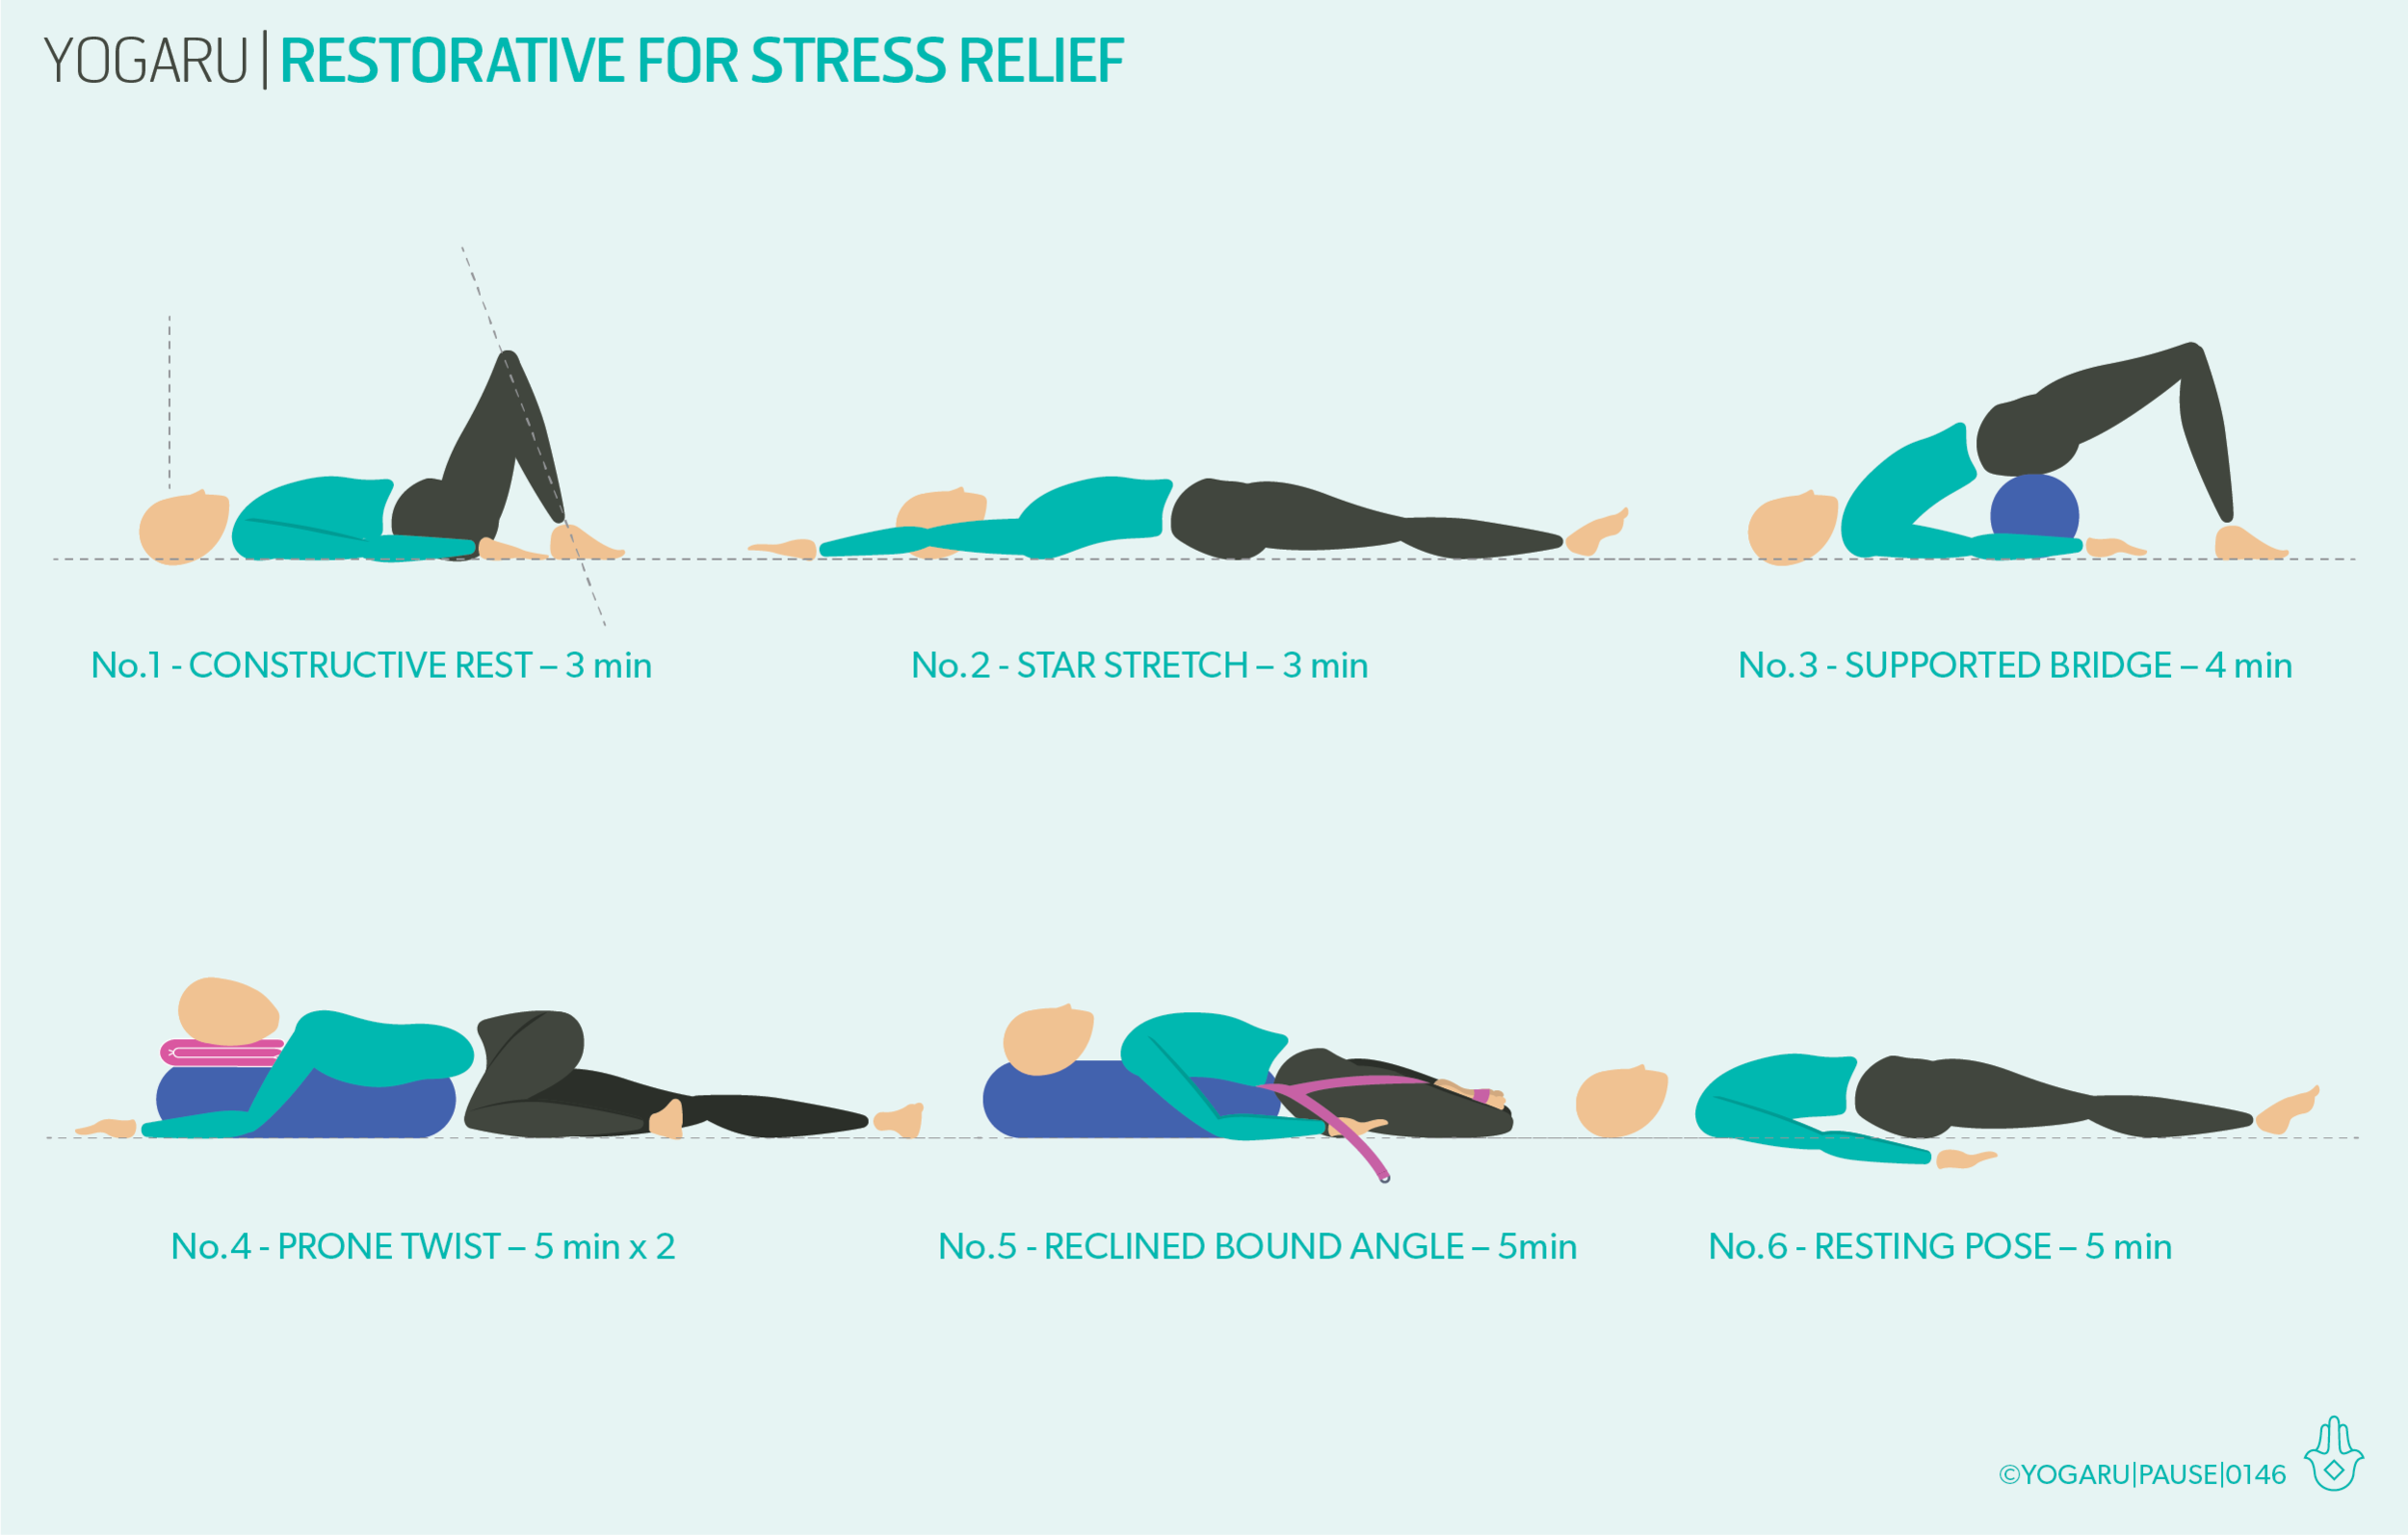
EXPLORING THE SEQUENCE
Anytime you feel rushed, exhausted or overwhelmed use this sequence to help you relearn how to relax and restore your nervous system. Consider the four pillars of restorative yoga when you are setting up your space – quiet, dark, safe, warmth. The body will cool down quickly so layer up and stay warm. Hold the poses for the suggested minute on the accompanying illustrated sequence. Remember to do both sides in an asymmetrical pose. Stay warm and be completely comfortable throughout your practice. Discomfort will reduce your ability to rest your nervous system. If a pose isn’t working for you just move onto the next one. Use a phone on a low volume to time your holds. As you settle into the pose, scan down from head to toe to make sure everything is happy. Use the gentle rise and fall of your breath if you find your mind wandering. Remember to take 10 minutes of resting pose at the end of your practice to let everything settle in a symmetrical pose before you reintegrate into your day.
PROPS SETUP
Props bring restorative to another level. But you don't have to have a huge array of official yoga props to get started. You can improvise with household items that can do just as good a job.
RESTORATIVE POSE ALIGNMENT CUES
The props you’ll need for the restorative poses are:
1 x bolster - or 2 towels, wrapped around a horizontally rolled pillow and tied to secure.
2 x yoga bricks - or 2 two thick similar sized dictionaries.
2 x yoga blankets - or any wool, thick cotton or fleece blanket with density.
No.1 - Constructive rest
Start lying on your back, your knees bent, feet mat distant apart and knees knocked in together. Place your hands on your belly and feel the breath move through you. Take four rounds of 4/6 breath, inhaling for the count of 4 and exhaling for the count of 6. Keep the breath as gentle as possible, notice if you are holding any tension in your shoulders and upper chest. Pause after and notice any change this simple breath observation has made to your body and mind.
No.2 - Star stretch
From lying on your back reach your arms overhead and stretch your feet away in a star shape. Stretch your right arm and left foot away, hold for 3-4 deep breaths. Stretch your left arm and right foot away, hold for 3-4 breaths.
No.3 - Supported bridge
From lying on your back, lift your hips up and place the bolster horizontally under your hips. Settle your hips down onto the support of the bolster. Knees bent, feet hip distance apart. Arms in cactus position or extended either side of your body, palms facing up.
No.4 - Prone twist
Place your bolster vertically along the top centre of your mat with a folded blanket at the far end. Sit with your right hip up against the short end of the bolster. Place your hands either side of the bolster. With an inhale lengthen through the whole spine and on your exhale gently place your front spine along the length of the bolster. Place your right cheek on the folded blanket and let your arms gently hang either side of the bolster. Repeat on the left side.
No.5 - Reclined bound angle
Place your bolster vertically along the top centre of your mat with a folded blanket at the far end. Sit with the back of your hips against the short end of the bolster. Bring the soles of your feet together and let your knees drop out to the sides. Prop your legs with a brick under each thigh or use a yoga belt to secure your feet and support the legs. Gently lie back onto your bolster and place your head on the folded blanket at the top.
No.6 - Resting pose
End your practice with at least 10 minutes of Savasana or Resting Pose. Lie on your back, legs stretched out, arms slightly away from your body, palms facing up. Legs slightly apart and feet fall out to the side, soften your shoulder, back of the neck long. Gently close your eyes, let the body become heavy and melt into the support of the ground. Soften the muscles across your forehead, releasing all tension, gaze inwards. Let all the muscles and bones of your body release.
To save the images for personal use click and hold down the image until the ‘save image’ option appears; on Mac hold down ‘control’ and click the image to get the option box; on PC right click on the image to get the option box. Scroll down in the ‘option box’ and click ‘save image’.
Ruth Delahunty Yogaru