Malasana - Squat

YOGARU_Malasana_PB.png

HIP MOBILITY & STABILITY
Recently I’ve been sitting writing articles more than I usually would and my hips are feeling it. This spurred me on to explore Malasana/Squat as my pose of the month. When I first practiced this sequence I found the repeated rounds of Malasana/Squat tough going but as the week progressed my hips started to feel stronger, more flexible and I was able to hold Malasana/Squat for a longer period of time. I have been practising this sequence for the last two weeks now and my hips are singing with glee. Malasana/Squat has so many hidden physical and mentally benefits and I’m definitely feeling them all.

Malasana/Squat was once the way we all sat before we invented the humble chair and is still the sitting method for many cultures. It is very strengthening on the leg, core and pelvic floor muscles. The ability to squat is important to maintain for everyday mobility. We squat down in our day to day life when we pick something up from the ground or tie our shoes. My son is a keen rugby player and squats for five minutes everyday as a way to keep his hips, knees and ankles strong and injury free. You don’t have to be on your mat to take a squat. Malasana/Squat teaches the body to find the natural curves of the spine again and is perfect to add into your movement breaks if you are sitting for long period and working from home.

THE BENEFITS OF MALASANA/SQUAT
Malasana/Squat stretches the inner groin and hips, strengthens the hip flexors, lower back, knees and ankles. It is a very good pose for keeping the knees and ankles flexible and strong at the same time. It encourages strengthening of the pelvic floor, increases circulation to the abdominal organs, aids digestion and eases constipation. As with backbends and twists it stimulates a healthy gut which has a strong link to our moods and emotional well-being. Stress leads to gut issues and similarly gut issues lead to stress. 95% of serotonin (the happy hormone) is produced in the bowel, stimulating the gut and releasing these happy hormones into the system relieves stress, tension and anxiety.

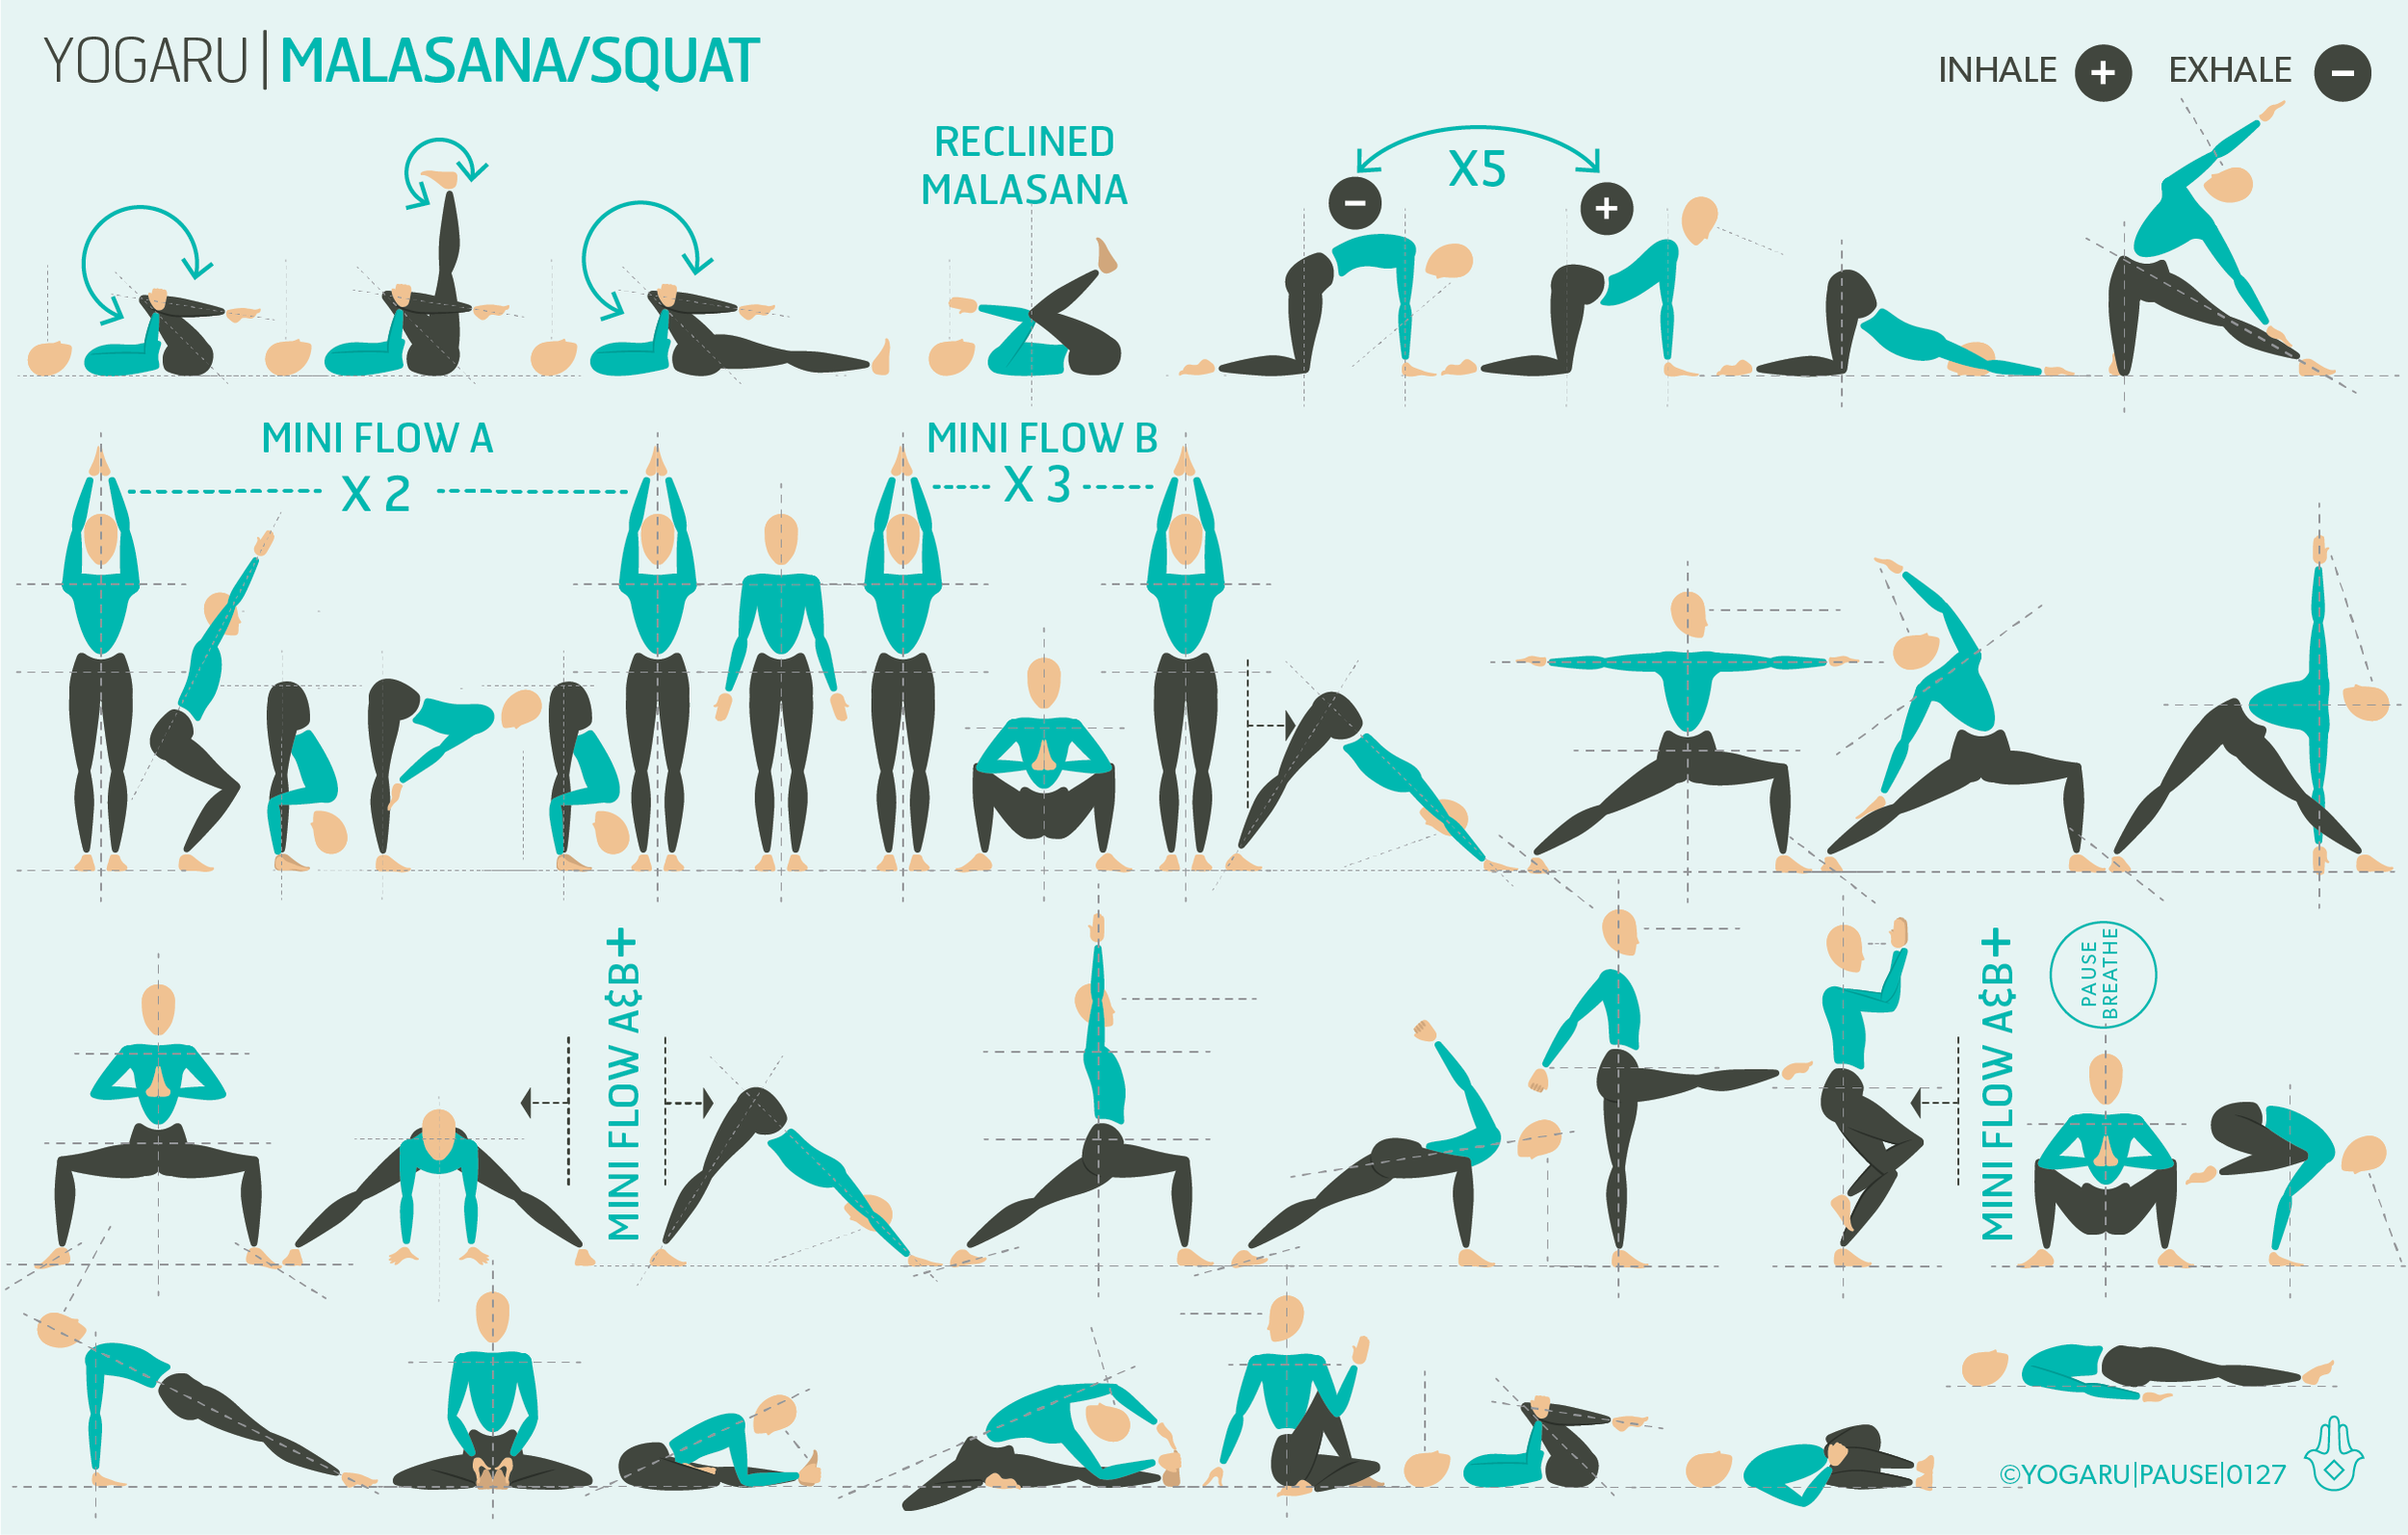
EXPLORING MALASANA/SQUAT IN YOUR PRACTICE
This sequence will gradually prepare your hips for Malasana/Squat. Malasana/Squat mini flow is preceded by a Utkatasana/Chair mini flow. Utkatasana/Chair is a perfect prep pose for Malasana/Squat. It strengthens the glutes and has many of the same muscular actions as Malasana/Squat – hip and knee flexion, spinal extension and grounding down through the three points of the feet. For the first three Malasana/Squat mini flows move in and out of the pose with a steady and lengthened breath. Look for the point in your descent where you want to speed up and try to consciously slow it down. For your final Malasana/Squat before you come to your seated poses, pause for three to five deep breaths and feel the full opening of the pose.

You can also check out my Instagram post on Malasana/Squat to play around with different versions of the pose. If you notice your knees collapse in it is an indication that you might have tight inner groins and weak glutes – squeeze your outer glutes to externally rotate your hips and only go down as far as you can keep your knees in line with your feet. If you notice your lower back rounds forward you might have a weak lower back – place bricks under your hands and press into them to lengthen up through the spine.
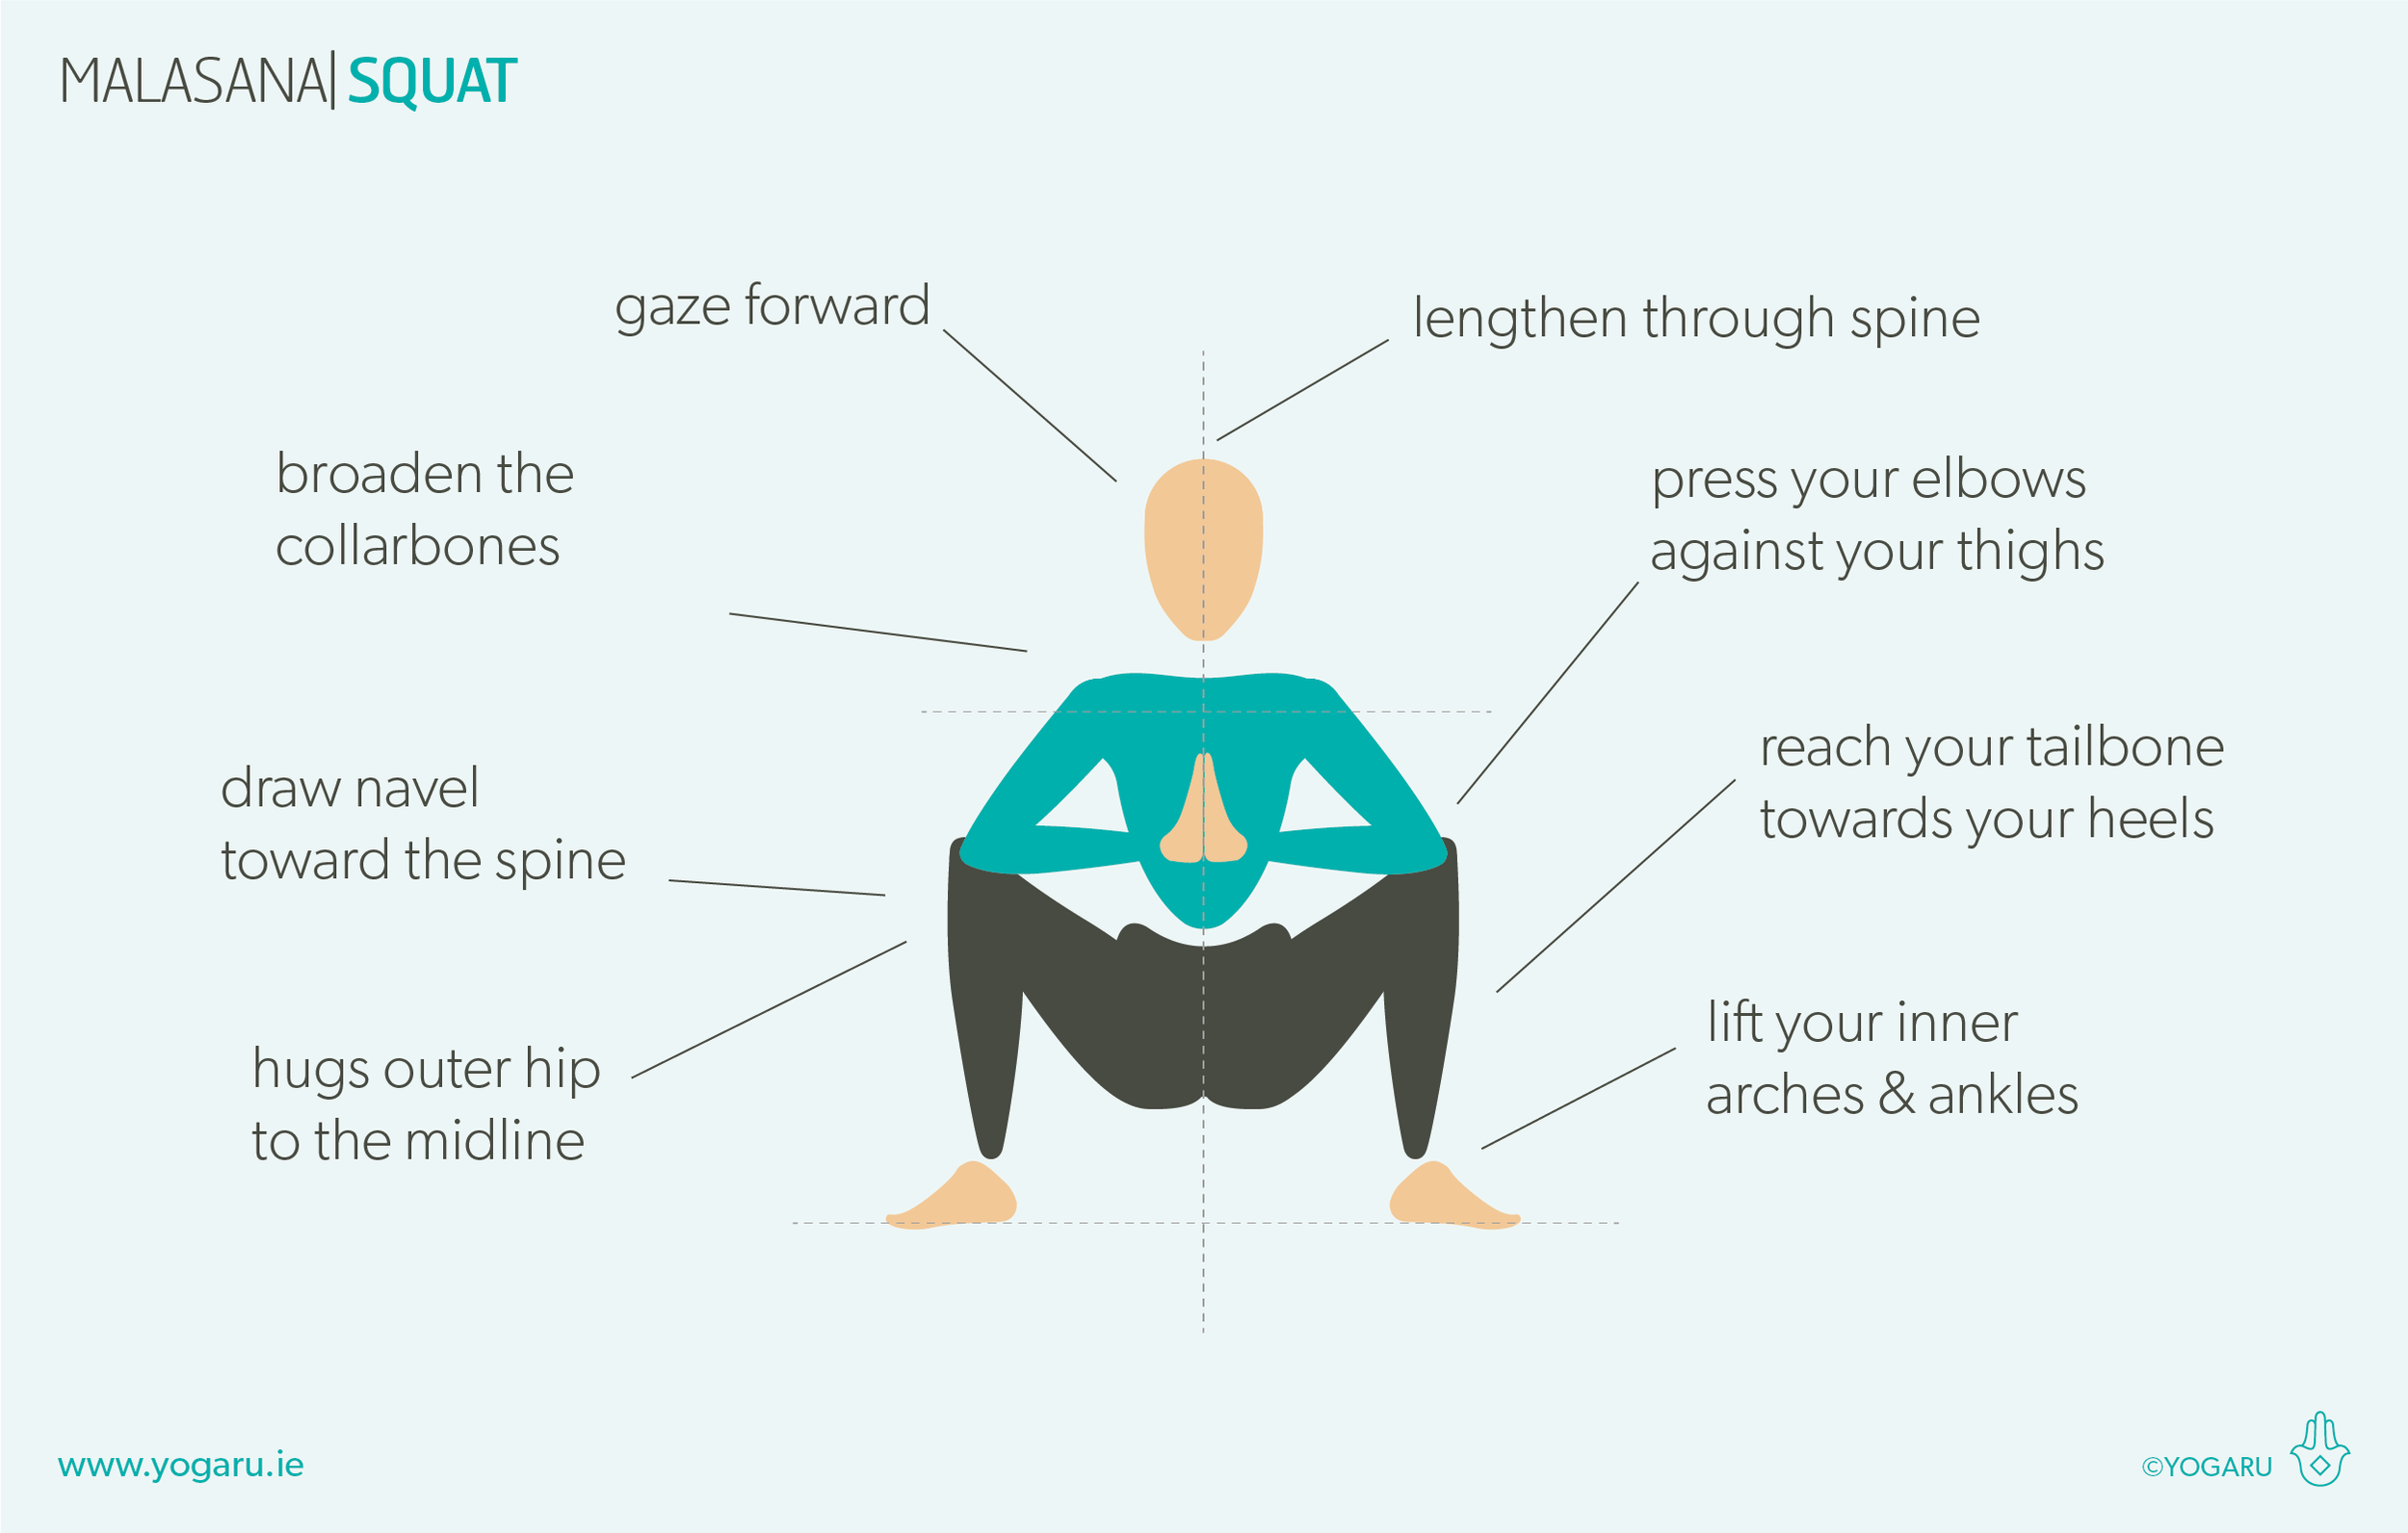
PAUSE_0127.png

ALIGNMENT CUES
You will come through three rounds of Malasana/Squat and a final one before you come down to your seated poses. Notice how the first round feels compared to your final round in terms of comfort and depth of the pose. If you practice this pose for a week or two you will start to notice great improvements in your hip mobility.

Have a read of the tips below and either print out the sequence or save it onto your device:

  • From Tadasana/Mountain, inhale, feet wider than hip width, feet slightly turned out, hands in prayer position, exhale, bend your knees and sit down in a deep squat.

  • Press your elbows against your thighs, hug your outer hips to the midline, let your pelvis become heavy down towards the back of your heels. Lift your inner arches and inner ankles.

  • Broaden through the collarbones, draw your navel towards your spine, lift your pelvic floor. Lengthen through your spine to the tip of your crown, gaze forward.

Subscribe to my newsletter & get a FREE YOGA BENEFITS INFOGRAPHIC as a thank you!

To save the images for personal use click and hold down the image until the ‘save image’ option appears; on Mac hold down ‘control’ and click the image to get the option box; on PC right click on the image to get the option box. Scroll down in the ‘option box’ and click ‘save image’.

Ruth Delahunty Yogaru

10 reasons to build a home practice

PAUSE_0126.png

MEETING YOUR NEEDS ON YOUR MAT
Home practice gives you the freedom, in the safety of your own home, to step on your mat when it suits you and practice exactly what you need, as often as you like. Putting aside some time for yourself and developing a home practice gives you the tools to take ownership of your wellness through yoga. Building a relationship with your practice, and getting to know your strengths, your limitations, your favourite asana, helps you tailor your practice to suit your needs.

HOW CAN MY HOME PRACTICE HELP ME TODAY?
Learning to listen to what you need each time you practice and having no expectations of yourself, is an important part of home practice. Each time you turn up to your mat is a new experience and is best treated with fresh curiosity and self inquiry. When you step on your mat take a few moments to work out how your practice can help you today. Ask yourself these questions:

YOGARU_Self inquiry.png

You may not have the answer to all the questions but it will help remind you if you have an injury you are minding, if you need to go easy because you have a full day ahead or if you are dealing with something else in life that might require you to be extra kind to yourself. Using the benefits list below and the answer to your questions you can start to build a practice unique to you and your needs.

YOGARU_Benefits.png

10 REASONS TO BUILD A HOME PRACTICE
1. Covid friendly! - Yes, my number one reason to build your home practice is to build resilience in a world that is in complete turmoil. Covid, and all the anxieties of uncertainty that come with it, will be with us for some time to come. Your wellness is in your hands, it is your responsibility. Investing in your home practice will help you feel stronger physically, mentally and emotionally. You will feel more able to deal with this unprecedented and challenging period in time. It is also a sole practice, an added Covid bonus!

2. Your home practice is there to support you, when it suits you, as often as you like - now that lots of us are working from home it is the perfect time to build a home practice into your day. We all know that building good routines is an important part of wellness. A morning home practice will get you up at a set time, start your day off the best way possible and you will feel the benefits for the rest of the day. Alternatively an evening home practice will set an end time to your home working day and help you wind down for the evening. You can also take bite sized movement breaks of a few seated or standing poses during your working day without inquisitive eyes on you! You choose, you are the boss of your practice.

3. You can create a practice relevant to your needs - your home practice is all about you! You have the freedom to practice exactly what you want each time you practice. This can be as simple as reading your energy levels and practising accordingly, or going into more depth and working out which poses will support your specific needs using the benefits list and the self inquiry questions above.

4. You get the most out of your time on your mat - in your home practice you can get straight to the point and address your needs in a shorter practice to make the most of your time on your mat. Your morning practice can be as simple as a 10 minute mobilisation of your whole body to sit more comfortably if you are working from home.

5. You can play around with your favorite poses - you can practice at your level and not feel you need to sit out poses that don’t suit you the way you might have to in a class scenario. You can also spend more time breaking down and playing around with poses that you find more challenging or poses that you just love.

6. You get the ‘feel good factor’ at your fingertips - for many reasons yoga has the ‘feel good factor’. We all need as much feel good factor as we can get at the moment. Developing a home practice means that you have this fabulous benefit available at arms reach. Yoga doesn’t take up much room and doesn’t require expensive equipment. Fancy yoga gear is optional, all you really need is a yoga mat and you are ready to go.

7. You can practice in private - with the best will in the world we are naturally curious to see what everyone else is doing in a yoga class and comparing ourselves to them. In your home practice you are less inclined to get stuck in self judgement and are more able to practice what is right for you in the privacy of your own home.

8. You build a relationship with your practice - taking ownership of your practice deepens your self awareness. When you build a relationship with your practice it gets easier to notice what feels good v’s what doesn’t, and what feels like enough v’s what feels like too much. In a class setting we are very subservient and are inclined to do as we see or as we are told, even if the poses don’t suit our level of experience or our anatomy.

9. You can support other hobbies and sports - whether you are a cyclist, runner, golfer, hiker – yoga can support you. In your home practice you can incorporate poses that specifically target areas that need strengthening or stretching to support and help you excel at other sporting interests.

10. It is free! - need I say more. With the cloud of uncertainty looming over many of us, free and ready when you need it self care is music to our ears.

JUST GET STARTED
My mission is to help you evolve and develop your home practice. On my website you will find every tool you could ever need to get you started. Have a read of How to build a home practice for a step to step guide to get you started, with YouTube videos to guide you through each of the Home Flows. You’ll also find tips on building good practice routines in 10 Tips to develop a home practice. There are over 100 FREE downloadable sequences in my Sequences section with pose breakdown, pose prep and pose versions too.

My 108 Asana sequencing cards and posters are also the perfect tool to give you alignment cues on each of the poses and a simple method for building sequences tailored to your needs. The best thing about your home practice is that each time you step on your mat you are moving in a way that will support and nourish your unique needs.

To save the images for personal use click and hold down the image until the ‘save image’ option appears; on Mac hold down ‘control’ and click the image to get the option box; on PC right click on the image to get the option box. Scroll down in the ‘option box’ and click ‘save image’.

Ruth Delahunty Yogaru

Salabhasana - Locust

YOGARU_Salabhasana_PB.png

BACK BODY STRENGTH
Salabhasana/Locust is by far my favourite backbend. I slot it into my vinyasas instead of Bhujangasana/Cobra to strengthen my whole back body, not just the muscles of my spine. ‘The posterior chain’ refers to the whole back body. It runs from the back of the heels up through the calves, hamstrings, glutes, lower back (lumbar spine), upper back (thoracic spine), neck (cervical spine) and ends just under the back curve of the skull (occipital curve). This chain of muscles are designed to hold us upright. If they are weak they become fatigued more easily and cause an overcurve of the upper spine and shoulders, resulting in a flattening of the lower spine as the body tries to compensate for the forward sway of the upper back and head. The posterior chain becomes weakened from lack of use or from long periods of sitting. A strong posterior chain protects the back and encourages good posture. In Salabhasana/Locust we are lifting the weight of the whole body against gravity which makes it a very strengthening pose for the posterior chain and the back of the arms. It also stretches the front of the shoulders, the chest, the belly and the front of the thighs. Although Salabhasana/Locust is quite a challenging pose to hold for more than a few breaths it is very accessible for beginners and is the perfect pose to prepare for deeper backbends.

THE BENEFITS OF SALABHASANA/LOCUST
The backbend family stimulates the nervous system, aids digestion, boosts circulation, boosts the immune system, and ease stress, tension, anxiety and mental fatigue. They also expand lung capacity and ease symptoms of asthma and sleep apnea. Backends that place pressure on your abdomen, like Salabhasana/Locust, have the added bonus of stimulating the organs of the body and aiding digestion by encouraging peristalsis in the muscles of the colon which help to push waste food along detoxing the body of food waste.

EXPLORING SALABHASANA/LOCUST IN YOUR PRACTICE
This sequence will give you plenty of opportunities to explore Salabhasana/Locust. Instead of linking your standing mini flows with a standard vinyasa you will come down to the ground and spend some time in a series of Salabhasana/Locust and Salabhasana versions. When you are moving through these poses use your public bone as your grounding anchor and see if you lightly draw your navel towards your spine. There is a temptation to puff the belly to fill the lungs and get higher but this will bypass the muscle activity of the back body. Stay lower and feel for the strength of the muscles all along the back body rather than striving for as much height as you can get.

PAUSE_0125.png

ALIGNMENT CUES
There are two Salabhasana mini flows. You will take the Mini flow A as a warm up at the end of the first row and you will take the full Mini Flow B after each standing flow indicated by ‘+ MINI FLOW B’. Take your time in this section of your practice and remember this is the essence of this sequence.

Have a read of the tips below and either print out the sequence or save it onto your device:

  • Lie on your front, arms by your sides, palms facing your body, forehead resting on the ground.

  • Inhale, press into your pubic bone, lift your head, upper torso, arms and legs, lift with the whole back. Reach your chest forward and up.

  • Extend your arms towards your feet, lift your legs up and press through the balls of your feet, roll your inner thighs up.

  • Broaden through the collarbones, firm your shoulder blades onto your back, back of the neck long, gaze slightly forward.

Subscribe to my newsletter & get a FREE YOGA BENEFITS INFOGRAPHIC as a thank you!

To save the images for personal use click and hold down the image until the ‘save image’ option appears; on Mac hold down ‘control’ and click the image to get the option box; on PC right click on the image to get the option box. Scroll down in the ‘option box’ and click ‘save image’.

Ruth Delahunty Yogaru