RELEARN HOW TO REST
Why is it that we use every excuse in the book to put off taking time for ourselves? Looking after ourselves is not just an act of self care, it ensures that we are able to function in the world, and with the people around us. Learning how to self soothe and self prioritise has become a lost art, but thankfully it is now being highlighted as an essential part of our physical and mental wellness. Learning how to relax helps you appreciate the value of downtime and cultivating a malleable nervous system with the ability to swap easily from activity to relaxation and appreciate the value of both. It rewires the brain's response to stress by tapping into the parasympathetic nervous system (rest and restore) rather than your sympathetic nervous system (fight and flight) and help build mental resilience. It also reduces production of the stress hormones adrenaline and cortisol, and increases production of the ‘feel good’ hormone endorphin. By cultivating the parasympathetic nervous system pathways the neuroplasticity of the brain changes, and in times of stress or decision making this more discerning pathway is more available to us.
THE NERVOUS SYSTEM
The parasympathetic nervous system is considered the ‘top down’ response controlled by the anterior cingulate cortex (ACC) in the prefrontal cortex, which is our logical and thinking mind. The sympathetic nervous system is considered the ‘bottom up’ response controlled by the amygdala in the limbic brain which is our internal risk assessment bodyguard. When we encounter a perceived threat the brain processes the information through these two pathways. In the ‘bottom up’ sympathetic path the perceived threat is processed in the hippocampus (past memories) to check for a record of previous experience, it sends this information to the amygdala (emotional alarm system) and decides the level of threat and action needed. A message is then sent to the thalamus (the switchboard) and on to the hypothalamus (hormone response) and a reaction to the situation is carried out. In the ‘top down’ parasympathetic path the perceived threat is processed in the anterior cingulate cortex (ACC) in the prefrontal cortex, the thinking mind works out if this is really a dangerous situation or something that can logically be worked out. It sends its decision to the hypothalamus (hormone response) to cause a reaction as required. When we work with building tone in the parasympathetic nervous system it helps slow down the amygdalas fast firing reaction and the prefrontal cortex steps in with a more rational, considered slant to the scenario.
RESTORATIVE YOGA
Restorative yoga is a healing practice that targets the parasympathetic nervous system and consciously relaxes the body to bring you into a deep state of rest while the body refreshes and renews. It supports you physically, mentally and emotionally and is used for both therapeutic and preventative measures. It restores the body's natural inclination towards balance or homeostasis by enhancing its capacity to heal, resetting pain patterns, balancing hormones, and optimising the functionality of the organs. This balance gives the immune system a better environment to work efficiently in. Restorative is a practice of passive poses which consciously relaxes the body. The poses are held for longer periods of time and are supported with props to help you feel effortless comfort. In this practice we look for gentle openings rather than strong stretches. The nervous system responds better to gentle stimuli, less is more!
THE BENEFITS OF RESTORATIVE
Aids digestion, aids fertility, aids pain management, aids relaxation, balances emotions, balances hormones, balances nervous system, boosts immune system, boosts healing capacity, eases constipation & bloating, eases back pain, eases fatigue, eases headaches, eases insomnia, eases menstrual & menopause symptoms, eases muscle tension, eases neck pain, eases stress, tension & anxiety, improves healing capacity, improves posture, improves sleep, increases circulation, increases mindfulness, massages abdominal organs, reduces blood pressure, reduces inflammation, strengthens lungs, strengthens spine.
EXPLORING THE SEQUENCE
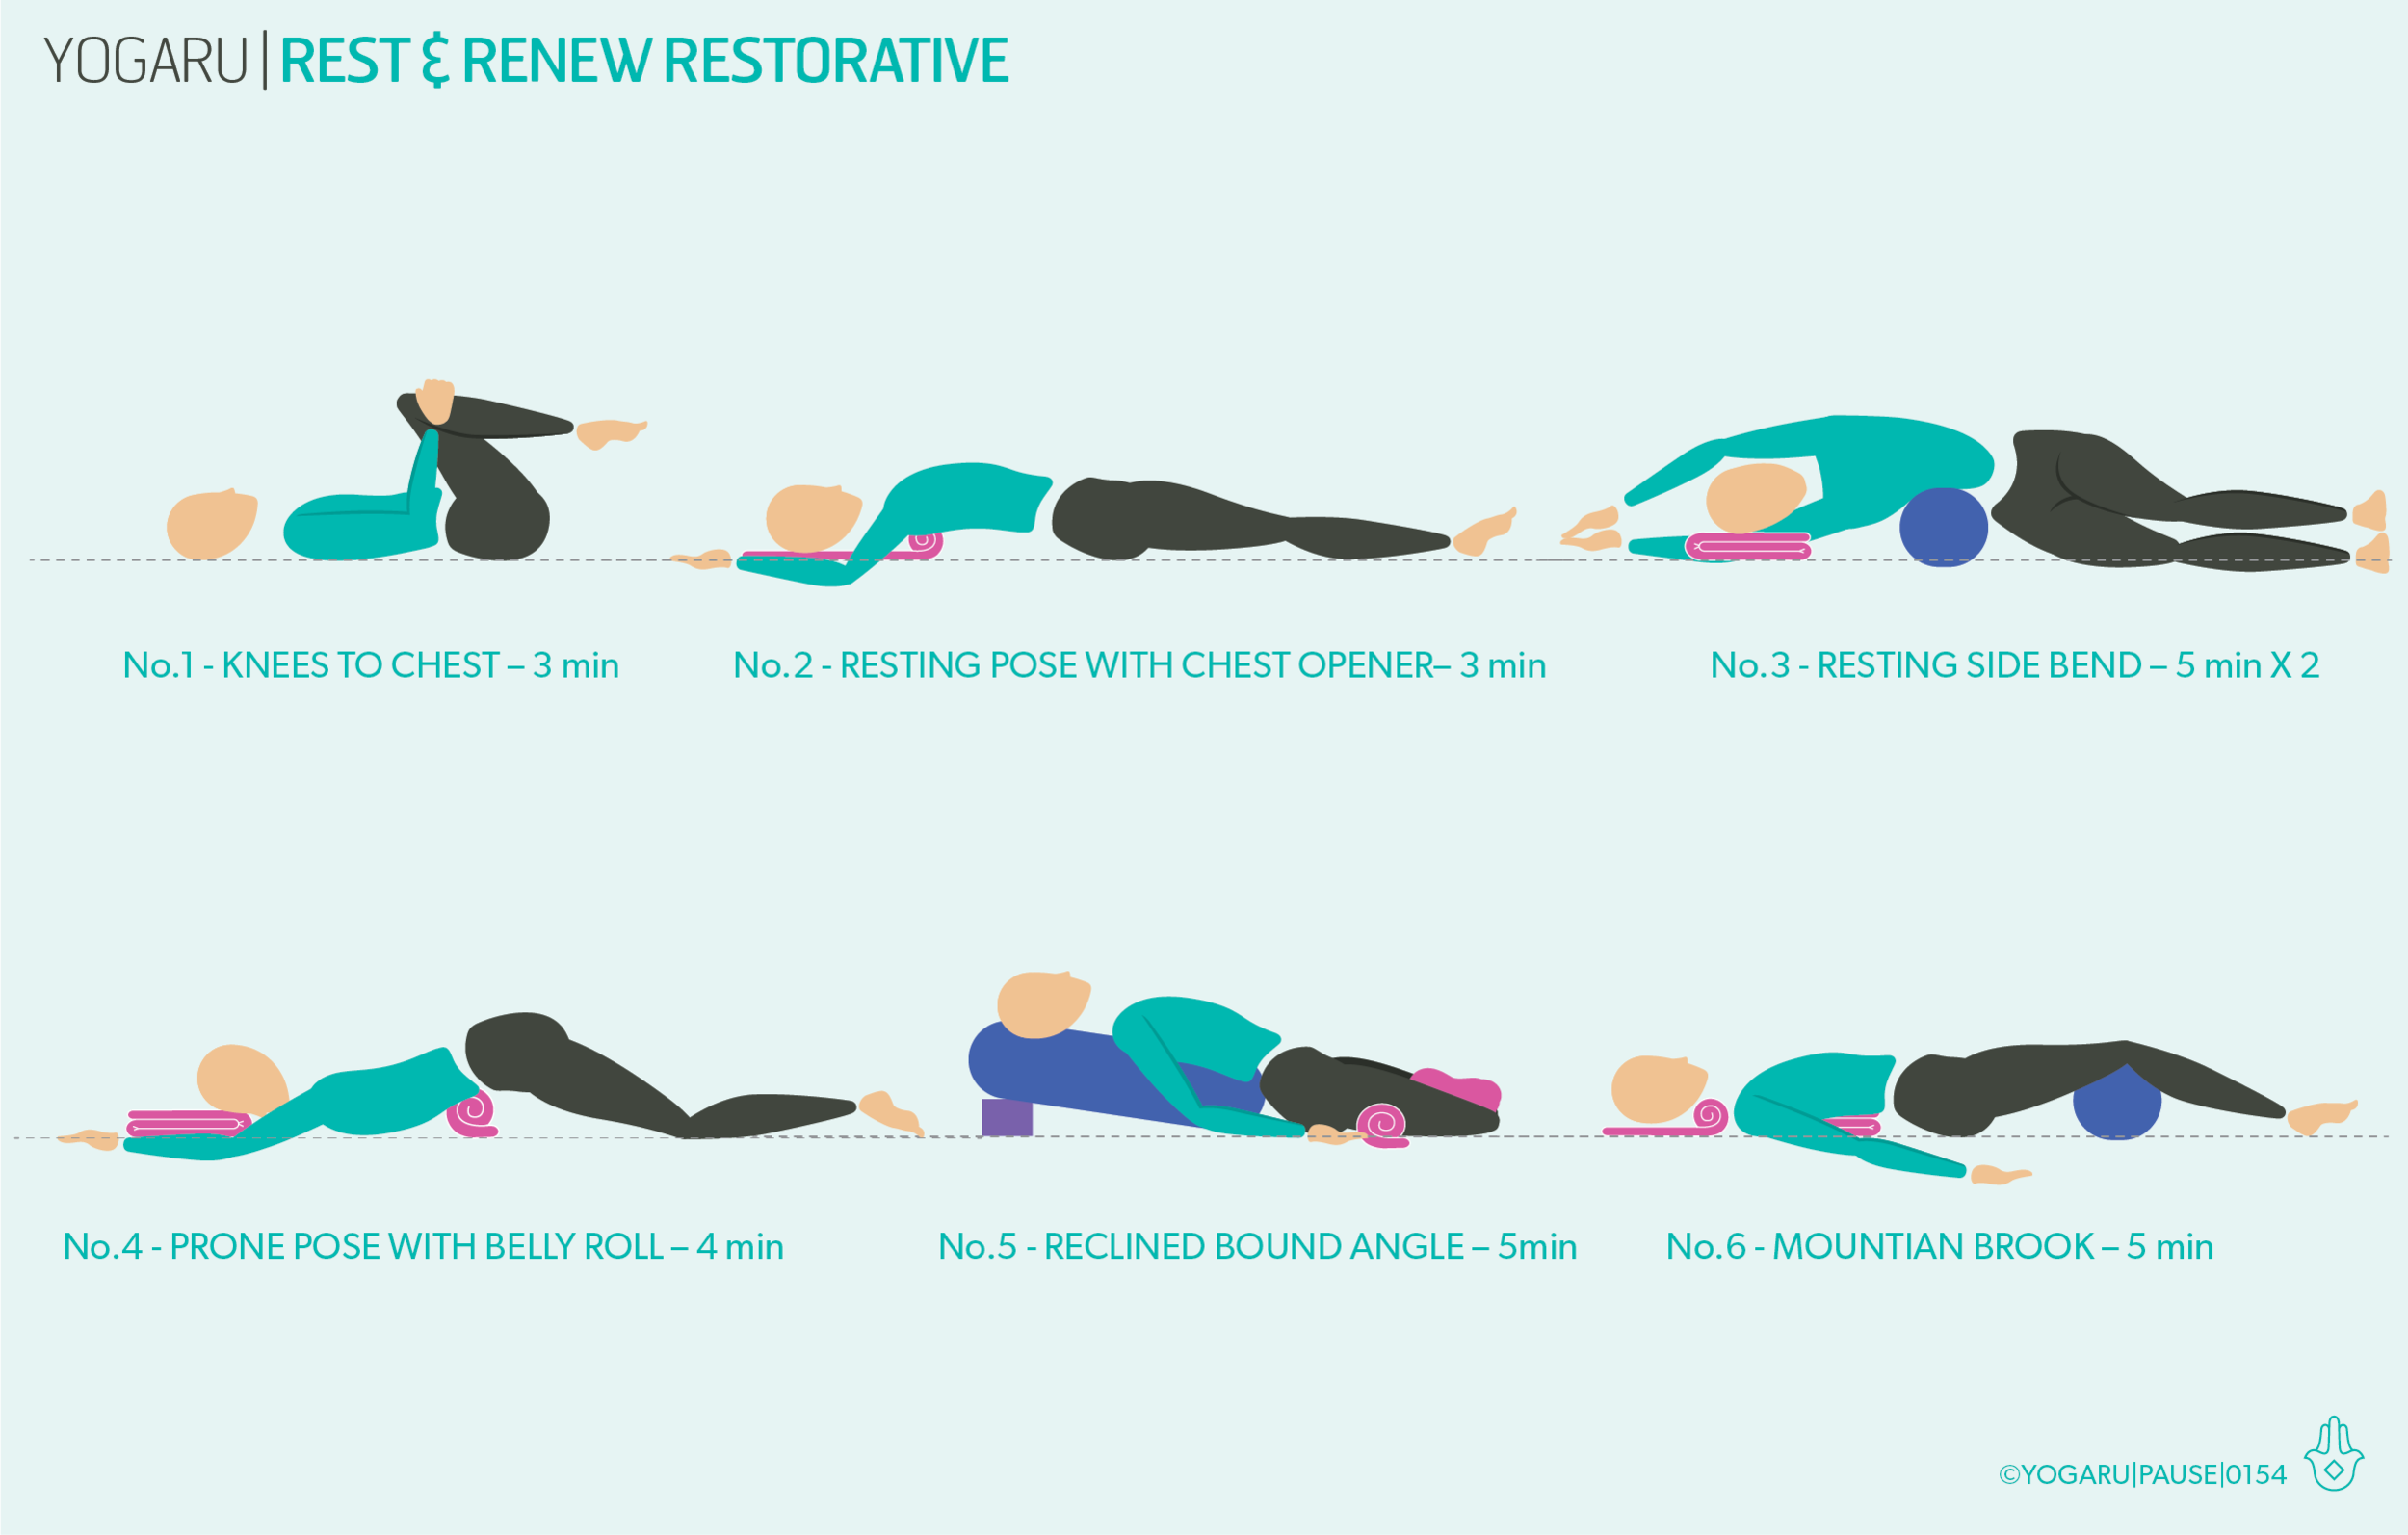
Use this simple restorative sequence to help you rest and renew your body and mind. Consider the four pillars of restorative yoga when you are setting up your space – quiet, dark, safe, warmth. The body will cool down quickly so layer up and stay warm. Hold the poses for the suggested times on the accompanying illustrated sequence. Remember to do both sides in an asymmetrical pose. Stay warm and be completely comfortable throughout your practice. Discomfort will reduce your ability to rest your nervous system. If a pose isn’t working for you just move onto the next one. Use a phone on a low volume to time your holds. As you settle into the pose, scan down from head to toe to make sure everything is happy. Use the gentle rise and fall of your breath if you find your mind wandering. Remember to take 10 minutes of resting pose at the end of your practice to let everything settle in a symmetrical pose before you reintegrate into your day.
PROPS SETUP
Props are king in restorative yoga. They bring the ground up to meet you allowing your body to melt into the practice and help you find complete comfort and support in each pose. Blankets are the most versatile of all the props – they can be rolled or folded, used for support or to keep you warm.
RESTORATIVE POSE ALIGNMENT CUES
The props you’ll need for the restorative poses are:
1 x bolster - or 2 towels, wrapped around a horizontally rolled pillow and tied to secure.
2 x yoga bricks - or 2 two thick similar sized dictionaries.
2 x yoga blankets - or any wool, thick cotton or fleece blanket with density.
No.1 - Knee to chest
Lie supine on your back, bend your knees and draw them towards your chest. Wrap your arms around your knees, reach your sit bones away and your sacrum down, lumbar spine lifts to a natural curve. Hug your knees to your chest, lengthen your neck, broaden through the collarbones. Feel a gentle stretch on the back of your hips and lower spine.
No.2 - Resting pose with chest opener
Quarter roll a four fold blanket and place it at the top of your mat. Lie supine on your back, with the tip of your shoulder blades at the roll of the blanket. Extend your arms overhead in cactus position. Feel a gentle opening across the chest and shoulders.
No.3 -Resting side bend
Place a folded blanket at the top of your mat. Place your bolster horizontally on your mat with a space between your bolster and pillow. Sit with your right hip along the long edge of the bolster, knees bent. Lengthen your right side along the mat and nestle the bolster into the curve of your waist. Place your head on the blanket and reach your arms overhead. Feel a gentle opening all along the top side of your body. Repeat on the left side.
No.4 - Prone pose with belly roll
Place a rolled blanket horizontally along the centre of your mat. Lie prone on your front with your belly on the rolled up blanket. Make a pillow with your stacked hands and place your forehead on your hands. Feel a gentle opening at the back of your lower spine and a gentle pressure on your abdominal region.
No.5 - Reclined bound angle with knee rolls & foot wrap
Place a brick horizontally at the top of your mat, lie your bolster vertically along the top centre of your mat with the brick propping up the far end. Sit with the back of your hips along the short end of the bolster. Roll up two folded blankets and place them under each thigh. Bring the soles of your feet together and let your knees drop out to the sides. Place your feet inside a folded blanket, wrap the outer edges through your inner ankles and tuck the ends around your ankles. When your legs are secure gently lie back onto your bolster. Feel a gentle opening in the inner groins and hips.
No.6 - Mountain brook
Half roll a four fold blanket and place it at the top of your mat. Accordion fold the other blanket and place it below your top blanket where your shoulder blades will lie. Place the bolster towards the bottom of your mat where your knees will be. Lie supine on your back, nestle the rolled part of the top blanket in the curve of your neck, place the accordion folded blanket under the lower tips of your shoulder blades and the bolster under the creases of your knees. Legs and arms extended, palms facing up, feet fall out to the side. Feel the rise and fall of the props supporting your back body.
To save the images for personal use click and hold down the image until the ‘save image’ option appears; on Mac hold down ‘control’ and click the image to get the option box; on PC right click on the image to get the option box. Scroll down in the ‘option box’ and click ‘save image’.
Ruth Delahunty Yogaru