The ultimate Christmas flow

ALL YOU NEED FOR CHRISTMAS
This year my gift to you is a Christmas flow with the essence of my previous Christmas sequences. It will be all you need for Christmas to help you enjoy time with friends and family, and get the most out of your Christmas break. My ultimate Christmas flow has a bit of everything to support you and give you some well earned self care. Think of it as an exchange in your energy bank between your outward energy debits, Christmas parties and socialising, and your inward energy savings, stepping on your mat and replenishing. This sequence will also give your immune system a kick start and help you stay well over the winter months. This one's a keeper that you can practise on repeat.

THE BENEFITS OF GETTING MOVING
Relaxing over your Christmas holidays should definitely be a priority, but that doesn’t mean you don't also prioritise adding a bit of movement and fresh air into each day to stop the Christmas cobwebs. Movement benefits you physically and mentally by keeping your joints and muscles working functionally; reducing stress and anxiety; improving heart rate variability (HRV); building strong lungs; reducing fatigue; regulating your hormones; and most importantly boosting Christmas festive happiness. Make it your priority to move every day over the Christmas break – whether it is stepping on your mat and practising this sequence, going for a walk or a run, or maybe even braving a winter sea swim!

EXPLORING THE ULTIMATE CHRISTMAS FLOW IN YOUR PRACTICE
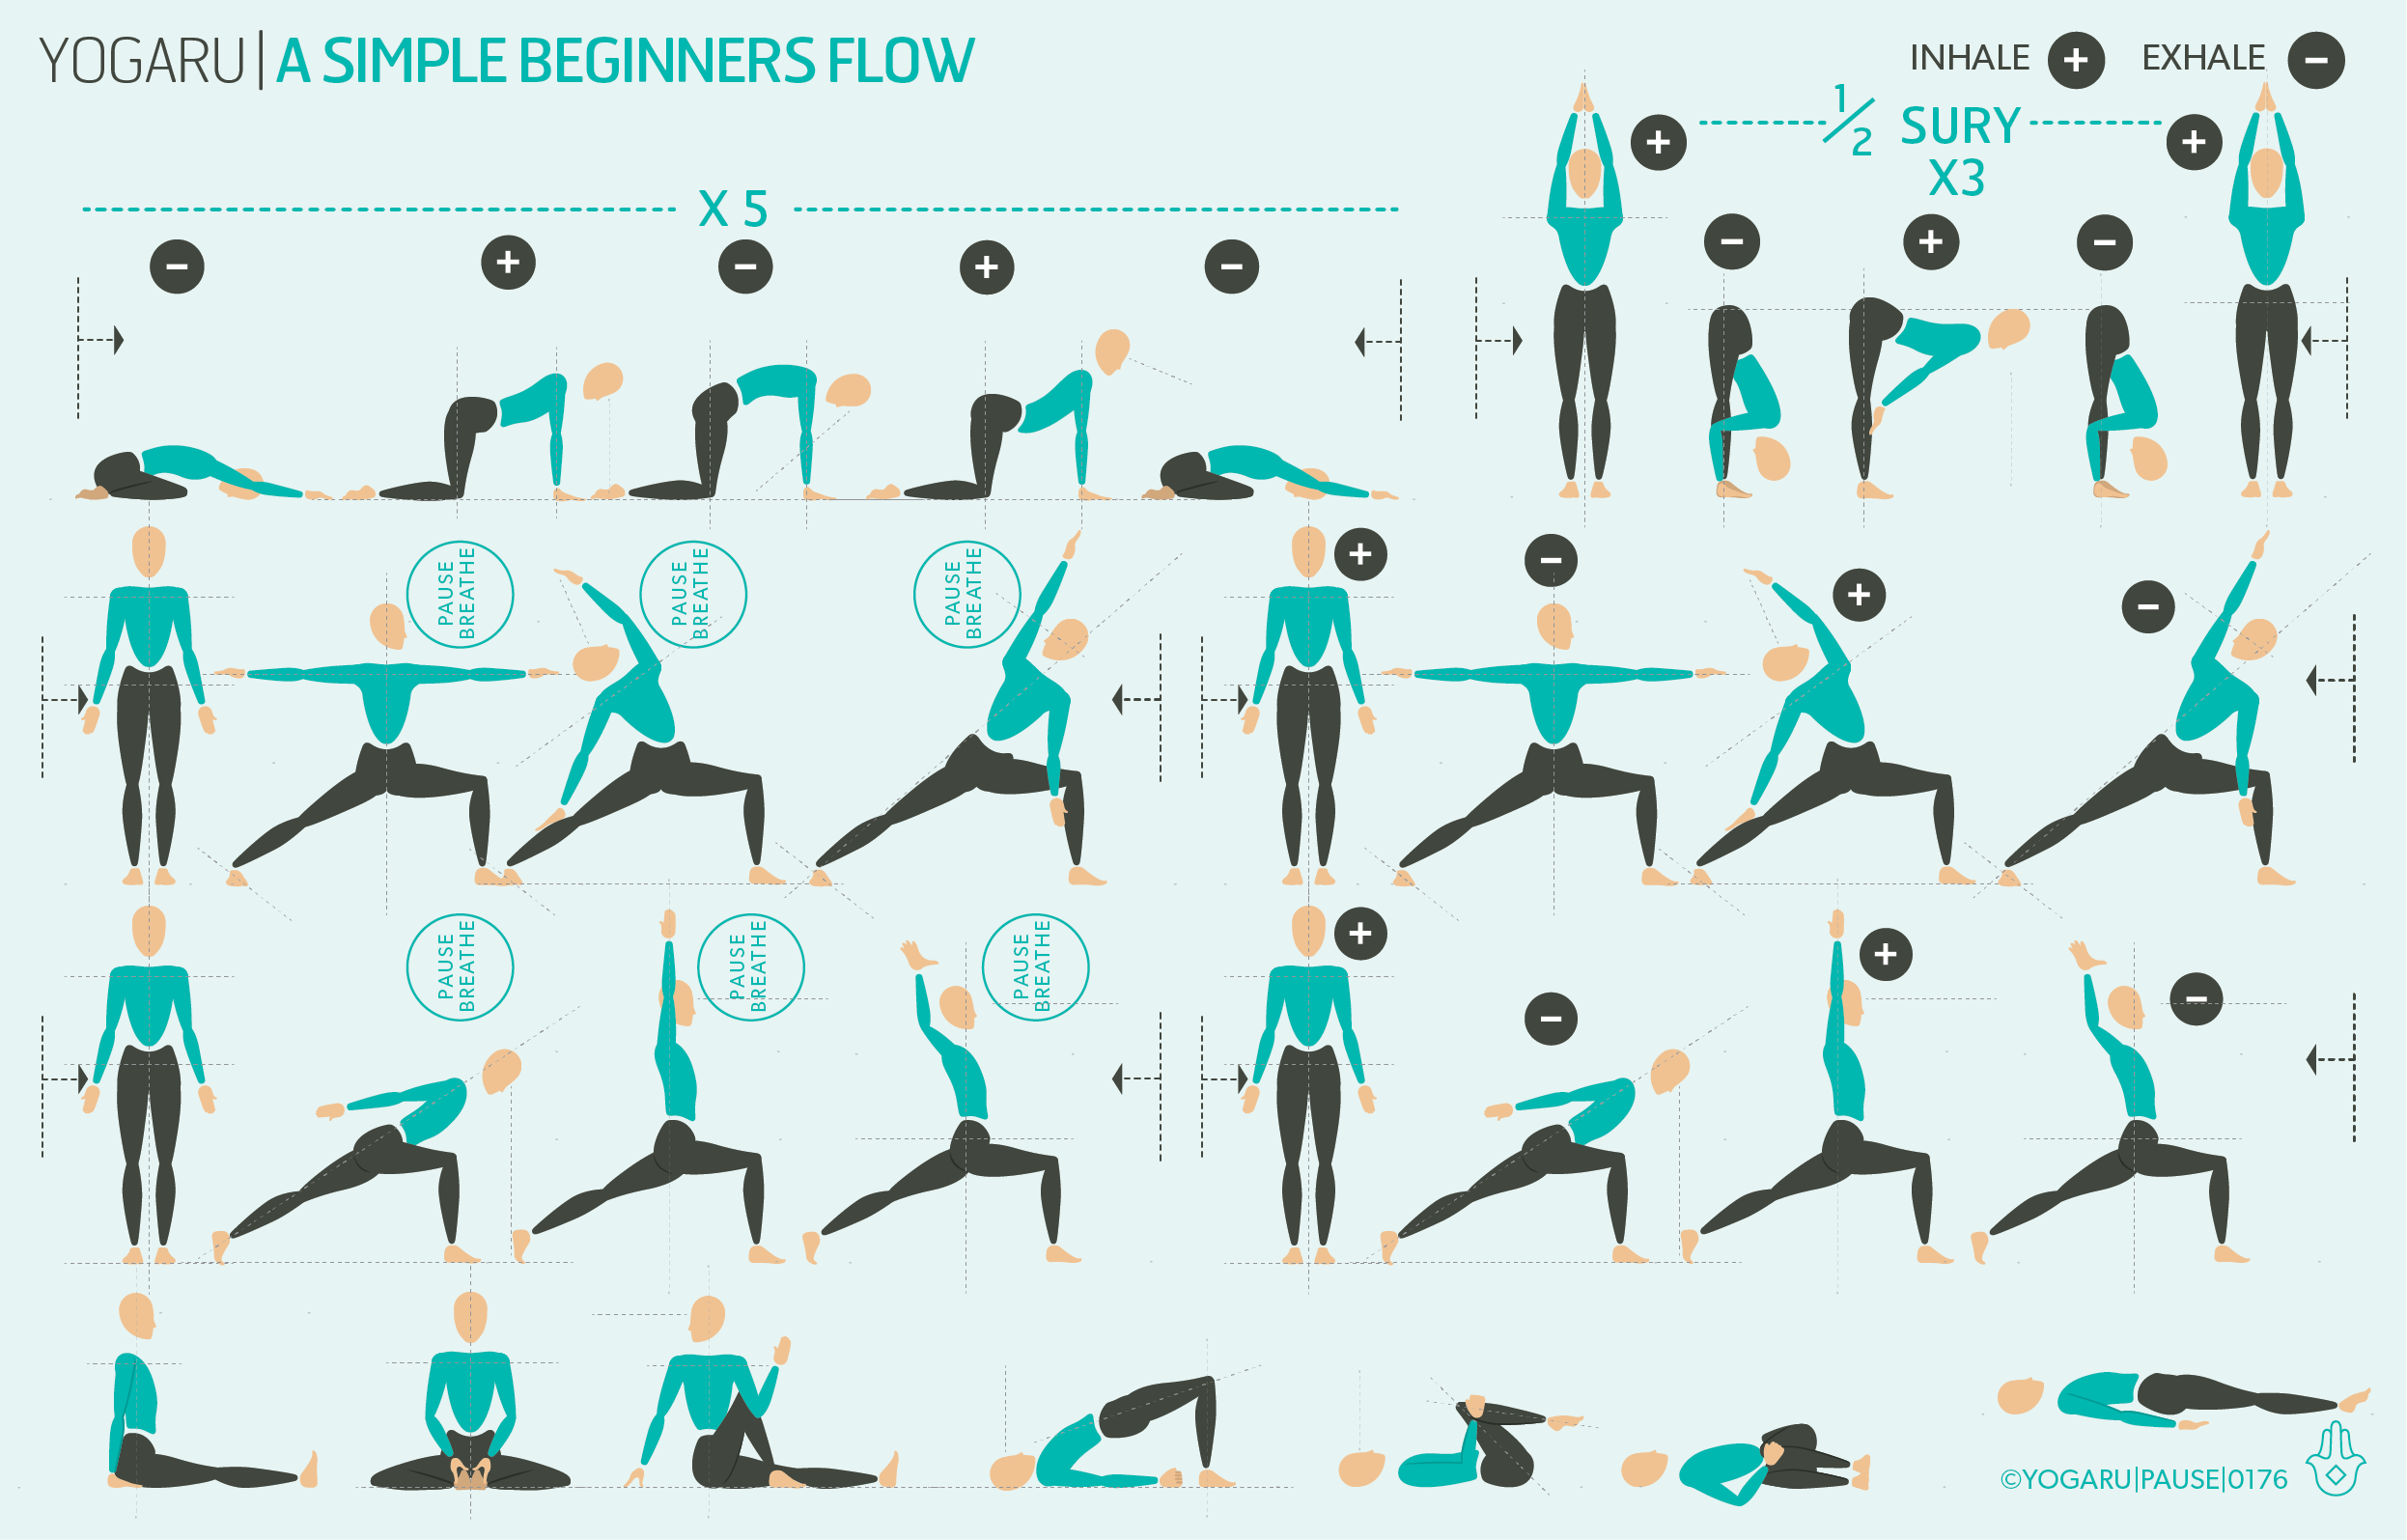
This sequence starts with Sun Salutations to get you warmed up and start linking your breath with your movement. For a longer practice you can add extra rounds of the Sun Salutation or for a shorter practice you can just do one Sun Salutation at the start of each mini flow. It then kicks into your standing mini flows on row two and three. There is a generous sprinkling of standing balancing poses to boost your energy and stamina. The standing mini flows also have plenty of hip openers to relieve stress and anxiety, and twists to boost your circulation and metabolism. Each mini flow ends with a gentle backbend to stimulate counteract festive indigestion and help keep you regular. Backbends and twists are both fantastic poses to support your immune system over the winter months.
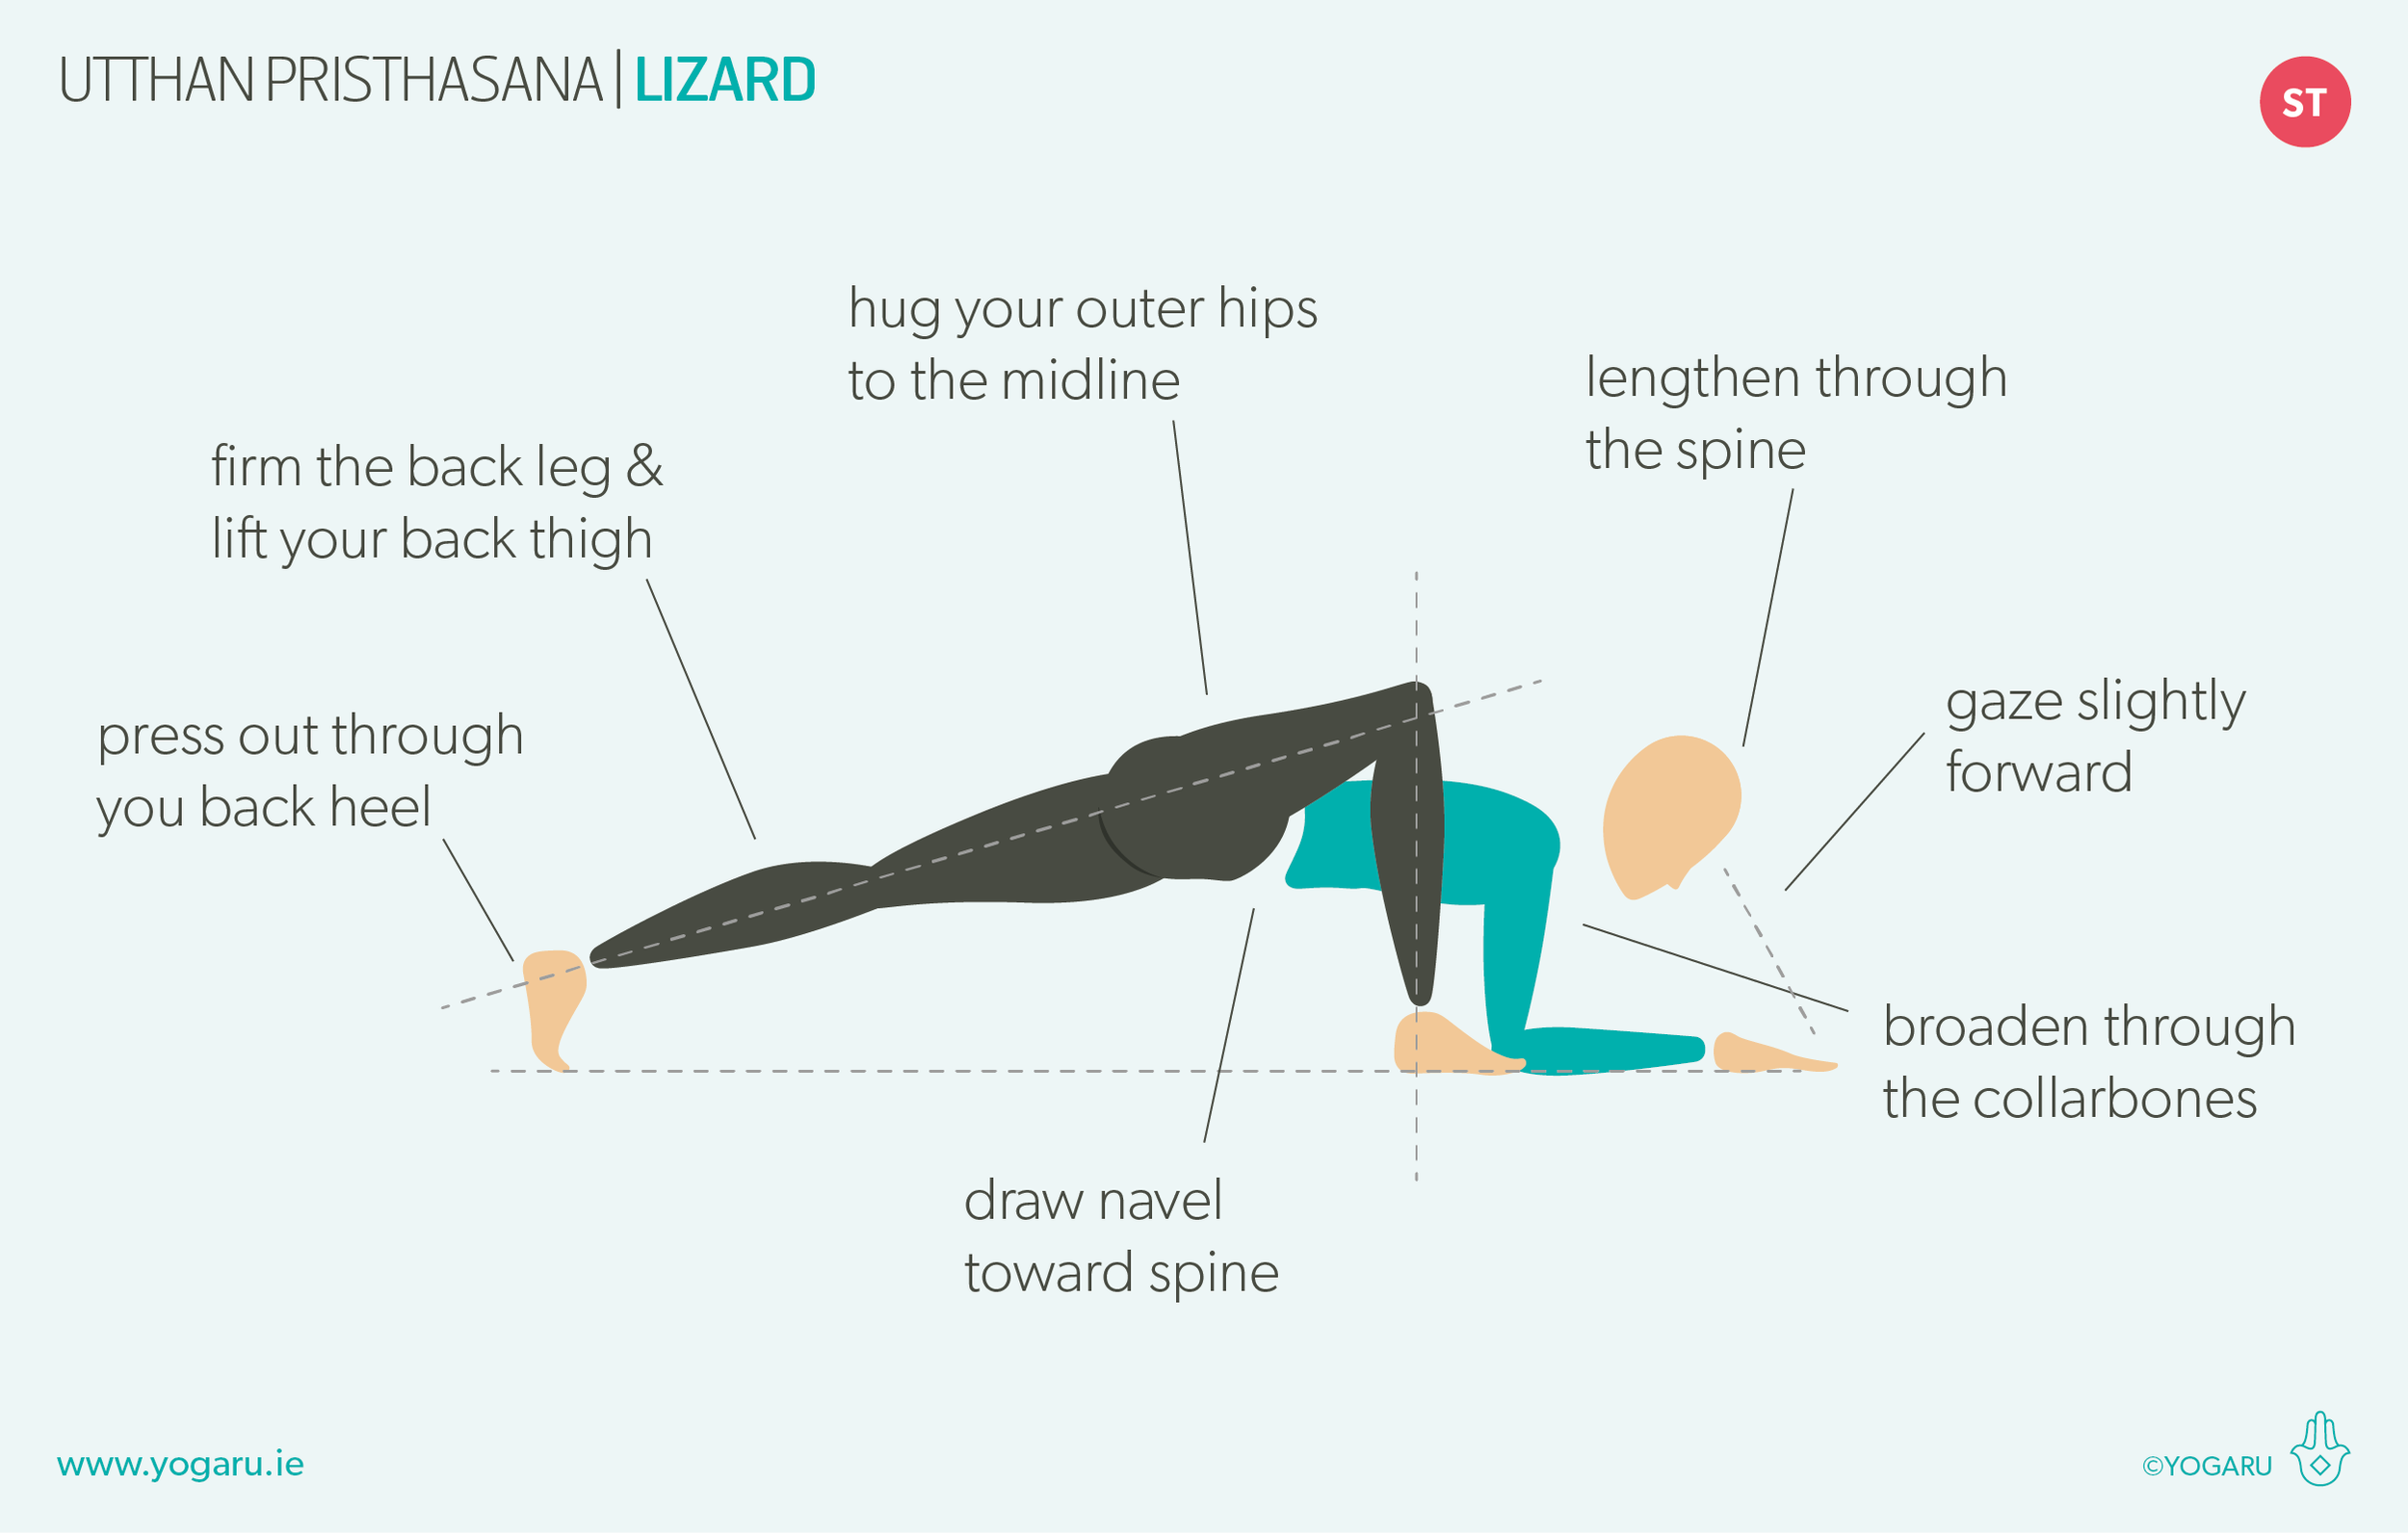
ALIGNMENT CUES
There is no specific peak pose in this simple beginners flow sequence. Focus on how each pose of the sequence feels while in the pose and after the pose.

Have a read of the tips below and either print out the sequence or save it onto your device:

  • Use the breath guide in the sequence to help you link breath with movement in the flow. Inhale is indicated with a ‘+’, exhale is a ‘-”.

  • If there are specific poses that you would like to stay longer in, give yourself three deep breaths in those poses, and pick up the next pose with the allocated inhale or exhale as indicated by the sequence.

  • For a longer practice add in a Sun Salutations at the start of each mini flow or repeat each mini flow.

To save the images for personal use click and hold down the image until the ‘save image’ option appears; on Mac hold down ‘control’ and click the image to get the option box; on PC right click on the image to get the option box. Scroll down in the ‘option box’ and click ‘save image’.

Ruth Delahunty Yogaru

Utthan Pristhasana - Lizard

HAPPY HIP OPENERS
Although you could argue that most yoga poses are hip openers, Utthan Pristhasana/Lizard gives the opportunity for a deep hip opening. The hip muscles can get very tight from sitting for long periods of time, or from sports that repeatedly contract these muscles, and can lead to a shortened stride or lower back issues. Utthan Pristhasana/Lizard helps relieve this issue and is a perfect pose for runners, cyclists, desk sitters and for anyone looking to increase hip mobility and freedom in everyday life.

The hip joint is made of a ball shape at the top of the leg bone (femur) and a socket shape at the base of the pelvis (acetabulum). This creates a ‘ball and socket’ joint that gives a wide range of movement to the hips. Within this range there are some directions the femur moves with more range than others. You can lift your leg up to an average height of 130 degrees but you can only extend your leg back to an average of 25 degrees. In Utthan Pristhasana/Lizard the back leg is extended and the front leg is flexed. When you come into the pose with the right leg forward and the left leg extended back, the front of the left hip is being stretched and the back of the right hip is being stretched. When you repeat the pose on the other side, with the left leg forward, you stretch the alternate sides – meaning both front and back of both hips have been equally stretched. Making Utthan Pristhasana/Lizard a great all round hip opener for both the front and back of the hips. That is why you will see in the benefits list below that it stretches and strengthens a lot of the same muscles.

THE BENEFITS OF UTTHAN PRISTHASANA/LIZARD
Utthan Pristhasana/Lizard is a standing pose and a deep hip opener. It stretches the hip flexors, glutes, groins, quads, hamstrings and strengthens core, hip flexors, glutes, groins, quads, hamstrings. As a hip opener it reduces stress tension and anxiety, increases energising, aids digestion, stimulates the abdominal organs, relieves sciatica and balances the nervous system. As a standing pose it builds heat, increases circulation and stamina.

EXPLORING UTTHAN PRISTHASANA/LIZARD IN YOUR PRACTICE
There are two versions of Utthan Pristhasana/Lizard. The first version, which you will find at the start of each mini flow, is where you keep your back knee down for balance, stay up higher and keep the arms straight. You can repeat this version or try the second version, which you will find at the end of each mini flow, is a deeper hip and groin opener, where you come down onto your forearms and lift the back knee. If you find you are somewhere in between the two you can use the version where you place bricks under the forearms to raise the ground up to meet you for both rounds. Regardless of which version you choose, remember to watch out for over rounding of the upper back and over extension of the neck. If you find your upper back is very rounded try broadening through the collarbones and lengthening through the spine. If this doesnt work then maybe take one of the versions with the chest a bit higher up off the ground. You can also play around with the optimal position for the front foot. Sometimes our anatomy will prevent the front leg from flexing deep enough to bring the hands to the ground when the head of the femur hits its end range with the pelvic socket. You can try placing your front foot at a 45 degree angle and allow the knee to move outwards to give more space for the femur bone to roll in the socket. In Utthan Pristhasana/Lizard gravity will do a lot of the work to drop you into the stretch, for this reason it is very important to make sure you are listening to your hips and stopping before they tell you they are at risk of muscle strain, particularly in the inner groins.

ALIGNMENT CUES
Allow plenty of time for the warm up phase of this sequence. The hips muscles habitually hold tightness in one of the directions for most people. Patience and plenty of breathing as you gently explore the prep and peak pose will serve your hips well.

Have a read of the tips below and either print out the sequence or save it onto your device:

  • From Adho Mukha Svanasana, inhale, step your right foot to the outside of your right hand, lower your left knee to the ground.

  • Hug your outer hips to the midline, hips squared to the front of the mat, lower your hips down towards the ground.

  • Stay here, or for a stronger stretch, lower onto your forearms and lift your left knee. Press out through your left heel to firm the back leg, hips level.

  • Press into your right foot and forearms, broaden through the collarbones, lengthen through your spine to the tip of your crown, gaze slightly forward.

To save the images for personal use click and hold down the image until the ‘save image’ option appears; on Mac hold down ‘control’ and click the image to get the option box; on PC right click on the image to get the option box. Scroll down in the ‘option box’ and click ‘save image’.

Ruth Delahunty Yogaru

A simple beginners flow

YOUR MIND BODY CONNECTION
If yoga is new to you, you are not alone. We were all beginners at some point and it is testament to the power of the benefits of yoga, that so many of us found our way back on to our mats after giving it a go. Learning how to move, and connecting body and mind, is a bit like learning a new language. Moving on your mat might feel awkward at first, but you will grasp this mind, body language very soon. The mind, body connection is one of the many benefits of yoga and is incredibly important for our physical and mental wellbeing. The body is a communication highway - hunger or satiety, tired or energised, happy or unhappy - yoga helps us read the signals our body is sending us, giving us the chance to adjust to meet its requirements before it hits a dead end.

Yoga also teaches us to cultivate a deep therapeutic and calming breath as we move. Consciously breathing stimulates a cranial nerve called the vagus nerve, which brings the body into the rest & restore nervous system response, or the parasympathetic nervous system response. This creates optimal conditions for the functionality of the organs of the body – strengthening the immune system, increasing lung capacity, increasing circulation, aiding digestion and increasing overall wellbeing. Initially you might find yourself holding your breath, which is very common when we are concentrating. Your first task is just to remember to breathe, once you master that you can start to link breath with movement as suggested by ‘+’ and ‘-’ in the sequence.

SELF CARE NOT SELF JUDGEMENT
Yoga is your practice. Regardless of whether you are doing self practice or attending classes, nobody will ever know how a pose feels to you, except you. For this reason you must embrace this as your very own unique experience and listen carefully to what your body is telling you. When you are using my illustrations or a teacher as a guide, it is exactly that – a guide. Your body will tell you how far it is ready to stretch or strengthen. Remember we are all very different on the outside and the inside too. A pose that one person is luxuriating in can feel pretty challenging to you and vice versa. Most importantly, practice without self judgement. If you have made it onto your mat, and care enough about yourself to give yoga a go, you are more than halfway there. In return for this brave step you have made, be kind and encourage yourself every step of the way. The best gift you can give yourself is to teach yourself to take Savasna at the end of each practice. This is simply lying down on your back for anything between 2-10 or more minutes and assimilating the work you have done. This allows your nervous system to settle down and prepares you for your day off the mat.

EXPLORING SIMPLE BEGINNERS FLOW IN YOUR PRACTICE
The first row gently warms you up with a child pose flow and a few rounds of Half Sun Salutation or Half Suryanamaskar (½ SURY). Rows two and three are your standing flows. You will hold each pose for 3 deep breaths to help, then you will repeat the same flow with the suggested inhale and exhale, as indicated by the illustrations. If the breath isn’t settling into a smooth rhythm as you move, repeat the first version where you hold the pose for 3 breaths again. At the start of each mini flow you can either step back from the top of your mat or you can add a Half Suryanamaskar from the first row and then step back into the flow.

TIPS TO GET YOU STARTED
Have a read of the follow tips to help you get started with your yoga practice:

Tip 1
Little and often is better than trying to get on your mat once a week to do a long practice. Start small with just 10 minutes, three times a week and let it naturally grow from there.

Tip 2
Make a commitment to yourself to give it your best shot, but if you don’t make it onto your mat don’t give up. The great thing about home practice is that it slots into your schedules.

Tip 3
Practise anywhere your mat fist – end of your bed, kitchen, sitting room. Politely let your ‘housemates’ know that your practice is your quiet time.

Tip 4
If possible try incorporating your home practice into your morning routine before you start your day.

Tip 5
Don’t panic or overcomplicate things. If there is a pose you are not sure about either skip it or if you have time use the asana section of my website to read the alignment cues for the pose.

Tip 6
When you are ready to move on to a new sequence you will find hundreds of sequences to try on my website. Some even come with a YouTube class of the sequence.

ALIGNMENT CUES
There is no specific peak pose in this simple beginners flow sequence. Move nice and slowly through your practice and enjoy being the boss. Get close to your breath, and take extra breaths in poses you are enjoying.

Have a read of the tips below and either print out the sequence or save it onto your device:

Use the breath guide in the sequence to help you link breath with movement in the flow. Inhale is indicated with a ‘+’, exhale is a ‘-”.

Move slowly from pose to pose taking 3 breaths in each pose. Scan your three platforms – feet, hips and shoulder – to check your alignment.

For a longer practice repeat each of the standing mini flows three times.

To save the images for personal use click and hold down the image until the ‘save image’ option appears; on Mac hold down ‘control’ and click the image to get the option box; on PC right click on the image to get the option box. Scroll down in the ‘option box’ and click ‘save image’.

Ruth Delahunty Yogaru