Sequences

Hit pause & reverse

PAUSE_0098.png

SAVOUR THE PRESENT MOMENT
At this time of year I find myself hurtling into planning mode and not taking time to pause and savour the last few weeks of Summer. September looms on the horizon and with it back to school mayhem and everyone settling into post holiday routines. My mind is racing and the ‘to do’ lists has gone into hyperdrive. The thing to remember is September is in the future and thinking and worrying about it isn’t going to change anything. Pausing and breathing will!

COME BACK TO NOW
In our practice we can take this emotion, translate it into the physical, and reverse it. Sounds complicated but stay with me. A busy mind manifests into a busy body. Think of how we walk when we are busy – shoulders hunched, head tilted and the whole upper body driving forward. We can sometimes see this in Virabhadrasana II/Warrior II when the body follows the gaze and leans forward towards the front hand – reaching for the future and striving for the perfect pose. Viparita Virabhadrasana/Reverse Warrior can help correct this and bring us back to the central column in Virabhadrasana II/Warrior II. It also opens the tissues of the lungs to help us take a deep, present moment breath. Hit pause, rewind to the present moment and enjoy where you are now.

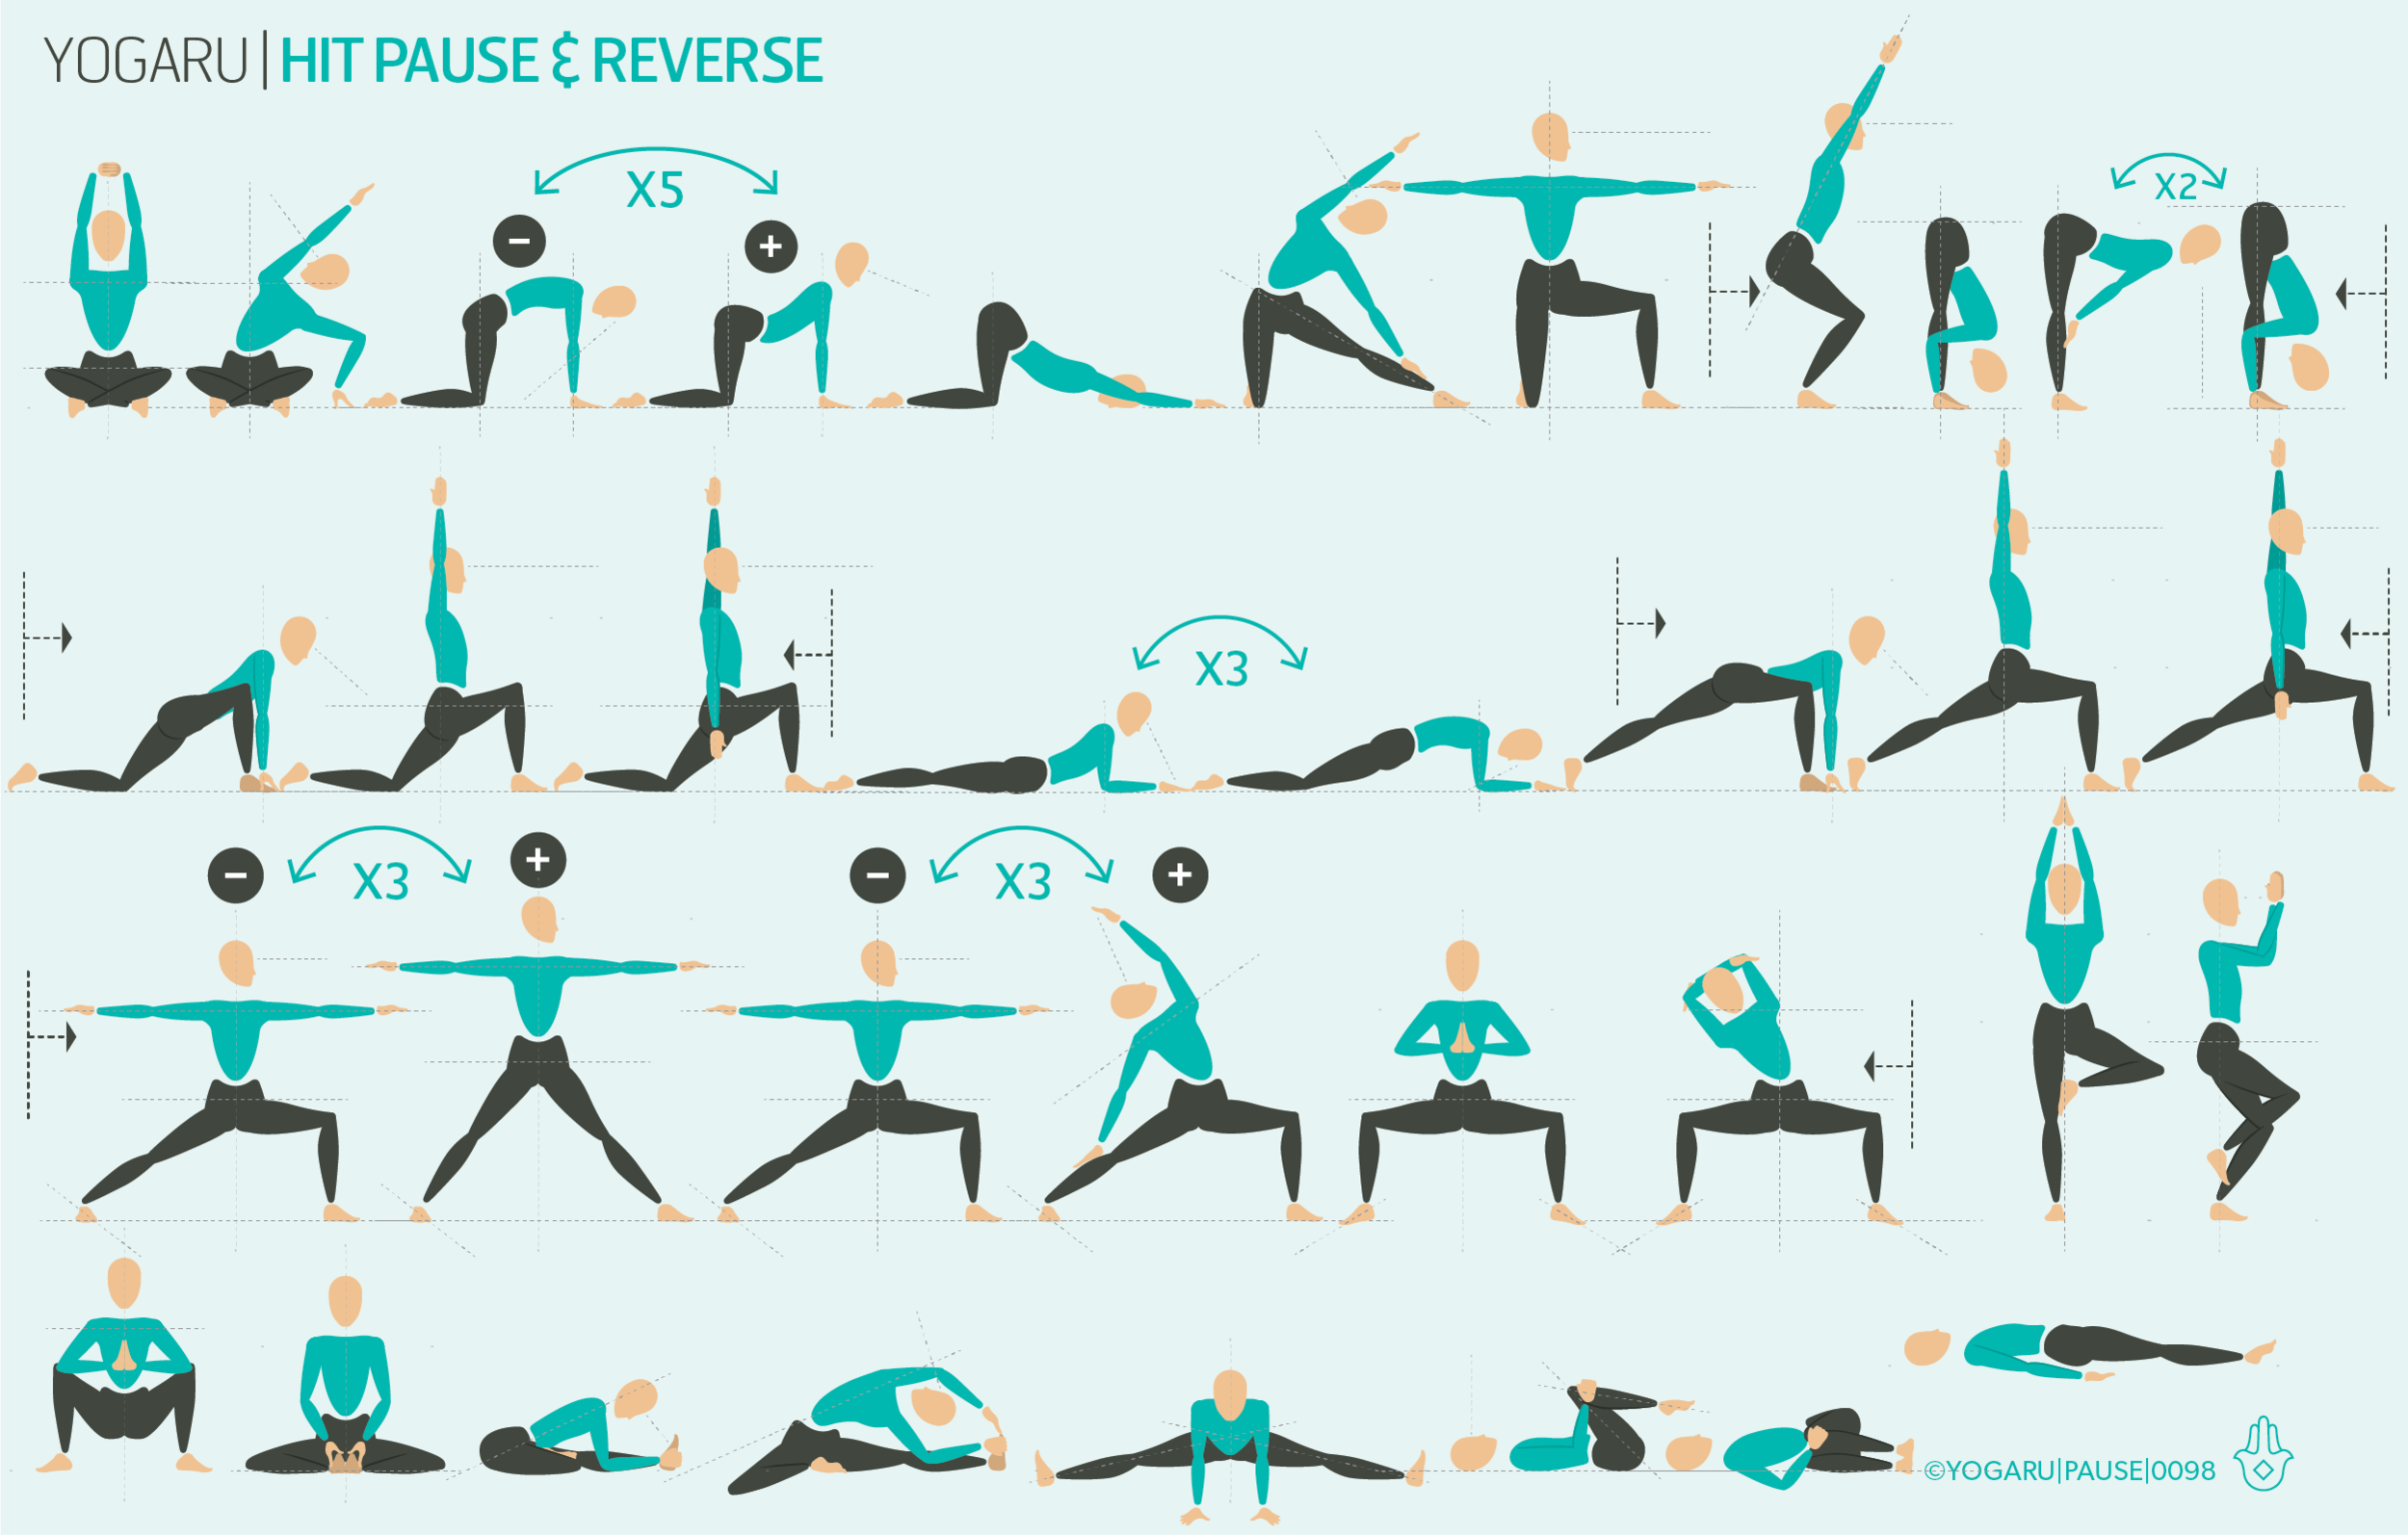
EXPLORING PAUSING & REVERSING IN YOUR PRACTICE
Viparita Virabhadrasana/Reverse Warrior gives the hip opening of Virabhadrasana II/Warrior II with the addition of a shoulder and spine stretch. This sequence breaks down the main components of Viparita Virabhadrasana/Reverse Warrior and prepares you by strengthening your core and legs, opening your inner groin and hips, and warming up the shoulder joint. The core is an important element and needs to be switched on to support the spine as it works to counteract the weight of the lifted the arm. As you move through the sequence see can you break down the poses and notice which ones have similar properties to the peak pose.

ALIGNMENT CUES
When you take Viparita Virabhadrasana/Reverse Warrior try to keep your hips as low as they were in Virabhadrasana II/Warrior II. When we reach the arm overhead the hips often lift and follow the arm. Work on keeping the front leg deeply bent. Lift and lengthen through the spine and concentrate on reaching the arm up before you reach overhead. If you experience any pinching or discomfort in the shoulder joint or neck come back to Virabhadrasana II/Warrior II and work lengthening through the spine to the tip of the crown.

  • From Virabhadrasana II, inhale, turn your right palm to face up.

  • Hinge to your left from your waist, reach your right palm up and over your ear.

  • Rest your left hand on your left thigh or your lower calf, draw your navel towards your spine.

  • Let your hips settle down low as you reach overhead.

  • Lengthen through your right side body all the way to your fingertips, keep your right leg deeply bent, gaze up to your right fingertips.

To save the images for personal use click and hold down the image until the ‘save image’ option appears; on Mac hold down ‘control’ and click the image to get the option box; on PC right click on the image to get the option box. Scroll down in the ‘option box’ and click ‘save image’.

Ruth Delahunty Yogaru

Happy hams

PAUSE_0097.png

YOGA BUTT
My practice is going on a journey of exploring the concept of sustainability and longevity. I recently wrote about it in my article on Strong glutes where I discussed the phenomenon called ‘yoga butt’ – where from many years of stretching the glutes and hamstring muscles and tendons can become inflamed and develop tendinopathy. We presume tight muscles need stretching but it is much more complicated than that. If you are an athlete in a specific discipline which continuously fires the hamstrings you may indeed have strong tight hamstrings, but for the majority of us they are tight and weak from prolonged periods of sitting and a general sedentary life. We get lulled into a false sense of security by convincing ourselves we are very active because we exercise everyday. But what are you doing for the other 23 hours of the day! Although we might feel a nice stretch will be the answer, stretching into a tight weak muscles is more likely to cause injury, because the connective tissue is not strong enough to withstand the load we are bringing to the muscles. We must tackle the weakness and strengthen the muscle up first.

YOUR INNATE WISDOM
In my experience injuries often come from failing to listen to the internal messages of the body and going into the mind frame of ‘I should’. In yoga philosophy there is a principle called ‘ahimsa’ or non harming. This non harming applies to ourselves as well as others. Practising with ahimsa means listening to your innate wisdom and acting appropriately. If your neighbour has managed to fold in two in a seated forward fold ask yourself first does this suit your body to follow suit and try to stay more present on your mat and your practice. We need to start considering our practice through the lens of a long term practice not something that is Instagram worthy.

EXPLORING YOUR STRONG HAMSTRINGS IN YOUR PRACTICE
The hamstrings are a group of muscles that run down the back of the leg starting at the back of the pelvis and the top of the femur and attach to the top of the tibia and fibula bones of the lower leg. They are responsible for walking running, jumping and any movement where the knee bends. In this sequence you are going to concentrate your effort on the eccentric movement which is the straightening of the leg and the hamstring fires to control this movement. Extend your exhale with the hamstring mini flows in the sequence and see how slow you can straighten the leg out, bringing your whole attention to what’s happening at the back of the upper leg.

ALIGNMENT CUES
This sequence is perfect if you have any instability going on in your hamstring. It gives lots of opportunity to find the strength in the hamstrings with minimal forward bends. If you use Downward Dog as a transition pose I suggest you don’t hang around in it for too long as essentially it is a forward fold and with further irritate tight hamstrings if they are feeling tender. The peak pose is one of my favourite poses for finding strength in the back chain of the body Salabhasana/Locust Pose. Take time in the pose, pause for three long breathes and repeat it at least three times.

  • Lie on your front, arms by your sides, palms facing your body, forehead resting on the ground.

  • Inhale, press into your pubic bone, lift your head, upper torso, arms and legs, lift with the whole back.

  • Reach your chest forward and up, extend your arms towards your feet, lift your legs up and press through the balls of your feet, roll your inner thighs up.

  • Broaden through the collarbones, firm your shoulder blades onto your back, back of the neck long, gaze slightly forward.

To save the images for personal use click and hold down the image until the ‘save image’ option appears; on Mac hold down ‘control’ and click the image to get the option box; on PC right click on the image to get the option box. Scroll down in the ‘option box’ and click ‘save image’.

Ruth Delahunty Yogaru

Strong core

PAUSE_0095.png

THE CORE OF THE ISSUE
Situated in the centre of our being is the core – ‘the most essential part of anything’. This fundamental part of the body supports the spine, facilitates movement, and contains the organs of the abdomen. It’s main role is to hold us upright against gravity, with only one bone structure to help it to do this important job – the spine – but for very good reasons. It’s multilayered muscle mass facilitates forward, backwards and side mobility. If we had more bone structure built into our core we would not be as fluid in our movements and move more like robots.

When combined with the spine the core gives us our unique upright posture. When the core is weak it can’t hold the upper body upright against gravity the spine suffers leading to back problems. Many people come to the practice of yoga as recommended by their doctor to build up their core strength to support the spine. This sequence will help to find the strength of your core by challenging strengthening poses and stability movements.

UNDERSTANDING THE CORE
The deepest layer, the transversus abdominis, is the containment sheath that wrap around the core like a corset to support the organs and assist in maintaining good posture. Next are the internal and external obliques which cross hatch diagonally along the side body and are responsible for lateral side bends and twists. The most external, and the one that gets the most attention, are the rectus abdominis, running from the pubis to the bottom of the sternum , which flex the spine and stabilise the pelvis. Finally the core is not just the front body, it also includes the quadratus lumborum and the erectors of the spine, which do the opposite of the rectus abdominis and extend the spine into backbends.

EXPLORING THE CORE IN YOUR PRACTICE
The challenge with core work is to maintain a soft expansive breath while you still draw the navel towards the spine. When you are moving into a pose that is directly working the core take a deep inhale first then exhale into the pose to activate all the supporting muscles of the the full 360 core.

ALIGNMENT CUES
This sequence works the core strengthening. The peak pose is Ashva Sanchalanasana/Galloping Horse. This is a strengthening and challenging pose for the core and back. If you find there is too much pressure on your lower back tilt a little less forward to the point where your core can ‘have your back’

Print out the below tips, along with the sequence, and start to build a connection with your strong core:

  • From Virabhadrasana I or Ashta Chandrasana arms reaching high, inhale, lengthen the spine, exhale, hinge forward from the hip joint over your front leg.

  • Arms in line with ears, lengthen up through your spine to the tip of your crown.

  • Press out through your left heel to firm your back leg, hug your outer hips to the midline

  • Draw your navel towards your spine to protect and strengthen your back, gaze down.

To save the images for personal use click and hold down the image until the ‘save image’ option appears; on Mac hold down ‘control’ and click the image to get the option box; on PC right click on the image to get the option box. Scroll down in the ‘option box’ and click ‘save image’.

Ruth Delahunty Yogaru