Sequences

A gentle morning flow

PAUSE_0119.png

ROUTINE, ROUTINE, ROUTINE
Starting your day with a morning movement routine is the best way to get the day started physically and mentally. It gets rid of stagnation and brings mobility and stability back after a prolonged static period of sleep. Starting the day with your practice ensures that it is consistently part of your routine and doesn’t get lost on a busy day. Gentle movement realigns the spine and helps you to stand, walk and sit more comfortably throughout the day with awareness of your posture. This more upright posture has a very positive effect on your mood and creates emotional openness for the day. Embedding a self care routine into your day cultivates a sense of calm, makes you feel more cared for and listened to – and in return makes you more caring and available to listen to others too. You are also more inclined to make healthy choices throughout your day when you have started with some self care.

Before each morning practice take a few moments to work out how your practice can support you today. Ask yourself what do you need physically? What do you need mentally? What are your energy levels? What is your mood today? What are your limitations? What is the rest of your day like? Where do you need mobility? Where do you need stability? You may not easily have the answer to each question but it will help remind you if you have an injury you are minding, if you need to go easy because you have a full day ahead or if you are dealing with something else in life that might require you to be extra kind to yourself.

THE BENEFITS OF A MORNING PRACTICE
Morning yoga stimulates the gut, promotes good digestion for the day, boosts the metabolism, builds a strong immune system, balances hormones, tones your muscles, improves posture and spine health, gives you energy, improves circulation, supports good heart health, builds healthy lungs and most importantly is proven to make you happier! Breath awareness in yoga triggers the ‘rest, restore and digest’ nervous system through the vagus nerve which runs from the brain stem down the spine. When this conscious breath is practiced as part of your daily routine it rewires your brain to naturally reach for this calmer reaction rather than a ‘flight or flight’ response to situations. In this calmer state of mind you are focused and able to make informed decisions.

WARMING UP
Before you start it is good to gently warm up all the joints and muscles – like you are politely asking them permission to move. Warmed up muscles will be more obliging and supple. Your muscles are like Blutac – if you spend a bit of time gently lengthening and contracting the fibres of the muscles they become more stretchy and smooth. If you pull Blutac without warming it up first it will rip in two!

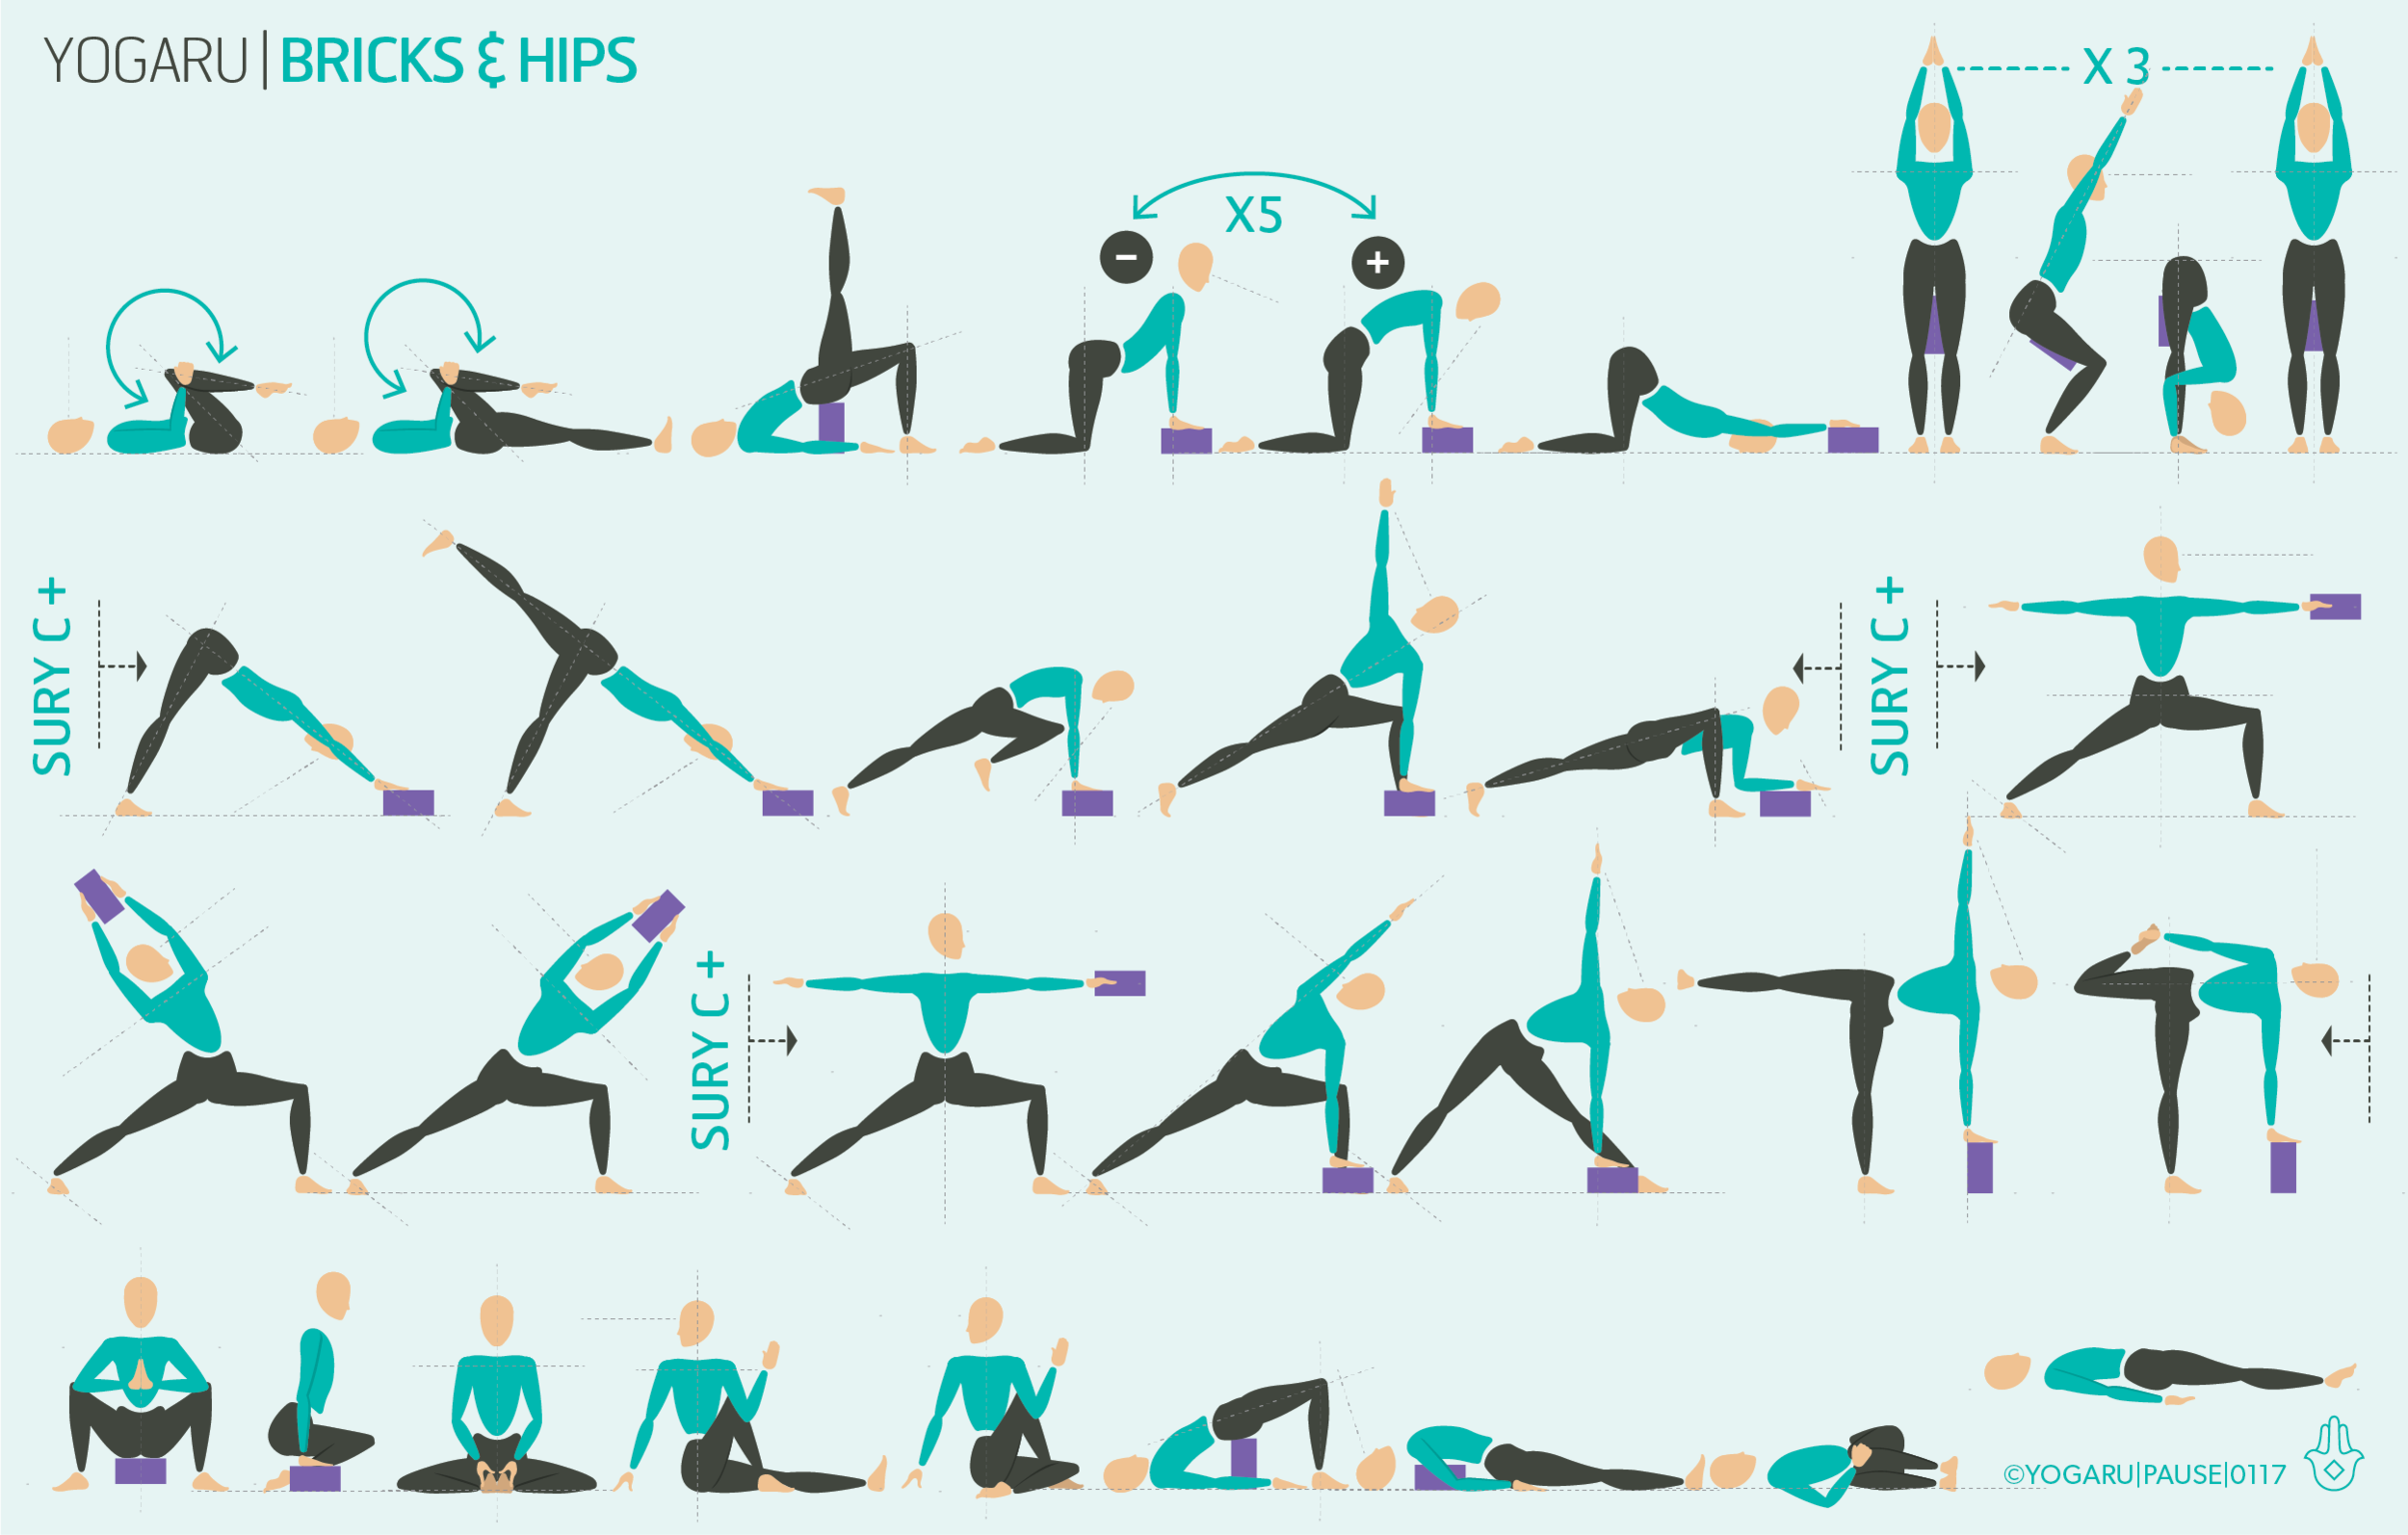
In the sequence there are two different ways you will warm up the muscles. The first, which you will be more familiar with, is through a series of gentle mobilising movements at the very start of the practice. The second way is with isometric contraction, or by actively pressing against a surface until you feel a warm sensation in the muscles. In the following poses after the initial warm up you will find three isometric poses – Tadasana/Mountain, Plankasana/Plank & Utkatasana/Chair. These poses will strengthen and warm up your muscles by using a pressing action into the ground. These three foundational poses are very strong poses when they are approached by actively pressing into the ground, hugging the muscles to your midline and drawing your navel towards your spine.

EXPLORING A GENTLE MORNING FLOW IN YOUR PRACTICE
There are two main aims, from a physical point of view, you want to achieve in your morning practice – mobility and stability (flexibility & strength). This sequence will gently mobilise all the joints and surrounding muscles first before progressing towards actively stabilising them.

You will also tap into the calming effect of yoga and embed it into our mindframe for the day ahead. You will do this by bringing your attention to the breath before you start which will give you an anchor to come back to when you get distracted with your ‘to do’ lists throughout your practice (which is completely natural and part of the practice!). Sit in a comfortable seated position with the hips raised on a brick or a cushion. Place one hand on your heart and one hand on your belly. Start by just noticing the breath before you change it in any way. Is it short, is it long, is it more in the chest or can you feel it in the belly too – notice without judgement. Close your eyes and visualise a box. You will use this box to gently guide a full breath using the count of four for each inhale, pause and exhale, pause. Starting at the left corner of your box, inhale for the count of four and travel across the top of the box, pause for the count of four and travel down the right side of the box, inhale across the bottom of the box, pause and travel up the left side of the box back to the start. Continue to draw the box with your breath for ten to twenty rounds or set a timer for 5 to 10 minutes. The more in tune you become with your breath, and learn how to tap into this simple technique, the more it will help you in your day to day life off the mat. Now you are ready to start the movement part of your practice.

ALIGNMENT CUES
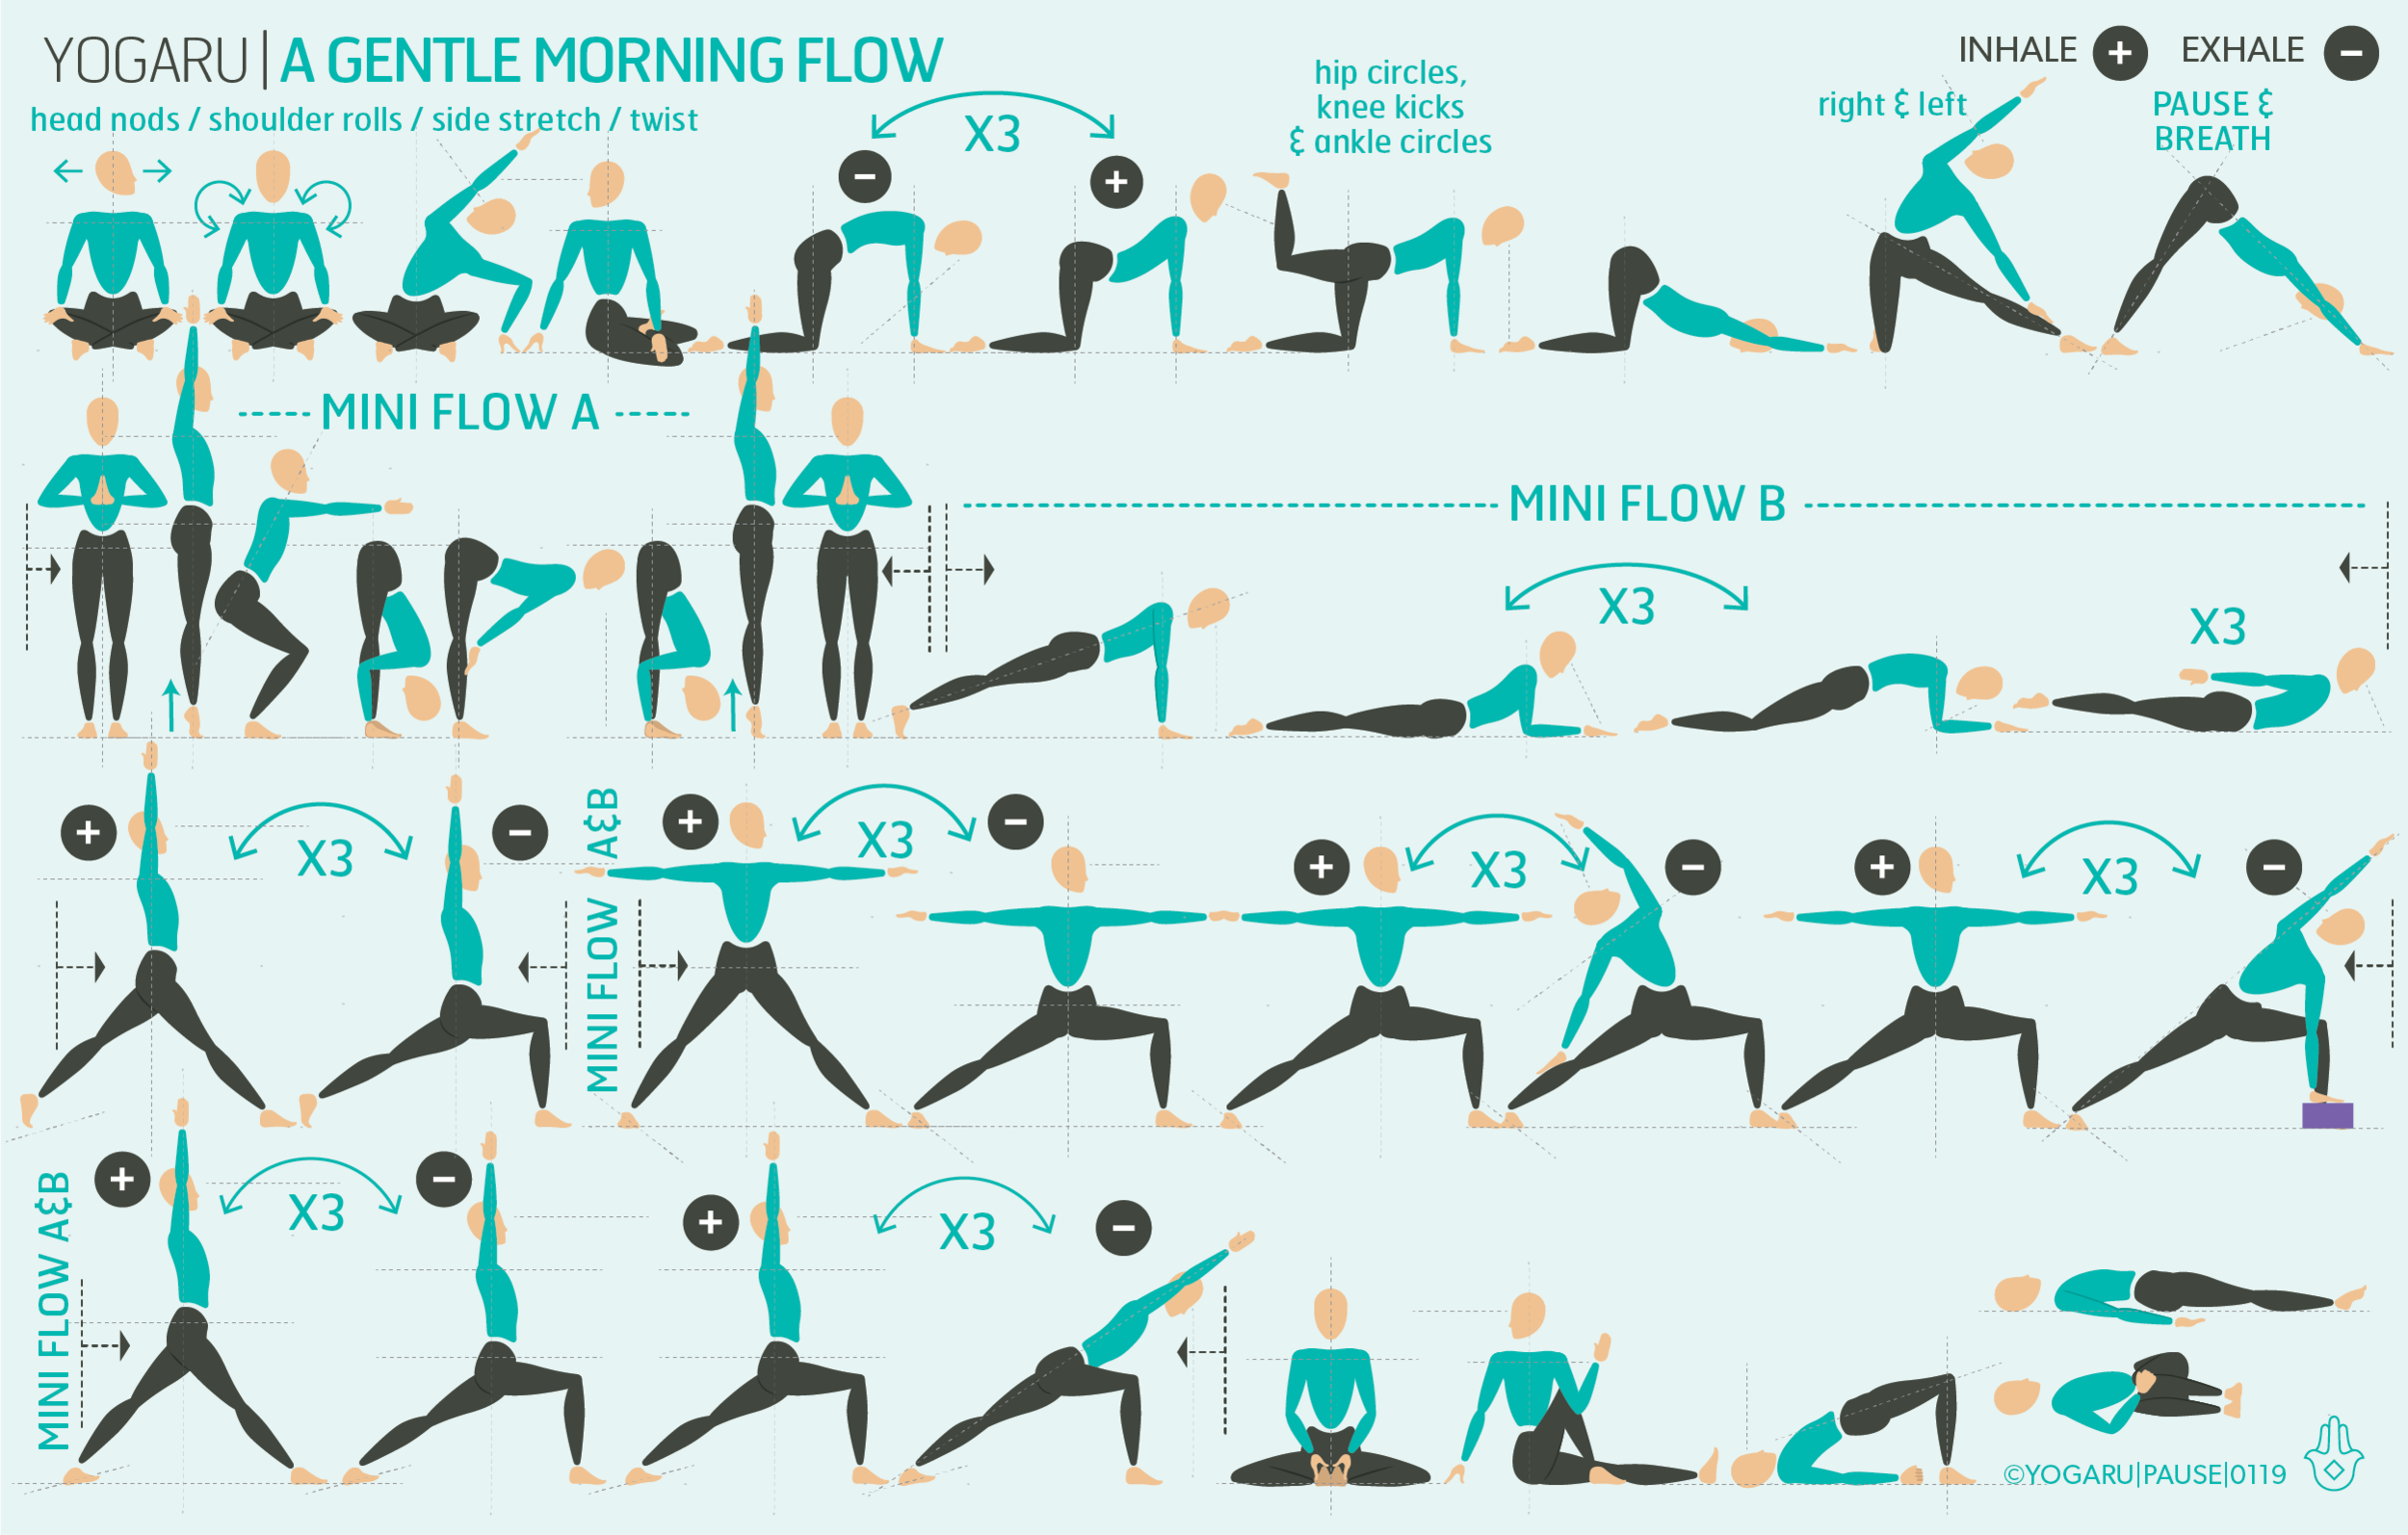
Moving slow and keeping it simple builds strength and stability in the joints and the surrounding muscles. In some of the mini flows in the sequence there are two poses linked together with a ‘x3’. You will move in and out of these two poses using the ‘+’ and ‘-’ breath cues and then settle into your version of the second pose. This fluid movement will help the muscles to hold the pose more comfortably and help you find which muscles are stretching and which you are strengthening in the pose.

Have a read of the tips below and either print out the sequence or save it onto your device:

  • In the first four warm up poses on row one sit up on a brick or a cushion to align and lengthen through the spine first.

  • After cat/cow, bring your knees together first for balance then starting on the right side lift your leg to hip height and bend your knee. Circle your knee for your hip circles, straighten and bend your knee for your knee kicks and keep the knee bent to do the ankle circles.

  • Before each mini flow, which are indicated between the arrowed lines, run through ‘mini flow a’ and ‘mini flow b’. Use downward dog to link your flows.

  • Incorporate at least 2 minutes for Savasana at the end of your practice to assimilate the practice and get yourself mentally ready for the day ahead.

To save the images for personal use click and hold down the image until the ‘save image’ option appears; on Mac hold down ‘control’ and click the image to get the option box; on PC right click on the image to get the option box. Scroll down in the ‘option box’ and click ‘save image’.

Ruth Delahunty Yogaru

Bricks & hips

PAUSE_0117.png

BRICK PARTY
Props are incredibly versatile and can offer support where you need it, facilitate deepening a pose and reinvigorate your home practice when used creatively. Anatomy comes into play when finding your personal optimum alignment. Some poses ask for a position that doesn’t suit your skeletal structure. For some students better alignment comes from using props regardless of flexibility or strength. Aisling Conn took us through the benefits of adding bricks, blocks and belts into your practice, with lots of different ways to use them and some sample poses to try out. Here we look at a full sequence using bricks. Bricks are the most adaptable of all the yoga props. They have three different height options – stacked, on their side and flat. They come on cork which are more sturdy and used mainly in Iyengar Yoga, or floam which are a slightly softer while still very supportive, and better for sitting on and propping the hips in poses like Setu Bandha Sarvangasana/Bridge and Restorative Yoga. Adding props gives your practice variety which is the basis of a sustainable practice. The more you surprise your body and don’t let it get too complacent in its movement, the more you can maintain your long term mobility.

HOW TO USE BRICKS
Bricks are currently my favourite prop to use in my home practice. I keep them beside my mat ready to grab and get creative with while I flow. There are lots of ways to add bricks to your practice. The most traditional use being in standing poses to press your hand into when your arm doesn’t reach the ground, giving you extra space to expand the chest and reach the top arm up. You can also use them to work the muscles of the arm in standing poses by raising one above your head and squeezing it between your hands. I have started to play around with placing them under my hands in Marjaryasana/Cat & Bitilasana/Cow. This helps to open the chest as you move from Marjaryasana/Cat to Bitilasana/Cow and deepen the breath. I also sometimes use them in Adho Mukha Svanasana/Downward Facing Dog to help me press the back of the heel down towards the ground and reach my sit bones up high.

EXPLORING BRICKS & HIPS IN YOUR PRACTICE
This sequence will give you lots of opportunities to try out the poses with bricks. Get creative and try a few different versions yourself too, to see what suits you and how you can find different versions of the poses. Use the bricks as suggested even in poses where you don’t usually use them and notice where in the body it might feel different.

For your Sun Salutation try placing a brick between your thighs and work on keeping it there without it falling out as you move. You might need to remove the brick as you step back and forward if jumping back and forward isn’t part of your practice. When using the brick in Adho Mukha Svanasana/Downward Facing Dog make sure to have the heel of your hand pressing over the edge of your bricks to make sure your hands don’t slip forward on the bricks. Play around with the three different heights of the blocks too and see what suits you.

ALIGNMENT CUES
The peak pose of this sequence is Ardha Chandra Chapasana/Half Moon Sugarcane using a brick to ensure you stay up a bit higher and have space to open the chest. If your arm doesn’t reach your foot just reach your arm towards the foot without holding it. You may not get quite as deep into your backbend but this version is very strengthening for the hamstrings and the hip joint.

  • Have a read of the tips below and either print out the sequence or save it onto your device:

  • From Ardha Chandrasana, bend your left knee, reach your left hand back to hold the outside of your left foot.

  • Press your hand into your foot and your foot into your hand. Reach your left knee up, broaden through the collarbones, press down through your right foot.

  • Arch through your whole spine, lengthen your neck and softly reach your head back, gaze down or up.

To save the images for personal use click and hold down the image until the ‘save image’ option appears; on Mac hold down ‘control’ and click the image to get the option box; on PC right click on the image to get the option box. Scroll down in the ‘option box’ and click ‘save image’.

Ruth Delahunty Yogaru

Moon salutation

PAUSE_0115.png

MEDITATIVE FLOW
The Moon Salutation, also known in Sanskrit as Chandra Namaskara, is a mini sequence of poses similar to the more commonly practised Sun Salutation (Surya Namaskara). The Sun Salutation was originally designed for a morning practice to create heat and energy and the Moon Salutation was created to practice in the evening as a cooling and calming end to the day. Both can be practised anytime of the day depending on what you are looking for from your practice. They both stretch and strengthen all the muscle groups, increase circulation, build a strong respiratory, aid the digestive system, boost the immune system, unwind a busy mind and release physical and mental tension. But if you are in need of a more invigorating energy boost head to the Sun Salutation and if you are feeling stressed and depleted look to the more soothing version of the Moon Salutation.

The Moon Salutation is a very symmetrical and balanced flow. You move through the first half of the sequence focusing on the right side of the body, come to a central symmetrical pose and flow back to the starting position focusing on the left side of the body, reversing the order of the poses as you go. The repetitive and meditative quality of the sequence of movements relaxes the mind and body, reducing stress and anxiety. Each pose is linked with an in-breath or an out-breath, helping you to connect to the breath and its many benefits.

EXPLORING MOON SALUTATION IN YOUR PRACTICE
The Moon Salutation can be practiced as part of your practice or repeated as your full practice with as many rounds as feel good to you. As you move through the poses use the transitions from pose to pose as an opportunity to thread the poses together and cultivate a flowing breath. Move with fluidity and length through your limbs to make the transitions as beneficial as the poses themselves.

You can also practice this sequence with my on YouTube.

Start standing in the centre of your mat facing the long side. Hands in prayer position at your hearts and take a few slow meditative breaths.

Step 1 - Inhale, reach your arms up high. Palms together arms reaching. Lengthen through the whole spine.

Step 2 - Exhale, hinged to the right, press into your left foot and feel the stretch through the whole left side of the body.

Step 3 - Inhale back to centre and lengthen.

Step 4 - Exhale, hinge to the left, press into your right foot and feel the stretch through the whole right side of the body

Step 5 - Inhale, back to centre.

Step 6 - Exhale, step your feet wide apart, feet turned out, bend your knees and lower your hips down, stack your knees over your ankles, thighs working towards being parallel to the ground. Tailbone reaches down, hip bones reach up. Arms in cactus position.

Step 7 - Inhale, straighten your right leg and pivot your right foot forward and your left foot to a 45 degree angle. Reach the arms out at shoulder height.

Step 8 - Exhale, hinge to your right from the hip joint. Place your hand on your shin or the ground inside/outside your right foot. Bottom waist rolls forward, top waist rolls back, reach your left arm up, palm facing left, gaze to your left fingertips.

Step 9 - Inhale, pivot your hips round to the front of your mat, hinge forward from the hip joint over your right leg, hips level, right hip draws back, left hip draws forward. Reach the chest forward, fold forward, release your head towards the front leg, keep the legs firm.

Step 10 - Exhale, bend the right leg and lift the left heel up, firm your back leg, hug your outer hips to the midline, press into your feet and scissors them towards each other. Broaden through your collarbones, lengthen through your spine to the tip of your crown, draw your sternum forward and up.

Step 11 - Inhale, place the left knee on the ground, hug your outer hips to the midline, reach your arm up high palms pressing together. Draw your navel towards your spine, broaden through the collarbones, lengthen through your spine to the tip of your crown.

Step 12 - Exhale, place both hands on the ground inside your right leg and pivot your hips around to the side of your mat. Press into both feet, keep your right knee over your right ankle. Squeeze into the back of the hips to open your inner groin.

Step 13 - Inhale, bend both knees and sit your hips down into a deep squat. Press your elbows against your thighs, hug your outer hips to the midline, let your pelvis become heavy down towards the back of your heels. Lift your inner arches and inner ankles. Broaden through the collarbones, lengthen through your spine to the tip of your crown.

On your next exhale pivot around to the back of the mat with your hands on the ground inside your left leg for wide legged low lunge on the left side. Move through the steps on the left side in reverse from Step 12 to Step 1 until you reach Tadasana.

To save the images for personal use click and hold down the image until the ‘save image’ option appears; on Mac hold down ‘control’ and click the image to get the option box; on PC right click on the image to get the option box. Scroll down in the ‘option box’ and click ‘save image’.

Ruth Delahunty Yogaru