Practise with distractions

THE PRACTICE OF PATIENCE
Summertime can offer some challenges to your yoga practice. Trying to find a quiet space to roll out your mat on summer holidays without too many onlookers; the draw of the sunshine in the longer evenings or, like myself, having a gang of little ones on school summer holidays that seem to rise with the birds!

In an ideal world we’d all have our own little yoga studio where we could immerse ourselves in daily practice, with a ‘do not disturb’ sign on the door. A very tempting thought! I’ve often looked at my modest garden and wondered if I could fit in a trendy German Huf Haus. But unfortunately most of us have to find a quiet space in a busy house with a lot of traffic from early morning.

After the initial period of panic and uncertainty, I realised the practice of yoga for my summer was going to mean the practice of letting go of expectations and accepting the distractions when you do manage to get on the mat. My summer routine always starts with a walk or run at around 6:30am, to clear the head of chatter and list-making before finding my way onto my mat, which I roll out before heading out so I can slip back into the house and onto it with as little noise as possible. Inevitably the household is in full swing, with rumbling tummies and list of requests, before I’ve managed to find my way into Savasana. Depending on the moods and hunger levels, I can sometimes finish my sequence with three little onlookers, who even join in for a quick Savasana at the end. They’re beginning to recognise that when they give me a few minutes to find my balance, I’m more chilled out and it’s a win, win situation!

ME TIME
While it is recommended to practise in a quiet, clean and uncluttered sacred space, sometimes this just isn’t possible. So think of your summer yoga as the ultimate challenge of being creative with where you practise, cultivating inner focus and lots of patience! Whether it’s for 5 minutes or an hour, such are the benefits of yoga that it’s worth practising with acceptance of all the distractions that life throws at you.

Ruth Delahunty Yogaru

Yoga like a tortoise

UNEXPECTED SLOW DOWNS
Life throws us little injuries every now and again to test our patience! When the initial annoyance of an injury subsides there is huge scope for learning. An injury teaches you to examine your approach to your yoga practice, your day to day exercise routine and your approach to life in general.

I’m currently working on rehabilitating an instability in my piriformis (deep hip muscle). I’ve learnt from experience that the sooner I tackle the problem, with self awareness or a trip to the physio, the faster I recover. I lead an active life and am inclined to overstretch myself, both mentally and physically. My yoga practice teaches me to listen to that inner voice telling me to slow down, pull back and acknowledge the warning signs.

NO SHOULDS
My practice changed hugely during and after teacher training. Where I might have expected it to get more intense and physical, I found I was learning to pull back from over pushing and to drop any perceived targets for how far I should stretch or what asana I should be able to do. I learnt that there are no ‘shoulds’ and that each practice is totally different.

My new challenge is to slow my practice down to the pace of a tortoise, making the transitions just as important as the asana itself. By moving in this way you can feel the actions of the muscles more intensely, making it easier to find where your edge is and, in the case of injury, listening to what the body needs and knowing when to stop or pull back. From a physical point of view, moving slowly is far more challenging. For example, moving with control by stepping your foot forward from Adho Mukha Svanasana/Downward Facing Dog in preparation for Virabhadrasana II/Warrior II is a stronger transition than swinging your foot forward and hoping it reaches the inside of your hand! In your next practice, try stepping forward as slowly as you possibly can. Notice how different it feels and observe the intense action in the abs, quads and glutes. See which version challenges you most, whilst at the same time feels more controlled and secure. It can be very helpful to set your phone up to video one of your transitions and see if there are any areas you need to be mindful of: a knee buckling out to the side; a shoulder dropping; or one hip dipping lower than the other.

Injuries can often be caused by habitual misalignments in transitions. Or, in fact, in our everyday lives: how you stand; how you sit cross-legged; how you sit on the couch (weakened piriformis, I speak from experience!). From a yoga point of view a transition misalignment, like a dropped shoulder in Chaturanga/Four Limb Staff can gradually cause an injury which, in my experience, is harder to shift than an overstretched muscle. By slowing down, we give ourselves a chance to observe and keep in touch with correct alignment and avoid repetition injuries.

Make your next practice all about transitions. Flow fluidly with grace and awareness, move as softly and lightly as possible. Feel your whole body thanking you for listening!

Ruth Delahunty Yogaru

Props are your best friend - belts

Aisling Conn, who teaches in The Yoga Room and My Yoga Body, has given us some expert tips and ideas of how to incorporate yoga bricks and yoga blocks into our yoga practice. This time she looks at ways belts can help us reach into some difficult asana, that would sometimes be beyond us, and help deepen our practice.

AISLING’S GUIDE TO YOGA BELTS
Yoga Belts are fantastic for extending the length of our arms in certain poses and for limiting movement in others.

Whereas it’s a good idea to avoid having an attachment to ‘perfecting’ any asana, there are lots of cases where using a belt and being able to connect to other parts of the body, will help to achieve greater structural alignment.

Belts are useful at any level of yoga. Here’s how I use them in my personal and teaching practices. On a physical level, Supta Padangusthasana A, B and C is a great way to stretch the hamstrings, calves and inner thighs. It can also help alleviate stiffness in the lower back and address imbalances or asymmetries in the pelvis.

Using a belt in this pose allows the hand to connect with the foot while the arms are straight, without the hamstrings over-stretching. Make sure to always keep the arms straight and creep them up the belt as the tight muscles stretch, instead of bending your elbows. This way the force assisting the stretch is kept constant, allow correct alignment to be maintained, and you’re more likely to avoid tensing the shoulders.

The wide-leg forward fold Prasarita Padottanasana C has the added chest-opening action of interlaced hands behind the back, which can be a source of dread for anyone  like me, who has tightness in the front of the shoulders.

A really helpful way to warm-up the shoulders for this pose is to practise it with a belt held between the hands. Being able to pull strongly on the belt (instead of using possibly slippery/sweaty interlaced fingers) it is easier to achieve the correct rotation of the upper arm bones in the shoulder sockets as you fold forward. This allows those tight areas of the chest and shoulders to stretch more efficiently.

If you are unable to interlace your hands behind your back using straight arms and rolling your shoulders back, a belt will be your best friend in this pose!

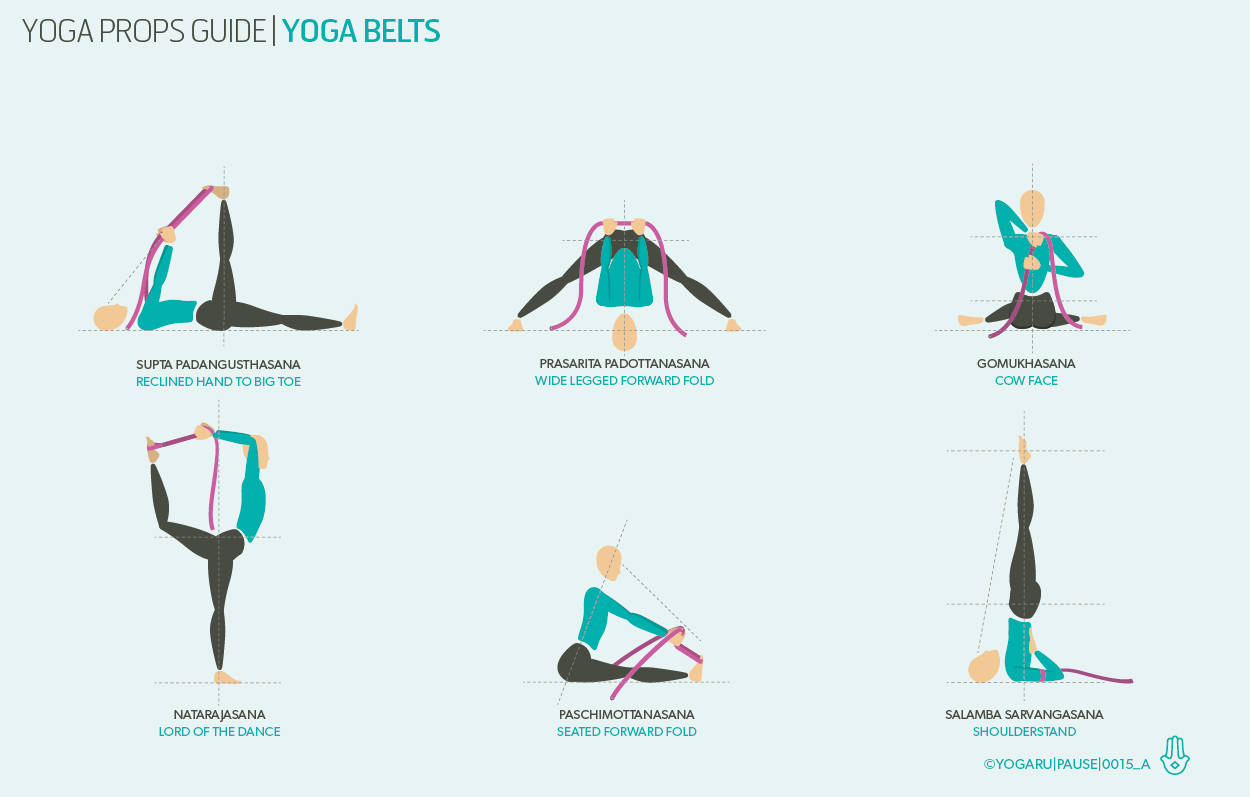
Gomukhasana (arms) is a really interesting asymmetrical pose for stretching the shoulders because it rotates the arms and stretches the corresponding muscles in two different ways. The top arm is externally rotated, raised and bent at the elbow (no mean feat!) and the lower arm is internally rotated, drawn back and bent at the elbow to, maybe, bind with the top arm.

A bind here is not always possible, generally due to restriction in any combination of parts of the shoulder’s range of motion. This is not necessarily a problem as it is still possible to feel a nice sense of the stretch by placing the palm of the top hand on the base of the neck and the back of the lower hand wherever it reaches on the back. However, in order to progress with the stretch, having a belt to bridge the gap and extend the reach of both arms is really useful and much safer in terms of keeping the correct alignment of the shoulders and arms.

Hold the belt with the top hand over the shoulder and reach for the end with the bottom hand, allowing the bottom arm to exert appropriate downward force, extending the overhead reach and range of motion of the top arm shoulder joint.

This is also really great preparation to come into the full variation of Natarajasana.

There’s a version of Natarajasana where one arm externally rotates and extends back to hold the same side foot from the inner side. Students can then tilt forward from the standing leg hip and use the connection of the hand and foot to stretch the chest, shoulder and hip flexors. When you are comfortable with this variation of the standing balance, and are ready to deepen the pose, using a belt can help to get you there.

It’s best to buckle your belt making a loop to slip over your foot, then take the free end in the same side hand and extend overhead adding the other arm when you are steady (it’s helpful to let the standing leg rest against a wall if you feel at all unsteady). Once both hands are holding the belt overhead you can work your alignment instructions and creep hand over hand closer to the foot.

You will certainly feel the benefit of this deep shoulder, heart and hip-flexor opening pose without compromising on safety.

The symmetrical, seated forward fold Paschimottanasana is a fantastic stretch for the whole back of the body. However, for a simple pose it can have some pitfalls for a new, or very stiff, student.

Often we get so caught up in getting the hands to the feet and the forward-folding element of the pose, without paying attention to the delicious stretch for the whole spine and back of the legs that is possible when performed with care.

Use a belt here to connect the hands to the feet whilst keeping the shoulders relaxed, so that you can encourage your pelvis to tilt forward to its full range of motion. Then, each vertebra of the spine bends sequentially forward from that anteriorly tilted pelvic position (forward tilt), making your Paschimottanasana the perfect stretch for legs and spine. regardless of how close your face is to your shins!

As with Supta Padangusthasana above, instead of bending the elbows as you come forward, walk your hands along the belt, keeping your shoulders relaxed, and you’ll achieve a better sense of the pose rather than grabbing straight for the toes and pulling the body forward, which just tends to aggravate the lower back.

For years in yoga class, when it came to practising Salamba Sarvangasana the teacher would invariably adjust my elbows closer together to give me a better lift in my thoracic spine and a better foundation for the inversion. A great way of giving yourself this adjustment is to loop a buckled belt just above your elbows so that the elbows are no more than shoulder width apart.

Hang the correctly sized loop around just one arm and come into Halasana, Plough Pose. Then manoeuver the second arm into the loop, externally rotate your arm bones, bend your elbows, place your hands on your upper back and lift you legs into Salamba Sarvangasana.

Make sure not to let your arms press out into the belt but rather draw the arms inward away from the belt to decrease your dependency on it for the correct alignment over time.

Hope you find these interesting and can put them to use in your practice. Keep an eye out for our next prop guide - blankets!


AISLING CONN
Aisling teaches yoga on Tuesdays, 9.45am in The Yoga Room, Sundays, 10am & 11.30 in My Yoga Body, and pilates on Mondays & Wednesdays, 9.30am in My Yoga Body. She is also available for private and small group classes by arrangement. To contact Aisling email at aisling.conn@gmail.com or send a message on Facebook