Utkata Konasana - Goddess

FIND YOUR INNER GODDESS
Utkata Konasana/Goddess is one of my favourite poses. Quite a few of the hip opening poses are asymmetrical poses, where left and right sides of the body are doing different things. In Utkata Konasana/Goddess if you drew a line down your midline the right and left side are in mirroring each other in symmetry which allows you to check that both sides are balanced. I often use Utkata Konasana/Goddess as a transition pose to go from a Virabhadrasana II/Warrior II standing flow at the top of the mat with the right leg forward, to a Virabhadrasana II/Warrior II standing flow at the back of the mat with the left leg forward. It is a subtly strong pose with plenty of physical challenge, all your muscles that have been strengthened and stretched will be talking to you after you’ve held it for a few breaths! Similar to Malasana/Squat it gives you the opportunity to work on your pelvic floor strength and is very toning for the digestive system.

THE BENEFITS OF UTKATA KONASANA/GODDESS
Utkata Konasana/Goddess warms and energises the whole body, particularly the lower body. It strengthens the legs, glutes, calves, ankles and spine; and stretches the inner groin, inner legs and chest. After incorporating it into your practice you will feel a lovely freedom of movement in your hips. As a hip opener it releases emotional tension, relieves stress and tension, aids digestion and is very grounding and calming. This pose is particularly beneficial for pregnancy because it creates space in the pelvis and strengthens the pelvic floor.

EXPLORING UTKATA KONASANA/GODDESS IN YOUR PRACTICE
The sequence will prepare you for the peak pose. It brings you through the pose several times to let you get a sense of progress as the muscles gradually open up. The main alignment to watch out for is to make sure your knees are pointing the same direction as your feet and that your knees don’t collapse inwards. It can sometimes feel like a balancing act of lifting the hipbones up and opening the knees.

Once you settle your lower body into the pose the best way to stay the course is to try different arm arrangements. Both distracting you from the intensity of the pose and giving you the opportunity to work on your shoulder strength.

It can help to find your alignment of the pose using some support before your first Utkata Konasana/Giddess on your mat. Try the pose sitting on the corner of a chair and feel the strong hip opening without the intensity of the pose, or try it with your back up against a wall to get a sense of the upright position of the spine in the pose. Then come back to your mat with these blueprints and see how a freestanding version feels.

PAUSE_0116.png

ALIGNMENT CUES
This sequence will gradually open your inner groin and wake up the muscles of the outer hips and legs. These are some big emotional muscles so move slowly and when you get to the peak pose pause and savour all your hard work.

Have a read of the tips below and either print out the sequence or save it onto your device:

  • From Tadasana, hands on hips, step your left foot out into a wide stance to face the side of your mat, rotate your feet out at a 45 degree angle.

  • Inhale, lift your inner thighs and lengthen up through your spine. Exhale, bend your knees and lower your hips down, stack your knees over your ankles, thighs working towards being parallel to the ground. Tailbone reaches down, hipbones reach up.

  • Press your weight into your heels and the outer edges of feet.

  • Hands in prayer position at your heart, sternum presses into your hands and hands press into your sternum, gaze forward.

To save the images for personal use click and hold down the image until the ‘save image’ option appears; on Mac hold down ‘control’ and click the image to get the option box; on PC right click on the image to get the option box. Scroll down in the ‘option box’ and click ‘save image’.

Ruth Delahunty Yogaru

Moon salutation

PAUSE_0115.png

MEDITATIVE FLOW
The Moon Salutation, also known in Sanskrit as Chandra Namaskara, is a mini sequence of poses similar to the more commonly practised Sun Salutation (Surya Namaskara). The Sun Salutation was originally designed for a morning practice to create heat and energy and the Moon Salutation was created to practice in the evening as a cooling and calming end to the day. Both can be practised anytime of the day depending on what you are looking for from your practice. They both stretch and strengthen all the muscle groups, increase circulation, build a strong respiratory, aid the digestive system, boost the immune system, unwind a busy mind and release physical and mental tension. But if you are in need of a more invigorating energy boost head to the Sun Salutation and if you are feeling stressed and depleted look to the more soothing version of the Moon Salutation.

The Moon Salutation is a very symmetrical and balanced flow. You move through the first half of the sequence focusing on the right side of the body, come to a central symmetrical pose and flow back to the starting position focusing on the left side of the body, reversing the order of the poses as you go. The repetitive and meditative quality of the sequence of movements relaxes the mind and body, reducing stress and anxiety. Each pose is linked with an in-breath or an out-breath, helping you to connect to the breath and its many benefits.

EXPLORING MOON SALUTATION IN YOUR PRACTICE
The Moon Salutation can be practiced as part of your practice or repeated as your full practice with as many rounds as feel good to you. As you move through the poses use the transitions from pose to pose as an opportunity to thread the poses together and cultivate a flowing breath. Move with fluidity and length through your limbs to make the transitions as beneficial as the poses themselves.

You can also practice this sequence with my on YouTube.

Start standing in the centre of your mat facing the long side. Hands in prayer position at your hearts and take a few slow meditative breaths.

Step 1 - Inhale, reach your arms up high. Palms together arms reaching. Lengthen through the whole spine.

Step 2 - Exhale, hinged to the right, press into your left foot and feel the stretch through the whole left side of the body.

Step 3 - Inhale back to centre and lengthen.

Step 4 - Exhale, hinge to the left, press into your right foot and feel the stretch through the whole right side of the body

Step 5 - Inhale, back to centre.

Step 6 - Exhale, step your feet wide apart, feet turned out, bend your knees and lower your hips down, stack your knees over your ankles, thighs working towards being parallel to the ground. Tailbone reaches down, hip bones reach up. Arms in cactus position.

Step 7 - Inhale, straighten your right leg and pivot your right foot forward and your left foot to a 45 degree angle. Reach the arms out at shoulder height.

Step 8 - Exhale, hinge to your right from the hip joint. Place your hand on your shin or the ground inside/outside your right foot. Bottom waist rolls forward, top waist rolls back, reach your left arm up, palm facing left, gaze to your left fingertips.

Step 9 - Inhale, pivot your hips round to the front of your mat, hinge forward from the hip joint over your right leg, hips level, right hip draws back, left hip draws forward. Reach the chest forward, fold forward, release your head towards the front leg, keep the legs firm.

Step 10 - Exhale, bend the right leg and lift the left heel up, firm your back leg, hug your outer hips to the midline, press into your feet and scissors them towards each other. Broaden through your collarbones, lengthen through your spine to the tip of your crown, draw your sternum forward and up.

Step 11 - Inhale, place the left knee on the ground, hug your outer hips to the midline, reach your arm up high palms pressing together. Draw your navel towards your spine, broaden through the collarbones, lengthen through your spine to the tip of your crown.

Step 12 - Exhale, place both hands on the ground inside your right leg and pivot your hips around to the side of your mat. Press into both feet, keep your right knee over your right ankle. Squeeze into the back of the hips to open your inner groin.

Step 13 - Inhale, bend both knees and sit your hips down into a deep squat. Press your elbows against your thighs, hug your outer hips to the midline, let your pelvis become heavy down towards the back of your heels. Lift your inner arches and inner ankles. Broaden through the collarbones, lengthen through your spine to the tip of your crown.

On your next exhale pivot around to the back of the mat with your hands on the ground inside your left leg for wide legged low lunge on the left side. Move through the steps on the left side in reverse from Step 12 to Step 1 until you reach Tadasana.

To save the images for personal use click and hold down the image until the ‘save image’ option appears; on Mac hold down ‘control’ and click the image to get the option box; on PC right click on the image to get the option box. Scroll down in the ‘option box’ and click ‘save image’.

Ruth Delahunty Yogaru

Restorative with home props

PAUSE_0114.png

This sequence is also available on YouTube

THE BENEFITS OF RESTORATIVE YOGA
Restorative yoga is the king of all yoga in terms of physical and mental wellbeing. It is particularly beneficial if you are feeling tired, stressed, anxious or have recently been ill. One of the main benefits of restorative yoga is that it triggers the rest, restore & digest nervous system response or the parasympathetic nervous system, through the cerebral cortex and the vagus nerve. This creates optimal conditions for the functionality of the organs of the body which supports the immune system, relieves symptoms of stress, anxiety and tension, rebalances hormones, releases muscle tension and aids the healing process.

The process of restorative yoga ‘takes a body that is feeling fragmented and puts it back together again in the kindest way possible’. In restorative we are consciously asking our muscles to release into the pose and gradually they submit. Even in sleep our muscles can be quite active, especially when we are dreaming. Restorative gives the whole body a chance to completely let go of held tension.

PROPS SWAPS
This sequence is for everybody, all you need is a yoga mat and some household prop swaps. Props bring restorative to another level. But you don't have to have a huge array of official yoga props to get started. You can improvise with household items that can do just as good a job. For this sequence I’ve used all household items as prop swaps as listed below:

Bolster - one large thick blanket & two bath size towels. Fold the blanket in four and place the two towels folded in half over the blanket. Roll them up and tie to secure with about four ribbon, strings or elastics.

Book bricks - two thick dictionaries or thick reading books per brick. Stack your two books and tie with string or elastic vertically and horizontally. Make two ‘book bricks’.

Tins prop - two tins & two thick socks. Place a tin in each sock, if the sock is long enough twist the top and fold it back down over the tin to seal it in.

Blankets - most blankets will do as a substitute for yoga blankets. Wool or thick cotton blankets are a better support than soft fleece blankets. Fleece blankets are good for keeping you warm and for a softer support.

EXPLORING THE SEQUENCE
Restorative is an accumulative practice. You might find it takes you a few poses to settle into the practice. The more restorative you practice the easier it will become to start the resting process. This sequence can be repeated as often as you like. You can practice it yourself or you can also practice this sequence with me on YouTube.

The body will cool down quickly so layer up and stay warm. Unlike regular yoga this is a socks on, stay cosy, practice! The poses and props are created to give you complete support. If possible have extra blankets and cushions beside you to add in if you need them. You will be holding the poses for between 3 minutes so scan down from head to toe and ensure every part of your body is happy. If after a few minutes you start to feel discomfort move to find comfort again. You are the boss of your practice!

If you are practicing this yourself you can use your phone to time when you need to move to the next pose, or you can use your instinct if you don’t like the idea of being disturbed with a sound. If you are using the YouTube video I will guide you in and out of the poses and do the timekeeping for you.
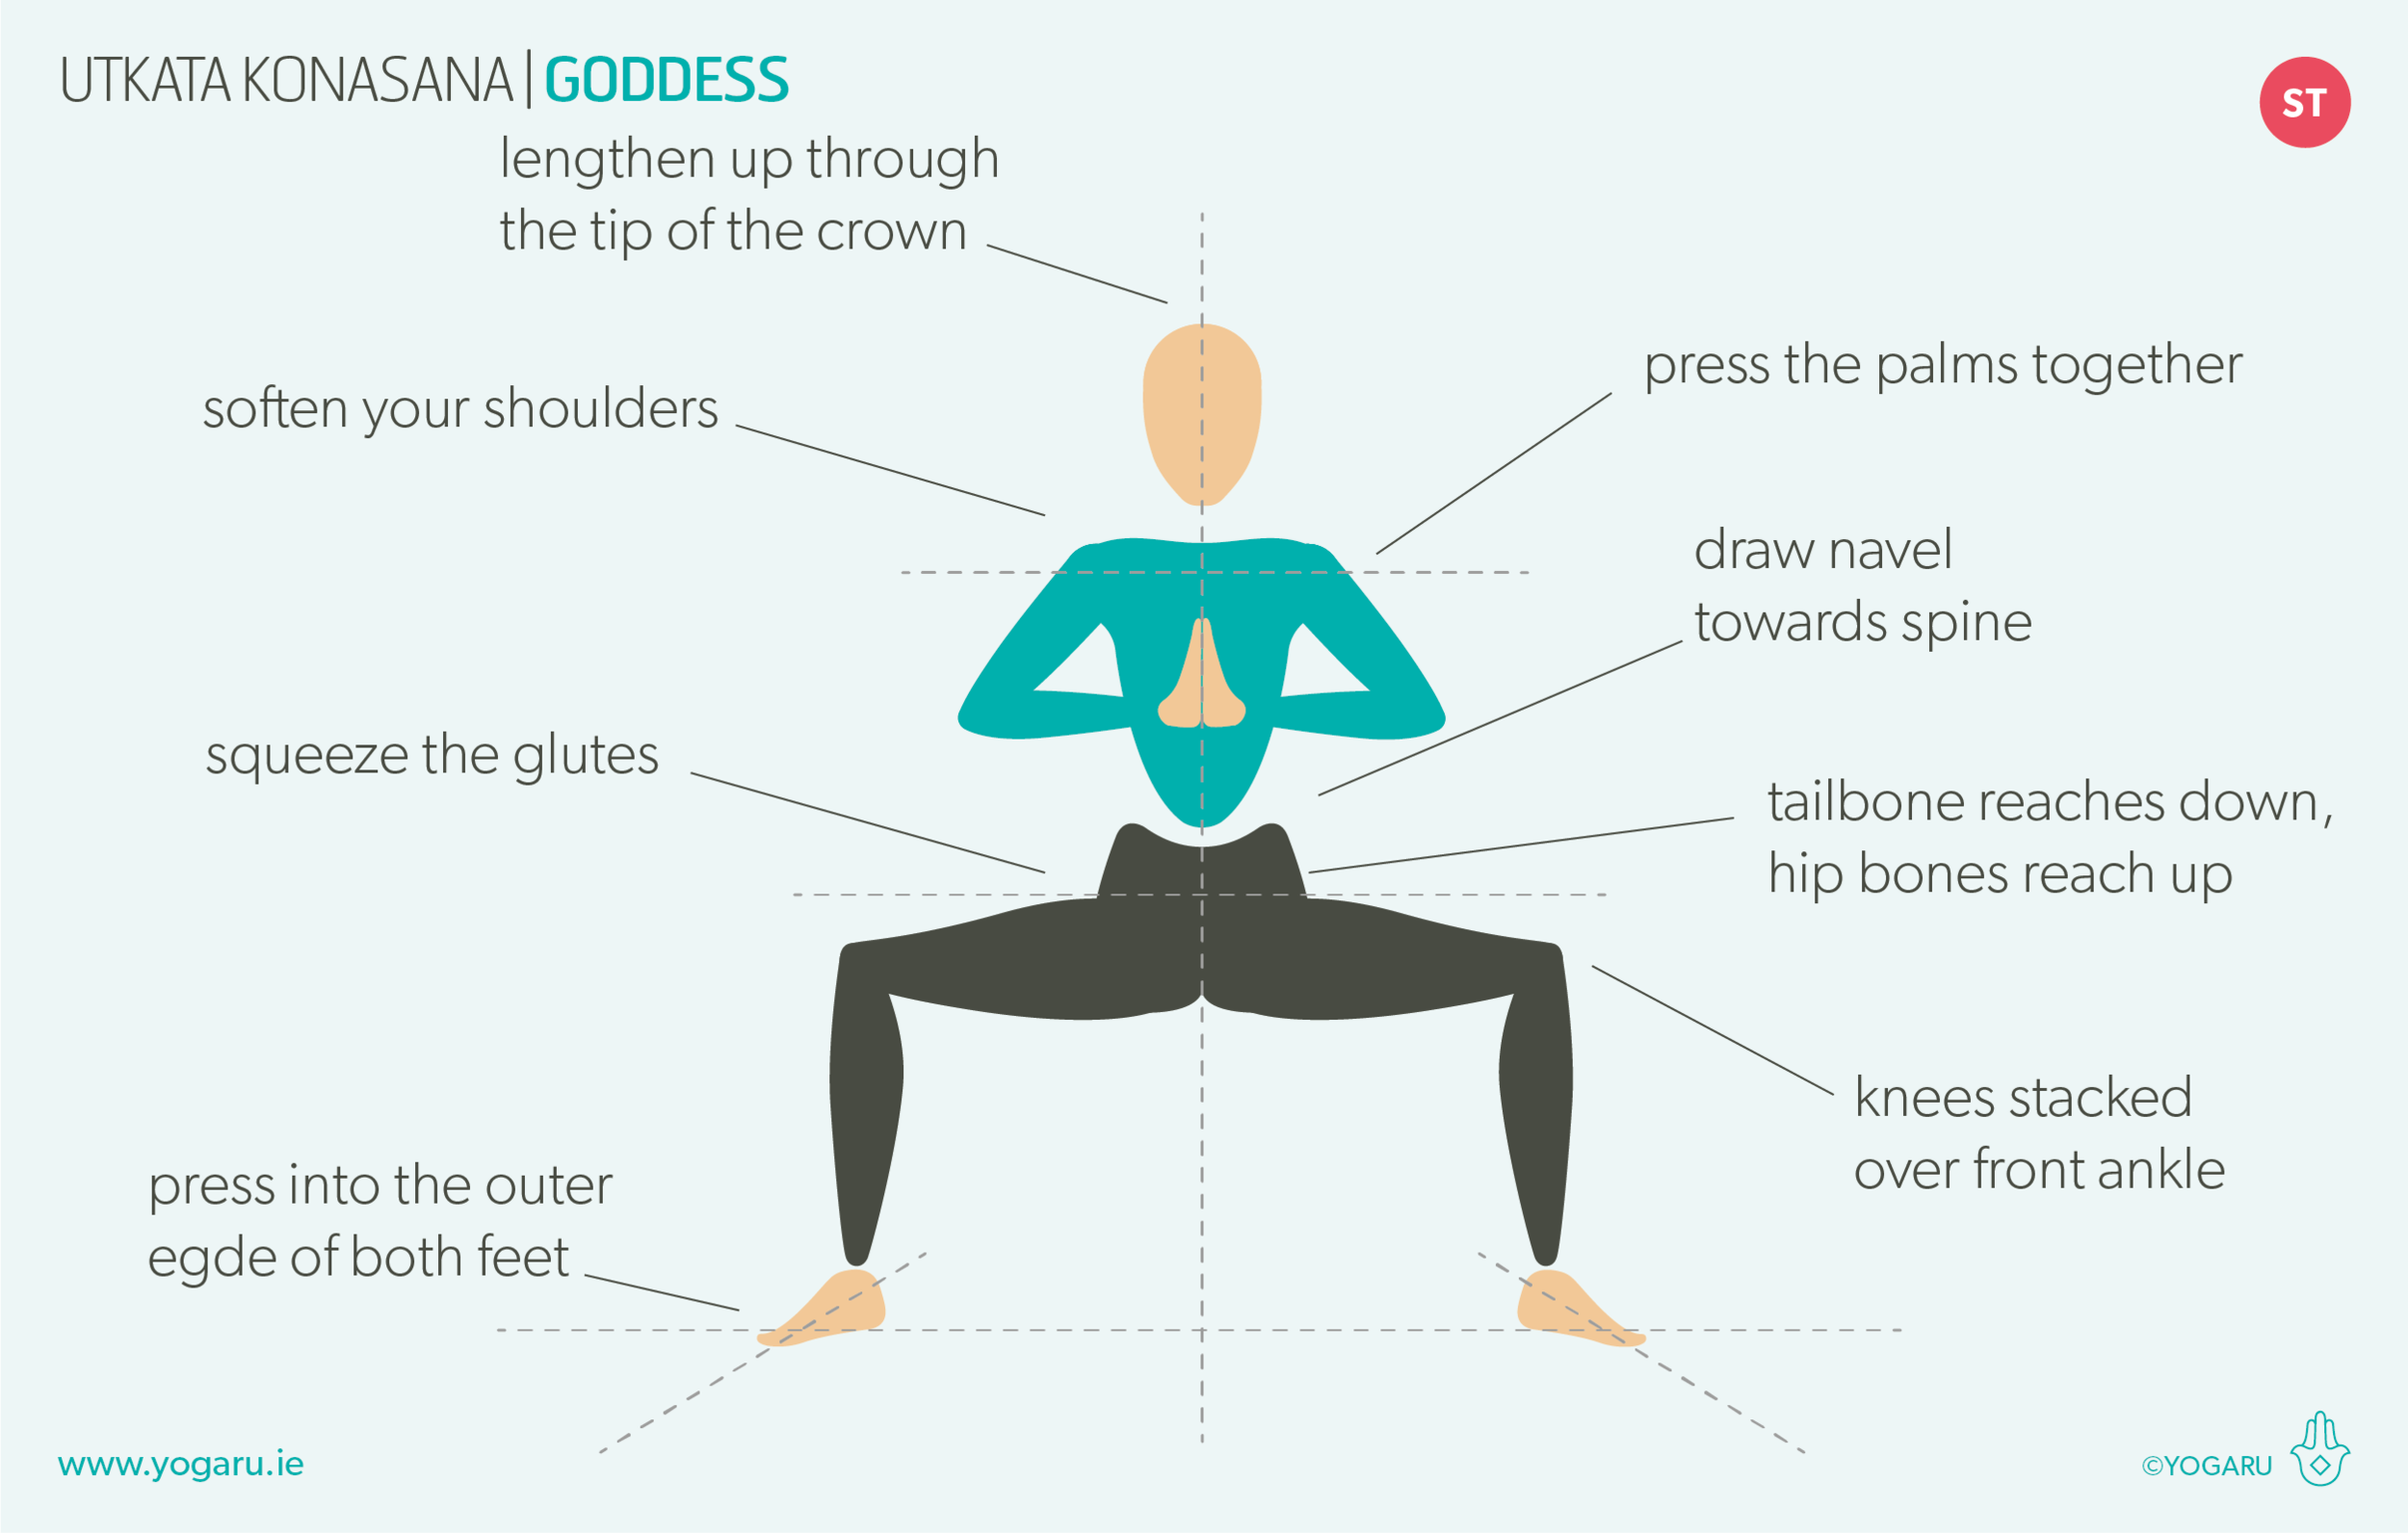
ALIGNMENT CUES
Below are the restorative techniques used in this sequence. The props you’ll need are:
1 x bolster - or 2 towels, wrapped around a horizontally rolled pillow and tied to secure.
2 x yoga bricks - or 2 two thick similar sized dictionaries.
2 x yoga blankets - or any wool, thick cotton or fleece blanket with density.

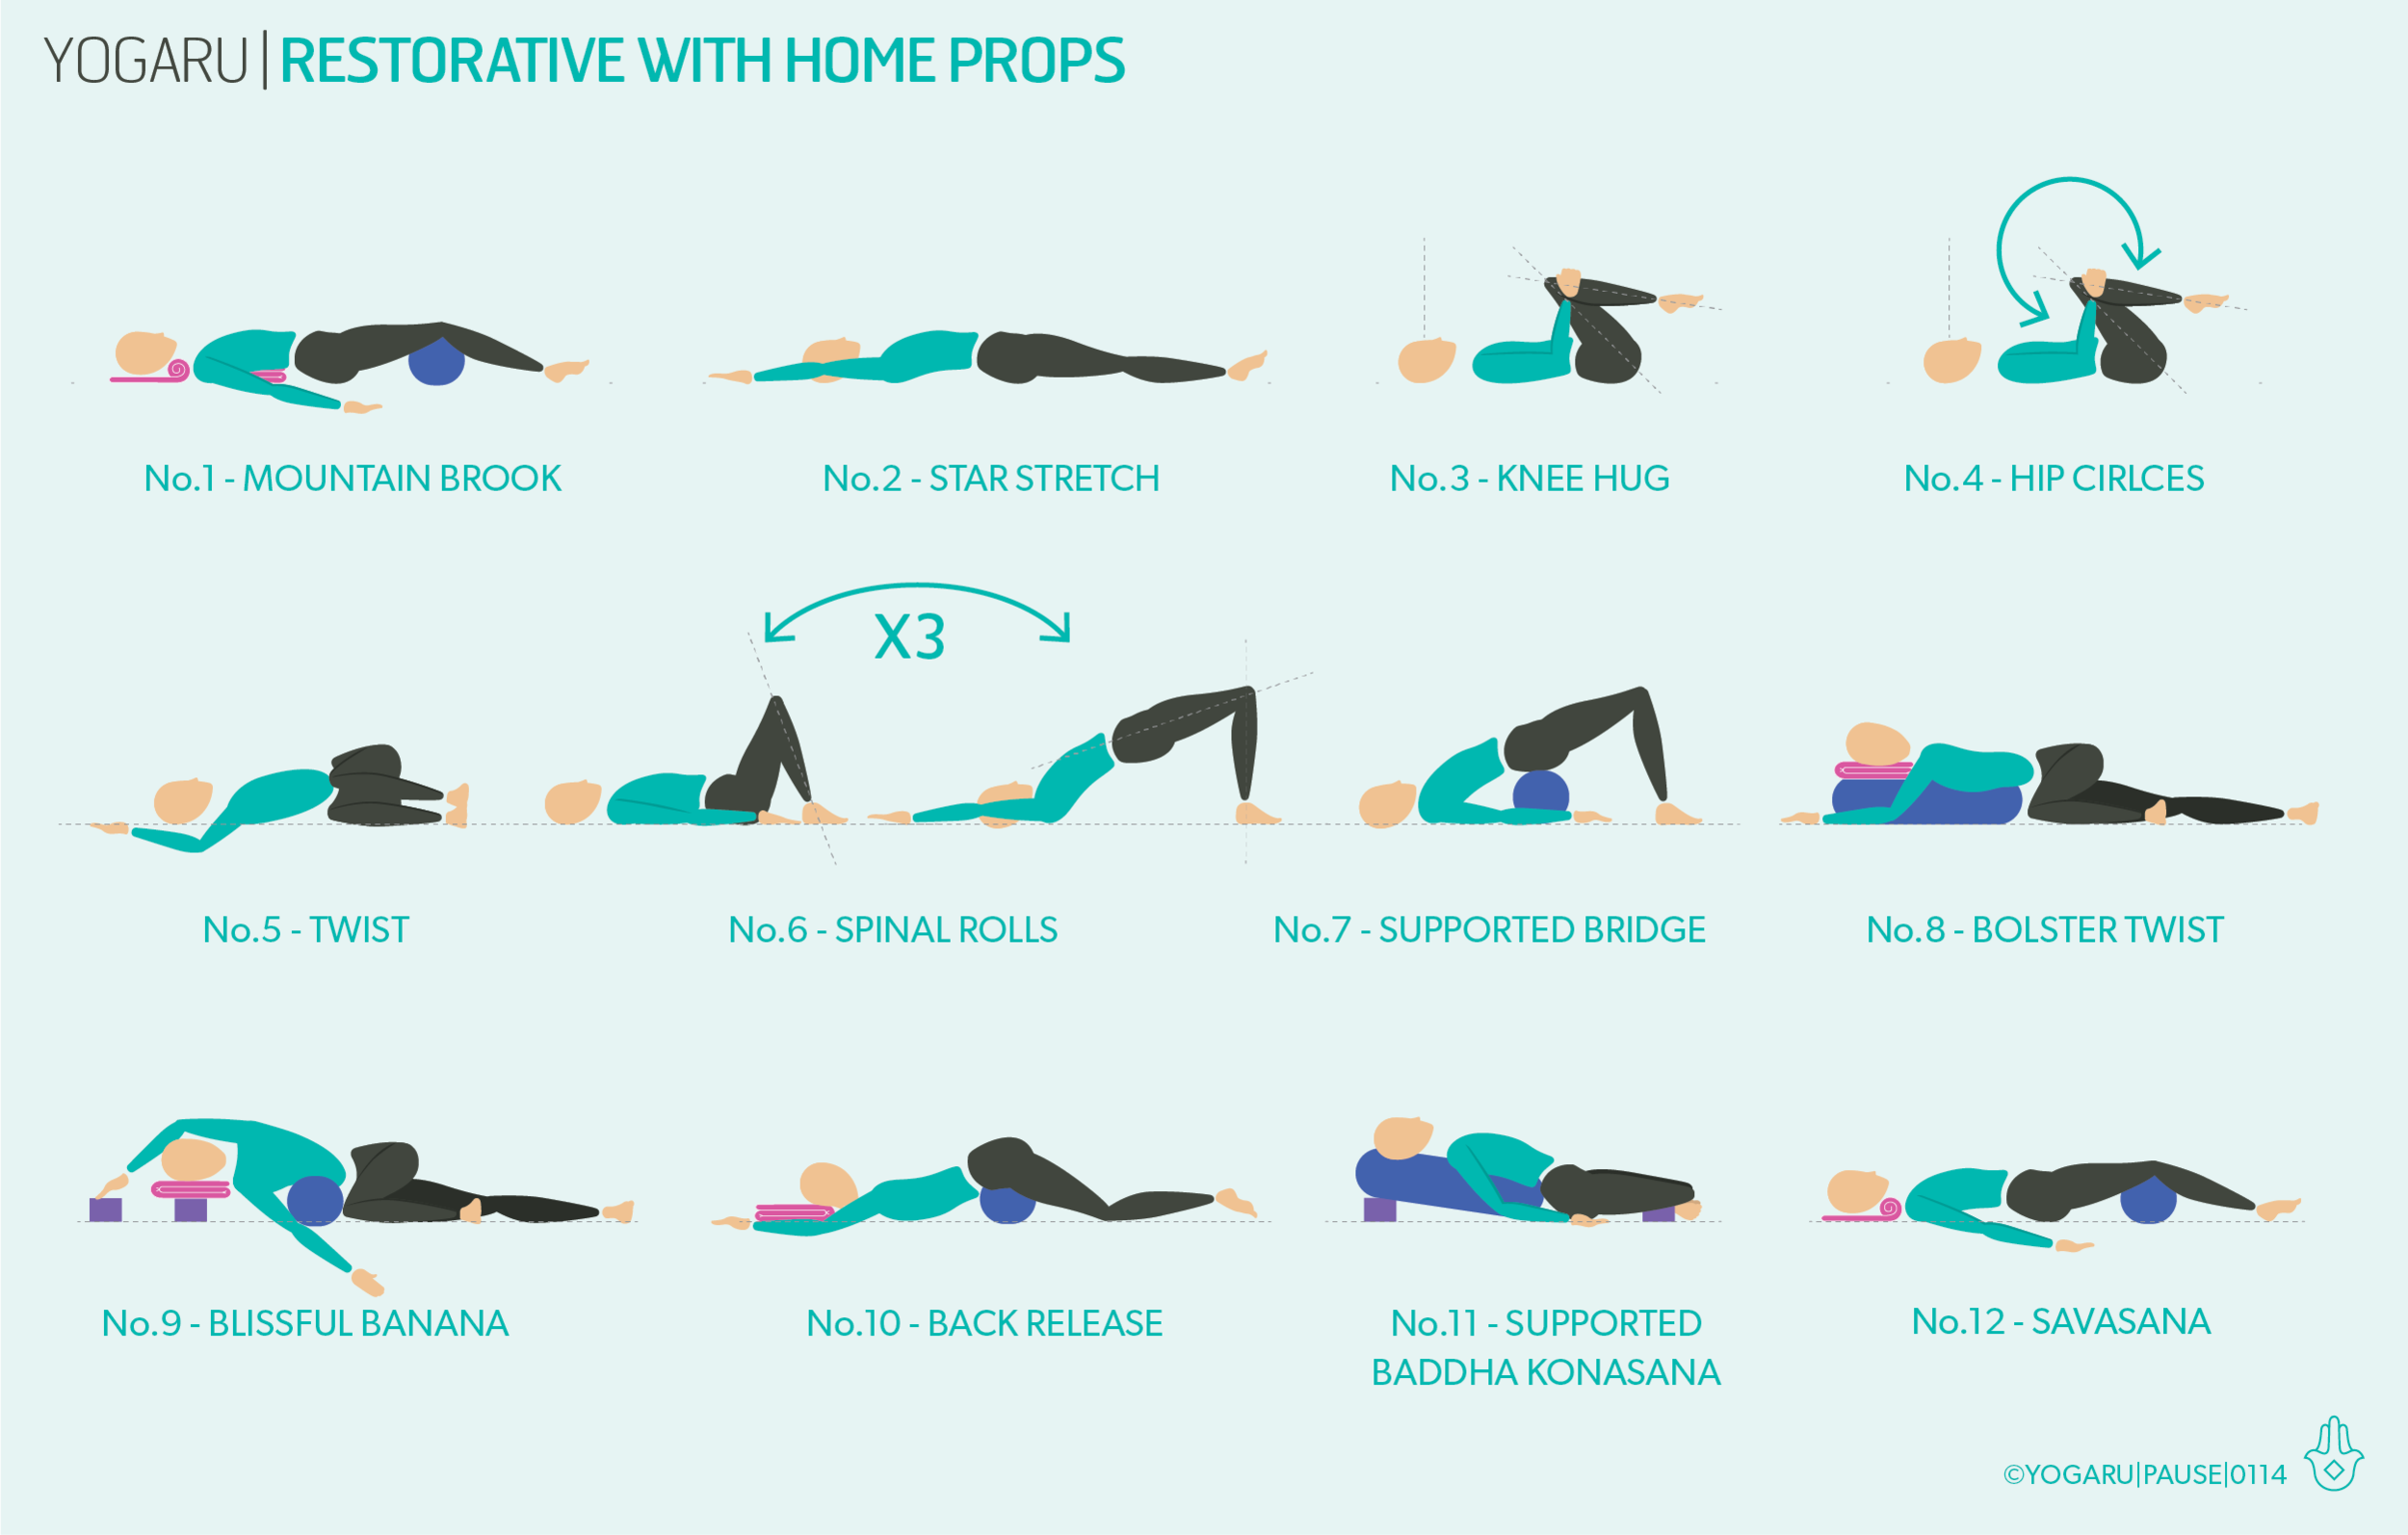
No.1 - Mountain brook
Start lying on your back with a half rolled blanket under your head, nestling the rolled part in the curve of your neck. Place a rolled up blanket under the lower tips of your shoulder blades and a bolster under the creases of your knees. If you have an additional blanket place it on top of you for warmth and for comfort. Legs and arms extended, palms facing up. Feet gently flop out to the sides. Shoulders melt to the floor. Eyeballs become heavy in their sockets, skin on the forehead smooth as silk. Soften the temples and find ease in the tiny lines around the eyes.

No.2-6 - Gentle warm ups
After Mountain Brook, take a series of stretches for the spine. Stretch your arms and legs out in a star shape then hug your knees into your chest. From your knee hug, cup a hand on each knee, take the knees wide with the toes touching. Circle both knees and gently roll around on your lower back, take three to 3-5 circles in both directions. Place your feet back down and gently let your knees drop to the left side of your mat. Extend your right knee away from you. Bring your arms to cactus position, with arms lifted and elbows bent either side of the body. Come back to center and repeat by dropping the knees to the right. Come back to lying with knees bent and arms by the side, take an exhale here, then inhale and lift your hips up and your arms overhead, exhale bring the hips back down and the arms back beside you. Repeat for 3-5 rounds moving with the breath.

No.7 - Supported bridge
From lying, lift your hips up and place the bolster horizontally under your hips. If your homemade bolster is too low add your two book bricks under the bolster. Settle your hips down onto the support of the bolster. Knees bent, feet hip distance apart or feet mat distance and knees together. Arms in cactus position or extended either side of your body, palms facing up.

No.8 - Bolster twist
Place your bolster vertically along the top centre of your mat with a folded blanket at the top. Sit with your right hip up against the end of the bolster. Place your hands on the mat either side of the bolster and with an inhale lengthen through the whole spine and on your exhale gently place your front spine along the length of the bolster. Place your right cheek on the folded blanket and let your arms gently hang either side of the bolster. Repeat on the left side.

No.9 - Blissful banana
Make a pillow with a book brick and a blanket on top of it at the top of the mat, place a tin prop above this at arms reach. Place your bolster horizontally on your mat with a space between your bolster and pillow. Sit with your right hip next to the long edge of the bolster, knees bent. Lengthen your right side along the mat and nestle the bolster into the curve of your waist. Place your head on your pillow, your shoulder in the space between your bolster and pillow and extend your right arm forward. Extend your left arm overhead and place hold onto the tin prop. If the raised arm doesn't suit you, bring your arm down and place it at your right arm. Repeat on the left side.

No.10 - Back release
Place the bolster horizontally along the centre of your mat with a rolled up blanket at the top of your mat. Come onto your front and lie with your belly on the bolster. Bring the arms to cactus position and place your forehead on the rolled up blanket. If this is uncomfortable on your neck you can flatten the blanket and lie on your cheek remembering to swap sides after a few minutes to even out your neck stretch.

No.11 - Supported Buddha konasana
Place your bolster vertically along the top of your mat with a rolled up blanket under the top. Make a head pillow with your second blanket to the top of your bolster. Have ready your book bricks and tin either side of you. Sit with the back of your hips up against the bolster. Bring the soles of your feet together and let your knees drop out to the sides. Prop your knees up with one book brick and tin each side. Gently lie back onto your bolster and place your head on the pillow at the top.

No.12 - Savasana
End your practice with at least 10 minutes of Resting Savasana. Lie on your back, legs stretched out, arms slightly away from your body, palms facing up. Legs slightly apart and feet fall out to the side, soften your shoulder, back of the neck long. Gently close your eyes, let the body become heavy and melt into the support of the ground. Soften the muscles across your forehead, releasing all tension, gaze inwards. Let all the muscles and bones of your body release. Bring your attention to the breath again, as you inhale think ‘this is me now’, and on your exhale tell yourself ‘this is the same me in the outside world’.

To save the images for personal use click and hold down the image until the ‘save image’ option appears; on Mac hold down ‘control’ and click the image to get the option box; on PC right click on the image to get the option box. Scroll down in the ‘option box’ and click ‘save image’.

Ruth Delahunty Yogaru