Sequences

Immune system boost

YOGA & THE IMMUNE SYSTEM
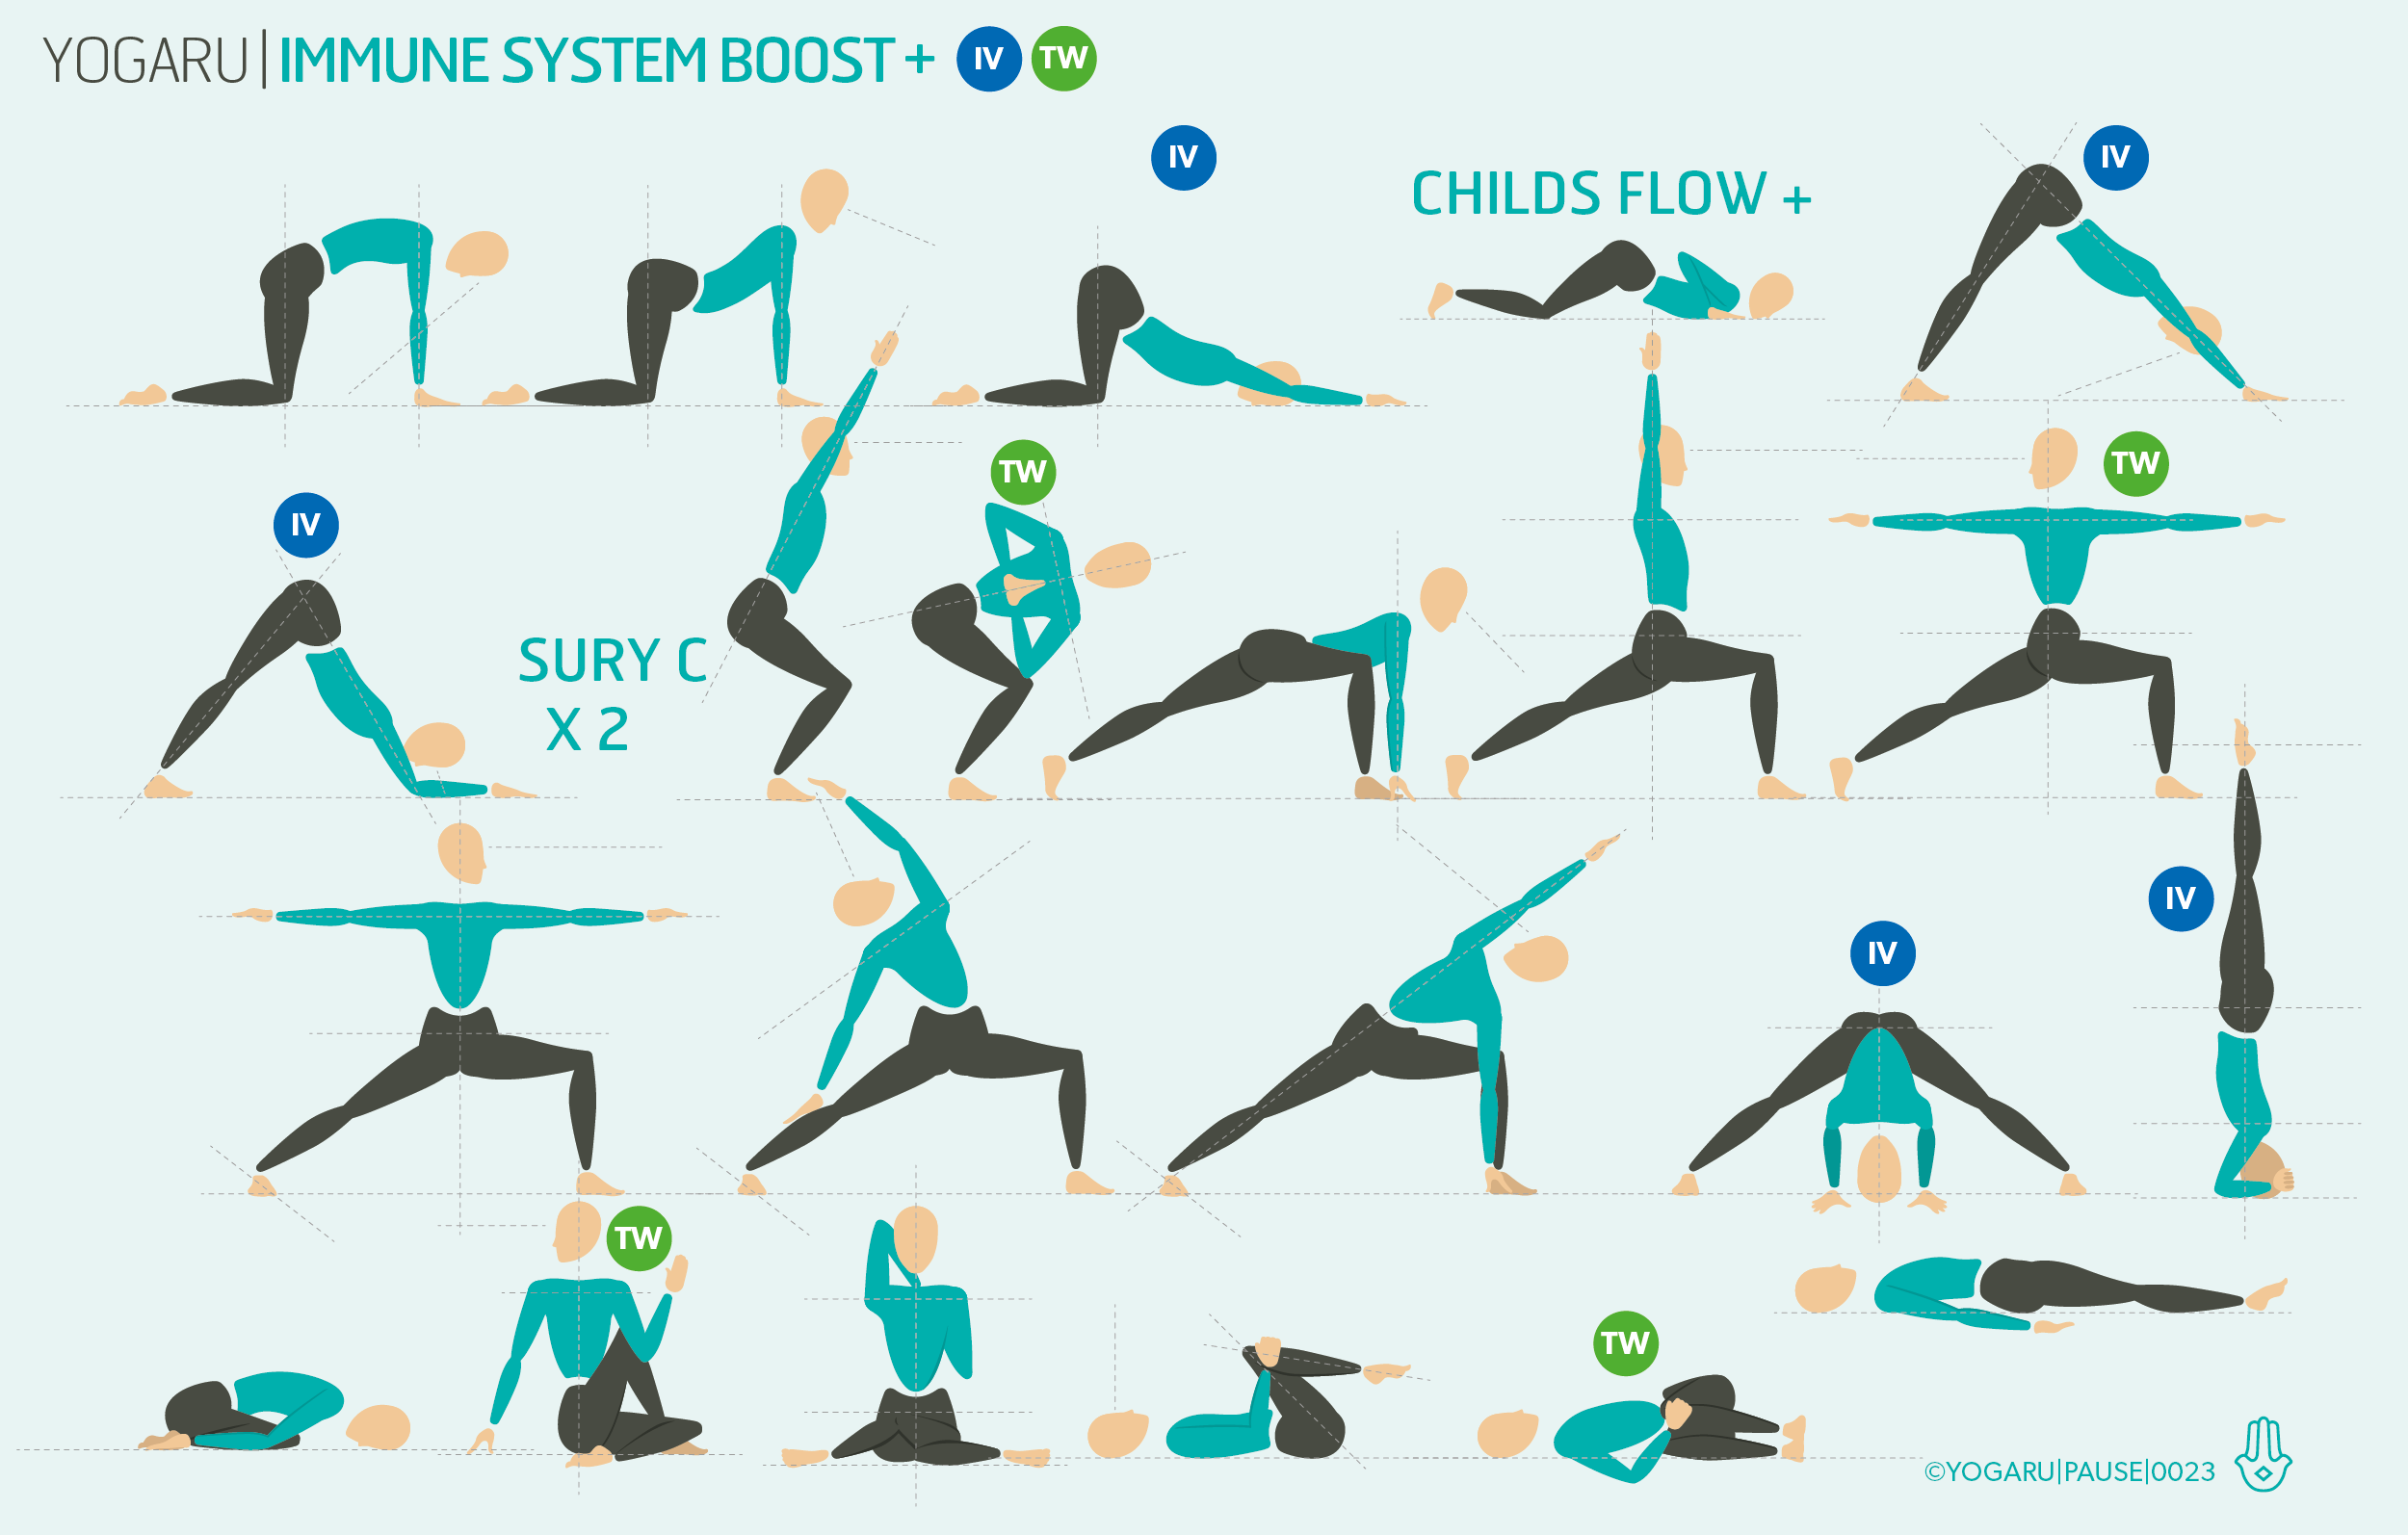
You might notice, at this time of year, a natural urge to move towards certain asana in your home practice, and these same asana cropping up in sequences your yoga teacher guides you through in class. This is no coincidence! Our bodies are more intelligent than we give them credit for. Nature is in tune with the seasons, and sometimes we forget we are part of nature. When winter moves us into darkness and colder weather it is time to explore grounding (forward bends & seated) and warming asana (twists & inversions).

Late nights, Christmas parties, foods you may not usually indulge in and the mayhem of Christmas prep – all put a strain on our immune system. Yoga stimulates four systems which boost our immunity – circulation, digestion, nervous & endocrine. Twists and inversions tick all four of these boxes. The practice also brings our attention to the breath – expanding and slowing our breath down soothes the nervous system and helps our lungs fight off respiratory infections over the winter months.

TWISTS
Twists massage and bring fresh blood flow to all the internal organs – stimulating the digestive system for maximum nutrient absorption; the liver and kidneys to remove toxins; and the lymph system which supports white blood cell production. It also stokes your internal prana (life energy) generator and helps you stay warm from within over the colder periods from within. Click this link to get a full list of twists.

INVERSION
Inversions can evoke different responses. For many of us turning the world upside down can be a bit daunting and make us feel quite vulnerable. But you don’t have to spend your day Instagramming yourself in handstand to take an inversion! Inversions are any asana where the heart is above the head – standing forward bends, Adho Mukha Svanasana/Downward Facing Dog, Setu Bandha Sarvangasana/Bridge and of course the lovely restorative Viparita Kiranai/Legs up the wall. Inversions get the blood flowing through your whole body – stimulating the digestive, nervous & endocrine systems. They also relieve stress and help with infertility, insomnia and sinusitis. Some inversions are grounding (forward bends, shoulderstand & headstand) and others are energising (handstand & peacock). Click this link to get a full list of inversions.

AMRITI
In yoga philosophy it’s said that there is a fluid secreted by the pineal gland in the head called Amriti, also known as the ‘fluid of immortality’. In our everyday upright position the Amriti flows down the body and is burnt up by prana energy. Inversions pool the Amriti back into the crown of the head and bring with them regeneration and vibrant health, allowing us to experiencing life at a higher resolution. This is a lovely idea and it's easy to see why inversions are considered the king of all yoga asana! Practising any of the inversions on a regular bases definitely brings a yoga glow to your complexion and gives you a different perspective on the world.

No article about boosting the immune system would be complete without mentioning the relationship between stress and its effect on the immune system. Stress-related illness, ranging from the common cold to obesity, heart disease and depression, are unfortunately rapidly increasing. It is well documented that yoga has a very calming and grounding effect – reducing stress, anxiety and tension in the body, a topic warranting a post of its own which will follow soon.

Click on the sequence above and try to get onto your mat as often as you can over the coming months to support your immune system. Just 10 minutes of Surya Namaskara/Sun Salutations over the festive period and into the new year will make a difference you'll notice.

To save the images for personal use click and hold down the image until the ‘save image’ option appears; on Mac hold down ‘control’ and click the image to get the option box; on PC right click on the image to get the option box. Scroll down in the ‘option box’ and click ‘save image’.

Ruth Delahunty Yogaru

Props are your best friend - belts

Aisling Conn, who teaches in The Yoga Room and My Yoga Body, has given us some expert tips and ideas of how to incorporate yoga bricks and yoga blocks into our yoga practice. This time she looks at ways belts can help us reach into some difficult asana, that would sometimes be beyond us, and help deepen our practice.

AISLING’S GUIDE TO YOGA BELTS
Yoga Belts are fantastic for extending the length of our arms in certain poses and for limiting movement in others.

Whereas it’s a good idea to avoid having an attachment to ‘perfecting’ any asana, there are lots of cases where using a belt and being able to connect to other parts of the body, will help to achieve greater structural alignment.

Belts are useful at any level of yoga. Here’s how I use them in my personal and teaching practices. On a physical level, Supta Padangusthasana A, B and C is a great way to stretch the hamstrings, calves and inner thighs. It can also help alleviate stiffness in the lower back and address imbalances or asymmetries in the pelvis.

Using a belt in this pose allows the hand to connect with the foot while the arms are straight, without the hamstrings over-stretching. Make sure to always keep the arms straight and creep them up the belt as the tight muscles stretch, instead of bending your elbows. This way the force assisting the stretch is kept constant, allow correct alignment to be maintained, and you’re more likely to avoid tensing the shoulders.

The wide-leg forward fold Prasarita Padottanasana C has the added chest-opening action of interlaced hands behind the back, which can be a source of dread for anyone  like me, who has tightness in the front of the shoulders.

A really helpful way to warm-up the shoulders for this pose is to practise it with a belt held between the hands. Being able to pull strongly on the belt (instead of using possibly slippery/sweaty interlaced fingers) it is easier to achieve the correct rotation of the upper arm bones in the shoulder sockets as you fold forward. This allows those tight areas of the chest and shoulders to stretch more efficiently.

If you are unable to interlace your hands behind your back using straight arms and rolling your shoulders back, a belt will be your best friend in this pose!

Gomukhasana (arms) is a really interesting asymmetrical pose for stretching the shoulders because it rotates the arms and stretches the corresponding muscles in two different ways. The top arm is externally rotated, raised and bent at the elbow (no mean feat!) and the lower arm is internally rotated, drawn back and bent at the elbow to, maybe, bind with the top arm.

A bind here is not always possible, generally due to restriction in any combination of parts of the shoulder’s range of motion. This is not necessarily a problem as it is still possible to feel a nice sense of the stretch by placing the palm of the top hand on the base of the neck and the back of the lower hand wherever it reaches on the back. However, in order to progress with the stretch, having a belt to bridge the gap and extend the reach of both arms is really useful and much safer in terms of keeping the correct alignment of the shoulders and arms.

Hold the belt with the top hand over the shoulder and reach for the end with the bottom hand, allowing the bottom arm to exert appropriate downward force, extending the overhead reach and range of motion of the top arm shoulder joint.

This is also really great preparation to come into the full variation of Natarajasana.

There’s a version of Natarajasana where one arm externally rotates and extends back to hold the same side foot from the inner side. Students can then tilt forward from the standing leg hip and use the connection of the hand and foot to stretch the chest, shoulder and hip flexors. When you are comfortable with this variation of the standing balance, and are ready to deepen the pose, using a belt can help to get you there.

It’s best to buckle your belt making a loop to slip over your foot, then take the free end in the same side hand and extend overhead adding the other arm when you are steady (it’s helpful to let the standing leg rest against a wall if you feel at all unsteady). Once both hands are holding the belt overhead you can work your alignment instructions and creep hand over hand closer to the foot.

You will certainly feel the benefit of this deep shoulder, heart and hip-flexor opening pose without compromising on safety.

The symmetrical, seated forward fold Paschimottanasana is a fantastic stretch for the whole back of the body. However, for a simple pose it can have some pitfalls for a new, or very stiff, student.

Often we get so caught up in getting the hands to the feet and the forward-folding element of the pose, without paying attention to the delicious stretch for the whole spine and back of the legs that is possible when performed with care.

Use a belt here to connect the hands to the feet whilst keeping the shoulders relaxed, so that you can encourage your pelvis to tilt forward to its full range of motion. Then, each vertebra of the spine bends sequentially forward from that anteriorly tilted pelvic position (forward tilt), making your Paschimottanasana the perfect stretch for legs and spine. regardless of how close your face is to your shins!

As with Supta Padangusthasana above, instead of bending the elbows as you come forward, walk your hands along the belt, keeping your shoulders relaxed, and you’ll achieve a better sense of the pose rather than grabbing straight for the toes and pulling the body forward, which just tends to aggravate the lower back.

For years in yoga class, when it came to practising Salamba Sarvangasana the teacher would invariably adjust my elbows closer together to give me a better lift in my thoracic spine and a better foundation for the inversion. A great way of giving yourself this adjustment is to loop a buckled belt just above your elbows so that the elbows are no more than shoulder width apart.

Hang the correctly sized loop around just one arm and come into Halasana, Plough Pose. Then manoeuver the second arm into the loop, externally rotate your arm bones, bend your elbows, place your hands on your upper back and lift you legs into Salamba Sarvangasana.

Make sure not to let your arms press out into the belt but rather draw the arms inward away from the belt to decrease your dependency on it for the correct alignment over time.

Hope you find these interesting and can put them to use in your practice. Keep an eye out for our next prop guide - blankets!


AISLING CONN
Aisling teaches yoga on Tuesdays, 9.45am in The Yoga Room, Sundays, 10am & 11.30 in My Yoga Body, and pilates on Mondays & Wednesdays, 9.30am in My Yoga Body. She is also available for private and small group classes by arrangement. To contact Aisling email at aisling.conn@gmail.com or send a message on Facebook

Props are your best friend - blocks

Aisling Conn, who teaches in The Yoga Room and My Yoga Body, talked us through the benefits of props in your yoga practice. She also talked us through the versatile uses of the simple yoga bricks and yoga belts, which gave us lots of poses to try in your next class or home practice. This time she’ll be examining ways blocks can lift and support us in seated, standing and inverted poses.

AISLING’S GUIDE TO YOGA BLOCKS
A yoga block is a fantastic support in your asana and pranayama practice. They are safely stackable to provide any required sitting height, and just squishy enough to be a comfortable surface for knees, shoulders, sit-bones, etc.

Here are just a few of the ways I use them in both my personal and teaching practices.
In seated poses, like Sukhasana, where we might spend a few moments on breath awareness or meditation before a class, using support is essential, even for the most seasoned practitioners. A block, or stack of blocks, allows the hips to be higher than the knees, and the spine to be neutral. This means less tension around the hips, and a more comfortable sit. We then get to focus our attention on the breath. It’s much easier to pay attention to something as evasive as the breath, when you’re not fixated on an aching upper back or pressure in the knees!

In any of the seated forward bends which use the general blueprint of Dandasana, having a foam block wedged just under the bony base of the pelvis (sit-bones), helps to create a much better angle for your spine to fold forward from. The hamstrings tendons attach to the sit-bones. When they are strong or tight they tend to pull the pelvis back (posterior tilt), this puts a strain on the lumbar spine. The tendency to pull forward with the arms sets you up for further strain on the lower back, increasing the risk of weakening & damaging the connective tissue. Getting help to tilt the pelvis forward (anterior tilt), means we can concentrate on finding the subtle balance between lengthening and bending the spine.

Virasana is a fantastic seated pose that stretches the front of the thighs and ankles. When comfortably held, it provides an easy place to find a lengthened, neutral spine and a sense of abdominal spaciousness. I love to use this steady base to explore the breath and spine, and to stretch and open the shoulders. Unsupported, it’s a very deep flexion for the knees. I always get students to sit on at least one, but usually two or three stacked blocks. The extra height the blocks give overcomes the pull of tight muscles, allowing you to sit right on top of the sit-bones. This way the spine can be in a neutral position, the back muscles in balance, and the legs in good alignment.

Another pose that can be torture for problematic knees is Anjaneyasana. A block under the back knee provides some welcome cushioning, even though there is not a lot of weight on it, especially if you’re staying there for more than a couple of breaths.

Eka Pada Rajakapotasana prep is a deep hip stretch, specifically the hip-flexors of the back leg and the groins. For plenty of us, getting the outside of the front-leg hip all the way to the floor is so much of a struggle, we sacrifice torso and shoulder alignment. Try slotting a block under the front hip, so that the pelvic bones can be supported, and feel the tight hip muscles release into hip-opening bliss!

Just about everyone can benefit from practicing Salamba Sarvangasana on a raised support - 4 foam blocks arranged in a rectangle. The large stable surface here provides extra height to the shoulders and arms, protecting the neck and lifting the spine. Precise positioning is key here, if you haven’t tried it before be sure to recruit the guidance of your yoga teacher.

There are heaps of other ways to use blocks in your yoga practice, the ones above are just a selection. Think about anywhere in your practice where you could use a little cushioning or support and grab a block before class so it's there if you need it - even if you just end up sitting on it! Next up is ways to use a yoga strap/belt.


AISLING CONN
Aisling teaches yoga on Tuesdays, 9.45am in The Yoga Room, Sundays, 10am & 11.30 in My Yoga Body, and pilates on Mondays & Wednesdays, 9.30am in My Yoga Body. She is also available for private and small group classes by arrangement. To contact Aisling email at aisling.conn@gmail.com or send a message on Facebook