Sequences

Seniors mobility flow

PAUSE_0120.png

FLEXIBILITY V’S MOBILITY
Yoga gets typecast as being all about flexibility. Yoga is not a measure of how far you can touch your toes, it is about finding mobility movements that suit you in order to keep your body moving freely in your everyday activities with longevity. Think of how a hinge works. If you repeatedly push the hinge to its furthest points it will eventually snap. On the other hand, if you don’t move the hinge at all it will get very stiff. The hinge works best when it is kept moving fluidly - the hinges of the body are no different, to work optimally they like to be regularly moved. A hinge might need oiling every now and again, but as an added bonus our clever bodies have their own built in oiling system, as long as we keep our hinges moving.

It is important to understand the difference between what is challenging but valuable for you and what might not be suitable for you. A bit of a challenge is a good thing to help maintain and build mobility and stability, and help you feel strong and well in your everyday movements, but you should feel safe within this challenge. When you find something challenging ask yourself ‘will this movement help me in my life off the mat and is it suitable for me’ – learning how to safely get up and down off the ground is a valuable life skill, working on your balance in standing poses is a valuable life skill, doing fancy picture perfect yoga poses is not a life skill!

EXPLORING SENIOR MOBILITY IN YOUR PRACTICE
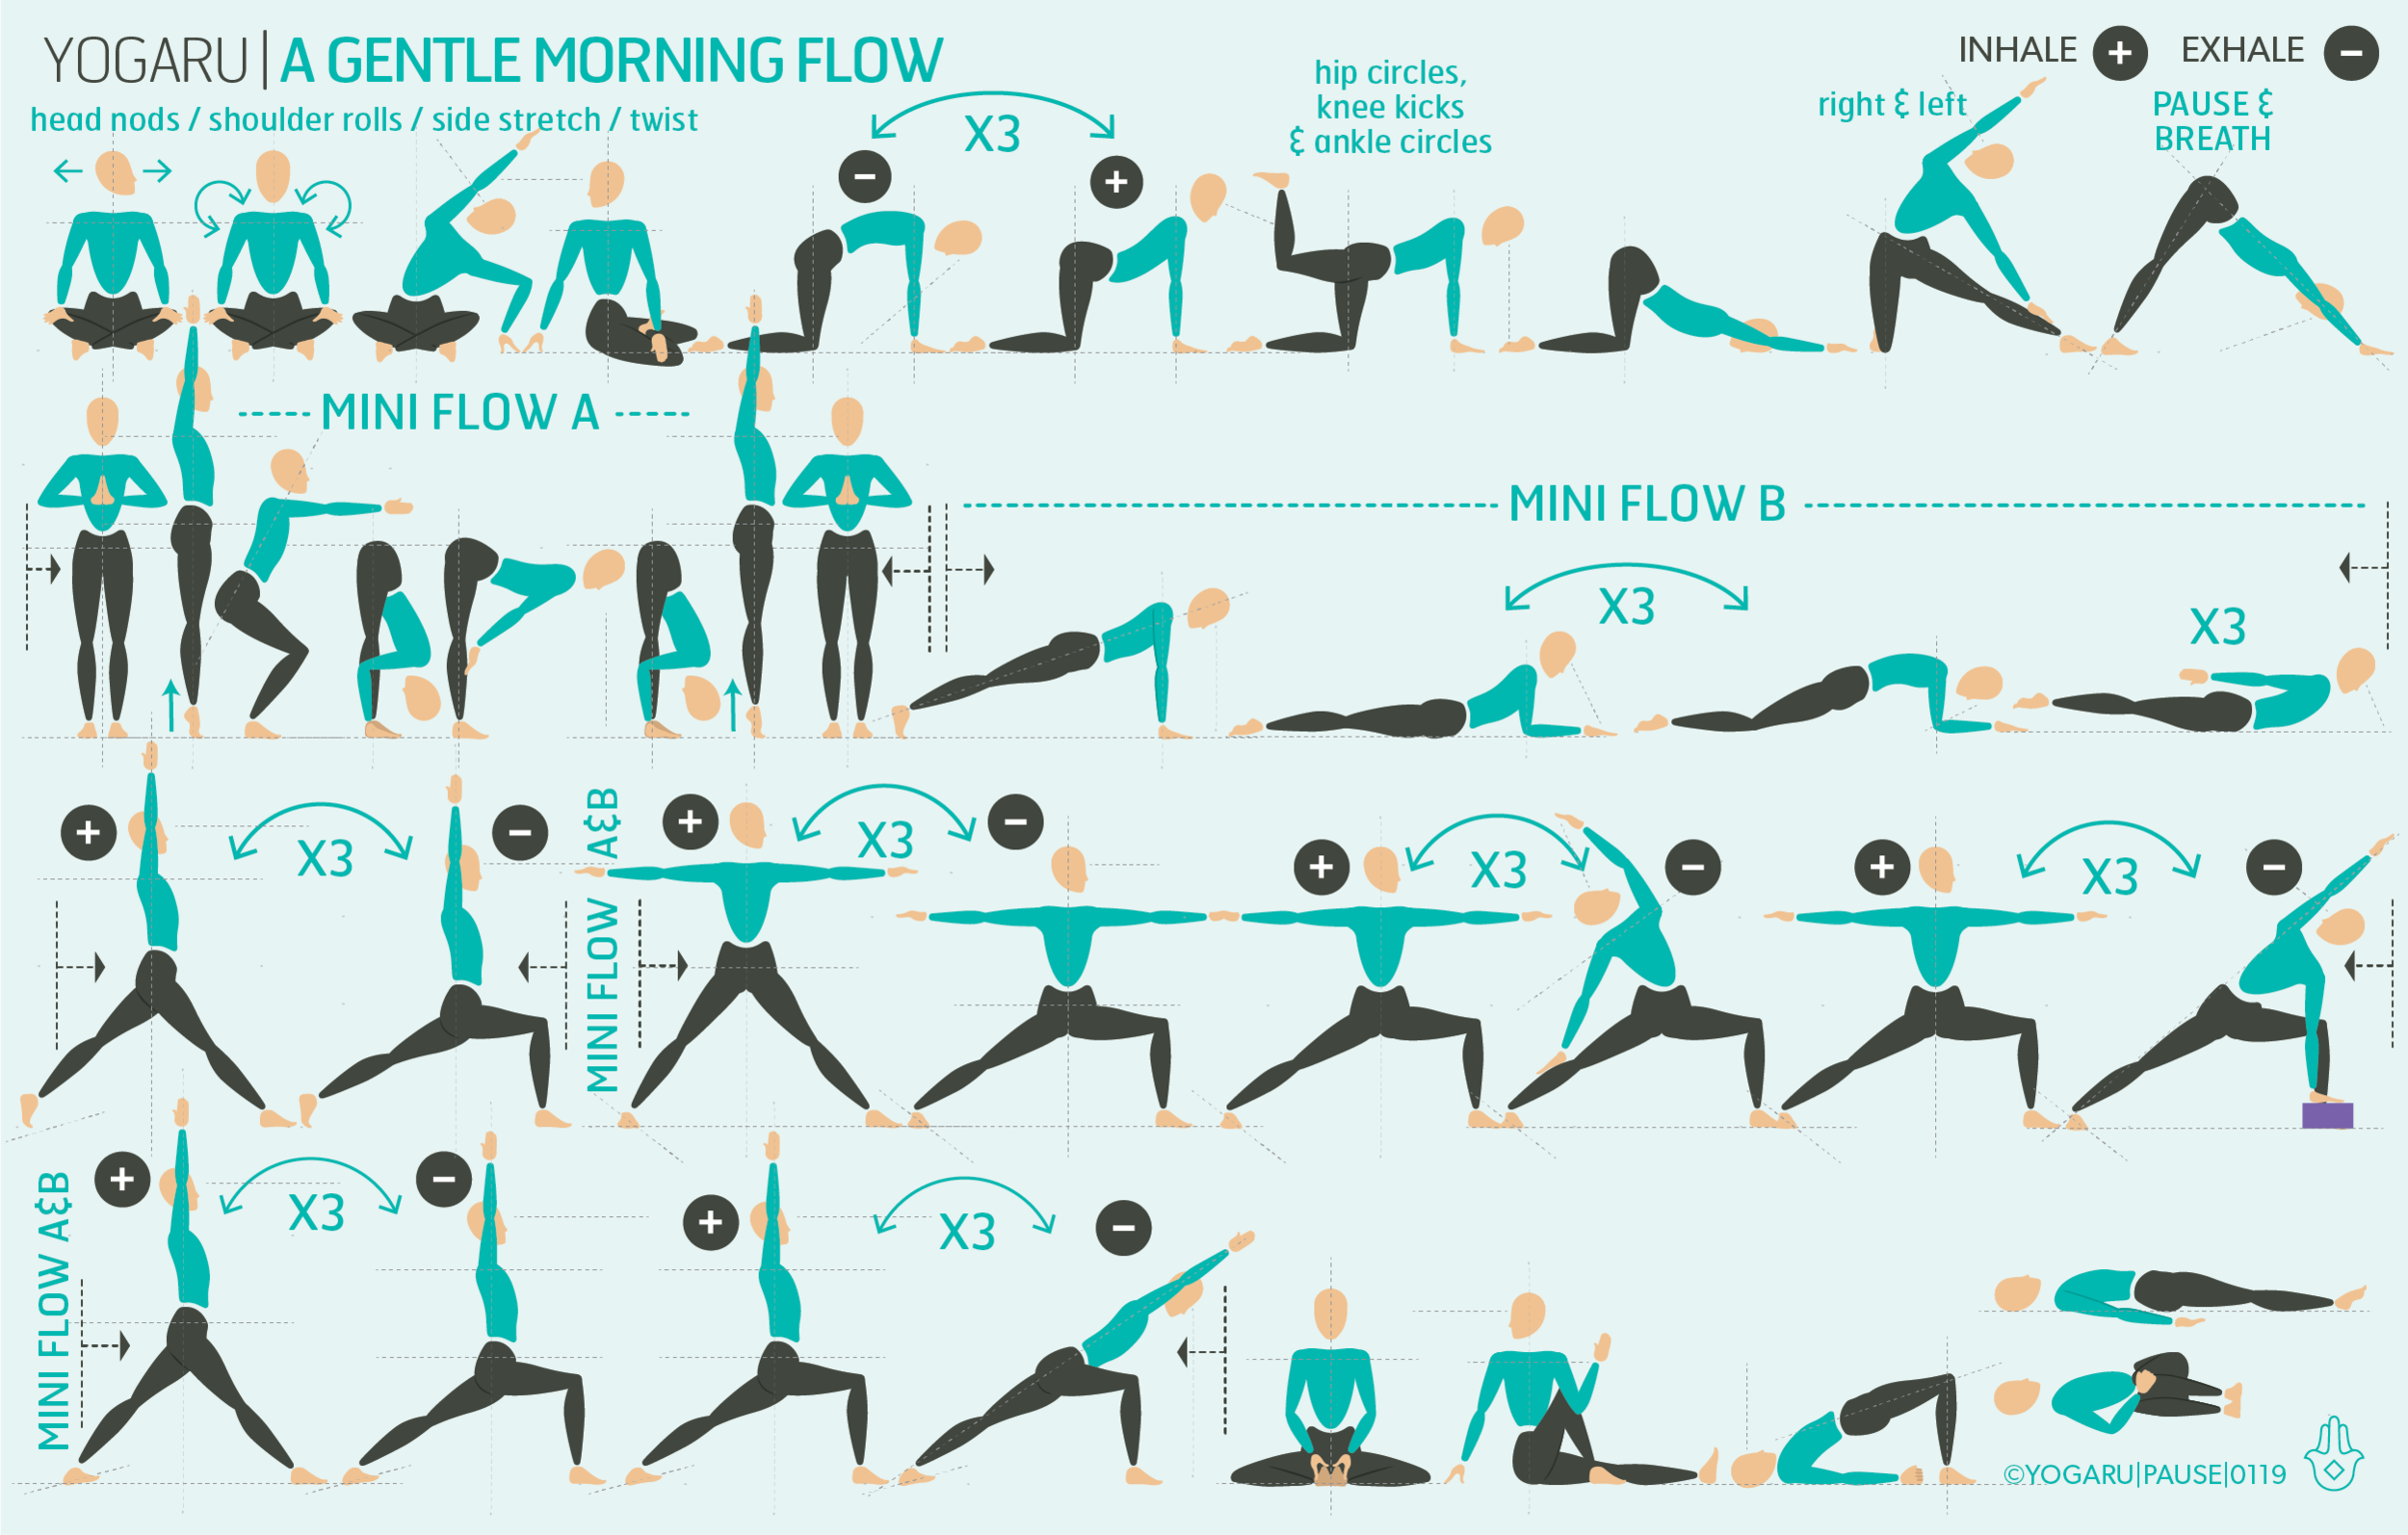
This sequence is designed to help you work on your balance, keep your joints moving, maintain bone density and build muscle strength. It will gently move your spine in all directions to help spinal health and ease out any held tension. It will also help you beyond your physical body. Movement, yoga in particular, is very good for building focus, concentration and all round mental health.

We all have areas of tenderness or stiffness that need an extra bit of care and attention. The best way to approach this is to bring them onto the mat with you as part of your practice that needs to be considered rather than a hindrance. Moving slowly as you practice will give you space to listen to your body for feedback on how it is reacting to the practice. A slow practice will also build better strength and stability to all the muscles and joints of your body.

There is a lovely principle in yoga of ‘Sthira & Sukham’ which means ‘effort and ease’. Look for the effort and the ease in each pose and in each transition between poses. Take as many breaks as you need. Taking a break gives your body the chance to assimilate all the wonderful benefits of each pose in the practice and is never considered a failure of stamina in yoga.

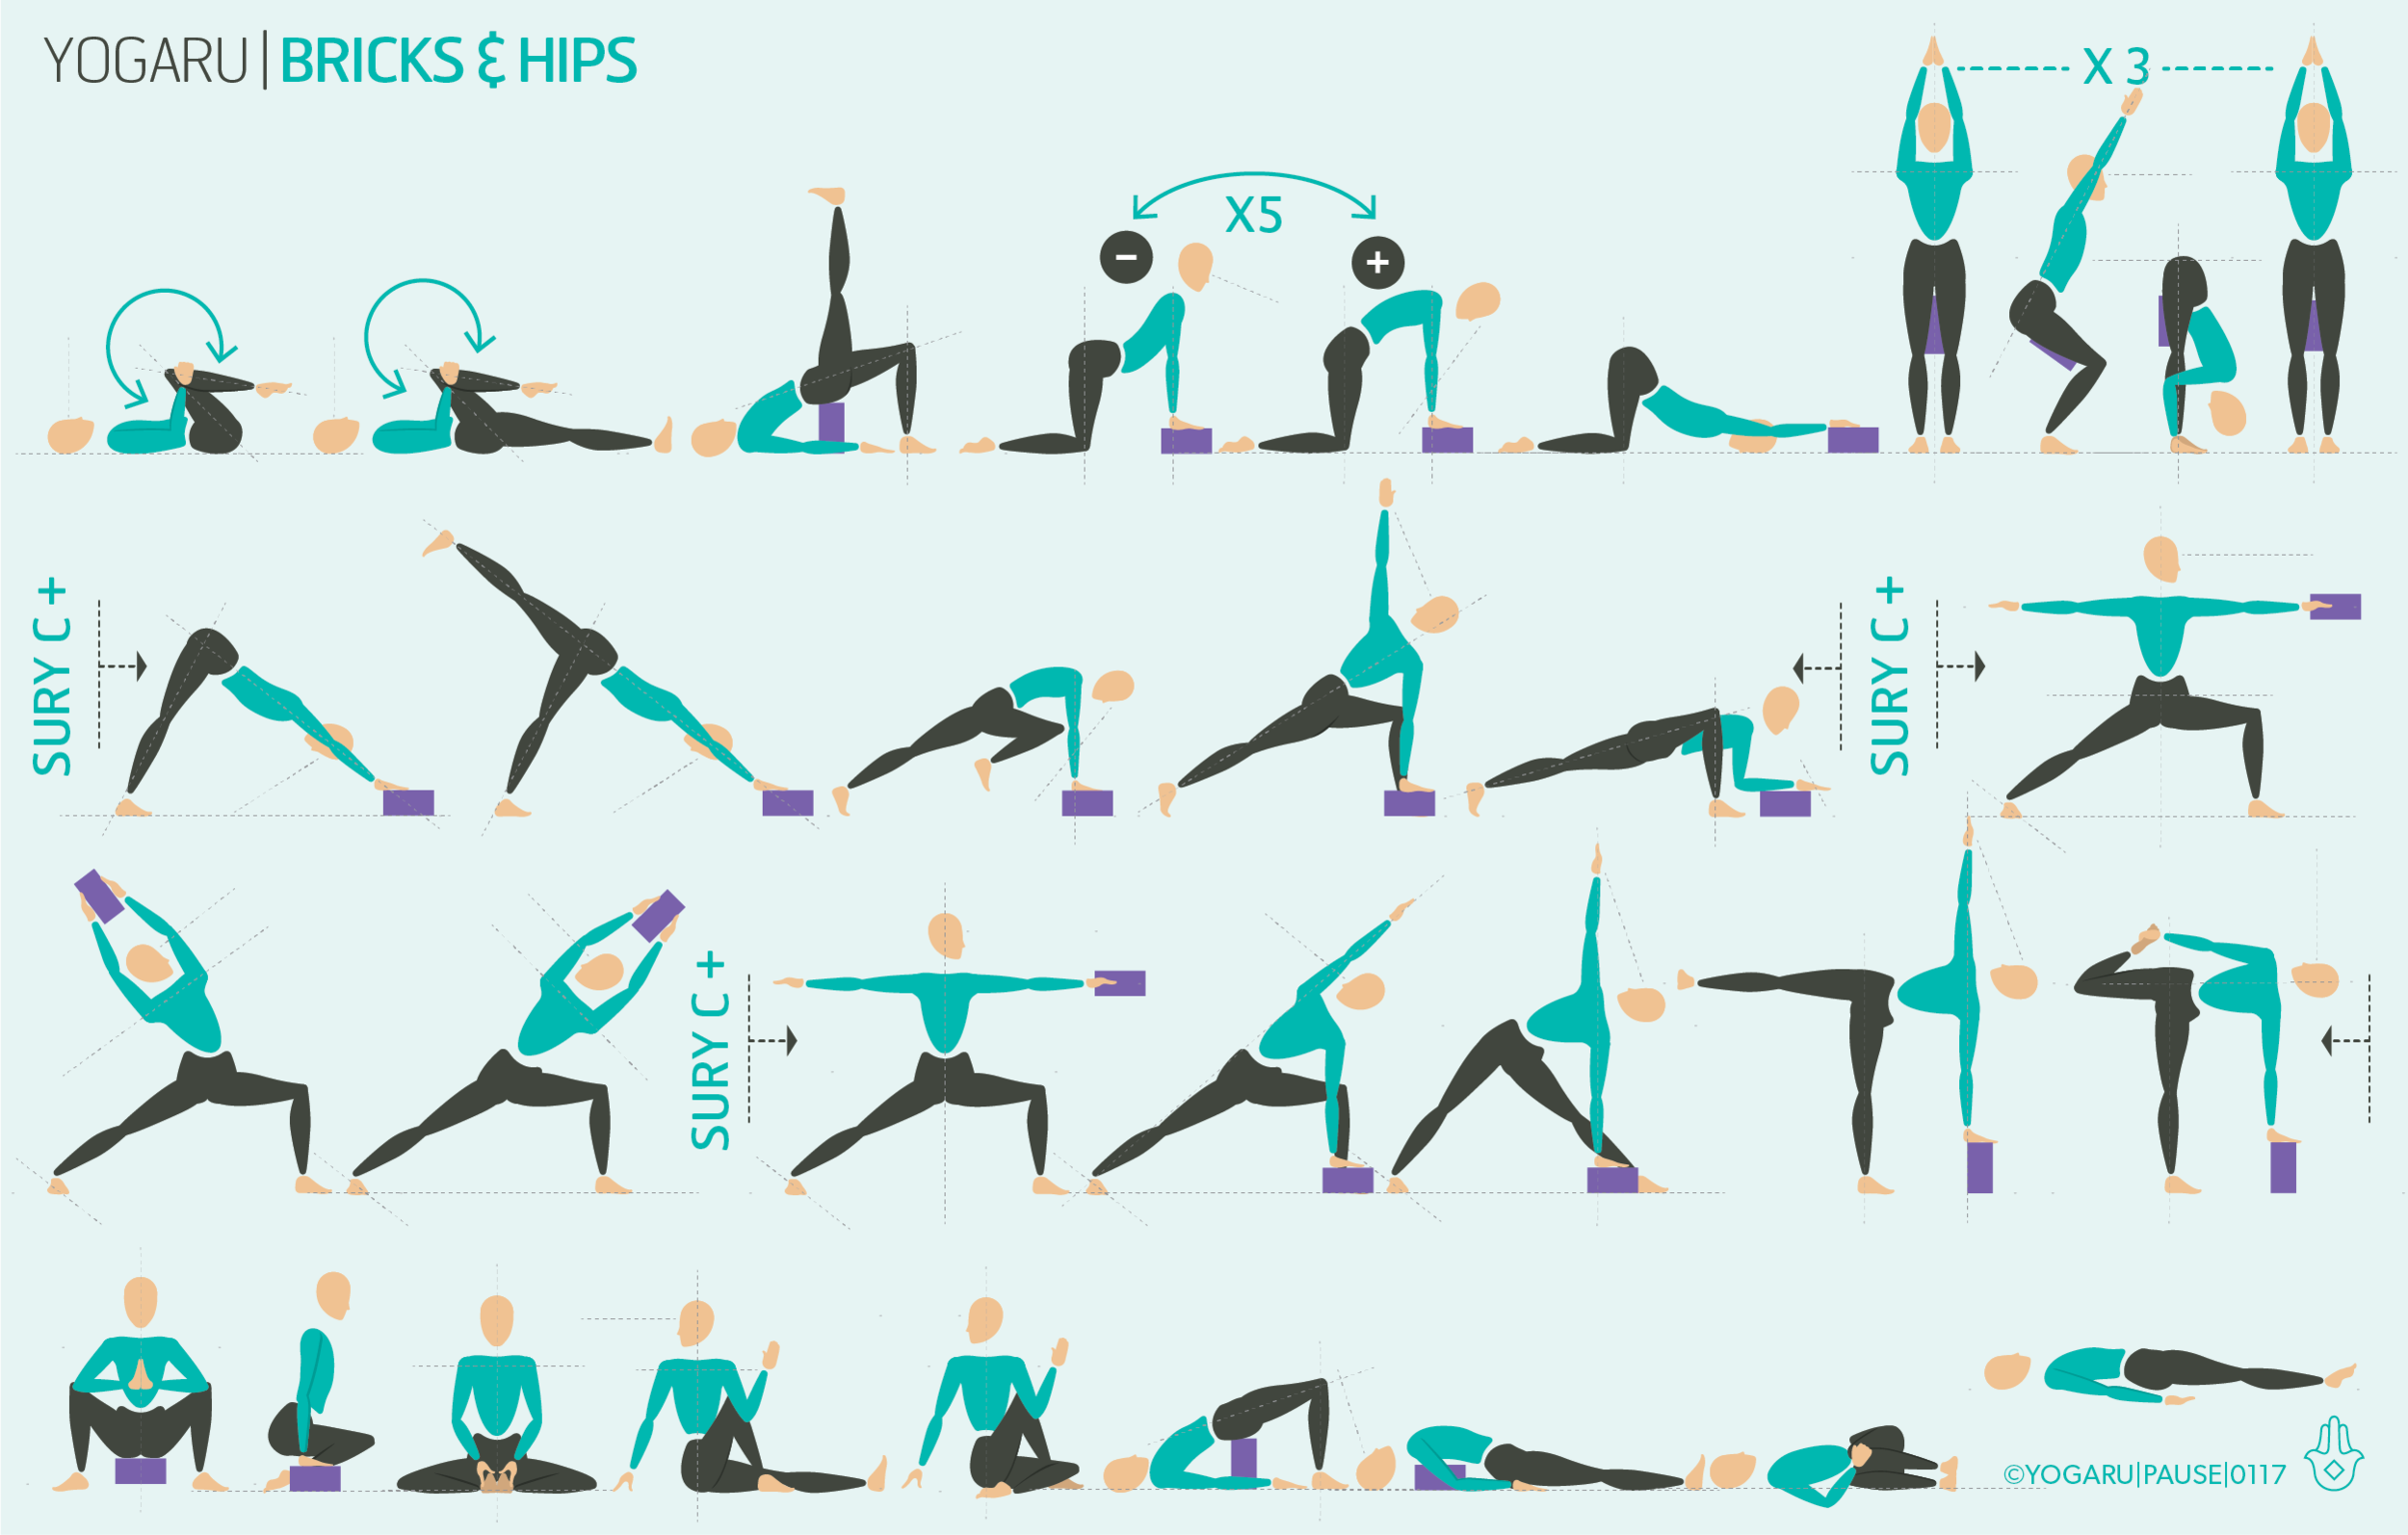
This sequence will teach you how to get up and down from the ground. If this is difficult for you at the start place a chair at the top of your mat and use it to help support you. Props are very much a part of the yoga practice and are used in many poses to help adjust a pose to suit the student.

ALIGNMENT CUES
On the first row of the sequence you will find a guide for ‘coming down’ and ‘getting up’ from the ground. To come down to kneeling , bend your knees and press both hands into your right knee, step your left foot back and gently bring the left knee down to the ground. Then place both hands on the ground, step the right foot back and bring the right knee to the ground to a kneeling position. To get up from kneeling, step your right foot forward between your hands, press both hands onto the right knee, lift your left knee up and when you are ready step the left foot forward. Visit my YouTube channel to see a practice tips tutorial on getting up and down from the ground and how to incorporate a chair to help you if needed. Use these through your practice to help you come down and get up as needed. You will also find a ‘½ Sury’ these are optional extras at the start of each mini flow. Start your practice by coming down to the ground and lying on your back, with your hands on your belly, and take a few rounds of Viloma breath. Viloma breath breaks the exhale into three and helps to naturally lengthen the breath without tension – inhale completely, then exhale, pause, exhale, exhale pause the full breath. Take two to three regular breaths to prepare you for your movement practice.

  • You can practice the whole sequence or dip into a few of the mini flows which are indicated by arrowed lines.

  • You flow through these connected poses on the right side first (right foot forward) and then take those poses on the left side (left foot forward).

  • If you encounter a pose that doesn’t feel right for you simply skip it and move onto the next pose.

  • As you move try not to get caught up too much on whether it should be an inhale or an exhale, just don’t forget to keep breathing!

  • If there is a pose that you’re not sure of you can find all 108 poses in my asana section. You can narrow down your search by clicking into the asana families in the bar on the right.

  • Take plenty of rests during the practice in either Balasana/Child’s Pose or Tadasana/Mountain.

  • Take a few minutes at the end of your practice in Savasana/Corpse to give yourself a chance to get reenter your day.

To save the images for personal use click and hold down the image until the ‘save image’ option appears; on Mac hold down ‘control’ and click the image to get the option box; on PC right click on the image to get the option box. Scroll down in the ‘option box’ and click ‘save image’.

Ruth Delahunty Yogaru

A gentle morning flow

PAUSE_0119.png

ROUTINE, ROUTINE, ROUTINE
Starting your day with a morning movement routine is the best way to get the day started physically and mentally. It gets rid of stagnation and brings mobility and stability back after a prolonged static period of sleep. Starting the day with your practice ensures that it is consistently part of your routine and doesn’t get lost on a busy day. Gentle movement realigns the spine and helps you to stand, walk and sit more comfortably throughout the day with awareness of your posture. This more upright posture has a very positive effect on your mood and creates emotional openness for the day. Embedding a self care routine into your day cultivates a sense of calm, makes you feel more cared for and listened to – and in return makes you more caring and available to listen to others too. You are also more inclined to make healthy choices throughout your day when you have started with some self care.

Before each morning practice take a few moments to work out how your practice can support you today. Ask yourself what do you need physically? What do you need mentally? What are your energy levels? What is your mood today? What are your limitations? What is the rest of your day like? Where do you need mobility? Where do you need stability? You may not easily have the answer to each question but it will help remind you if you have an injury you are minding, if you need to go easy because you have a full day ahead or if you are dealing with something else in life that might require you to be extra kind to yourself.

THE BENEFITS OF A MORNING PRACTICE
Morning yoga stimulates the gut, promotes good digestion for the day, boosts the metabolism, builds a strong immune system, balances hormones, tones your muscles, improves posture and spine health, gives you energy, improves circulation, supports good heart health, builds healthy lungs and most importantly is proven to make you happier! Breath awareness in yoga triggers the ‘rest, restore and digest’ nervous system through the vagus nerve which runs from the brain stem down the spine. When this conscious breath is practiced as part of your daily routine it rewires your brain to naturally reach for this calmer reaction rather than a ‘flight or flight’ response to situations. In this calmer state of mind you are focused and able to make informed decisions.

WARMING UP
Before you start it is good to gently warm up all the joints and muscles – like you are politely asking them permission to move. Warmed up muscles will be more obliging and supple. Your muscles are like Blutac – if you spend a bit of time gently lengthening and contracting the fibres of the muscles they become more stretchy and smooth. If you pull Blutac without warming it up first it will rip in two!

In the sequence there are two different ways you will warm up the muscles. The first, which you will be more familiar with, is through a series of gentle mobilising movements at the very start of the practice. The second way is with isometric contraction, or by actively pressing against a surface until you feel a warm sensation in the muscles. In the following poses after the initial warm up you will find three isometric poses – Tadasana/Mountain, Plankasana/Plank & Utkatasana/Chair. These poses will strengthen and warm up your muscles by using a pressing action into the ground. These three foundational poses are very strong poses when they are approached by actively pressing into the ground, hugging the muscles to your midline and drawing your navel towards your spine.

EXPLORING A GENTLE MORNING FLOW IN YOUR PRACTICE
There are two main aims, from a physical point of view, you want to achieve in your morning practice – mobility and stability (flexibility & strength). This sequence will gently mobilise all the joints and surrounding muscles first before progressing towards actively stabilising them.

You will also tap into the calming effect of yoga and embed it into our mindframe for the day ahead. You will do this by bringing your attention to the breath before you start which will give you an anchor to come back to when you get distracted with your ‘to do’ lists throughout your practice (which is completely natural and part of the practice!). Sit in a comfortable seated position with the hips raised on a brick or a cushion. Place one hand on your heart and one hand on your belly. Start by just noticing the breath before you change it in any way. Is it short, is it long, is it more in the chest or can you feel it in the belly too – notice without judgement. Close your eyes and visualise a box. You will use this box to gently guide a full breath using the count of four for each inhale, pause and exhale, pause. Starting at the left corner of your box, inhale for the count of four and travel across the top of the box, pause for the count of four and travel down the right side of the box, inhale across the bottom of the box, pause and travel up the left side of the box back to the start. Continue to draw the box with your breath for ten to twenty rounds or set a timer for 5 to 10 minutes. The more in tune you become with your breath, and learn how to tap into this simple technique, the more it will help you in your day to day life off the mat. Now you are ready to start the movement part of your practice.

ALIGNMENT CUES
Moving slow and keeping it simple builds strength and stability in the joints and the surrounding muscles. In some of the mini flows in the sequence there are two poses linked together with a ‘x3’. You will move in and out of these two poses using the ‘+’ and ‘-’ breath cues and then settle into your version of the second pose. This fluid movement will help the muscles to hold the pose more comfortably and help you find which muscles are stretching and which you are strengthening in the pose.

Have a read of the tips below and either print out the sequence or save it onto your device:

  • In the first four warm up poses on row one sit up on a brick or a cushion to align and lengthen through the spine first.

  • After cat/cow, bring your knees together first for balance then starting on the right side lift your leg to hip height and bend your knee. Circle your knee for your hip circles, straighten and bend your knee for your knee kicks and keep the knee bent to do the ankle circles.

  • Before each mini flow, which are indicated between the arrowed lines, run through ‘mini flow a’ and ‘mini flow b’. Use downward dog to link your flows.

  • Incorporate at least 2 minutes for Savasana at the end of your practice to assimilate the practice and get yourself mentally ready for the day ahead.

To save the images for personal use click and hold down the image until the ‘save image’ option appears; on Mac hold down ‘control’ and click the image to get the option box; on PC right click on the image to get the option box. Scroll down in the ‘option box’ and click ‘save image’.

Ruth Delahunty Yogaru

Bricks & hips

PAUSE_0117.png

BRICK PARTY
Props are incredibly versatile and can offer support where you need it, facilitate deepening a pose and reinvigorate your home practice when used creatively. Anatomy comes into play when finding your personal optimum alignment. Some poses ask for a position that doesn’t suit your skeletal structure. For some students better alignment comes from using props regardless of flexibility or strength. Aisling Conn took us through the benefits of adding bricks, blocks and belts into your practice, with lots of different ways to use them and some sample poses to try out. Here we look at a full sequence using bricks. Bricks are the most adaptable of all the yoga props. They have three different height options – stacked, on their side and flat. They come on cork which are more sturdy and used mainly in Iyengar Yoga, or floam which are a slightly softer while still very supportive, and better for sitting on and propping the hips in poses like Setu Bandha Sarvangasana/Bridge and Restorative Yoga. Adding props gives your practice variety which is the basis of a sustainable practice. The more you surprise your body and don’t let it get too complacent in its movement, the more you can maintain your long term mobility.

HOW TO USE BRICKS
Bricks are currently my favourite prop to use in my home practice. I keep them beside my mat ready to grab and get creative with while I flow. There are lots of ways to add bricks to your practice. The most traditional use being in standing poses to press your hand into when your arm doesn’t reach the ground, giving you extra space to expand the chest and reach the top arm up. You can also use them to work the muscles of the arm in standing poses by raising one above your head and squeezing it between your hands. I have started to play around with placing them under my hands in Marjaryasana/Cat & Bitilasana/Cow. This helps to open the chest as you move from Marjaryasana/Cat to Bitilasana/Cow and deepen the breath. I also sometimes use them in Adho Mukha Svanasana/Downward Facing Dog to help me press the back of the heel down towards the ground and reach my sit bones up high.

EXPLORING BRICKS & HIPS IN YOUR PRACTICE
This sequence will give you lots of opportunities to try out the poses with bricks. Get creative and try a few different versions yourself too, to see what suits you and how you can find different versions of the poses. Use the bricks as suggested even in poses where you don’t usually use them and notice where in the body it might feel different.

For your Sun Salutation try placing a brick between your thighs and work on keeping it there without it falling out as you move. You might need to remove the brick as you step back and forward if jumping back and forward isn’t part of your practice. When using the brick in Adho Mukha Svanasana/Downward Facing Dog make sure to have the heel of your hand pressing over the edge of your bricks to make sure your hands don’t slip forward on the bricks. Play around with the three different heights of the blocks too and see what suits you.

ALIGNMENT CUES
The peak pose of this sequence is Ardha Chandra Chapasana/Half Moon Sugarcane using a brick to ensure you stay up a bit higher and have space to open the chest. If your arm doesn’t reach your foot just reach your arm towards the foot without holding it. You may not get quite as deep into your backbend but this version is very strengthening for the hamstrings and the hip joint.

  • Have a read of the tips below and either print out the sequence or save it onto your device:

  • From Ardha Chandrasana, bend your left knee, reach your left hand back to hold the outside of your left foot.

  • Press your hand into your foot and your foot into your hand. Reach your left knee up, broaden through the collarbones, press down through your right foot.

  • Arch through your whole spine, lengthen your neck and softly reach your head back, gaze down or up.

To save the images for personal use click and hold down the image until the ‘save image’ option appears; on Mac hold down ‘control’ and click the image to get the option box; on PC right click on the image to get the option box. Scroll down in the ‘option box’ and click ‘save image’.

Ruth Delahunty Yogaru