Staying committed

PAUSE_0035.png

BEING PRESENT
The concept of staying committed to your practice doesn’t have to be as daunting as trying to find time everyday to get on your mat. It can be as simple as working towards staying present on your mat, when you do find time to practice. Whether it’s in respect to the fact that you got up that extra bit early to practice at home, or that you’ve managed to put aside some time for yourself to make it to a class. Take a few moments to ask yourself what it is that your practice can give you today, and honour the response that you get from your inner voice. During your practice reconnect with this intention, and be true and honest to yourself, and the journey of your practice.

PRACTICE WITH PATIENCE
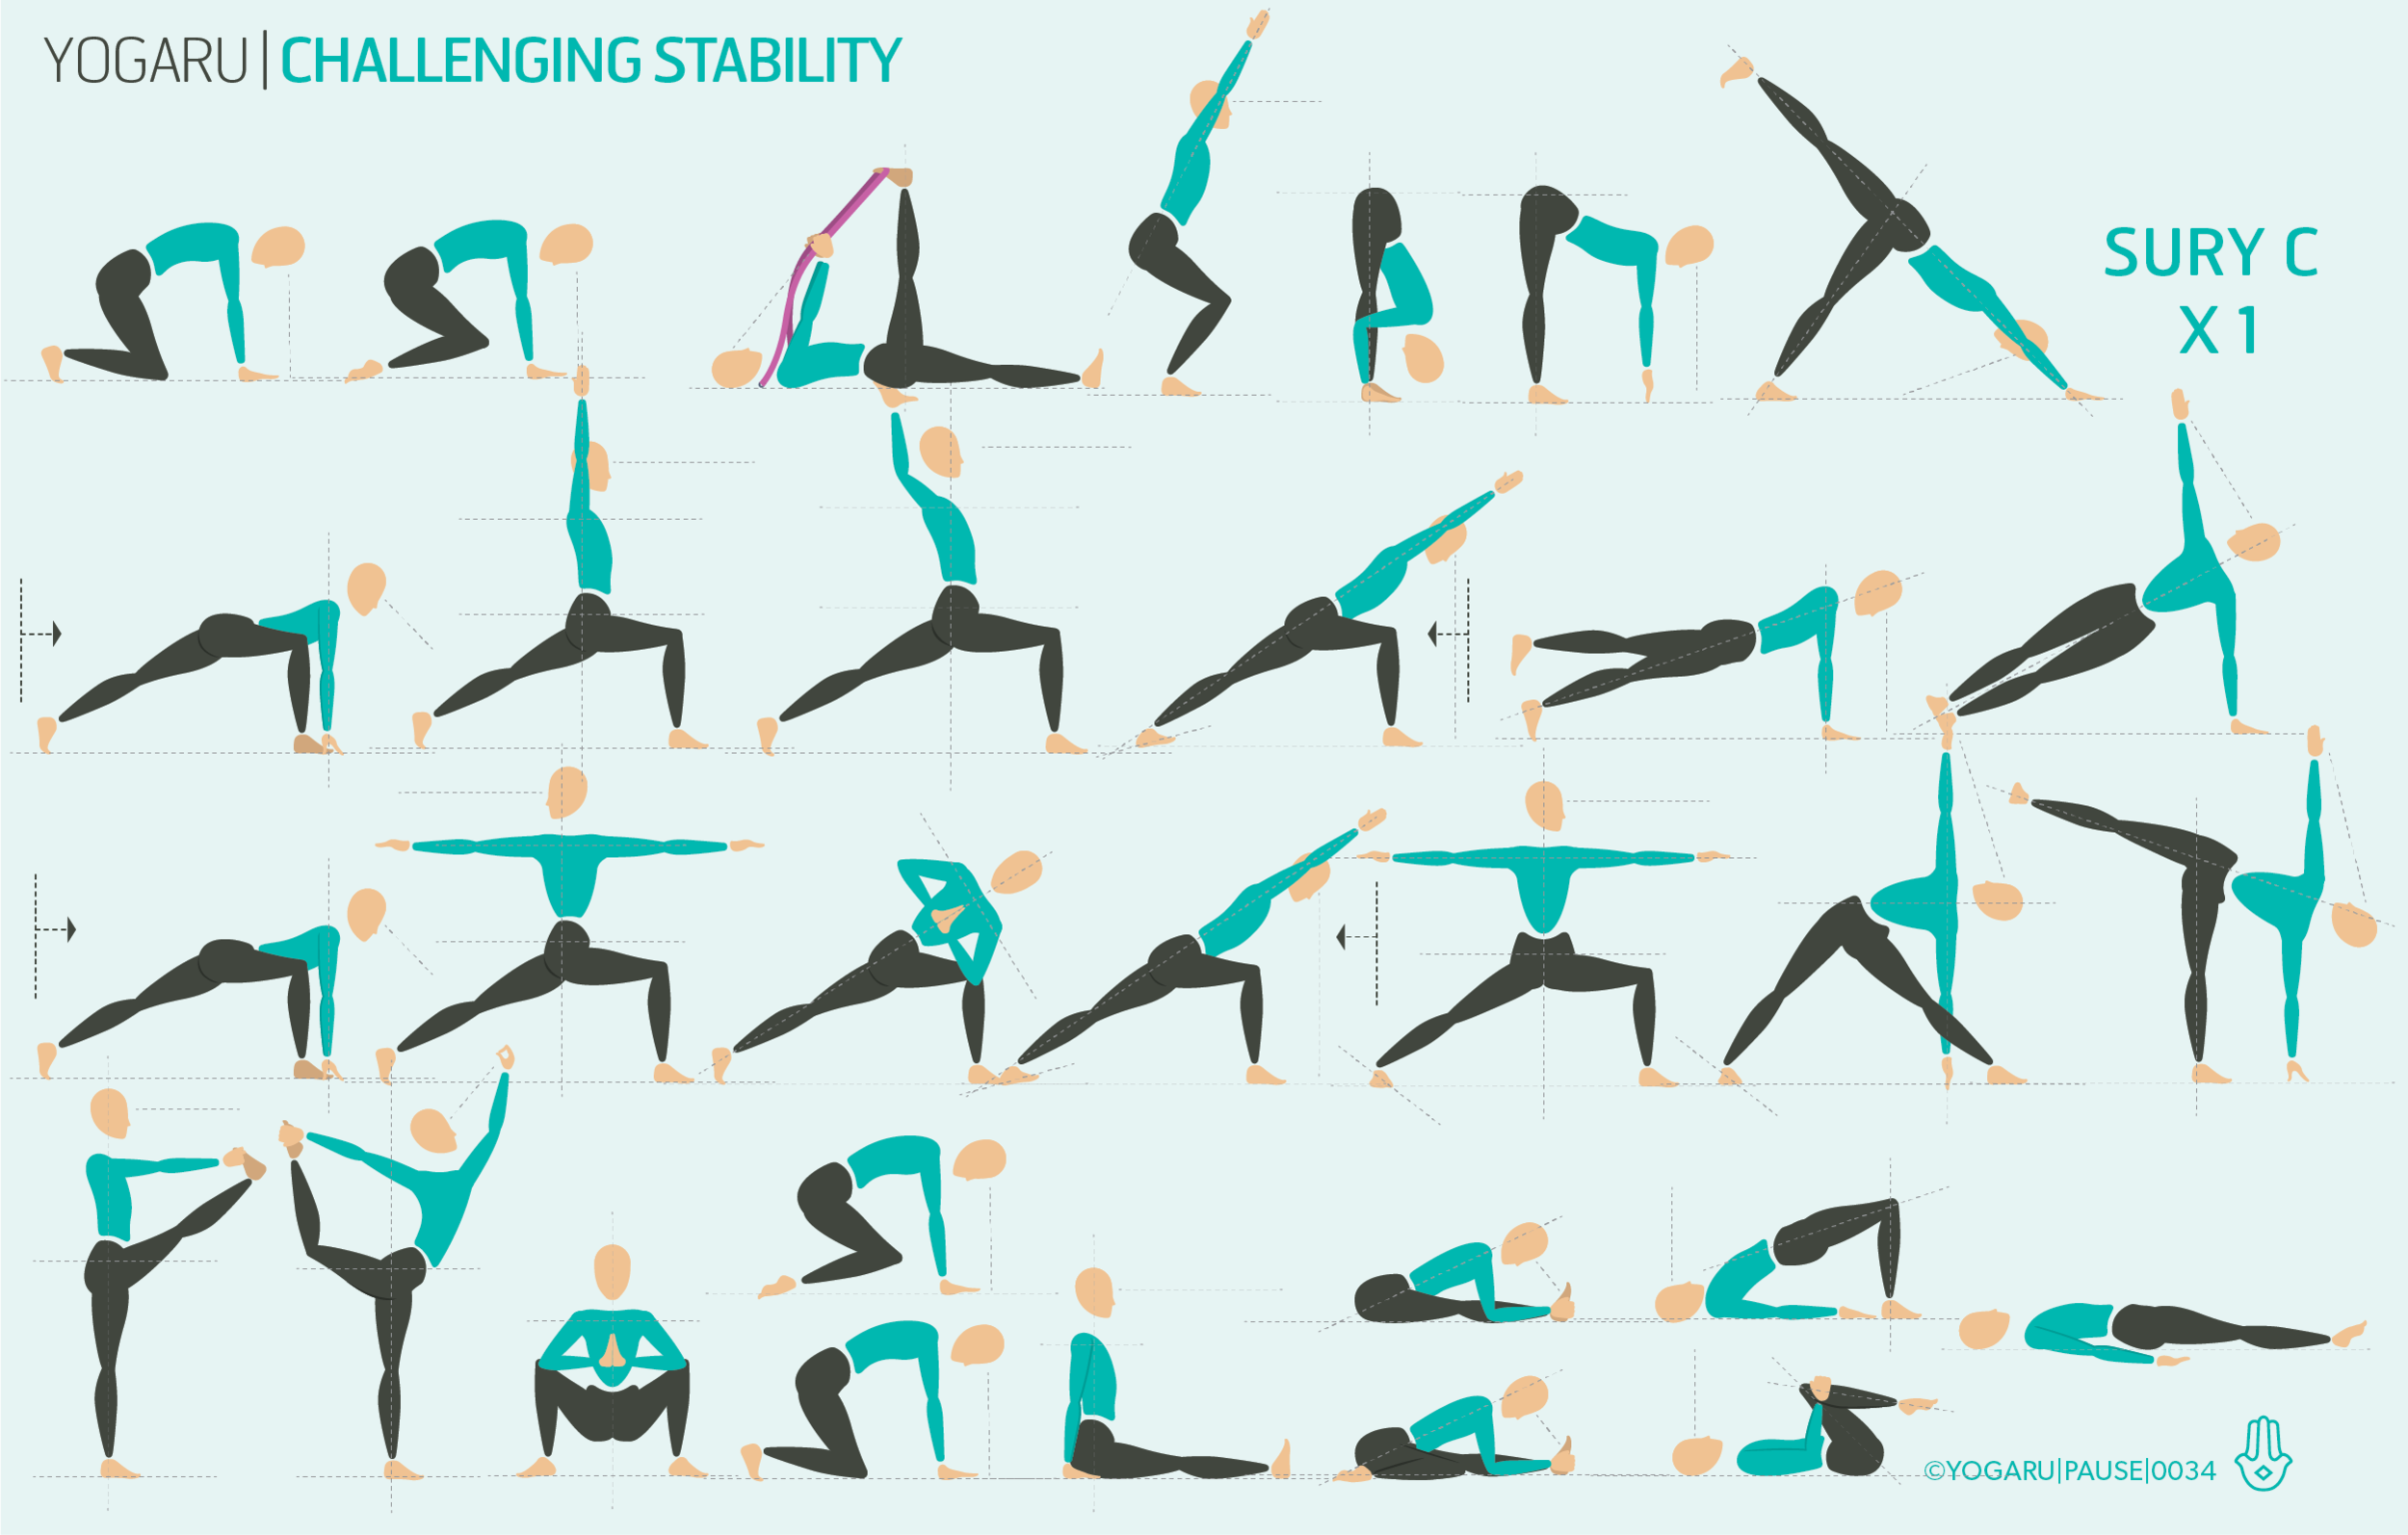
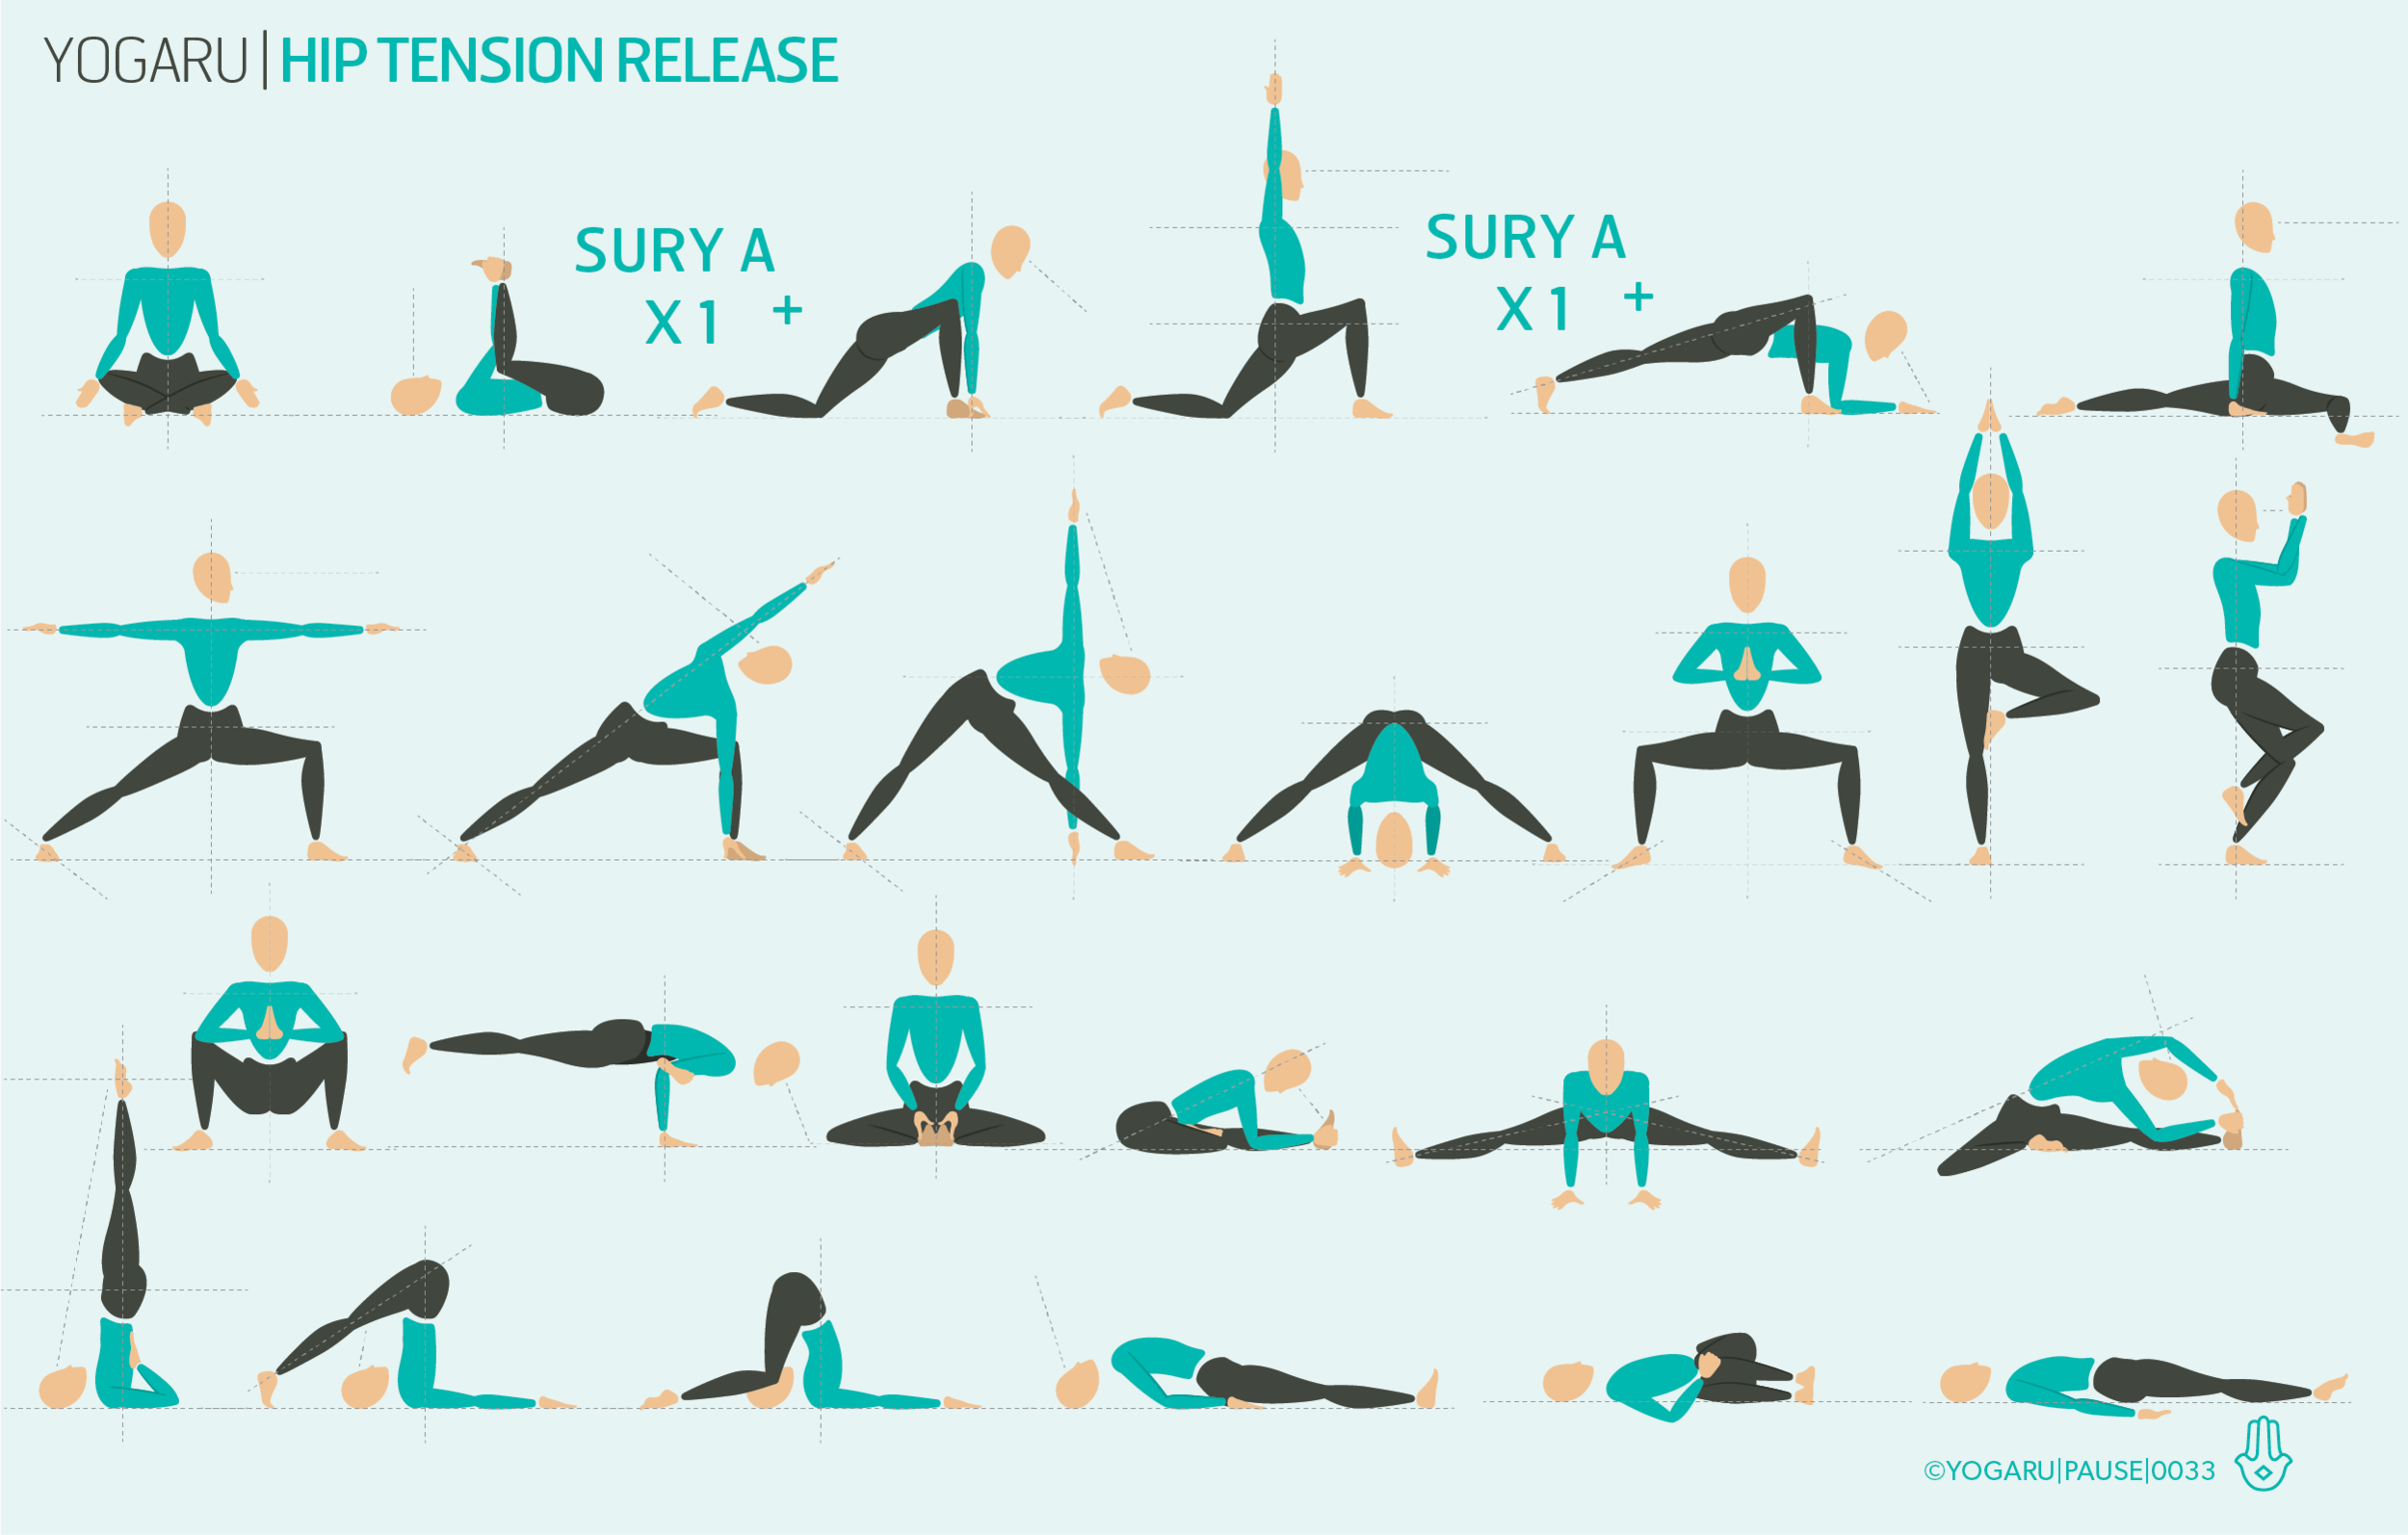
The above sequence works strongly into the hamstrings in preparation for Hanumanasana/Monkey pose or Splits. As a runner, hamstring asana do not come easily to me, they teach me patience and commitment to staying present. For most people, Hanumanasana/Monkey pose or Splits is a challenging pose. It doesn’t require strength but it gives you a very clear picture as to the level of stretch in your hamstrings, hip flexors, quads and inner groins. It also stimulates the abdominal organs; teaches you patience; reverses the effect of sitting for long periods of time and develops deep body awareness.

Try the above sequence. Start in Balasana/Childs Pose, with your knees together; hug your outer hips into the midline, using your outer buttocks muscles; strengthen your quads and squeeze the creases at the back of your knees; make your lower body as tight and small as possible. Hold for 5 deep breaths and release, repeat 3 times . Take a few breaths in the asana where you find some resistance in your hamstrings and being very gentle and patient. It takes 30 seconds for a muscle to register that you are asking its permission to open up. Use a bolster to raise your hips up in Hanumanasana/Monkey pose or Splits The higher your hips are from the ground the lower down your leg the support should be. Stay committed to the time on your mat, keep exploring and keep going.

To save the images for personal use click and hold down the image until the ‘save image’ option appears; on Mac hold down ‘control’ and click the image to get the option box; on PC right click on the image to get the option box. Scroll down in the ‘option box’ and click ‘save image’.

Ruth Delahunty Yogaru

Challenging stability

PAUSE_0034.png

BRINGING IT OFF THE MAT
Often in our practice we look at standing asana which require balance as a challenge to be conquered. When we don’t manage to catch our balance, the ego and the self-critic rise to the surface. Our practice on the mat can help us to deal with situations off the mat. We become better at recognising emotions, dealing with them in a supportive safe environment, and feeling more at ease with them off the mat. There will be periods of life when we feel out of balance emotionally and physically. Learning to deal with the emotions which come to the surface won’t stop the periods of instability, but it will help you to manoeuvre through these stages more smoothly – knowing that it’s a natural wave that will pass; staying present, and pausing before you react, as you move through the process.

CREATING INSTABILITY
This sequence artificially creates an unstable physical environment – with the intention of making you feel off balance – challenging you to slow down, explore the feelings that instability bring up for you, and recognising that these feeling will pass. If you find yourself judging your abilities – bring your attention back inwards, down to the three points on the soles of your feet (big toe mound, little toe mound and centre of the heel), and visualise your feet sprouting roots into the support of the solid ground. You will start to feel an engagement and energy travelling up from your foundation. Follow this sensation, pausing at points where you feel muscles working to stabilise and support you. Pay particular attention to your supporting leg/legs in the standing asana of this sequence.

There are two Ashta Chandrasana/High Lunge flows, mark a vertical line in the centre at the top and bottom of your mat (I used chalk). Line the big toe of your front foot to the right of the chalk line and the big toe of your back foot to the left of the chalk line. A narrower stance will make the high lunge more challenging to your balance. Root down into your feet and feel for your centre of gravity. Use a strap around the ball of the lifted foot in Utthita Hasta Padangustasana/Extended hand to big toe to help keep the upper body more upright. For more information on the importance of your feet in yoga have a read of Anatomy 101 - Find your feet.

To save the images for personal use click and hold down the image until the ‘save image’ option appears; on Mac hold down ‘control’ and click the image to get the option box; on PC right click on the image to get the option box. Scroll down in the ‘option box’ and click ‘save image’.

Ruth Delahunty Yogaru

Hip tension release

PAUSE_0033.png

ANATOMY OF THE HIP JOINT
The hip joint is our biggest ball and socket joint. It is made up of a complicated network of muscles that build stability in all our movements. When you start to look at the anatomy of the joint it all seems to make perfect sense – until you hit the multi-functional muscles! To maintain stability in movement, each action requires a muscle that contracts – to instigate movement (agonist), and a muscle that stretches – to control the extent of movement (antagonist). But some of the muscles do both! The adductor muscles running down the top of the inner thigh, referred to as the groin, do just that. They adduct (move towards the midline) the leg at the hip joint, causing the glutes to stretch, but they also laterally rotate (rotate outwards) the leg, causing the glutes to contract.

The adductors stabilise the hip joint, hold the inner thighs together and stop the legs from buckling out when we walk. Tight groins can cause an anterior (forward) tilt of he pelvis. If your groins are tight you might notice this anterior tilt in Warrior II, where your pelvis tilts forward and your buttocks stick out, causing you to over-curve your lower back. They can also pull your knee out of alignment and buckle it over to the big-toe side, preventing you from being able to stack your knee safely over your ankle.

EXPLORING HIP OPENERS IN YOUR PRACTICE
We hold a lot of tension in our hips which can be caused by emotional or physical stress. Sitting, running, cycling, all make our hips very tight and limit the range of motion in the joint. Hip openers in your yoga practice aid digestion, relieve stress, release tension and release emotions in a safe environment. Hip opening asana, such as Eka Pada Rajakopotasana/Pigeon, when held for several long, deep breaths, give the muscles time to feel safe and release. It also is a multi-functional asana, in that it stretches the outer hips and inner groin.

You can check to see if your groins are tight by sitting on the ground with the soles of your feet together and drawn towards your groin. Gently drop your knees out on either side, down towards the ground, and notice where you hips start to resist. Print out the above sequence and run through it. Repeat the groin stretch at the end and feel the increased freedom to your inner groin.

To save the images for personal use click and hold down the image until the ‘save image’ option appears; on Mac hold down ‘control’ and click the image to get the option box; on PC right click on the image to get the option box. Scroll down in the ‘option box’ and click ‘save image’.

Ruth Delahunty Yogaru