Immune system flow

PAUSE_0122.png

THE IMMUNE SYSTEM
The immune system works 24/7 to defend us against disease, infections and viruses. It is very effective but also benefits from a helping hand. The immune system likes the body to be balanced to work at its best. We know that life balance and lifestyle choices help overall health and wellness, but in a nutshell what are four steps you can take to get straight to the point of supporting the immune system.

  1. Eat well - eat plenty of whole plant foods, fermented foods and fibre.
    Whole foods are packed full of vitamins and minerals to power up the immune system. The gut is where we ingest the outside world. For this reason 70% of the immune system is found in the gut. The gut microbiome feeds on fibre (prebiotics) and thrives on fermented foods (probiotics). A strong and diverse microbiome supports the gut immune system and helps prevent any harmful bacteria entering the body through the digestive tract.

  2. Keep moving - move every day and throughout the day. Exercise increases the heart rate and boosts circulation around the whole body. This helps the body eliminate unwanted toxins that can hinder the immune system. Exercise also helps you get a good night sleep.

  3. Mind your mind - take time out to slow down.
    Short term stress is natural and something our bodies are built to deal with. But longer periods of stress overloads the body with stress hormones. Stress hormones suppress the effectiveness of the immune system making you more susceptible to illness. Which is why you are more prone to head colds and cold sores after a prolonged period of stress.

  4. Value sleep - have a good sleep routine.
    When you sleep your body rebuilds and replenishes its energy stores. Your stress hormones are lower while you sleep which gives the immune system optimally 8 hours to build stronger.

THE BENEFITS OF YOGA ON THE IMMUNE SYSTEM
At a glance yoga fits into the ‘keep moving’ category. Yoga is a gentle exercise which promotes good circulation and increases the function of the lymphatic (white blood cells and toxin removal) and endocrine (hormone production) system to keep them working more efficiently. Yoga actually ticks all boxes of the above four steps to a strong immune system.

Stress relief is one of yoga's most well known benefits and is often what attracts people to the practice. Yoga reduces physical and emotional stress in the body by tapping into the parasympathetic nervous system (rest, digest & restore response) through the breath. Lengthening and slowing our breath is both very calming for the mind and builds healthy lungs.

In yoga you learn how to breathe into your belly, this breath is very calming and helps to quieten a busy mind. When you have a regular practice you are training your brain to tap into the rest, restore and digest response. So when you are ready to go to sleep at night you can use this calming breath to find that same response and fall asleep faster, sleep longer and fall back asleep if you wake at night.

Where does ‘eat well’ fit in? When you start to practice yoga you naturally become more in tune with your body. You are more inclined to make more informed food choices either in the light of ‘ahimsa’ (non harming) of the world around you or just because it makes you feel better. Yoga also promotes good gut health by stretching and compressing the whole digestive system and encouraging peristalsis (waves of muscular contractions) to remove unwanted waste and toxins from the body, enabling your digestive system to concentrate on absorbing all the nutrition from food.

TWISTS, BACKBENDS & INVERSIONS
Twists, backbends and inversions are the most powerful poses to practice when working with the immune system. In yoga philosophy texts it is said that twists ‘destroy disease’. When we twist we temporarily constrict blood flow and when we release the twist a surge of fresh oxygenated blood rushes back. This twist and release action massages and stimulates the organs and helps the digestive system with maximum nutrition absorption; the respiratory system to build strong lungs; the liver and kidneys to remove toxins; and the lymph system to support white blood cell production. The same principle applies to backbends which stretch the front of the body and stimulate the organs of the abdominal and chest cavity. Backbends are particularly good for expanding lung capacity and opening the chest region. The higher the lung capacity the better our ability to feed all the cells of the body with fresh oxygen.

A healthy gut also has a strong link to our moods and emotional well-being. Stress leads to gut issues and gut issues lead to stress. 95% of serotonin (the happy hormone) is produced in the bowel. Stimulating the gut through twists and backbends release these happy hormones into the system and relieve stress, tension and anxiety and allow the body to concentrate on other jobs like building its defences.

Inversions boost circulation and increase blood and lymph flow which helps clear bacteria and toxins from the body and plays a vital role in building a strong immune system. Inversions are hidden everywhere in the practice. An inversion is any pose where the heart is above the head. Along with the obvious poses like handstand and headstand there are lots of opportunities to take inversions in standing forward bends, Adho Mukha Svanasana/Downward Dog, Setu Bandha Sarvangasana/Bridge and restorative poses like Viparita Kiranai/Legs up the Wall.

Hip openers are strong stress relieving poses and are also very beneficial for the immune system. There are certain poses that are considered formal ‘hip opener’ poses but in reality most yoga poses are hip openers which are either ‘opening’ the inner hips (Virabhadrasana II/Warrior II, Utkata Konasana/Goddess, Upavistha Padottanasana/Wide Legged Forward Fold, Malasana/Squat, Badhakonasana/Bound Angle) or ‘opening’ the outer hips (Gomukasana/Cow Face, Ardha Matsyendrasana/Half Lord of the Fishes, Garudasana/Eagle, Ananda Balasana/Happy Baby). Apart from Urdhva Hastasana/Upward Salute, Salamba Sarvangasana/Shoulderstand and Savasana/Corpse Pose all of the poses in this sequence are opening the hips to some degree.

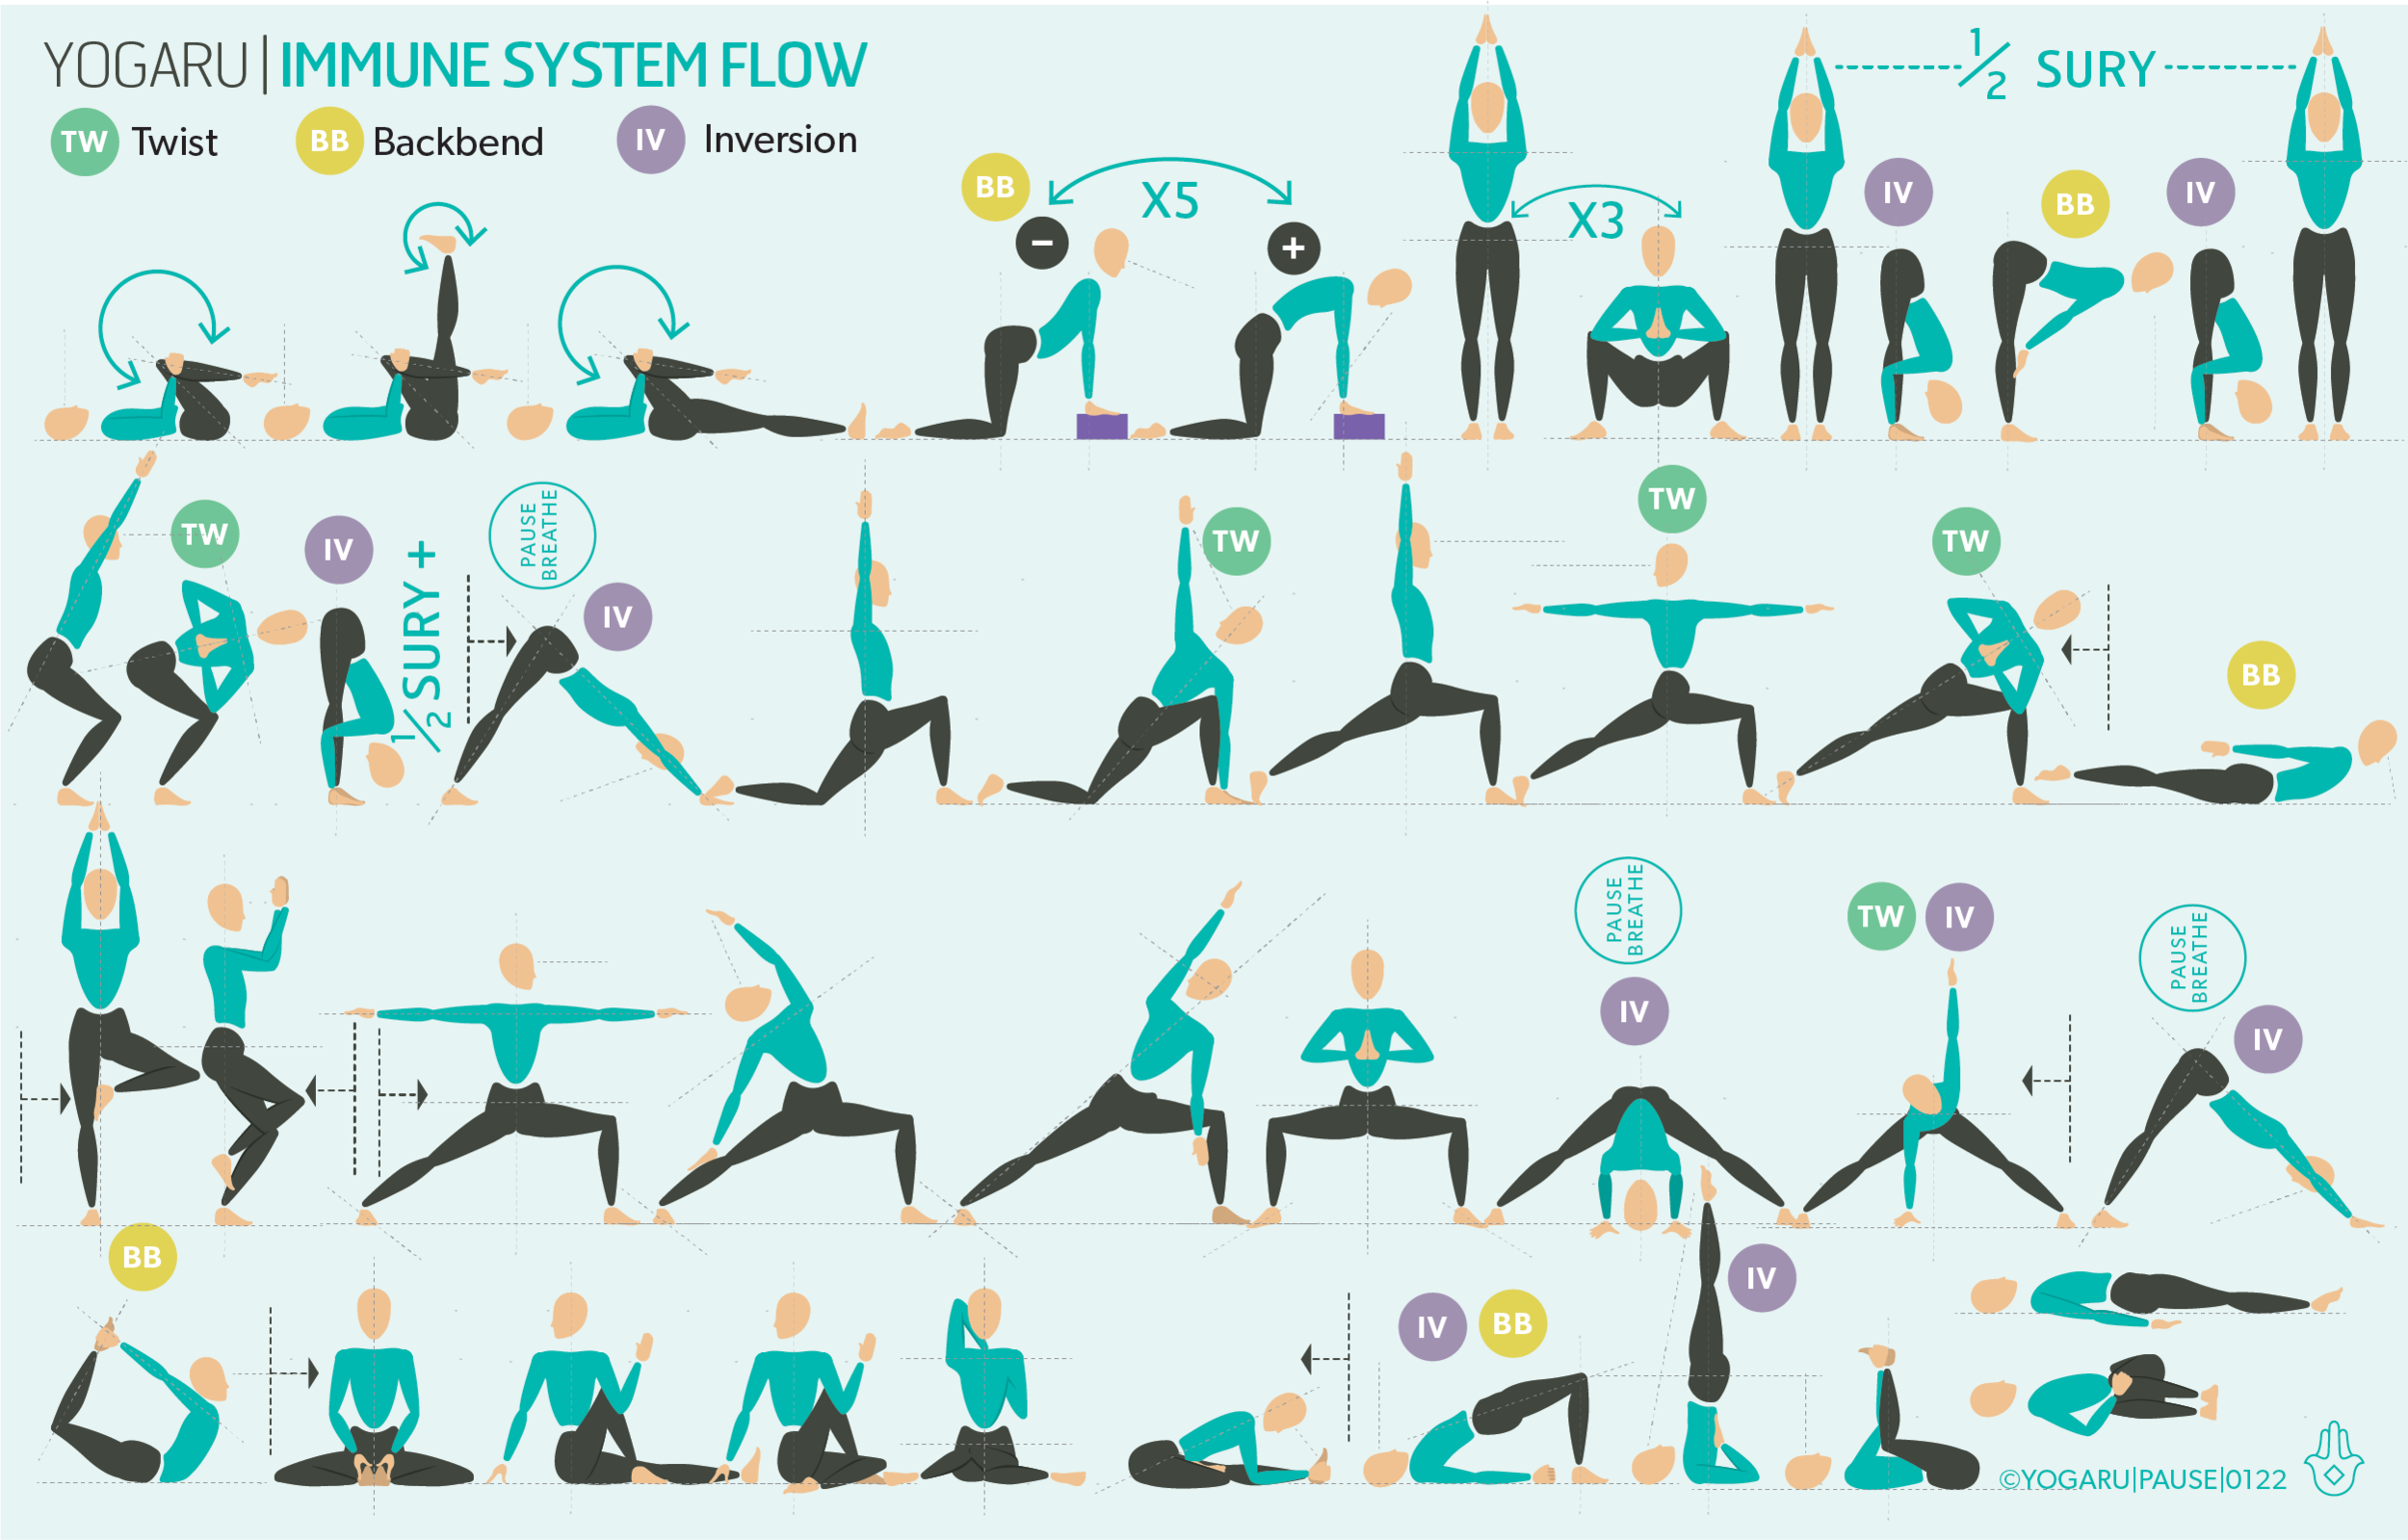
EXPLORING IMMUNE SYSTEM FLOW IN YOUR PRACTICE
This sequence is designed to work on the inner mechanics of your body. As you move through the practice travel inwards and visualise the parts of your inner body that are being gently invigorated. There are plenty of inversions throughout this practice. Taking an inversion is like turning up the volume on your circulation. You are reversing what it is used to and sending more oxygenated blood to the brain which is why they can be very invigorating. If Shoulderstand is not comfortably part of your practice you can either pick an inversion that you prefer or skip it.
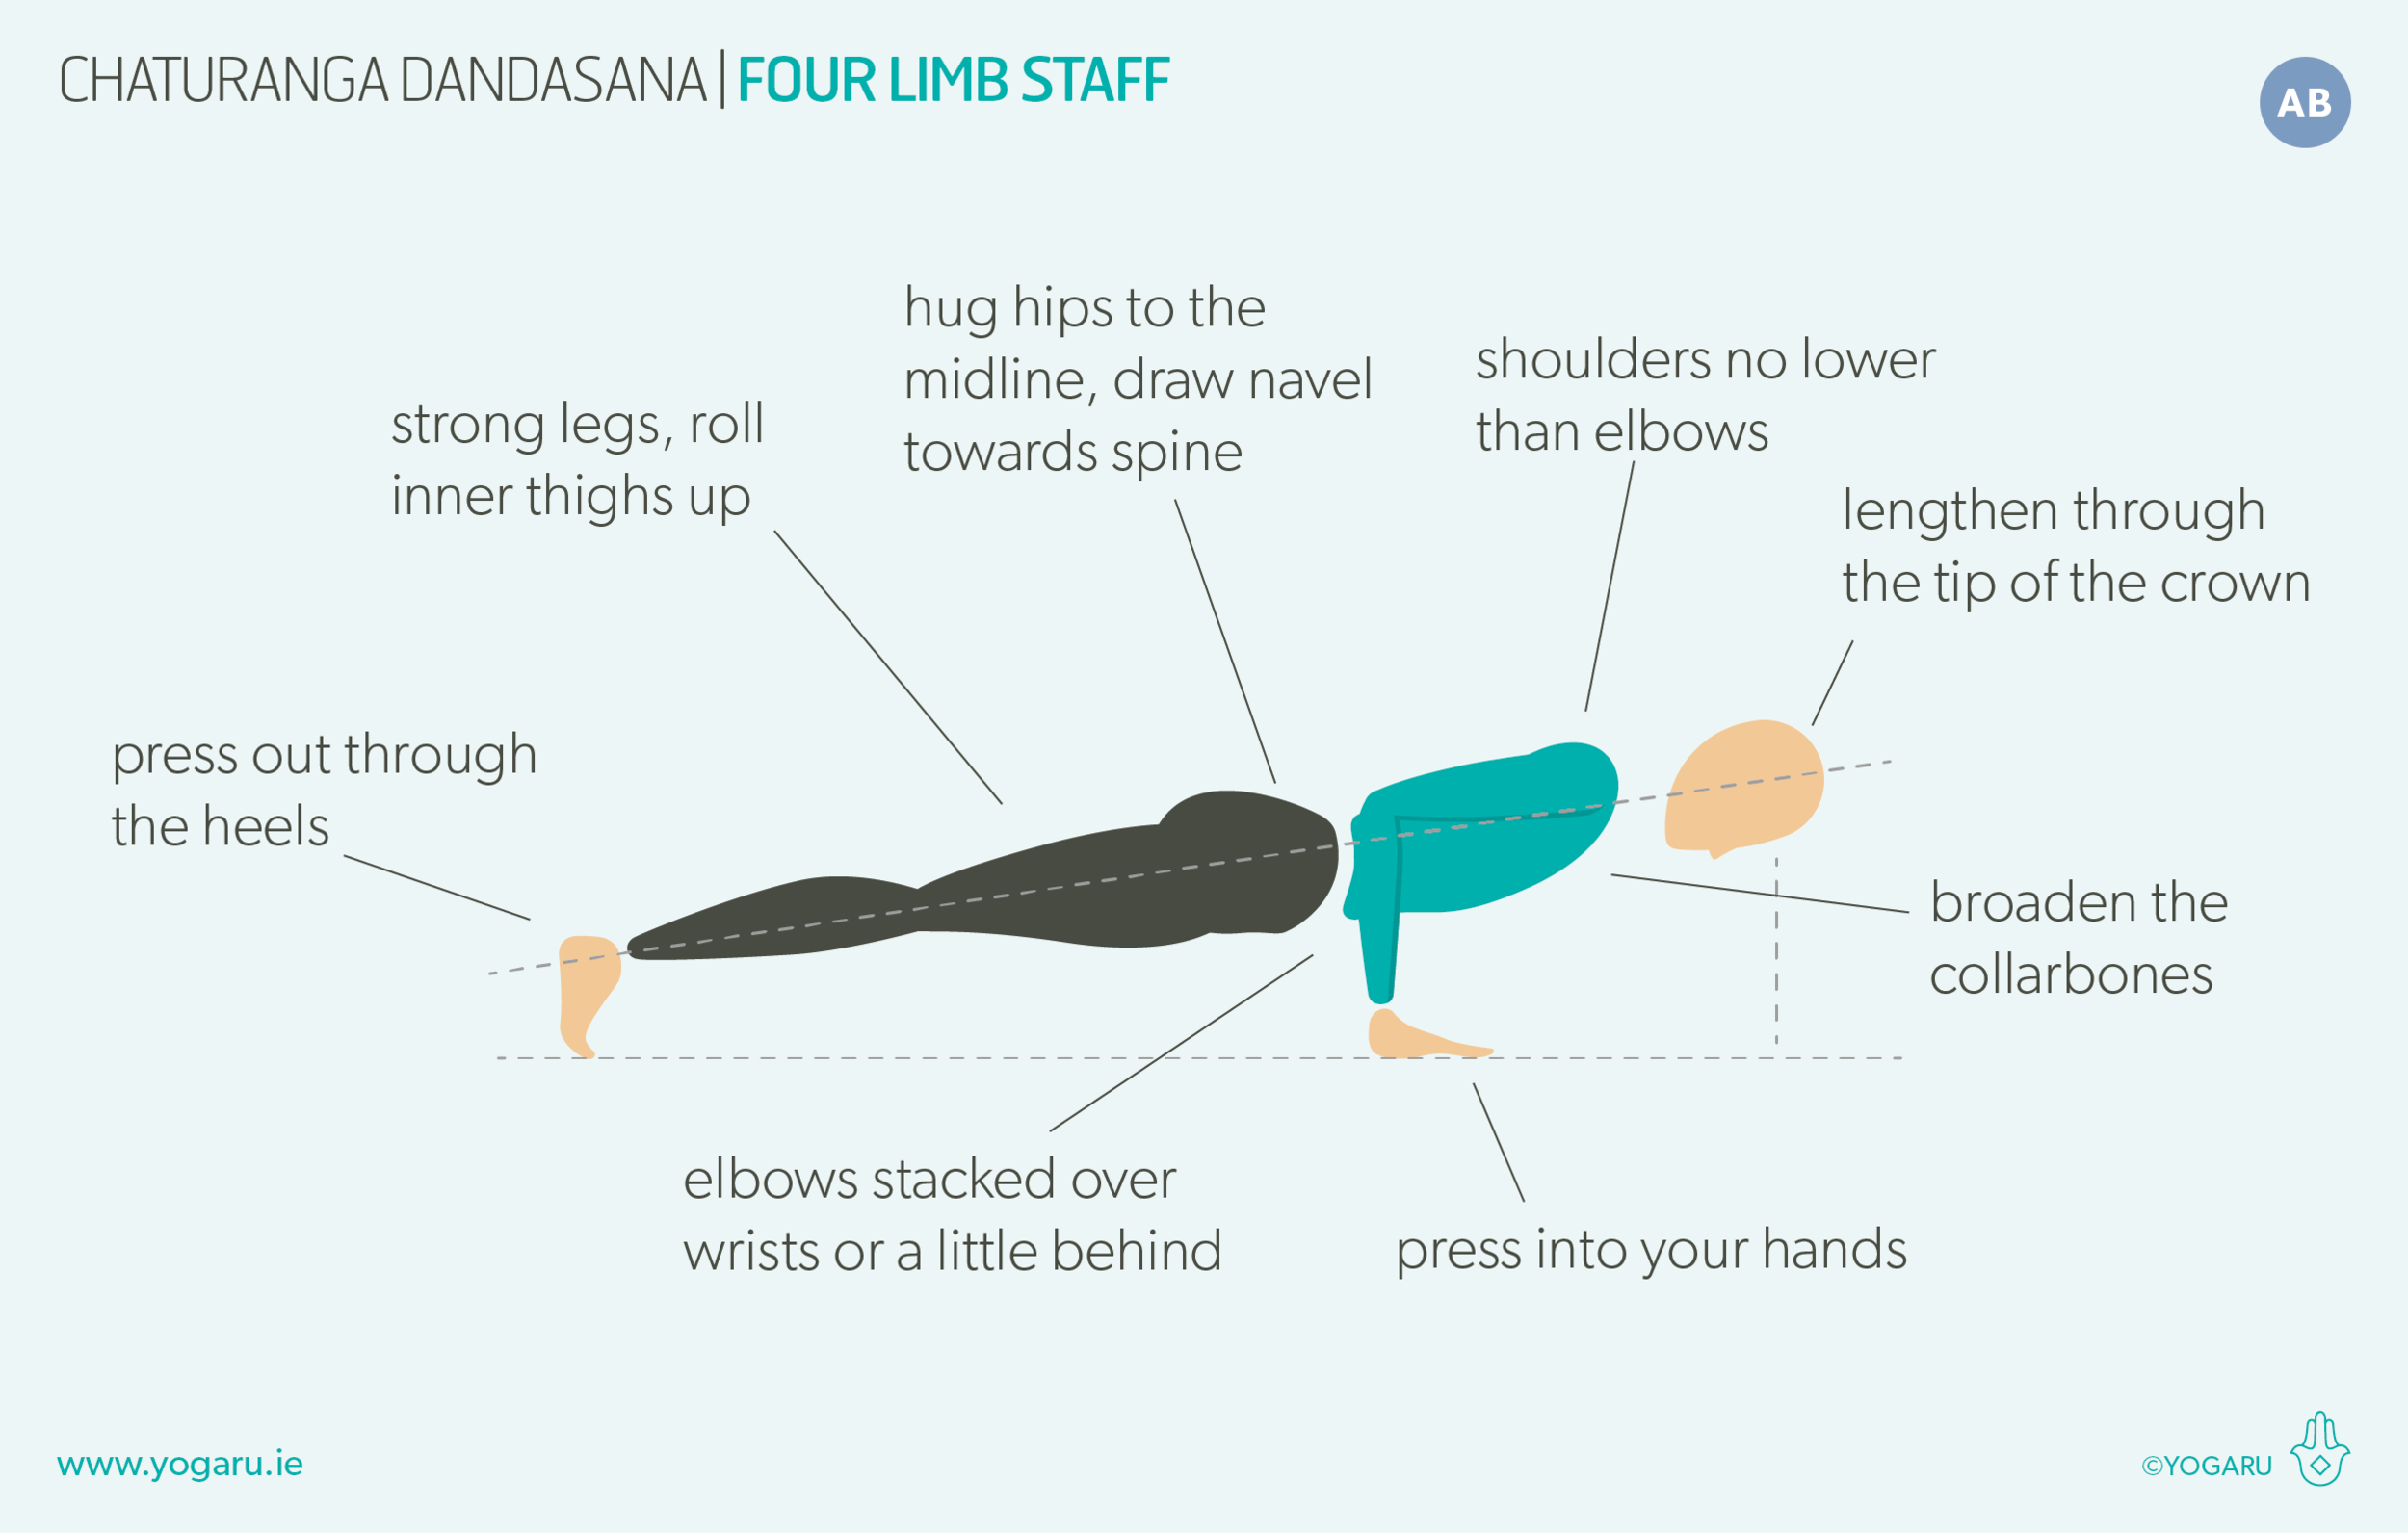
ALIGNMENT CUES
Allow yourself to arrive gently onto your mat, place your hands on your belly and take a few breaths to connect with your breath before you start moving. If you notice you have lost your breath though your practice come back to the ground and find your breath again. Start with some warmups on your back to open the hips and start preparing the spine for backbends. Move slowly and mindfully and be prepared to invest a bit of time and patience to allow yourself to gently build up your practice to the stronger poses of the sequence.

Have a read of the tips below and either print out the sequence or save it onto your device:

  • You can decide to take an open twist where you twist away from your front leg or a deeper closed twist where you twist towards your front leg.

  • If you have bricks take your cat/cow with your hands raised on the bricks. This gives you a bit more space to comfortably open the chest a bit more.

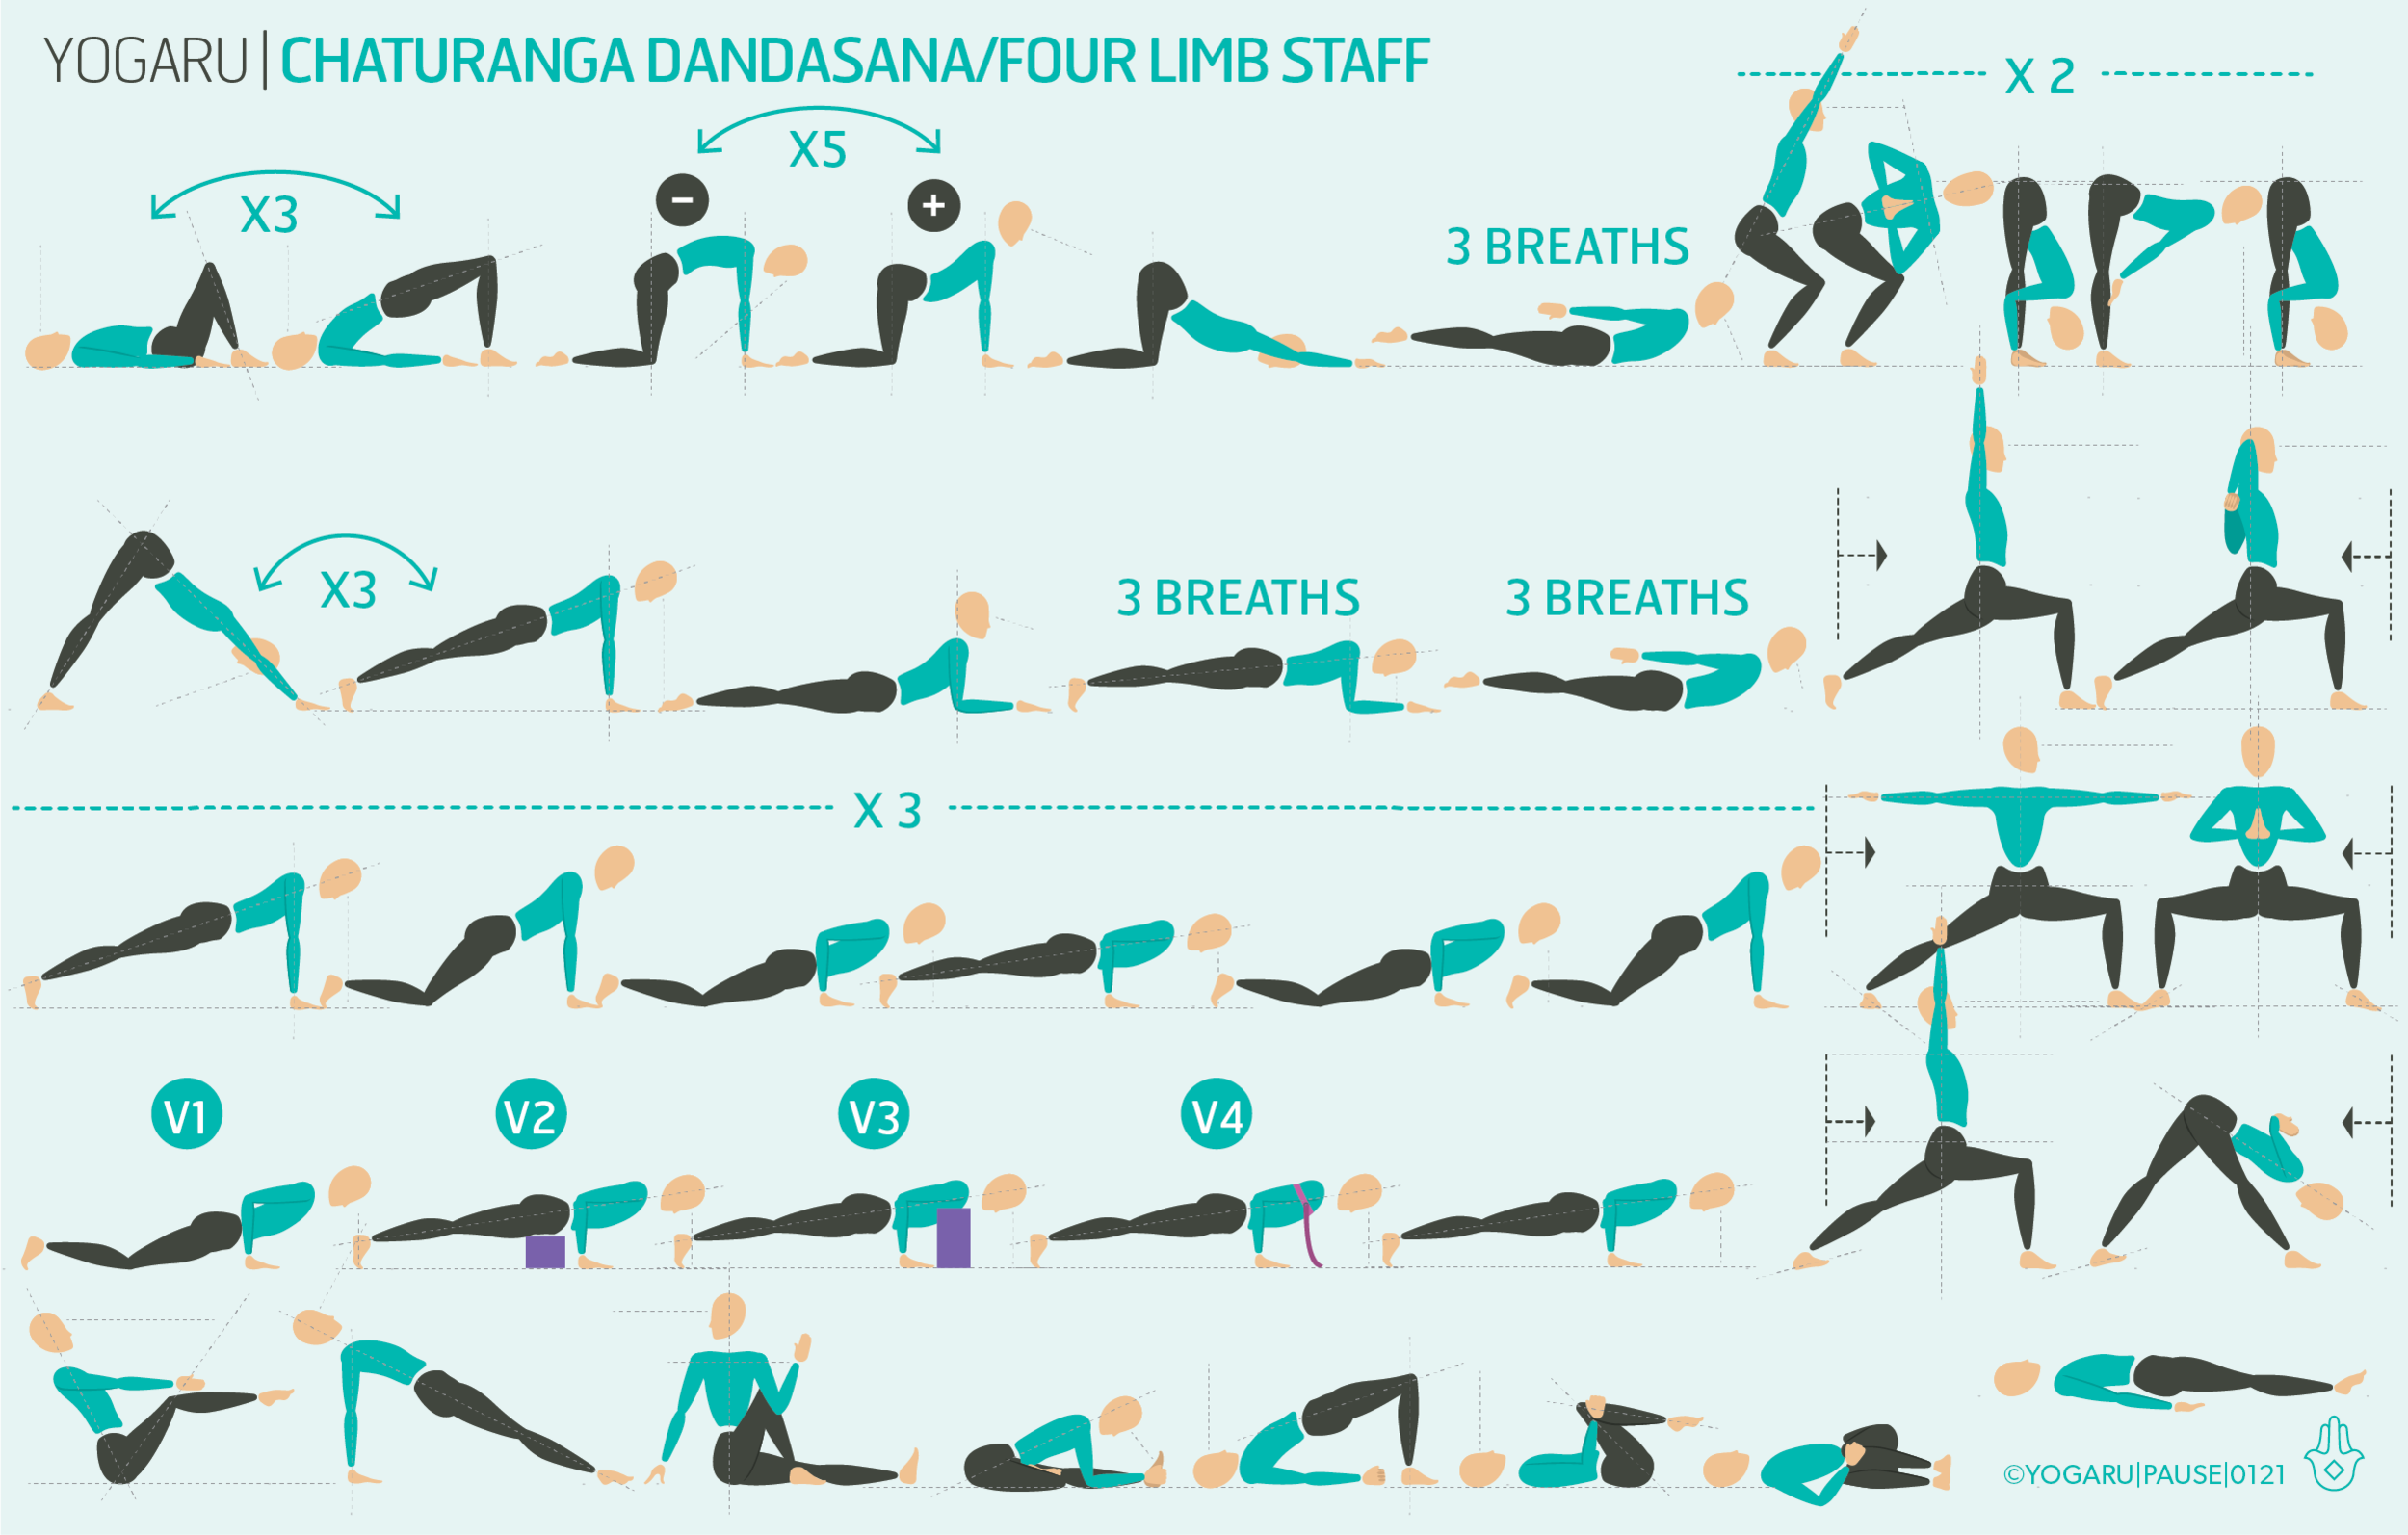
  • Before each mini flow come to the top of your mat and take a ½ Surya Namaskara which you will find in the first row.

  • Incorporate at least 2 minutes for Savasana at the end of your practice to assimilate the practice and get yourself mentally ready for the day ahead.

To save the images for personal use click and hold down the image until the ‘save image’ option appears; on Mac hold down ‘control’ and click the image to get the option box; on PC right click on the image to get the option box. Scroll down in the ‘option box’ and click ‘save image’.

Ruth Delahunty Yogaru

Chaturanga Dandasana - Four Limb Staff

YOGARU_Chaturanga Dandasana_PB.png

NOT JUST A TRANSITIONAL POSE
Chaturanga Dandasana/Four Limb Staff is a pose in its own right which is often lost in vanyasanas somewhere between Phlankasana/Plank and Urdhva Mukha Svanasana/Upwards Facing Dog! It is a tricky pose, which is why we sometimes rush through it to get to Urdhva Mukha Svanasana/Upwards Facing Dog or Bhujangasana/Cobra. When performed repeatedly, and not given the time and respect it deserves, it has the potential to cause shoulder, lower back and wrist injuries. Having a better understanding of the alignment of the pose will not only give you the opportunity to strengthen your arms and shoulders but will help you recognise when to reduce your repetitions of the pose to avoid injuries.

THE BENEFITS OF CHATURANGA DANDASANA/FOUR LIMB STAFF
Chaturanga Dandasana/Four Limb Staff is an arm balancing pose and teaches you the principles of stabilising the shoulder joint and prepares you for more challenging arm balances where the legs are lifted. When performed with integrity it also strengthens the shoulders, spine, arms, core, glutes, and legs.

COMMON MISALIGNMENTS
After several rounds of sun salutations or vinyasas the muscle of the shoulder can start to fatigue. When muscles run out of steam, it can put unwanted load on the joint and potentially injure the fatigued muscles, tendons or the surrounding supporting ligaments. Most of us are asymmetrical – where one side is weaker or stronger than the other – when this is the case it can either put too much pressure on the weaker side, or the stronger side compensates which can eventually increase your chance of repetitive strain injuries. One of the most common misalignments is when the shoulders drop lower than the elbows. When this happens we push great force into the shallow shoulder joint in an extended position. This is not a naturally strong position for the joint, and causes too much reliance on the upper shoulder muscles rather than utilising all of the shoulder muscles. Common misalignments in Chaturanga Dandasana/Four Limb Staff to watch out for are:

  • Elbows splayed - causes pressure in the shoulder joint - track the elbows with the shoulders.

  • Shoulders dropped lower than the elbows - causes pressure in the shoulder joint - broaden through the collarbones and lift the chest up to lower down.

  • Chest sunken down - pinching in between the shoulder blades - press into the hands, spread shoulder blades across your back.

  • Shoulders hunched up towards ears - neck issues - soften shoulders away from the ears.

  • Belly dropped down to the ground - pressure in the lower back - draw your navel towards your spine.

EXPLORING CHATURANGA DANDASANA/FOUR LIMB STAFF IN YOUR PRACTICE
This sequence will bring you through different versions of chaturanga to help you build shoulder, spine, arm and core strength to gradually prepare for the peak pose. Some with the knees down to gradually build you up to the full pose, and some using props so you can stay longer in the pose and build a blueprint of it in your body. If the full pose is not safely possible for you at the moment, continue to use the props or bring the knees down for the full sequence. These are valuable versions of the pose and ones I use frequently if I am repeatedly coming down to the floor in my practice. Versions of Chaturanga Dandasana/Four Limb Staff:

V1 - from Phlankasana/Plank Pose bring your knees down and slowly bend your elbows and lower down until your shoulders are no lower than your elbows.

V2 - position a brick under your hips, from Phlankasana/Plank Pose slowly bend your elbow and lower down until your hips are lightly supported by the brick, press into your hands, arms hugging in, collarbones wide, lengthen through the whole spine.

V3 - position two bricks standing upright in front or your fingertips, from Phlankasana/Plank Pose slowly bend your elbow and lower down until your shoulders are lightly supported by the bricks, draw your navel towards your spine, press into your hands, arms hugging in, collarbones wide, lengthen through the whole spine.

V4 - wrap a belt loop around your upper arms, from Phlankasana/Plank Pose slowly bend your elbow and lower down until your chest is lightly supported by the belt, draw your navel towards your spine, press into your hands, arms hugging in, collarbones wide, lengthen through the whole spine.

PAUSE_0121.png

ALIGNMENT CUES
Take your time with this sequence and treat it like a mini home workshop. If you don’t have bricks use stacked books and if you don't have a belt use a scarf. These versions might take a bit of organisation but it will be well worth the set up time. They support you in the pose and give you a chance to spend a bit of time exploring what your optimum alignment feels like.

Have a read of the tips below and either print out the sequence or save it onto your device:

  • From Phalakasana/Plank Pose, inhale, press out through your heels to firm your legs, draw your navel towards your spine, firm your shoulder blades onto your back, and broaden through the collarbones.

  • Press into all five knuckles of your hands pull them towards your feet as you reach your chest forward. Exhale, bend your elbows, track them directly in line with your shoulders.

  • Lower your chest forward and down. Lift through the upper back and spread your shoulder blades as you lower.

  • Think ‘up’ as you are coming down.

  • Hug your hips to the midline and squeeze your thighs. Roll your inner thighs up and reach your tailbone towards your heels.

  • Draw your navel towards your spine to keep the core strong.

  • Elbow stacked over wrists or a little further back toward your feet to avoid injury to the wrist or irritation to carpal tunnel syndrome.

  • Keep your head in line with your spine, back of the neck long, gaze down.

To save the images for personal use click and hold down the image until the ‘save image’ option appears; on Mac hold down ‘control’ and click the image to get the option box; on PC right click on the image to get the option box. Scroll down in the ‘option box’ and click ‘save image’.

Ruth Delahunty Yogaru


Seniors mobility flow

PAUSE_0120.png

FLEXIBILITY V’S MOBILITY
Yoga gets typecast as being all about flexibility. Yoga is not a measure of how far you can touch your toes, it is about finding mobility movements that suit you in order to keep your body moving freely in your everyday activities with longevity. Think of how a hinge works. If you repeatedly push the hinge to its furthest points it will eventually snap. On the other hand, if you don’t move the hinge at all it will get very stiff. The hinge works best when it is kept moving fluidly - the hinges of the body are no different, to work optimally they like to be regularly moved. A hinge might need oiling every now and again, but as an added bonus our clever bodies have their own built in oiling system, as long as we keep our hinges moving.

It is important to understand the difference between what is challenging but valuable for you and what might not be suitable for you. A bit of a challenge is a good thing to help maintain and build mobility and stability, and help you feel strong and well in your everyday movements, but you should feel safe within this challenge. When you find something challenging ask yourself ‘will this movement help me in my life off the mat and is it suitable for me’ – learning how to safely get up and down off the ground is a valuable life skill, working on your balance in standing poses is a valuable life skill, doing fancy picture perfect yoga poses is not a life skill!

EXPLORING SENIOR MOBILITY IN YOUR PRACTICE
This sequence is designed to help you work on your balance, keep your joints moving, maintain bone density and build muscle strength. It will gently move your spine in all directions to help spinal health and ease out any held tension. It will also help you beyond your physical body. Movement, yoga in particular, is very good for building focus, concentration and all round mental health.

We all have areas of tenderness or stiffness that need an extra bit of care and attention. The best way to approach this is to bring them onto the mat with you as part of your practice that needs to be considered rather than a hindrance. Moving slowly as you practice will give you space to listen to your body for feedback on how it is reacting to the practice. A slow practice will also build better strength and stability to all the muscles and joints of your body.

There is a lovely principle in yoga of ‘Sthira & Sukham’ which means ‘effort and ease’. Look for the effort and the ease in each pose and in each transition between poses. Take as many breaks as you need. Taking a break gives your body the chance to assimilate all the wonderful benefits of each pose in the practice and is never considered a failure of stamina in yoga.

This sequence will teach you how to get up and down from the ground. If this is difficult for you at the start place a chair at the top of your mat and use it to help support you. Props are very much a part of the yoga practice and are used in many poses to help adjust a pose to suit the student.

ALIGNMENT CUES
On the first row of the sequence you will find a guide for ‘coming down’ and ‘getting up’ from the ground. To come down to kneeling , bend your knees and press both hands into your right knee, step your left foot back and gently bring the left knee down to the ground. Then place both hands on the ground, step the right foot back and bring the right knee to the ground to a kneeling position. To get up from kneeling, step your right foot forward between your hands, press both hands onto the right knee, lift your left knee up and when you are ready step the left foot forward. Visit my YouTube channel to see a practice tips tutorial on getting up and down from the ground and how to incorporate a chair to help you if needed. Use these through your practice to help you come down and get up as needed. You will also find a ‘½ Sury’ these are optional extras at the start of each mini flow. Start your practice by coming down to the ground and lying on your back, with your hands on your belly, and take a few rounds of Viloma breath. Viloma breath breaks the exhale into three and helps to naturally lengthen the breath without tension – inhale completely, then exhale, pause, exhale, exhale pause the full breath. Take two to three regular breaths to prepare you for your movement practice.

  • You can practice the whole sequence or dip into a few of the mini flows which are indicated by arrowed lines.

  • You flow through these connected poses on the right side first (right foot forward) and then take those poses on the left side (left foot forward).

  • If you encounter a pose that doesn’t feel right for you simply skip it and move onto the next pose.

  • As you move try not to get caught up too much on whether it should be an inhale or an exhale, just don’t forget to keep breathing!

  • If there is a pose that you’re not sure of you can find all 108 poses in my asana section. You can narrow down your search by clicking into the asana families in the bar on the right.

  • Take plenty of rests during the practice in either Balasana/Child’s Pose or Tadasana/Mountain.

  • Take a few minutes at the end of your practice in Savasana/Corpse to give yourself a chance to get reenter your day.

To save the images for personal use click and hold down the image until the ‘save image’ option appears; on Mac hold down ‘control’ and click the image to get the option box; on PC right click on the image to get the option box. Scroll down in the ‘option box’ and click ‘save image’.

Ruth Delahunty Yogaru