Sequences

The posterior chain

PAUSE_0103.png

THREE DIMENSIONAL BEINGS
We are very conscious of our front bodies. It is what looks back at us in the mirror and primarily what we communicate with too – it’s much harder to read a person from their posterior! We concentrate most of our movement patterns on our front body too and the back body gets ignored, until it makes itself heard through shoulder, back, glute or hamstring pain or injuries. ‘The posterior chain’ refers to the whole back body, starting from the back of the heel, the calves, hamstrings, glutes, lower back (lumbar spine), upper back (thoracic spine), the neck (cervical spine) and end just under the back curve of the skull. This chain of muscles are designed to hold us upright. If they are weak they can become fatigued more easily and we collapse and curl forward in the front body. The posterior chain become weakened from lack of use or from long periods of sitting where parts are in a static slight stretch and there is very little strengthening and stabilising. A strong posterior chain protects the back and allows more freer fluid movement.

FORWARD BENDS VS BACKBENDS
In our practice we naturally come into more forward bend poses than backbends. In a Classic Sun Salutation you will take six forward bends (where the upper body is moving towards the lower body) and one backbend (where the upper body is moving away from the lower body) on each side which means twelve forward bends to two backbends to a full round of a Classic Sun Salutation. As with everything in life and especially in movement balance is best. Adding more poses that actively strengthen all or part of the posterior chain and will ignite the muscles of the back body.

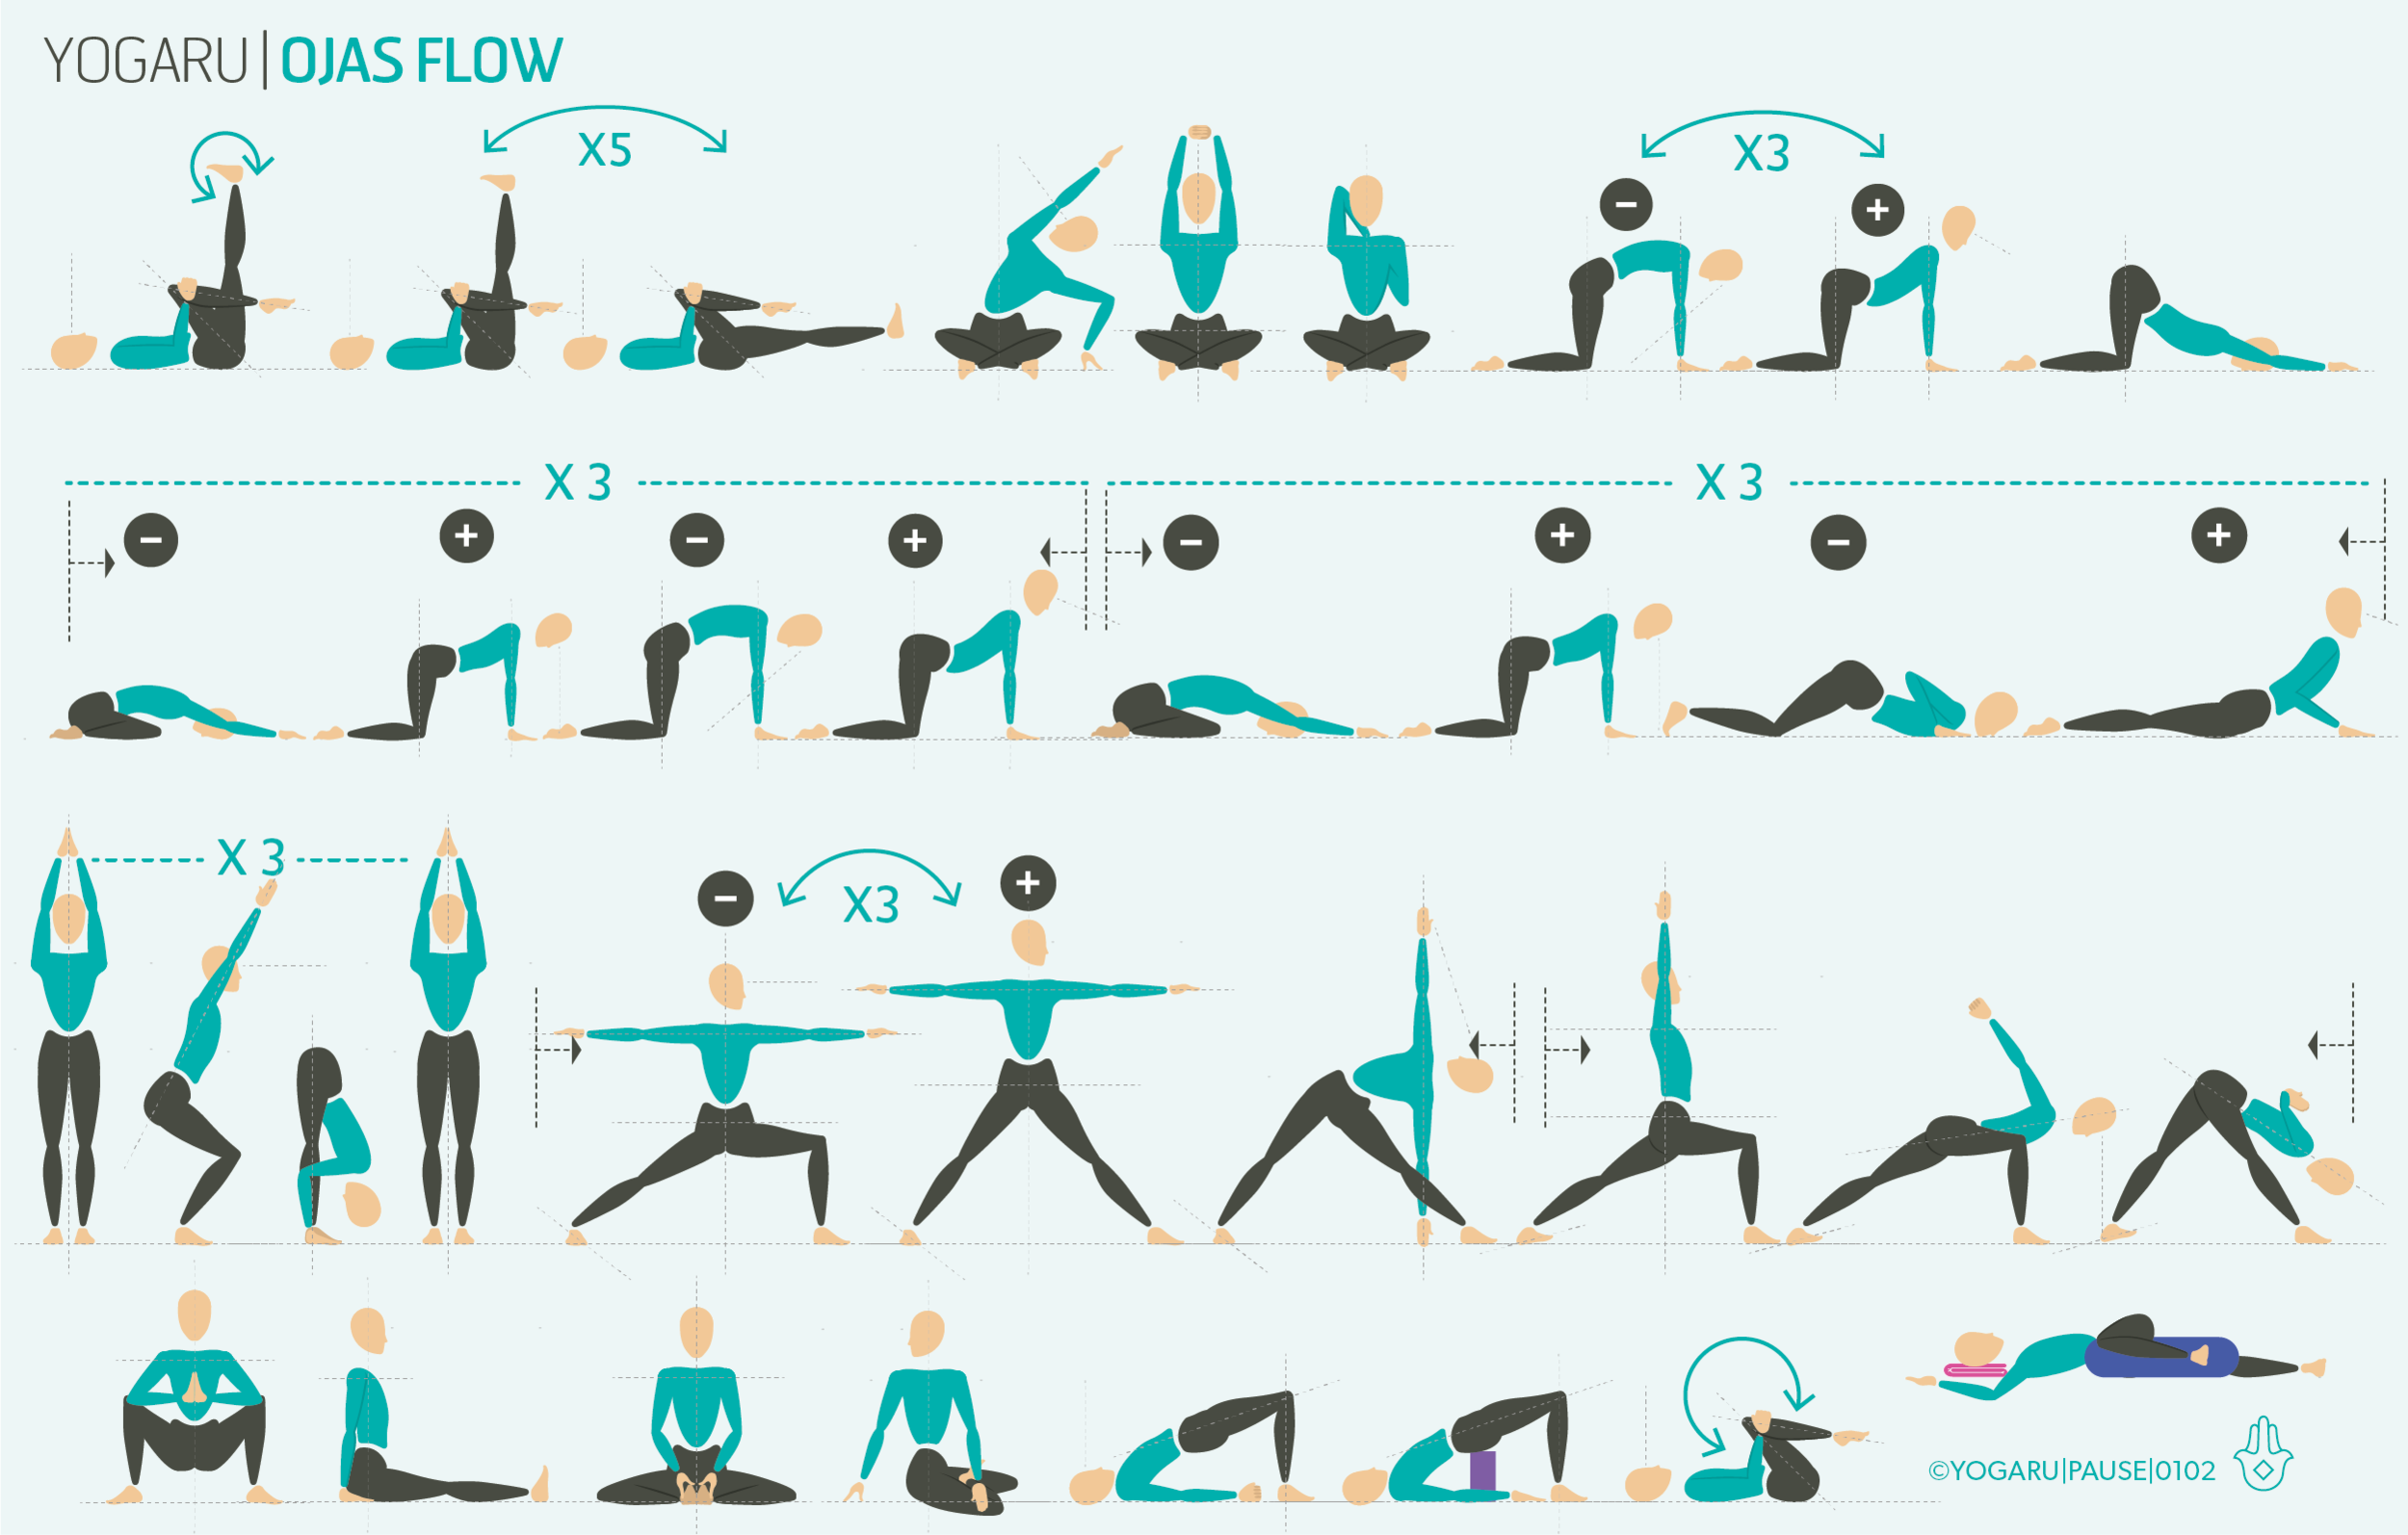
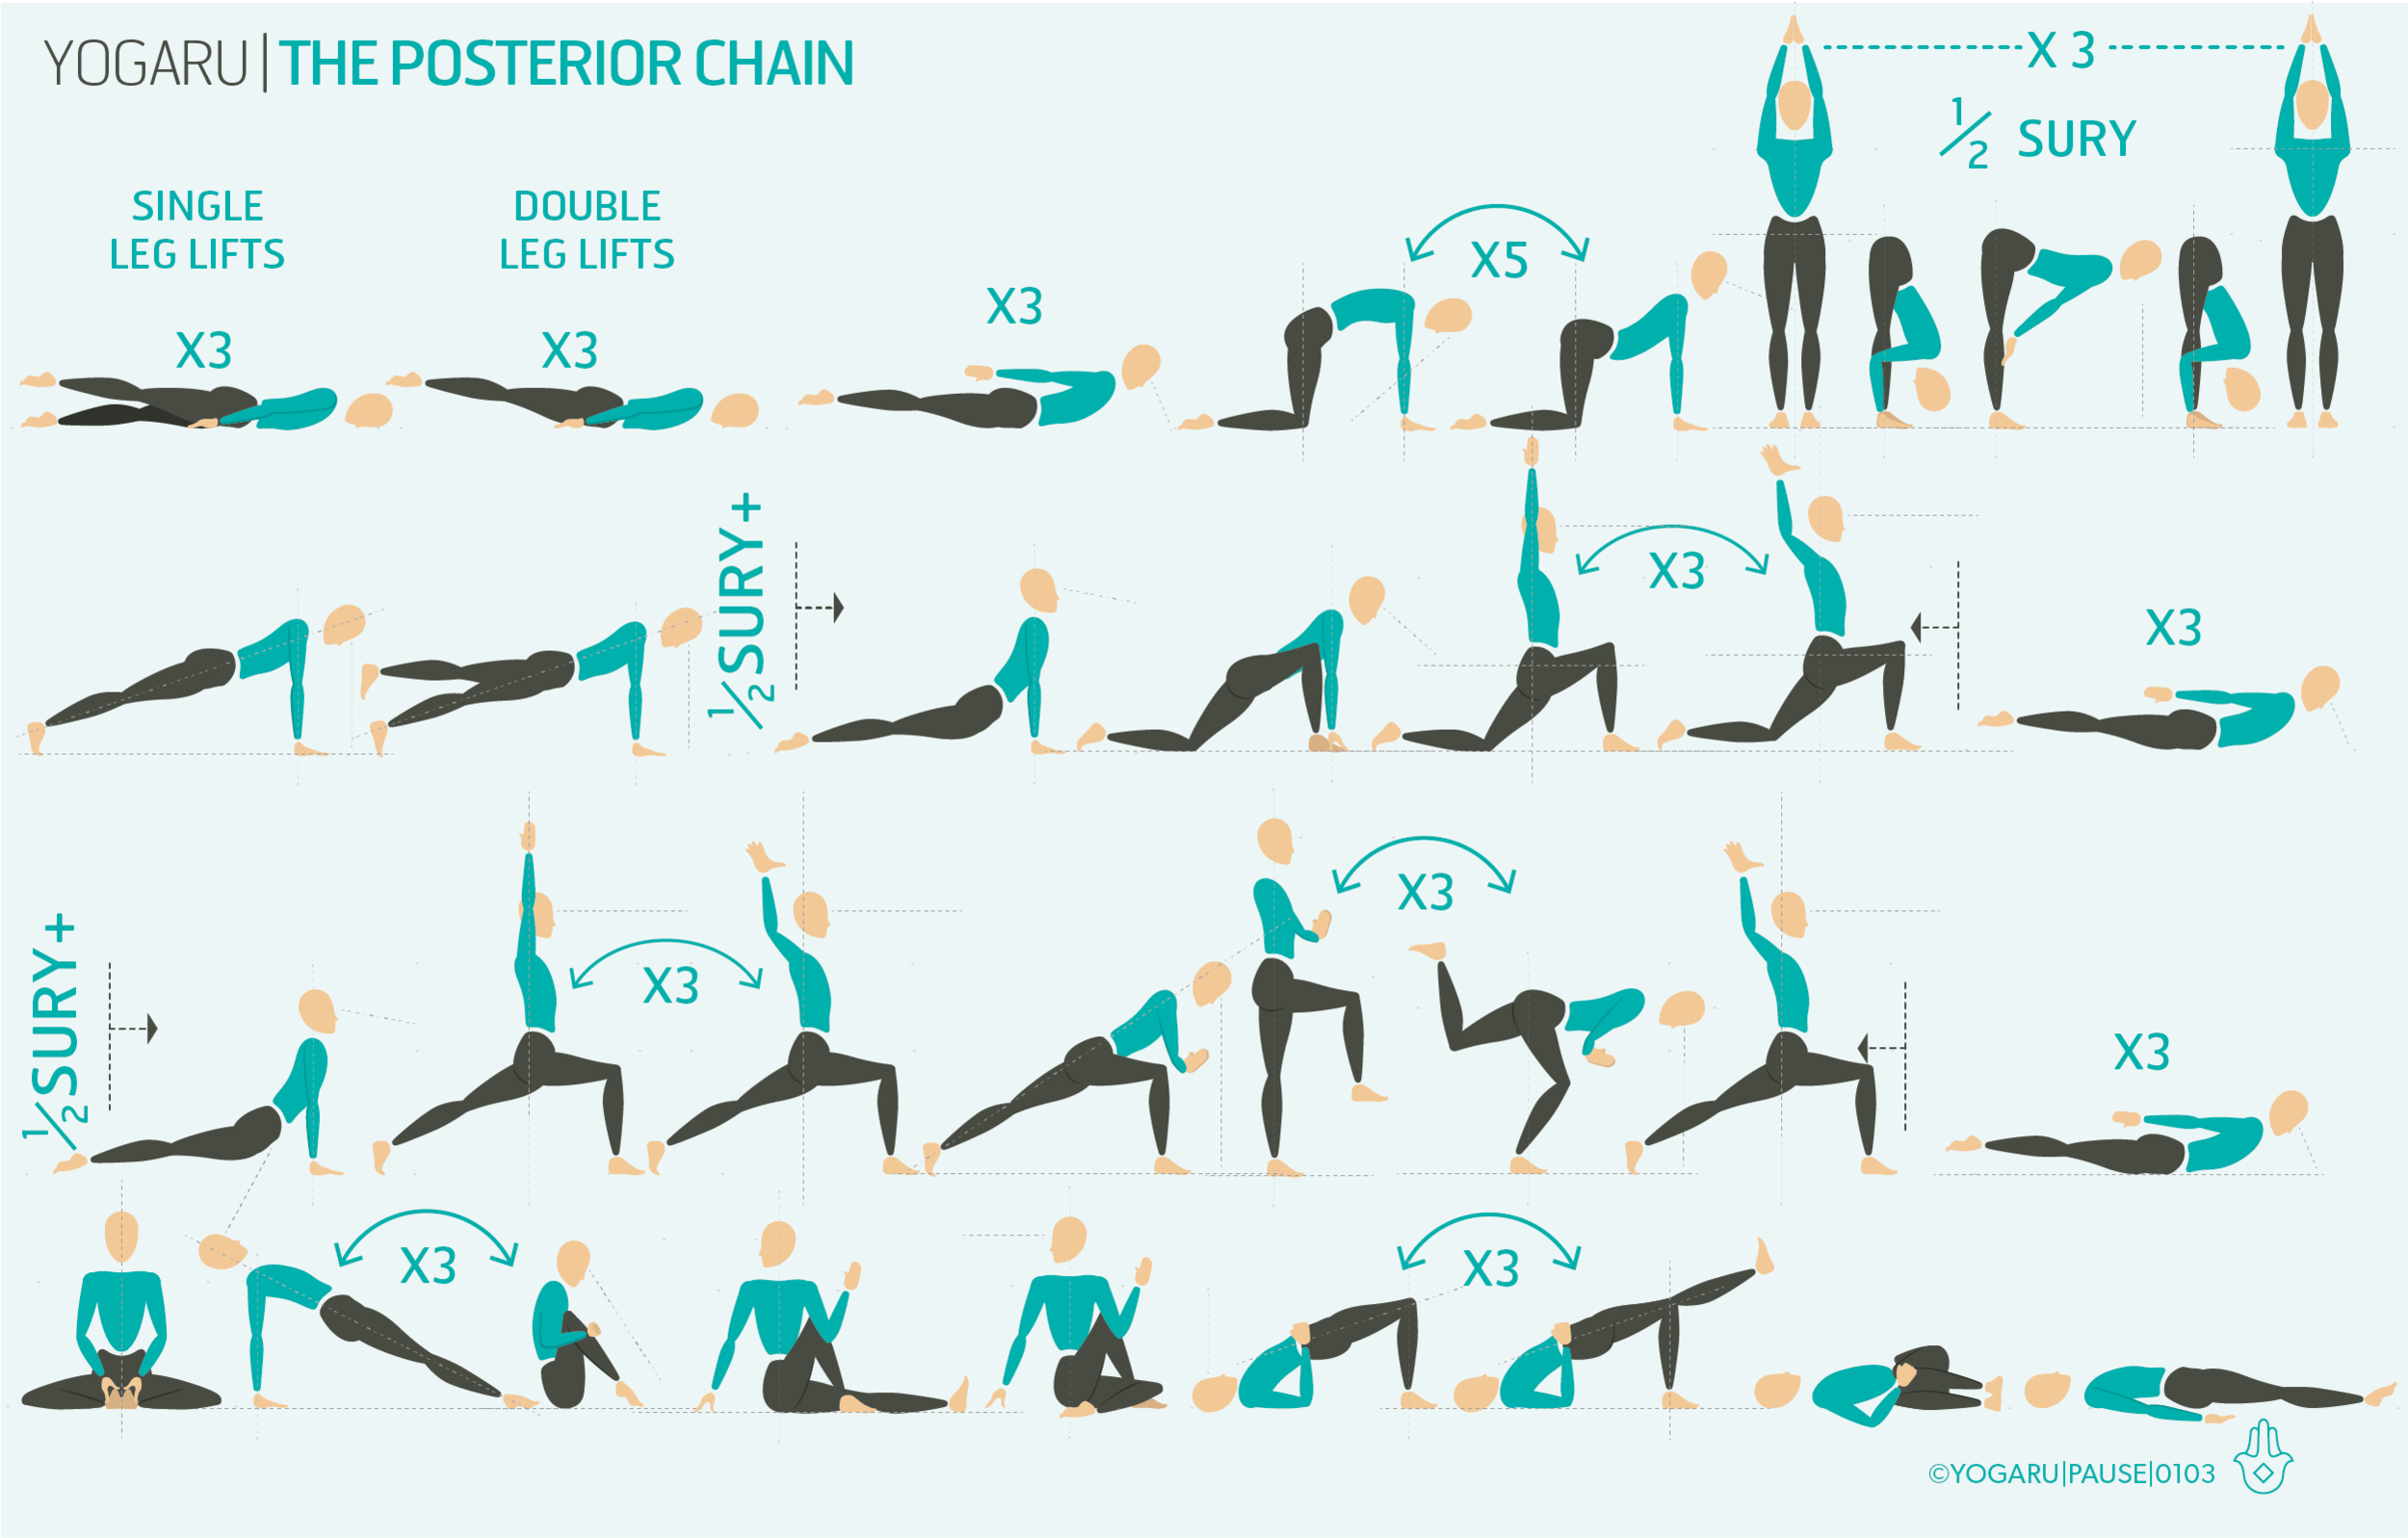
EXPLORING THE POSTERIOR CHAIN IN YOUR PRACTICE
This sequence intermittently adds poses that will strengthen your whole back body. Salabhasana/Locust is one of my favourite poses for strengthening the posterior chain from the heels to the top of your neck. Ardha Uttanasana/Half Forward Fold is also very easy to add into your sequences and will help to counteract long periods of sitting and improve posture by strengthening the back. To concentrate the actions into the back strength keep your knees slightly bent and press your hands strongly into the tops of your knees to reach your chest forward and up, taking care not to bring too much flexion into the back of the neck.

ALIGNMENT CUES
The sequence starts lying prone and connecting with all the muscle groups of your posterior chain. The peak pose is Urdhva Mukha Svanasana/Upward Facing Dog. When you find yourself in this pose lift up with the back body and work on taking as much weight off your hands through the strength of your back as you can. Press into the tps of your feet and reach them back as you hug to the midline and lift through the core to protect your lower back. It is not a pose to stay in for too long, but you can add a few more of them in between mini flows if you are enjoying finding your back body strength.

  • From Chaturanga Dandasana, inhale, reach your sternum forward and up, roll over your toes onto the tops of the feet, straighten your arms, hands either side of your ribs.

  • Press into your hands and tops of feet, lift chest and hips up. Broaden through the collarbones, firm your shoulder blades onto your back.

  • Reach your toes back, firm your legs, hug your outer hip to the midline

  • Pull your hands back, draw your sternum forward and up, draw your navel towards your spine. Gaze forward or arch your head back and gaze up.

To save the images for personal use click and hold down the image until the ‘save image’ option appears; on Mac hold down ‘control’ and click the image to get the option box; on PC right click on the image to get the option box. Scroll down in the ‘option box’ and click ‘save image’.

Ruth Delahunty Yogaru

Ojas flow

PAUSE_0102.png

JUICE UP YOUR OJAS
The art of Ayurveda medicine dates back to the Vedic period in 1500 BCE. This holistic healing tradition tailors to your individual needs based on your constitution, or your dosha, for prolonging life. In Ayurveda ojas, sanskrit for ‘vigor’, is thought to be responsible for strength, health, long life and strong immunity. Ojas, or life energy, is your vitality, your drive for life that brings with it longevity. It is the essence of every cell in your body that powers your immune system and fight disease. It manifests in more than the physical body, ojas gives you a strong resilient mind too. Signs that you have an abundance of ojas are mental and emotional wellness, feeling rested, radiant complexion, feeling content and balanced, good digestion, a clear mind and feeling light and energised.

FINDING YOUR OJAS
Ojas comes from eating pure and nourishing foods. A diet full of fresh organic sattvic food and plenty of plants as close to nature as possible will boost you ojas stores. A diet high in processed foods, oily foods and too much meat increases your toxicity and depletes your ojas stores. Similarly negativity, anger, greed and attachment depletes your ojas too. Self care is an important component in honouring your ojas life force. Running on empty and living in a constant state of heightened stress will burn out your ojas stores.

EXPLORING OJAS IN YOUR PRACTICE
Ojas sit at our heart centre. Gentle heart opening backbends and juicing up all your joint with this ojas flow which will tap into your stores and circulate this life energy through your whole body. The sun salutations will move all the joints in every directions and replenish the synovial fluid. Find new sensations in the poses by spending some extra time in the standing poses. Meet yourself exactly where you are today and find your vital energy.

ALIGNMENT CUES
You will start low and start slow with this sequence and very gradually build up to the standing poses. The peak pose is Baddha Virabhadrasana/Humble Warrior. Look for an opening of the heart centre and a humble nod to the power of Ojas.

  • From Virabhadrasana I or Ashta Chandrasana, interlace your hands behind your back.

  • Inhale, lengthen the spine, exhale hinge forward from the hip joint just to the inside of your right leg.

  • Raise your arms up behind you with a soft bend in your elbows, broaden through the collarbones, keep your shoulders level to the ground.

  • Press into your left heel, hug your right hip to the midline, gaze down.

To save the images for personal use click and hold down the image until the ‘save image’ option appears; on Mac hold down ‘control’ and click the image to get the option box; on PC right click on the image to get the option box. Scroll down in the ‘option box’ and click ‘save image’.

Ruth Delahunty Yogaru

Hip mobility flow

PAUSE_0101.png

FLUID HIPS
Mobility well into our 90s and beyond is all about hip fluidity. It is essential to facilitate fluid movement in everyday life. Sitting for long periods of time shortens the hip muscles and can lead to hip mobility problems. Moving the hip 360 degrees in our yoga practice will strengthen and stretch all the muscles of the hip joint. When the hip is rotated outwards the inner muscles of the hips (the groin) are stretching and the outer muscles of the hips (the glutes) are strengthening. This principle of opposing muscles (agonist and antagonist) works for all movements in the hip. Yoga is not about opening the hips and hanging out on the ligaments and tendons – first we must connect to the muscles to switch them on to take a safe stretch and keep the integrity of the connective tissue ignited.

HIP & SPINE RELATIONSHIP
Hip mobility releases physical and emotional tension, relieve stress and anxiety, aid digestion, and enable freer movement to everyday activities. Incorporating hip mobility into your practice releases the muscles of the hips and help you with backbends, forward bends, inversions and finding optimal alignment for you body in your practice. It also helps create a neutral spine and builds good posture. The pelvis and the spine are closely related when it comes to movement. When the pelvis tilts forward into an anterior tilt the curve of the lumbar spine increases, and when the pelvis tilts back into a posterior tilt the curve flattens. If you suffer from back problems you might notice your habitual standing stance is for the pelvis to be tilted slightly forward or back – compromising the vertebrae and discs of the lumbar spine causing your pain.

EXPLORING HIP MOBILITY IN YOUR PRACTICE
This sequence will move the hip in all directions using the weight of the leg to build strength and facilitate stretch where it is needed. Stay within a safe range of movement at about 90% of your full stretch. Feel strength in the muscles that are flexing and a contained supported stretch in the muscles that are extending. Get familiar with how this feels and how this principle might work in all your poses for a more sustainable lifelong practice and the ability to tie your own shoe laces on your 100th birthday and beyond!

ALIGNMENT CUES
Start lying on you back with the knees bent and tilt your pelvis forward and back into anterior and posterior movements. Connect with a visual of your deep ball and socket of the hip joint. Move slowly and with control. Notice what is happening on opposing sides of the joint. What do you feel stretching and what do you feel strengthening and stabilising the joint. Below is the peak pose of the sequence Eka Pada Rajakapotasana/One Legged King Pigeon which is a deep hip opener. Take your time getting into the pose and as you explore the stretch remember to keep an element of muscle integrity to protect the connective tissue.

  • From Adho Mukha Svanasana, place your right foot behind your left hand and your right knee behind your right hand.

  • Right foot flexed, working towards your right shin being parallel to the top of the mat.

  • Place your hands either side of your hips, walk your left leg out behind you in line with your left hip as you lower your hips down.

  • Draw your left hip forward and your right hip back, let the weight of your upper body help to gently lower your hips down.

  • Stay here, or for a stronger stretch, exhale, fold forward, interlock your hands and place your head on your hands, gaze down.

  • Squeeze your outer hip muscles your glute to open the hip out.

  • Contract your muscles, draw your front knee back and your back knee forward. Lift your pelvic floor, draw navel to spine, hold for 6 seconds.

  • Exhale and release for 30 seconds.

To save the images for personal use click and hold down the image until the ‘save image’ option appears; on Mac hold down ‘control’ and click the image to get the option box; on PC right click on the image to get the option box. Scroll down in the ‘option box’ and click ‘save image’.

Ruth Delahunty Yogaru