Anatomy 101 - the core

THE CORE OF THE BODY
The abdominal muscles, often referred to as the ‘core’, are a group of muscles located between the ribs and the pelvis. Their job is to support the spine against gravity, contain the organs of the trunk and facilitate movement. The core is also linked to the health of our spine. They work together with the muscles of the lower back to protect the spine and move it in flexion and extension. When the core is weak the back needs to work harder to hold us up. When the core is tight or overworked it pulls the pelvis into a posterior backwards tilt, puts additional strain on the lumbar spine, curls the shoulders forward and rounds the upper back.

THE STRUCTURE OF THE CORE
In working with the core it is important to visualise it as a full 360 degree network of muscles wrapping around your whole trunk. The core has a back, the quadratus lumborum, a base, the pelvic floor, and a top, the diaphragm. The psoas, which is considered ‘the core of the core’, is one of the biggest muscles of the body, and is responsible for hip flexion and movement. It is the only muscle that connects the upper and lower body, and is vital for all movement. For the purpose of this exploration we will stick with the four front abdominal muscles and the quadratus lumborum which connects the back of the hips to the back of the ribs.

THE MOVEMENTS OF THE CORE
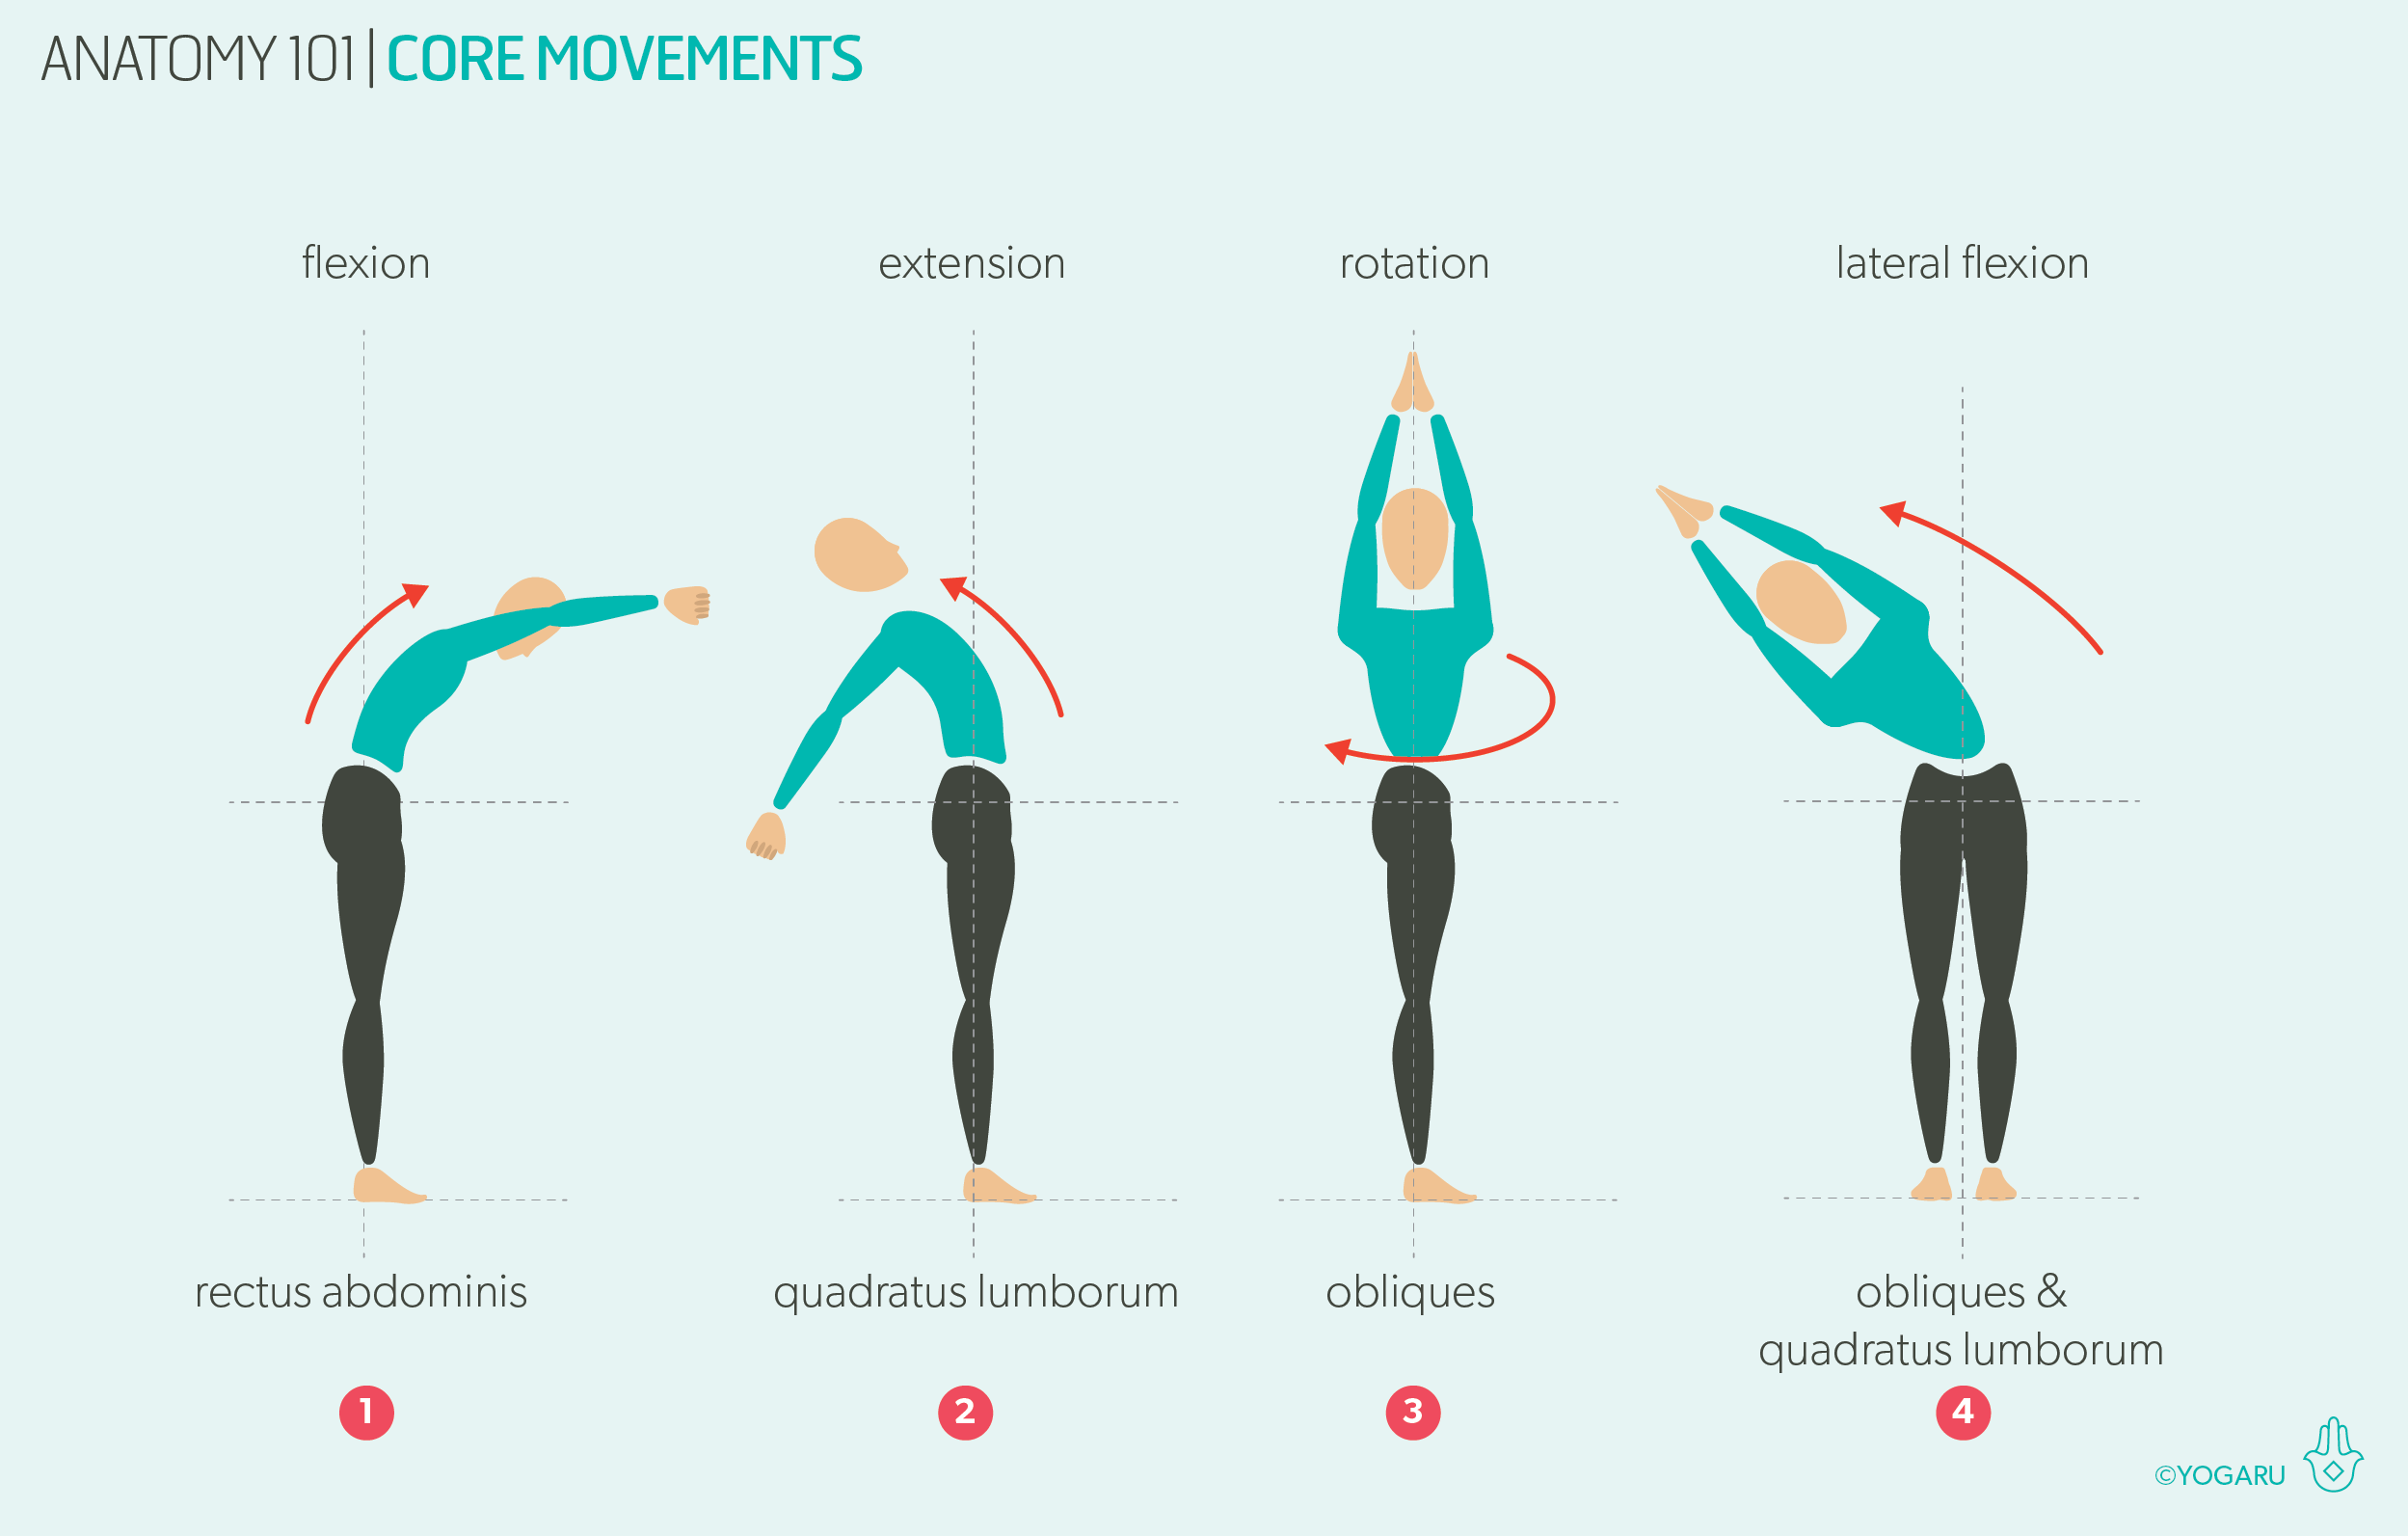
Below there is an illustration of the movements of the core:
Flexion – where the core contracts forward.
Extension – where the core expands back.
Rotation – where the core twists to the right or left side.
Lateral flexion – where the core bends to the right or left side.

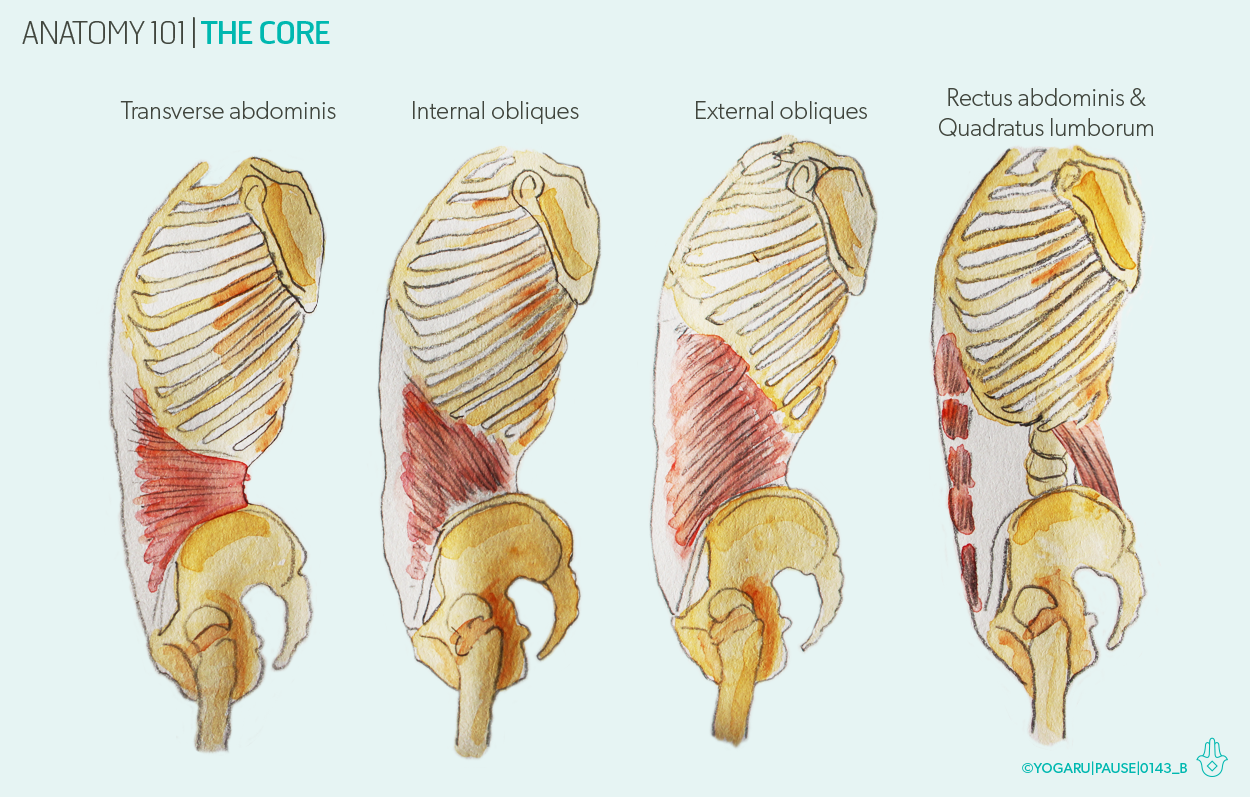
THE MUSCLES OF THE CORE
Starting with the deepest muscle:
Transverse abdominis are not considered a movement muscle, their action is compression and work like a containment sheaths that wrap around the core like a corset to support the organs, assist in posture and cinch the waist in.
Internal obliques are found either side of the body and run from the hips to the ribs diagonally and are responsible for lateral flexion, rotation and the side curves of the waistline.
External obliques are also found either side of the body and run from the ribs to the hips, crossing diagonally with the internal obliques and are also responsible for lateral flexion, rotation and the side curves of the waistline.
Rectus abdominis are the outermost layer of muscle at the front of the body and run from the pubis to the bottom of the sternum and are responsible for flexion of the spine into forward folds, stabilise the pelvis and shape the front of the body.
Quadratus lumborum is located at the back of the body and runs from the hips to the lower ribs, it does the opposite to the rectus abdominis to extend the spine into backbends when working as a pair and assist in lateral flexion when working individually.

THE OBLIQUES IN ROTATION & LATERAL FLEXION
Rotation (twist) and lateral flexion (sider bends) are a bit more complicated when it comes to which muscles are stretching and contracting. When we twist to the right the right side internal obliques contract and the right side external obliques stretch, while the left side internal obliques stretch and the left side external obliques contract. When we take a side bends to the right the right side internal obliques contract and the right side external obliques contract, while on the left side the left side internal obliques stretch and the left side external obliques stretch.

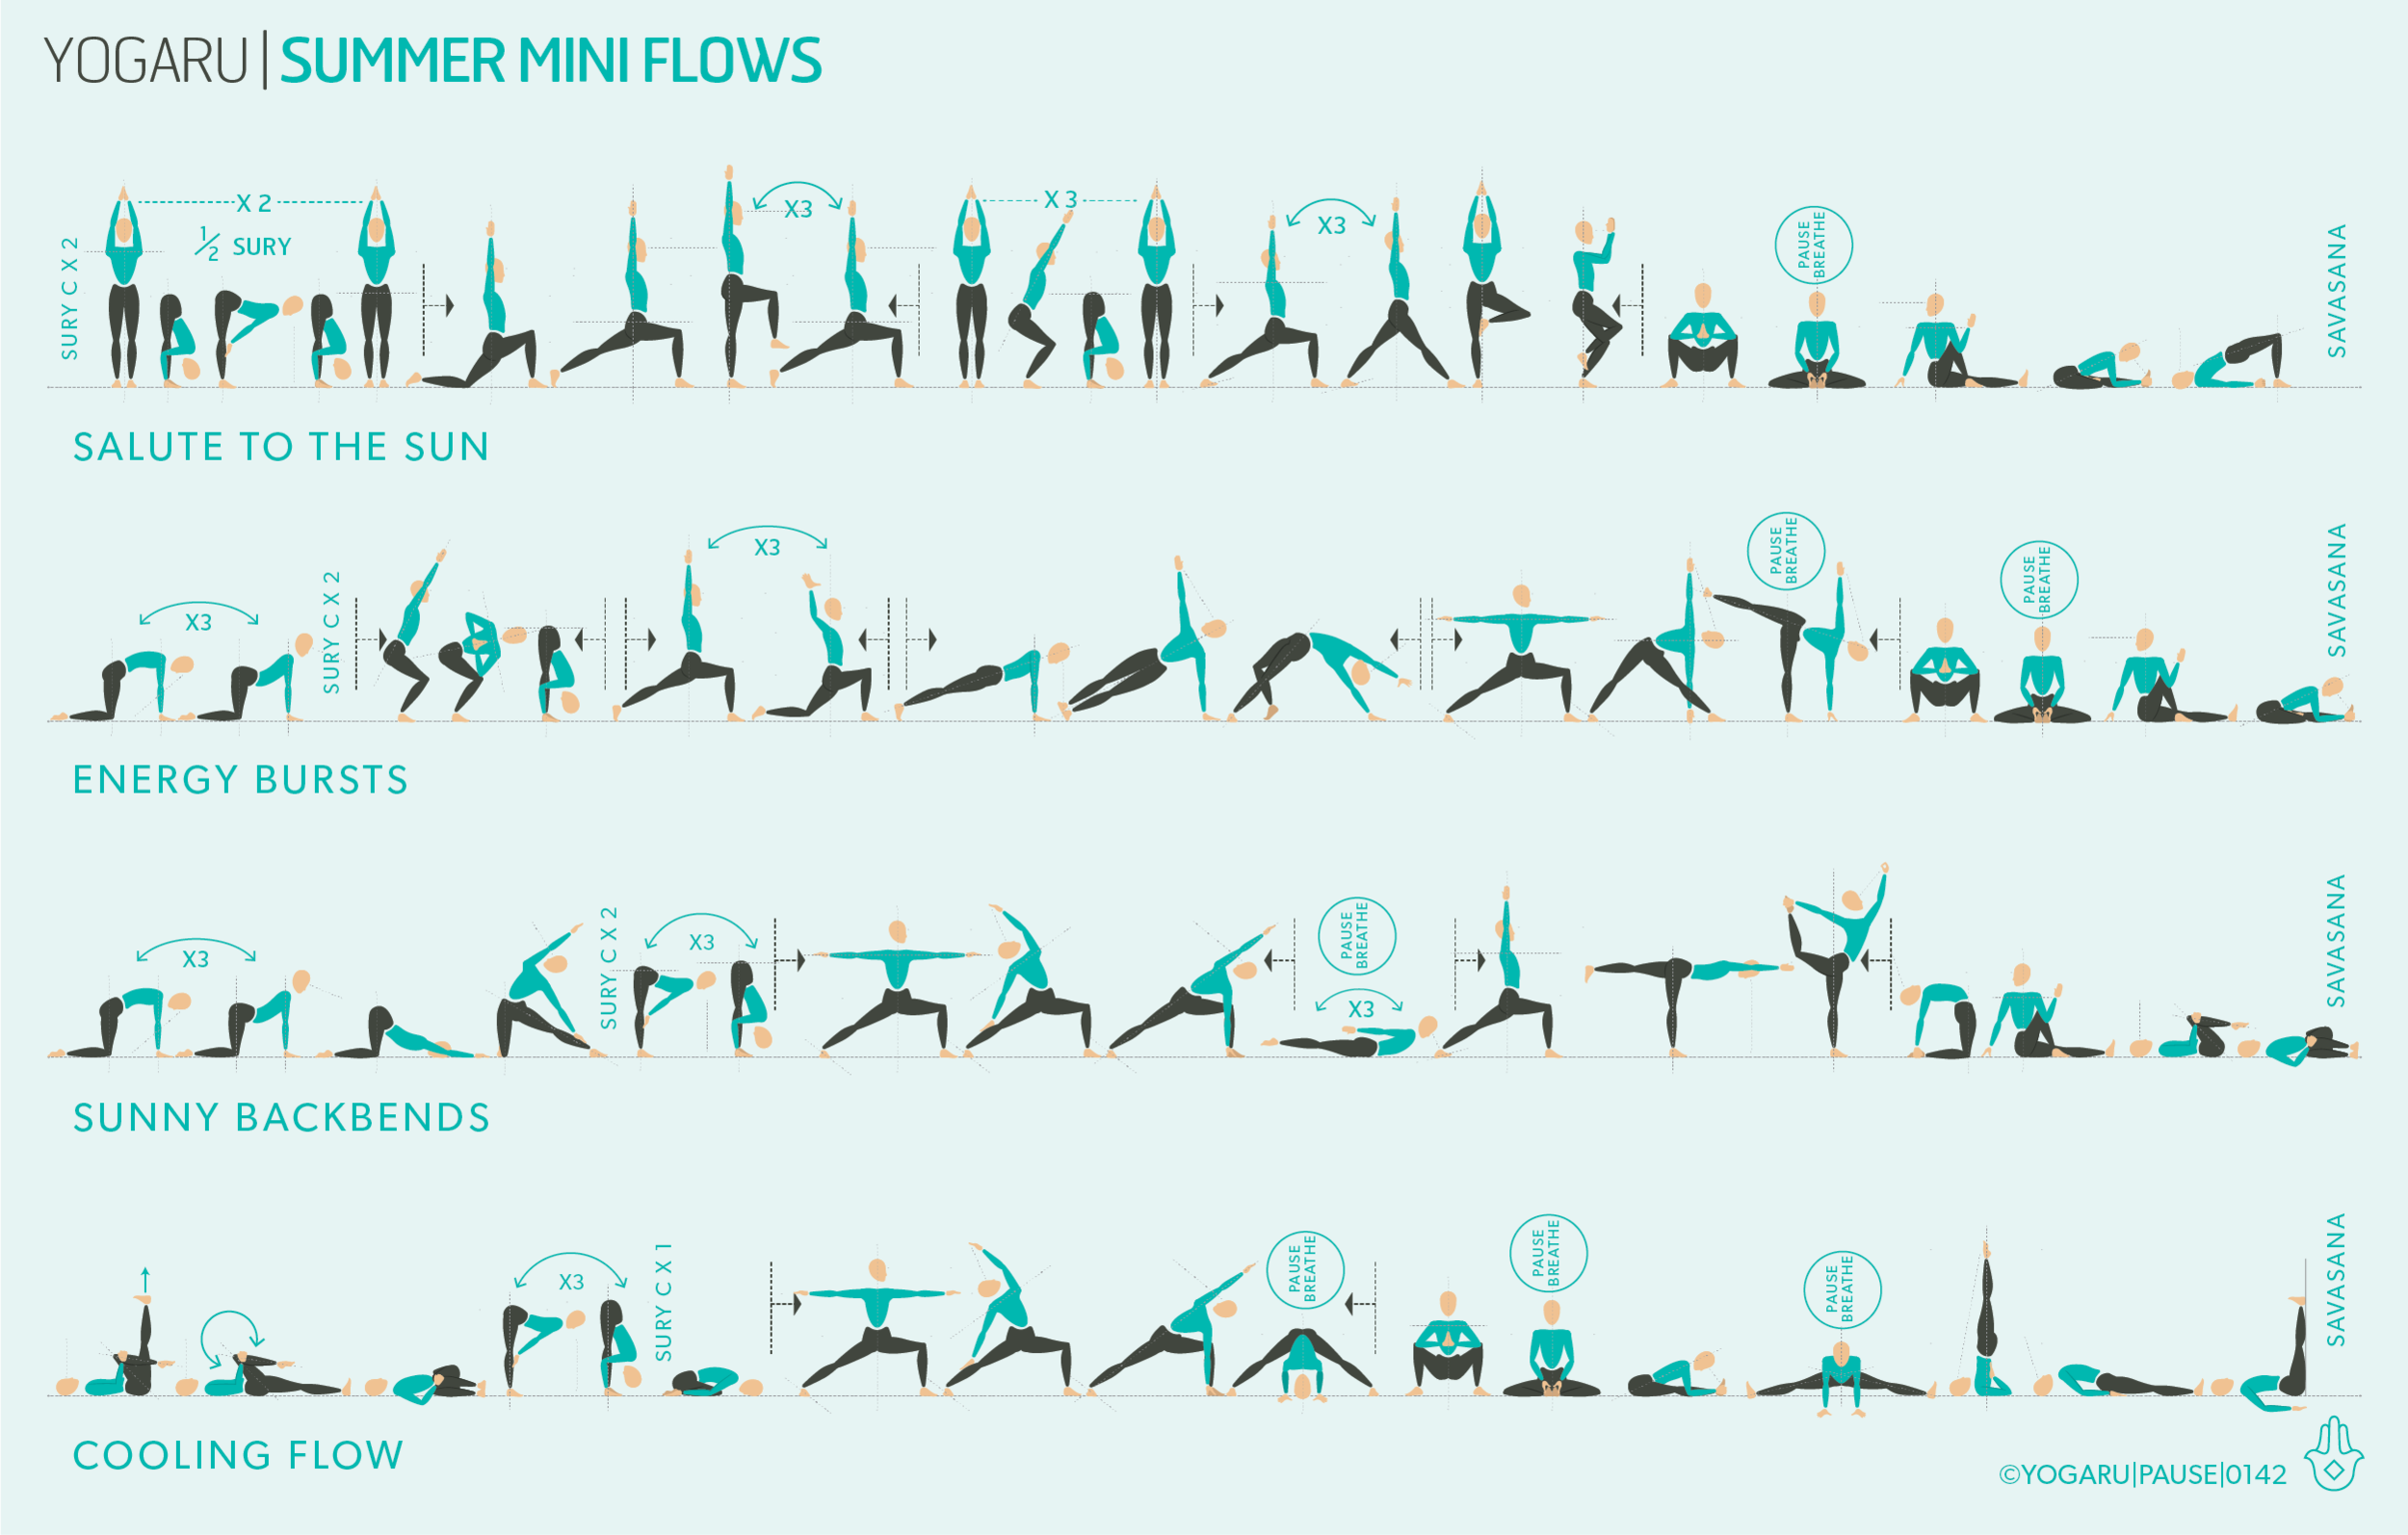
EXPLORING THE CORE IN YOUR PRACTICE
This sequence brings your full attention to the 360 wrap of your core in action. Remember that muscles work in tandem to each other so when you feel a stretch on one side the other side is strengthening. I have highlighted the five muscle actions of the core - four movements of the core and an additional action of compression. The sequence is designed to build a three dimensional awareness of the core.

ALIGNMENT CUES
This sequence will bring you through the five muscle actions of the core – flexion, extension, rotation, lateral flexion and compression. A selection of asana are numbered to highlight sample poses from each muscle action to give you a better understanding and the opportunity to experience the sensations of the core in action ad you practise. Below are the asanas which are highlighted in the sequence and some cues to help you tap into where you will feel the five muscle actions of the core:

1 – Flexion - draw your navel towards your spine and come into flexion on an exhale. Feel the rectus abdominis muscles at the front of the core contract .
Marjaryasana/Cat with the knees slightly lifted off the ground; Naraviralasana/Sphinx with hips lifted; Phalakasana/Plank Pose with knee to elbow; Tadasana/Mountain with single knee lifted. 

2 – Extension - allow the inhale to expand your front core as the back core contracts. Feel the quadrates lumborum  muscles at the back of the spine contract.
Bitilasana/Cow; reverse table top; Setu Bandha Sarvangasana/Bridge.

3 – Rotation - lengthen on an inhale and come into your twist on an exhale. Feel the diagonal pairs of the obliques muscles on the side of the body contract and stretch.
Parivrtta Ashta Chandrasana/Revolved Eight Crescent Moon; Marichyasana III/Marichi III.

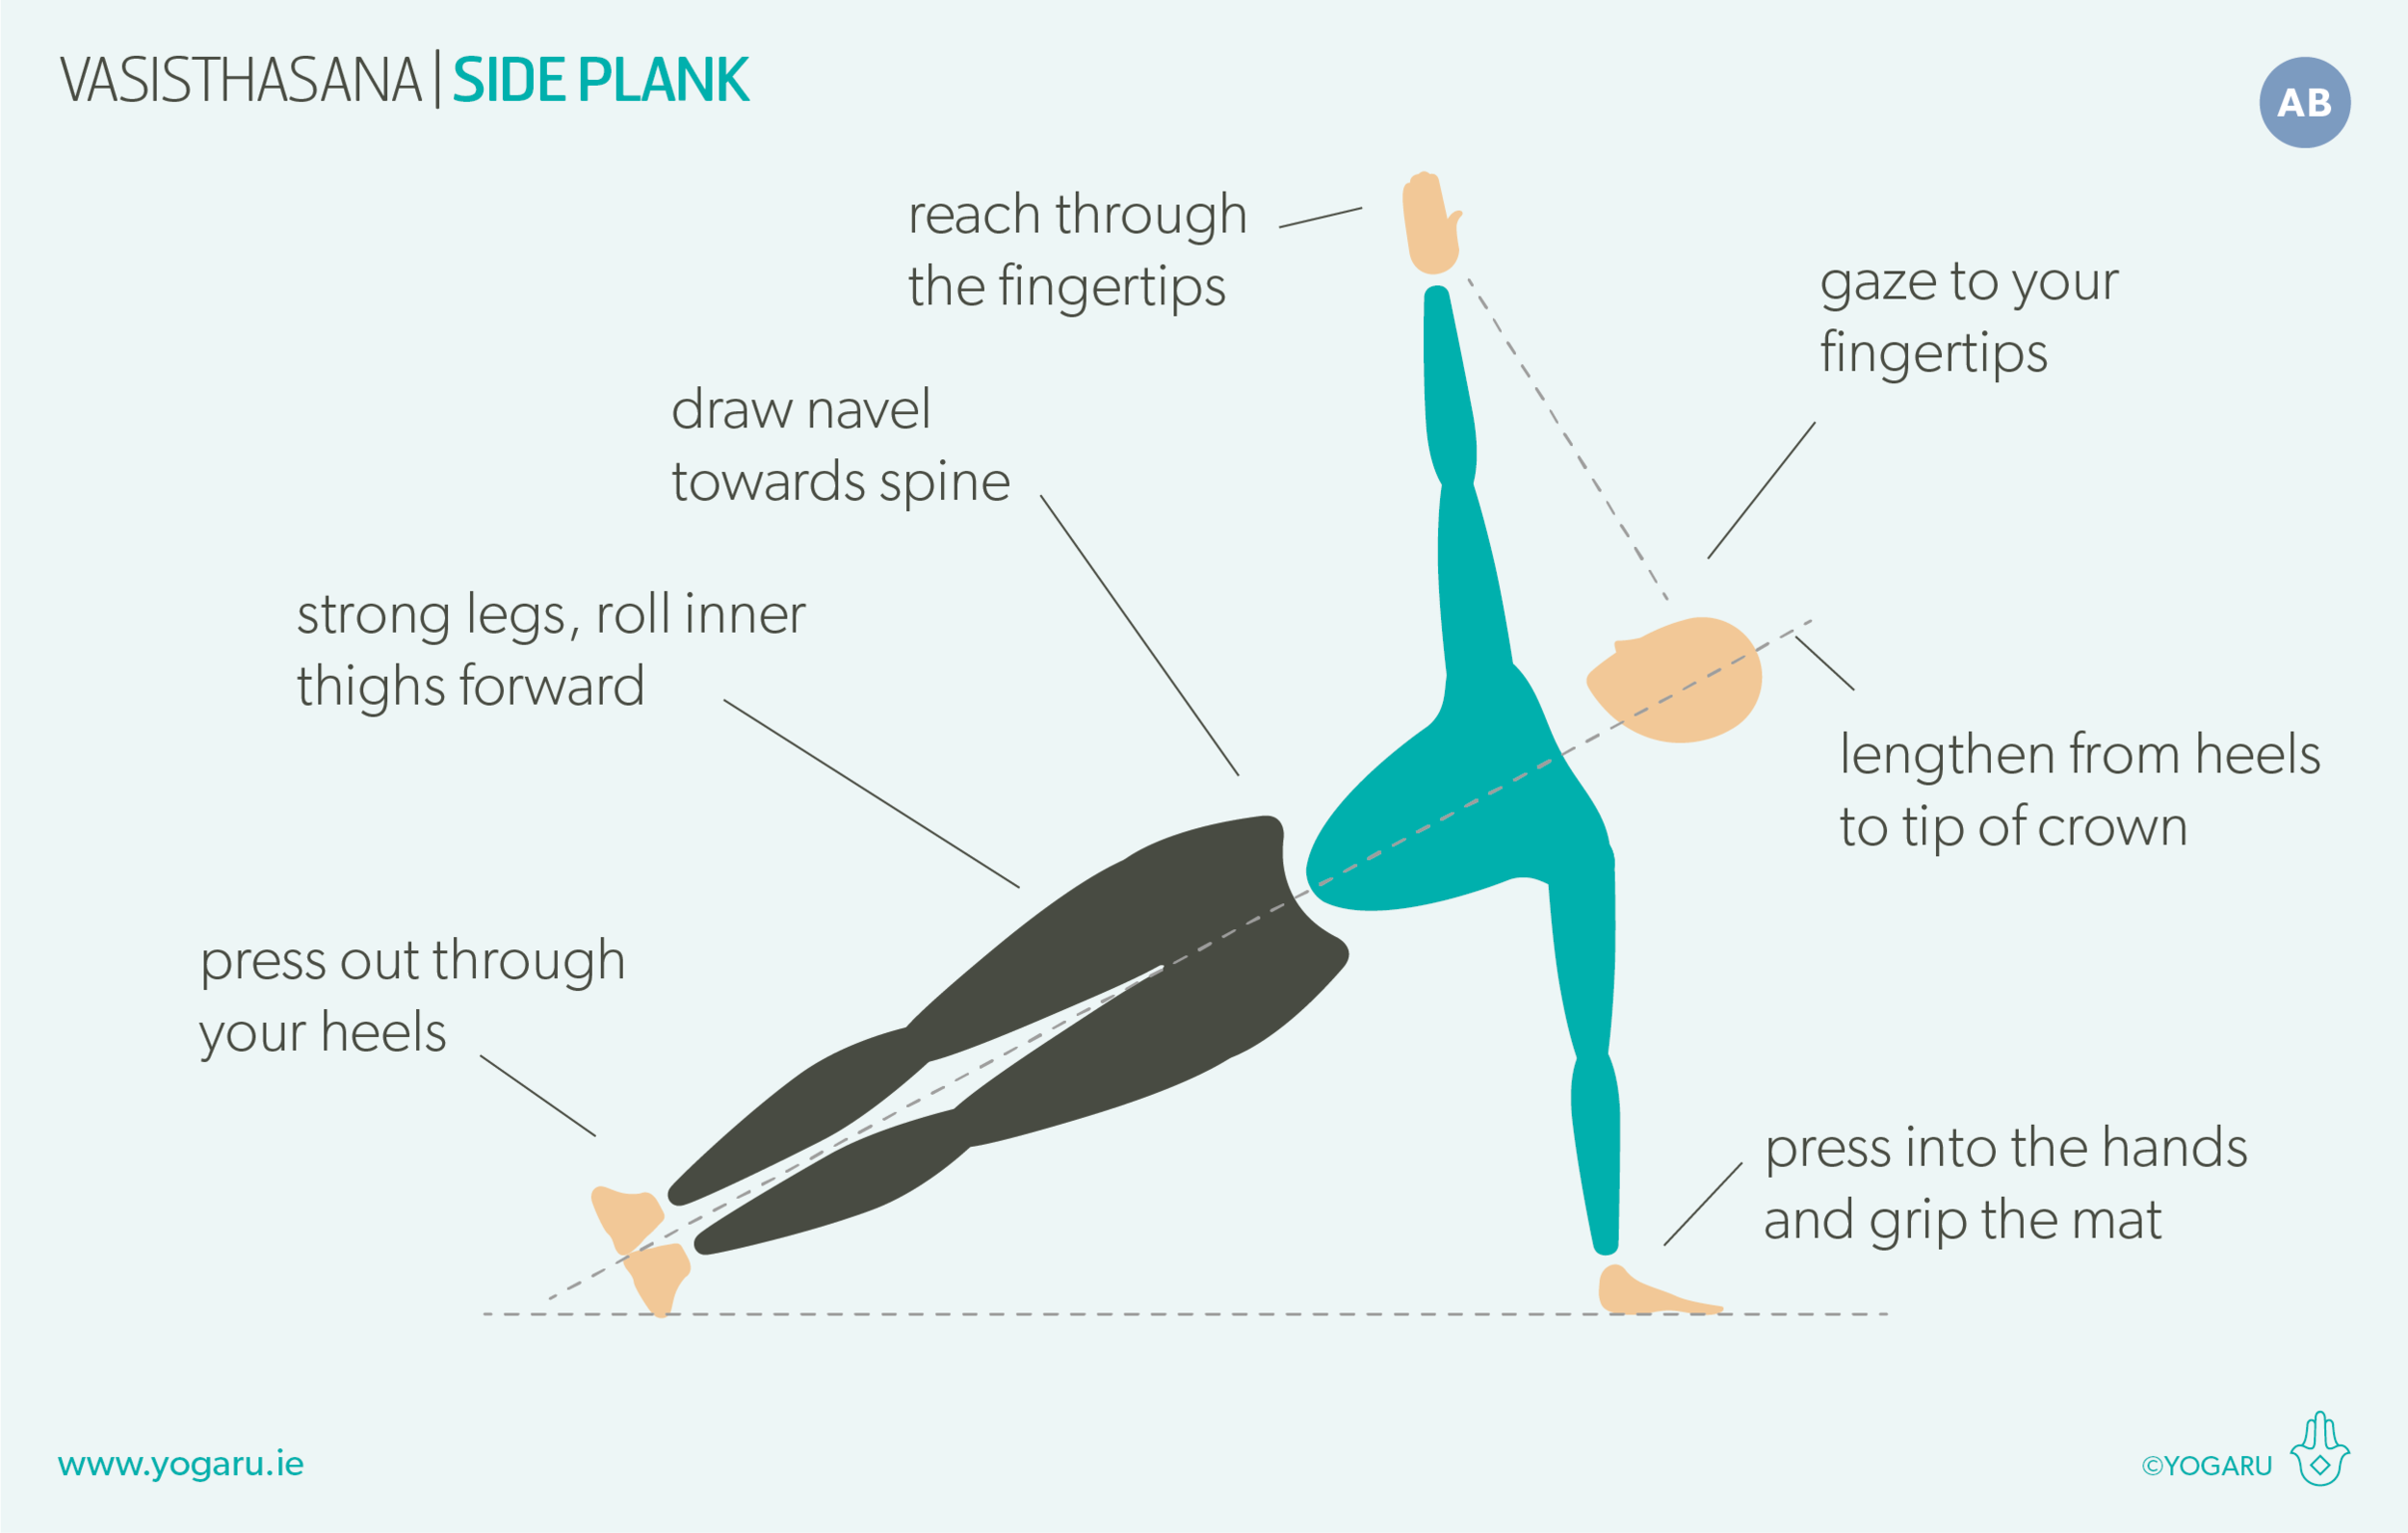
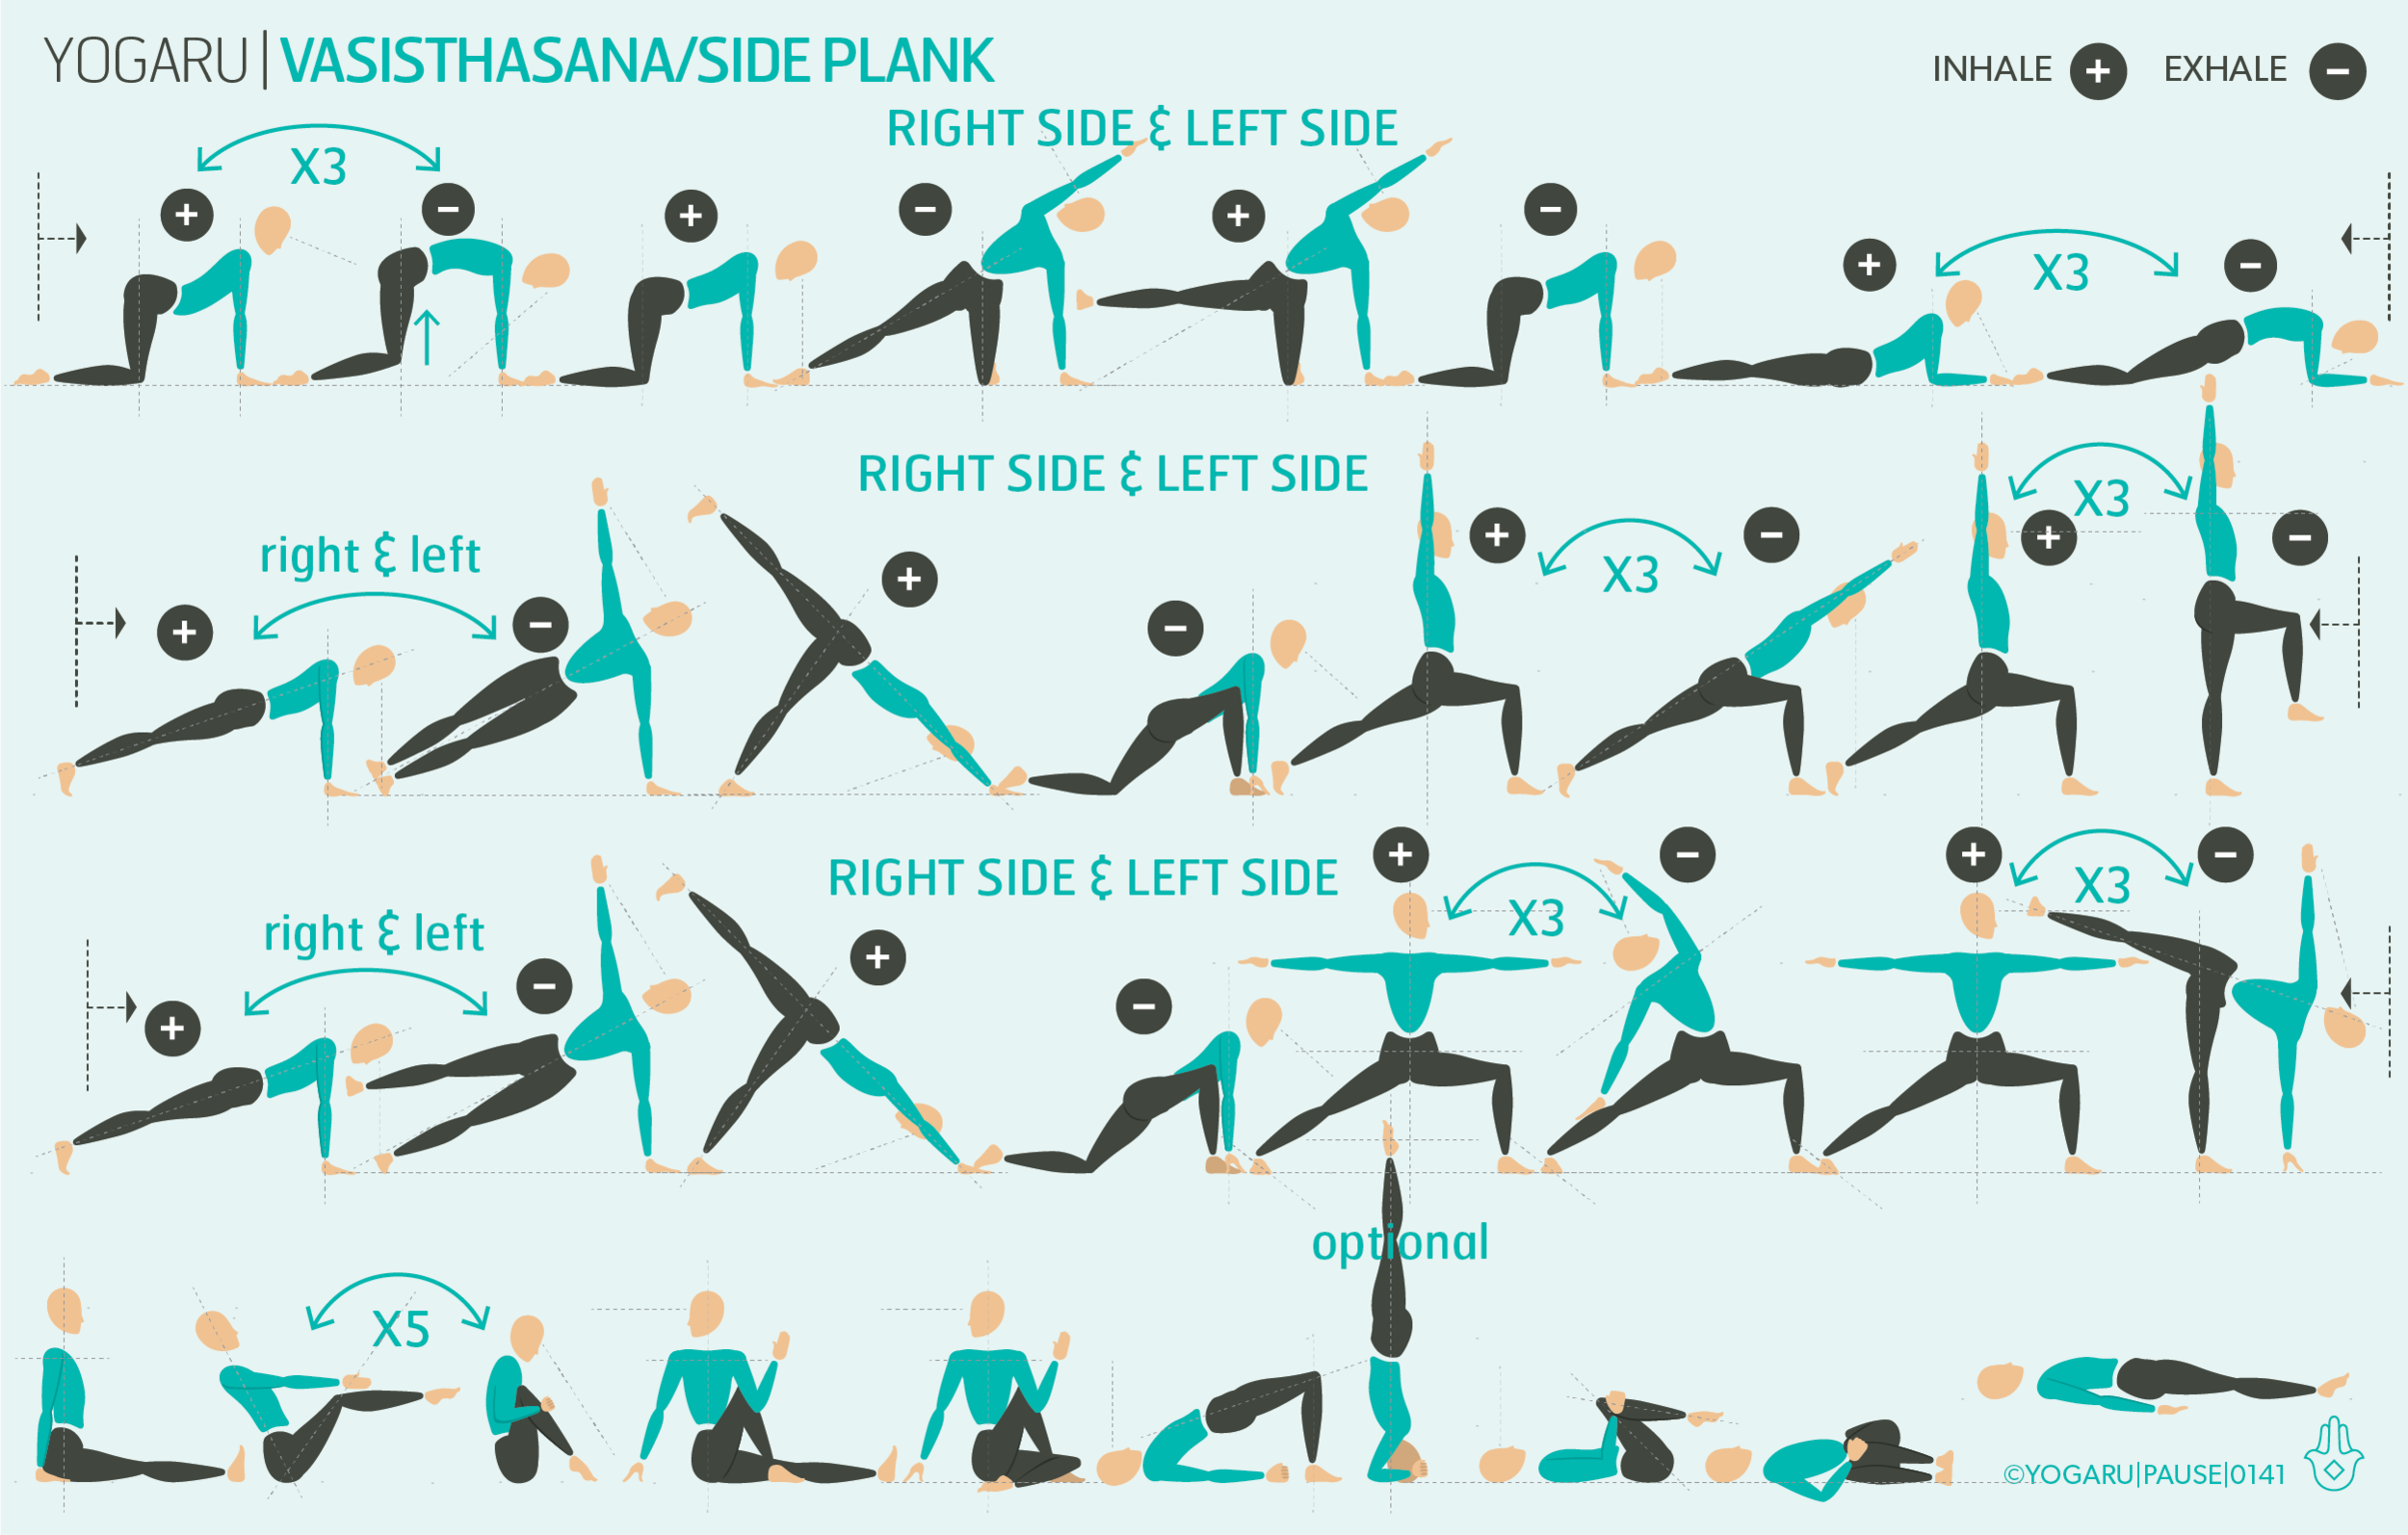
4 – Lateral flexion - lift up out of the spine and lengthen through your whole side bend. Feel the obliques and quadratus lumborum muscles contract on the bending side and stretch on the opposite side.
Parighasana/Gate; Vasisthasana/Side Plank.

5 – Compression - cinch your 360 waist in on an exhale. Feel the muscles of the transverse abdominis contract.
Phalakasana/Plank Pose; Ashva Sanchalanasana/Galloping Horse; reverse Galloping Horse.

To save the images for personal use click and hold down the image until the ‘save image’ option appears; on Mac hold down ‘control’ and click the image to get the option box; on PC right click on the image to get the option box. Scroll down in the ‘option box’ and click ‘save image’.
Ruth Delahunty Yogaru

Summer mini flows

PAUSE_0142_A.png

This sequence is also available on YouTube.

DISCOVER YOUR SUMMER HOME PRACTICE
Summer is the perfect time to take the brave step of rolling your mat out and getting your home practice going. These sequences will work anytime of the day. But starting your morning off with your practice, before the busyness of the day takes over, is a great way to build a healthy habit into your daily routine. Getting up that extra few minutes early is much more doable when the sun is shining outside! You might even find you get the taste for practicing outdoors into your garden or your local park. You can also practice these mini flows on your summer holidays. They are the perfect way to stay active, while still getting all the benefits of your relaxing holiday vibes.

THE BENEFITS OF SALUTE TO THE SUN FLOW
The sun brings out the best in us and for that we salute it. This sequence has lots of standing poses with arms reaching for the sky. Standing poses are very strengthening to the legs, core and glutes. The addition of the arms raised, wakes up the shoulders and the arms and gives you a full body workout. They are also great for getting the circulation going and building focus, concentration and stamina. The standing poses where one leg is lifted will strengthen and stabilise the ankles and knees and are valuable support if you are a seasoned runner.

THE BENEFITS OF ENERGY BURSTS FLOW
Starting the day off with this sequence will set you up for whatever the day has in store for you. It’s hard to not feel a burst of energy in the afterglow of poses like Camatkarasana/Wild Thing and Ardha Chandrasana/Half Moon. They are challenging poses that require balance, concentration and a small leap of faith! Wild Thing has the added benefit of being an inversion (where the heart is above the head) and eases stress, tension and anxiety; boosts the immune system; aids good digestion; increases circulation; and most importantly, gives you that yogi glow to your complexion! There is also a healthy splattering of twists and side bends in this sequence which are very energising. Anytime you’re feeling tired sit up tall and take a twist to wake yourself up again.

THE BENEFITS OF SUNNY BACKBENDS FLOW
Backbends are the perfect summer poses. It feels really good to open up the chest and shoulders after months of guarding ourselves from the cold weather. Backbends are energising; aid good digestion; ease stress, tension, anxiety, fatigue, depression; and boost the immune system. On top of that already impressive list of benefits they press and stimulate the colon and help you stay regular over the summer months. Look for strength in the whole extent of the back body in locust pose to counteract all the sitting you might do through your day.

THE BENEFITS OF COOLING FLOW
We may not always need cooling down on your average Irish summer day but this sequence is also very calming and soothing. Forward bends ease insomnia, stress, tension and anxiety and are very relaxing and calming. If you’ve had a busy day and your mind is rushing this is the sequence for you. It can also be practiced in the morning if you wake up feeling less than refreshed and still need to get on with your day. Spend a few minutes in your Salamba Sarvangasana/Shoulderstand and feel the effect of the reverse of blood flow through the body.

YOGARU_SSC.png

EXPLORING SUMMER MINI FLOWS IN YOUR PRACTICE
Each mini flow will take around 15mins. If you would like to practice for longer add more rounds of Surya Namaskara C illustrated above in between each standing mini flow. When flowing through the mini flows indicated between the arrows, start with the right leg forward first, and then repeat this group of poses on the left side. Keep your transitions simple and when in doubt link pose through a Downward Dog or come back to Tadasana at the top of your mat and step back into your next pose. See how it feels to practice outdoors. You will find the surface you roll your mat out on can change the sensations of the poses. Grass adds a softness, challenges your balance and works all your balancing muscles, while sand adds surfaces to dig in and press your heels against in poses like downward dog. Being outdoors also helps you to really breathe deeply during your practice in the fresh air. Take your time and enjoy the poses that nourish you, remember you are the boss of your practice.

To save the images for personal use click and hold down the image until the ‘save image’ option appears; on Mac hold down ‘control’ and click the image to get the option box; on PC right click on the image to get the option box. Scroll down in the ‘option box’ and click ‘save image’.

Ruth Delahunty Yogaru

Vasisthasana - Side Plank

YOGARU_Vasisthasana_PB.png

‘MOST EXCELLENT’ POSE
Named after the sage Vasitha Vasisthasana/Side Plank is a simple but challenging pose that works the whole body as it works out how to balance on one hand and the outer edge of one foot. It is considered one of the best poses for strengthening the full 360 core, improving posture and building strength in all the muscles that support the spine. The challenge of the pose is in balancing and maintaining a neutral spine against the forces of gravity. When we balance on one hand with the body at a slant it takes great effort and strength to keep the hips perfectly in line with the spine – not lifted too high or low and not tipping the top hip forward or back. It is the perfect pose to understand the principles of proprioception and our awareness of the space we inhabit.

THE BENEFITS OF VASISTHASANA/SIDE PLANK
Vasisthasana/Side Plank strengthens the arms, shoulders, core, spine, legs and glutes. It also gives a lovely opening to the chest. Similar to our last peak pose Parsvakonasana/Side Angle this pose builds awareness of the core being a 360 degree wrapping muscle. The full wrap of the 360 core is working to protect the spine and keep it in a neutral position. The lower obliques are helping to keep the hips lifted against the forces of gravity. The front of the core is helping you from tipping forward and the back of the core is helping from tipping backwards. When they are all working in partnership in the centre of this pose they will help to stabilise the spine and along with the strong legs will take some of the effort out of the bottom arm and shoulder.

EXPLORING VASISTHASANA/SIDE PLANK IN YOUR PRACTICE
Think of Vasisthasana/Side Plank through the lens of Tadasana/Mountain with the arms in a ‘T’ shape. In Tadasana/Mountain we are pressing through the feet, hugging the hips to the midline, lengthening through all sides of the body and broadening through the collarbones. In Vasisthasana/Side Plank we are following these exact blueprints and adding an extra level of lifting the hips against gravity with the strength of the core.

The sequence builds to full Vasisthasana/Side Plank from the ground up to allow your wrist and arm to warm up before the peak pose. The warm up flow starts to build heat and strength in the arms, core and legs. Use the breath guide to help you link breath with movement as you flow.

In Vasisthasana/Side Plank press strongly through the soles of your feet and extend through the tip of your crown. Glance down to check your hips are stacked and haven’t tipped forward or back. Press into your supporting hand, grip your mat and lengthen the space between your shoulder joint and your neck. See can you find lightness and space in the shoulder joint and a sense of the shoulder blade containing the effort of the pose within the joint.

If Vasisthasana/Side Plank is not part of your practice, take a modified version of the pose with the bottom knee on the ground as illustrated in the first line of the sequence after the cat/cow flow.

PAUSE_0141.png

ALIGNMENT CUES
In this sequence there are three main standing flows starting with the peak pose of Vasisthasana/Side Plank. Flow through the poses within the married lines on the right side first and then the full mini flow on the left side. You can extend your practice by running through these two standing flows for two full rounds of each side. If you want to try a few different versions of Vasisthasana/Side Plank have a look at my Instagram post.

Have a read of the tips below and either print out the sequence or save it onto your device:

  • From Phalakasana with feet together, roll onto the little toe side of your right foot, stack your feet together, legs straight.

  • Place your right hand slightly forward of your right shoulder, shoulders stacked, place your left hand on your hip, hips stacked, draw your navel towards your spine.

  • Lift your hips up, press out through your heels, lengthen from your heels through your spine to the tip of the crown in a diagonal line.

  • Reach your left arm up high, palm facing left, gaze forward or to your extended hand.

To save the images for personal use click and hold down the image until the ‘save image’ option appears; on Mac hold down ‘control’ and click the image to get the option box; on PC right click on the image to get the option box. Scroll down in the ‘option box’ and click ‘save image’.

Ruth Delahunty Yogaru