Sequences

Props are your best friend - blocks

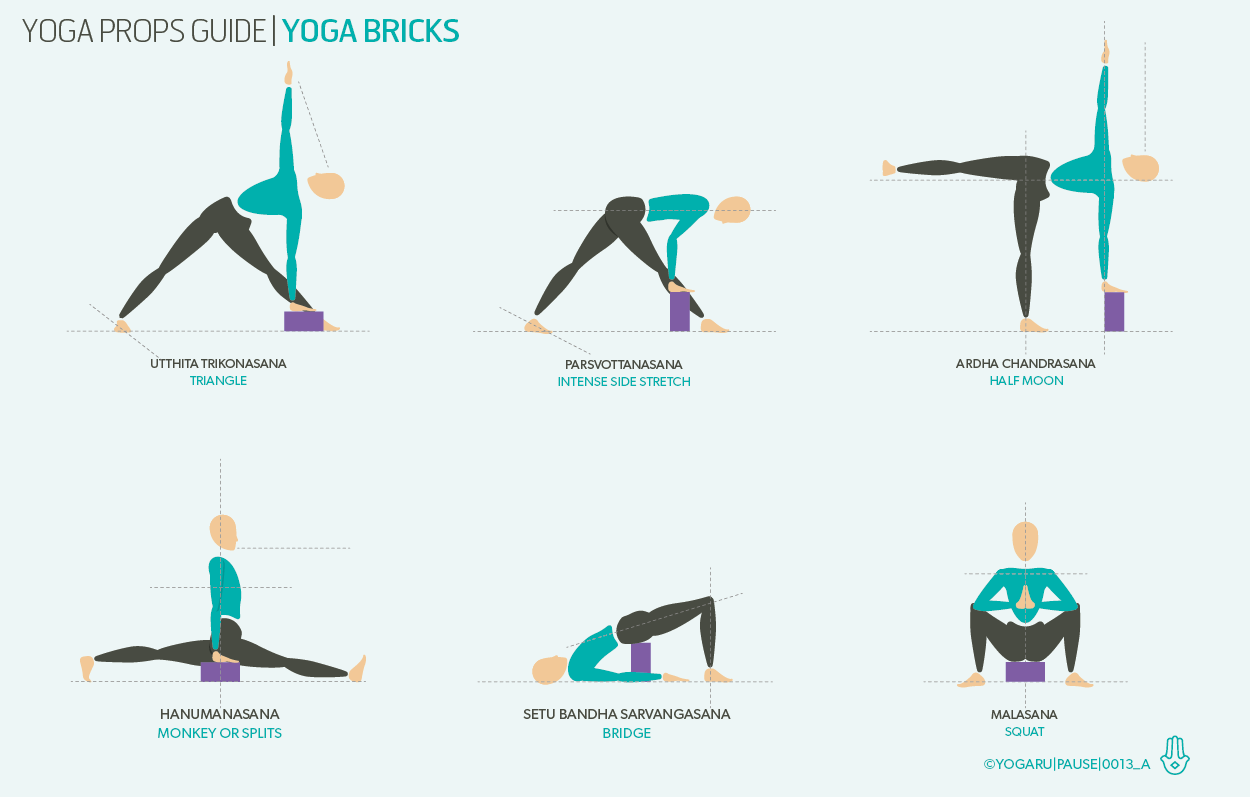
Aisling Conn, who teaches in The Yoga Room and My Yoga Body, talked us through the benefits of props in your yoga practice. She also talked us through the versatile uses of the simple yoga bricks and yoga belts, which gave us lots of poses to try in your next class or home practice. This time she’ll be examining ways blocks can lift and support us in seated, standing and inverted poses.

AISLING’S GUIDE TO YOGA BLOCKS
A yoga block is a fantastic support in your asana and pranayama practice. They are safely stackable to provide any required sitting height, and just squishy enough to be a comfortable surface for knees, shoulders, sit-bones, etc.

Here are just a few of the ways I use them in both my personal and teaching practices.
In seated poses, like Sukhasana, where we might spend a few moments on breath awareness or meditation before a class, using support is essential, even for the most seasoned practitioners. A block, or stack of blocks, allows the hips to be higher than the knees, and the spine to be neutral. This means less tension around the hips, and a more comfortable sit. We then get to focus our attention on the breath. It’s much easier to pay attention to something as evasive as the breath, when you’re not fixated on an aching upper back or pressure in the knees!

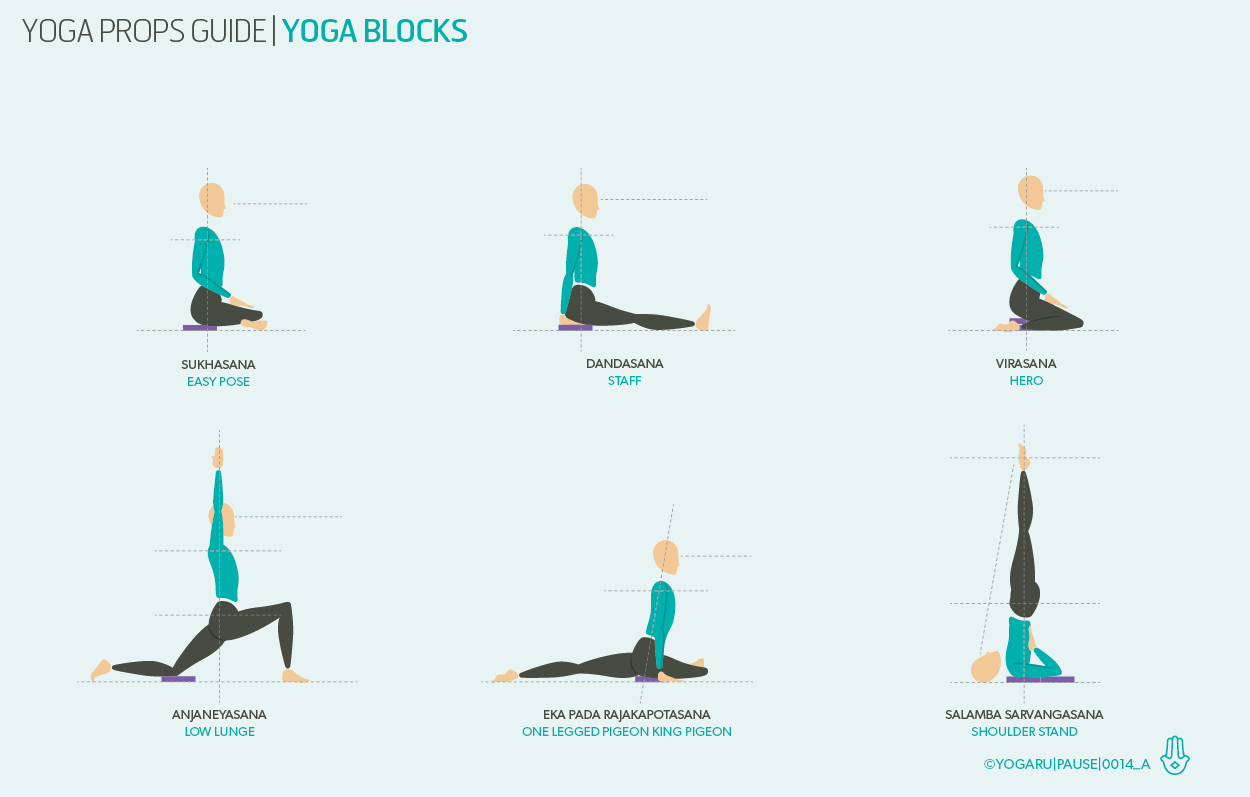
In any of the seated forward bends which use the general blueprint of Dandasana, having a foam block wedged just under the bony base of the pelvis (sit-bones), helps to create a much better angle for your spine to fold forward from. The hamstrings tendons attach to the sit-bones. When they are strong or tight they tend to pull the pelvis back (posterior tilt), this puts a strain on the lumbar spine. The tendency to pull forward with the arms sets you up for further strain on the lower back, increasing the risk of weakening & damaging the connective tissue. Getting help to tilt the pelvis forward (anterior tilt), means we can concentrate on finding the subtle balance between lengthening and bending the spine.

Virasana is a fantastic seated pose that stretches the front of the thighs and ankles. When comfortably held, it provides an easy place to find a lengthened, neutral spine and a sense of abdominal spaciousness. I love to use this steady base to explore the breath and spine, and to stretch and open the shoulders. Unsupported, it’s a very deep flexion for the knees. I always get students to sit on at least one, but usually two or three stacked blocks. The extra height the blocks give overcomes the pull of tight muscles, allowing you to sit right on top of the sit-bones. This way the spine can be in a neutral position, the back muscles in balance, and the legs in good alignment.

Another pose that can be torture for problematic knees is Anjaneyasana. A block under the back knee provides some welcome cushioning, even though there is not a lot of weight on it, especially if you’re staying there for more than a couple of breaths.

Eka Pada Rajakapotasana prep is a deep hip stretch, specifically the hip-flexors of the back leg and the groins. For plenty of us, getting the outside of the front-leg hip all the way to the floor is so much of a struggle, we sacrifice torso and shoulder alignment. Try slotting a block under the front hip, so that the pelvic bones can be supported, and feel the tight hip muscles release into hip-opening bliss!

Just about everyone can benefit from practicing Salamba Sarvangasana on a raised support - 4 foam blocks arranged in a rectangle. The large stable surface here provides extra height to the shoulders and arms, protecting the neck and lifting the spine. Precise positioning is key here, if you haven’t tried it before be sure to recruit the guidance of your yoga teacher.

There are heaps of other ways to use blocks in your yoga practice, the ones above are just a selection. Think about anywhere in your practice where you could use a little cushioning or support and grab a block before class so it's there if you need it - even if you just end up sitting on it! Next up is ways to use a yoga strap/belt.


AISLING CONN
Aisling teaches yoga on Tuesdays, 9.45am in The Yoga Room, Sundays, 10am & 11.30 in My Yoga Body, and pilates on Mondays & Wednesdays, 9.30am in My Yoga Body. She is also available for private and small group classes by arrangement. To contact Aisling email at aisling.conn@gmail.com or send a message on Facebook

Props are your best friend - bricks

A prop is, by definition, a support or an aid. We are encouraged from an early age to be independent but sometimes this independence tips into not asking for help when we need it. Your yoga class is somewhere you can get this support from a simple prop and you don’t even have to ask for its help!

Aisling Conn, who teaches in The Yoga Room and My Yoga Body, has the most comprehensive anatomy and alignment knowledge. I frequently leave after her class intrigued with new ways to look at well-worn asana. She also manages to mix the perfect balance of this knowledge with little gems of ‘the bigger picture’ of yoga too, a skill that takes years of practice.

Aisling is writing a series of posts with lots of suggestions on ways to get the most from your props, which will help you to open up into some lovely asana, and to feel the difference a prop can bring to your practice. Each post will cover a different prop, starting with yoga bricks. She has also given a guide to yoga blocks and yoga belts, which will follow with blankets & bolsters and the often forgotten wall!

AISLING'S GUIDE TO YOGA PROPS
With the vast array of props out there it’s no surprise that there are many ways to use them. It also depends on each person’s individual anatomical characteristics as to what prop suits best for certain asana.

I’ve had varying relationships with props throughout my yoga life. Starting with Iyengar classes where I would struggle along to class with 4 foam blocks, 2 bricks, a mat and a belt, only to find out the essential props for that day’s practice were 4 cotton blankets and a couple of sandbags!

My next love was Ashtanga where props were rarely, if ever, used and I was fully on board with that at the time too.

My own classes nowadays will always call for one or two blocks, at the very least, and this is regardless of hamstring, hip or shoulder muscles. For the vast majority of people in the class, the props will assist them to either better understand the alignment instructions, or fine-tune my ‘one size fits all’ class to suit each person’s individual needs.

One of the huge benefits of a regular yoga practice is that we can develop a great ability to notice the subtleties of our bodies, attain a better sense of proprioception and ultimately become our own principal teacher.

BENEFITS OF PROPS
The use of props should not be seen as just a way of creating more ease in a pose, but of working more deeply and efficiently towards better, safer alignment and refining our awareness of our own bodies in the spirit of Svadhyaya (self-study).

Some props are great for support, like blankets, bolsters and blocks and some are used for extending the reach or range of movement, like belts or bricks, .

So which prop will work best for your yoga practice? Here I have looked at the yoga brick and given some examples of how to put it to use.

YOGA BRICKS
Yoga bricks are the props I use most often in my classes and in my home practice, because they can be used in so many ways. They are also useable in 3 different heights, making them great for different body heights and for progressing from high side to low side (or vice versa) as needed during a practice.

In standing forward folding poses, like Trikonasana and Parsvakonasana and their Revolved or Twisted versions, in balancing forward folding poses, like Half Moon and Revolved Half Moon, the block provides a steady, height-adjustable surface for the hand to press into.

Even if it is possible for the hand to reach the floor in these poses, what you gain in hamstring-stretch, you may lose in opening and expansion. The extra space and security that the block gives allows for better pelvic and shoulder alignment, allowing you to stay longer in a pose with a better ability to be present body and mind.

Parsvottanasana is a huge stretch for the whole body, done correctly it can strengthen and tone the legs, back and abdomen, correct alignment is key in this pose. For most of us, regardless of yoga experience, having a block under each hand to teach a level pelvis, lengthening spine and open shoulders, will lay down a really beneficial alignment pattern in the body.

Even if you don’t have particularly tight hamstrings or hip-flexors, Hanumanasana is beyond the reach of many of us. If it is something you’re working on in your practice, having a yoga brick under each hand to support you on the way down is pretty essential. It’s not just safer, but it allows you to keep your spine upright over your pelvis, heart lifting and breath steady and deep.

Another way I regularly use a yoga brick in classes is in Supported Bridge Pose. Positioning a brick on mid or high side under the boney sacrum, allows the body to relax and give the student the option of lifting the legs into a supported inversion. As with the previous poses when bones feel supported muscles relax!

Squats like Malasana are not always easy for every body. Sitting on a block lets strong hip muscles loosen their grip, allowing the inner groins to stretch, the knees to avoid injury and the feet to stay active. In this way the mind gets to stay attentive to the breath instead of being distracted by discomfort.

I use bricks all the time in both my personal and teaching practices. I find them an invaluable resource. I hope this article gives you some new ideas of ways to support your own practice with a brick, in studio classes or at home.


AISLING CONN
Aisling teaches yoga on Tuesdays, 9.45am in The Yoga Room, Sundays, 10am & 11.30 in My Yoga Body, and pilates on Mondays & Wednesdays, 9.30am in My Yoga Body. She is also available for private and small group classes by arrangement. To contact Aisling email at aisling.conn@gmail.com or send a message on Facebook

Sun Salutation, a closer look

YOGARU_SSA.png
YOGARU_SSB.png
YOGARU_SSC.png

SUN SALUTATION ROOTS
The origins of the Sun Salutation/Surya Namaskara are uncertain. The earliest text illustrating the classic Sun Salutation we practise today, was written in the 1930s by Krishnamacharya. But it is not known if he was simply recording a sequence handed down for centuries from teacher to teacher or if he created it himself. He went on to teach the sequence to his students, including K. Pattabhi Jois and K.B.S Iyengar.

Traditionally practised in the morning as a salute to the rising sun, the Sun Salutation/Surya Namaskara is multi functional and can actually be practised at any time of the day. When practised in the morning it wakes up the system and gets you ready for the day ahead. Practised in the evening it helps you unwind and relax. It is the perfect way to start building a home practice. The three versions strengthen and stretch all the main muscle groups, build stamina and prepare for more challenging asana. They also build heat and increase circulation throughout the whole system, which aids digestion and benefits all the internal organs.

The repetitive and meditative quality of the movements relaxes the mind and body, reducing stress and anxiety and increasing mental clarity. As you move through each pose in the Sun Salutation/Surya Namaskara, you take either an in-breath or an out-breath. This makes it a good start to your practice and establishes the link between the breath and the movement. When done slowly it also encourages a calm breath which triggers the parasympathetic nervous system.

There are three main versions of Sun Salutation/Surya Namaskara. Sun Salutation/Surya Namaskara C, also called Sun Salutation/Surya Namaskara Classic, is the best version to start any practice with. You step back from your first Forward Fold/Uttanasana, to Anjaneyasana/Low Lunge, which is kinder on the joints while you give your system a chance to warm up. It also offers a softer decline to the floor through Knees, Chest, Chin, rather than Chaturanga Dandasana/Four Limb Pose. Coming all the way down to the ground offers a gentler backbend with Bhujangasana/Cobra, instead of a full Urdhva Mukha Svanasana/Upward Facing Dog. You can also incorporate a soft bend in the knees for the forward folds, allowing time for the hamstrings to warm up.

Sun Salutation A, or Surynamaskara A, is also the perfect way to start to your practice. Chose from one of the two option for Sun Salutation A above. In the first option you come down to the floor through Knees, Chest, Chin. You can stay with this version if it suits or move to the second option of Chaturanga Dandasana/Four Limb Pose and Urdhva Mukha Svanasana/Upward Facing Dog when your shoulders and back are warmed up enough to support the correct alignment.

Sun Salutation/Surya Namaskara B, or Sun Salutation/Surya Namaskara B, is actually the most challenging version of the three. It builds on the poses of Sun Salutation/Surya Namaskara A, with the addition of Utkatasana/Chair, and Virabhadrasana I/Warrior I. Warrior I requires your hips to be very open, and exposes any instabilities or tightness you might have in knees, hips or lower back. It also offers a lovely stretch in the psoas, strengthens and stretches the thigh, calves and ankles, and stretches the shoulder and neck when the raised arms are added into the pose.

Click on any of the above sequences and print them out to use as a visual aid for your next home practice.

To save the images for personal use click and hold down the image until the ‘save image’ option appears; on Mac hold down ‘control’ and click the image to get the option box; on PC right click on the image to get the option box. Scroll down in the ‘option box’ and click ‘save image’.

Ruth Delahunty Yogaru