Hip stability flow

PAUSE_0062.png

YOUR POSE IS THE PERFECT POSE
What would a yoga class look like if we were to actually listen to what was right for our own unique bodies – rather than what we were told to do, or striving for what the person on the mat beside us was doing. The discipline of yoga, as with all movement, if not practiced with self care and awareness can lead to injuries. Your teacher is there to guide you and facilitate the movement, you are there to ultimately decide what feels right for you. There is many reasons why your body may never reach the perceived ‘perfect pose’ – from shortened muscles and ligament restrictions, to your unique skeletal structure. During our practice we are constantly getting feedback from our bodies – what feels good and what doesn’t. It’s up to us to listen! The deeper I go into my own practice, the more I pull back from being attached to perfection. Instead I look for a balance between mobility and stability by moving slowly and being guided by felt sensations and pulling back to a softer version of the pose when needed.

MOBILITY & STABILITY
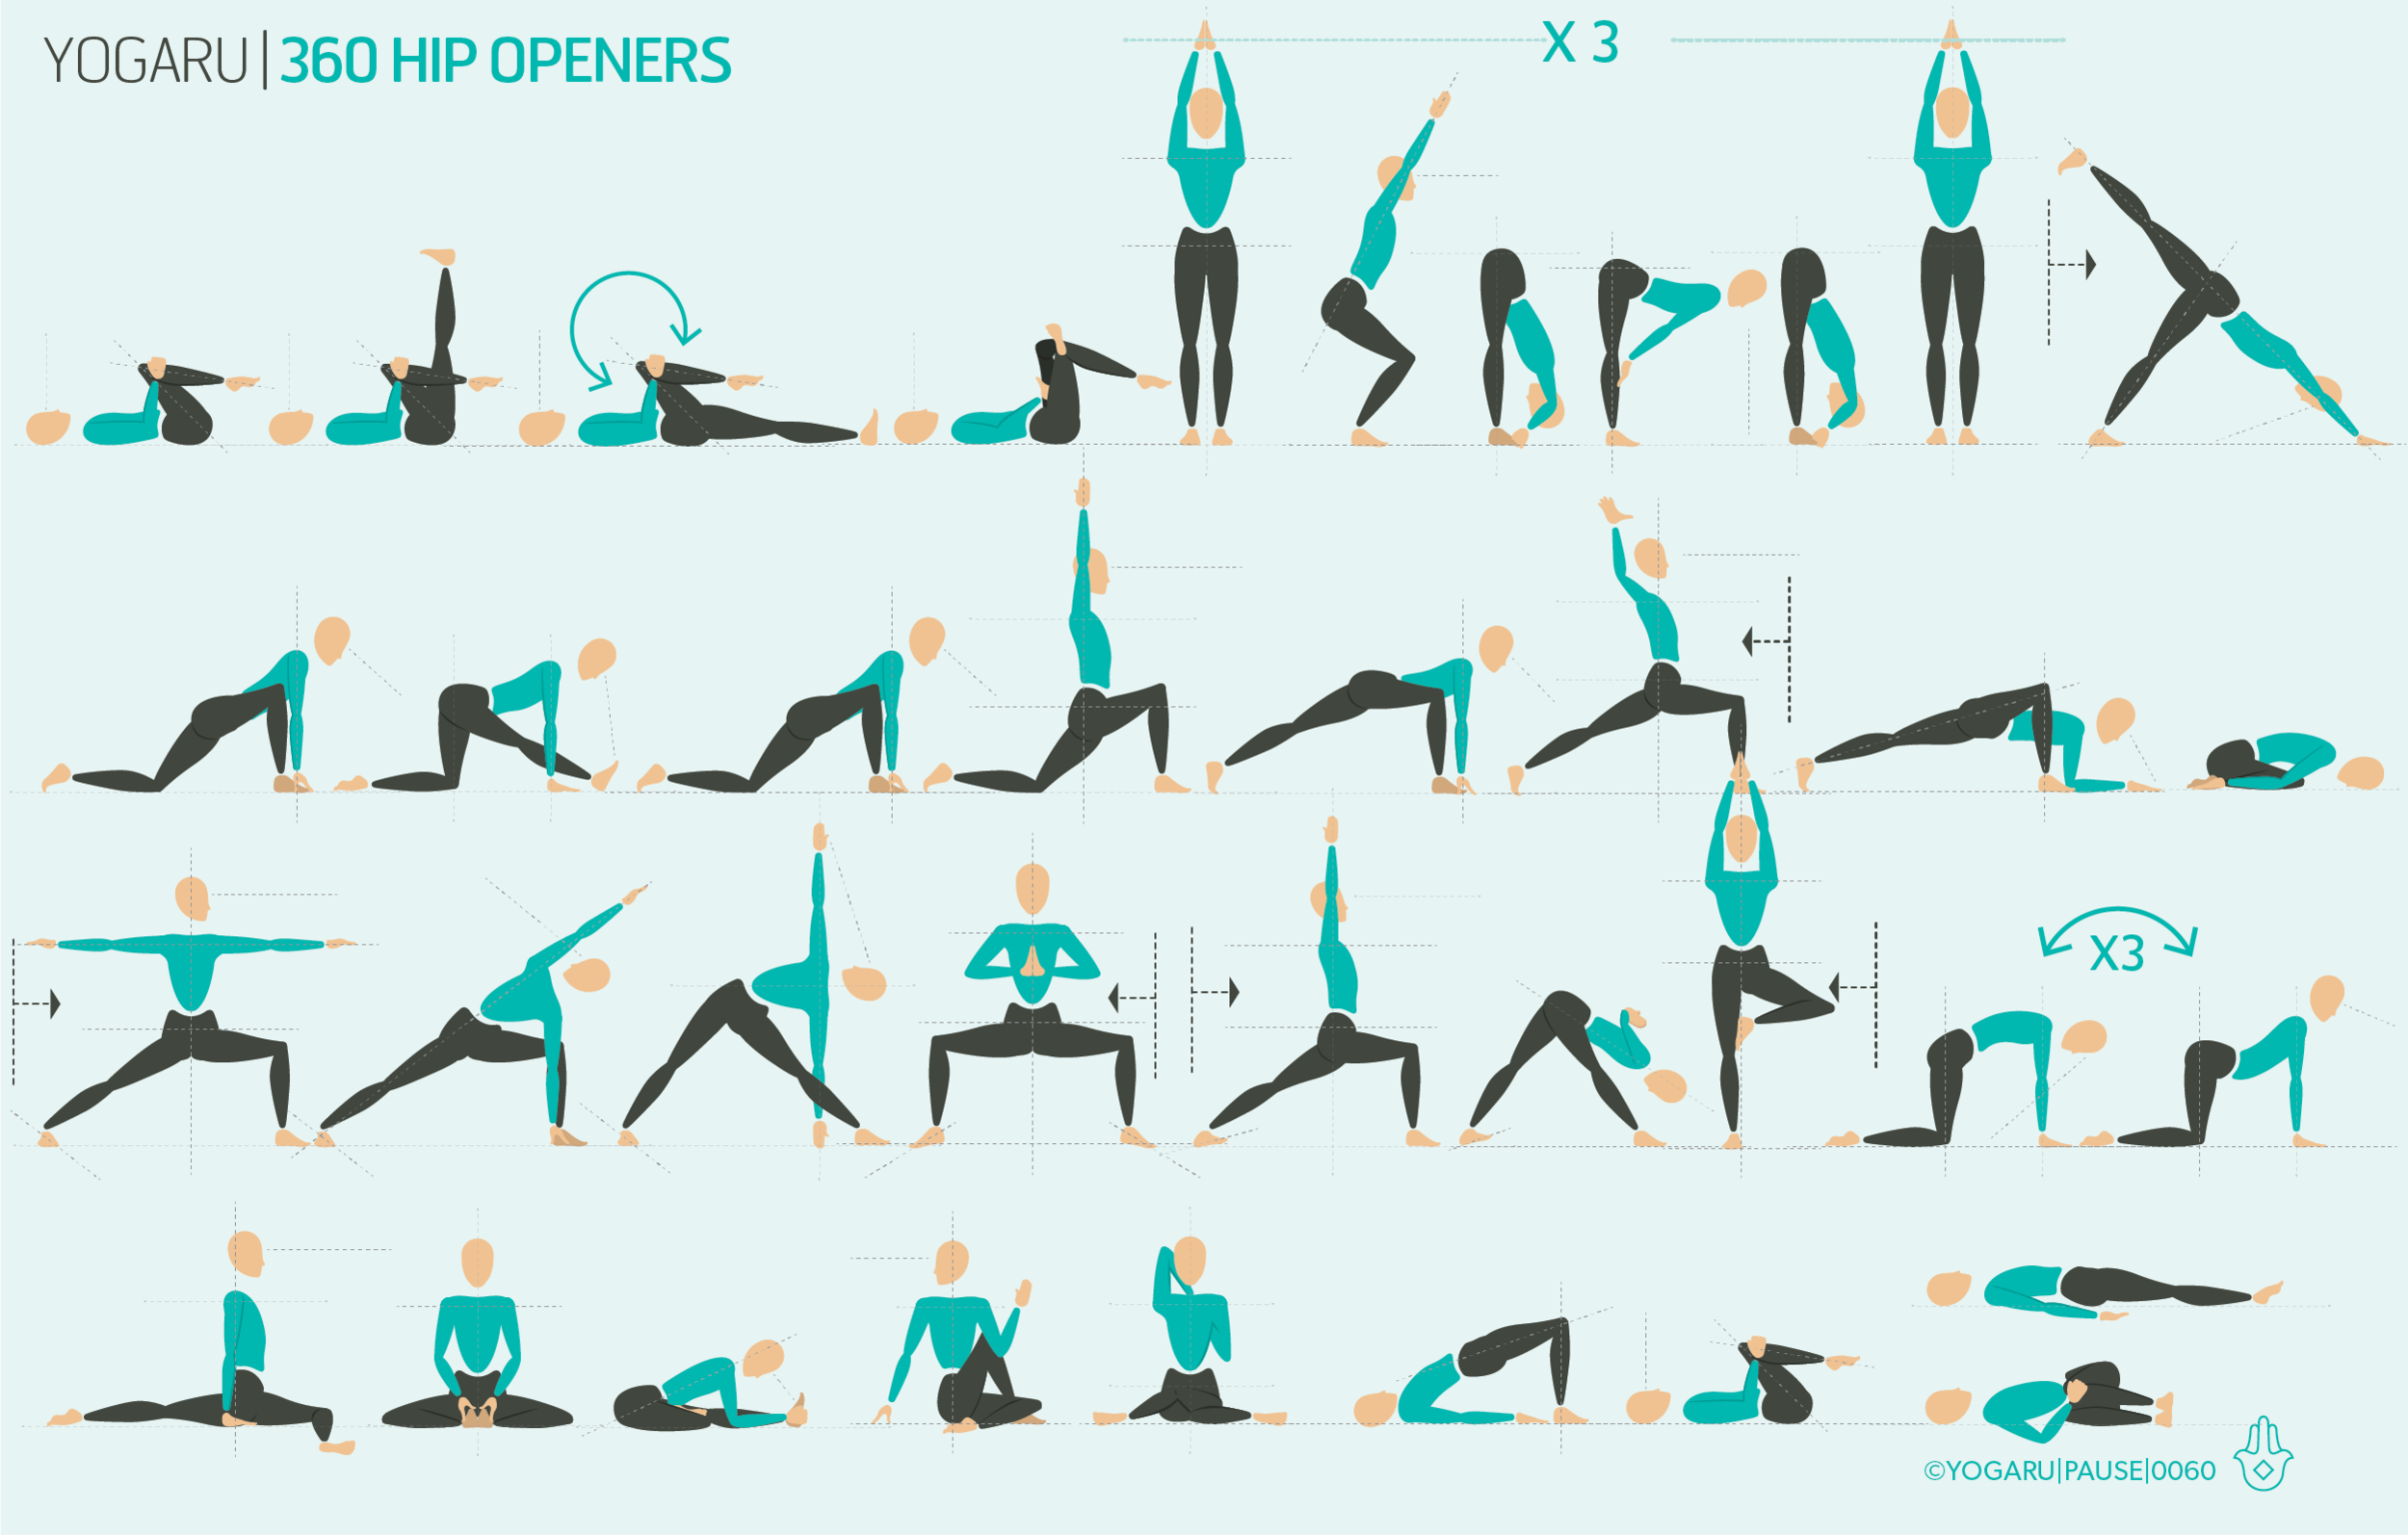
With this in mind, following on from 360 Hip Openers, I have started to explore hip stability. As with everything in life, there has to be a balanced approach to both stretching and strengthening to avoid injuries further down the line. Hip openers have many benefits to counteract our sedentary lives, but hip stability is just as important to incorporate into your practice too. Supporting one with the other will help you to stay within your safe boundaries and give you the mobility of stretching with the stability of strengthening. There is a misconception of yoga that it is purely stretching, but it gives you both stretching and strengthening – using our own body weight, and pressing into our foundation to trigger strong muscle activity.

EXPLORING HIP STABILITY IN YOUR PRACTICE
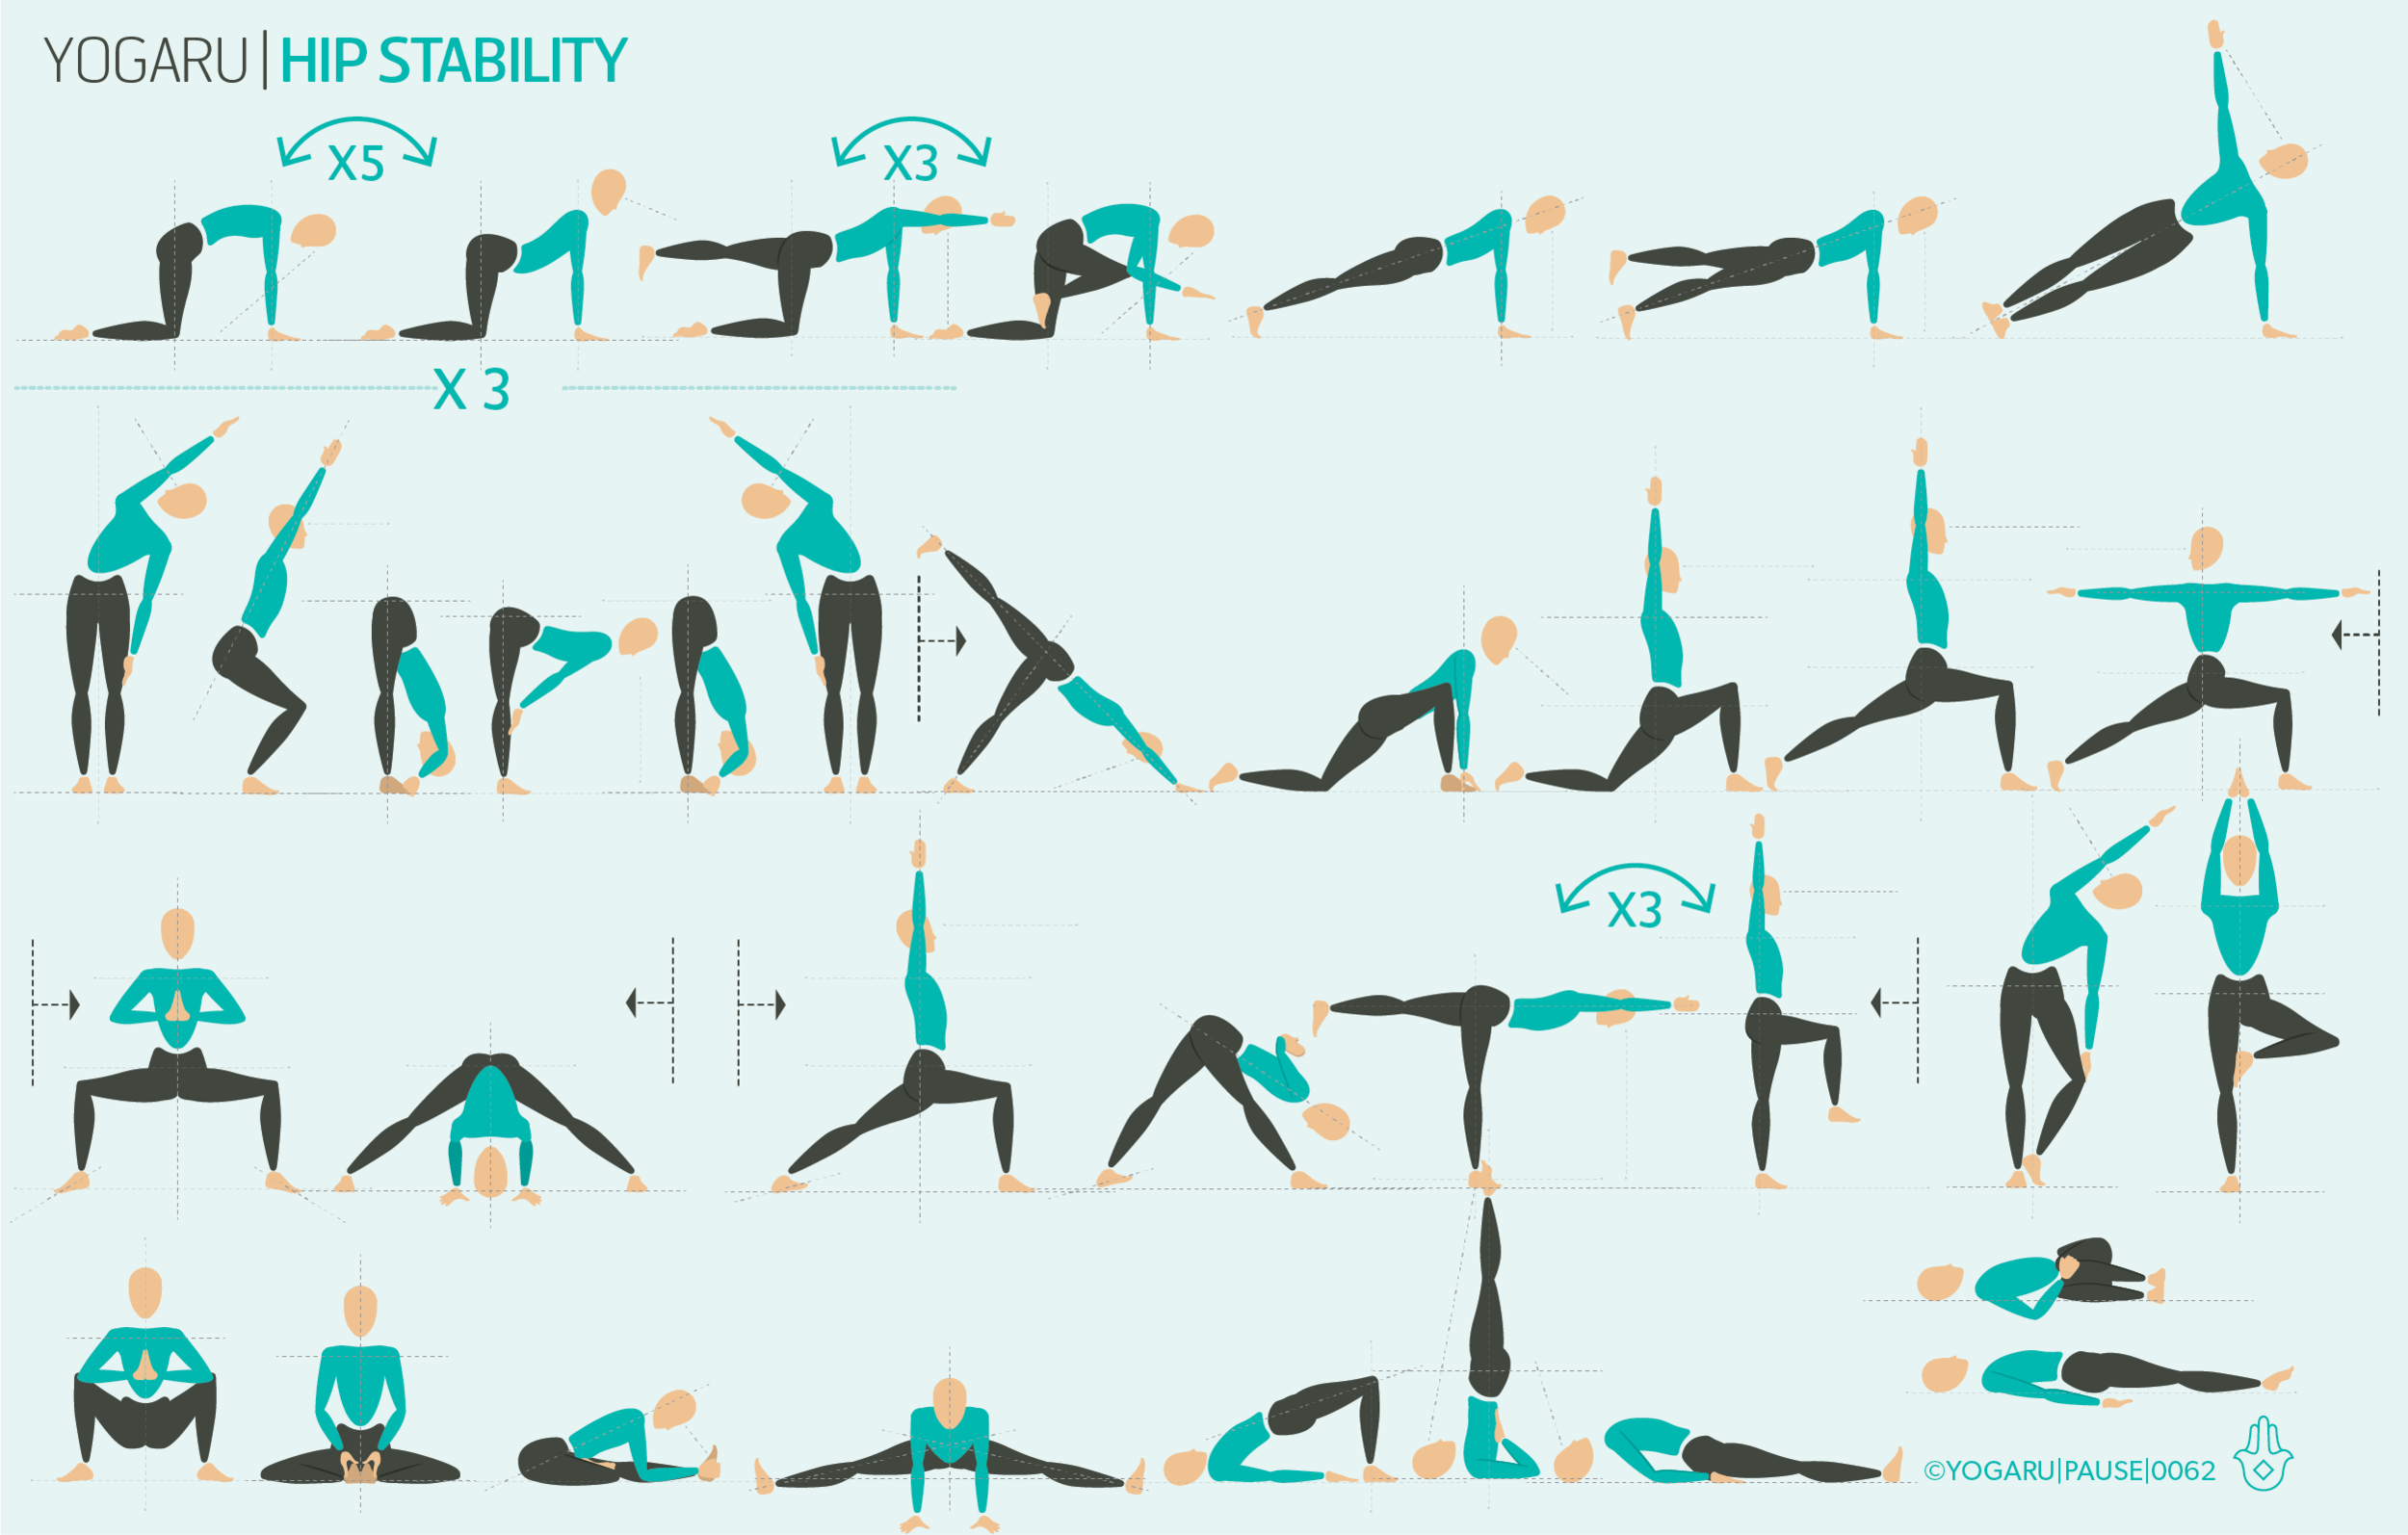
The pelvis is the foundation of the body and encompasses the base of our spine (1st Chakra), our reproductive organs, our digestive system, and enables all movement. The pointy hip bones (iliac crest) at the front of our hips can tell us a lot about our alignment. As you work through this sequence place your fingertips on the hip bones at the front of your pelvis, or have a glance down at your hips, and looking for level hip bones. When you find your hip bones, hug your outer hips to the midline to activate your strong stabilising hip muscles of the glutes. This will help with your alignment in many poses - such as Phalakasana/Plank Pose, Virabhadrasana III/Warrior III and Setu Bandha Sarvangasana/Bridge. When the hips are not level it has implications on the whole body and brings the spine into a lateral bend or a twist to compensate. If you find this is the case for you, come back out of the pose and move into it slower – squeezing your outer hips muscles to the midline – and staying at the point just before the hips move out of alignment. For example in Virabhadrasana III/Warrior III - lift your left leg, pressing out through the heel, with your hands on your hip bones. If you feel the left hip hiking up pull back a little, and work on strengthening your version of the pose at this point. Your leg may not be perfectly parallel to the floor but your hips are learning all about stability and your supporting hip muscles are firing appropriately rather than being bypassed. This way you are being guided by your body rather than what you are being asked to do or what you see other people doing.

ALIGNMENT CUES
The peak pose of this sequence is Parivrtta Ardha Chamdrasana/Revolved Half Moon. Read through these alignment cues to help you find your optimum alignment for your unique body.

  • From Virabhadrasana III, inhale, lengthen up through your spine. Exhale, twist to your right from the waist, reach your left hand to the big toe side of your right foot, a foot forward, on a brick, or the ground. Keeping your left leg parallel to the ground, toes facing down, press out through the heel, roll the inner thigh of your left leg up.

  • Reach your right arm up high, palm facing right, stack your shoulders. Bottom waist rolls forward, top waist rolls back, lengthen from the heel of your lifted leg to the tip of your crown, gaze forward or to your right fingertips.

Print out the above sequence and practice with the intention of searching for a connection with your body rather than searching for perfection. Embrace what you can and can’t do as part of what makes you uniquely you. As you flow through this sequence remember our intention of stability and listening to feedback. When you find you’ve lost your connection move slower and isolate a single area (the hips points) to help you find that feedback again.

To save the images for personal use click and hold down the image until the ‘save image’ option appears; on Mac hold down ‘control’ and click the image to get the option box; on PC right click on the image to get the option box. Scroll down in the ‘option box’ and click ‘save image’.

Ruth Delahunty Yogaru

A simple morning flow

PAUSE_0061.png

EARLY MORNINGS
Finally we’re starting to leave behind the colder months and see the Spring making a brave appearance with the brighter mornings. I’ve always been a morning person – I love catching a glimpse of the silent sleeping world, with the anticipation of the start of a new day. It’s definitely my favourite time of day to get on my mat and instill a bit of calm. Getting on your mat in the morning is about taking time for self care, and realigning yourself physically and mentally for the day ahead. There is a misconception that if you’re not practicing for at least an hour you’re not ‘doing it properly’. You will still get lots of benefits from a simple 10 to 15 minutes flow of some of your favourite yoga poses. You’ll find that as you get into the routine, you’ll start to naturally wake up a little bit earlier and be ready for your practice.

THERE IS BEAUTY IN SIMPLICITY
Most mornings I like to keep my practice simple, and take a few extra breaths in each pose to scan through the sensations that arise. After years of not listening I’m finally more patient with my muscles, especially my hamstrings, and give them plenty of gentle encouraging to open up. I find when I have stretched and strengthened in the morning, and have oiled up the synovial fluid in all my joints, I can sit more comfortably throughout the day with more awareness of posture, and the importance of taking breaks from sitting.

FEEL THE BENEFITS
Morning yoga stimulates the gut – waking up good digestion for the day and builds a strong immune system. A healthy happy digestive system nurtures an Ayurvedic principle of ‘ojas’ – which means vitality or glow, and is considered to be the essence of health that supports wellness. Breath awareness in yoga triggers the ‘rest, restore and digest’ nervous system. When this conscious breath is practiced as part of your daily routine it rewires your brain to naturally reach for this calmer reaction rather than a ‘flight or flight’ response. Of course there is always exceptions where a bit of fight or flight is needed, but with awareness your responses are more informed and less reactive.

EXPLORING SIMPLICITY IN YOUR PRACTICE
This sequence has a bit of everything that will get your day off to a great start. Move slowly through the sequence and pause to take extra breaths when you encounter tightness. You can tailor the length of your flow by picking just one of the three main standing flows, skipping the extra vinyasas which link the flows, or reducing the amount of repetitions on some of the poses. In order to feel the cumulative benefits of this sequence, and get a sense of serenity in familiarity, practice this same sequence for 2-3 weeks. If practicing everyday is daunting for you, start with aiming for a 2-3 days a week, for 10-15 mins, and let it naturally build it up from there.

ALIGNMENT CUES
The peak pose for this sequence is Virabhadrasana II/Warrior II one of the classic poses of yoga that you will likely find in most sequences. Read through these alignment cues to find your expression of Warrior II.

  • From Adho Mukha Svanasana, ground your left foot at a 45 degree angle. Inhale, step your right foot between your hands, check for front heel to back arch alignment, exhale here.

  • Inhale, press into your feet to come up, open your hips to the side of the mat, front knee bent. Left hip naturally sits forward of your right hip. Reach your arms out to shoulder height, palms facing down.

  • Stack your front knee over your front ankle, working towards your front thigh being parallel to the ground.

  • Lift your inner thighs, roll your outer left thigh down, hug your right hip in, gaze to your right fingertips.

To save the images for personal use click and hold down the image until the ‘save image’ option appears; on Mac hold down ‘control’ and click the image to get the option box; on PC right click on the image to get the option box. Scroll down in the ‘option box’ and click ‘save image’.

Ruth Delahunty Yogaru

Anatomy 101 - 360 hips

PAUSE_0060.png

THE FEEL GOOD FACTOR
Hip openers definitely have a feel good factor. They release physical and emotional tension, relieve stress and anxiety, aid digestion, and enable freer mobility to everyday activities. Incorporating hip openers into your practice releases the muscles of the hips and help you with backbends, forward bends and inversions.

HOW DO THEY WORK?
Hip openers are one of the most requested poses in a yoga class, we’re all familiar with the effect they have on us physically and mentally, but what exactly is happening in the hips to produce this effect? One of the hip flexor muscles called the psoas muscle, which connect the upper and lower body, is one of the most important muscles for mobility and is linked to the ‘fight or flight’ response. Chronically tight psoas muscles, from prolonged periods of sitting, continuously triggers the stress hormone cortisol. When there is no fight or flight required the cortisol stays in our system and becomes surplus – keeping us in a permanent state of unrest, and leaves you feeling stressed, anxious and exhausted. Hip openers release this physical hip tension, and as a result stimulates the ‘rest, restore and digest’ response. Which is why you feel a lovely freedom of movement, along with a sense of calm, after incorporating some hip openers into your yoga practice.

BALANCING MISALIGNMENTS
The hip joint is a ball and socket joint which gives us a full 360 range of motion, along with internal rotation and external rotation. With such a range of motion comes a very complicated system of muscles to facilitate mobility and stability of the joint. When there is tightness in any of these muscles it can cause back and/or hip pain – for example tight hamstrings pull on the sit bones, tilting the pelvis back and cause the lower back to loose its natural lumbar curve and compress the vertebra of the spine. The hamstrings flex the knees and so shorten in extended periods of sitting, which is one of the main cause of lower back pain.

We all have a favoured side which can cause misalignment in the pelvis and spine. Misalignments pull on the opposing muscle – this also can cause back and/or hip pain. Hip openers help realign your posture and address these imbalances. Releasing the muscles of the hips and reestablishing the curve of the lower back are particularly good for those who suffer from mild to moderate back pain.

EXPLORING HIP OPENERS IN YOUR PRACTICE
The muscles of the hips are thick multi-layered muscles and need time and patience to release. Slow down and recognise when the muscles have reached their full range of motion. At first pull back 10 percent from your maximum and allow the muscle to get used to the idea of stretching. The sequence builds up to the ultimate hip opener Eka Pada Rajakapotasana/One Legged King Pigeon. Pigeon works on many of the hip muscles – it stretches the hip flexors on the back leg, and the inner groin and outer hip of the front bent leg. They help to regulate hormones and massage all the muscles of the upper body.

ALIGNMENT CUES
Move slowly through the above sequence and take extra time when you encounter tight areas. Take some deep breaths while the muscle gently warm up.

Print out the below tips, along with the sequence, and melt into your hip openers:

  • From Adho Mukha Svanasana, place your right foot behind your left hand and your right knee behind your right hand.

  • Right foot flexed, working towards your right shin being parallel to the top of the mat.

  • Place your hands either side of your hips, walk your left leg out behind you in line with your left hip as you lower your hips down.

  • Draw your left hip forward and your right hip back, let the weight of your upper body help to gently lower your hips down.

  • Stay here, or for a stronger stretch, exhale, fold forward, interlock your hands and place your head on your hands, gaze down.

  • ‘Proprioceptive Neuromuscular Facilitation’ or PNM contract and release to get a greater release similar to the stretch reflex.

  • Squeeze your outer hip muscles your glute to open the hip out.

  • Contract your muscles, draw your front knee back and your back knee forward. Lift your pelvic floor, draw navel to spine, hold for 6 seconds.

  • Exhale and release for 30 seconds.

To save the images for personal use click and hold down the image until the ‘save image’ option appears; on Mac hold down ‘control’ and click the image to get the option box; on PC right click on the image to get the option box. Scroll down in the ‘option box’ and click ‘save image’.

Ruth Delahunty Yogaru