Salabhasana - Locust

YOGARU_Salabhasana_PB.png

BACK BODY STRENGTH
Salabhasana/Locust is by far my favourite backbend. I slot it into my vinyasas instead of Bhujangasana/Cobra to strengthen my whole back body, not just the muscles of my spine. ‘The posterior chain’ refers to the whole back body. It runs from the back of the heels up through the calves, hamstrings, glutes, lower back (lumbar spine), upper back (thoracic spine), neck (cervical spine) and ends just under the back curve of the skull (occipital curve). This chain of muscles are designed to hold us upright. If they are weak they become fatigued more easily and cause an overcurve of the upper spine and shoulders, resulting in a flattening of the lower spine as the body tries to compensate for the forward sway of the upper back and head. The posterior chain becomes weakened from lack of use or from long periods of sitting. A strong posterior chain protects the back and encourages good posture. In Salabhasana/Locust we are lifting the weight of the whole body against gravity which makes it a very strengthening pose for the posterior chain and the back of the arms. It also stretches the front of the shoulders, the chest, the belly and the front of the thighs. Although Salabhasana/Locust is quite a challenging pose to hold for more than a few breaths it is very accessible for beginners and is the perfect pose to prepare for deeper backbends.

THE BENEFITS OF SALABHASANA/LOCUST
The backbend family stimulates the nervous system, aids digestion, boosts circulation, boosts the immune system, and ease stress, tension, anxiety and mental fatigue. They also expand lung capacity and ease symptoms of asthma and sleep apnea. Backends that place pressure on your abdomen, like Salabhasana/Locust, have the added bonus of stimulating the organs of the body and aiding digestion by encouraging peristalsis in the muscles of the colon which help to push waste food along detoxing the body of food waste.

EXPLORING SALABHASANA/LOCUST IN YOUR PRACTICE
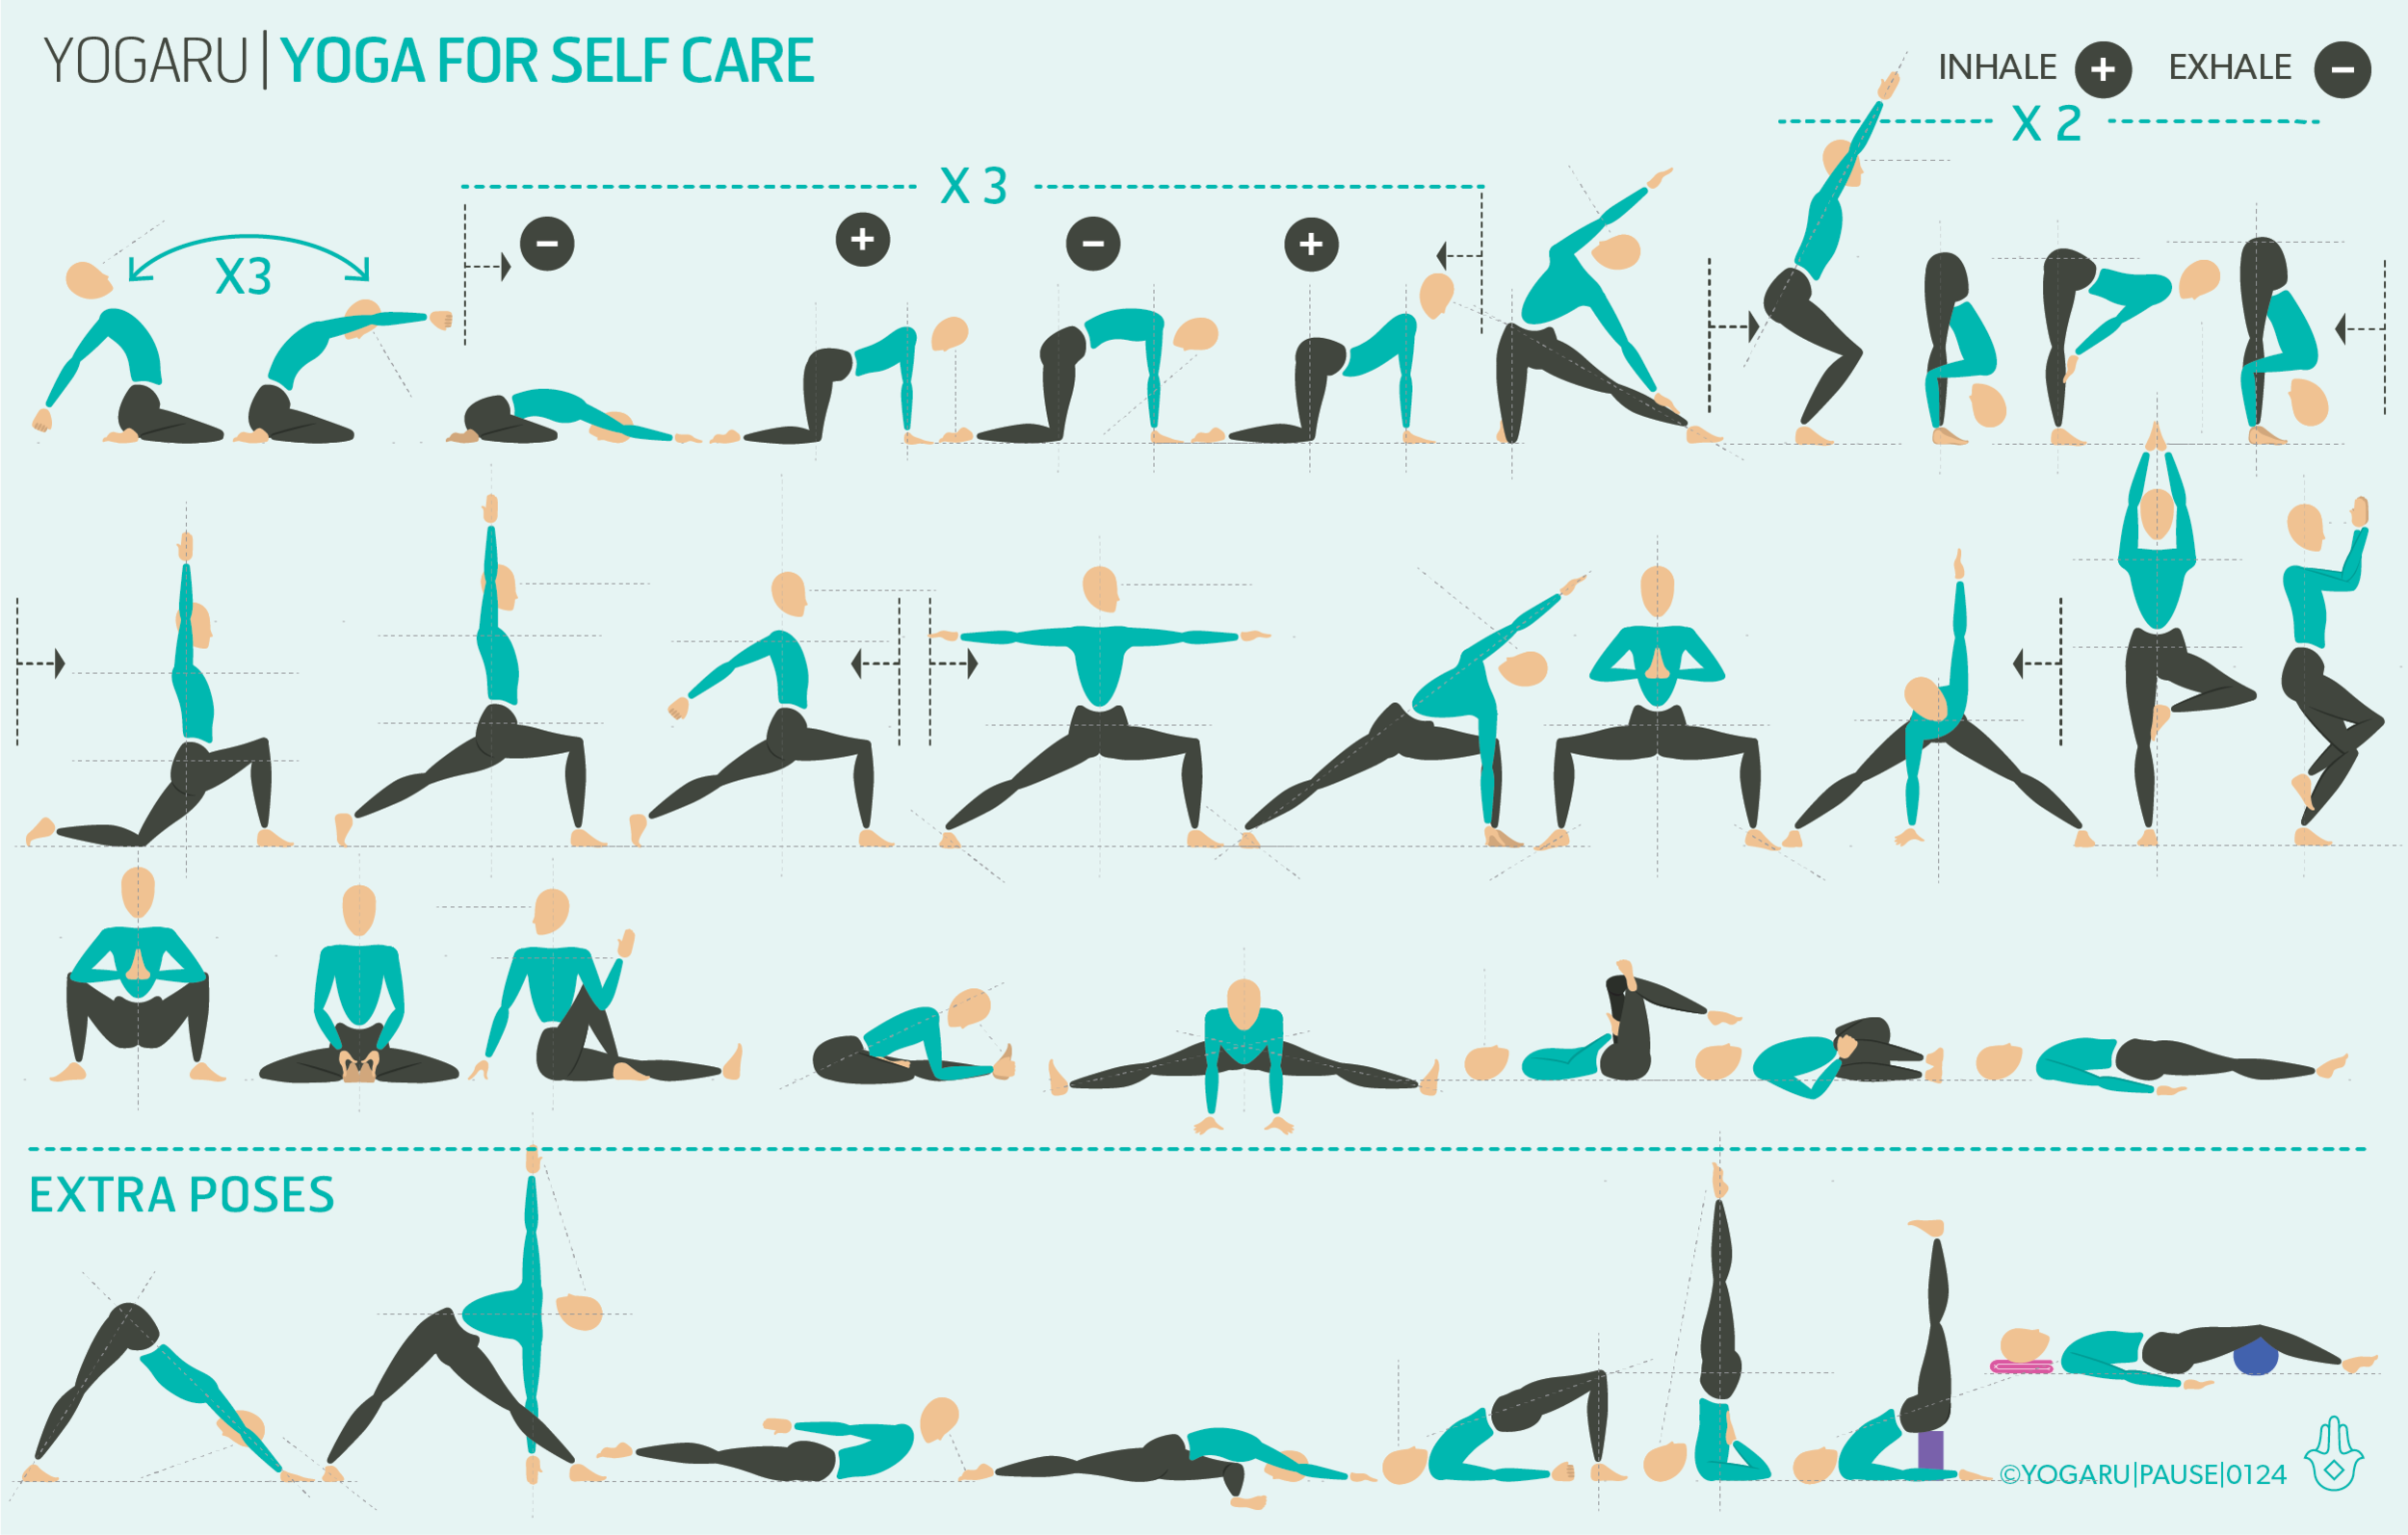
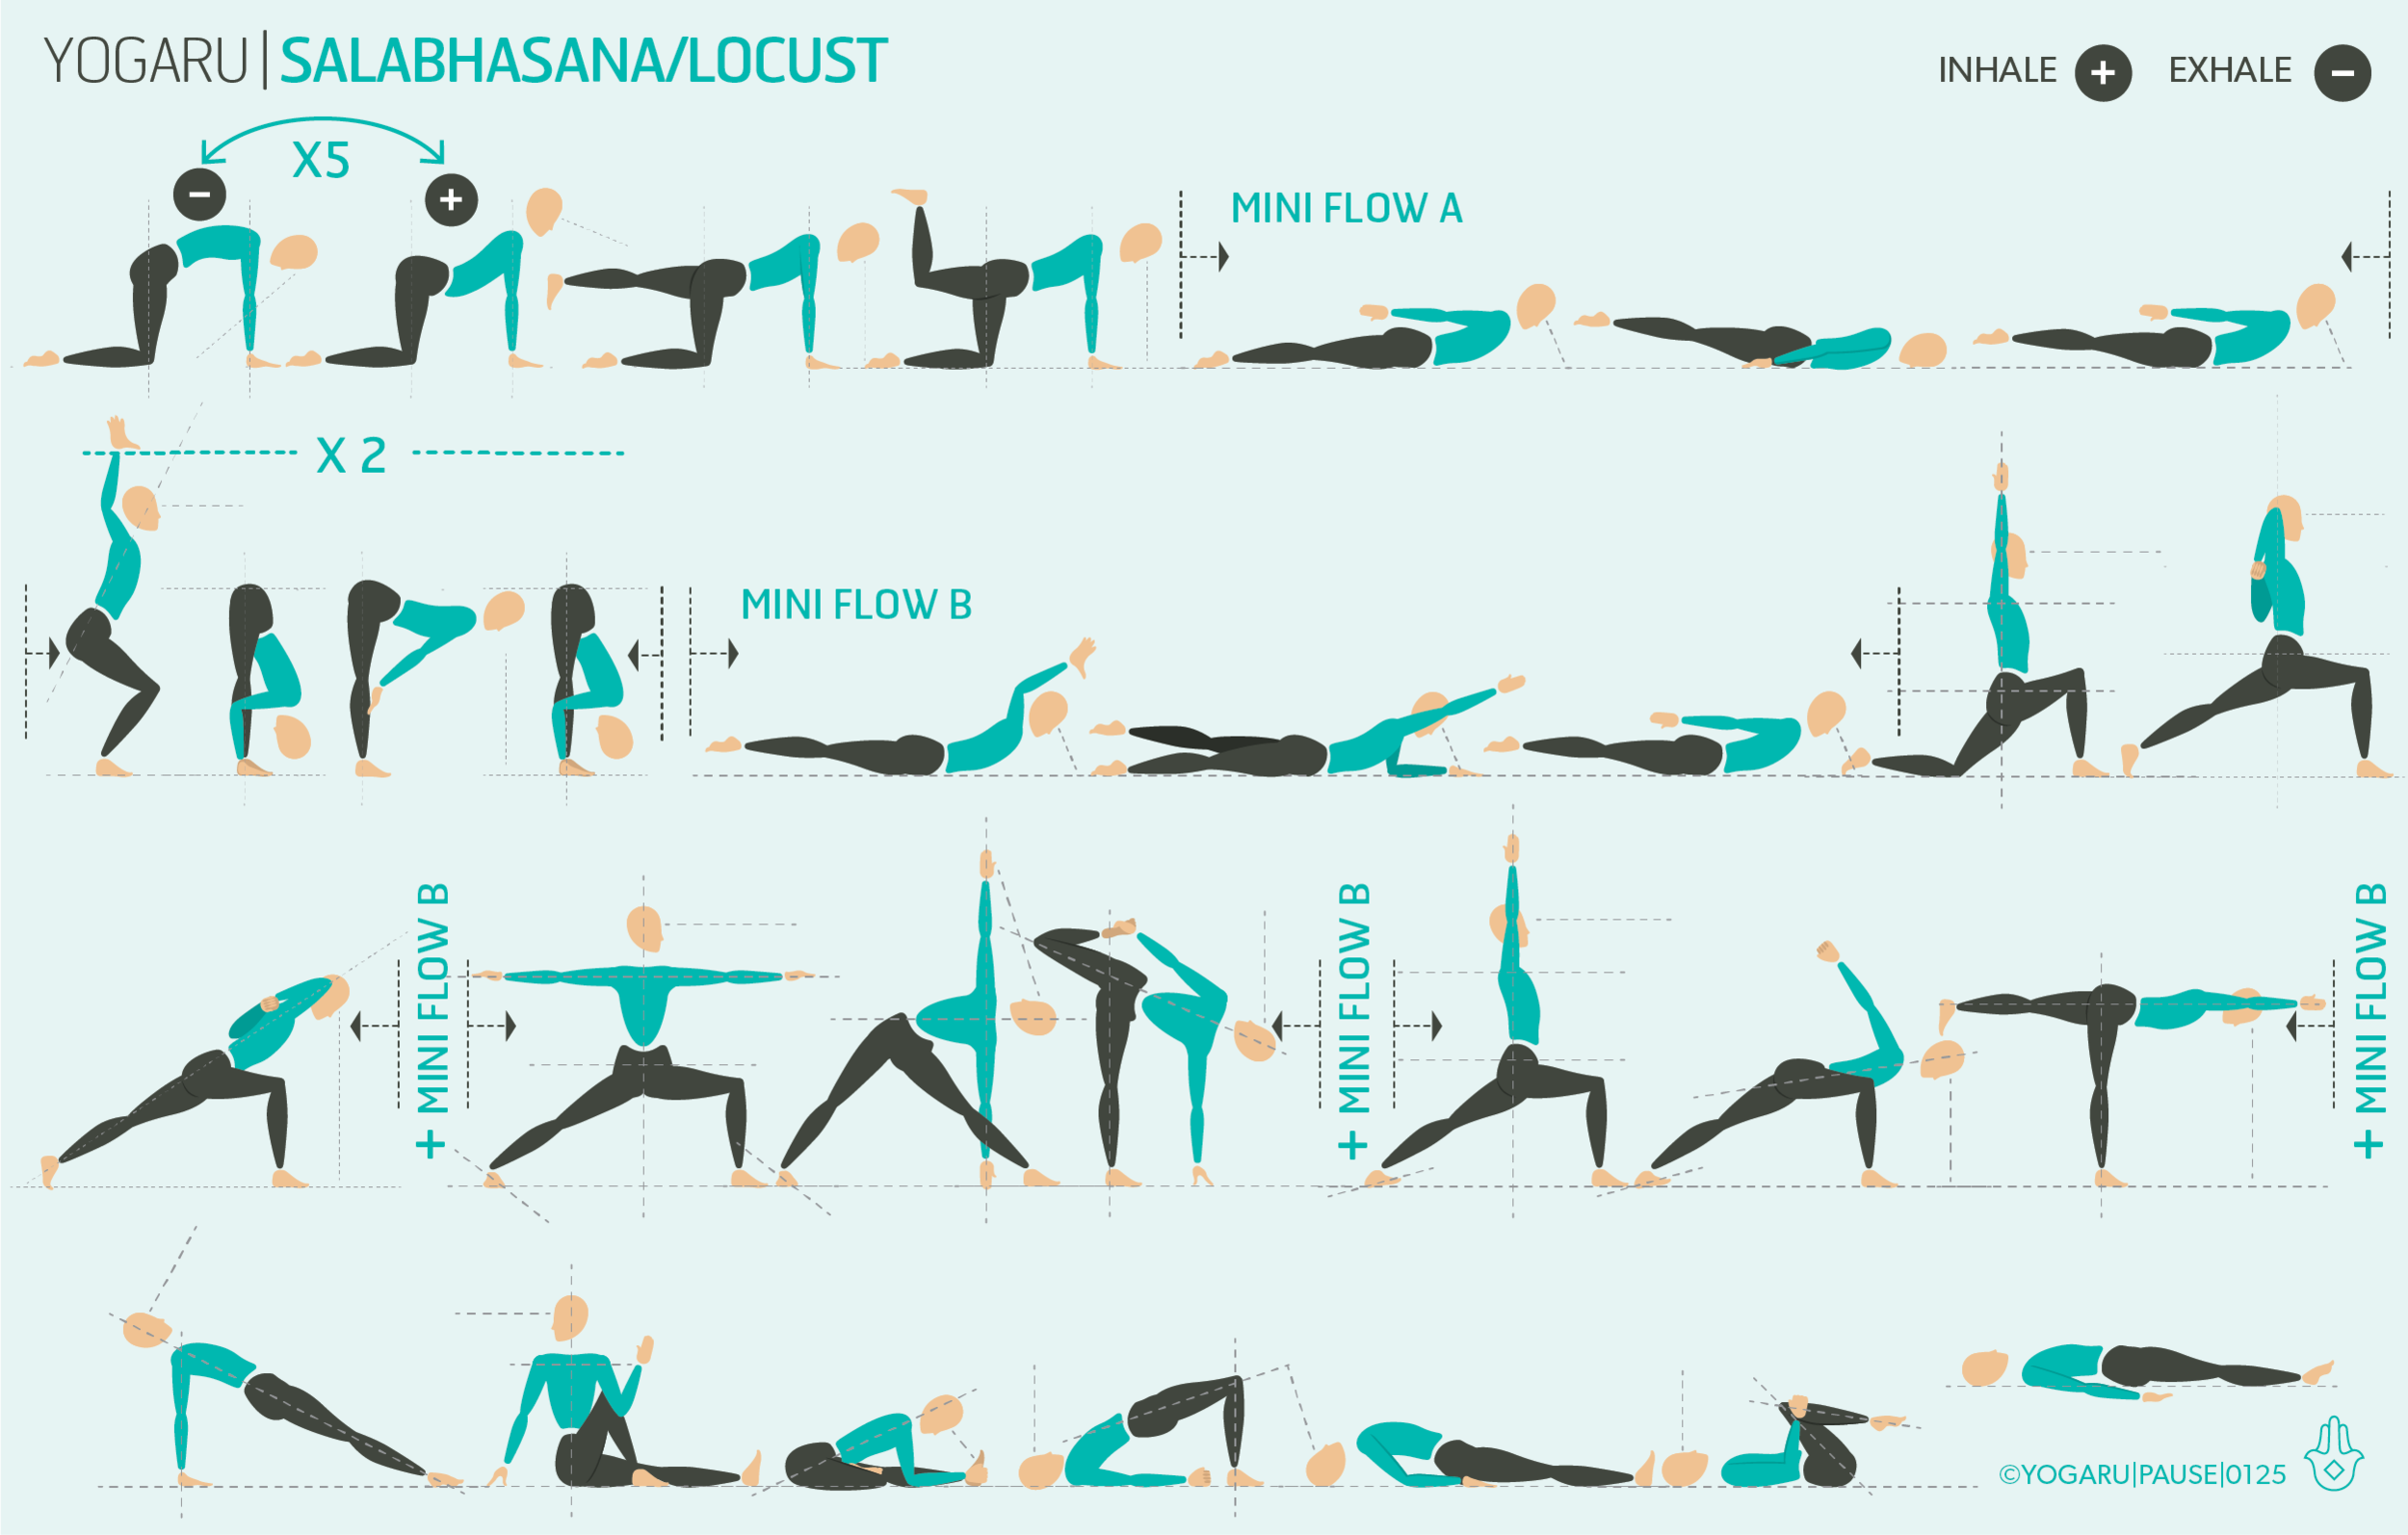
This sequence will give you plenty of opportunities to explore Salabhasana/Locust. Instead of linking your standing mini flows with a standard vinyasa you will come down to the ground and spend some time in a series of Salabhasana/Locust and Salabhasana versions. When you are moving through these poses use your public bone as your grounding anchor and see if you lightly draw your navel towards your spine. There is a temptation to puff the belly to fill the lungs and get higher but this will bypass the muscle activity of the back body. Stay lower and feel for the strength of the muscles all along the back body rather than striving for as much height as you can get.

PAUSE_0125.png

ALIGNMENT CUES
There are two Salabhasana mini flows. You will take the Mini flow A as a warm up at the end of the first row and you will take the full Mini Flow B after each standing flow indicated by ‘+ MINI FLOW B’. Take your time in this section of your practice and remember this is the essence of this sequence.

Have a read of the tips below and either print out the sequence or save it onto your device:

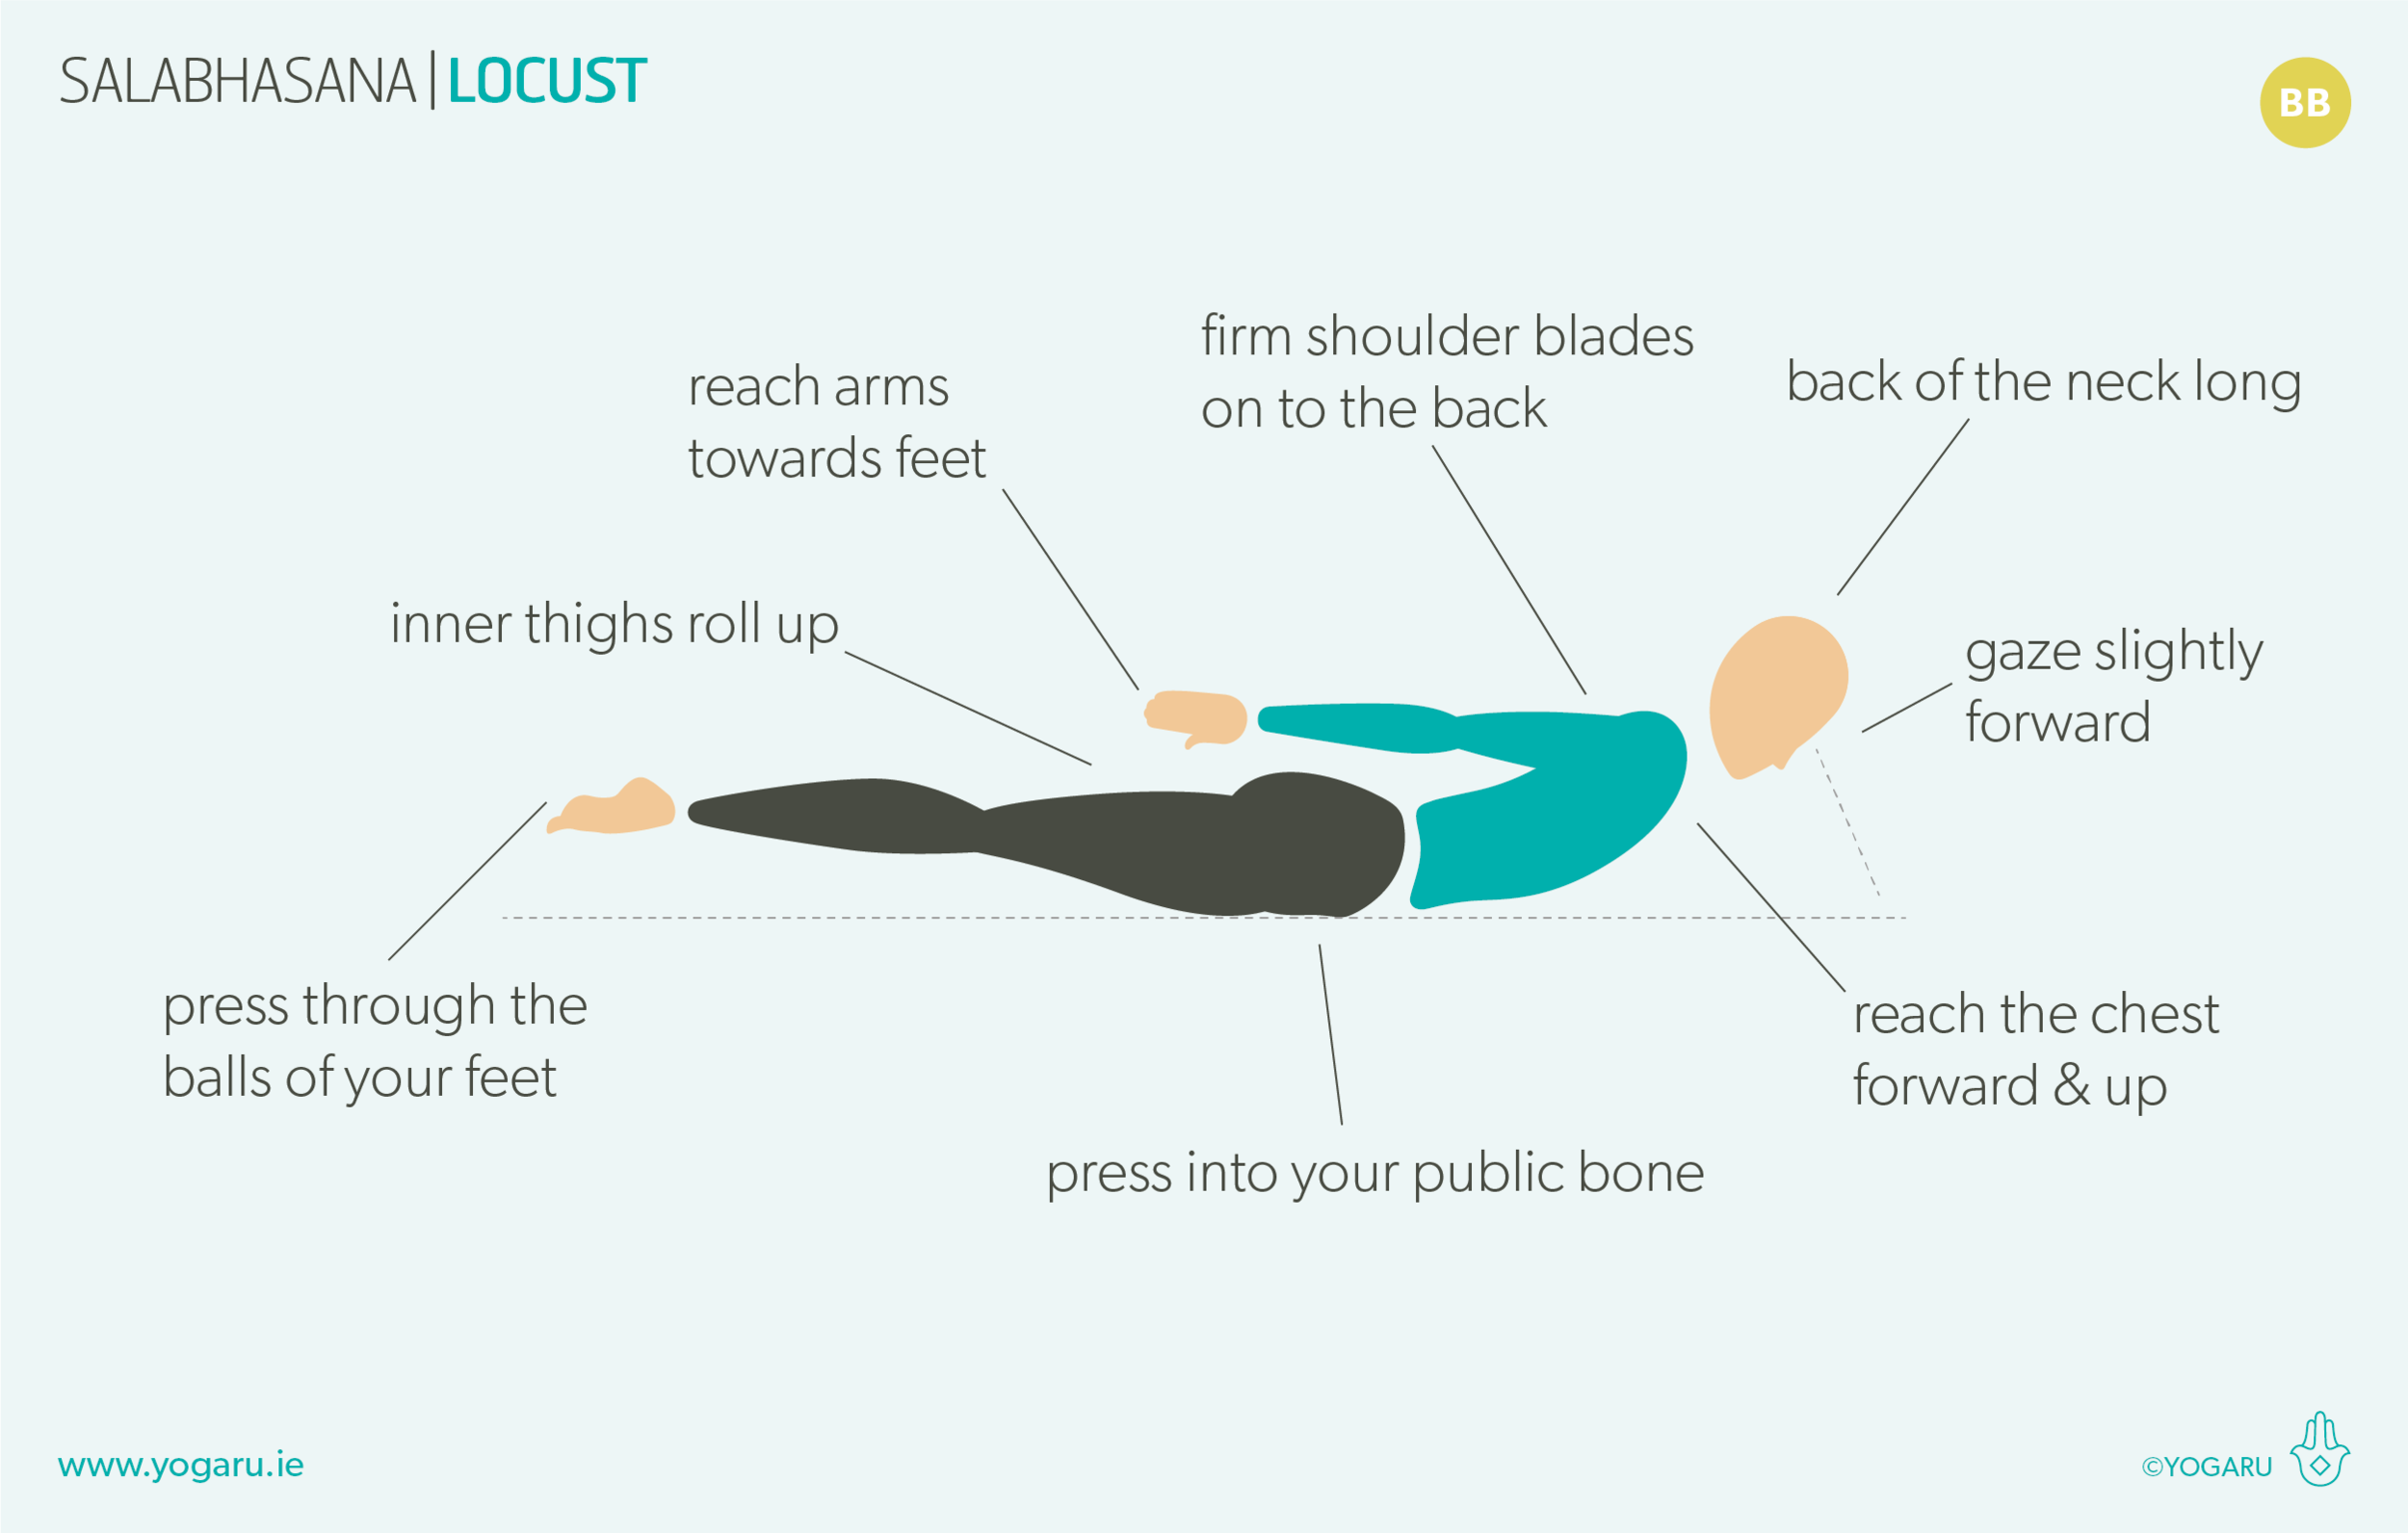
  • Lie on your front, arms by your sides, palms facing your body, forehead resting on the ground.

  • Inhale, press into your pubic bone, lift your head, upper torso, arms and legs, lift with the whole back. Reach your chest forward and up.

  • Extend your arms towards your feet, lift your legs up and press through the balls of your feet, roll your inner thighs up.

  • Broaden through the collarbones, firm your shoulder blades onto your back, back of the neck long, gaze slightly forward.

Subscribe to my newsletter & get a FREE YOGA BENEFITS INFOGRAPHIC as a thank you!

To save the images for personal use click and hold down the image until the ‘save image’ option appears; on Mac hold down ‘control’ and click the image to get the option box; on PC right click on the image to get the option box. Scroll down in the ‘option box’ and click ‘save image’.

Ruth Delahunty Yogaru

Yoga for self care

PAUSE_0124.png

PRIORITISING SELF CARE
We wear busyness like a badge of honour and looking after ourselves is often at the end of our ‘to do’ list. When I’m busy, self care is the first thing that gets dropped from my day, even though I know it is when I need it the most. Sometimes we need reminding how important self care and making a point of prioritising it is. If we put self care at the top of the list all the other jobs would be much easier – we would feel restored, cared for, content and ready for the rest of the day. Self care not only benefits us, it also benefits everyone we encounter throughout the day. Andrea Ferretti, host of the Yogaland Podcast defines self care as “the conscious act of taking care of your needs so that you can best serve your purpose in the world’. Life without self care is all outward energy without receiving anything back in return.

Do you have a self care routine? What does your self care routine look like for you? Write down a list of your go to self care tools. When you are like a hamster stuck in a wheel you will find it hard to remember what will help you. Work out what your obstacles to self care are to help you recognise them. You need a written message to your future self to remind you that you know exactly how to help yourself find balance again.

THE ROLE OF YOGA IN SELF CARE
Yoga is at the top of my list. It is the ultimate expression of self care, it helps you pause to check in with yourself and allows you to move in a way that will support you in your life off the mat. On the days I practice I notice my energy is better, my moods are more balanced, I am more focused and productive throughout the day and I sleep better. I look after myself and probably look after others better too! Yoga helps you sprinkle self care throughout your day, it reminds you that looking after yourself is an essential part of life, not a luxury.

HOW TO WORK OUT WHAT YOU NEED
Your yoga practice can help you take ownership of your wellness. Personal practice is where the magic happens. In your personal practice you are addressing your unique needs and tailoring to what you specifically need. When you step on your mat take a few moments to work out how your practice can help you today. Ask yourself these questions:

  • What do I need physically?

  • What do I need mentally?

  • What are my energy levels?

  • What is my mood today?

  • What are my limitations or injuries?

  • What is the rest of my day like?

  • Where do I need mobility?

  • Where do I need stability?

You may not have the answer to all the questions but it will help remind you if you have an injury you are minding, if you need to go easy because you have a full day ahead, or if you are dealing with something else in life that might require you to be extra kind to yourself.

When I practice I use one if my ready made sequences, or I go through the 108 Asana and either pick a peak pose that I’m curious to try and build a sequence, or pick a selection of poses at my level of experience.

EXPLORING YOGA FOR SELF CARE IN YOUR PRACTICE
Yoga works best when it is approached with a commitment to consistently getting on your mat, even if it is just for 10 minutes. You need to invest some time to get the wealth of benefits yoga gives in return. Everyone has different favourite poses and poses that suit them better than others. Consider this sequence is a starting point for building your self care flow. It is a gentle sequence full of nourishing poses that you can hold for a little bit longer and explore what your reactions to them are. Notice which poses you are enjoying and which challenge you physically and mentally. Start to build a picture of what your yoga practice looks like. Keep a note of poses that give you instant yoga good vibes.

ALIGNMENT CUES
Along the bottom of the sequence are a selection of ‘extra poses’ that you can slot in or substitute with other poses, so you can start to create your own unique flow tailored to your needs. You can also use these poses to create variety in your practice and continue to use this sequence for several practices.

Have a read of the tips below and either print out the sequence or save it onto your device:

  • Before you start to move, place one hand on your heart and one hand on your belly and take three gentle breaths to help you settle.

  • Remember to take time in each pose to notice your reaction to it and use a slow calm breath to find your stamina.

  • Consider adding Salabhasana/Locust at the end of each mini flow as a lovely way to strengthen and reset your spine.

  • If you are adding poses you can come into Downward Facing Dog/Adho Mukha Svanasana and then get ready to take your pose, or add them into their appropriate section ie Trikonasana into the end of one of the standing mini flows, Salamba Sarvangasana/Shoulderstand towards the end of the seated section.

  • Incorporate at least 2 minutes for Savasana at the end of your practice using a standard Savasana or the supported version in the extra poses section.

Subscribe to my newsletter & get a FREE YOGA BENEFITS INFOGRAPHIC as a thank you!

To save the images for personal use click and hold down the image until the ‘save image’ option appears; on Mac hold down ‘control’ and click the image to get the option box; on PC right click on the image to get the option box. Scroll down in the ‘option box’ and click ‘save image’.

Ruth Delahunty Yogaru

Ashta Chandrasana - Crescent Moon

YOGARU_Ashta Chandrasana_PB.png

KEEP IT SIMPLE
Your favourite yoga pose doesn’t have to be one of the big poses that takes years to master. The poses we see on social media are beautiful to look at, and can be quite aspirational, but don’t really reflect the poses that are the essence of the practice. The magic begins the minute you step on your mat with the simpler poses that are often overlooked as not much more than warm up poses. This month's pose is one of my favourite poses that you’ll encounter in almost every yoga class - Ashta Chandrasana/Crescent Moon or more commonly known as high lunge.

THE BENEFITS OF ASHTA CHANDRASANA/CRESCENT MOON
The muscles of the legs are the biggest muscles of the body. As a standing pose Ashta Chandrasana/Crescent Moon builds focus, heat, stamina, strength; increases circulation, metabolism; and improves posture, spinal health and coordination. This pose is more challenging than you’d expect and with the extended leg position it requires plenty of muscle activity to keep you balanced.

Yoga is not just about stretching – it’s about equal amounts of stretching and strengthening. Even within the stretching element, containing the stretch and finding the strength of the muscle first will give you a more supported injury free practice. In Ashta Chandrasana/Crescent Moon the temptation is to release the muscles that support the hip joint, and let the weight of the upper body sink the hips down as low as they can go. In this position you have lost the support of the muscles in the hip joint and are more likely to overstretch muscles. A more supportive version of the pose is to come to 80% of your full range of motion, firm the buttocks muscles of your back leg and hug your outer hips to the midline. Feel strength in the muscles that are flexing and a contained supported stretch in the muscles that are extending. Get familiar with how this feels and how this principle might feel in all your yoga poses throughout your practice for a more sustainable lifelong practice.

EXPLORING ASHTA CHANDRASANA/CRESCENT MOON IN YOUR PRACTICE
This sequence has six rounds of Ashta Chandrasana/Crescent Moon and gives you plenty of opportunities to find your strong leg muscles. The feet are a crucial part of the pose – press down into the ground and draw your hip bone back into their sockets as you hug your outer hips to the midline. Grounding down through your feet will trigger strength in your legs and your spine, while hugging to the midline will stabilise and help you balance in this wide legged position. The sequence starts with a series of standing poses with the feet together to help you find your connection with the ground before you move into Ashta Chandrasana/Crescent Moon where the feet are much further apart and your balance is challenged.

Before you come up to high lunge make sure your feet are at least hip distance apart – like you’re feet are on train tracks. The wider your feet are the easier it is to balance when standing. In the second round of Ashta Chandrasana/Crescent Moon you will start with a bent back leg and lift your pointy hip bones at the front of your pelvis up to find the stretch in the hip flexors. Then gradually move to straighten out the back leg any amount without letting the hip bone tilt forward again.

PAUSE_0123.png

ALIGNMENT CUES
There are lots of standing poses in this sequence. Take breaks if you need to and either stand in Tadasana/Mountain for a few breaths or come to the ground in between mini flows and take a child's pose or a few rounds of cat/cow to ease out any built up tension.

Have a read of the tips below and either print out the sequence or save it onto your device:

  • From Adho Mukha Svanasana, inhale, step your right foot between your hands, exhale here.

  • Inhale, press into your feet to come up, reach your arms up high, shoulder width apart or palms together. Stack your front knee over your front ankle.

  • Press out through your left heel, firm your back leg, lift the thigh of your back leg up, hug your outer hips to the midline.

  • Press into your feet and push the floor away, firm your left buttocks.

  • Lift your pointy hip bones up to stack your pelvis perpendicular to the ground.

  • Draw your navel towards your spine, broaden through your collarbones, lengthen through your spine to the tip of your crown, gaze forward or to your fingertips.

To save the images for personal use click and hold down the image until the ‘save image’ option appears; on Mac hold down ‘control’ and click the image to get the option box; on PC right click on the image to get the option box. Scroll down in the ‘option box’ and click ‘save image’.

Ruth Delahunty Yogaru