Bakasana - Crow

YOGARU_Bakasana_PB.png

TAKING FLIGHT
Bakasana/Crow is one of my favorite arm balancing poses. I remember the feeling of achievement when I finally took flight after many failed attempts and tumbles. While yoga poses are not to be conquered and ticked off a list, they do give you the opportunity to challenge yourself and feel proud of yourself. As long as you don’t grasp at poses that are not suitable for you or have no benefits for you beyond making shapes. Arm balances teach you the principles of finding balance physically in your practice and mentally in your everyday lives. Learning when you fall you can get back up and keep going is all part of yoga and life practice. If we didn’t face challenges we wouldn’t learn how to deal with difficult situations. Remember, no matter how gracefully the person beside you pops up into crow pose, they have their own challenges that yoga offers them. It is recommended that you can hold Adho Mukha Svanasana/Downward Dog and Phlankasana/Plank comfortably before you consider putting the full weight of your body on your wrist joint.

THE BENEFITS OF BAKASANA/CROW
Bakasana/Crow gives the opportunity to take an arm balance with a smaller distance from the ground than bigger arm balances like Adho Mukha Vrksasana/Handstand. Bakasana/Crow strengthens the shoulder, arms, core, hip flexors, glutes, groins and hamstrings and stretches the spine. It builds confidence, stamina, focus, concentration and coordination; boosts circulation, the immune system and energy levels. A strong, reactive and supple core will help you to take a controlled lift and find your centre of gravity. Good news is that it’s the foundation pose of lots of other arm balancing poses – so once you grasp it, it opens up a whole range of poses to you.

EXPLORING BAKASANA/CROW IN YOUR PRACTICE
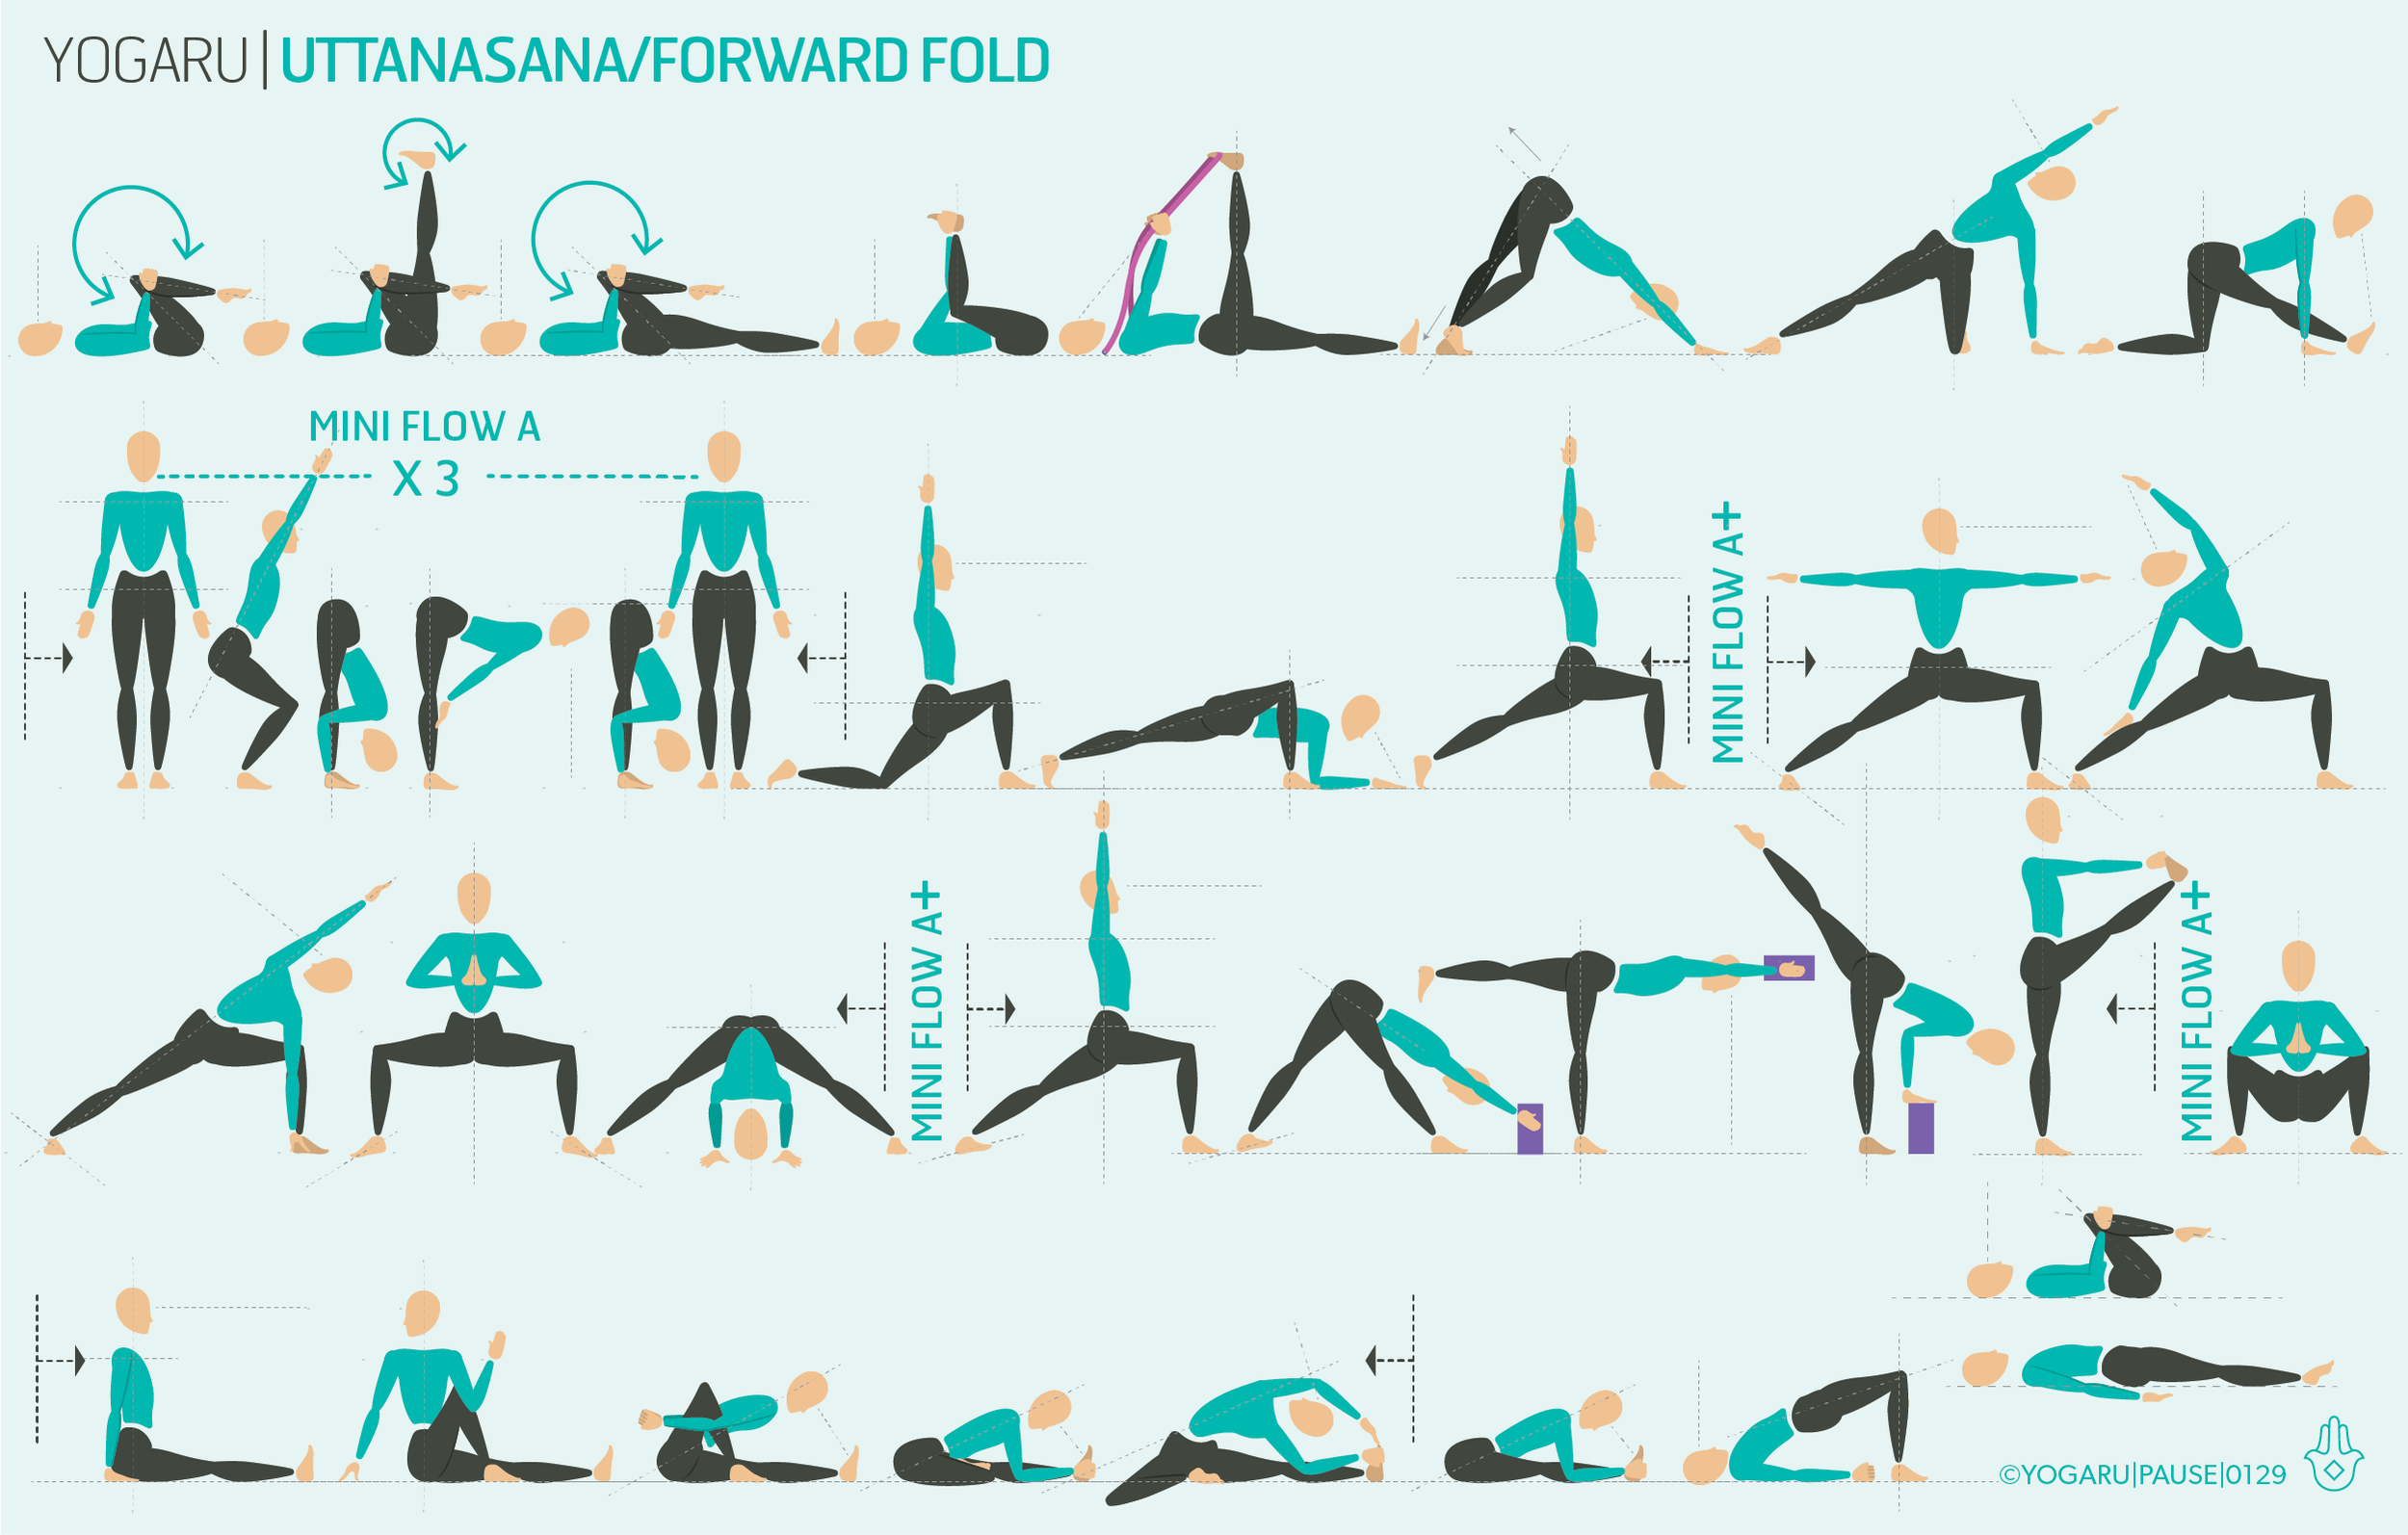
Journeying into Bakasana/Crow with awareness of the different areas that need to be prepared makes it easier to give it your best shot. As you run through the prep poses, notice if there are particular ones that you find more difficult, spend a bit more time on these poses and breathe deeply in them.

If taking flight in Bakasana/Crow is completely out of your comfort zone, place a pillow or blanket on the ground in front of you, most people find that they have the courage to lift up if they have an insurance policy for potential face planting! Practice Lolasana/Dangling Earing on blocks first to work on your core and hand strength. For your first Bakasana/Crow lift the feet up one at a time to start with and work upto lifting both feet together. When you’re lifting up, if the second foot isn’t ready to follow, practice lifting the right foot first, hold for a few breaths and then lift the left foot and hold. Play with your centre of gravity by tipping your weight forward. Like the principles of a seesaw eventually the legs start to feel light as the arms take the body weight.

PAUSE_0131.png

ALIGNMENT CUES
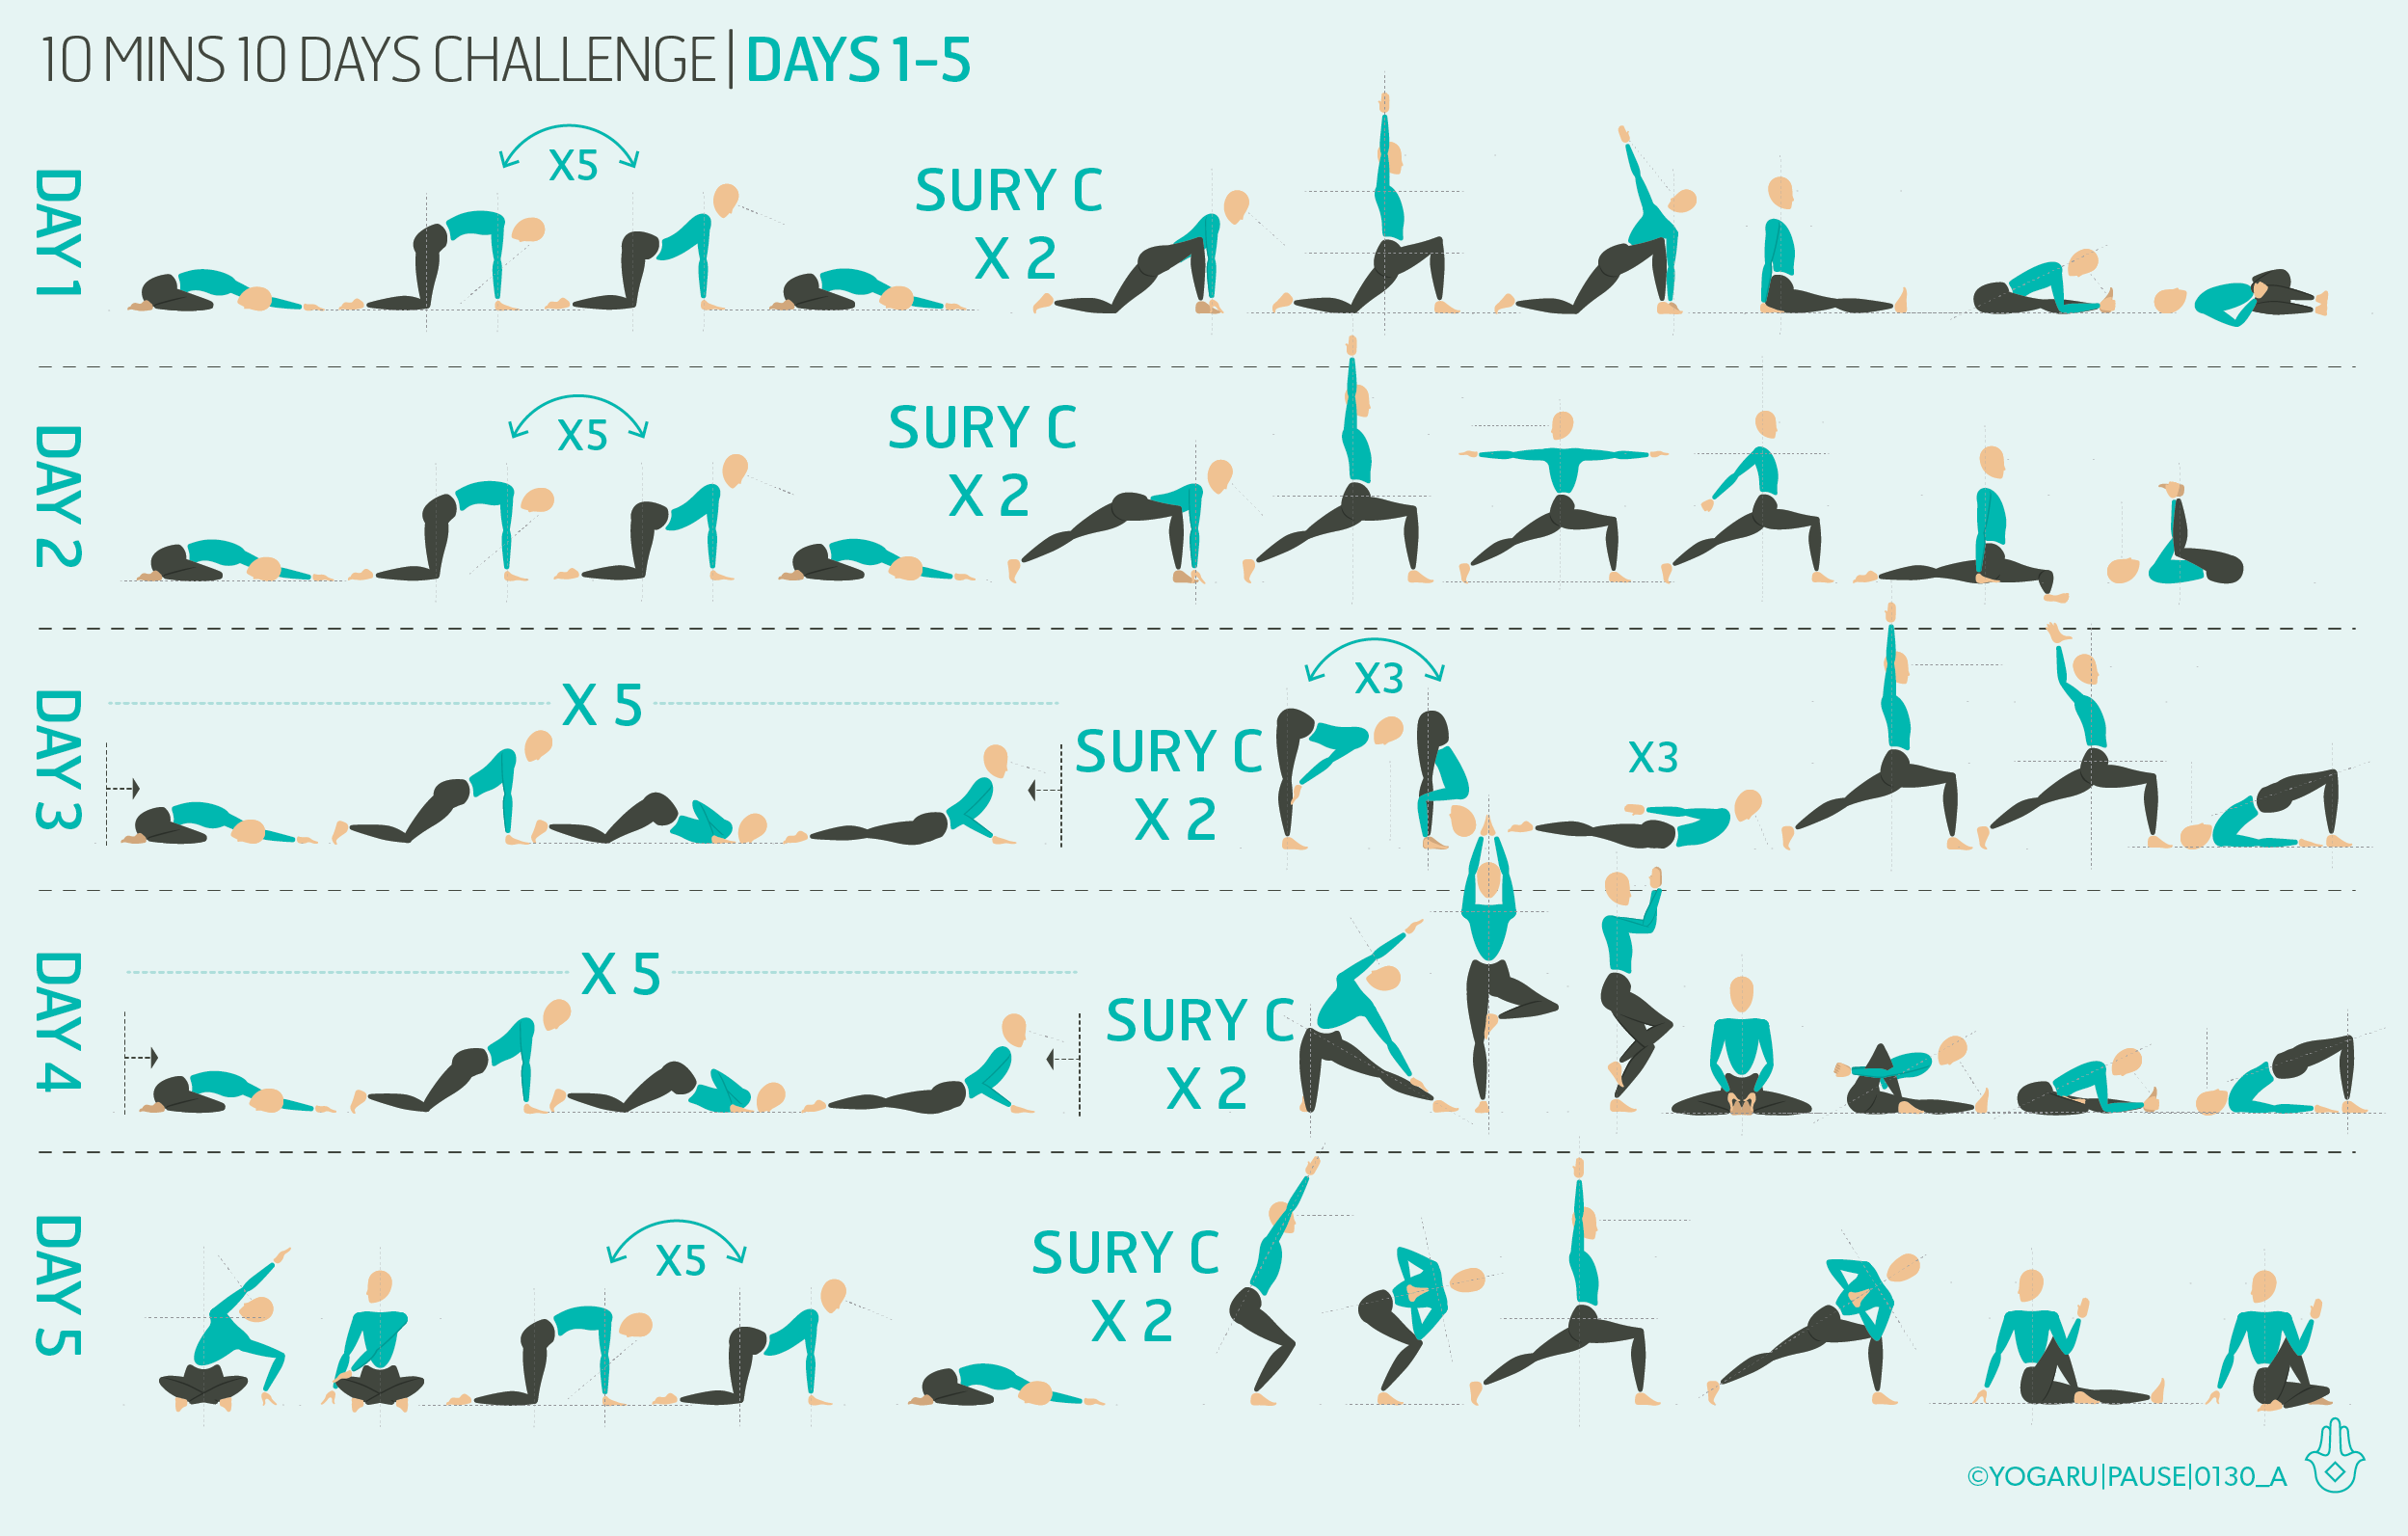
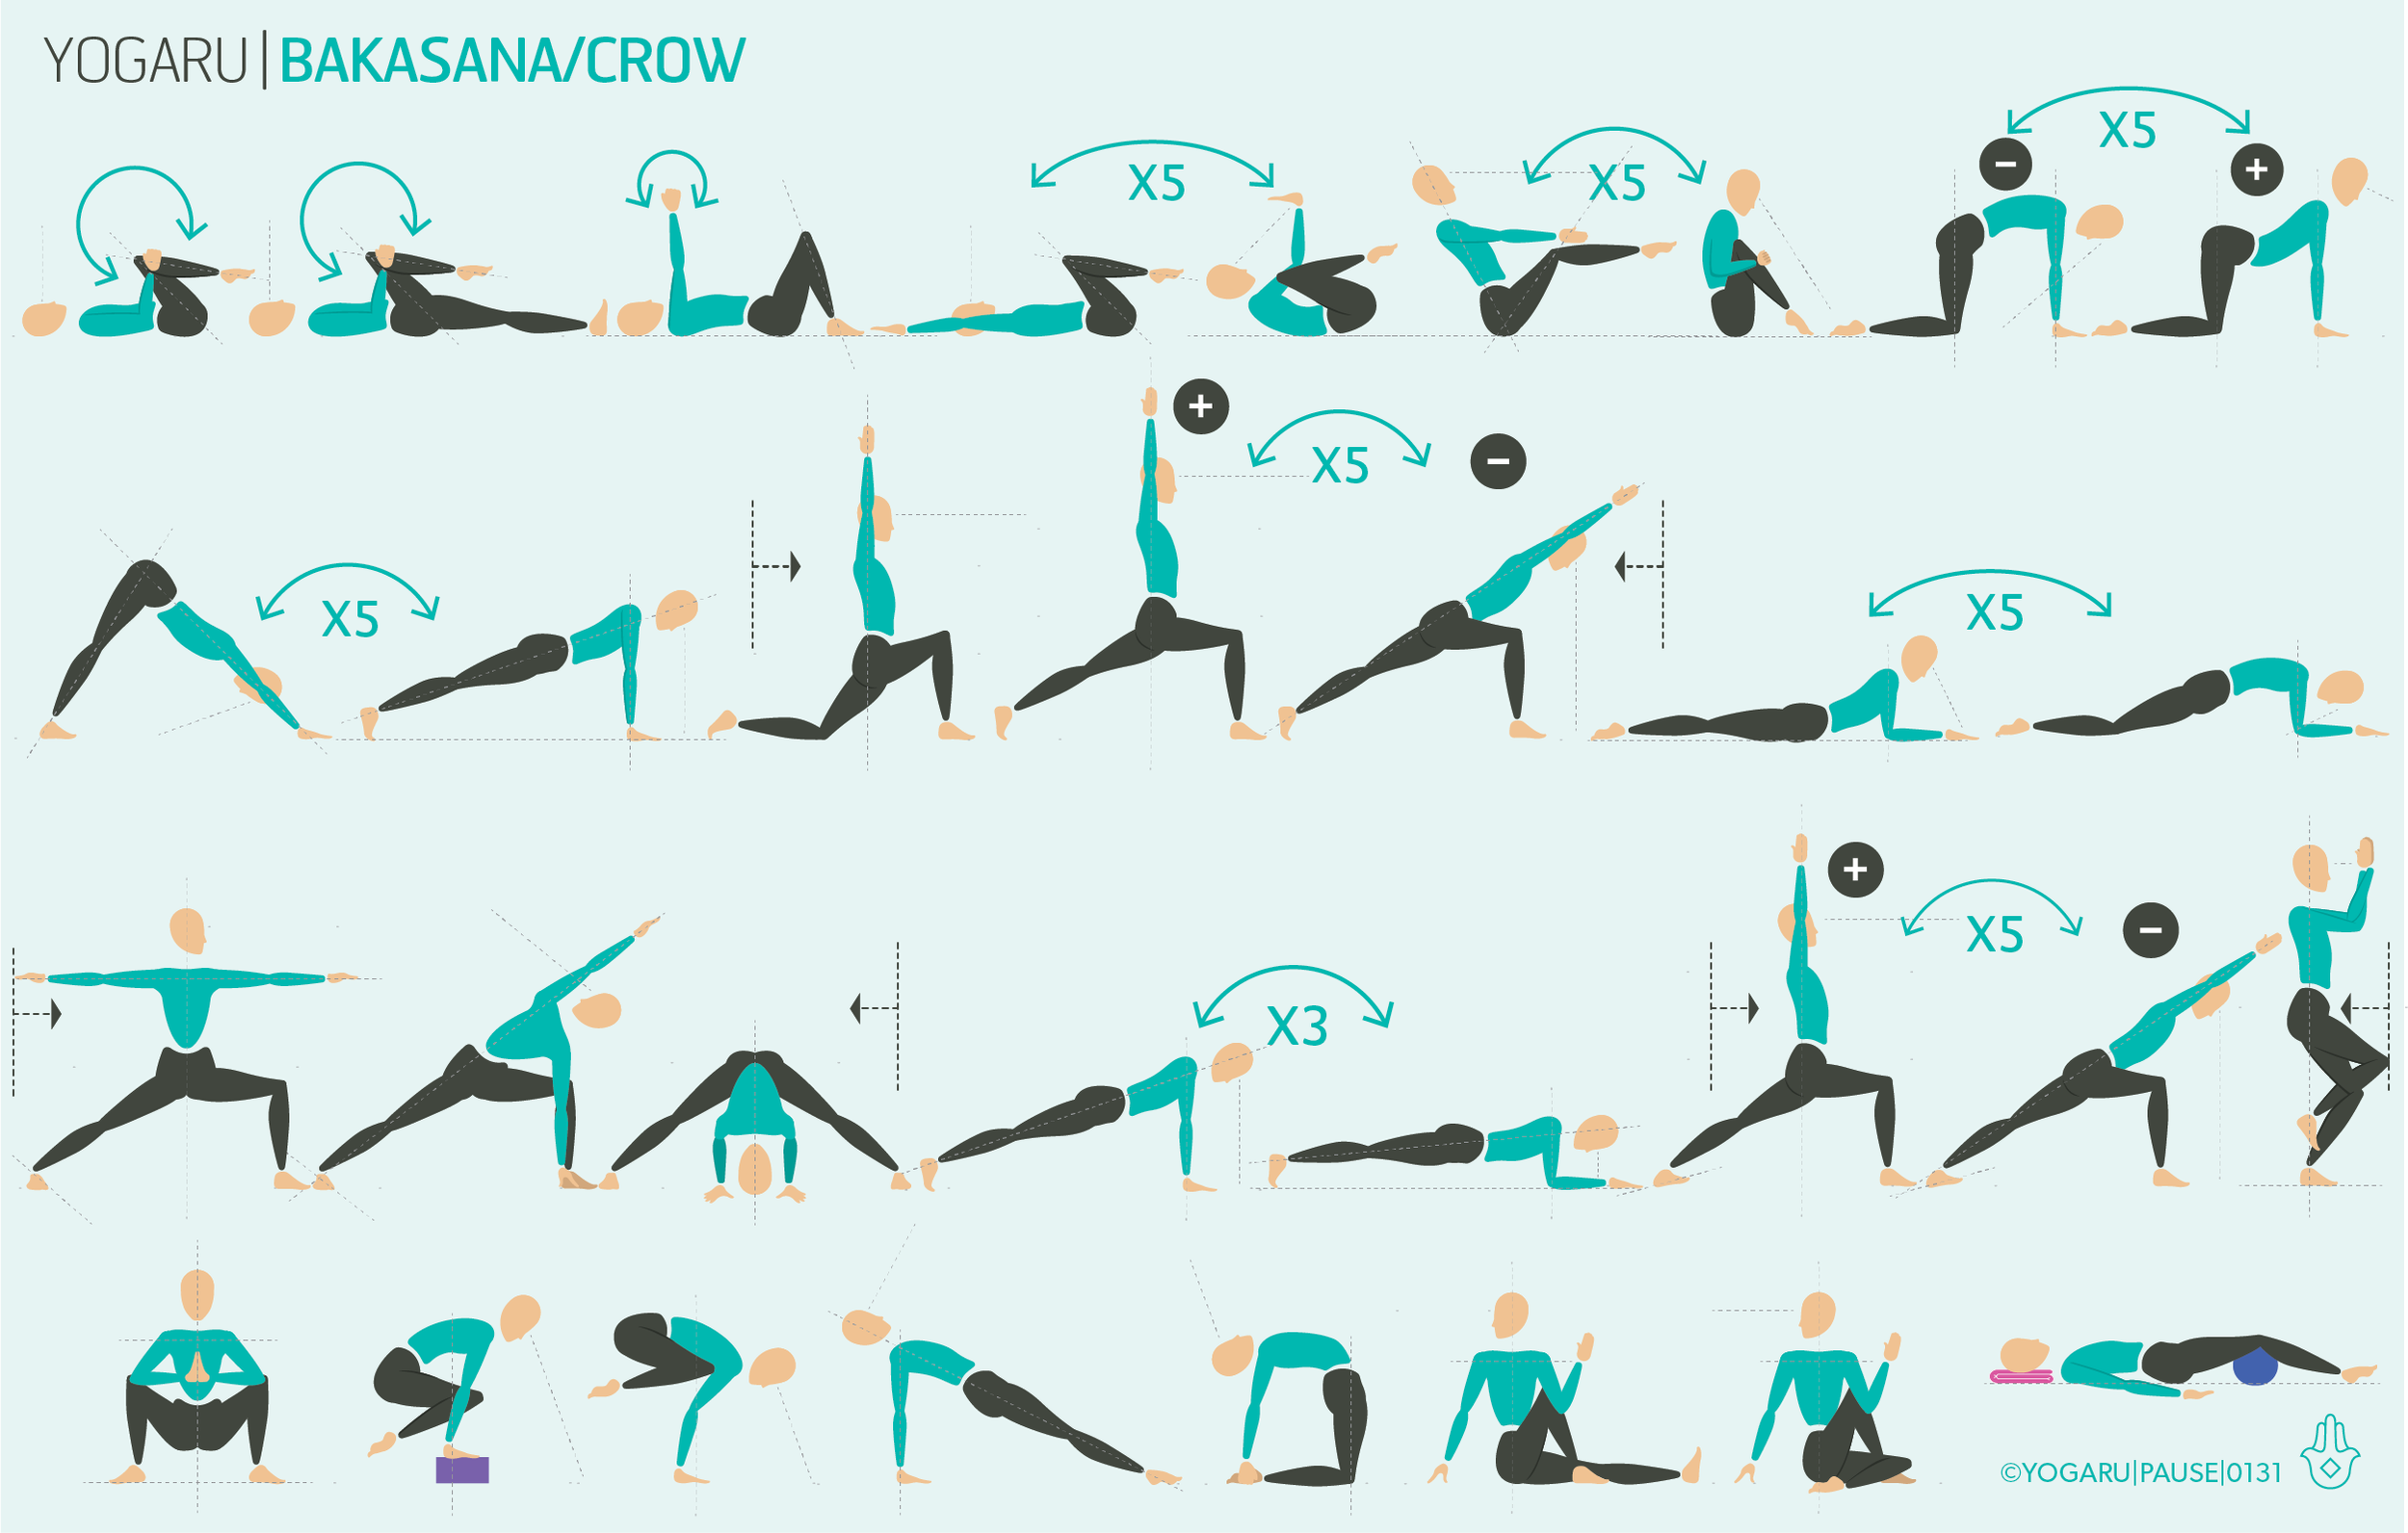
You will start to prepare yourself for Bakasana/Crow from the start of the sequence to make sure you are ready to give it your best shot. If Bakasana/Crow is not a pose for you, concentrate on the rest of the sequence which will give you all benefits of Bakasana/Crow distributed amongst a collection of other poses. You will have two opportunities to try Bakasana/Crow, you can add more rounds or just do one depending on your energy levels.

Have a read of the tips below and either print out the sequence or save it onto your device:

  • From Malasana/Squat, step your feet together, bend your elbows and place your hands forward on the ground, shoulder width apart.

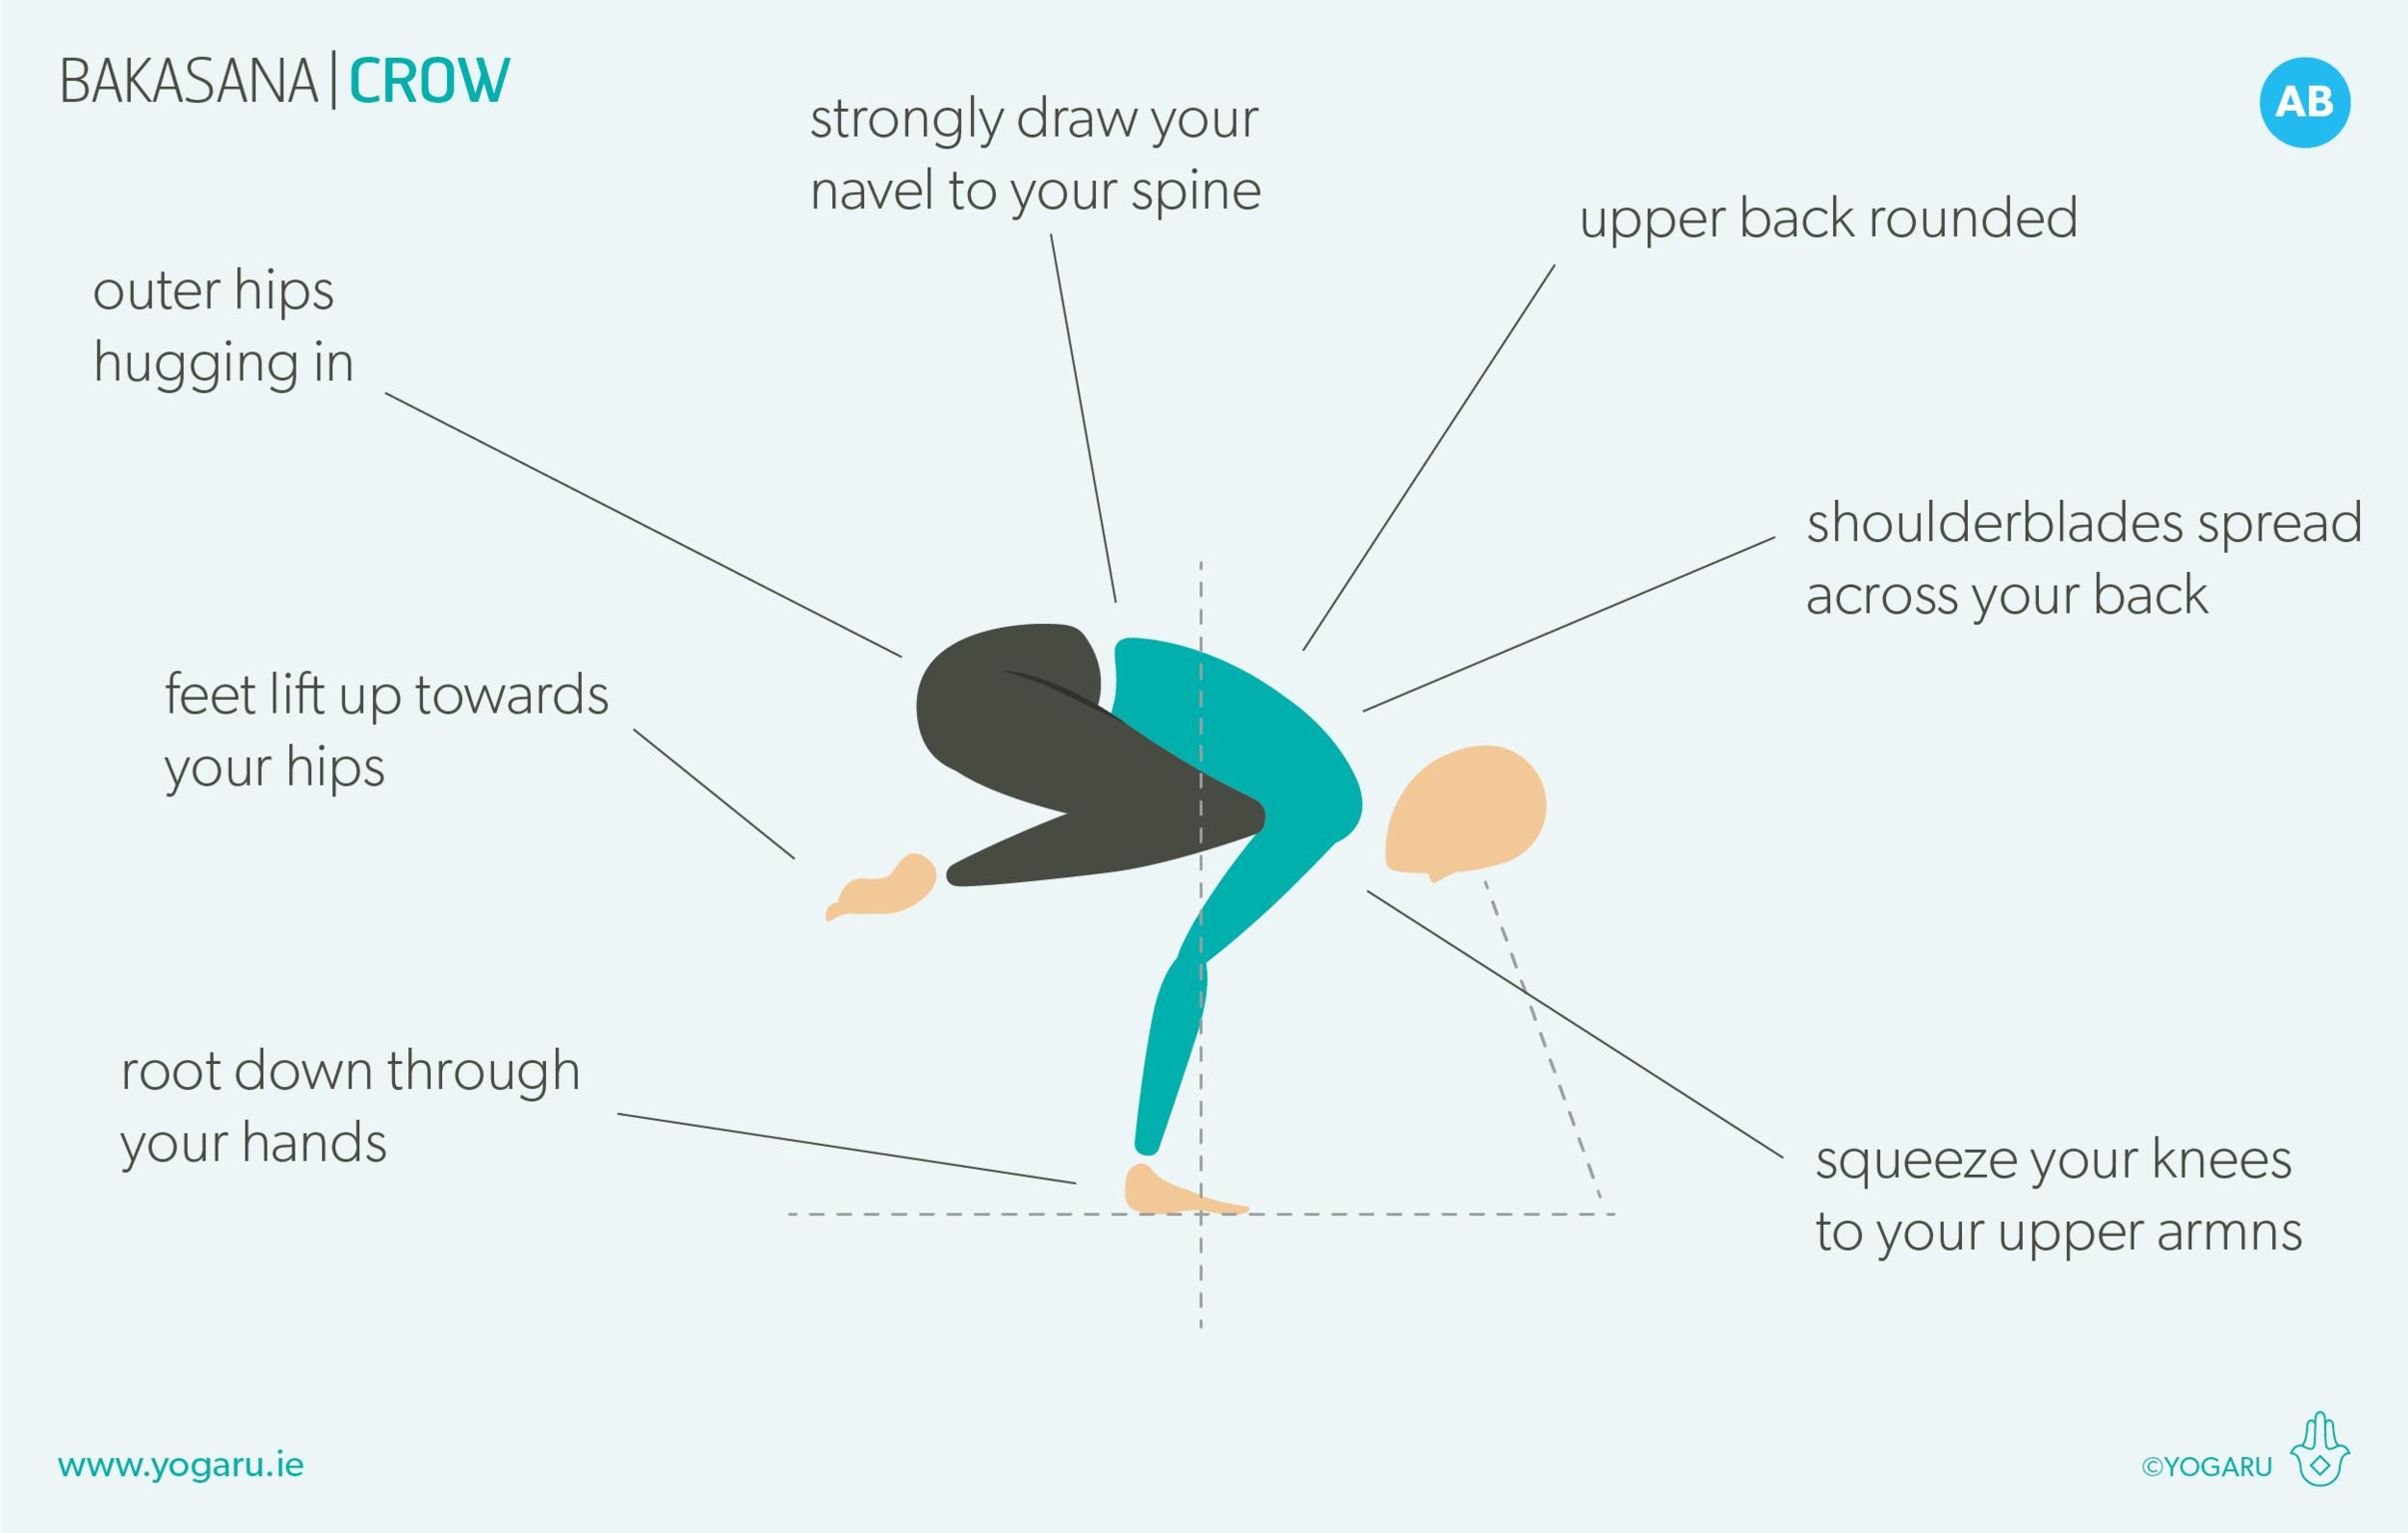
  • Place your knees high up on your upper arms, hug your knees to your arms.

  • Strongly draw your navel towards your spine, round your upper back.

  • Lean forward and shift your weight into your hands, lift your hips up high.

  • Exhale, lift up onto the balls of your feet, with control lift your feet up towards your buttocks, one at a time or both together, working towards straightening your arms, press into your hands, gaze slightly forward.

To save the images for personal use click and hold down the image until the ‘save image’ option appears; on Mac hold down ‘control’ and click the image to get the option box; on PC right click on the image to get the option box. Scroll down in the ‘option box’ and click ‘save image’.

Ruth Delahunty Yogaru

10 day yoga challenge

SUIT YOUR NEEDS
Developing a home practice can sometimes feel a bit daunting to yogis at any level of experience. You may feel overwhelmed by what pose to do next, how long to hold a pose or how long to practice for. This series of mini sequences will guide you through a simple practice and give you a taste of the many benefits you can get from a manageable 10 minute daily practice. With an added promise that your home practice will become your best friend and your most important supportive routine for staying physically and mentally, in your own space, in your own time.

Home practice gives you the freedom, in the safety of your own home, to step on your mat when it suits you and practice exactly what you need, as often as you like. Putting aside some time for yourself and developing a home practice gives you the tools to take ownership of your wellness through yoga. Building a relationship with your practice, and getting to know your strengths, your limitations, your favourite asana, helps you tailor your practice to suit your needs.

PAUSE_0130_B.png

KEEP IT SIMPLE
Most days my home practice is 10 minutes of a very simple sequence. I give myself plenty of time with warm ups lying on my back and move slowly through some Sun Salutations. In your home practice you can flow at your own pace and listen carefully to how your muscles are feeling. Your body reacts differently to the practice from day to day, and from hour to hour. If you choose the practice in the morning you feel the benefits for the day ahead, if you choose to practice in the evening it will help you unwind from the day and relax after a busy day. Take time to slow down, move with your breath, and stay in the poses a little longer to explore where you feel the stretching and strengthening actions.

GET STARTED
All you need is a yoga mat and enough space to roll it out! Bricks and blocks can be handy props but they’re not essential to get started. You can do these short sequences at any time of the day. The Sun Salutation is a great place to start – it has an array of movements that strengthen and stretch all the major muscle groups. The repetition is very calming and helps to link your breath with the movement.

Sequences are often built of mini flows where you step from one pose straight to the next. You will see these in the 10 sequences above as 2-5 poses enclosed by two arrowed lines. You flow through these connected poses on the right side first (right foot forward) and then take those poses on the left side (left foot forward). Downward Dog or simply Tadasana are often used as the transitional pose between mini flows.

The breath is one of the most important elements of stress relief in yoga. As you move try not to get caught up too much on whether it should be an inhale or an exhale, just don’t forget to keep breathing! At the end of your practice remember to always take Savasana for a minute or two to assimilate your practice and re-enter your day gently.

10 TIPS FOR YOUR HOME PRACTICE
Tip 1 -
Little and often is better than doing one hour once a week. These mini sequences will help you establish a short 10 minute yoga routine into your day.

Tip 2 - Try to commit to a 10 day run but if you don’t make it onto the mat don’t beat yourself up. It can sometimes take a bit of time to train your brain into this new healthy habit.

Tip 3 - You don’t need a sacred space to practice. Anywhere your mat fits is perfect – end of your bed, kitchen floor, sitting room.

Tip 4 - Try incorporating your home practice into your morning routine. I find getting on my mat before I start into anything else works best for me. With the best will in the world life can often take over and prevent you from getting onto your mat later in the day.

Tip 5 - If you are getting into the swing of it, repeat that day's mini sequence or add in a few more Sun Salutations. Stay within what feels comfortable to you to establish your mat as a supportive space to come back.

Tip 6 - Move slowly through your practice and enjoy being the boss. Get close to your breath, and take extra breaths in poses you are enjoying. Keep your transitions simple and when in doubt link pose through a Downward Dog or come back to Tadasana at the top of your mat and step back into your next pose.

Tip 7 - When you find a pose that really nourishes you, spend a bit more time in it or add it in throughout your practice even if it is not in that day's flow.

Tip 8 - You can repeat the sequences if there are ones that suit you better. It is more important to try to build a routine than to do something new everyday.

Tip 9 - From the get go embed Savasana into your practice. It is all too tempting to jump up and roll your mat away but I really believe no matter how short it is Savasana is where all you have done on your mat will translate into the benefits.

Tip 10 - Explore other ‘off the mat’ yoga lifestyle choices like mindfulness, conscious living, an eco challenge – embedding the concept of yoga into your whole life.

YOGARU_SSC.png

To save the images for personal use click and hold down the image until the ‘save image’ option appears; on Mac hold down ‘control’ and click the image to get the option box; on PC right click on the image to get the option box. Scroll down in the ‘option box’ and click ‘save image’.

Ruth Delahunty Yogaru

Uttanasana - Forward Fold

YOGARU_Uttanasana_PB.png

SHIFTING YOUR MINDSET
Uttanasana/Forward Fold is a pose I have had a rocky relationship with. As a runner I have tight hamstrings and contrary to popular belief tight does not necessarily mean strong. I am inclined to overstretch the back of my hips if I get caught up in the ego of the pose. One of the keys to staying injury free in this pose is to be patient and to have no expectation of how far forward you think you can fold. Each practice is different, your Uttanasana/Forward Fold in a morning practice will be completely different to an evening practice. Try not to be attached to destinations in your poses, this one in particular. The journey of your practice is the point of yoga, not the picture perfect pose. When you feel sensation in your pose you are getting all the same benefits as the person who seems to effortlessly touch their toes. Stay in your body and with your experience of your practice. Striving and grasping at poses will lead to frustration and injuries.

THE BENEFITS OF UTTANASANA/FORWARD FOLD
Uttanasana/Forward Fold stretches the hamstrings, glutes and spine along the back of the body, and strengthens the hip flexors at the front of the body. Forward bends are a very therapeutic family of poses. They aid digestion, eases constipation and bloating, eases insomnia, eases menstrual & menopause symptoms, eases fatigue, stress, tension and anxiety and boosts the immune system. They also ease headaches and lower blood pressure. In Uttanasana/Forward Fold the head is below the heart which makes it an official inversion pose too, adding extra benefits like increasing circulation, energy and metabolism.

EXPLORING UTTANASANA/FORWARD FOLD IN YOUR PRACTICE
Moving gently between stretching and strengthening is a preferable way to warm the muscles for this pose rather than going straight into a deep forward fold. The hamstrings are the most commonly overstretched muscles in yoga practitioners. They originate at the sit bones on the base of the pelvis, cross over at the back of the thigh, and attach to either side at the top of the shin bone. Their job is to flex the knee and extend the hip. Uttanasana/Forward Fold deeply stretches the hamstrings.

The sooner you establish the difference between the feeling of a muscle stretching, which is a dull, evenly distributed sensation, and a muscle overstretching, which has a pinching sensation, you will be less likely to cause yourself an overstretch injury. It is also important to note that if you are like the majority of people, yogis and non yogis alike, you will not be anywhere near the human sandwich version of this pose you see in books.

Before you fold, lengthen your spine up and lift out of your pelvis to find as much space as possible to tilt forward from. Exhale as you fold forward to lift the organs up out of the lower abdomen and engage your core muscles to support your lower back. When the pelvis can tilt no further, start to pour your upper body over your legs like you are tipping the contents of your head out. If you struggle to get the pelvis to tilt forward try having your feet hip distance apart, rather than the traditional feet together version of the pose. If you have issues with your lower back keep a slight bend in your knees to release the hamstrings and use your hands on your knees to support you as you tilt forward. At your final destination soften what can soften - your shoulders, your arms, your neck, your face. Have a sense of what parts of the body are on duty and what parts can be relaxed.

Before your first Uttanasana/Forward Fold you will have started to open the back of your hips with a supine warm up, Supta Padangusthasana/Reclined Hand to Big Toe and Adho Mukha Svanasana/Downward Facing Dog. The Uttanasana/Forward Fold MINI FLOW A features in full on the first row and then your will repeat it after each standing flow indicated by a ‘MINI FLOW A’ before each subsequent standing flow. You will go through four rounds of the Uttanasana/Forward Fold flow throughout the sequence.

You can also check out my Instagram post on Uttanasana/Forward Fold to add a few different versions of the pose with and without props into this sequence. You will definitely notice a difference between your forward folds at the start and end of your practice as the muscles gradually open up for you.

ALIGNMENT CUES
You will come through three rounds of Uttanasana/Forward Fold. Start gently and have no expectation of how deep you will fold forward. See do you notice any change between the first round of Uttanasana/Forward Fold compared to your final round.

Have a read of the tips below and either print out the sequence or save it onto your device:

  • From Tadasana, inhale, lengthen up through the spine.

  • Exhale, slowly fold forward from the hip joint as your pelvis tips forward.

  • Hands to your shins, to the ground in front of you, or beside your feet.

  • Press your heels into the ground, lift your sit bones up.

  • Inhale, lengthen through your spine to the tip of your crown, exhale, fold forward a little more.

  • Broaden through the collarbones, gaze to your shins.

Subscribe to my newsletter & get a FREE YOGA BENEFITS INFOGRAPHIC as a thank you!

To save the images for personal use click and hold down the image until the ‘save image’ option appears; on Mac hold down ‘control’ and click the image to get the option box; on PC right click on the image to get the option box. Scroll down in the ‘option box’ and click ‘save image’.

Ruth Delahunty Yogaru