Pose breakdowns

Chaturanga Dandasana - Four Limb Staff

YOGARU_Chaturanga Dandasana_PB.png

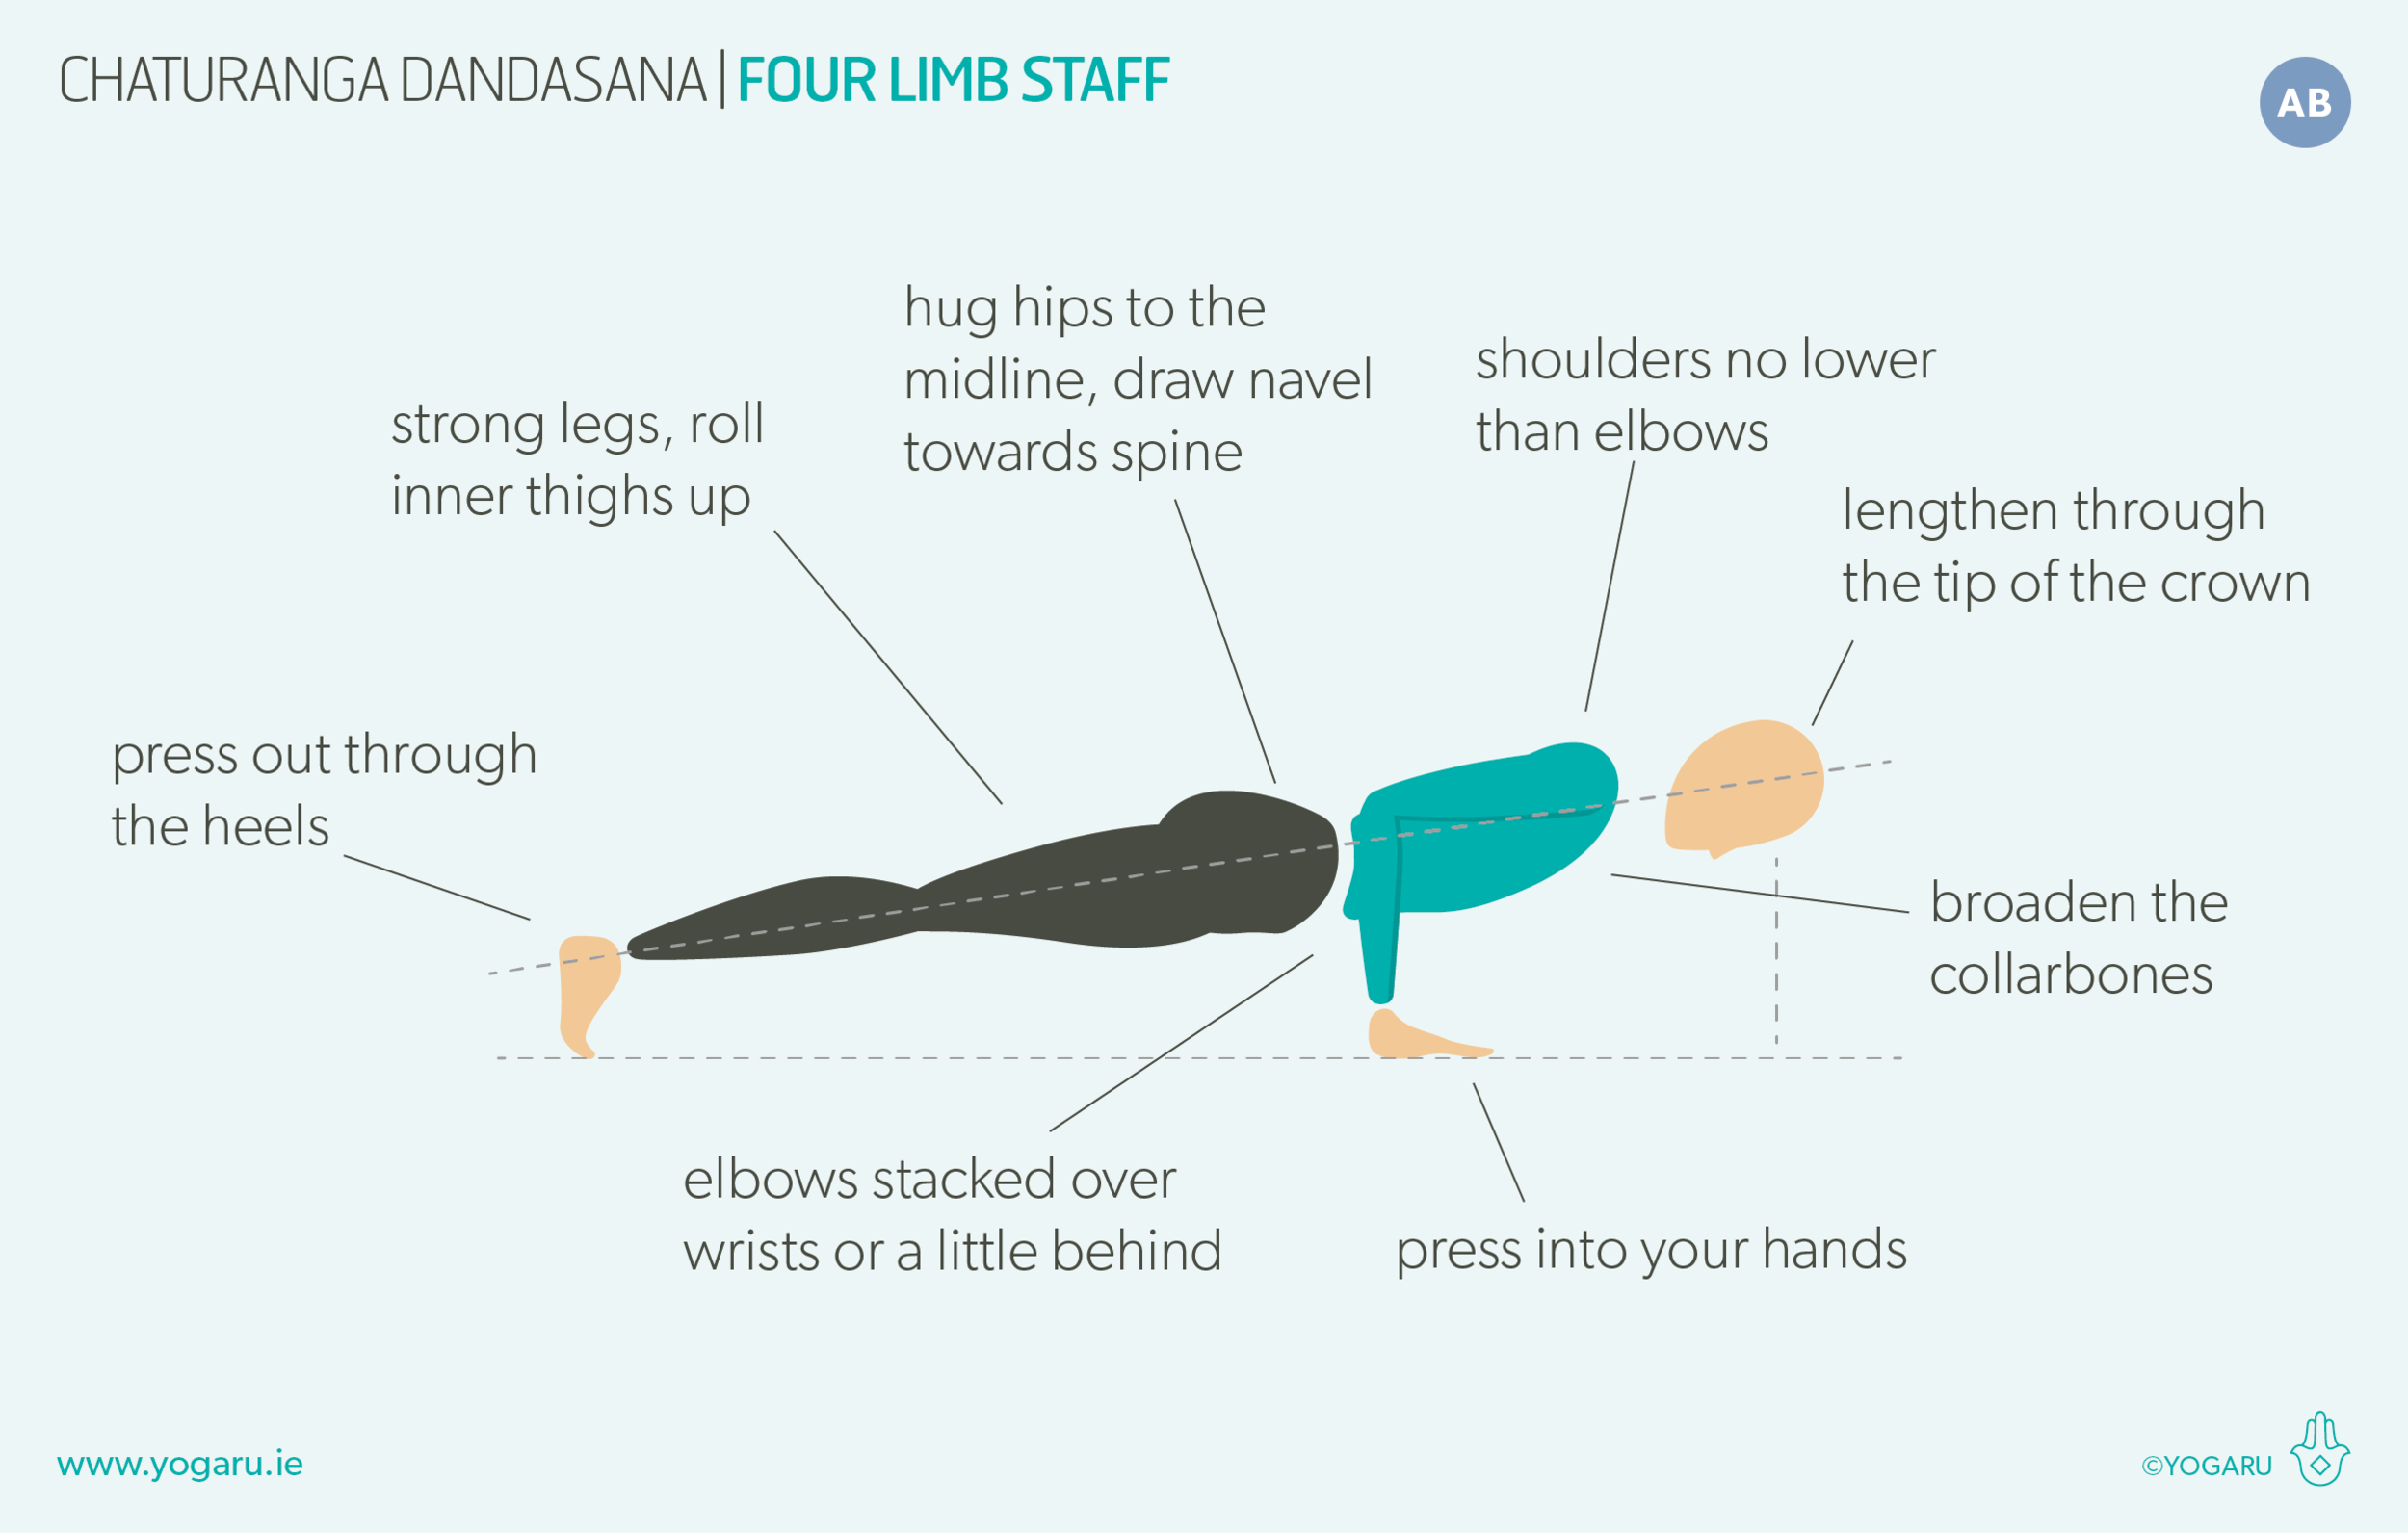
NOT JUST A TRANSITIONAL POSE
Chaturanga Dandasana/Four Limb Staff is a pose in its own right which is often lost in vanyasanas somewhere between Phlankasana/Plank and Urdhva Mukha Svanasana/Upwards Facing Dog! It is a tricky pose, which is why we sometimes rush through it to get to Urdhva Mukha Svanasana/Upwards Facing Dog or Bhujangasana/Cobra. When performed repeatedly, and not given the time and respect it deserves, it has the potential to cause shoulder, lower back and wrist injuries. Having a better understanding of the alignment of the pose will not only give you the opportunity to strengthen your arms and shoulders but will help you recognise when to reduce your repetitions of the pose to avoid injuries.

THE BENEFITS OF CHATURANGA DANDASANA/FOUR LIMB STAFF
Chaturanga Dandasana/Four Limb Staff is an arm balancing pose and teaches you the principles of stabilising the shoulder joint and prepares you for more challenging arm balances where the legs are lifted. When performed with integrity it also strengthens the shoulders, spine, arms, core, glutes, and legs.

COMMON MISALIGNMENTS
After several rounds of sun salutations or vinyasas the muscle of the shoulder can start to fatigue. When muscles run out of steam, it can put unwanted load on the joint and potentially injure the fatigued muscles, tendons or the surrounding supporting ligaments. Most of us are asymmetrical – where one side is weaker or stronger than the other – when this is the case it can either put too much pressure on the weaker side, or the stronger side compensates which can eventually increase your chance of repetitive strain injuries. One of the most common misalignments is when the shoulders drop lower than the elbows. When this happens we push great force into the shallow shoulder joint in an extended position. This is not a naturally strong position for the joint, and causes too much reliance on the upper shoulder muscles rather than utilising all of the shoulder muscles. Common misalignments in Chaturanga Dandasana/Four Limb Staff to watch out for are:

  • Elbows splayed - causes pressure in the shoulder joint - track the elbows with the shoulders.

  • Shoulders dropped lower than the elbows - causes pressure in the shoulder joint - broaden through the collarbones and lift the chest up to lower down.

  • Chest sunken down - pinching in between the shoulder blades - press into the hands, spread shoulder blades across your back.

  • Shoulders hunched up towards ears - neck issues - soften shoulders away from the ears.

  • Belly dropped down to the ground - pressure in the lower back - draw your navel towards your spine.

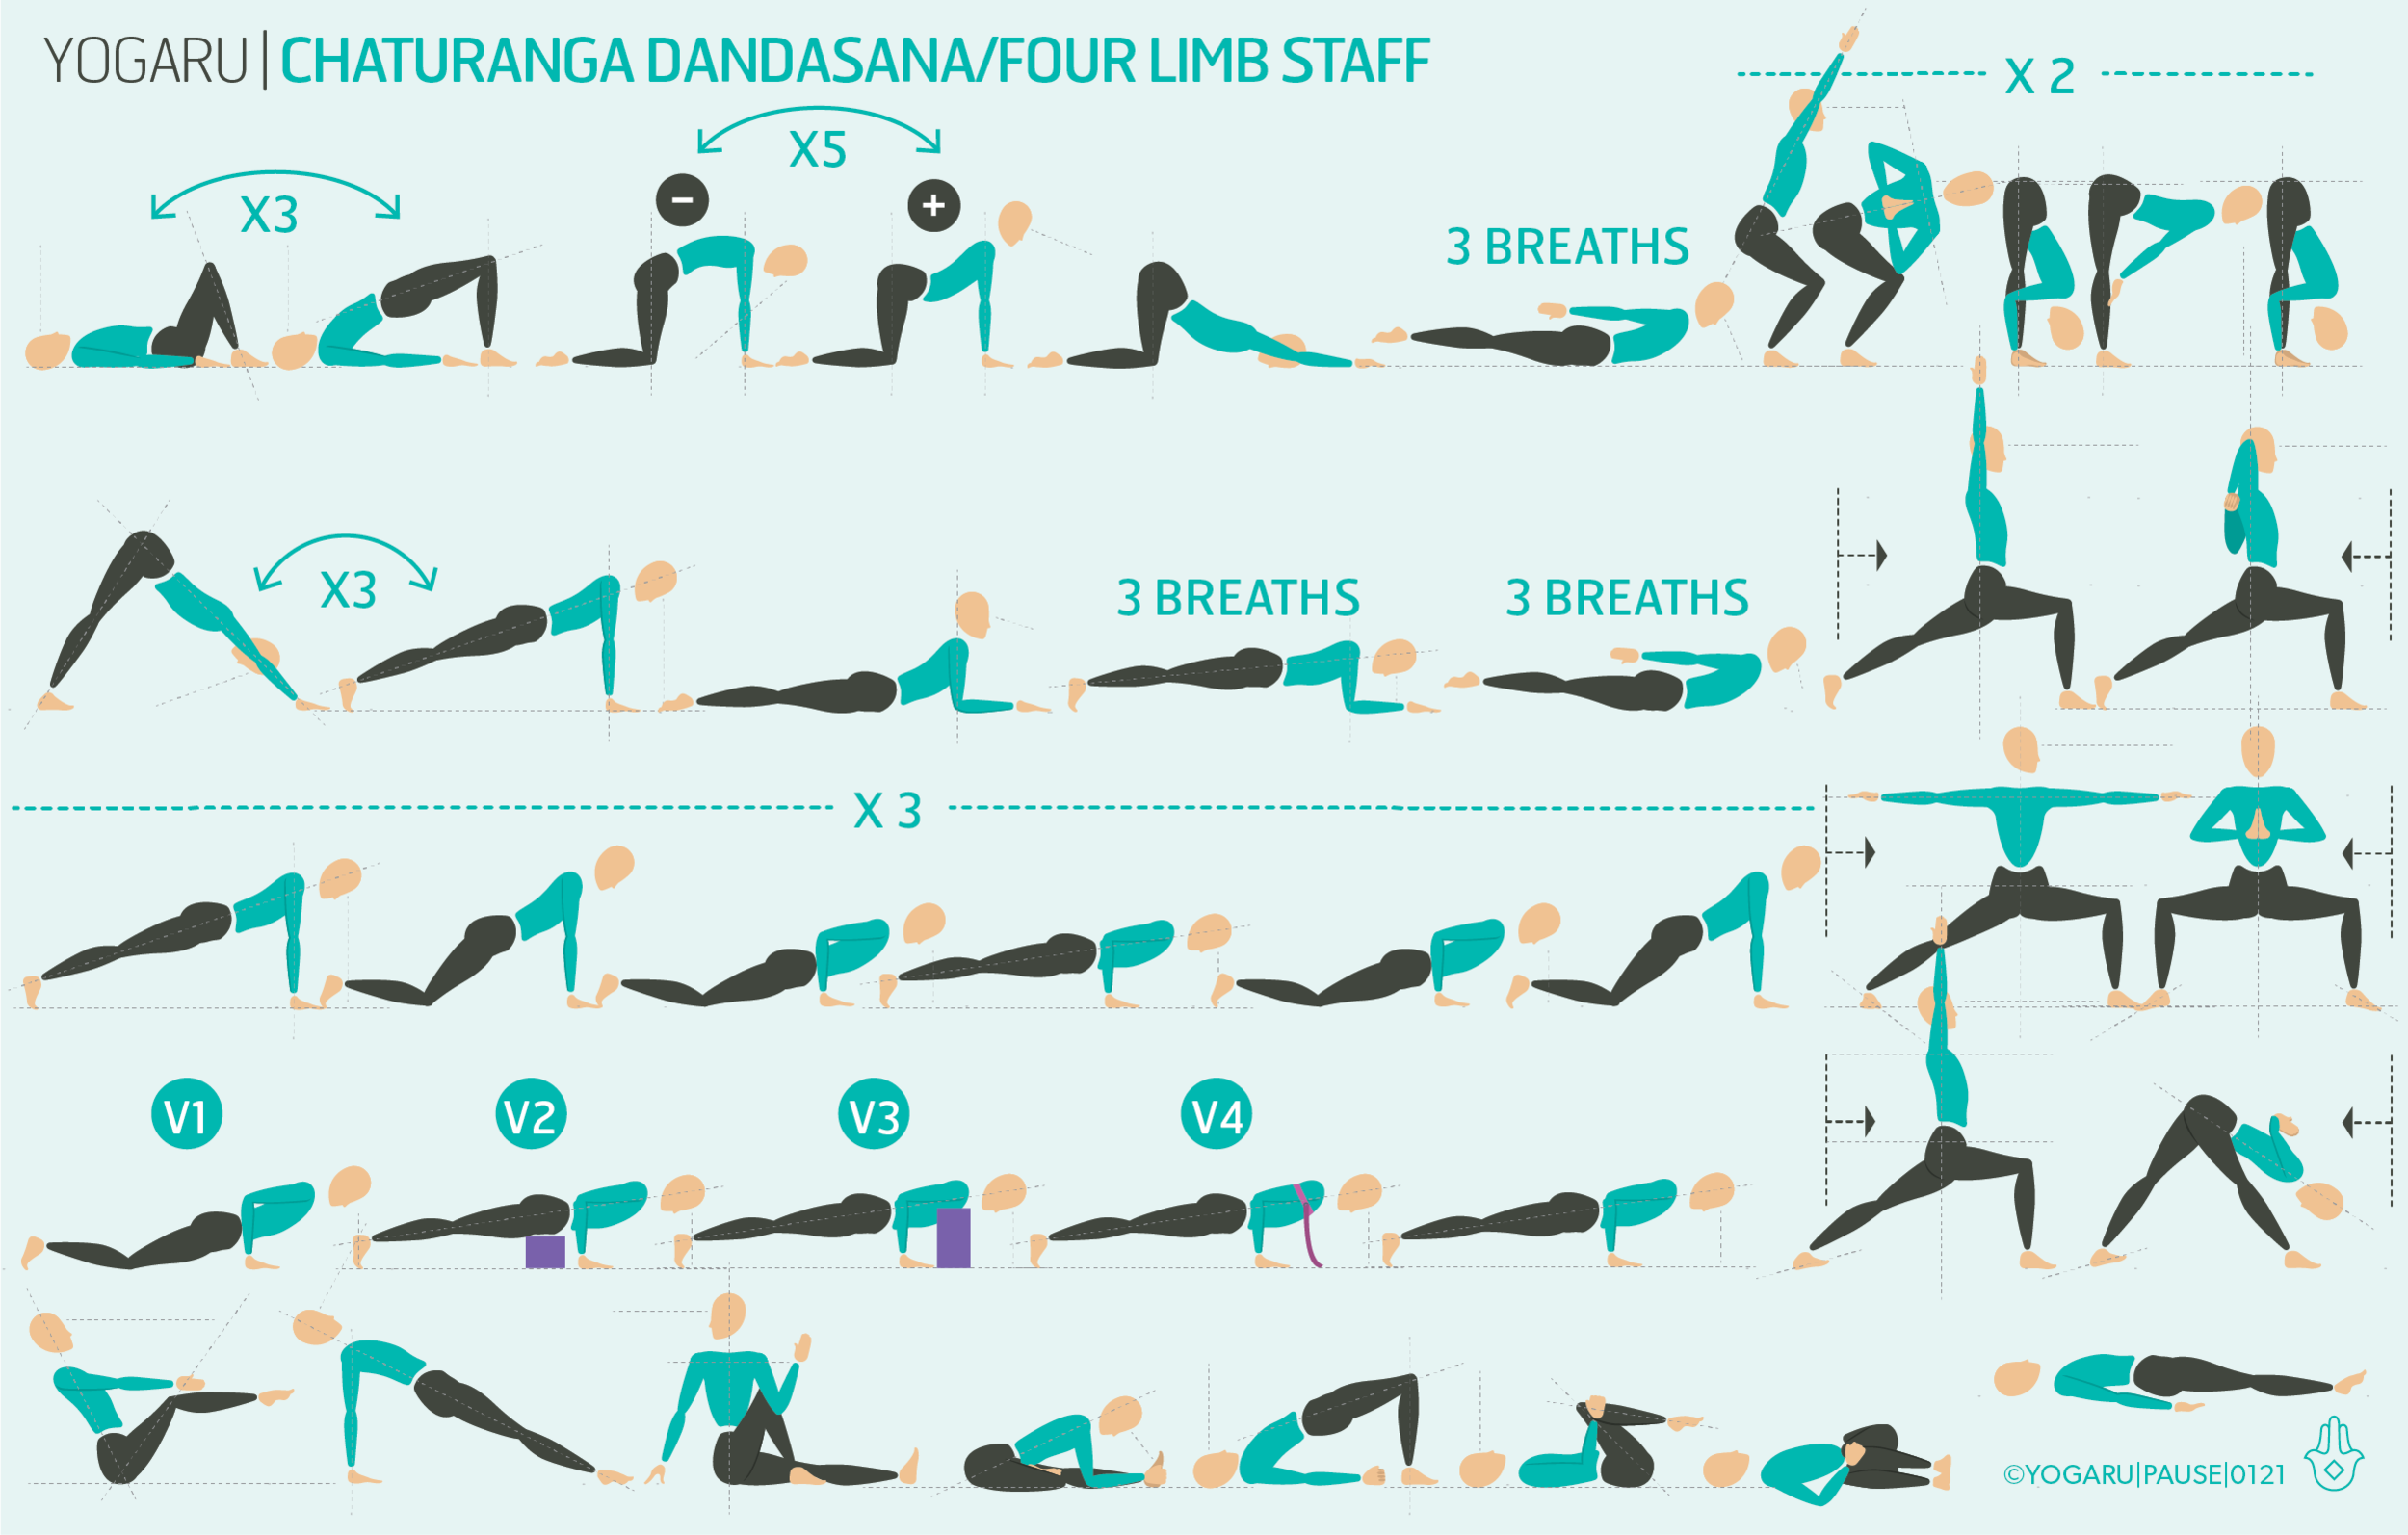
EXPLORING CHATURANGA DANDASANA/FOUR LIMB STAFF IN YOUR PRACTICE
This sequence will bring you through different versions of chaturanga to help you build shoulder, spine, arm and core strength to gradually prepare for the peak pose. Some with the knees down to gradually build you up to the full pose, and some using props so you can stay longer in the pose and build a blueprint of it in your body. If the full pose is not safely possible for you at the moment, continue to use the props or bring the knees down for the full sequence. These are valuable versions of the pose and ones I use frequently if I am repeatedly coming down to the floor in my practice. Versions of Chaturanga Dandasana/Four Limb Staff:

V1 - from Phlankasana/Plank Pose bring your knees down and slowly bend your elbows and lower down until your shoulders are no lower than your elbows.

V2 - position a brick under your hips, from Phlankasana/Plank Pose slowly bend your elbow and lower down until your hips are lightly supported by the brick, press into your hands, arms hugging in, collarbones wide, lengthen through the whole spine.

V3 - position two bricks standing upright in front or your fingertips, from Phlankasana/Plank Pose slowly bend your elbow and lower down until your shoulders are lightly supported by the bricks, draw your navel towards your spine, press into your hands, arms hugging in, collarbones wide, lengthen through the whole spine.

V4 - wrap a belt loop around your upper arms, from Phlankasana/Plank Pose slowly bend your elbow and lower down until your chest is lightly supported by the belt, draw your navel towards your spine, press into your hands, arms hugging in, collarbones wide, lengthen through the whole spine.

PAUSE_0121.png

ALIGNMENT CUES
Take your time with this sequence and treat it like a mini home workshop. If you don’t have bricks use stacked books and if you don't have a belt use a scarf. These versions might take a bit of organisation but it will be well worth the set up time. They support you in the pose and give you a chance to spend a bit of time exploring what your optimum alignment feels like.

Have a read of the tips below and either print out the sequence or save it onto your device:

  • From Phalakasana/Plank Pose, inhale, press out through your heels to firm your legs, draw your navel towards your spine, firm your shoulder blades onto your back, and broaden through the collarbones.

  • Press into all five knuckles of your hands pull them towards your feet as you reach your chest forward. Exhale, bend your elbows, track them directly in line with your shoulders.

  • Lower your chest forward and down. Lift through the upper back and spread your shoulder blades as you lower.

  • Think ‘up’ as you are coming down.

  • Hug your hips to the midline and squeeze your thighs. Roll your inner thighs up and reach your tailbone towards your heels.

  • Draw your navel towards your spine to keep the core strong.

  • Elbow stacked over wrists or a little further back toward your feet to avoid injury to the wrist or irritation to carpal tunnel syndrome.

  • Keep your head in line with your spine, back of the neck long, gaze down.

To save the images for personal use click and hold down the image until the ‘save image’ option appears; on Mac hold down ‘control’ and click the image to get the option box; on PC right click on the image to get the option box. Scroll down in the ‘option box’ and click ‘save image’.

Ruth Delahunty Yogaru


Utkata Konasana - Goddess

FIND YOUR INNER GODDESS
Utkata Konasana/Goddess is one of my favourite poses. Quite a few of the hip opening poses are asymmetrical poses, where left and right sides of the body are doing different things. In Utkata Konasana/Goddess if you drew a line down your midline the right and left side are in mirroring each other in symmetry which allows you to check that both sides are balanced. I often use Utkata Konasana/Goddess as a transition pose to go from a Virabhadrasana II/Warrior II standing flow at the top of the mat with the right leg forward, to a Virabhadrasana II/Warrior II standing flow at the back of the mat with the left leg forward. It is a subtly strong pose with plenty of physical challenge, all your muscles that have been strengthened and stretched will be talking to you after you’ve held it for a few breaths! Similar to Malasana/Squat it gives you the opportunity to work on your pelvic floor strength and is very toning for the digestive system.

THE BENEFITS OF UTKATA KONASANA/GODDESS
Utkata Konasana/Goddess warms and energises the whole body, particularly the lower body. It strengthens the legs, glutes, calves, ankles and spine; and stretches the inner groin, inner legs and chest. After incorporating it into your practice you will feel a lovely freedom of movement in your hips. As a hip opener it releases emotional tension, relieves stress and tension, aids digestion and is very grounding and calming. This pose is particularly beneficial for pregnancy because it creates space in the pelvis and strengthens the pelvic floor.

EXPLORING UTKATA KONASANA/GODDESS IN YOUR PRACTICE
The sequence will prepare you for the peak pose. It brings you through the pose several times to let you get a sense of progress as the muscles gradually open up. The main alignment to watch out for is to make sure your knees are pointing the same direction as your feet and that your knees don’t collapse inwards. It can sometimes feel like a balancing act of lifting the hipbones up and opening the knees.

Once you settle your lower body into the pose the best way to stay the course is to try different arm arrangements. Both distracting you from the intensity of the pose and giving you the opportunity to work on your shoulder strength.

It can help to find your alignment of the pose using some support before your first Utkata Konasana/Giddess on your mat. Try the pose sitting on the corner of a chair and feel the strong hip opening without the intensity of the pose, or try it with your back up against a wall to get a sense of the upright position of the spine in the pose. Then come back to your mat with these blueprints and see how a freestanding version feels.

PAUSE_0116.png

ALIGNMENT CUES
This sequence will gradually open your inner groin and wake up the muscles of the outer hips and legs. These are some big emotional muscles so move slowly and when you get to the peak pose pause and savour all your hard work.

Have a read of the tips below and either print out the sequence or save it onto your device:

  • From Tadasana, hands on hips, step your left foot out into a wide stance to face the side of your mat, rotate your feet out at a 45 degree angle.

  • Inhale, lift your inner thighs and lengthen up through your spine. Exhale, bend your knees and lower your hips down, stack your knees over your ankles, thighs working towards being parallel to the ground. Tailbone reaches down, hipbones reach up.

  • Press your weight into your heels and the outer edges of feet.

  • Hands in prayer position at your heart, sternum presses into your hands and hands press into your sternum, gaze forward.

To save the images for personal use click and hold down the image until the ‘save image’ option appears; on Mac hold down ‘control’ and click the image to get the option box; on PC right click on the image to get the option box. Scroll down in the ‘option box’ and click ‘save image’.

Ruth Delahunty Yogaru

Vrksasana - Tree

YOGARU_Vrksasana_PB.png

ROOTING DOWN
Vrksasana/Tree is the natural progression from our last pose breakdown – Tadasana/Mountain. There is no Vrksasana/Tree without first finding your roots in Tadasana/Mountain. So be sure to feel find your stable foundation in Tadasana/Mountain before you start moving into Vrksasana/Tree. Tree Pose teaches us the principles of rooting down to connect with the support of the earth beneath to help you find your centre of gravity and reach up through the whole length of your spine.

THE BENEFITS OF VRKSASANA/TREE POSE
It may seem like a simple enough pose but it has lots to offer – it builds focus and improves your coordination; stretches the inner groin, arms and shoulders; and strengthens the core, hip flexors, glutes and ankle joint.

It is the perfect pose for runners to add into their routine to build ankle stability and strong feet. With 26 bones, 25 joints and 33 muscles our feet are designed to support the weight of the whole body without the intervention of shoes! Your feet get tired and sore because the bones are being squashed together and the muscles are being bypassed by arch support. Whilst I’m not quite suggesting you turn you back on wearing conventional shoes, getting barefoot and onto your yoga mat is the best thing you can do for your feet to let them spread to their natural shape, realign the bones, and get all the muscles firing again.

EXPLORING THE VRKSASANA/TREE POSE IN YOUR PRACTICE
After your the first row warm up come to a standing position and explore the three points of each foot: the ball of the big toe, ball of the little toe and middle of the heel – root down into them equally, while at the same time feeling a lift in the three arches of each foot. When we root down into these three points, the arches naturally lift into a triangular dome shape. This action is called Pada Bandha (foot energy lock) – it brings an awakening and energy to the leg muscles that travels up the entire body. Building strong and flexible feet will help you find your foundation throughout your yoga practice, cultivating a flow of energy from the ground up. You’ll find that when you take time to focus on the placement of your feet the ‘rooting-down’ effect will naturally help you achieve better alignment in all standing poses. Having an awareness and appreciation of your feet will not only benefit your yoga practice but also your day-to-day movement and activities.

PAUSE_0108.png

ALIGNMENT CUES
This sequence will bring you through a progression of poses to prepare you for Tree Pose to strengthen the core, hip flexors and glutes and stretch out the inner groin. You will come into Tree Pose twice, once at the end of each standing flow. When you arrive into each standing pose bring your attention to the placement of your feet. Scan through the three points of your feet and find the connection to your sticky mat. When you press into these three points you will feel the three arches lifting and a strong suction drawing you down and projecting you up at the same time.

The following are some alignment cues to help you get into the pose with ease. Read through them and spend a bit of time in your Vrksasana/Tree:

  • From Tadasana, hands on hips, inhale, pour your weight into your left foot, draw your navel towards your spine.

  • Bend your right knee and open your hip out to the side, place your right foot on your right calf, or at the top inside of your left thigh.

  • Press your right foot against your inner left thigh and your thigh into your foot.

  • Place your hands on your hip bones to check they are level, press firmly into the standing leg, squeeze the glute of the lifted leg to help open the hip out to the side, exhale here.

  • Pick an unmovable point, called your ‘dristi’, to focus on, which will help you find your balance.

  • Lengthen through your spine to the tip of your crown, bring your hands to prayer position, inhale, raise your hands up over your head, broaden your collarbones.

We all have wobbly days. There is no shame in using a wall for support if your balance just isn’t with you today. You might find if you are a bit kinder to yourself and use the wall, the next time you try the sequence you will calmly find your best tree ever!

To save the images for personal use click and hold down the image until the ‘save image’ option appears; on Mac hold down ‘control’ and click the image to get the option box; on PC right click on the image to get the option box. Scroll down in the ‘option box’ and click ‘save image’.

Ruth Delahunty Yogaru