Anatomy 101

The immune system

YOUR DEFENCE SYSTEM
The immune system protects you from harmful microorganisms and from your own cells that have malfunctioned. It is your body's defence system against infection, illness and disease. The immune system is made up of millions of white blood cells, called leukocytes, which are mainly made in the bone marrow. They travel through the blood and lymph constantly scanning for signs of invaders. They are very adaptable and able to tackle many different threats. There are two types of leukocytes – phagocytes and T-cells. The phagocytes digest the foreign cells and send signals to lymphocytes in the lymph nodes. This information is processed and T-cells and B-cells are sent to kill the infected cells. These T-cells and B-cells produce antibodies to counteract further similar invasions and build long term immunity to this specific threat.

THE SYSTEMS OF THE BODY
The immune system works best when the body is balanced in homeostasis. For the body to be balanced all the systems of the body need to be working efficiently. Breath awareness and slow mindful movement of yoga stimulates several systems of the body which work hand in hand with a strong, reactive, but not over reactive, immune system – the nervous system, the digestive system, the respiratory system, the circulatory system, and the lymphatic system.

The nervous system
The nervous system is the body's communication and control system. It is responsible for all internal bodily functions and for our reactions to external stimuli. Periods of busyness and stress are a natural part of life. Every day we face challenges, adapt, solve, and move on. In these busy periods our body concentrates its energy resources on the activity and the other systems of the body are put on the back burner. When these challenges become overwhelming, and linger long term, the effect on the functionality of all the systems, including our immune system, starts to suffer. Yoga enhances the malleability of the nervous system – which is our capacity to move easily from activity to rest – by rewiring the brain's response to stress. The breath is one of the fastest ways to stimulate this response, which is why it is so important in yoga.

The digestive system
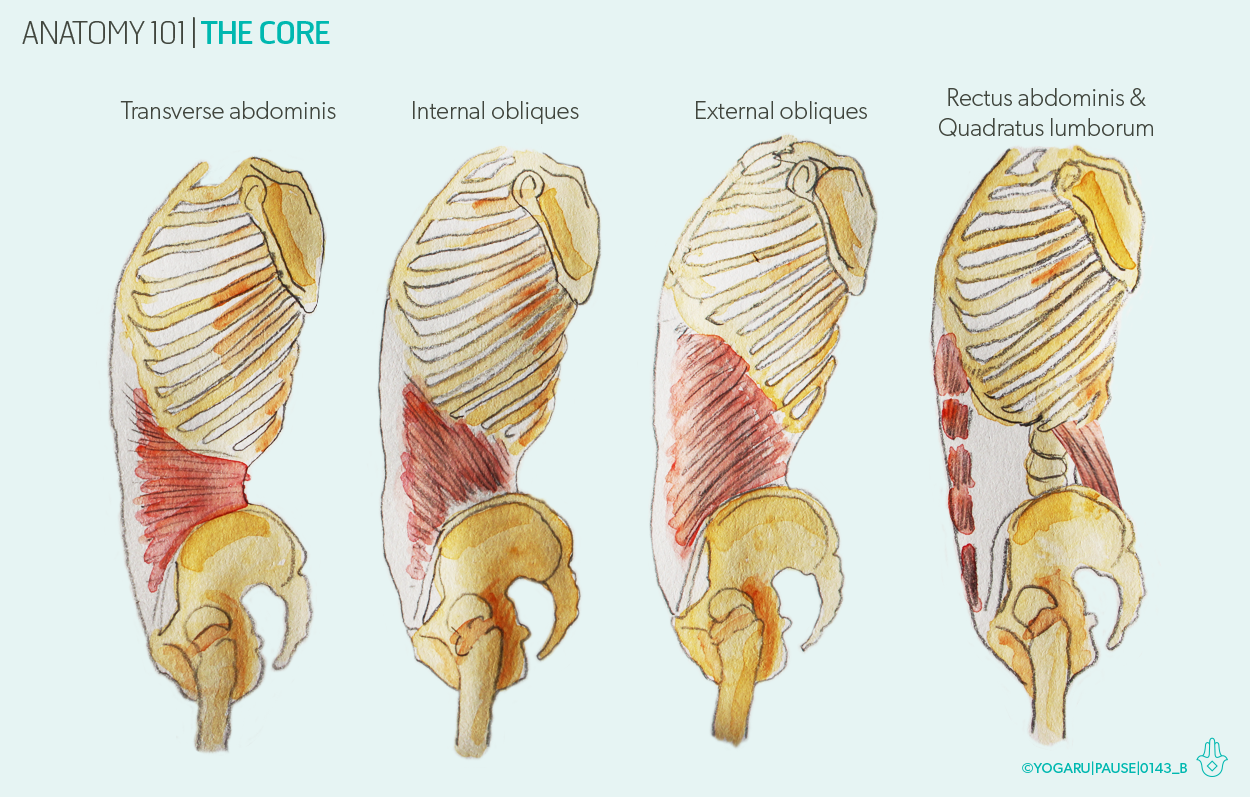
The digestive system, or the enteric system, is where the body processes food, absorbs nutrition and removes waste from the body – functions which are imperative to a strong immune system. The squeezing and stretching actions in yoga helps the digestive system in two main ways – it encourages fresh blood flow and stimulates the muscles in the walls of the gut. These two actions assist in efficient nutrition absorption, detoxification, and staying regular through the action of peristalsis in the colon.

The respiratory system
The respiratory system is responsible for bringing oxygen to all the cells of the body to facilitate cell growth and replication. The breath is part of the autonomic nervous system, which means it works automatically. What makes the breath unique is that we can also control it to a certain extent. We can extend, shorten and hold the breath depending on our desired outcomes. When we inhale our heart rate increases, the cells receive oxygen, and we feel energised. When we exhale the heart rate decreases, the cells release carbon dioxide, and we feel calmer. The vagus nerve, which is the main nerve responsible for the relaxation response, travels through the diaphragm. When we breathe, in particular an exhale, it stimulates the vagus nerve and initiates the relaxation response.

The circulatory system
The circulatory system, or the cardiovascular system, pumps blood around the body with the heart through a network of blood vessels. The blood carries oxygen, nutrients, and hormones to all the cells of the body, and removes waste products created in the metabolic functions. Think of the circulatory system as housekeeping. When the body is well serviced the immune system is able to work more efficiently. Breath awareness, and extending the inhale and exhale, affects the pace of the heart and in turn increases or decreases circulation and blood pressure. The movement and wide variety of positions in yoga – twists, inversions, backbends – each add their own challenge and benefit to the circulatory system.

The lymphatic system
The lymphatic system is the transport system for the immune system. It carries white blood cells and nutrients around the body, regulates the immune system, removes toxins, balances fluids and controls inflammation. Unlike the circulatory system it doesn’t have a pump to help it move around the body. It relies on gravity, muscle contractions and the rhythmic breath to keep it moving. When we breathe in we increase pressure on the abdominal region and reduce pressure in the thoracic area, when we exhale we reverse this. This increase and decrease in pressure is one the most efficient tools for keeping lymph flowing and is something that we can accentuate in our yoga practice.

All the systems of the body overlap and work in partnership with each other. The circulatory system works with the respiratory system to distribute oxygen; the circulatory system works with the digestive system to distribute nutrients; the digestive system works with the respiratory system to give each other oxygen and nutrients; the respiratory system works with the lymph system to keep lymph flowing; and the nervous system is the conductor that brings everything together in harmony. Within this harmony lies a strong and efficent immune system.

TWISTS, BACKBENDS & INVERSIONS
For the immune system to work at its best all these systems need to be working in symmetry. Although all yoga will help keep these systems in balance – twists, backbends and inversions are the most powerful poses to practice when working with the immune system.

Twists
When we squeeze into a twist, and stretch to open back up again, it stimulates all the abdominal organs. This twisting action helps the gut absorb nutrition and remove waste; the lungs expand and contract; and the blood to transport oxygenated blood to the organs and remove toxins.

Backbends
A similar principle as twists applies to backbends. When we stretch the front of the body in a backbend it stimulates the organs of the abdominal and chest cavity. This action is particularly good for expanding lung capacity. The higher the lung capacity the better our ability to feed all the cells of the body with fresh oxygen.

Inversions
Inversions add an extra bonus of boosting circulation and increase blood and lymph flow which helps clear bacteria and toxins from the body and plays a vital role in building a strong immune system. Inversions are any pose where the heart is above the head. Along with formal inversion poses, like handstand and headstand, they are also all standing forward bends, downward dog, dolphin, and bridge.

EXPLORING THE IMMUNE SYSTEM IN YOUR PRACTICE
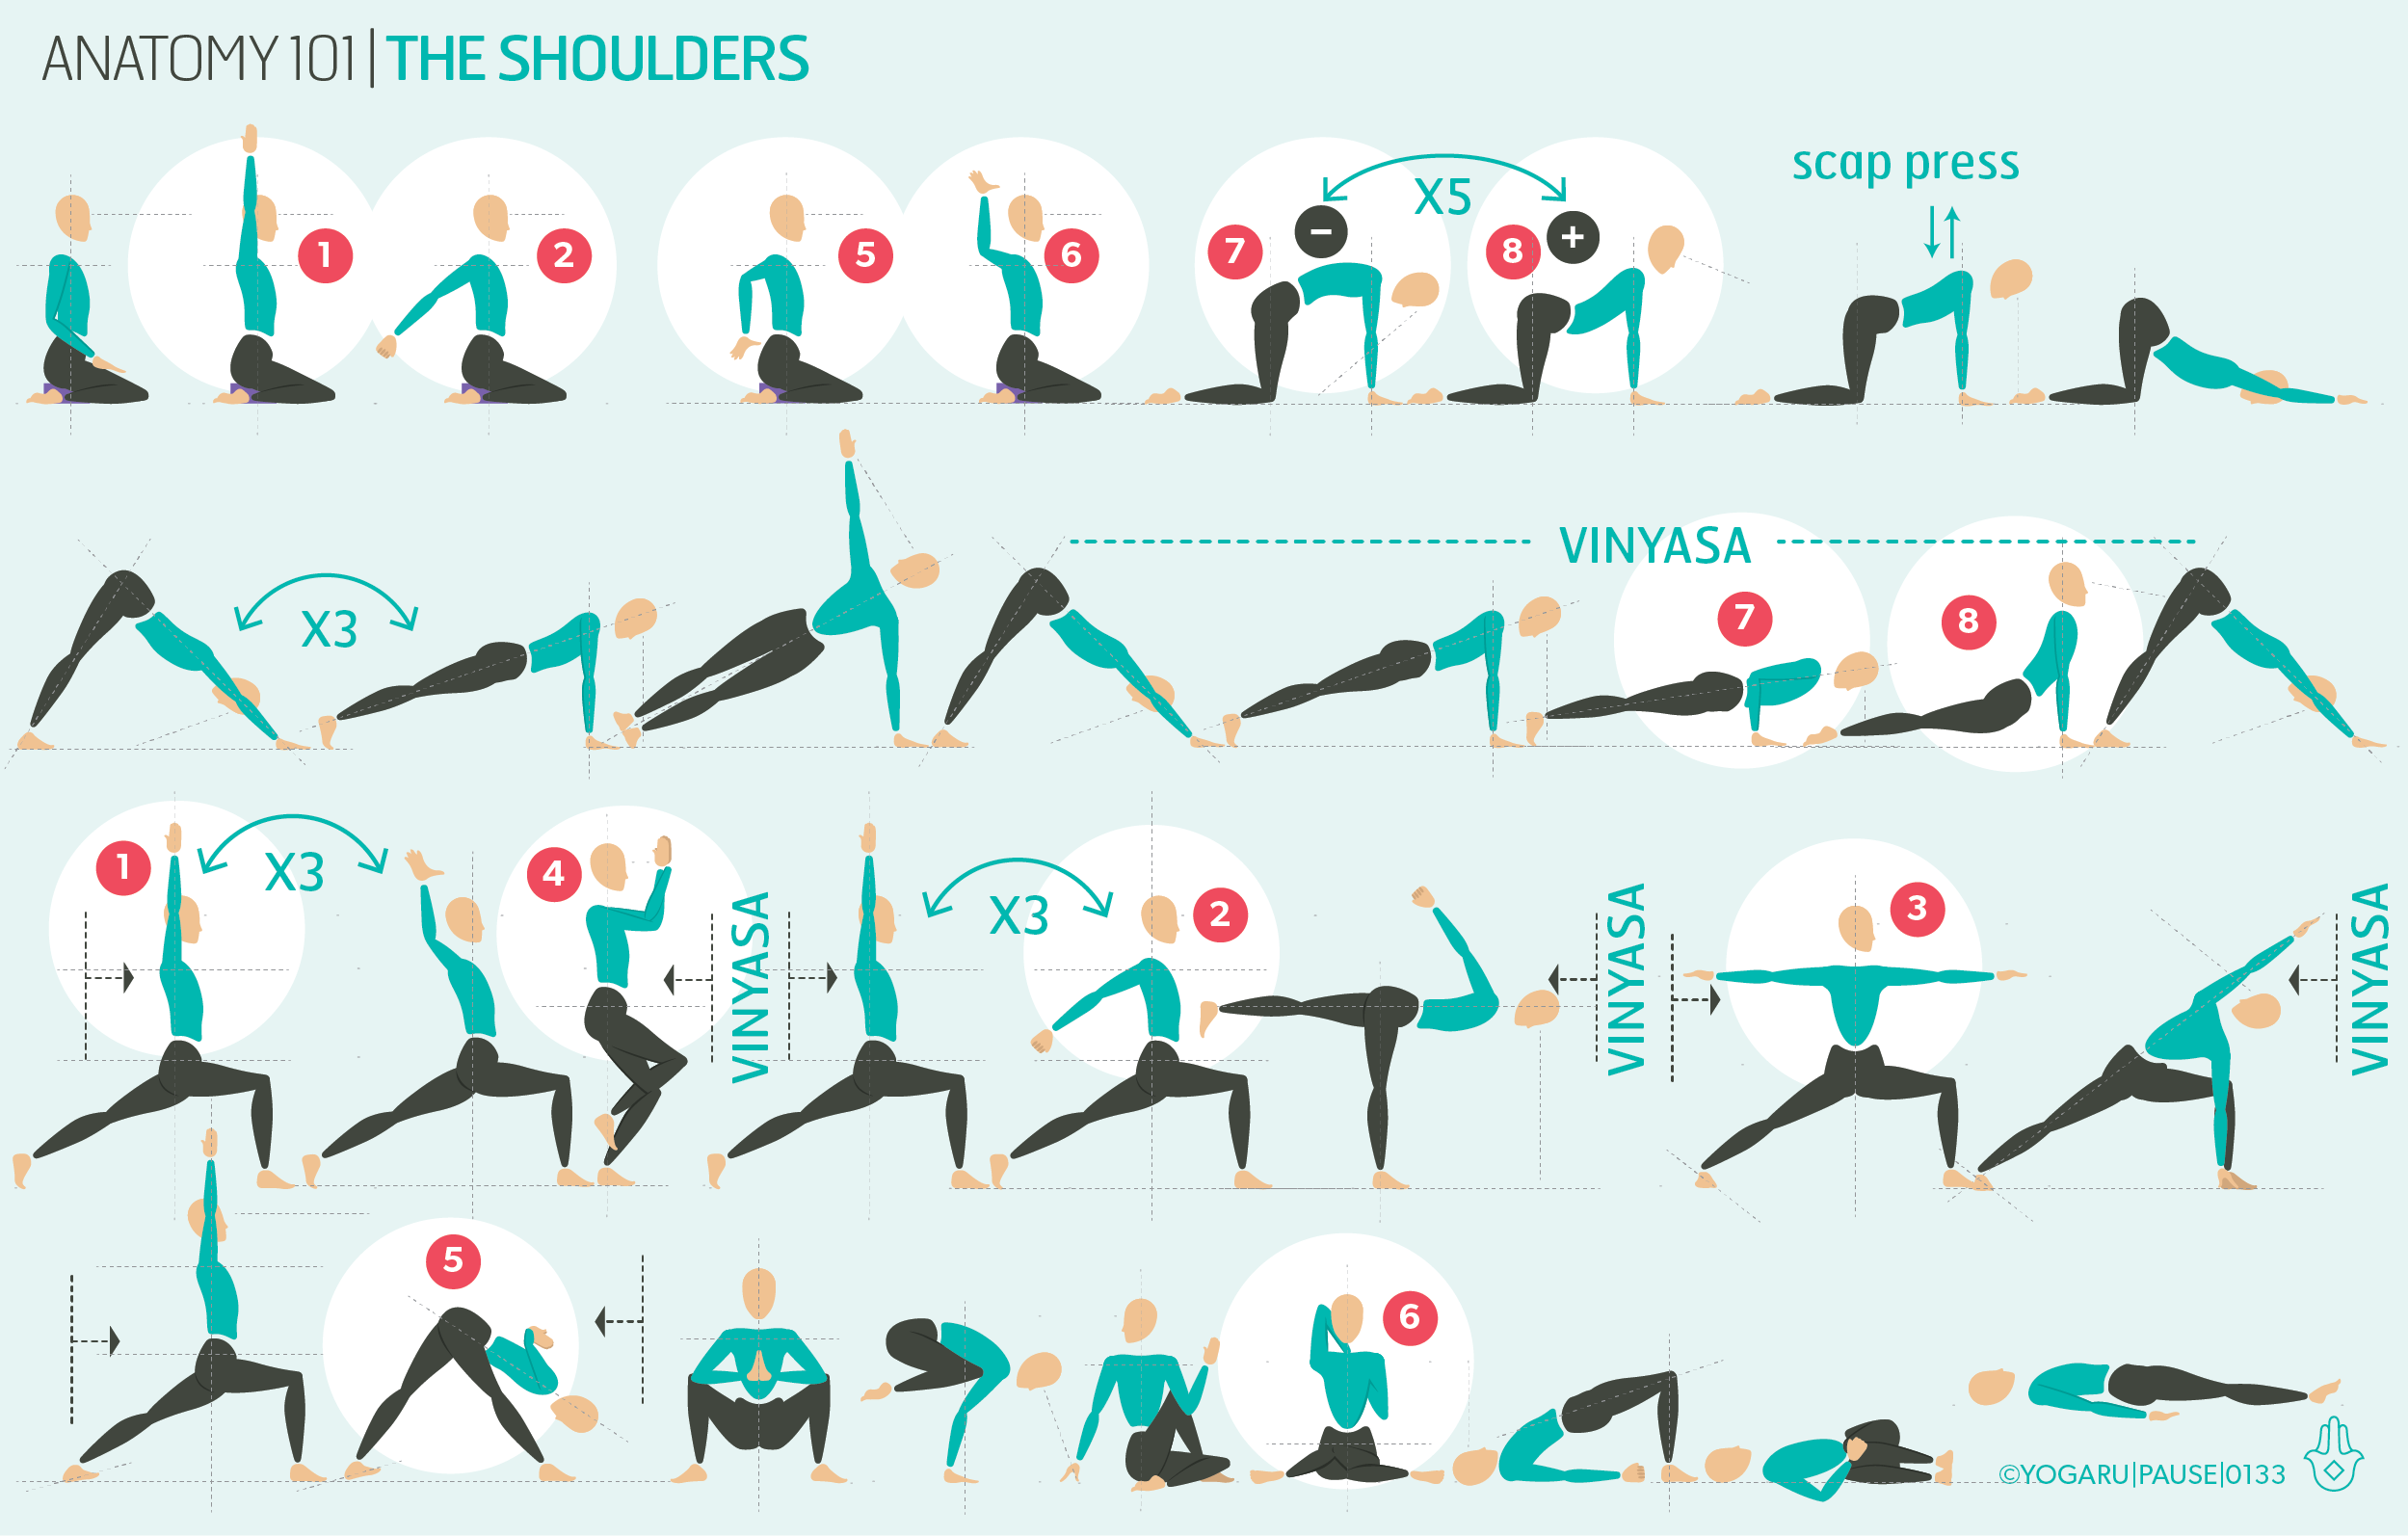
Throughout the sequence there are lots of opportunities to twist, backbend and take an inversion. For added benefits you could choose one or two of these poses and linger in them for a few breaths. Towards the end of the first row and the third row there is a chest opening mini flow. To do this, place the fingertips of the raised arm to your temple with the elbow pointing down on your inhale, lift your elbow and rotate the arm open on the exhale. Swap the breath around and notice the difference between opening on the exhale and opening on the inhale. The final pose is Viparita Kirana with the legs up the wall. If you prefer not to move to a wall you can take a simple Savasana fro your resting pose.

ALIGNMENT CUES
There is no specific peak pose in this immune system sequence. Throughout the sequence there are lots of opportunities to twist, backbend and invert. Use the cues below to help you flow through the sequence with ease and fluidity.

Have a read of the tips below and either print out the sequence or save it onto your device:

  • Use the breath guide in the sequence to help you link breath with movement in the flow. Inhale is indicated with a ‘+’, exhale is a ‘-”.

  • If there are specific poses that you would like to stay longer in, give yourself three deep breaths in those poses and pick up the next pose with the allocated inhale or exhale as indicated by the sequence.

  • There are five ‘pause breathe’ poses in the sequence. Take three deep breaths in these poses before you move on to the next pose.

  • For a longer practice repeat the warm up flow on the first line at the start of each of the two standing flows.

To save the images for personal use click and hold down the image until the ‘save image’ option appears; on Mac hold down ‘control’ and click the image to get the option box; on PC right click on the image to get the option box. Scroll down in the ‘option box’ and click ‘save image’.

Ruth Delahunty Yogaru

Anatomy 101 - the core

THE CORE OF THE BODY
The abdominal muscles, often referred to as the ‘core’, are a group of muscles located between the ribs and the pelvis. Their job is to support the spine against gravity, contain the organs of the trunk and facilitate movement. The core is also linked to the health of our spine. They work together with the muscles of the lower back to protect the spine and move it in flexion and extension. When the core is weak the back needs to work harder to hold us up. When the core is tight or overworked it pulls the pelvis into a posterior backwards tilt, puts additional strain on the lumbar spine, curls the shoulders forward and rounds the upper back.

THE STRUCTURE OF THE CORE
In working with the core it is important to visualise it as a full 360 degree network of muscles wrapping around your whole trunk. The core has a back, the quadratus lumborum, a base, the pelvic floor, and a top, the diaphragm. The psoas, which is considered ‘the core of the core’, is one of the biggest muscles of the body, and is responsible for hip flexion and movement. It is the only muscle that connects the upper and lower body, and is vital for all movement. For the purpose of this exploration we will stick with the four front abdominal muscles and the quadratus lumborum which connects the back of the hips to the back of the ribs.

THE MOVEMENTS OF THE CORE
Below there is an illustration of the movements of the core:
Flexion – where the core contracts forward.
Extension – where the core expands back.
Rotation – where the core twists to the right or left side.
Lateral flexion – where the core bends to the right or left side.

THE MUSCLES OF THE CORE
Starting with the deepest muscle:
Transverse abdominis are not considered a movement muscle, their action is compression and work like a containment sheaths that wrap around the core like a corset to support the organs, assist in posture and cinch the waist in.
Internal obliques are found either side of the body and run from the hips to the ribs diagonally and are responsible for lateral flexion, rotation and the side curves of the waistline.
External obliques are also found either side of the body and run from the ribs to the hips, crossing diagonally with the internal obliques and are also responsible for lateral flexion, rotation and the side curves of the waistline.
Rectus abdominis are the outermost layer of muscle at the front of the body and run from the pubis to the bottom of the sternum and are responsible for flexion of the spine into forward folds, stabilise the pelvis and shape the front of the body.
Quadratus lumborum is located at the back of the body and runs from the hips to the lower ribs, it does the opposite to the rectus abdominis to extend the spine into backbends when working as a pair and assist in lateral flexion when working individually.

THE OBLIQUES IN ROTATION & LATERAL FLEXION
Rotation (twist) and lateral flexion (sider bends) are a bit more complicated when it comes to which muscles are stretching and contracting. When we twist to the right the right side internal obliques contract and the right side external obliques stretch, while the left side internal obliques stretch and the left side external obliques contract. When we take a side bends to the right the right side internal obliques contract and the right side external obliques contract, while on the left side the left side internal obliques stretch and the left side external obliques stretch.

EXPLORING THE CORE IN YOUR PRACTICE
This sequence brings your full attention to the 360 wrap of your core in action. Remember that muscles work in tandem to each other so when you feel a stretch on one side the other side is strengthening. I have highlighted the five muscle actions of the core - four movements of the core and an additional action of compression. The sequence is designed to build a three dimensional awareness of the core.

ALIGNMENT CUES
This sequence will bring you through the five muscle actions of the core – flexion, extension, rotation, lateral flexion and compression. A selection of asana are numbered to highlight sample poses from each muscle action to give you a better understanding and the opportunity to experience the sensations of the core in action ad you practise. Below are the asanas which are highlighted in the sequence and some cues to help you tap into where you will feel the five muscle actions of the core:

1 – Flexion - draw your navel towards your spine and come into flexion on an exhale. Feel the rectus abdominis muscles at the front of the core contract .
Marjaryasana/Cat with the knees slightly lifted off the ground; Naraviralasana/Sphinx with hips lifted; Phalakasana/Plank Pose with knee to elbow; Tadasana/Mountain with single knee lifted. 

2 – Extension - allow the inhale to expand your front core as the back core contracts. Feel the quadrates lumborum  muscles at the back of the spine contract.
Bitilasana/Cow; reverse table top; Setu Bandha Sarvangasana/Bridge.

3 – Rotation - lengthen on an inhale and come into your twist on an exhale. Feel the diagonal pairs of the obliques muscles on the side of the body contract and stretch.
Parivrtta Ashta Chandrasana/Revolved Eight Crescent Moon; Marichyasana III/Marichi III.

4 – Lateral flexion - lift up out of the spine and lengthen through your whole side bend. Feel the obliques and quadratus lumborum muscles contract on the bending side and stretch on the opposite side.
Parighasana/Gate; Vasisthasana/Side Plank.

5 – Compression - cinch your 360 waist in on an exhale. Feel the muscles of the transverse abdominis contract.
Phalakasana/Plank Pose; Ashva Sanchalanasana/Galloping Horse; reverse Galloping Horse.

To save the images for personal use click and hold down the image until the ‘save image’ option appears; on Mac hold down ‘control’ and click the image to get the option box; on PC right click on the image to get the option box. Scroll down in the ‘option box’ and click ‘save image’.
Ruth Delahunty Yogaru

Anatomy 101 - the shoulders

THE SHOULDER COMPLEX
Similar in structure to the hip the shoulder is a ball and synovial socket joint. It is a more complex joint because of the range of motion that is required for day to day movements. Not only do we use our shoulders for practical purposes like lifting and carrying but we also use our shoulders to express ourselves. We communicate with our shoulders in body language and gestures. They curl forward when we are feeling vulnerable, tired or cold and they open back when we are happy, proud and enjoying the sun. Similar to a dog's wagging tail you can tell a lot about a person by their shoulder language. We carry our emotions in our shoulders and often this is where we see and feel the effects of stress in our bodies. It is also one of the most used body parts in idioms - we carry the weight of the world on our shoulders; stand shoulder to shoulder; give someone the cold shoulder; and offer a shoulder to cry on.

To make this complex joint easier to understand I will break it down into – the structure of the shoulder; the shoulder blade movements; and the shoulder joint movements with their assisting muscles. Having a basic knowledge of this joint will help keep the integrity of this important joint during your practice. When you get a clearer picture of how all the components work together you will get a deeper understanding of the joint in action as you practice the accompanying shoulder sequence below.

THE STRUCTURE OF THE SHOULDER
The shoulder is the most mobile joint of the body. The structure of the joint, which gives it this mobility, is the main reason it is considerably less stable than the hip joint and more prone to injury and dislocation.

The shoulder is made up of three bones – the shoulder blade (scapula), the arm bone (humerus) and the collarbone (clavicle). There are three joints that work together as a unit to form the shoulder complex:
The glenohumeral (GH) joint – which is a ball and socket joint made up of the head of the humerus and a shallow cup at the side of the scapula called the glenoid fossa.
The acromioclavicular (AC) joint – which connects the clavicle with the scapula and assists the scapula in shoulder abduction and flexion.
The sternoclavicular (SC) joint – which connects the medial end of the clavicle with the sternum and helps us lift our arm above shoulder height.

THE MOVEMENTS OF THE SHOULDER JOINT
Below there is an illustration of the six movements of the shoulder joint:
Flexion – where the arm lift forward and up, the scapula elevates and upwardly rotates.
Extension – where the arm reaches back and up, the scapula depresses and downwardly rotates.
Adduction – where the arm moves towards the midline, the scapula downwardly rotates.
Abduction – where the arm moves away from the midline, the scapula upwardly rotates.
Internal rotation – where the arm rotates inwards, the scapula protracts.
External rotation – where the arm rotates outwards, the scapula retracts.

THE MOVEMENTS OF THE SCAPULA
Below there is an illustration of the six movements of the scapula:
Elevation – where the scapula lift up
Depression – where the scapula lower down.
Retraction – where the scapula move towards each other.
Protraction – where the scapula move away from each other.
Upward rotation – where the outer corners of the scapula rotate upwards.
Downward rotation – where the outer corners of the scapula rotate downwards.

THE MUSCLES OF THE SHOULDERS
For those of you who love to go deeper into the actions of the shoulder joint I have also listed the six movements of the shoulder joint and scapula with their assisting muscles in the chart below. Grouping the muscles to the action rather than looking at each muscle in isolation gives a more experiential understanding.

THE ROTATOR CUFF
The anatomy of the shoulder is not complete without a mention of the rotator cuff. The rotator cuff consists of four muscles which form a ‘cuff’ around the head of the arm bone (humerus) and the shoulder socket (glenoid fossa). Their main job is to work collectively to stabilise the head of the arm bone (humerus) in the shoulder socket (glenoid fossa) and help prevent the joint from dislocating. Each of the four muscles also assist in the following movements:
Supraspinatus – shoulder joint abduction.
Infraspinatus – shoulder joint external rotation.
Teres minor – shoulder joint external rotation.
Subscapularis – shoulder joint internal rotation.

EXPLORING THE SHOULDERS IN YOUR PRACTICE
We use our shoulders a lot during our yoga practice. We lift and extend them, we press into them to hold our weight and we wrap them around our bodies. In this sequence bring your full attention to the sensations of stretching and strengthening in your shoulder joint. Remember that muscles work in tandem to each other so when you feel a stretch on one side the other side is most likely strengthening. Look for each side to build a three dimensional picture of the shoulders in each pose, especially the poses I have highlighted as the six movements of the shoulder. The sequence is designed to build a well rounded shoulder focused practice and each pose has a role to play. For the purpose of simplicity, and understanding the movement of the shoulder and scapula, I have highlighted the six movements twice – once as you warm up and once in the flow of the sequence.

ALIGNMENT CUES
This sequence will bring you through the six movements of the shoulder – flexion, extension, abduction, adduction, internal and external rotation. Concentrate this practice on your shoulders and move mindfully with curiosity as you move through the poses. The sequence is numbered to highlight sample poses from each movement of the shoulder to give you a better understanding of the role of the shoulder joint in the pose. The seated poses bring you into shoulder flexion, extension, external rotation and internal rotation. Cat & cow will bring the scapula into protraction and retraction which helps the scapula move freely in preparation for other shoulder work. Below are the asana which are highlighted in the sequence and the correlating arm and scapular movement:

1 – Flexion - Seated arm warm up & Ashta Chandrasana/Eight Crescent Moon
When the arms are in flexion the scapula is elevated and upwardly rotated.
2 – Extension - Seated arm warm up & Ashta Chandrasana/Eight Crescent Moon with clasped arms
When the arms are in extension the scapula is depressed and downwardly rotated.
3 – Abduction - Virabhadrasana II/Warrior II
When the arms are in abduction the scapula is upwardly rotated.
4 – Adduction - Garudasana/Eagle
When the arms are in adduction the scapula is in downward rotation.
5 – Internal rotation - Seated arm warm up & Parsvotanasana/Intense Side Stretch
When the arms are in internal (medial) rotation the scapula is in protraction.
6 – External rotation - Seated arm warm up & Gomukhasana/Cow Face
When the arms are in external (lateral) rotation the scapula is in retraction.
7 – Scapula protraction - Marjaryasana/Cat & Chaturanga Dandasana/Four Limb Staff
Scapula moves away from each other.
8 – Scapula retraction - Bitilasana/Cow & Urdhva Mukha Svanasana/Upward Facing Dog
Scapula moves towards each other.

Subscribe to my newsletter & get a FREE YOGA BENEFITS INFOGRAPHIC as a thank you!

To save the images for personal use click and hold down the image until the ‘save image’ option appears; on Mac hold down ‘control’ and click the image to get the option box; on PC right click on the image to get the option box. Scroll down in the ‘option box’ and click ‘save image’.

Ruth Delahunty Yogaru