Sequences

Fluid movement

THE FLUID BODY
The human body is made up of between 60-70% fluid. This fluid acts as an important transport system for all bodily functions and a lubricant for movement. It decreases as we get older, but practising yoga keep you juiced up and minimises this naturally lose of fluid.

I am not naturally a very fluid person in my movement or, I have to admit, in my life off the mat. Routine is great but when it inhibits your ability to flow freely through life you need to dig deep and look for balance. The mind follows the body, and so, when we move with more fluidity in our practice we become more adaptable in life, less resistant to change, and find it easier to go with the flow in the yoga practice of aparigraha, or non grasping.

EXPLORING FLUID MOVEMENT IN YOUR PRACTICE
This sequence will give you the opportunity to flow through your practice. Use your breath to initiate your flowing movement. Think of the the breath as the ebb and flow of the tide – it takes it’s time and is never rushed; it pauses before it changes direction; it flows with ease and adaptability around any obstacles. Move from the inside out – yoga doesn’t care what you look like from the outside, it is busy working it’s magic on the inside! Be guided by what it feels like on the inside rather than what it looks like from the outside. Pay particular attention to bringing some fluid movement into your transitions. Pause, and work out how your are going to move from one pose to another, with muscular integrity and a slow and steady pace. Your time on the mat can double in benefits to the mind, body and spirit connection, if you link your poses with conscious transitions.

ALIGNMENT CUES
Think of yourself as fluid rather than solid as you move through the sequence. Become more pliable and explore working out how to adapt to obstacles you encounter in your time on the mat, and off the mat too. Let go of expectation of yourself in your practice. Everyone is different and everyone has different body proportions too – your leg may never be physically long enough to wrap around your head, and that person who can most likely struggle with other areas of their practice on or off the mat.

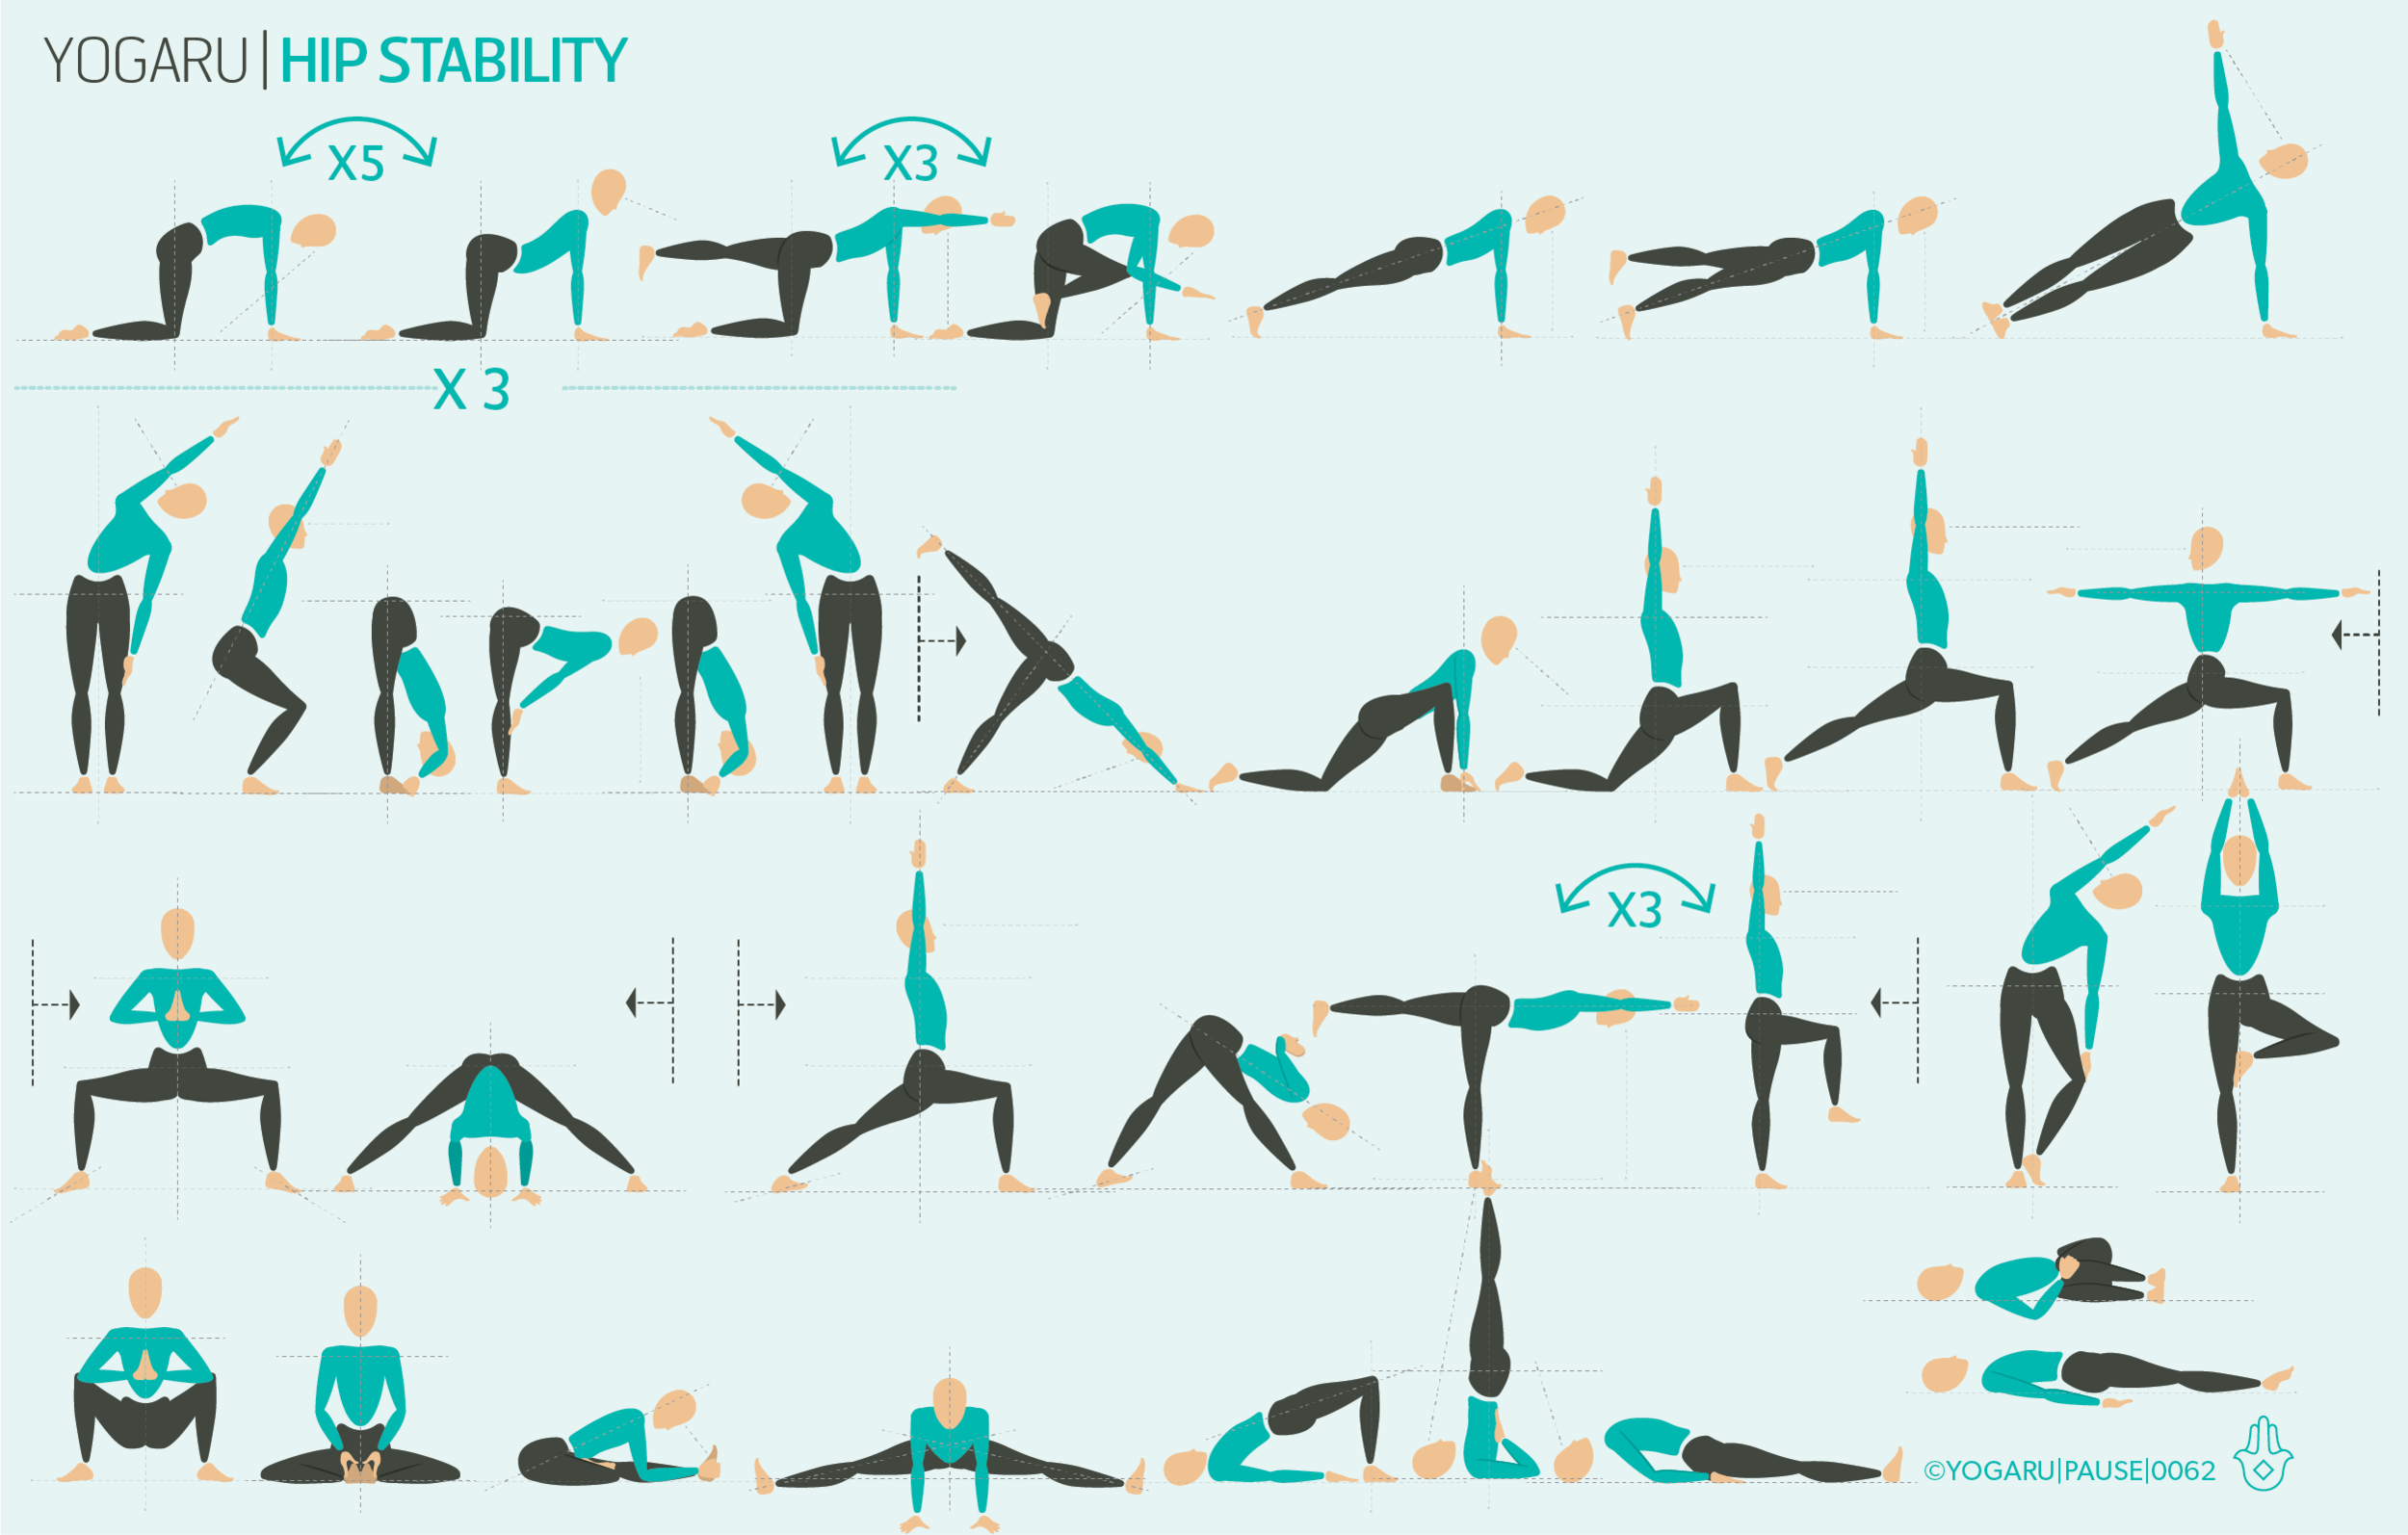
Print out the above sequence and move like a liquid rather than a solid form:

  • Start by lying on your back and tilting your pelvis forward and back. Notice the effect this movement has on your spine – when your pelvis is tilted forward (anterior tilt) the spine arches and the lumbar becomes pronounced; when you tilt your pelvis back (posterior tilt) the spine flattens out and you lose the natural curve of your lumbar. Look for a tilt between the two where you can just about fit your hand between the ground and your lower back to build a blueprint for the natural curve of your back. Revisit this curve throughout your practice to ensure you are flowing in sympathy to the spring system of your back.

  • As you flow from bent leg Adho Mukha Svanasana/Downward Dog to Phlankasana/Plank Pose ripple from your pelvis to your shoulders and move with your whole spine.

  • From Ashta Chandrasana/Eight Crescent Moon inhale, and on your next exhale, bend your back knee and hover it a few inches off the ground. Hug your outer hips to the midline to stabilise the pelvis. Inhale and lift back up to Ashta Chandrasana/Eight Crescent Moon. For the second set of three take a gentle backbend with the arms in cactus position on your exhale.

  • Try flowing through the Virabhadrasana II/Warrior II sequence with the breath cues as suggested in the sequence. Visualise the lungs filling up with prana as you lift up on the inhale and emptying out as you dip the pelvis down on the exhales.

  • For the final flow in Ashta Chandrasana/Eight Crescent Moon, with hands in prayer position, strongly draw your navel towards your spine and press into your standing foot to activate the lift of the leg. Move slowly with the breath. On your final leg lift see can you come up onto the balls of your standing foot.

To save the images for personal use click and hold down the image until the ‘save image’ option appears; on Mac hold down ‘control’ and click the image to get the option box; on PC right click on the image to get the option box. Scroll down in the ‘option box’ and click ‘save image’.

Ruth Delahunty Yogaru

Press & reach

PAUSE_0065.png

SENSORIAL SOLES
Inspired by my recent purchase of Vivobarefoot runners I’ve become curious about the role of our feet in our practice, and the impact they have on how our bones and muscles find their true alignment. As yogis we have the unique opportunity to refind the lost connection with the ground – without any barriers to dull the sensations and over support the musculature of the foot. Shoes protect our feet from doing the very job they were cleverly designed to do – feed proprioceptive signals to the brain and allow the body to move accordingly. As I acclimatise to walking in my barefoot shoes I’ve noticed my stride is different, my hips swing more and I am completely in the present moment through connecting with present felt sensations in the act of walking.

PRESS & REACH
The practice of yoga asana is designed to do just that – journey through the sensorial body as a method to find the gateway to quieten the mind, and in its origins, ultimately prepare for seated meditation. You start the journey through your foundation – the soles of your feet – and you complete the action through the part of the body which is reaching. This ‘press and reach’ is the essence of this sequence, and a principle you can apply to any home practice or class you attend. We root down to find a strong foundation, and we grow the pose from this stability. The action of pressing gives an isometric strength to the active muscles, while reaching stretches the active muscles. Yoga is not just about stretching – it’s about balanced amounts of stretching and strengthening for optimum balance.

EXPLORING PRESS & REACH IN YOUR PRACTICE
In yoga we find our grounding by pressing through the points in contact with the ground. Spreading equal weight through all the points will support the pose with unity and spark a chain reaction up through the body. The parts of the body that are stacked over this stable foundation will naturally flow into freer optimal alignment. Each pose has elements of press and reach. Establish your ‘press’ in the points of contact with the ground first, then follow the lines of energy through the whole body and look for the natural ‘reach’ in the upper body of each pose.

ALIGNMENT CUES
‘Press’ is sometimes easier to find than ‘reach’. The alignment cues below will help you to work out which parts of the body are strengthening/pressing and which are stretching/reaching. When you find your pose, trace the ‘press & reach’ through your body – get curious about where you feel the two opposite actions meeting and it moves from ‘press’ to ‘reach’.

PAUSE_0065_A.png

Print out the below tips, along with the sequence, and find your ‘press & reach’:

  • Starting with Marjaryasana/Cat, Bitilasana/Cow spread your fingers and find your hasta bandha. Spread your weight equally between the hands, knees and tops of the feet. From this stable foundation reach the centre of your spine up high in Marjaryasana/Cat and your sternum forward and sit bones up in Bitilasana/Cow

  • In Urdhva Hastasana/Upward Salute find the three points of contact with the ground – ball of the big toe, ball of the little toe and the centre of the heel root down into them equally and feel a lift in the arches and inner ankles. Reach through the tip of the crown and the fingertips. Let your shoulder blades spin out to the sides and soften your shoulders.

  • In Adho Mukha Svanasana/Downward Facing Dog spread your weight equally between your hands and feet. Spread your fingers and press into all five knuckles of your hands, and lightly into the pads of your fingers. Press into your feet and reach your sit bones up as high as you can. Feel the support of the press enabling you to reach up. I find starting your first few rounds with bent knees help you to find the forward tilt of the pelvis and stop your lower back from rounding.

  • Our peak pose is Parsvakonasana/Side Angle. It gives the perfect example of ‘press & reach’. With the right leg forward, establish the foundation in the left foot in particular. Press into the three point of the left foot and reach through the fingertips of the left arm. Trace the journey from strengthening to stretching through the whole left side of the body.

To save the images for personal use click and hold down the image until the ‘save image’ option appears; on Mac hold down ‘control’ and click the image to get the option box; on PC right click on the image to get the option box. Scroll down in the ‘option box’ and click ‘save image’.

Ruth Delahunty Yogaru

Hip stability flow

PAUSE_0062.png

YOUR POSE IS THE PERFECT POSE
What would a yoga class look like if we were to actually listen to what was right for our own unique bodies – rather than what we were told to do, or striving for what the person on the mat beside us was doing. The discipline of yoga, as with all movement, if not practiced with self care and awareness can lead to injuries. Your teacher is there to guide you and facilitate the movement, you are there to ultimately decide what feels right for you. There is many reasons why your body may never reach the perceived ‘perfect pose’ – from shortened muscles and ligament restrictions, to your unique skeletal structure. During our practice we are constantly getting feedback from our bodies – what feels good and what doesn’t. It’s up to us to listen! The deeper I go into my own practice, the more I pull back from being attached to perfection. Instead I look for a balance between mobility and stability by moving slowly and being guided by felt sensations and pulling back to a softer version of the pose when needed.

MOBILITY & STABILITY
With this in mind, following on from 360 Hip Openers, I have started to explore hip stability. As with everything in life, there has to be a balanced approach to both stretching and strengthening to avoid injuries further down the line. Hip openers have many benefits to counteract our sedentary lives, but hip stability is just as important to incorporate into your practice too. Supporting one with the other will help you to stay within your safe boundaries and give you the mobility of stretching with the stability of strengthening. There is a misconception of yoga that it is purely stretching, but it gives you both stretching and strengthening – using our own body weight, and pressing into our foundation to trigger strong muscle activity.

EXPLORING HIP STABILITY IN YOUR PRACTICE
The pelvis is the foundation of the body and encompasses the base of our spine (1st Chakra), our reproductive organs, our digestive system, and enables all movement. The pointy hip bones (iliac crest) at the front of our hips can tell us a lot about our alignment. As you work through this sequence place your fingertips on the hip bones at the front of your pelvis, or have a glance down at your hips, and looking for level hip bones. When you find your hip bones, hug your outer hips to the midline to activate your strong stabilising hip muscles of the glutes. This will help with your alignment in many poses - such as Phalakasana/Plank Pose, Virabhadrasana III/Warrior III and Setu Bandha Sarvangasana/Bridge. When the hips are not level it has implications on the whole body and brings the spine into a lateral bend or a twist to compensate. If you find this is the case for you, come back out of the pose and move into it slower – squeezing your outer hips muscles to the midline – and staying at the point just before the hips move out of alignment. For example in Virabhadrasana III/Warrior III - lift your left leg, pressing out through the heel, with your hands on your hip bones. If you feel the left hip hiking up pull back a little, and work on strengthening your version of the pose at this point. Your leg may not be perfectly parallel to the floor but your hips are learning all about stability and your supporting hip muscles are firing appropriately rather than being bypassed. This way you are being guided by your body rather than what you are being asked to do or what you see other people doing.

ALIGNMENT CUES
The peak pose of this sequence is Parivrtta Ardha Chamdrasana/Revolved Half Moon. Read through these alignment cues to help you find your optimum alignment for your unique body.

  • From Virabhadrasana III, inhale, lengthen up through your spine. Exhale, twist to your right from the waist, reach your left hand to the big toe side of your right foot, a foot forward, on a brick, or the ground. Keeping your left leg parallel to the ground, toes facing down, press out through the heel, roll the inner thigh of your left leg up.

  • Reach your right arm up high, palm facing right, stack your shoulders. Bottom waist rolls forward, top waist rolls back, lengthen from the heel of your lifted leg to the tip of your crown, gaze forward or to your right fingertips.

Print out the above sequence and practice with the intention of searching for a connection with your body rather than searching for perfection. Embrace what you can and can’t do as part of what makes you uniquely you. As you flow through this sequence remember our intention of stability and listening to feedback. When you find you’ve lost your connection move slower and isolate a single area (the hips points) to help you find that feedback again.

To save the images for personal use click and hold down the image until the ‘save image’ option appears; on Mac hold down ‘control’ and click the image to get the option box; on PC right click on the image to get the option box. Scroll down in the ‘option box’ and click ‘save image’.

Ruth Delahunty Yogaru