
Pincha Mayurasana - Peacock

YOGARU_Pincha Mayurasana_PB.png

GIVING THE SHOULDER CENTRE STAGE
In yoga the legs get plenty of attention and hard work in the duration of your time on the mat – from the sensory connection to the ground with the feet; the musculature energy of the legs in standing poses; to the intricate stretching and strengthening actions in the hips. The shoulder joint gets a lot less time in the limelight, and yet, when well warmed up, we ask them to hold the full body weight in arm balancing poses and inversions. We need to bring a bit more conscious attention to the integrity of the shoulders joint to prepare them for these more challenging poses. When we break down a pose like Pincha Mayurasana/Peacock we can see the importance of shoulders strength, flexibility and stability. As with every asana the shoulders don’t work alone – the core, arms and spine need to be strengthened too. One often forgotten area, that is important for the action of getting into kick up position in balancing inversions, are the hamstrings. This was a game changer for my inversion practice. I noticed that when I spent time warming up my hamstrings, I could walk my legs in closer to my forearms, and work towards reaching my pelvis further up over my shoulders and lengthen my kicking leg up more. Pincha Mayurasana/Peacock can be a good starting point for working towards Adho Mukha Vrksasana/Handstand. It teaches the principles of kicking up, with the benefit of a wider foundation on the ground, and less distance from the ground to potentially face plant! When the backs of the shoulders are tight it makes it harder to stack them over the elbows, and as a result the lumbar lower back over flexes to compensate and help find your centre of gravity – cause the ‘banana back’ effect. This sequence will help to avoid this by preparing the whole shoulder and all the assisting muscles that are recruited for Pincha Mayurasana/Peacock.

THE BENEFITS OF PINCHA MAYURASANA/PEACOCK
Pincha Mayurasana/Peacock is a very energising inversions. It strengthens the shoulders, arms, and spine and stretches the shoulders. Whilst it is very invigorating for the brain it is also very calming and helps relieve stress tension and anxiety. As an inversion it boosts the immune system and increases circulation.

EXPLORING PINCHA MAYURASANA/PEACOCK IN YOUR PRACTICE
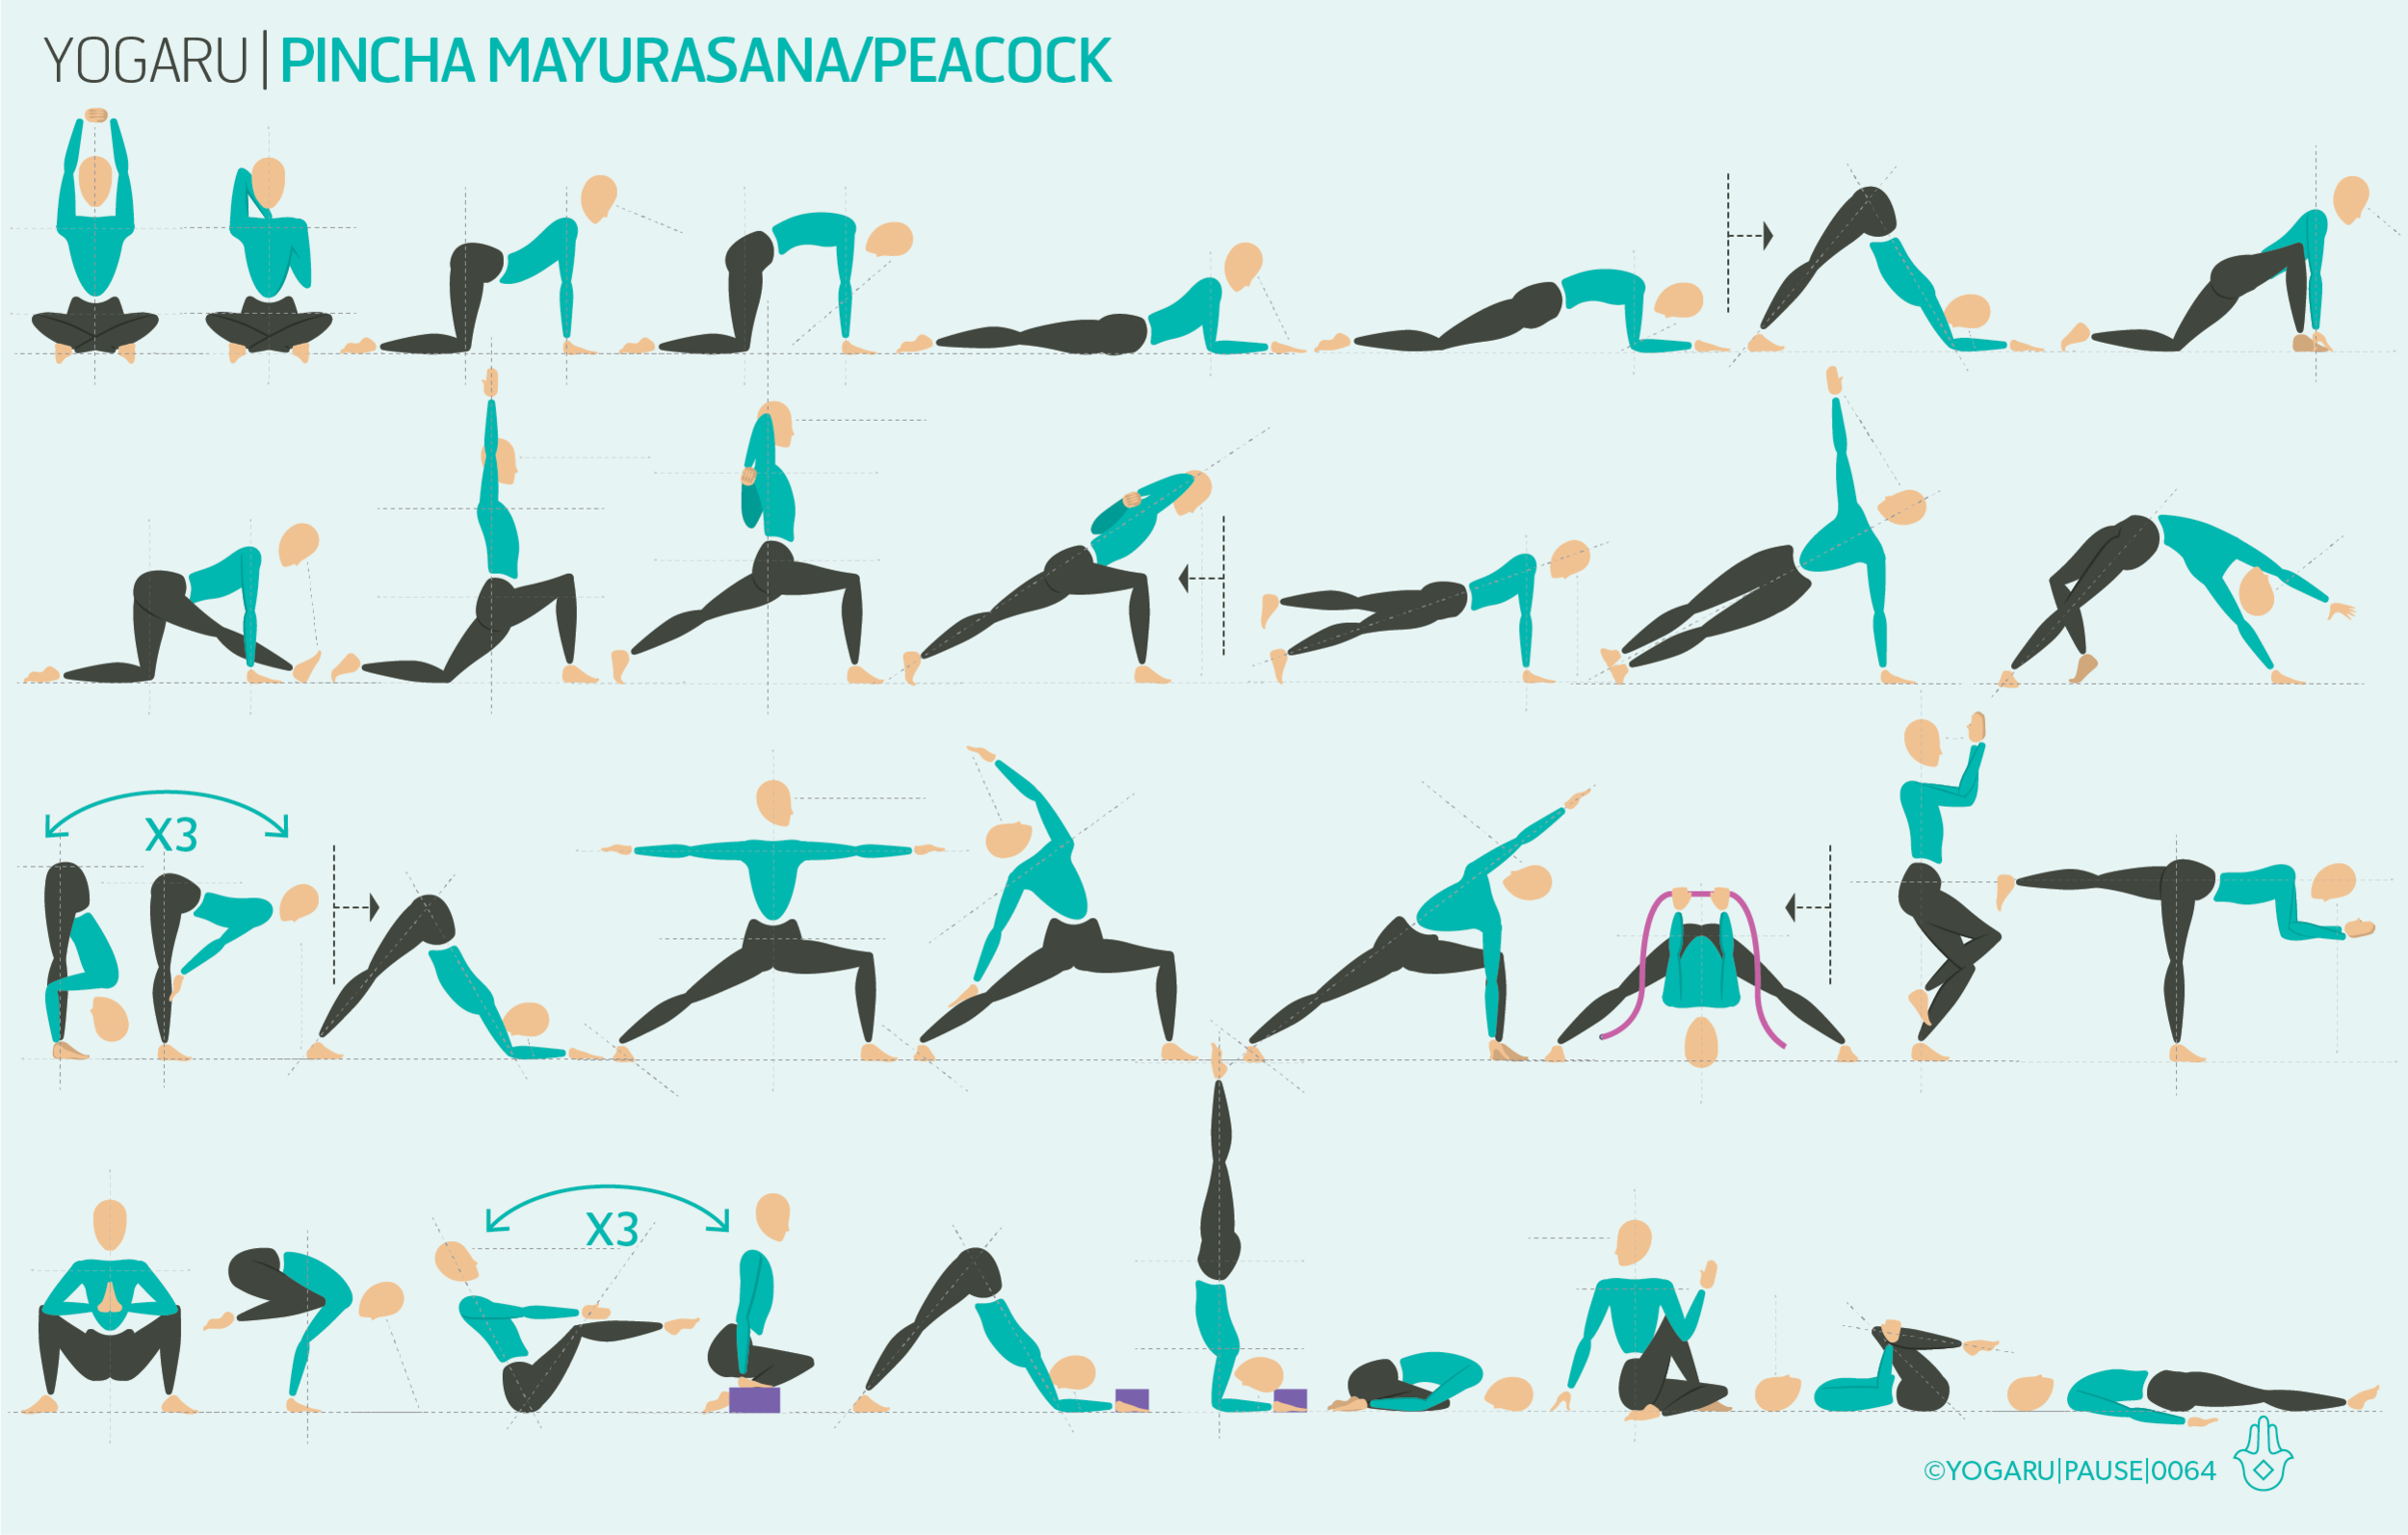
As you run through the sequence pay particular attention to your shoulders. When the arms are reaching up, they are not just reaching up, they are reaching up with intention. The lines of energy are running all the way to your fingertips. Notice if you are bringing any unnecessary tension into your shoulders when your arms are raised. Soften around the shoulder joint while still maintaining the integrity of the strength required. Throughout the sequence Adho Mukha Svanasana/Downward Dog is replaced with Ardha Pincha Mayurasana/Dolphin to help prepare the shoulders for the peak pose. This is the perfect pose to add to any practice in order to strengthen the shoulders for all arm balances and balancing inversions.
PAUSE_0064.png

ALIGNMENT CUES
The sequence will build strength and stability in the shoulders, arms and core. It will also prepare the legs to assist you if you are ready to try the kick up stage. Set your intention on strengthening your shoulders and staying within your safe limits, rather than expecting to achieve full Pincha Mayurasana/Peacock. There are two options – prep pose with hands pressing into the wall or the prop assisted full version of the pose.

Print out the below tips, along with the sequence, and spend some extra time exploring your shoulders:

HOW TO PREP FOR PEACOCK
Use this version to build shoulder strength to either build towards Pincha Mayurasana/Peacock or stay with this version fo the pose.

  • Set your mat short side up against a wall. From kneeling, place your forearms parallel on the ground, shoulder width apart. Place your hands at the wall fingertips reaching away from you.

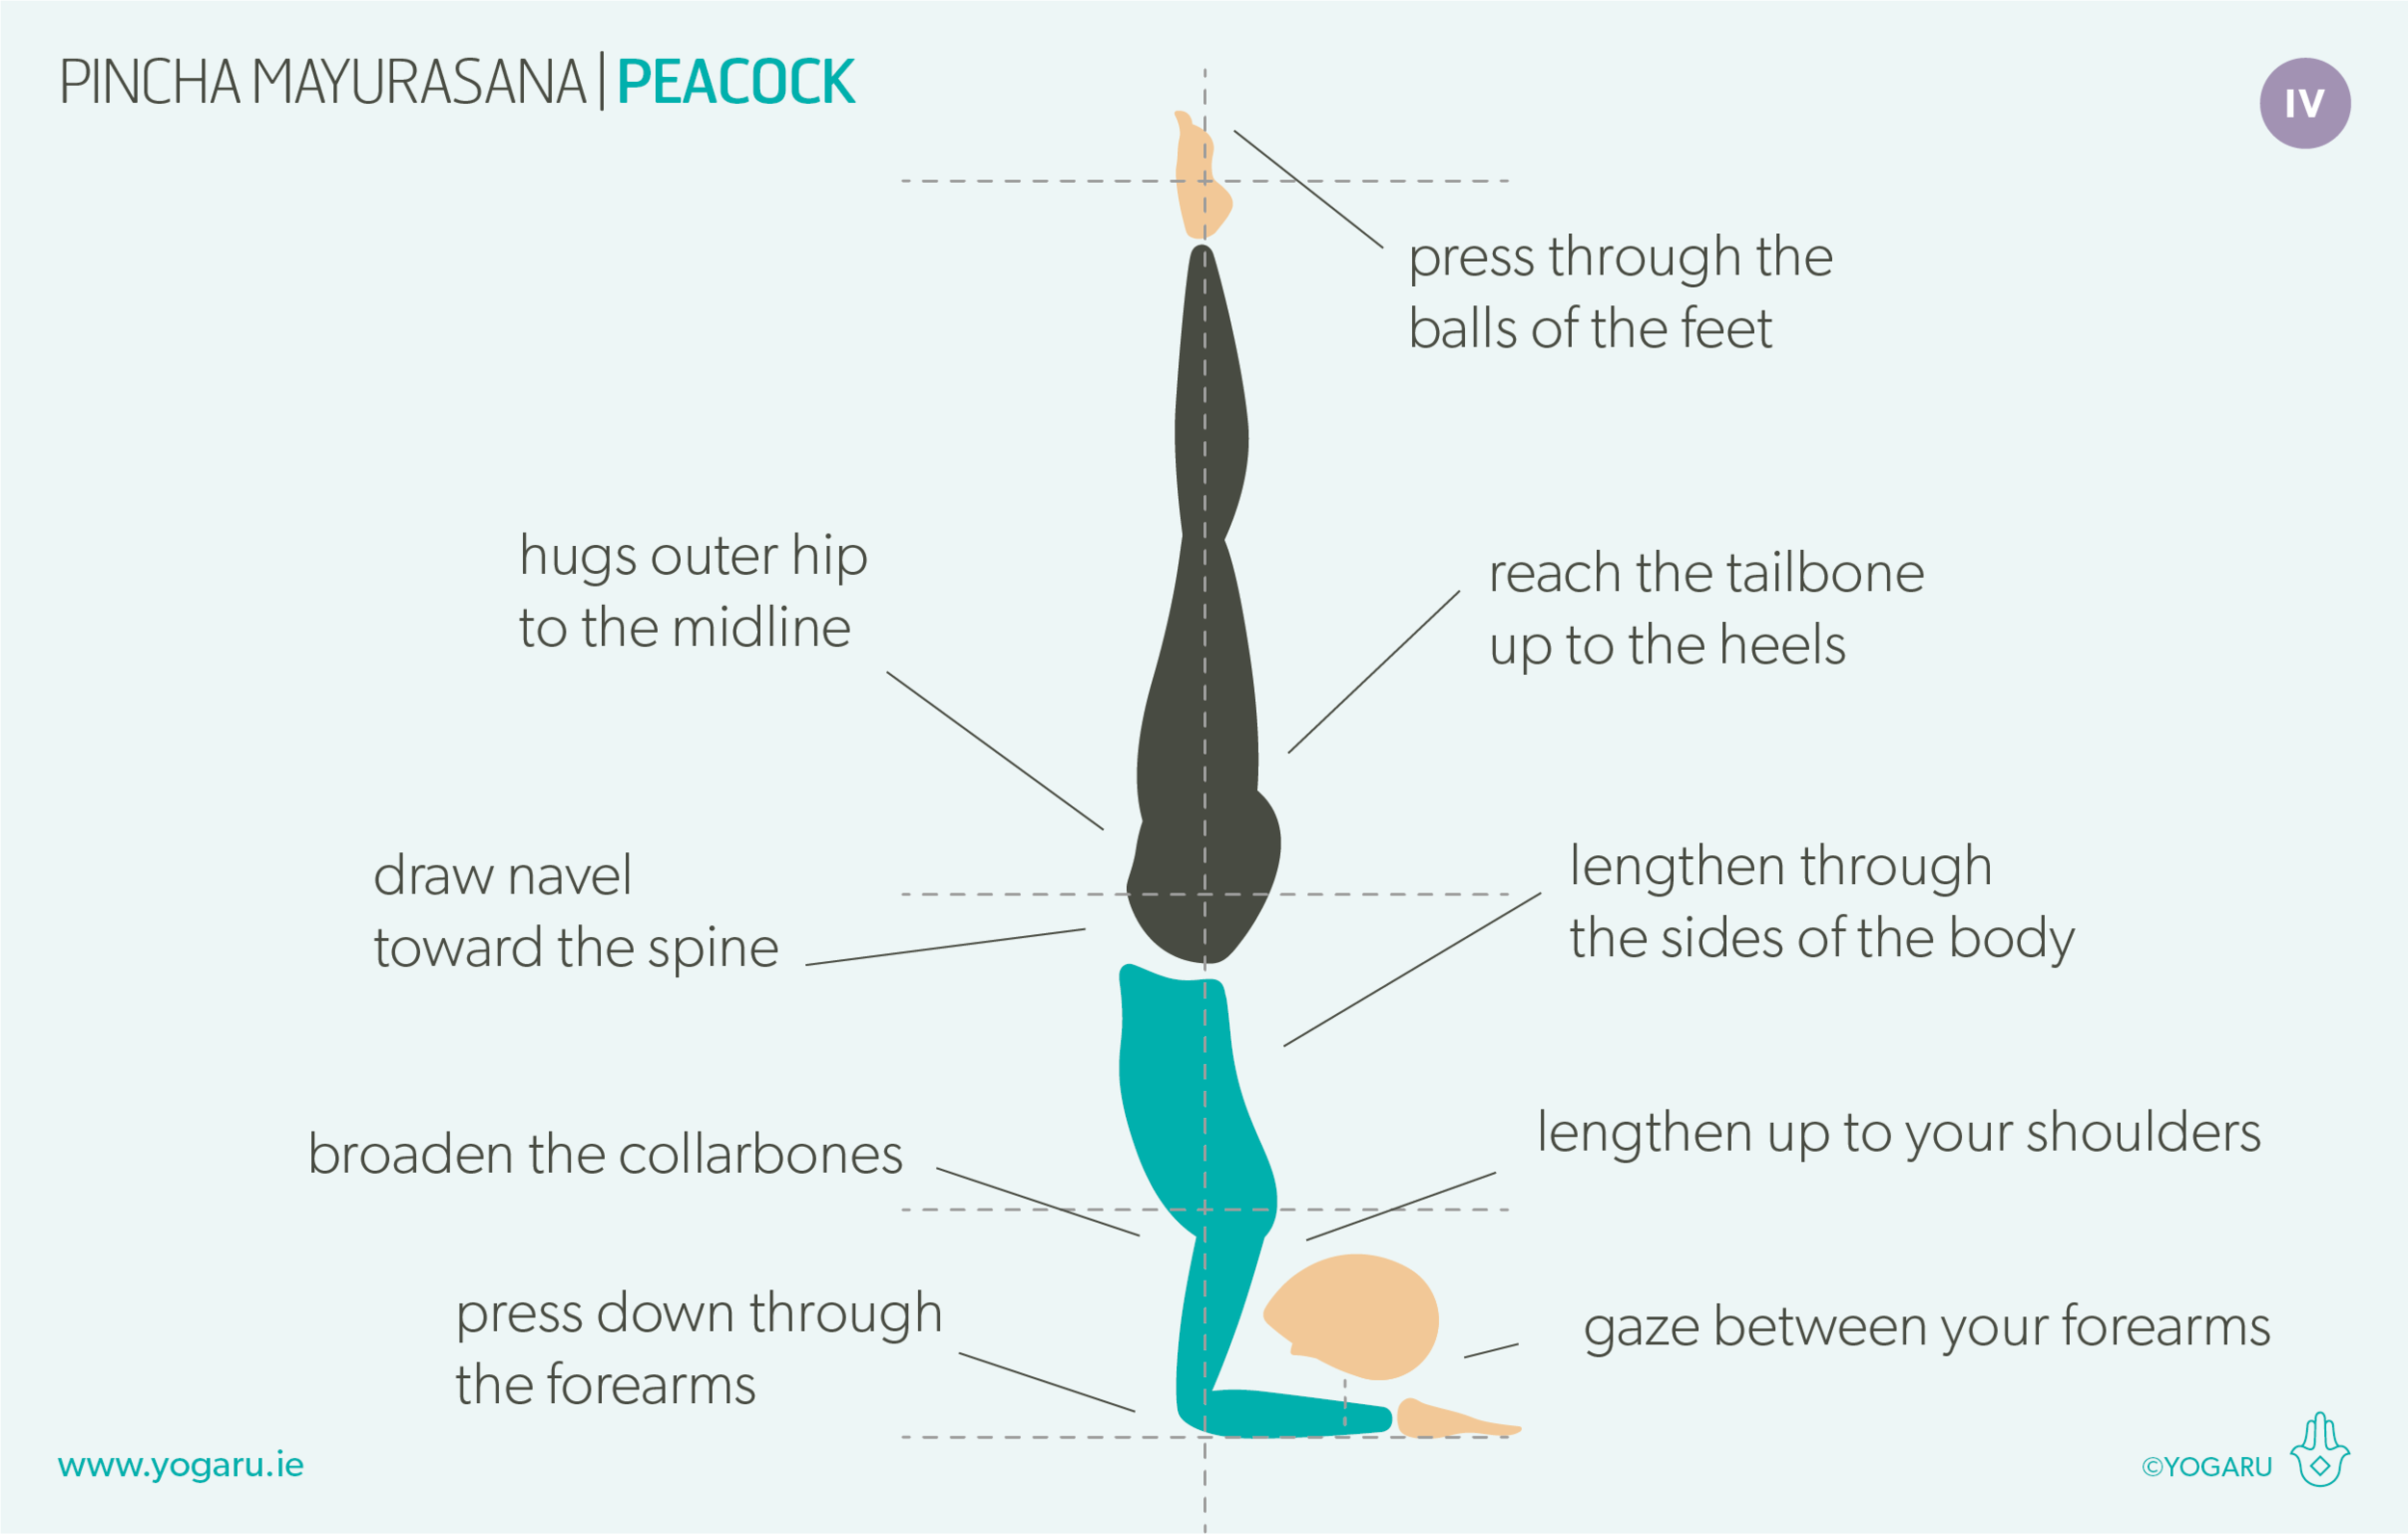
  • Lift your knees and walk your feet forward. Press down through your forearms, lengthen up to your shoulders, broaden your collarbones. Gaze between your forearms.

HOW TO USE PROPS FOR PEACOCK
Once you are happy your shoulders can hold your inversion move on to this version of Pincha Mayurasana/Peacock using a brick to help you stabilise your foundation.

  • Move your forearms about two inches away from the wall. Place the long side of a brick between your hands – fingers on the short side and thumbs on the long side of the brick.

  • Press down through your forearms, lengthen up to your shoulders, broaden your collarbones. Gaze to the brick between your forearms.

  • Bend your left leg, lift your right leg up and press out through the heel. Spring your right leg up overhead, follow with the left leg, reach your legs up high, draw your navel towards your spine.

  • Hug your outer hips and inner thighs to midline, press through the balls of your feet, reach your tailbone up to your heels.

  • To come down, slowly bend your knees and lower your feet to the ground.

Enjoy turning your practice upside down, focusing on the shoulders and letting the legs look after themselves for a change.

To save the images for personal use click and hold down the image until the ‘save image’ option appears; on Mac hold down ‘control’ and click the image to get the option box; on PC right click on the image to get the option box. Scroll down in the ‘option box’ and click ‘save image’.

Ruth Delahunty Yogaru
Anatomy 101 - 360 core

PAUSE_0063.png

THE ESSENTIAL CENTRE
The concept of ‘the core’ is a fascinating topic. If you peel away the idea of ‘core’ as a fashion item to be chased after, and look at it from a functional point of view you see it for what it actually is – an amazing anatomical feat of nature that plays a crucial role in physical and mental health. Just like an apple core, our core is the centre of our being – the powerhouse that gives stability to our spine, support to the organs, and mobility to the pelvis as a source of all movement.

HOW THE CORE WORK?
The core is intrinsically linked to the health of our spine. When the core is weak the back needs to work harder to hold us up and facilitate movement. When the core is tight or overworked it pulls the pelvis into a posterior backwards tilt and puts additional strain on the lumbar spine. To understand the core it is important to have a very simple understanding of the main muscle groups involved, and remembering the core does not just comprise of the ripped six pack summer holiday accessory, it wraps around to support you 360 degrees.

To break it down very simply – the transversus abdominis are the containment sheath that wrap around the core like a corset which support the organs and assist in posture; the internal and external obliques run diagonally up and down the side body and are mainly responsible for lateral side bends and twists; the rectus abdominis are the outermost layer of muscle and run from the pubis to the bottom of the sternum, they flex the spine and stabilise the pelvis; the quadratus lumborum do the opposite and extend the spine into backbends. The iliopsoas, which is considered ‘the core of the core’, is one of the biggest muscles of the body, and is responsible for hip flexion and movement. It is the only muscle that connect the upper and lower body, and is vital for all movement. The pelvic floor and the diaphragm are also considered crucial parts of the upper and lower core – making the core not only 360, but a full three dimensional top, bottom and sides shape.

EXPLORING THE CORE IN YOUR PRACTICE
What we are looking for in our practice is an evenly distributed strong and supple core that facilitates safe supported movement. The first step is to connect to the core, then work out what you need to do to engage the muscles, and in turn stabilise the spine and inner organs.

ALIGNMENT CUES
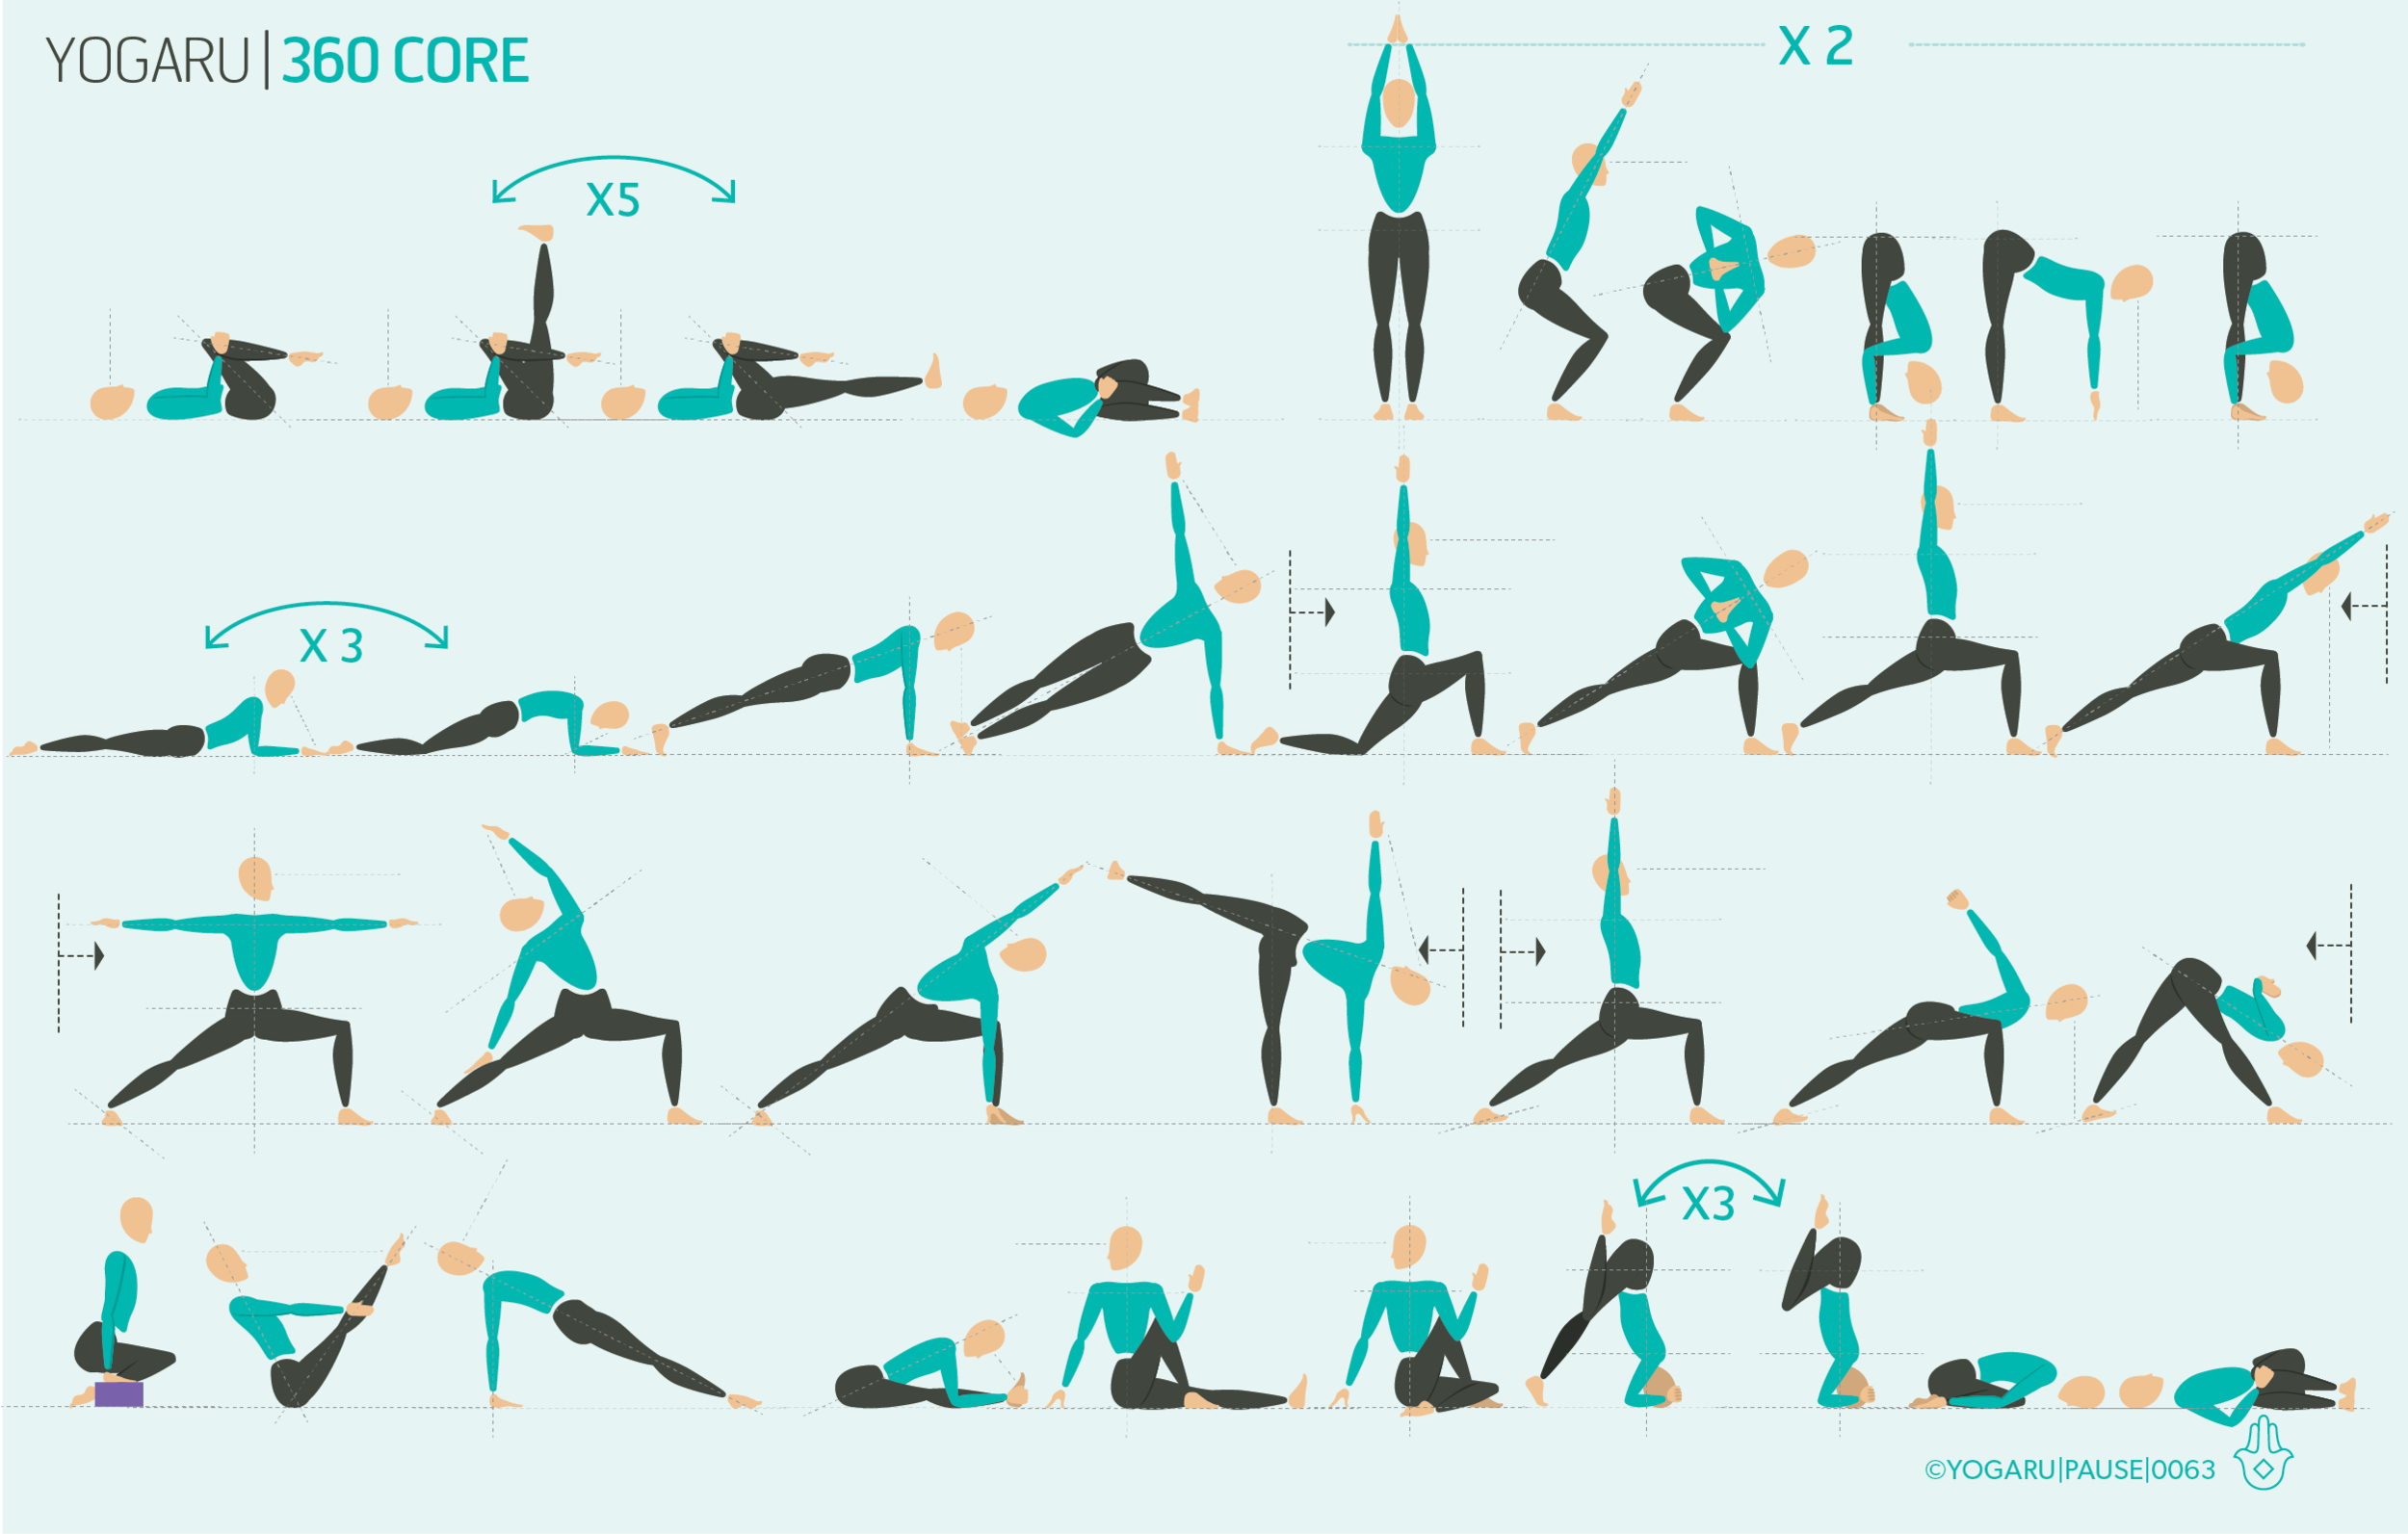
This sequence works the full range of the core. As you move through your practice consider the three steps of connect, engage and stabilise the core. The peak pose is Salamba Sirsasana/Headstand prep which requires strong core engagement and mobility.

Print out the below tips, along with the sequence, and explore the full spectrum of your core:

  • Set your yoga mat up short end to the wall. From all fours place your elbows down directly under your shoulders and interlace your fingers. Place your knuckles about an inch away from the wall.

  • Place the crown of your head on the ground using the interlaced fingers as a support wall. Lift your knees up and walk your toes in towards your elbows until you find the support of the wall against your back.

  • Press down into your forearms, lengthen up to your shoulders and hug your upper arms in. Lift your right leg up with a bent knee and draw it in to your chest. Squeeze into the back of your knee and reach your toes towards your buttocks.

  • Stack your hips over your shoulders and strongly draw your belly in towards your spine. On an exhale, slowly lift your left leg up with a bent knee and reach your toes towards your buttocks.

  • Keep your knees deeply bent and as slow as you can bring your feet back down onto the ground pausing at the point where you feel the work coming from your deep core muscles.

To save the images for personal use click and hold down the image until the ‘save image’ option appears; on Mac hold down ‘control’ and click the image to get the option box; on PC right click on the image to get the option box. Scroll down in the ‘option box’ and click ‘save image’.

Ruth Delahunty Yogaru
Hip stability flow

PAUSE_0062.png

YOUR POSE IS THE PERFECT POSE
What would a yoga class look like if we were to actually listen to what was right for our own unique bodies – rather than what we were told to do, or striving for what the person on the mat beside us was doing. The discipline of yoga, as with all movement, if not practiced with self care and awareness can lead to injuries. Your teacher is there to guide you and facilitate the movement, you are there to ultimately decide what feels right for you. There is many reasons why your body may never reach the perceived ‘perfect pose’ – from shortened muscles and ligament restrictions, to your unique skeletal structure. During our practice we are constantly getting feedback from our bodies – what feels good and what doesn’t. It’s up to us to listen! The deeper I go into my own practice, the more I pull back from being attached to perfection. Instead I look for a balance between mobility and stability by moving slowly and being guided by felt sensations and pulling back to a softer version of the pose when needed.

MOBILITY & STABILITY
With this in mind, following on from 360 Hip Openers, I have started to explore hip stability. As with everything in life, there has to be a balanced approach to both stretching and strengthening to avoid injuries further down the line. Hip openers have many benefits to counteract our sedentary lives, but hip stability is just as important to incorporate into your practice too. Supporting one with the other will help you to stay within your safe boundaries and give you the mobility of stretching with the stability of strengthening. There is a misconception of yoga that it is purely stretching, but it gives you both stretching and strengthening – using our own body weight, and pressing into our foundation to trigger strong muscle activity.

EXPLORING HIP STABILITY IN YOUR PRACTICE
The pelvis is the foundation of the body and encompasses the base of our spine (1st Chakra), our reproductive organs, our digestive system, and enables all movement. The pointy hip bones (iliac crest) at the front of our hips can tell us a lot about our alignment. As you work through this sequence place your fingertips on the hip bones at the front of your pelvis, or have a glance down at your hips, and looking for level hip bones. When you find your hip bones, hug your outer hips to the midline to activate your strong stabilising hip muscles of the glutes. This will help with your alignment in many poses - such as Phalakasana/Plank Pose, Virabhadrasana III/Warrior III and Setu Bandha Sarvangasana/Bridge. When the hips are not level it has implications on the whole body and brings the spine into a lateral bend or a twist to compensate. If you find this is the case for you, come back out of the pose and move into it slower – squeezing your outer hips muscles to the midline – and staying at the point just before the hips move out of alignment. For example in Virabhadrasana III/Warrior III - lift your left leg, pressing out through the heel, with your hands on your hip bones. If you feel the left hip hiking up pull back a little, and work on strengthening your version of the pose at this point. Your leg may not be perfectly parallel to the floor but your hips are learning all about stability and your supporting hip muscles are firing appropriately rather than being bypassed. This way you are being guided by your body rather than what you are being asked to do or what you see other people doing.

ALIGNMENT CUES
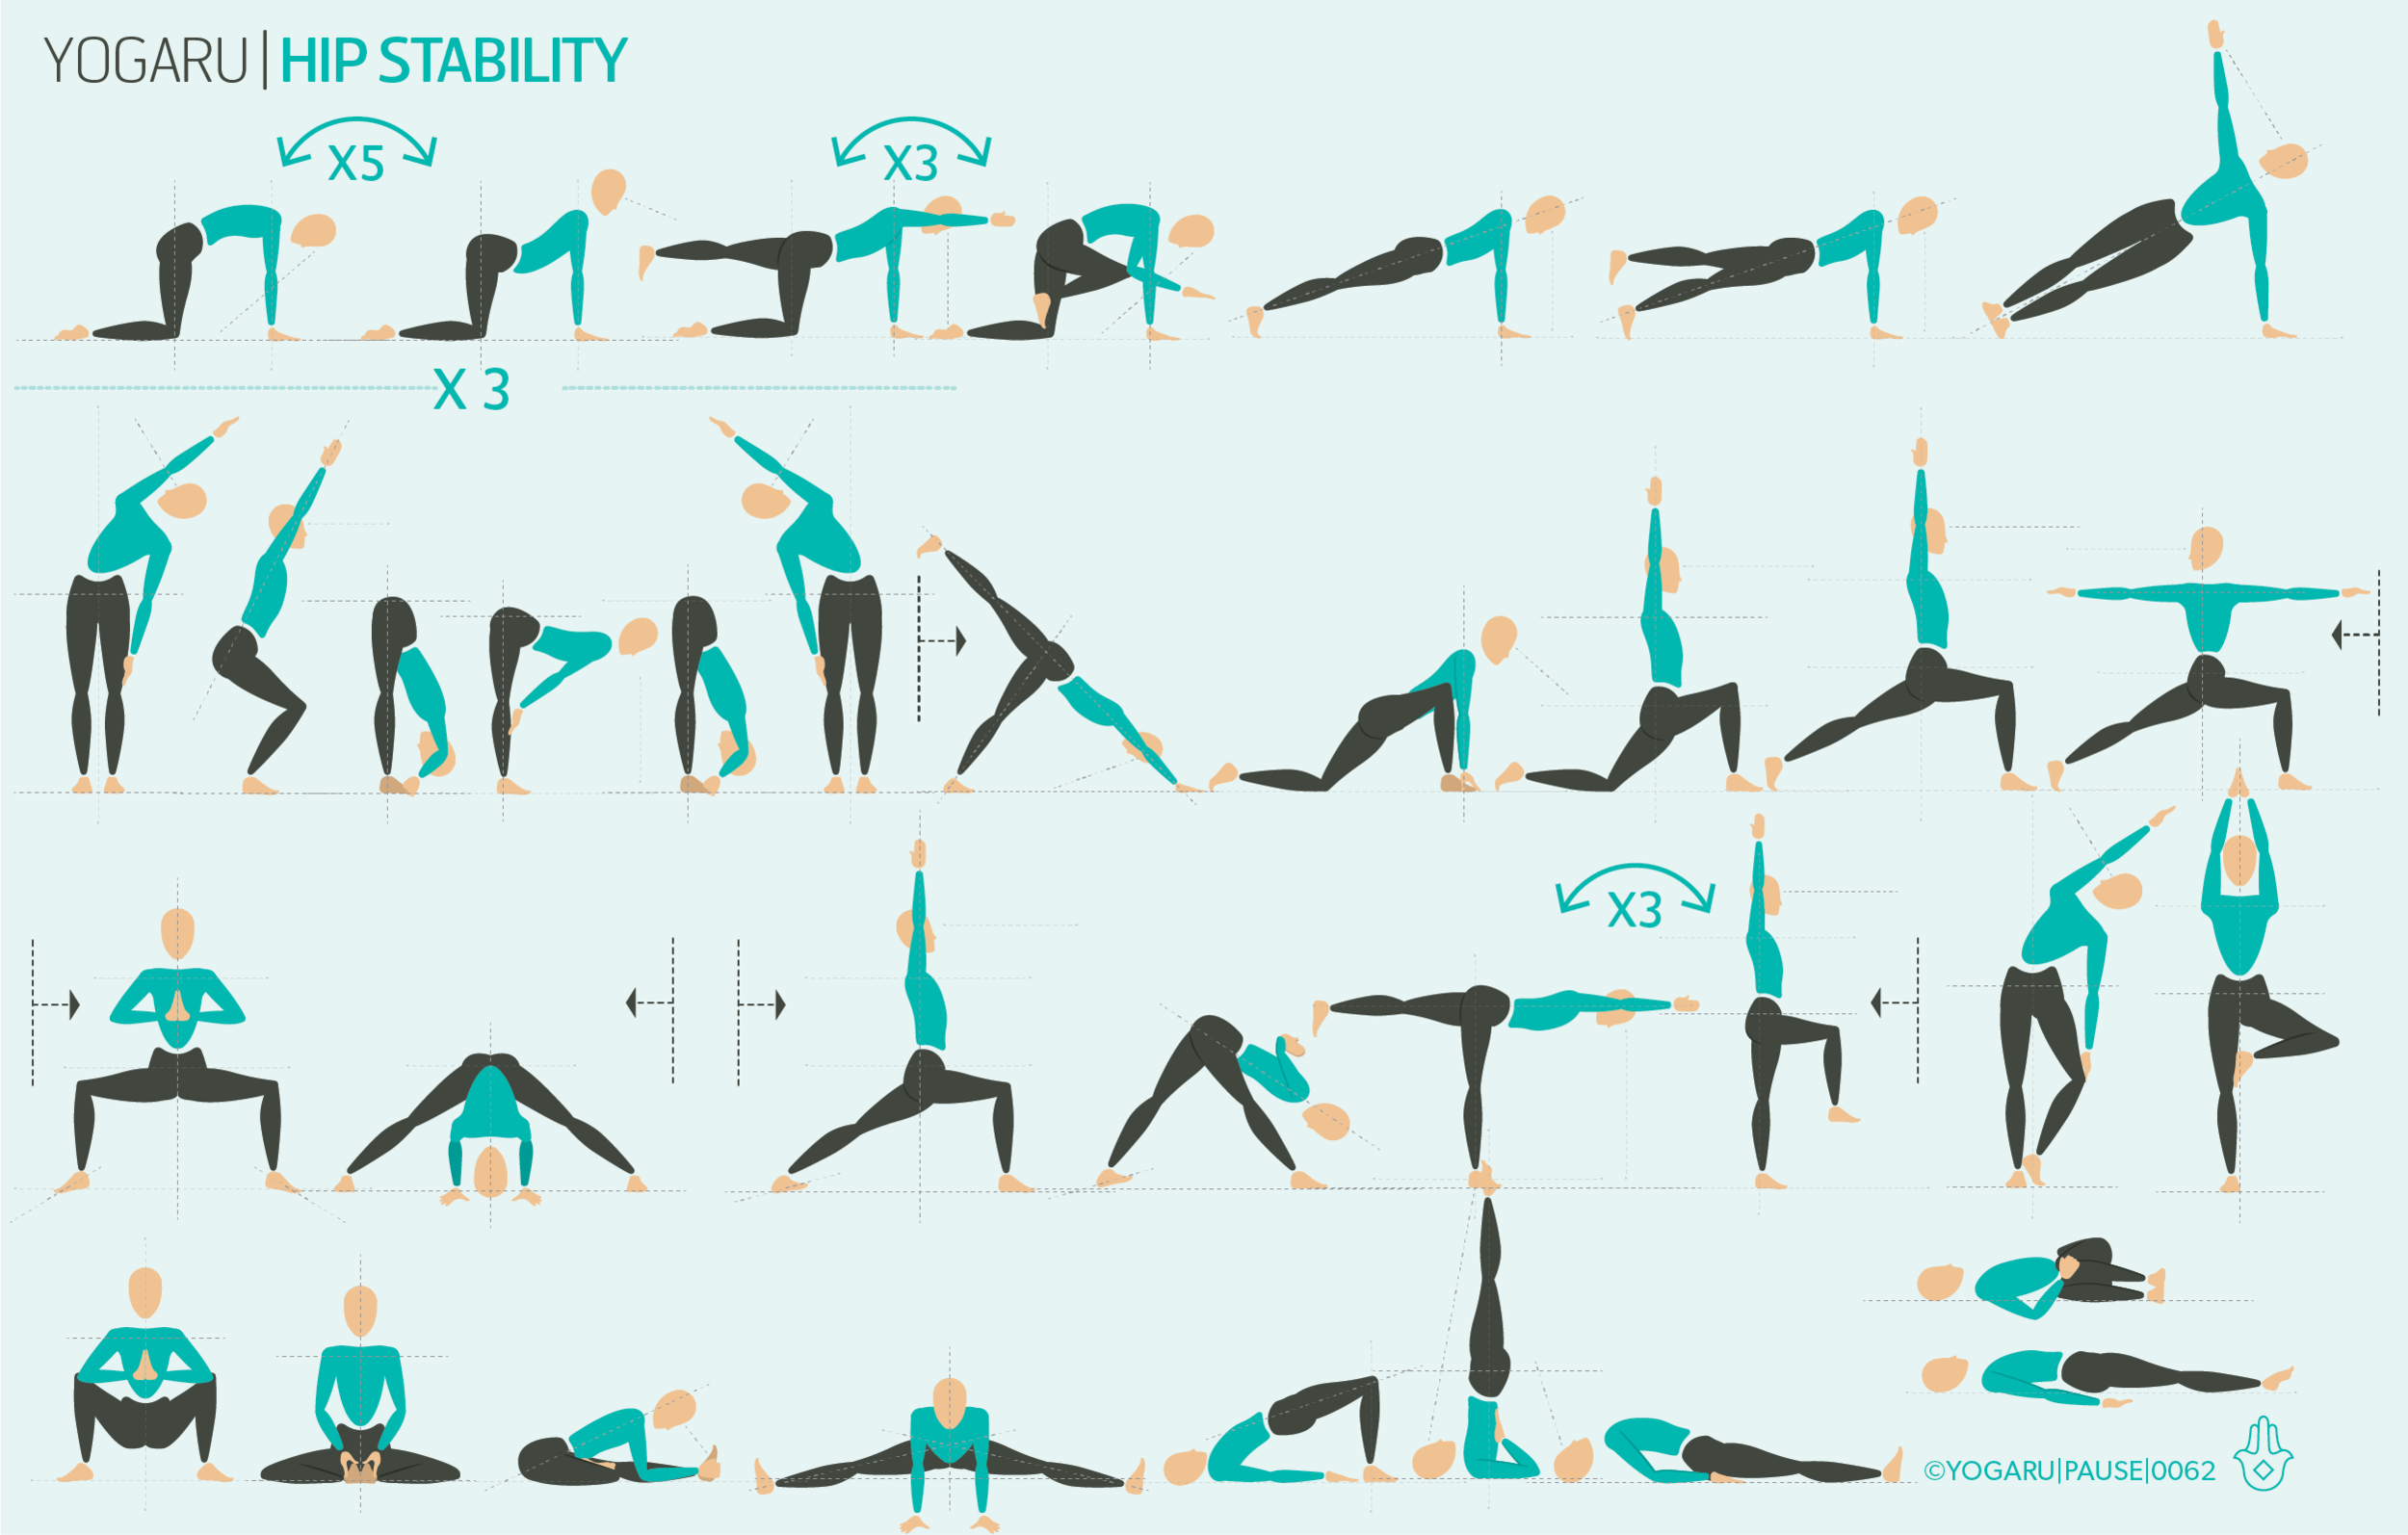
The peak pose of this sequence is Parivrtta Ardha Chamdrasana/Revolved Half Moon. Read through these alignment cues to help you find your optimum alignment for your unique body.

  • From Virabhadrasana III, inhale, lengthen up through your spine. Exhale, twist to your right from the waist, reach your left hand to the big toe side of your right foot, a foot forward, on a brick, or the ground. Keeping your left leg parallel to the ground, toes facing down, press out through the heel, roll the inner thigh of your left leg up.

  • Reach your right arm up high, palm facing right, stack your shoulders. Bottom waist rolls forward, top waist rolls back, lengthen from the heel of your lifted leg to the tip of your crown, gaze forward or to your right fingertips.

Print out the above sequence and practice with the intention of searching for a connection with your body rather than searching for perfection. Embrace what you can and can’t do as part of what makes you uniquely you. As you flow through this sequence remember our intention of stability and listening to feedback. When you find you’ve lost your connection move slower and isolate a single area (the hips points) to help you find that feedback again.

To save the images for personal use click and hold down the image until the ‘save image’ option appears; on Mac hold down ‘control’ and click the image to get the option box; on PC right click on the image to get the option box. Scroll down in the ‘option box’ and click ‘save image’.

Ruth Delahunty Yogaru