Press & reach

PAUSE_0065.png

SENSORIAL SOLES
Inspired by my recent purchase of Vivobarefoot runners I’ve become curious about the role of our feet in our practice, and the impact they have on how our bones and muscles find their true alignment. As yogis we have the unique opportunity to refind the lost connection with the ground – without any barriers to dull the sensations and over support the musculature of the foot. Shoes protect our feet from doing the very job they were cleverly designed to do – feed proprioceptive signals to the brain and allow the body to move accordingly. As I acclimatise to walking in my barefoot shoes I’ve noticed my stride is different, my hips swing more and I am completely in the present moment through connecting with present felt sensations in the act of walking.

PRESS & REACH
The practice of yoga asana is designed to do just that – journey through the sensorial body as a method to find the gateway to quieten the mind, and in its origins, ultimately prepare for seated meditation. You start the journey through your foundation – the soles of your feet – and you complete the action through the part of the body which is reaching. This ‘press and reach’ is the essence of this sequence, and a principle you can apply to any home practice or class you attend. We root down to find a strong foundation, and we grow the pose from this stability. The action of pressing gives an isometric strength to the active muscles, while reaching stretches the active muscles. Yoga is not just about stretching – it’s about balanced amounts of stretching and strengthening for optimum balance.

EXPLORING PRESS & REACH IN YOUR PRACTICE
In yoga we find our grounding by pressing through the points in contact with the ground. Spreading equal weight through all the points will support the pose with unity and spark a chain reaction up through the body. The parts of the body that are stacked over this stable foundation will naturally flow into freer optimal alignment. Each pose has elements of press and reach. Establish your ‘press’ in the points of contact with the ground first, then follow the lines of energy through the whole body and look for the natural ‘reach’ in the upper body of each pose.

ALIGNMENT CUES
‘Press’ is sometimes easier to find than ‘reach’. The alignment cues below will help you to work out which parts of the body are strengthening/pressing and which are stretching/reaching. When you find your pose, trace the ‘press & reach’ through your body – get curious about where you feel the two opposite actions meeting and it moves from ‘press’ to ‘reach’.

PAUSE_0065_A.png

Print out the below tips, along with the sequence, and find your ‘press & reach’:

  • Starting with Marjaryasana/Cat, Bitilasana/Cow spread your fingers and find your hasta bandha. Spread your weight equally between the hands, knees and tops of the feet. From this stable foundation reach the centre of your spine up high in Marjaryasana/Cat and your sternum forward and sit bones up in Bitilasana/Cow

  • In Urdhva Hastasana/Upward Salute find the three points of contact with the ground – ball of the big toe, ball of the little toe and the centre of the heel root down into them equally and feel a lift in the arches and inner ankles. Reach through the tip of the crown and the fingertips. Let your shoulder blades spin out to the sides and soften your shoulders.

  • In Adho Mukha Svanasana/Downward Facing Dog spread your weight equally between your hands and feet. Spread your fingers and press into all five knuckles of your hands, and lightly into the pads of your fingers. Press into your feet and reach your sit bones up as high as you can. Feel the support of the press enabling you to reach up. I find starting your first few rounds with bent knees help you to find the forward tilt of the pelvis and stop your lower back from rounding.

  • Our peak pose is Parsvakonasana/Side Angle. It gives the perfect example of ‘press & reach’. With the right leg forward, establish the foundation in the left foot in particular. Press into the three point of the left foot and reach through the fingertips of the left arm. Trace the journey from strengthening to stretching through the whole left side of the body.

To save the images for personal use click and hold down the image until the ‘save image’ option appears; on Mac hold down ‘control’ and click the image to get the option box; on PC right click on the image to get the option box. Scroll down in the ‘option box’ and click ‘save image’.

Ruth Delahunty Yogaru

Pincha Mayurasana - Peacock

YOGARU_Pincha Mayurasana_PB.png

GIVING THE SHOULDER CENTRE STAGE
In yoga the legs get plenty of attention and hard work in the duration of your time on the mat – from the sensory connection to the ground with the feet; the musculature energy of the legs in standing poses; to the intricate stretching and strengthening actions in the hips. The shoulder joint gets a lot less time in the limelight, and yet, when well warmed up, we ask them to hold the full body weight in arm balancing poses and inversions. We need to bring a bit more conscious attention to the integrity of the shoulders joint to prepare them for these more challenging poses. When we break down a pose like Pincha Mayurasana/Peacock we can see the importance of shoulders strength, flexibility and stability. As with every asana the shoulders don’t work alone – the core, arms and spine need to be strengthened too. One often forgotten area, that is important for the action of getting into kick up position in balancing inversions, are the hamstrings. This was a game changer for my inversion practice. I noticed that when I spent time warming up my hamstrings, I could walk my legs in closer to my forearms, and work towards reaching my pelvis further up over my shoulders and lengthen my kicking leg up more. Pincha Mayurasana/Peacock can be a good starting point for working towards Adho Mukha Vrksasana/Handstand. It teaches the principles of kicking up, with the benefit of a wider foundation on the ground, and less distance from the ground to potentially face plant! When the backs of the shoulders are tight it makes it harder to stack them over the elbows, and as a result the lumbar lower back over flexes to compensate and help find your centre of gravity – cause the ‘banana back’ effect. This sequence will help to avoid this by preparing the whole shoulder and all the assisting muscles that are recruited for Pincha Mayurasana/Peacock.

THE BENEFITS OF PINCHA MAYURASANA/PEACOCK
Pincha Mayurasana/Peacock is a very energising inversions. It strengthens the shoulders, arms, and spine and stretches the shoulders. Whilst it is very invigorating for the brain it is also very calming and helps relieve stress tension and anxiety. As an inversion it boosts the immune system and increases circulation.

EXPLORING PINCHA MAYURASANA/PEACOCK IN YOUR PRACTICE
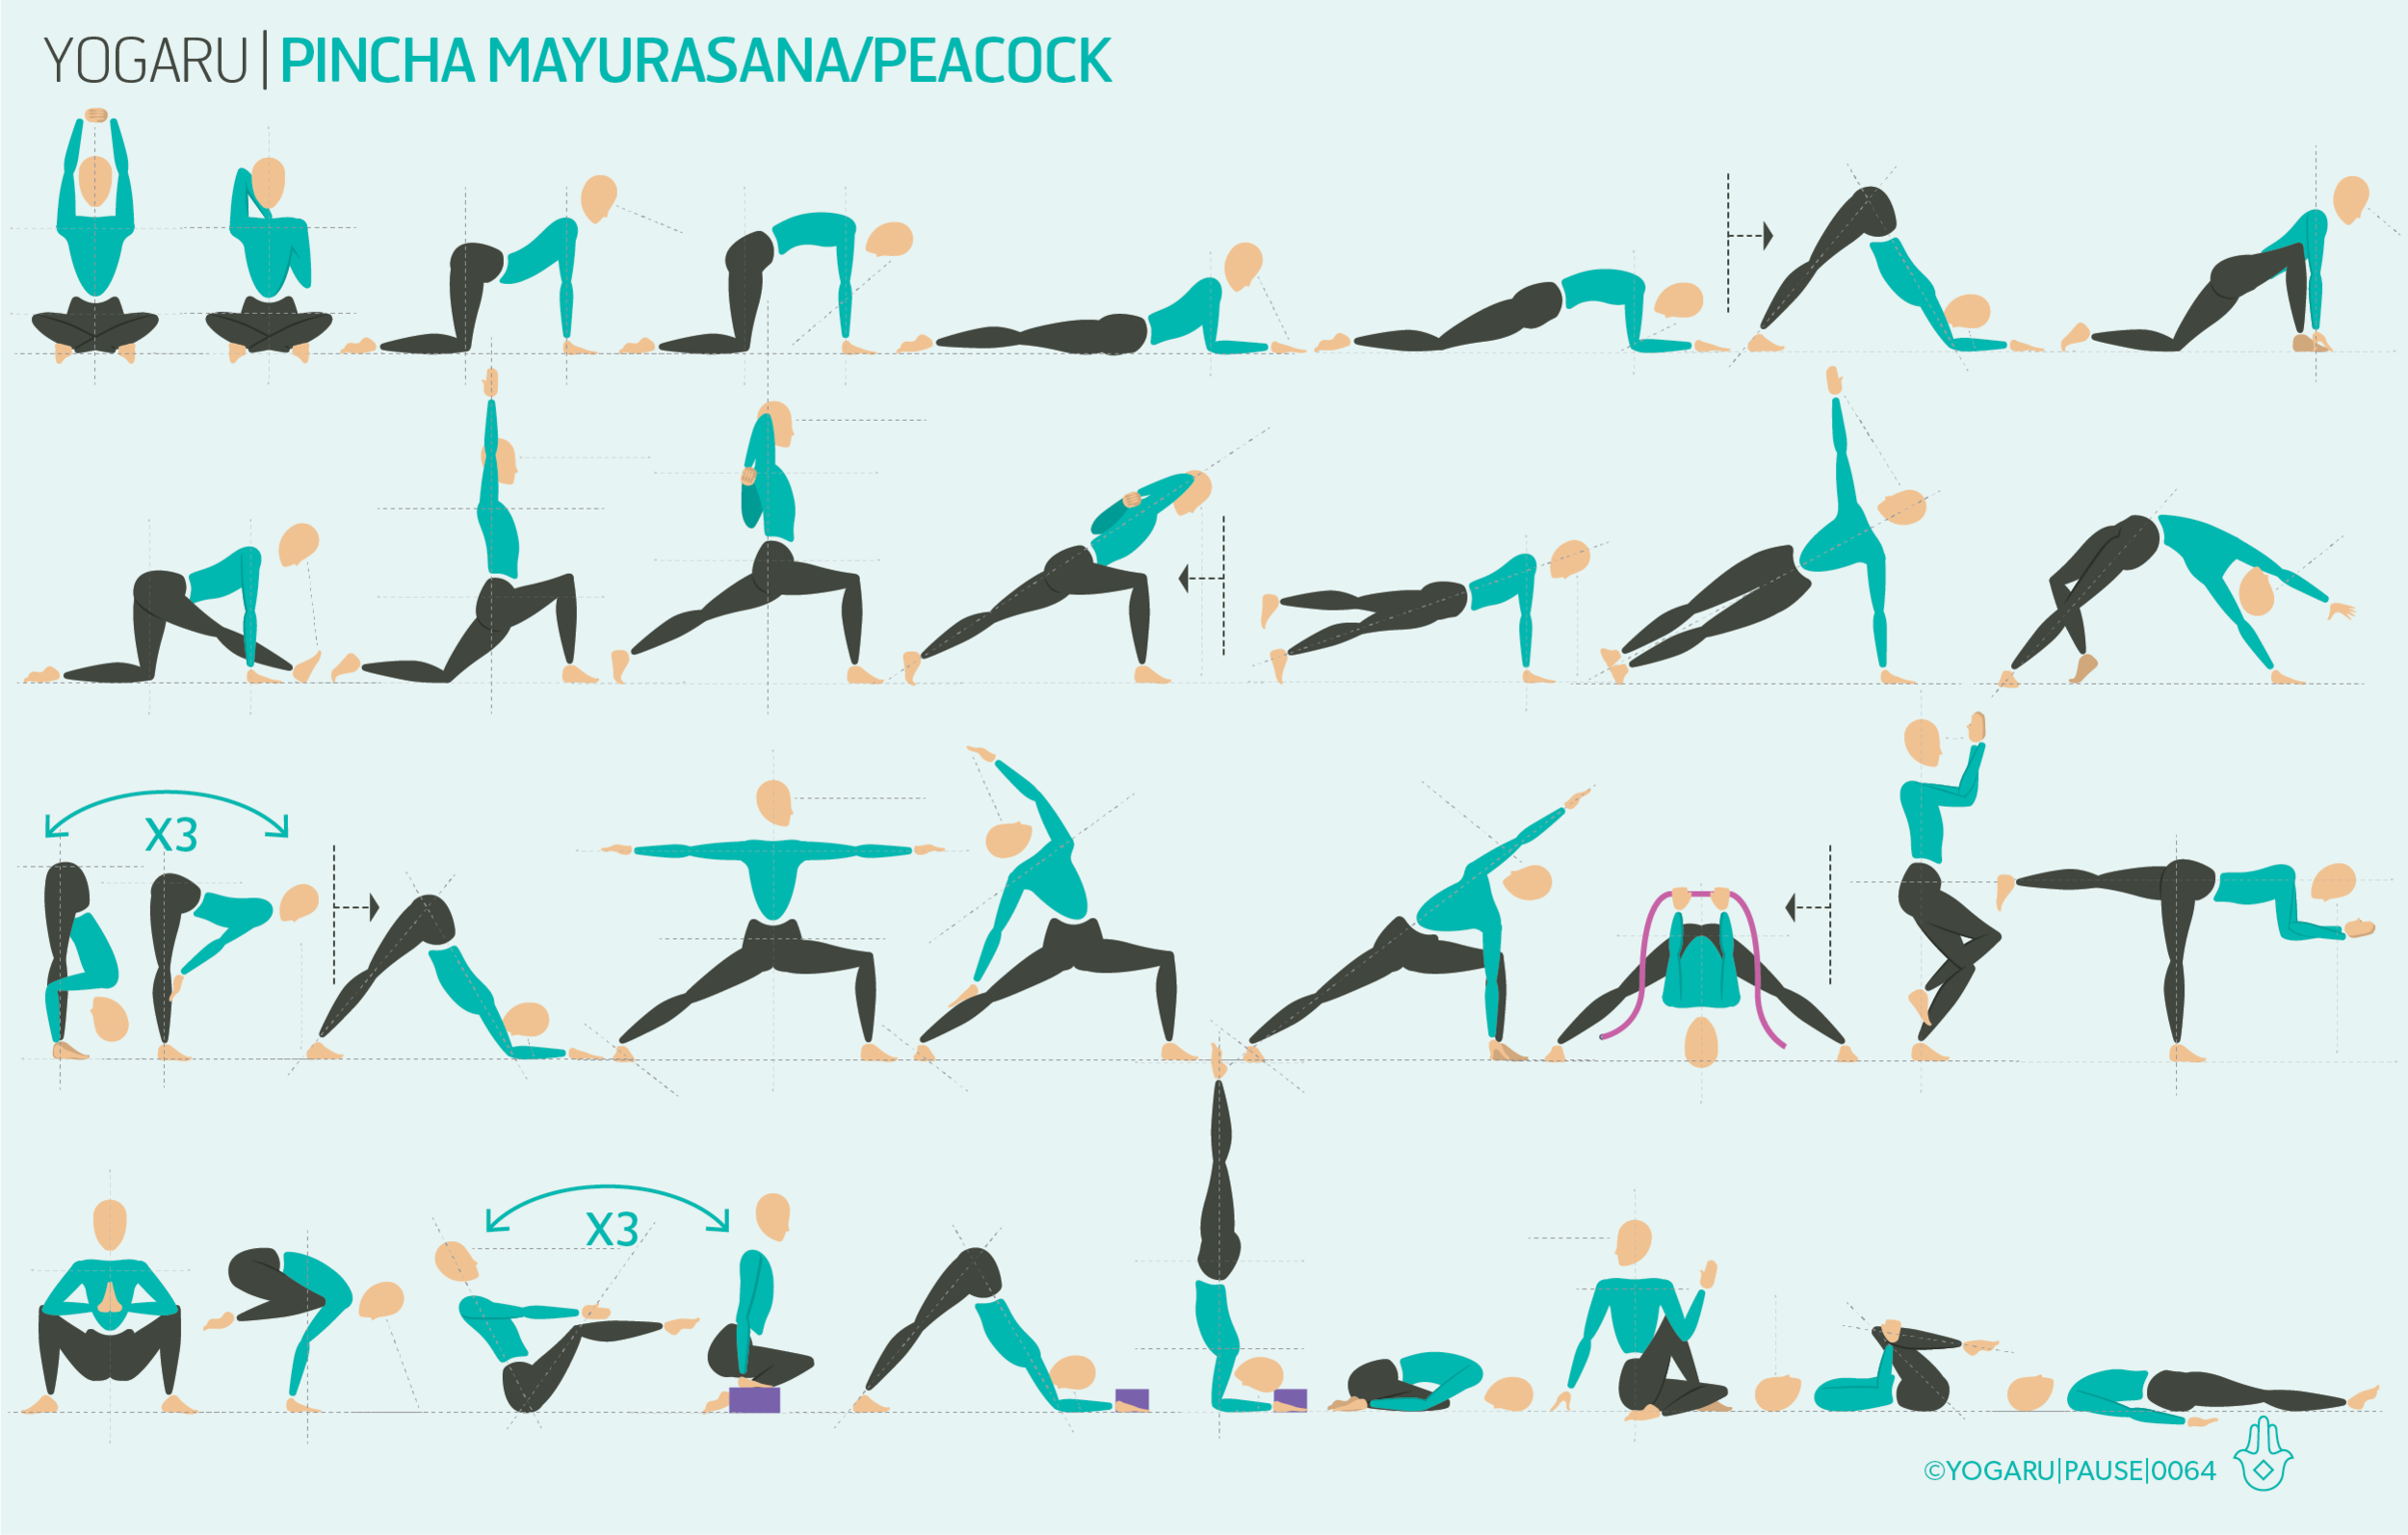
As you run through the sequence pay particular attention to your shoulders. When the arms are reaching up, they are not just reaching up, they are reaching up with intention. The lines of energy are running all the way to your fingertips. Notice if you are bringing any unnecessary tension into your shoulders when your arms are raised. Soften around the shoulder joint while still maintaining the integrity of the strength required. Throughout the sequence Adho Mukha Svanasana/Downward Dog is replaced with Ardha Pincha Mayurasana/Dolphin to help prepare the shoulders for the peak pose. This is the perfect pose to add to any practice in order to strengthen the shoulders for all arm balances and balancing inversions.

PAUSE_0064.png

ALIGNMENT CUES
The sequence will build strength and stability in the shoulders, arms and core. It will also prepare the legs to assist you if you are ready to try the kick up stage. Set your intention on strengthening your shoulders and staying within your safe limits, rather than expecting to achieve full Pincha Mayurasana/Peacock. There are two options – prep pose with hands pressing into the wall or the prop assisted full version of the pose.

Print out the below tips, along with the sequence, and spend some extra time exploring your shoulders:

HOW TO PREP FOR PEACOCK
Use this version to build shoulder strength to either build towards Pincha Mayurasana/Peacock or stay with this version fo the pose.

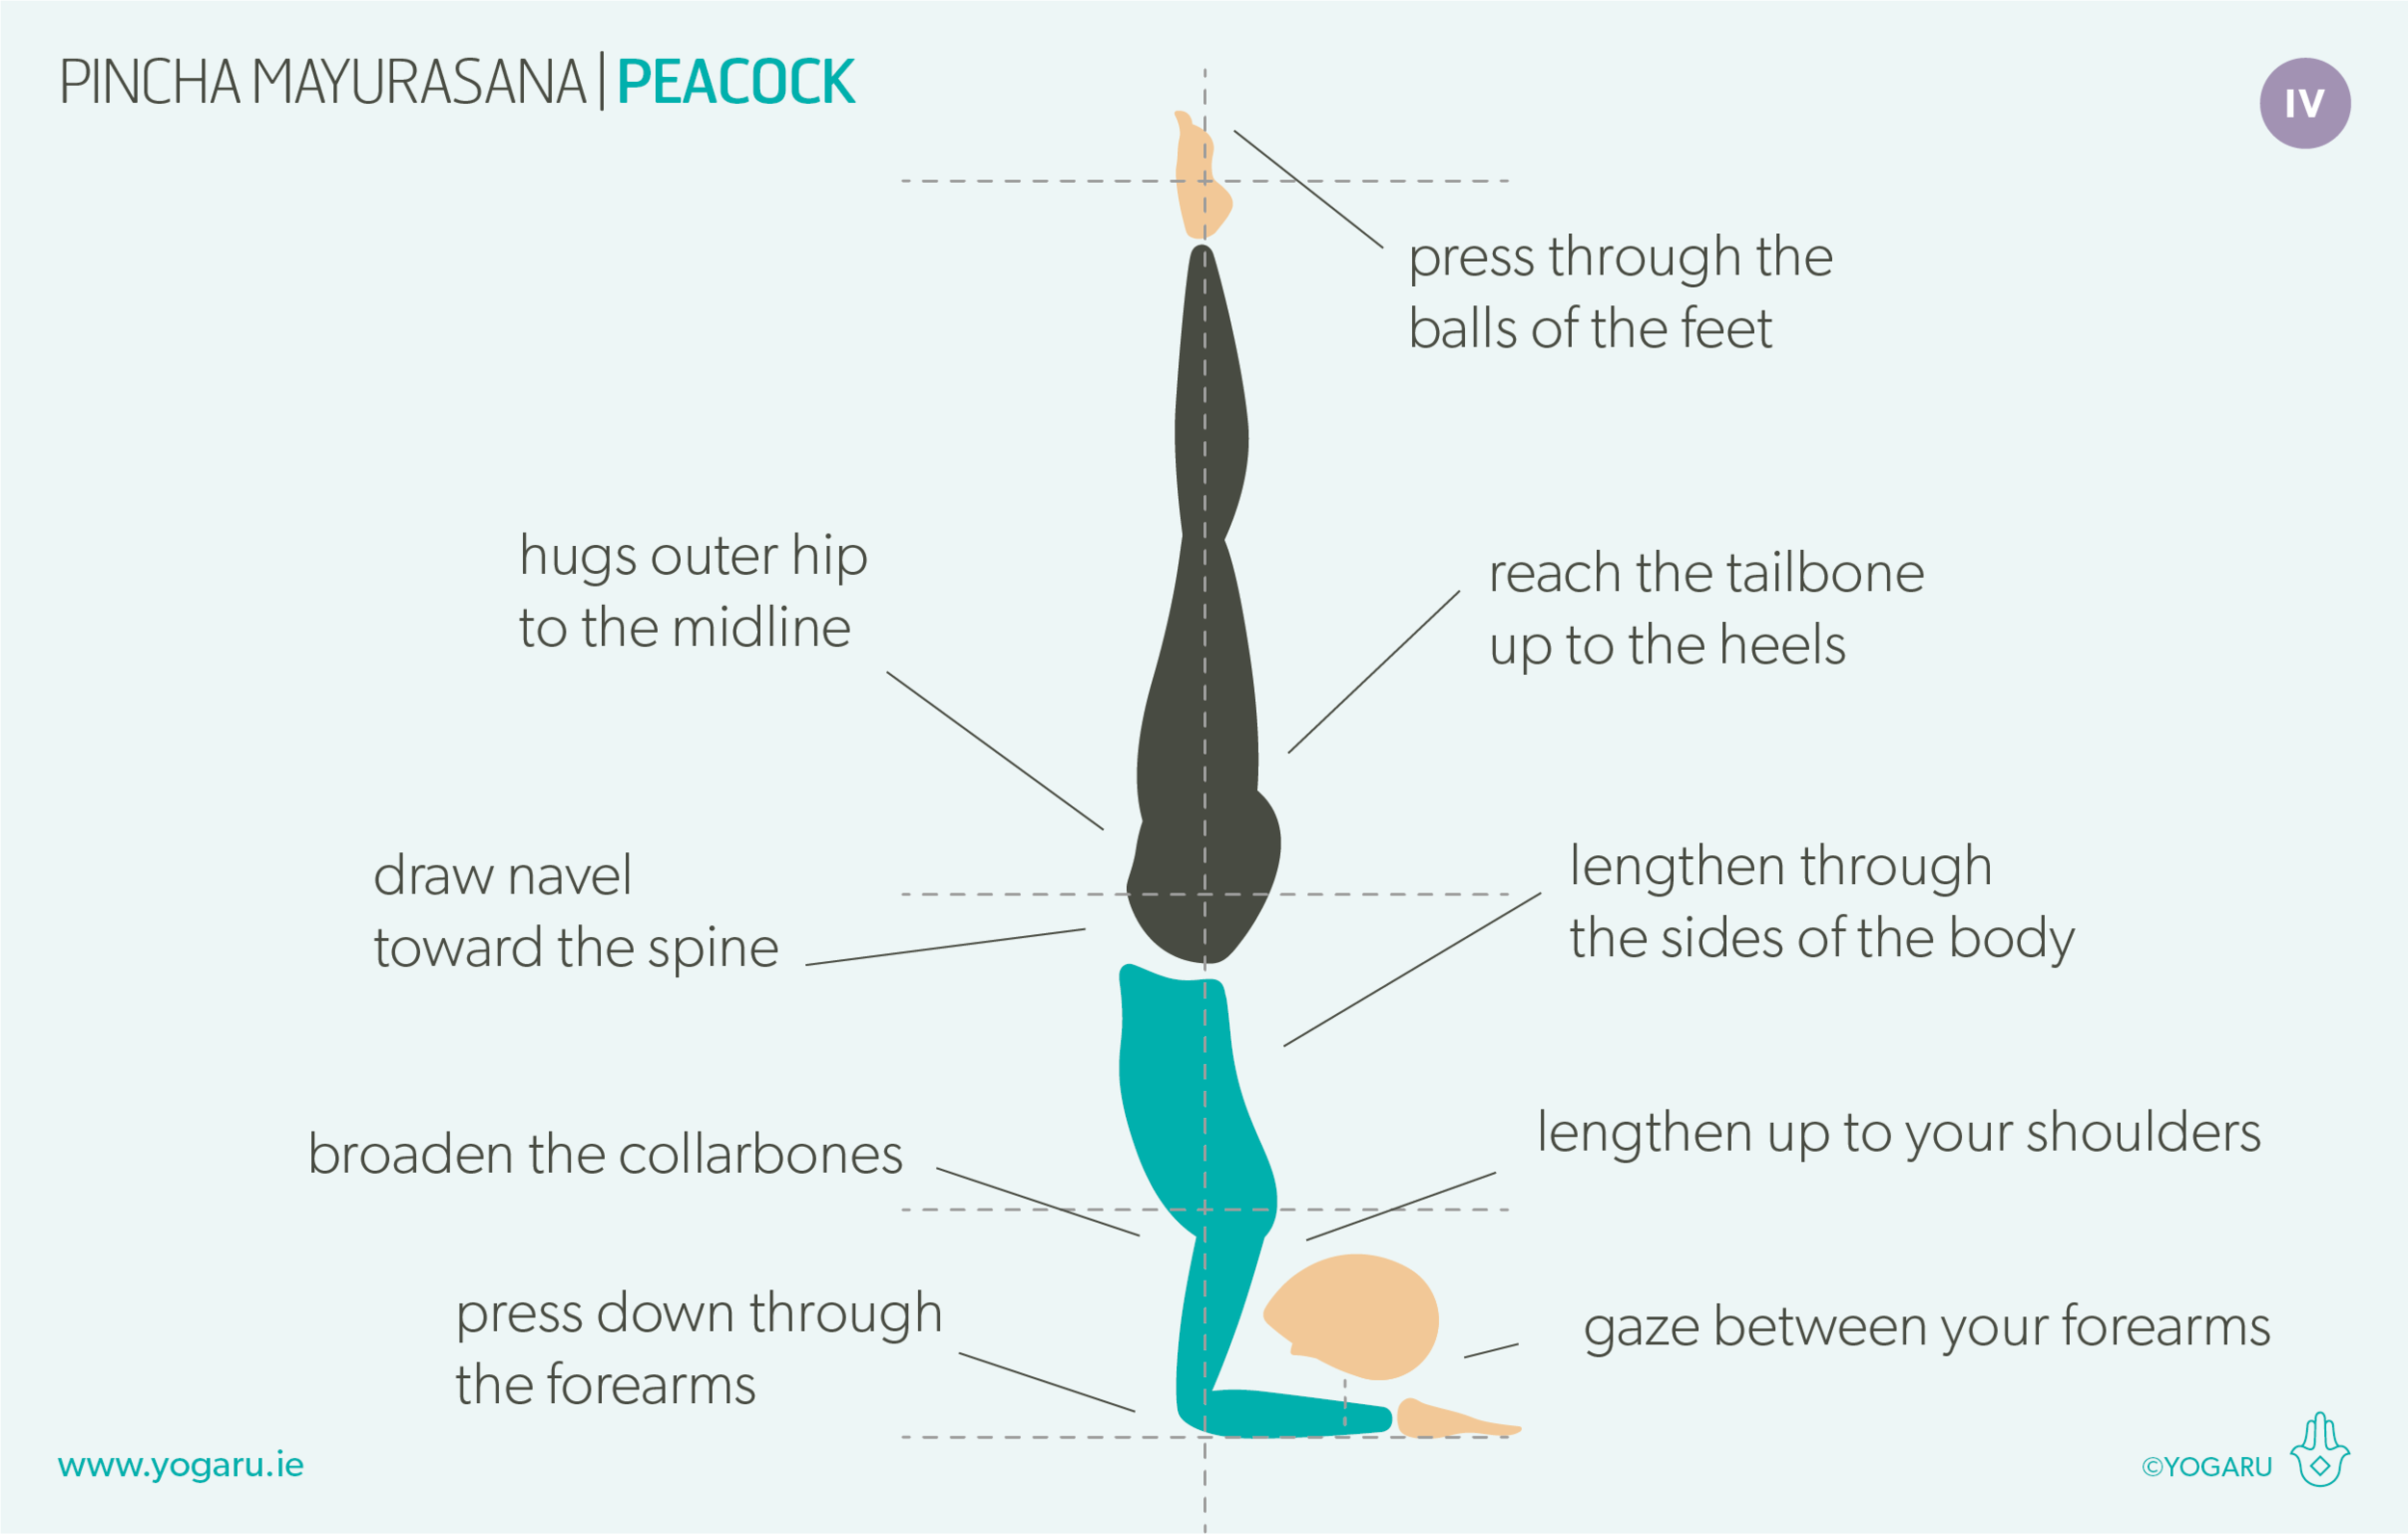
  • Set your mat short side up against a wall. From kneeling, place your forearms parallel on the ground, shoulder width apart. Place your hands at the wall fingertips reaching away from you.

  • Lift your knees and walk your feet forward. Press down through your forearms, lengthen up to your shoulders, broaden your collarbones. Gaze between your forearms.

HOW TO USE PROPS FOR PEACOCK
Once you are happy your shoulders can hold your inversion move on to this version of Pincha Mayurasana/Peacock using a brick to help you stabilise your foundation.

  • Move your forearms about two inches away from the wall. Place the long side of a brick between your hands – fingers on the short side and thumbs on the long side of the brick.

  • Press down through your forearms, lengthen up to your shoulders, broaden your collarbones. Gaze to the brick between your forearms.

  • Bend your left leg, lift your right leg up and press out through the heel. Spring your right leg up overhead, follow with the left leg, reach your legs up high, draw your navel towards your spine.

  • Hug your outer hips and inner thighs to midline, press through the balls of your feet, reach your tailbone up to your heels.

  • To come down, slowly bend your knees and lower your feet to the ground.

Enjoy turning your practice upside down, focusing on the shoulders and letting the legs look after themselves for a change.

To save the images for personal use click and hold down the image until the ‘save image’ option appears; on Mac hold down ‘control’ and click the image to get the option box; on PC right click on the image to get the option box. Scroll down in the ‘option box’ and click ‘save image’.

Ruth Delahunty Yogaru

Anatomy 101 - 360 core

PAUSE_0063.png

THE ESSENTIAL CENTRE
The concept of ‘the core’ is a fascinating topic. If you peel away the idea of ‘core’ as a fashion item to be chased after, and look at it from a functional point of view you see it for what it actually is – an amazing anatomical feat of nature that plays a crucial role in physical and mental health. Just like an apple core, our core is the centre of our being – the powerhouse that gives stability to our spine, support to the organs, and mobility to the pelvis as a source of all movement.

HOW THE CORE WORK?
The core is intrinsically linked to the health of our spine. When the core is weak the back needs to work harder to hold us up and facilitate movement. When the core is tight or overworked it pulls the pelvis into a posterior backwards tilt and puts additional strain on the lumbar spine. To understand the core it is important to have a very simple understanding of the main muscle groups involved, and remembering the core does not just comprise of the ripped six pack summer holiday accessory, it wraps around to support you 360 degrees.

To break it down very simply – the transversus abdominis are the containment sheath that wrap around the core like a corset which support the organs and assist in posture; the internal and external obliques run diagonally up and down the side body and are mainly responsible for lateral side bends and twists; the rectus abdominis are the outermost layer of muscle and run from the pubis to the bottom of the sternum, they flex the spine and stabilise the pelvis; the quadratus lumborum do the opposite and extend the spine into backbends. The iliopsoas, which is considered ‘the core of the core’, is one of the biggest muscles of the body, and is responsible for hip flexion and movement. It is the only muscle that connect the upper and lower body, and is vital for all movement. The pelvic floor and the diaphragm are also considered crucial parts of the upper and lower core – making the core not only 360, but a full three dimensional top, bottom and sides shape.

EXPLORING THE CORE IN YOUR PRACTICE
What we are looking for in our practice is an evenly distributed strong and supple core that facilitates safe supported movement. The first step is to connect to the core, then work out what you need to do to engage the muscles, and in turn stabilise the spine and inner organs.

ALIGNMENT CUES
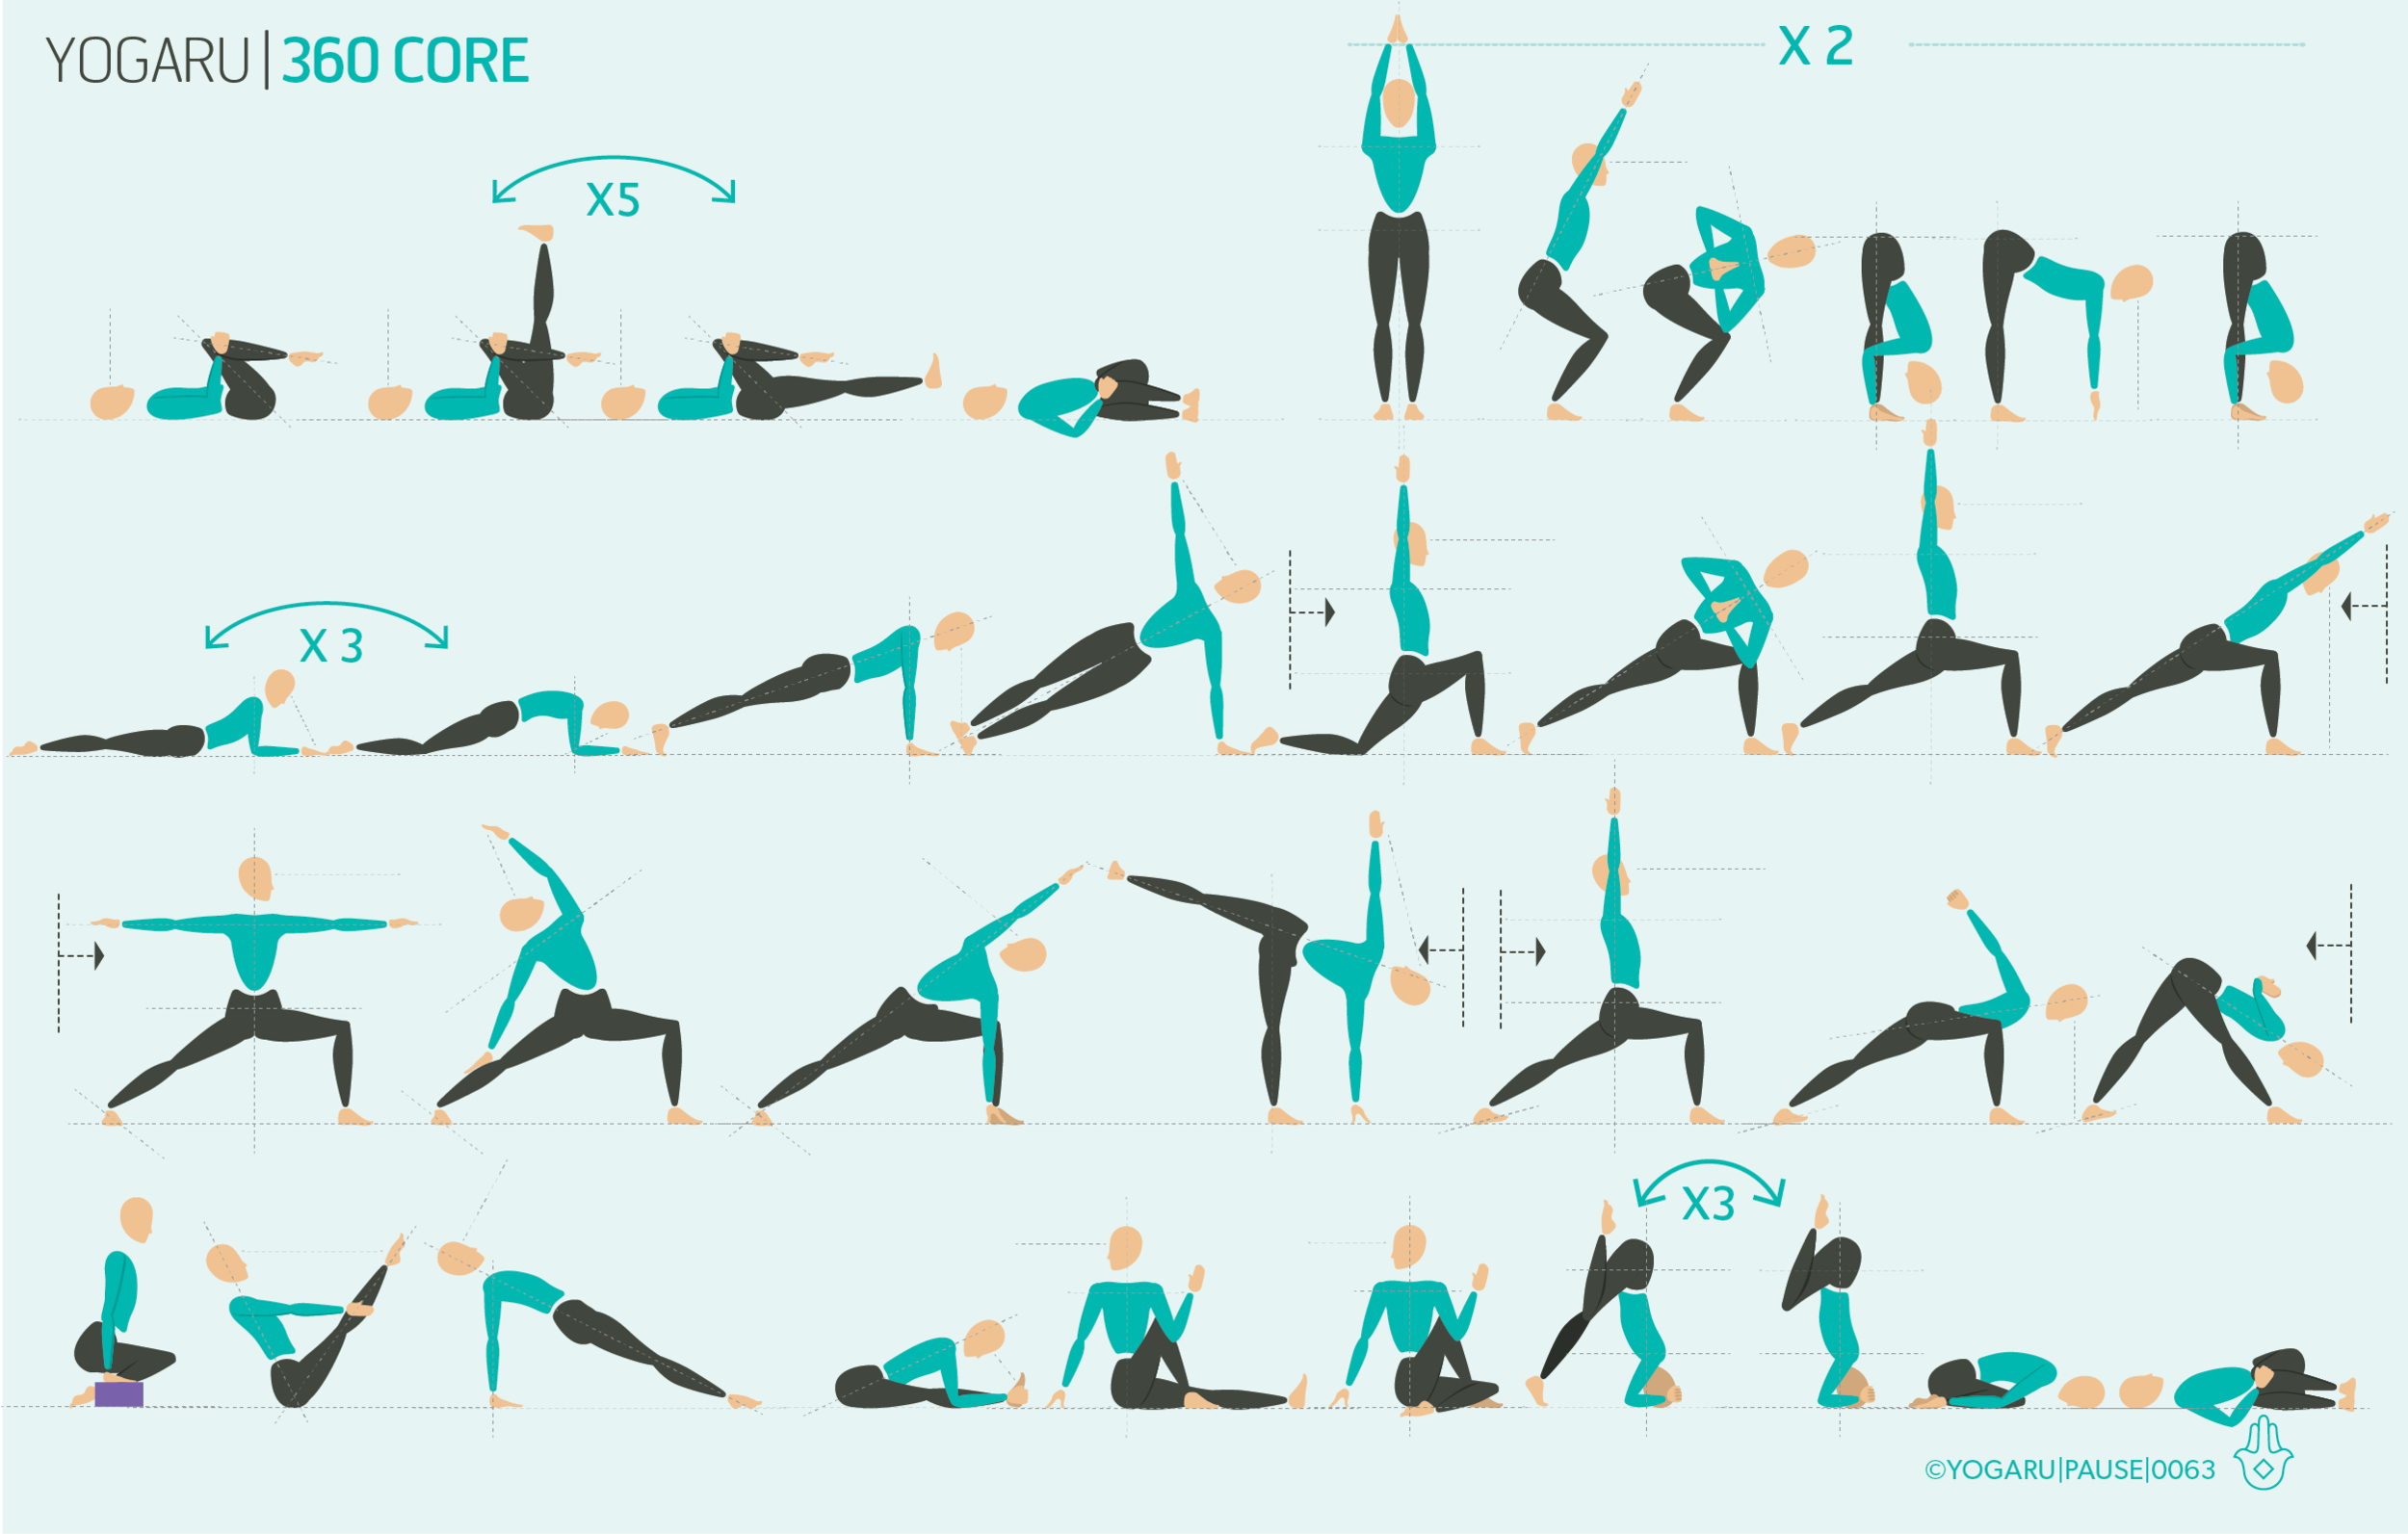
This sequence works the full range of the core. As you move through your practice consider the three steps of connect, engage and stabilise the core. The peak pose is Salamba Sirsasana/Headstand prep which requires strong core engagement and mobility.

Print out the below tips, along with the sequence, and explore the full spectrum of your core:

  • Set your yoga mat up short end to the wall. From all fours place your elbows down directly under your shoulders and interlace your fingers. Place your knuckles about an inch away from the wall.

  • Place the crown of your head on the ground using the interlaced fingers as a support wall. Lift your knees up and walk your toes in towards your elbows until you find the support of the wall against your back.

  • Press down into your forearms, lengthen up to your shoulders and hug your upper arms in. Lift your right leg up with a bent knee and draw it in to your chest. Squeeze into the back of your knee and reach your toes towards your buttocks.

  • Stack your hips over your shoulders and strongly draw your belly in towards your spine. On an exhale, slowly lift your left leg up with a bent knee and reach your toes towards your buttocks.

  • Keep your knees deeply bent and as slow as you can bring your feet back down onto the ground pausing at the point where you feel the work coming from your deep core muscles.

To save the images for personal use click and hold down the image until the ‘save image’ option appears; on Mac hold down ‘control’ and click the image to get the option box; on PC right click on the image to get the option box. Scroll down in the ‘option box’ and click ‘save image’.

Ruth Delahunty Yogaru