
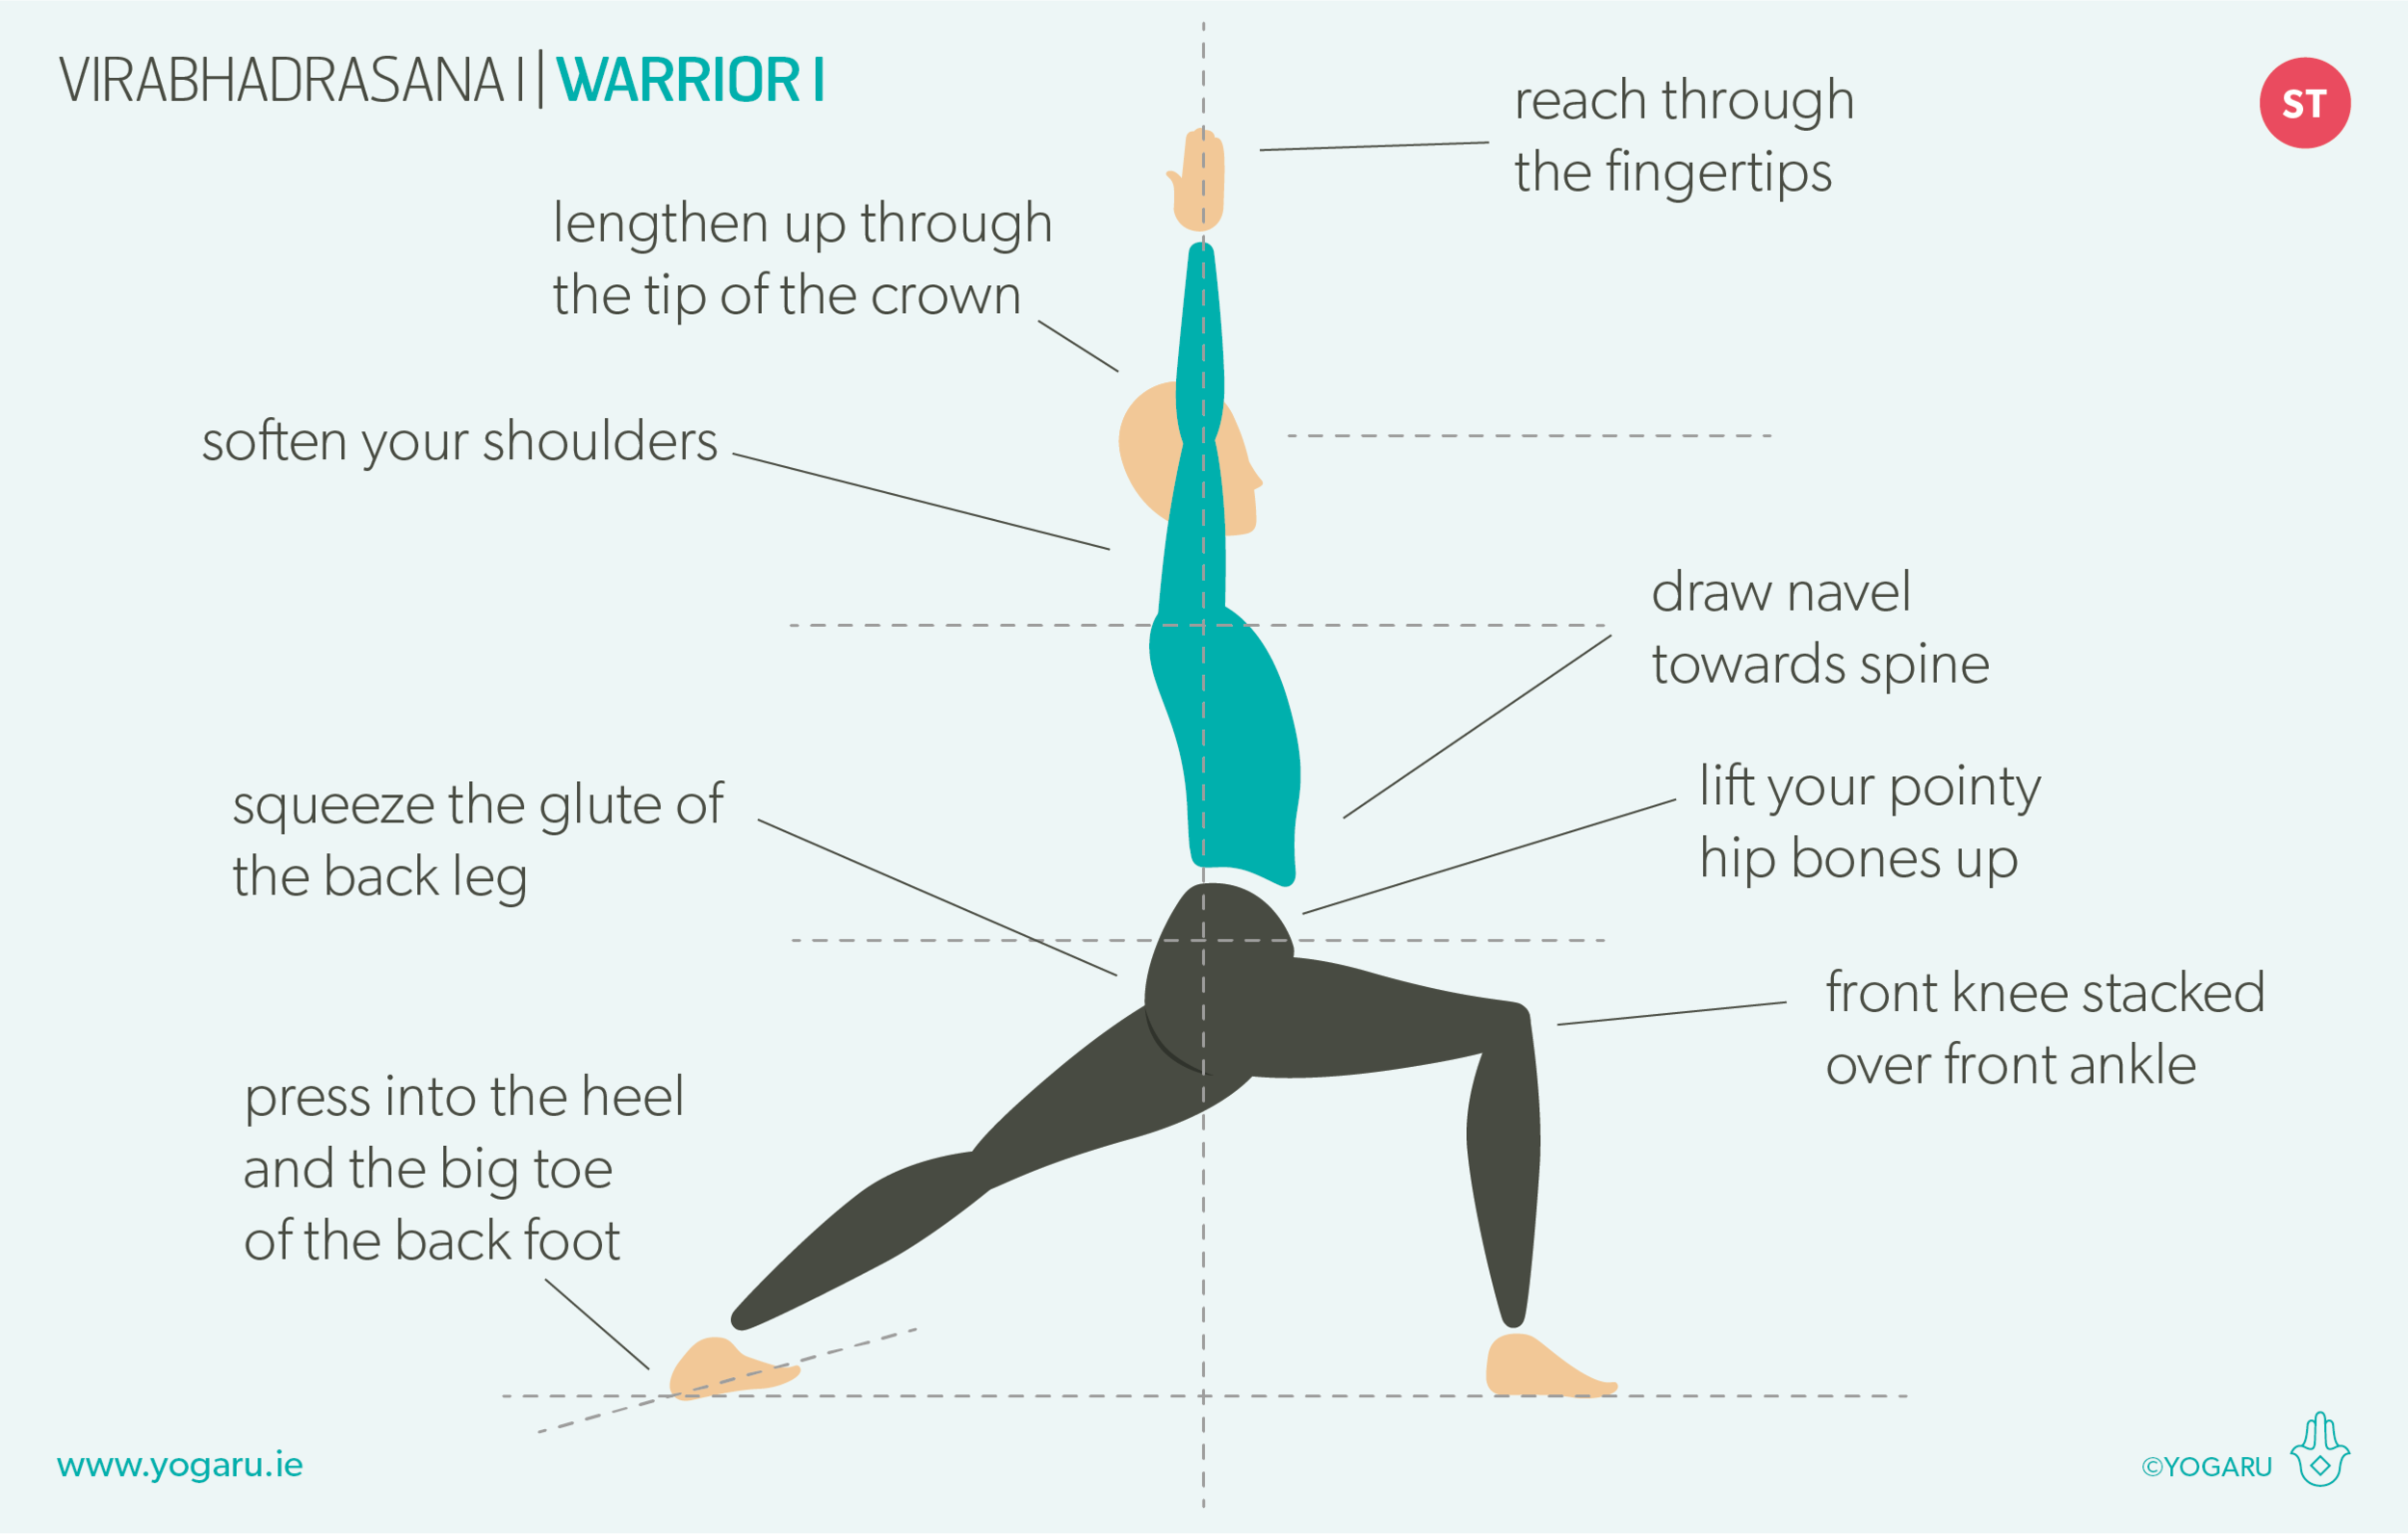
Virabhadrasana I - Warrior I

YOGARU_Virabhadrasana I_PB.png

FINDING EFFORT & EASE IN WARRIOR I
Virabhadrasana I/Warrior I is one of the most widely known foundational poses of yoga. It features in the Sun Salutations sequences – which are often used at the start of class. But Virabhadrasana I/Warrior I is quite a statement pose in its own right, and to find effort and ease in your expression of the pose it helps to explore some targeted stretching and strengthening, before you arrive there.

THE BENEFITS OF VIRABHADRASANA I/WARRIOR I
Virabhadrasana I/Warrior I stretches the hip flexors, calf muscles and inner groin; and strengthens the quads, glutes, shoulders and the muscles of the spine and ankles. It is quite a complex pose for the back leg, and you are not alone if you find it very challenging to get that back heel comfortably grounded, with the toes pointing forward. The hip joint of the back leg is externally rotated, to allow the heel to drop down, while the muscle action of the back leg is internal rotation! This can sometimes feel like the leg is fighting to find its position in the pose, and if you are overzealous about reaching that left hip forward it can manifest in discomfort in the knee or the sacroiliac joints. 

EXPLORING VIRABHADRASANA I/WARRIOR I IN YOUR PRACTICE
The above sequence stretches and strengthens all the appropriate muscle groups in preparation for the nuances in Virabhadrasana I/Warrior I. It also incorporates two balancing standing poses to strengthen the ankle and bring some stability to the joint which takes a lot of pressure in the pose.

In the second pose of the sequence lengthen through your whole leg, press you heel away from you and draw your toes down towards your face, until you feel a strong stretch in the calf muscle. Take some ankle circles here too before you move on to the next hip circling pose. Throughout the sequence there is specific targeted poses for the calves and hip flexors in particular. Bring your attention to these two areas – press the heel towards the ground in the standing calf stretches, and gently let your hips become heavy towards the ground in the standing hip flexor stretches.

In the Ashta Chandrasana/High Lunge to Virabhadrasana I/Warrior I flow, which you will run through three times, place your hands on your pointy hip bones and notice what needs to  change when you drop that back heel to the ground.

When you are in Virabhadrasana II/Warrior II pay particular attention to the back leg and the action of the glute muscle to open the hip out to the side. Press into the big toe mound and try to find that inner arch of your back foot.
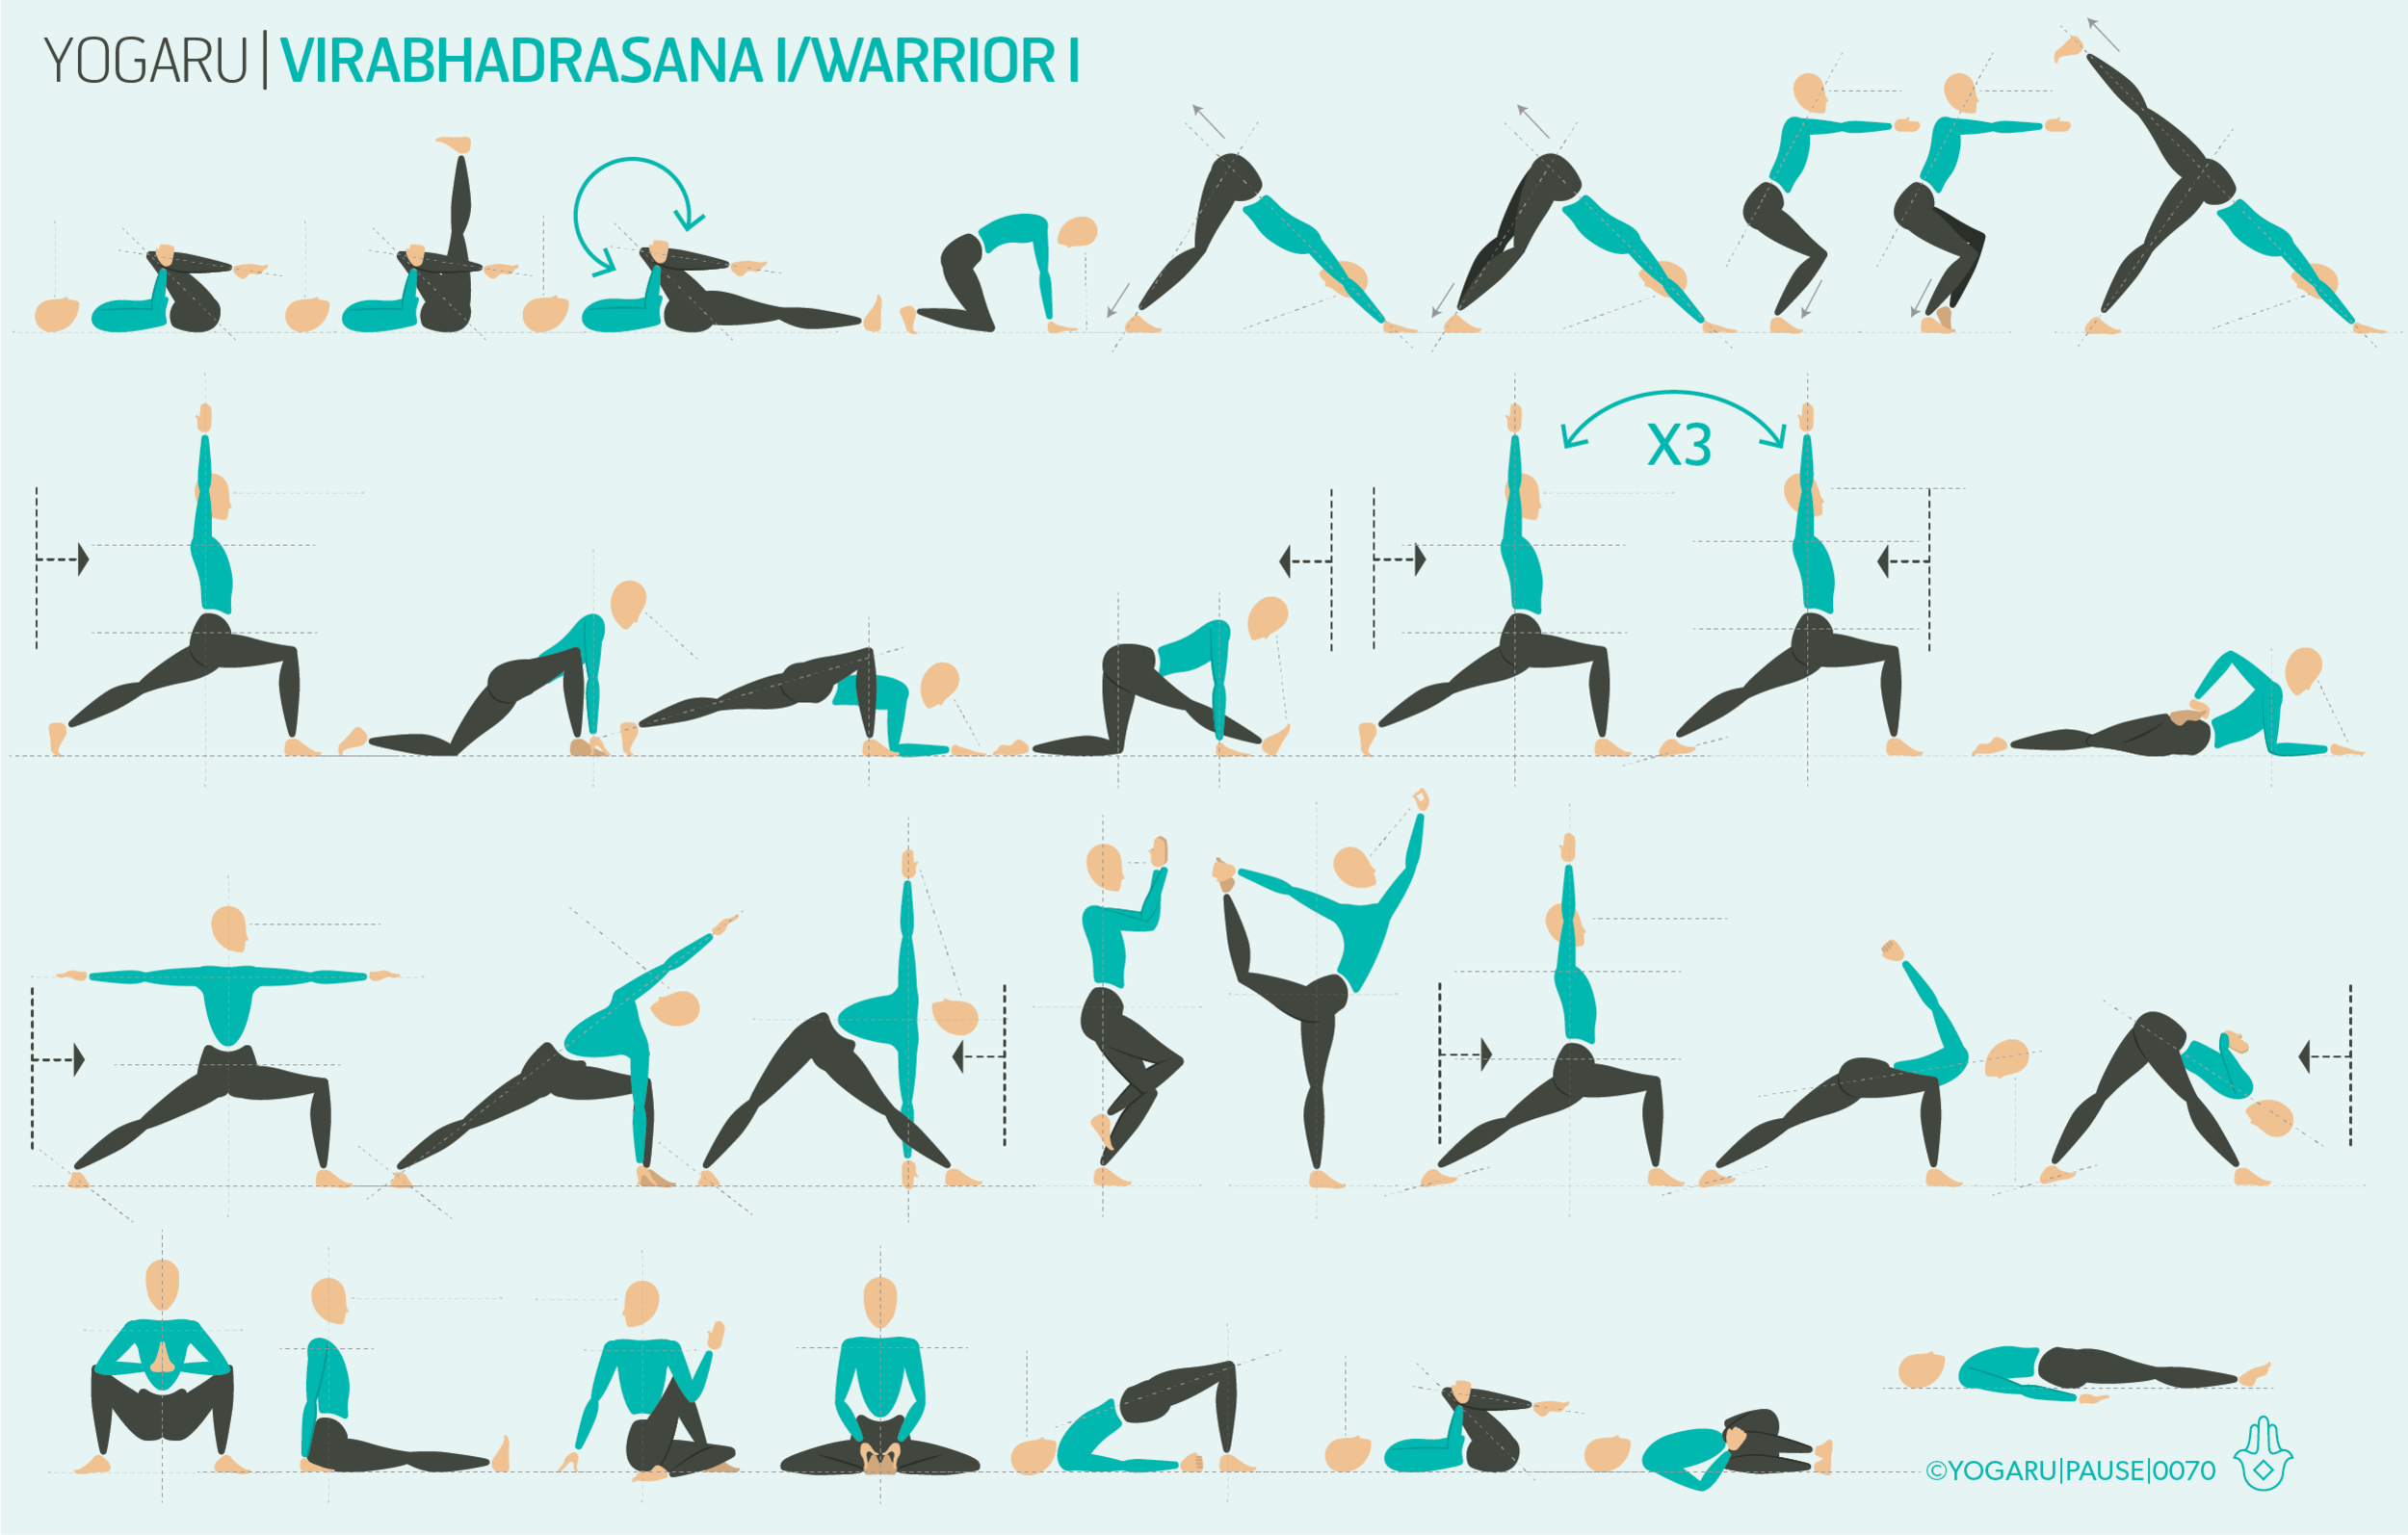
PAUSE_0070.png

ALIGNMENT CUES
When you find yourself in Virabhadrasana I/Warrior I in this sequence consider the 'squaring of the hips' as directional action rather than a definitive end goal. Allow the hip of the back leg to be further back than the hip of the front leg if it feels kinder to the knee and sacroiliac. Spend some extra time in Warrior I and notice what your optimal alignment is, with effort and ease, for your unique body.

Print out the below tips, along with the sequence, and give Warrior I some extra time and exploration:

  • From Adho Mukha Svanasana/Downward Facing Dog, ground your left foot at a 45 degree angle.

  • Inhale, step your right foot to just inside of your right hand, check that your feet are tracking behind their hip joints to allow space for the hips to rotate forward, exhale here.

  • Inhale, place your hands on your right knee to help you come up, or draw your navel towards your spine and reach your arms forward and up.

  • Reach your arms up high, arms shoulder width apart or palms together.

  • Lift your lower ribs up from the rim of your pelvic bowl.

  • Keep your front knee bent and stack your front knee over your front ankle.

  • Press into your big toe mound of your back leg to find your inner arch.

  • Press down into your left heel to ease the left hip forward.

  • Press into your right foot to draw the right hip back.

  • Scissors your legs together and roll your right thigh down.

  • Lift your two pointy hip bones up from your right thigh and gaze forward or to your fingertips.

To save the images for personal use click and hold down the image until the ‘save image’ option appears; on Mac hold down ‘control’ and click the image to get the option box; on PC right click on the image to get the option box. Scroll down in the ‘option box’ and click ‘save image’.

Ruth Delahunty Yogaru
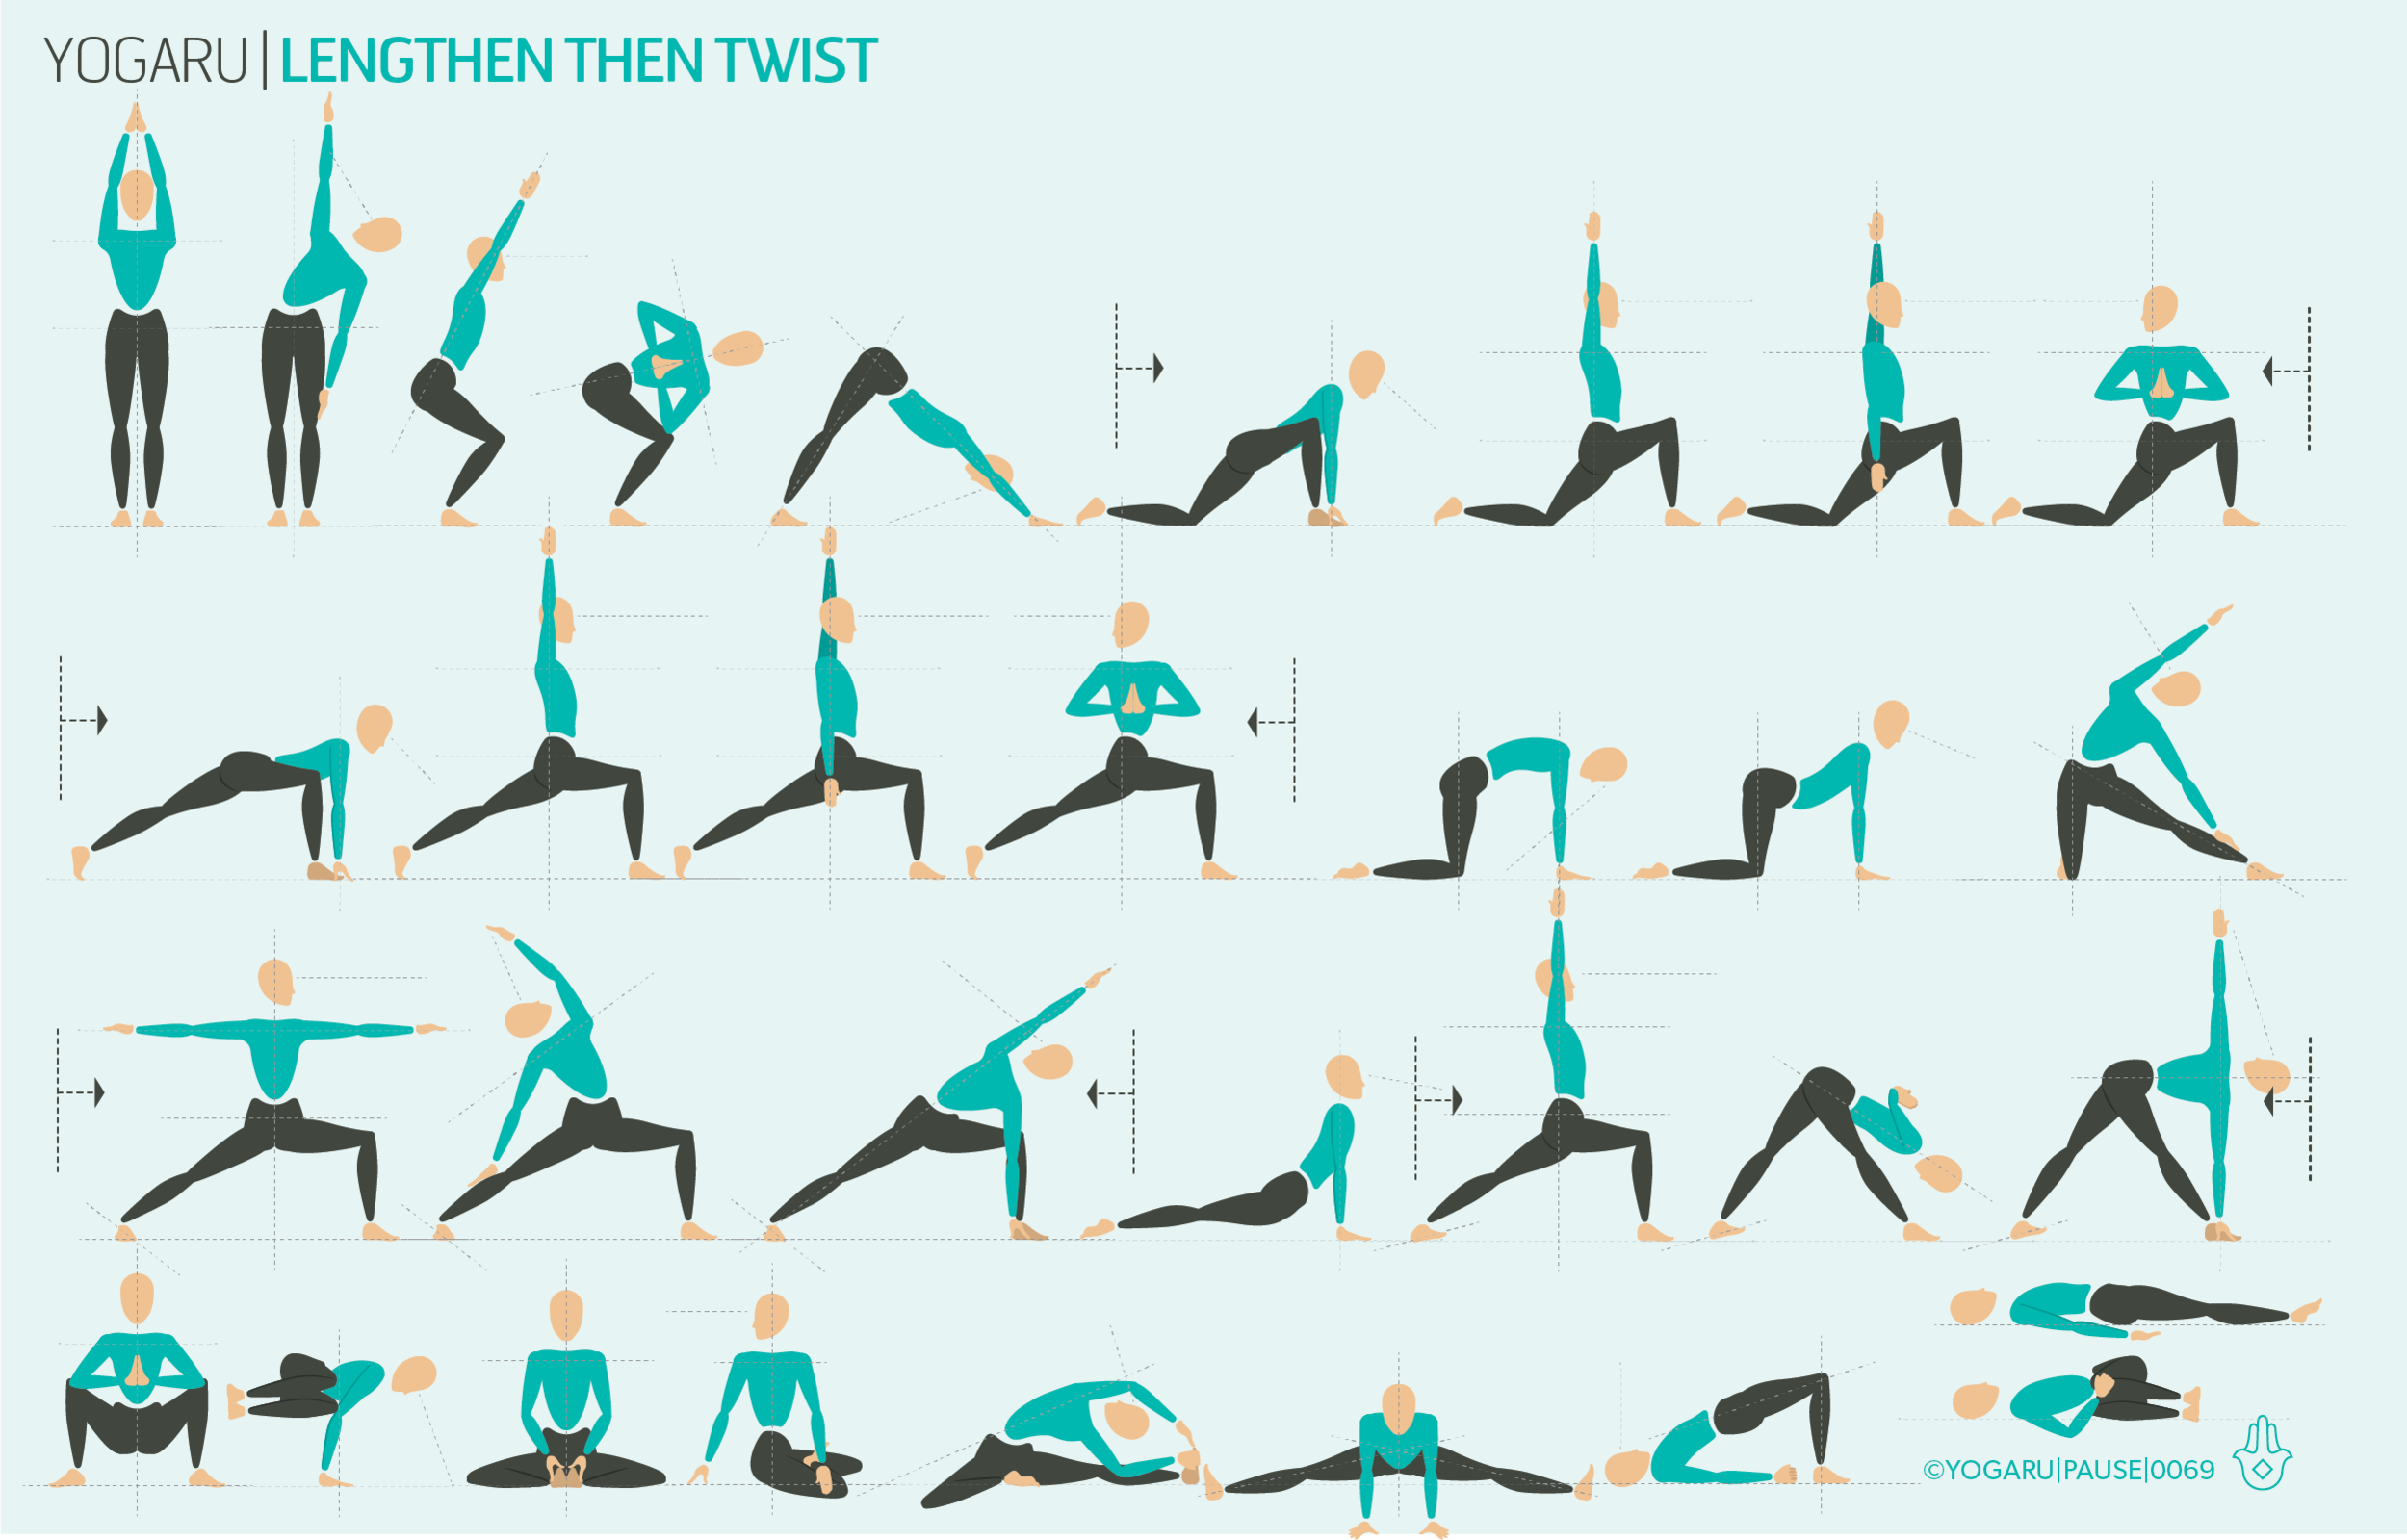
Lengthen then twist

PAUSE_0069.png

SUMMER CLEANSE
Holiday are all about tasting regional specialities and immersing yourself in the local culture. This may mean that you are sampling foods that are not usually part of your diet. I sometimes find that on my return it takes a few weeks to reclimitise to my regular home routine. This year, with a touch of post travel tiredness and headaches, I embarked on a mini cleanse to reboot my system and reinvigorate my savoury gut microbiome. I practices my Gutsy Flow everyday and followed the Rich Roll cleanse for five days – which included 100% veg smoothies, mushroom broths, chlorella and lots of water. After the cleanse I noticed a spectacular increase in my energy levels, clarity of mind and fluidity of movement. I was bouncing out of bed at 5:30am to teach my morning class and was still awake at 9:30pm which is very unheard of! The cleanse encourages you to write notes on each day of your cleanse. My day five note to self was:

GOOD FOOD = ENERGY = HAPPINESS   

TWISTS
Twists wring out the digestive system and massage the digestive tract. In yoga we twist to the right first to stimulate the ascending colon first, and we twist to the left after to stimulate the descending colon – aiding regular elimination and toxin removal from the body. Similar to backbends, when we twists we constrict the blood flow, and on releasing a surge of blood rushes back – bringing with it a fresh supply of oxygen and flushes out the system. Click this link to get a full list of twists.

FIND LENGTH FIRST
This sequence takes a step back from twists and looks at what you can do before you twist to maximise the rotation in the spine. When you twist a piece of cord you’ll notice that the more you twist it the shorter the cord gets. The same thing happens in the spine as you twist. You may reach an end point where you hit vertebrae to vertebrae before you reach the limitation of your muscle stretch. Lengthening up the spine through side bends first, and lifting the torso up out of the deep pelvic bowl, helps to find extra space between the vertebrae before you take your twist.

EXPLORING LENGTHENING THEN TWISTING
After you take your side bend make sure you come back to centre first before you move into the twist. When you are in a twist play around with placing the hand of the side you are twisting to on the small of your back and feeling for the position of your pelvis. Can you keep the hips squared forward to the front of the mat rather than following the rotation of the twist. See can you sense if both hips are level to each other too. The hip on the side you are twisting to can sometimes lift up which shortens the side of the waist and limits your twist.

ALIGNMENT CUES
Print out this sequence and explore the difference taking a side bend first can make to your twisting practice:

  • In Utkatasana/Chair Pose check to see are the knees in line with each other or has the twisting side knee drifted back.

  • In Anjaneyasana/Low Lunge & Ashta Chandrasana/Eight Crescent Moon notice how much harder it is to twist without the aid of something to press against.

  • Parivrtta Trikonasana/Revolved Triangle is a very deep twist for the spine. Place your hand on your lower back and check to see is the top of the pelvis level and both left and right sides are in line with each other. Use a brick on the high level to help you keep the pelvis level and stable.

  • If Balasana/Crow Pose is not part of your practice take the preparatory stage and you’ll get a lovely twist through the spine without having to master the full arm balance.

Remember to drink plenty of water after a twisting sequence to help the system flush out all the toxins from the organs.

To save the images for personal use click and hold down the image until the ‘save image’ option appears; on Mac hold down ‘control’ and click the image to get the option box; on PC right click on the image to get the option box. Scroll down in the ‘option box’ and click ‘save image’.

Ruth Delahunty Yogaru

Gutsy flow

SUMMER DEHYDRATION
During the summer months it can be hard to stay well hydrated. The body is constantly perspiring to regulate your body temperature, and even if you are drinking plenty of water you can still end up feeling a bit dehydrated. The recommended amount of water per day varies – depending on how much exercise you do, and if you have eaten enough fruit and veg. In general aim for a minimum of 2 litres per day, which is about 8 glasses of water.

THE EFFECT OF STRESS
Stress can also be the root cause of constipation. When the body goes into fight or flight mode all the blood rushes from the organs to our extremities ready for action. This means that the organs of the body, the digestive system included, have a reduced blood supply and are not working optimally. Yoga reduce stress by stimulating the parasympathetic nervous system through breath awareness; slow mindful movement; and repetitive flows – which allows the mind to quieten and bring increases blood flow to all the organs of the body again.

There are many different reasons why you might be feeling bloated or constipated. This gutsy flow sequence will benefit you, regardless of the cause, if you find your bowel movements are a bit sluggish, or to keep everything moving and prevent getting constipated. As the saying goes ‘prevention is better than cure’. The specially chosen asana promote good gut health by stretching and compressing the whole digestive system.

BACKBENDS
Backends place pressure on your gut and stimulate peristalsis in the muscles of the colon which help to push waste food along. They also compress the blood vessels of the digestive system, and on releasing the backbend, bringing a rush of fresh blood flow to help remove toxins. Click this link to get a full list of backbends.

TWISTS
Twists wring out the digestive system and massage the digestive tract. In yoga we twist to the right first to stimulate the ascending colon first, and we twist to the left after to stimulate the descending colon – aiding regular elimination and toxin removal from the body. Similar to backbends, when we twists we constrict the blood flow, and on releasing a surge of blood rushes back – bringing with it a fresh supply of oxygen and flushes out the system. Click this link to get a full list of twists.

EXPLORING STAYING REGULAR IN YOUR PRACTICE
This sequence will help to stimulate the walls of the gut and bowels. It is best not to drink water during your practice so that the body is not trying to multi task. As soon as you have finished drink plenty of water to help all the good work you have done on your mat.

ALIGNMENT CUES
Print out the above sequence and have it at hand for those mornings when you feel your bowel movements have slowed down, or if you ate late and feel you’re digestive system is still struggling to process last night’s dinner:

To save the images for personal use click and hold down the image until the ‘save image’ option appears; on Mac hold down ‘control’ and click the image to get the option box; on PC right click on the image to get the option box. Scroll down in the ‘option box’ and click ‘save image’.

Ruth Delahunty Yogaru