Sequences

Contain the stretch

PAUSE_0076.png

THE ELEPHANT IN THE ROOM
I’m beginning to feel there is a big yoga elephant in the room who has hip issues! There is no disputing the many benefits of yoga, but like every activity or sport – regardless of whether they are strengthening or stretching actions, care needs to be taken with repetitive ranges of movements. Almost every yoga pose includes an element of hip activity. Without noticing it, your practice could very well be tilting more towards hip stretching than hip strengthening, which can leave you with some overstretch tenderness in the hip joint.

Recently I’m noticing my hips are quite loudly telling me to rethink how I approach my practice. This has led me to more consciously evaluate the balance of stretching v’s strengthening in my time on the mat. In last weeks post I talked about including equal amounts of mobility and strength work for a balanced, strong and flexible body. In this weeks sequence I’m looking at ways to incorporate this principle in Ashta Chandrasana/High Lunge. Yoga is not all about stretching, it’s about looking for the strength in each pose too – protecting the connective tissues and contain the stretch. You’ll sometimes hear phrases like ‘find your edge’. Playing with your edge is a dangerous game in my opinion, yoga is not about tipping over the edge! In my practice I am retraining myself to work on back off by about 10% of my end range of motion and find that sweet spot at 90%.

EXPLORING ASHTA CHANDRASANA IN YOUR PRACTICE
Using Ashta Chandrasana/High Lunge as an example, the temptation is to release the muscles that support the hip joint, and let the weight of the upper body sink the hips down as low as they can go, till you hit your end range of motion. In this position you have lost the support of the muscles in the hip joints and are more likely to overstretch any number of muscles. A more supportive version of the pose it to come to your 90% range of motion, firm the buttocks muscles of your back leg and hug your outer hips to the midline. Press your feet into the ground and draw your hip bone back in into their sockets like you have magnets in your hip. Feel strength in the muscles that are flexing and a contained supported stretch in the muscles that are extending. Get familiar with how this feels and how this principle might feel in all your poses for a more sustainable lifelong practice.

ALIGNMENT CUES
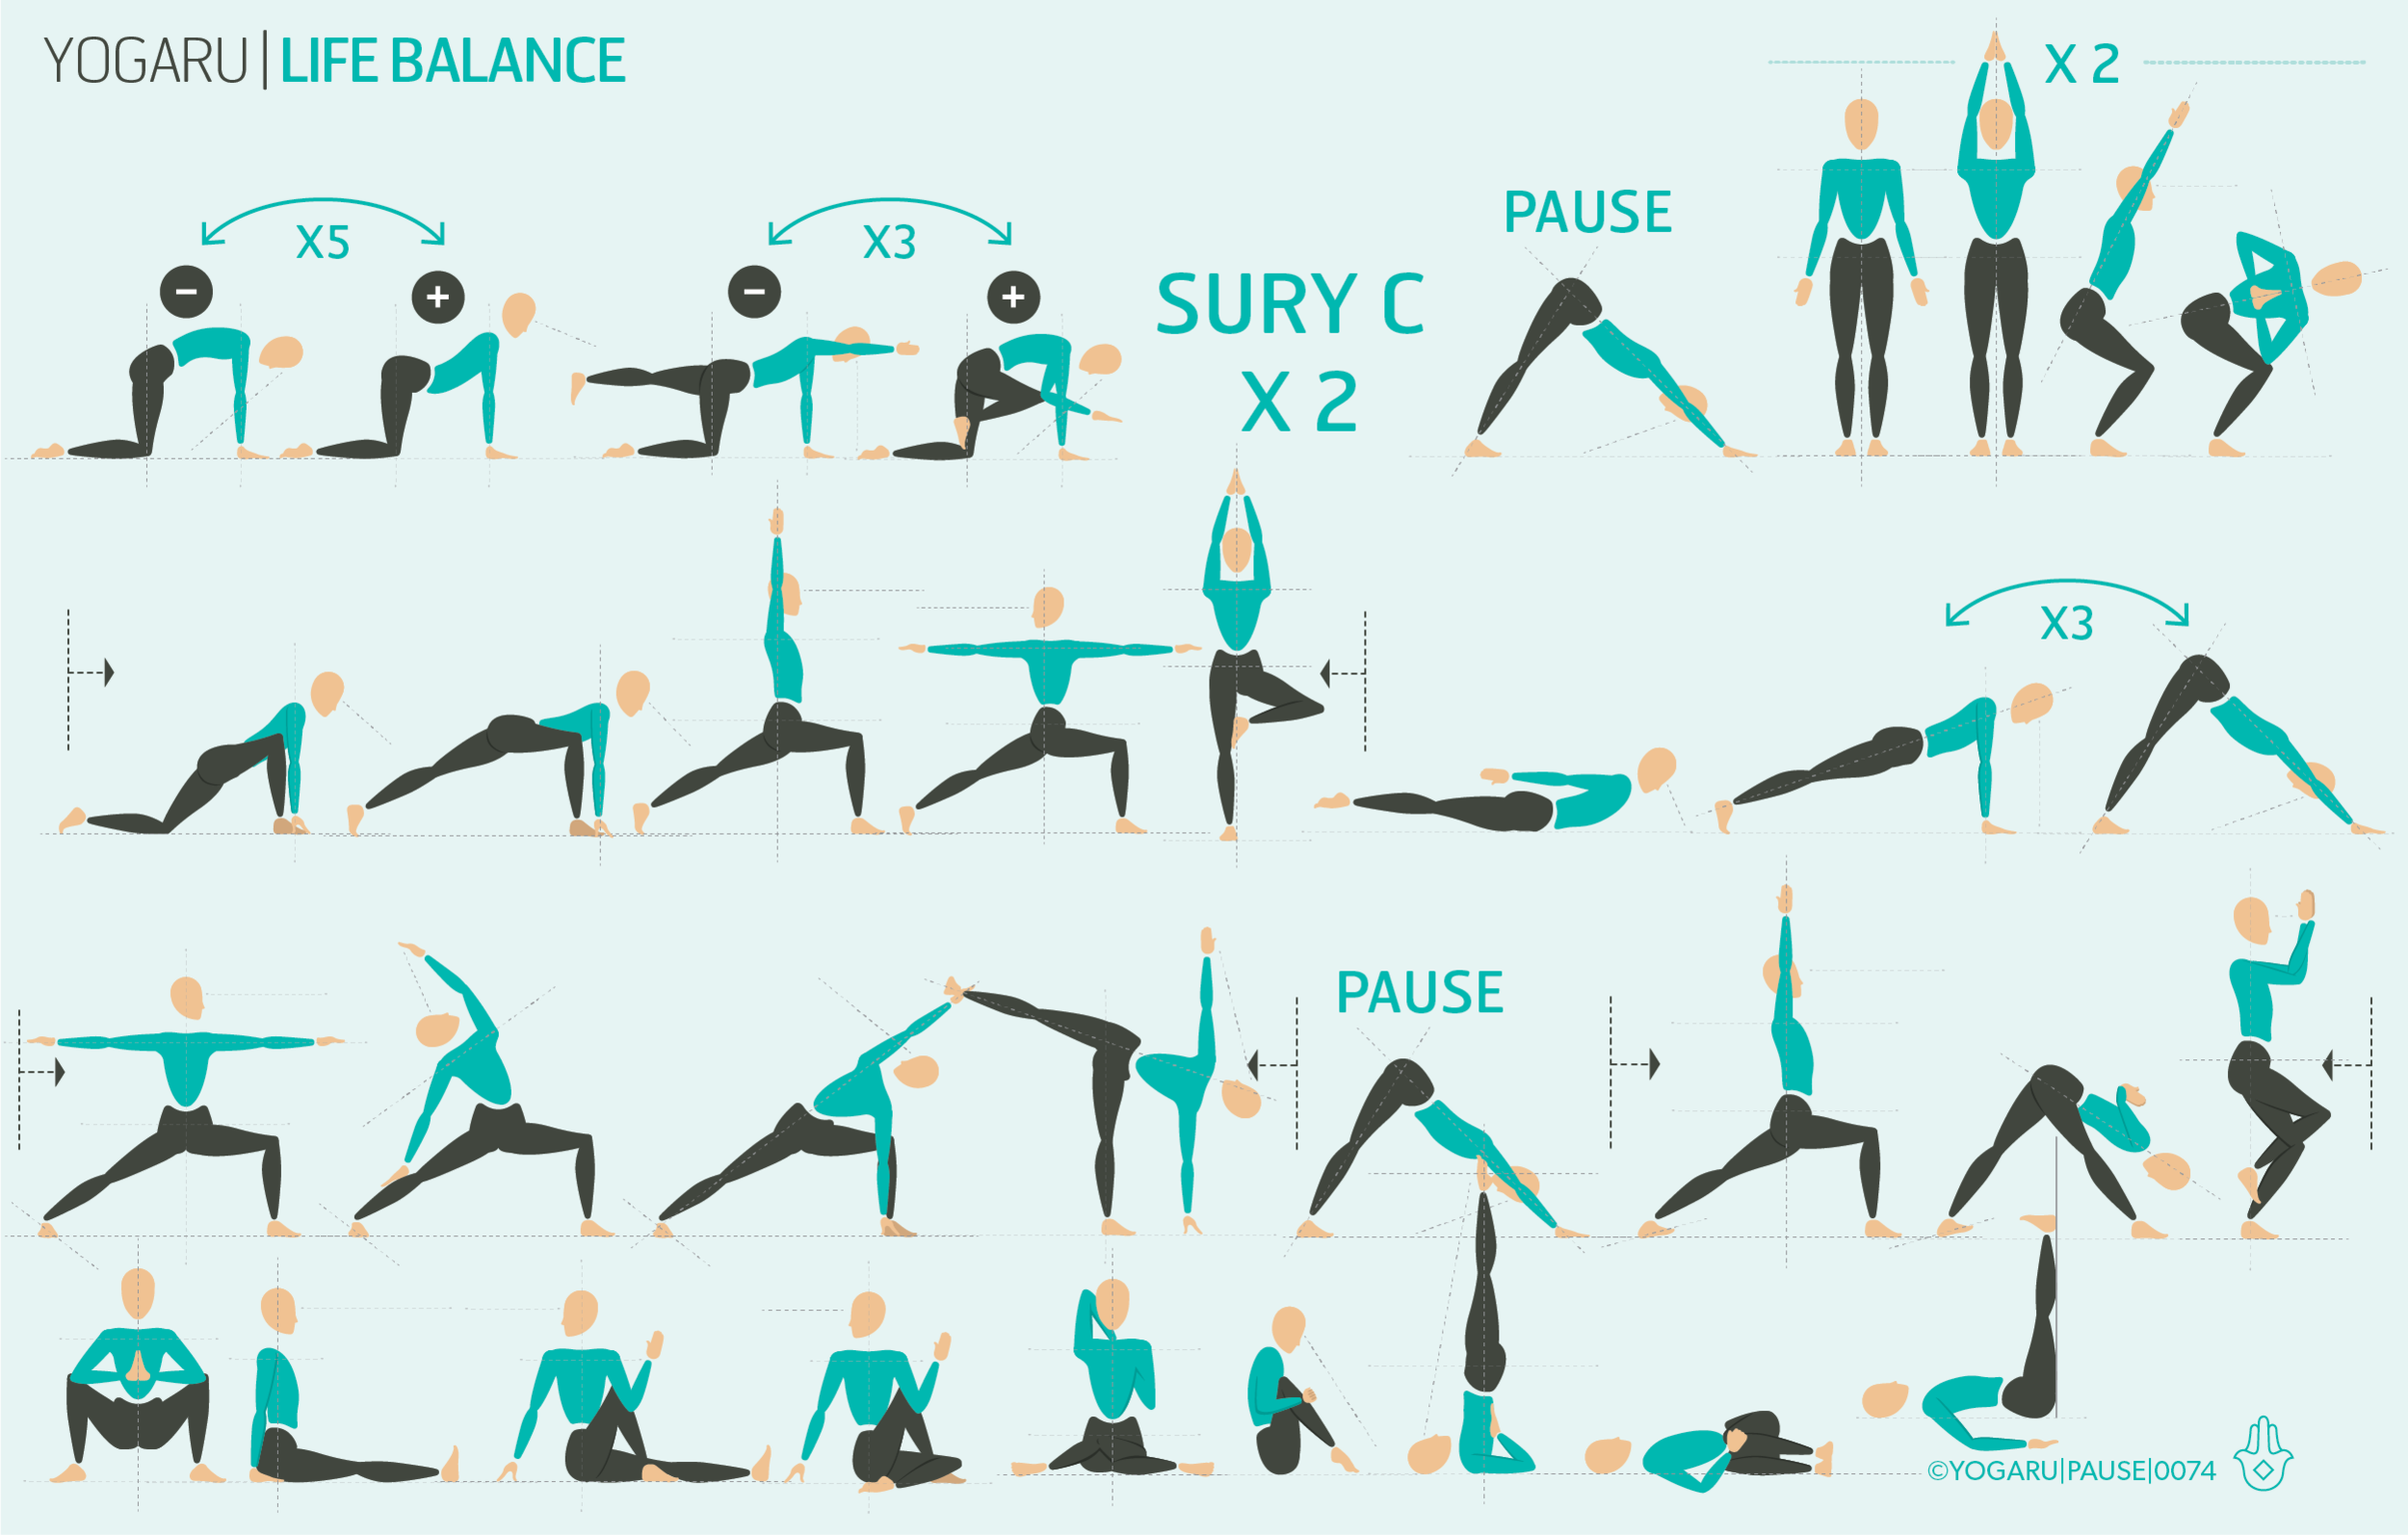
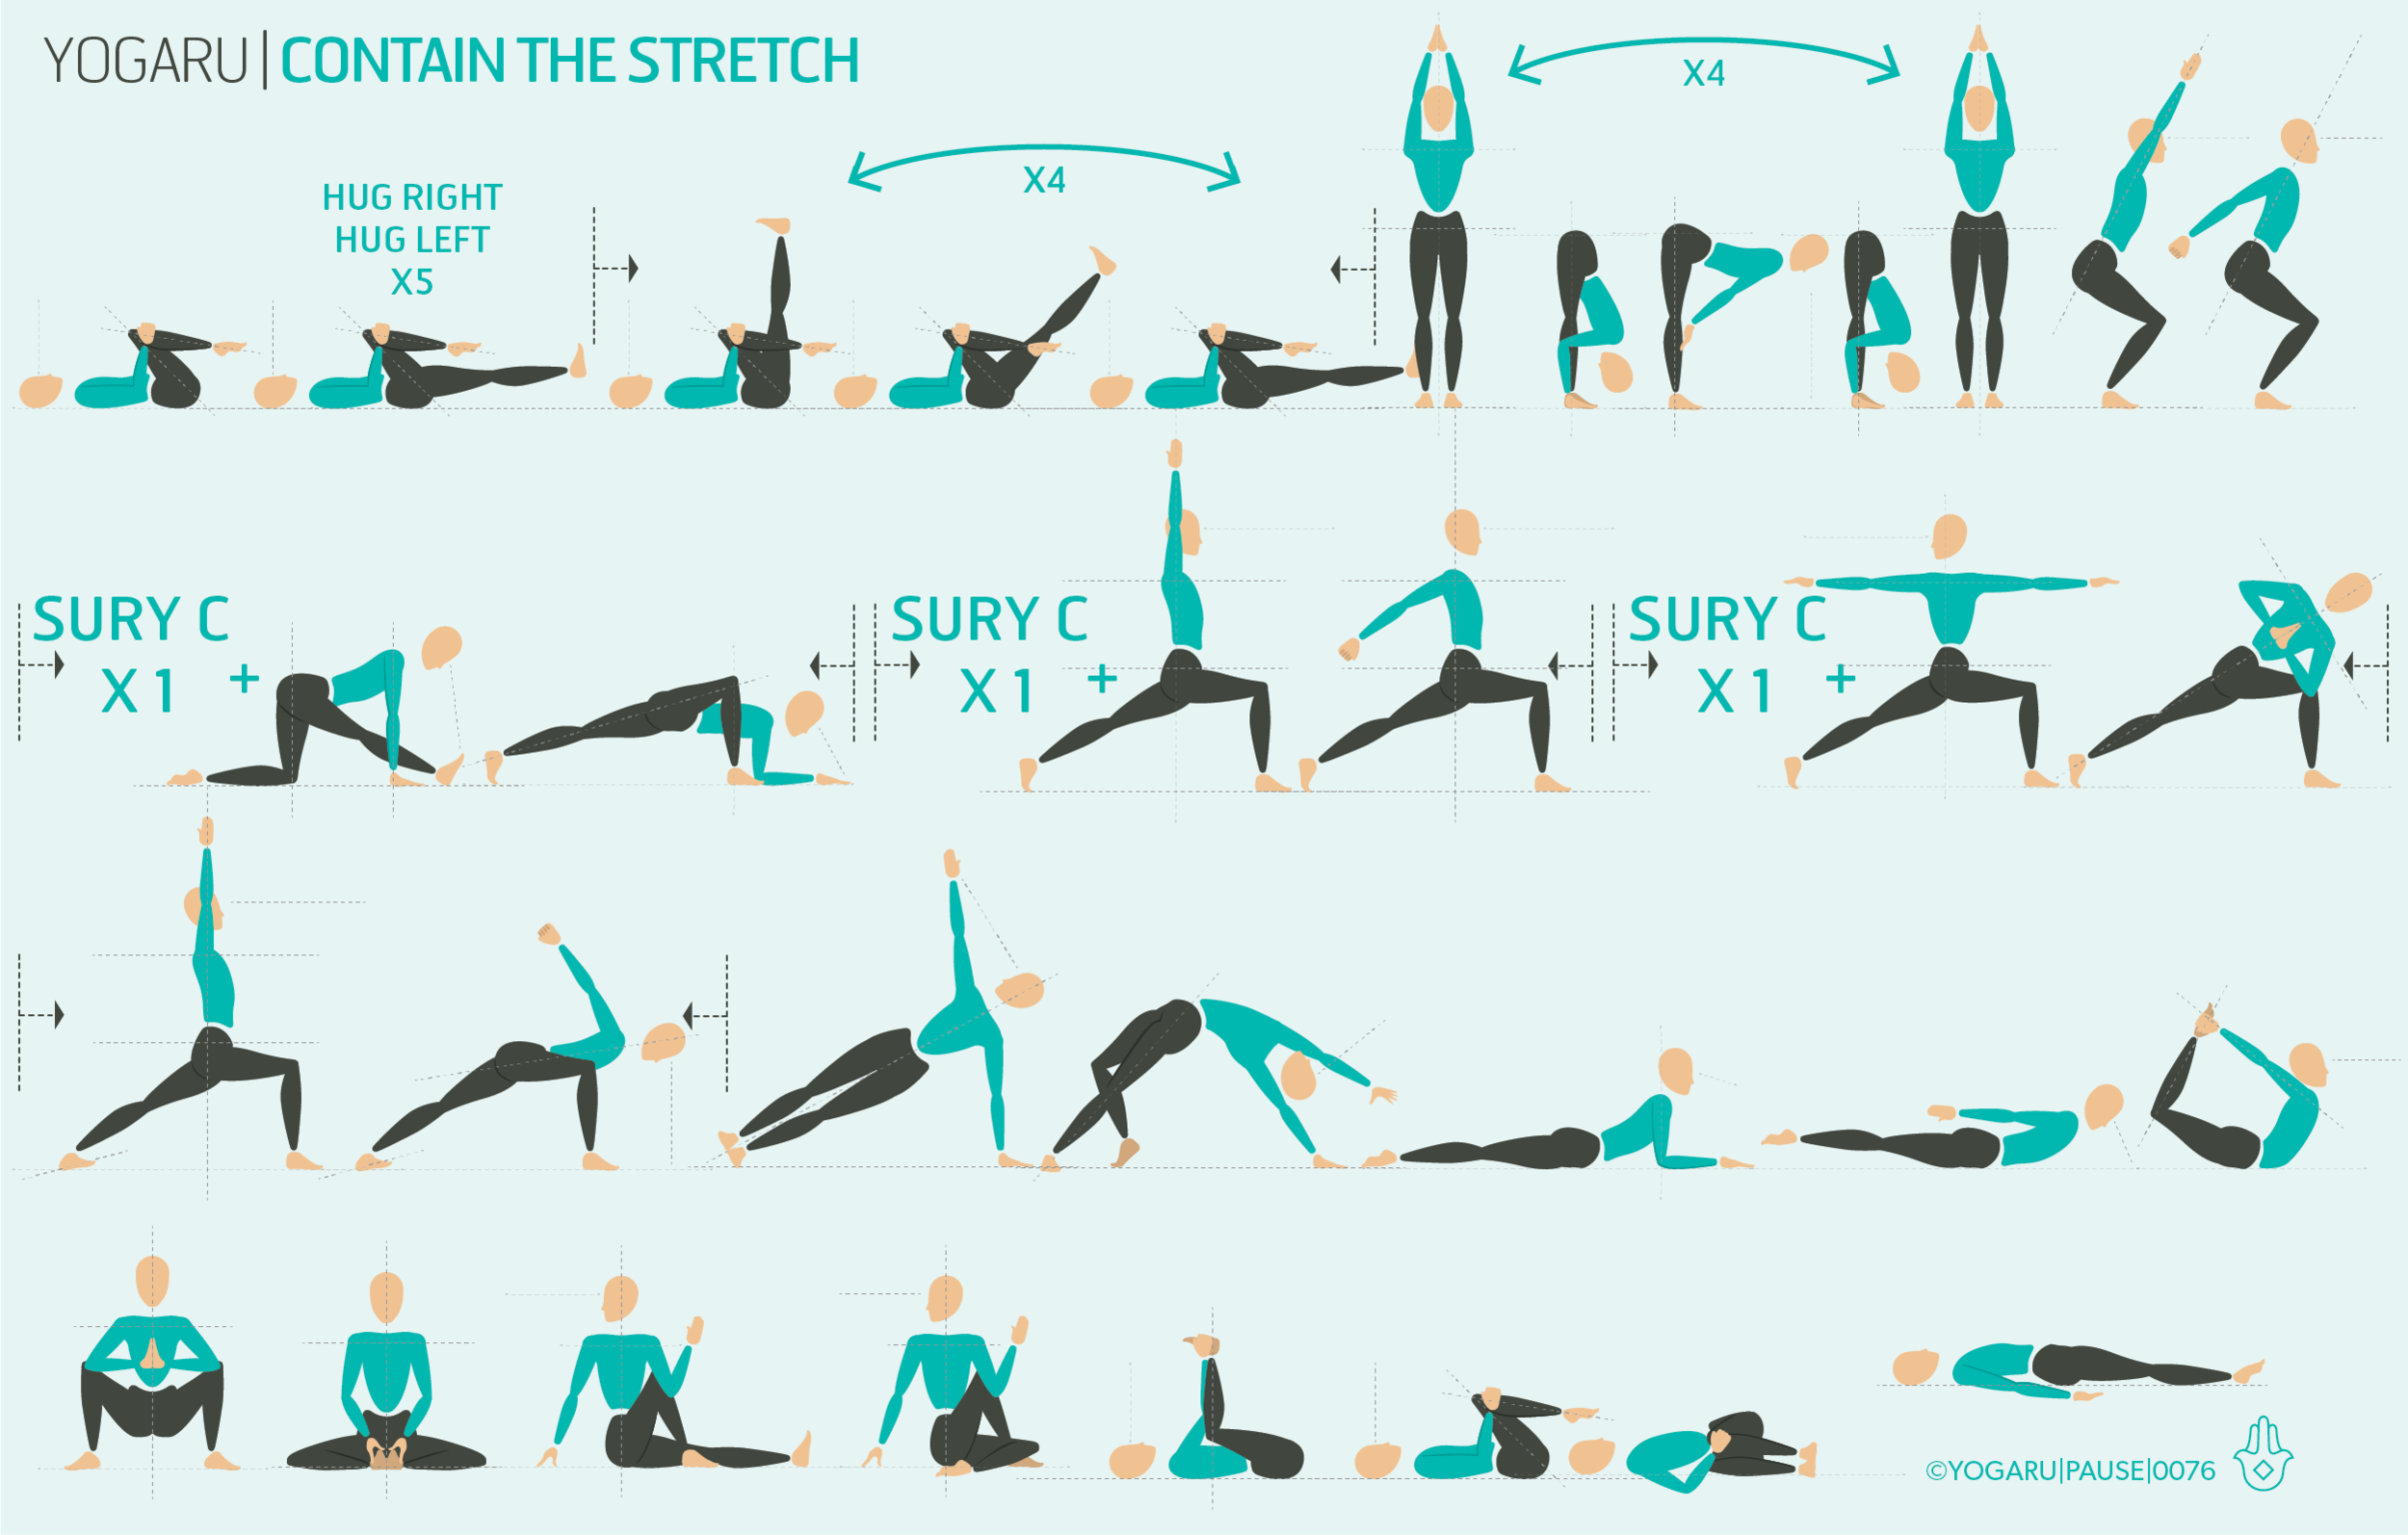
This sequence gives you plenty of opportunities to find your strong connective hip tissue in Ashta Chandrasana/High Lunge. Route your standing flow sequences through rounds of Sury Namaskara C, replacing the low lunges for the poses indicated in the sequence above. For the first Ashta Chandrasana/High Lunge see how it feels to bend the back knee slightly and allow the hip bones to lift up towards your bottom rib. In subsequent Ashta Chandrasana/High Lunge move towards straightening out the back leg, and pressing out through the heel, if the hip flexors feel warmed up. The feet are a crucial part of the pose for finding your strength. Use your feet and press into them strongly. This will trigger strength and stability up your legs and into the hip joints. Maintain this contained stretch throughout all versions of the pose in the sequence.

Print out the tips below, along with the sequence, and find a sturdy and stable Ashta Chandrasana/High Lunge:

  • From Adho Mukha Svanasana, inhale, step your right foot between your hands, exhale here.

  • Inhale, press into your feet to come up, reach your arms up high, shoulder width apart or palms together. Stack your front knee over your front ankle.

  • Press out through your left heel, firm your back leg, lift the thigh of your back leg up, hug your outer hips to the midline.

  • Press into your feet and push the floor away, firm your left buttocks.

  • Lift your point hip bones up to stack your pelvis perpendicular to the ground.

  • Draw your navel towards your spine, broaden through your collarbones, lengthen through your spine to the tip of your crown, gaze forward or to your fingertips.

To save the images for personal use click and hold down the image until the ‘save image’ option appears; on Mac hold down ‘control’ and click the image to get the option box; on PC right click on the image to get the option box. Scroll down in the ‘option box’ and click ‘save image’.

Ruth Delahunty Yogaru

Inner strength

PAUSE_0075.png

OUTER STRENGTH
After a busy September I’m focusing on finding my inner strength for the month of October. I’ve noticed I’ve been ignoring a few snags and tight spots in my hips, so I’m consciously working on staying out these areas and finding ways to strengthen them in my practice. The body is in perpetual healing till the day you die. Even though you may not be able to see it, it’s constantly busy mending, repairing and removing the natural byproducts of the metabolic actions in the body and external environmental toxins.

There is a common misconception in yoga and the fitness industry that flexibility means weak muscles, and inflexibility means strong muscles. Both principles crossover – you can maintain flexible, strong muscles by including equal amounts of mobility and strength work, and you can also have tight, weak muscles too which is what I’m currently working on in my right glute and sacroiliac joint.

To access your inner strength you must find your outer strength first. You’ll notice after a yoga class that has lots of standing poses, you leave your class feeling stronger, taller, and more confident. In yoga what we practice in the physical body trigger the same response in the emotional body. Outer strength naturally leads to inner strength.

FINDING STRENGTH IN YOUR PRACTICE
The muscles of the legs are the biggest muscles of the body. This sequence has lots of standing poses to get straight into these muscles. The core muscles wrap around to contain the organs of the body, support the spine and are the important structure that connect upper and lower body. Igniting these muscles will help you feel stronger and move more confidently with the 360 column you have created. Arm balances like plank and Bakasana/Crow build heat and require core activation to lift the hips into the required position.

ALIGNMENT CUES
Through this sequence look for the heat and strength in the big muscles of the body. Enjoy finding your inner strength and know that you are much stronger than you think you are:

  • Take your time with the first section of the sequence and work on keeping the back of the pelvis pressed into the ground, and the hips stable, while you warm up the core area.

  • From Adho Mukha Svanasana/Downward Facing Dog to Phlakasana/Plank Pose leg curls, move slowly and use your whole core to control the movement. Lift you pelvic floor to give the core a base to work from.

  • In Utkatasana/Chair stay here for at least five breaths before you move on to the Parivrtta Utkatasana/Revolved Chair.

  • Take Balasana/Child’s Pose after the plank sequence to rest your core.

  • When you are in Anjaneyasana/Low Lunge push the floor away with your feet, lift your ribs and hip bones up, and strongly squeeze the glute of the front leg. Keep this connection as you move into the variations.

  • When you’re in half boat play around with hands forward first then both hands to the right of your right leg followed by the both to left to get your muscles ready for Bakasana/Crow and Parsva Bakasana/Side Crow.

  • In Setu Bandha Sarvangasana/Bridge bend your elbows and place your fingertips on your hip bones to get feedback on where you hips are. Try to keep the hips perfectly level in both of these poses.

To save the images for personal use click and hold down the image until the ‘save image’ option appears; on Mac hold down ‘control’ and click the image to get the option box; on PC right click on the image to get the option box. Scroll down in the ‘option box’ and click ‘save image’.

Ruth Delahunty Yogaru

Life balance

TIPPING POINTS
Keeping everything balanced in life can be quite the balancing act, pardon the pun. Life is like a seesaw with lots of ups and downs. There is always going to be degrees of tipping one way or the other and we have to consciously work on bringing it back to level. When you find you have slipped down to one end of the seesaw it can be quite challenging to get back to the fulcrum point. Which, after a busy period in September where I lost sight of balance, is where I find myself at the moment looking up the incline of the slide!

FINDING BALANCE IN YOUR PRACTICE
When the world around me is spinning I find comfort in simple, familiar poses during my practice – poses that I know feel safe, secure, and even conjure up a bit of inner strength to help me feel strong again. This sequence includes lots of twists to balance out the nervous system and hormone levels; some standing balances to find physical balance and carve out a groove for mental balance; and core activation to stabilise the whole body. Most of us hold more tension in one side of the body than the other. As you run through the sequence look for symmetry left and right. Actively soften both shoulders in poses where the arms are arised. Look for equal press down and effort in both legs for the standing poses.

ALIGNMENT CUES
Through this sequence look for signals as to how the poses make you feel and what you need from your time on the mat. Tune into your practice and let it support you physically and mentally:

  • Before you start you Marjaryasana/Cat Bitilasana/Cow flow take a few breaths in tabletop position and find equal weight through all four points in contact with the ground.

  • Come back to Adho Mukha Svanasana/Downward Facing Dog in between flows to consciously look for your symmetry again.

  • In Utkatasana/Chair stay more upright and lengthen through the crown, take your twists in this position with the hands in prayer position at your heart.

  • When you are in Anjaneyasana/Low Lunge with the knee on the ground, and off the ground, contain and support the stretch of the inner groin and hip flexor by lightly pressing your feet/knee into the ground and scissoring them together. Lift you pelvic floor here.

  • In Virabhadrasana II/Warrior II press strongly into your front heel and keep this connection as you move into Reverse Warrior.

  • Explore a wide legged Virabhadrasana I/Warrior I with the feet mat distance apart. Notice if this makes a difference to you hip bone position.

To save the images for personal use click and hold down the image until the ‘save image’ option appears; on Mac hold down ‘control’ and click the image to get the option box; on PC right click on the image to get the option box. Scroll down in the ‘option box’ and click ‘save image’.

Ruth Delahunty Yogaru