Pose breakdowns

Virabhadrasana I - Warrior I

YOGARU_Virabhadrasana I_PB.png

FINDING EFFORT & EASE IN WARRIOR I
Virabhadrasana I/Warrior I is one of the most widely known foundational poses of yoga. It features in the Sun Salutations sequences – which are often used at the start of class. But Virabhadrasana I/Warrior I is quite a statement pose in its own right, and to find effort and ease in your expression of the pose it helps to explore some targeted stretching and strengthening, before you arrive there.

THE BENEFITS OF VIRABHADRASANA I/WARRIOR I
Virabhadrasana I/Warrior I stretches the hip flexors, calf muscles and inner groin; and strengthens the quads, glutes, shoulders and the muscles of the spine and ankles. It is quite a complex pose for the back leg, and you are not alone if you find it very challenging to get that back heel comfortably grounded, with the toes pointing forward. The hip joint of the back leg is externally rotated, to allow the heel to drop down, while the muscle action of the back leg is internal rotation! This can sometimes feel like the leg is fighting to find its position in the pose, and if you are overzealous about reaching that left hip forward it can manifest in discomfort in the knee or the sacroiliac joints. 

EXPLORING VIRABHADRASANA I/WARRIOR I IN YOUR PRACTICE
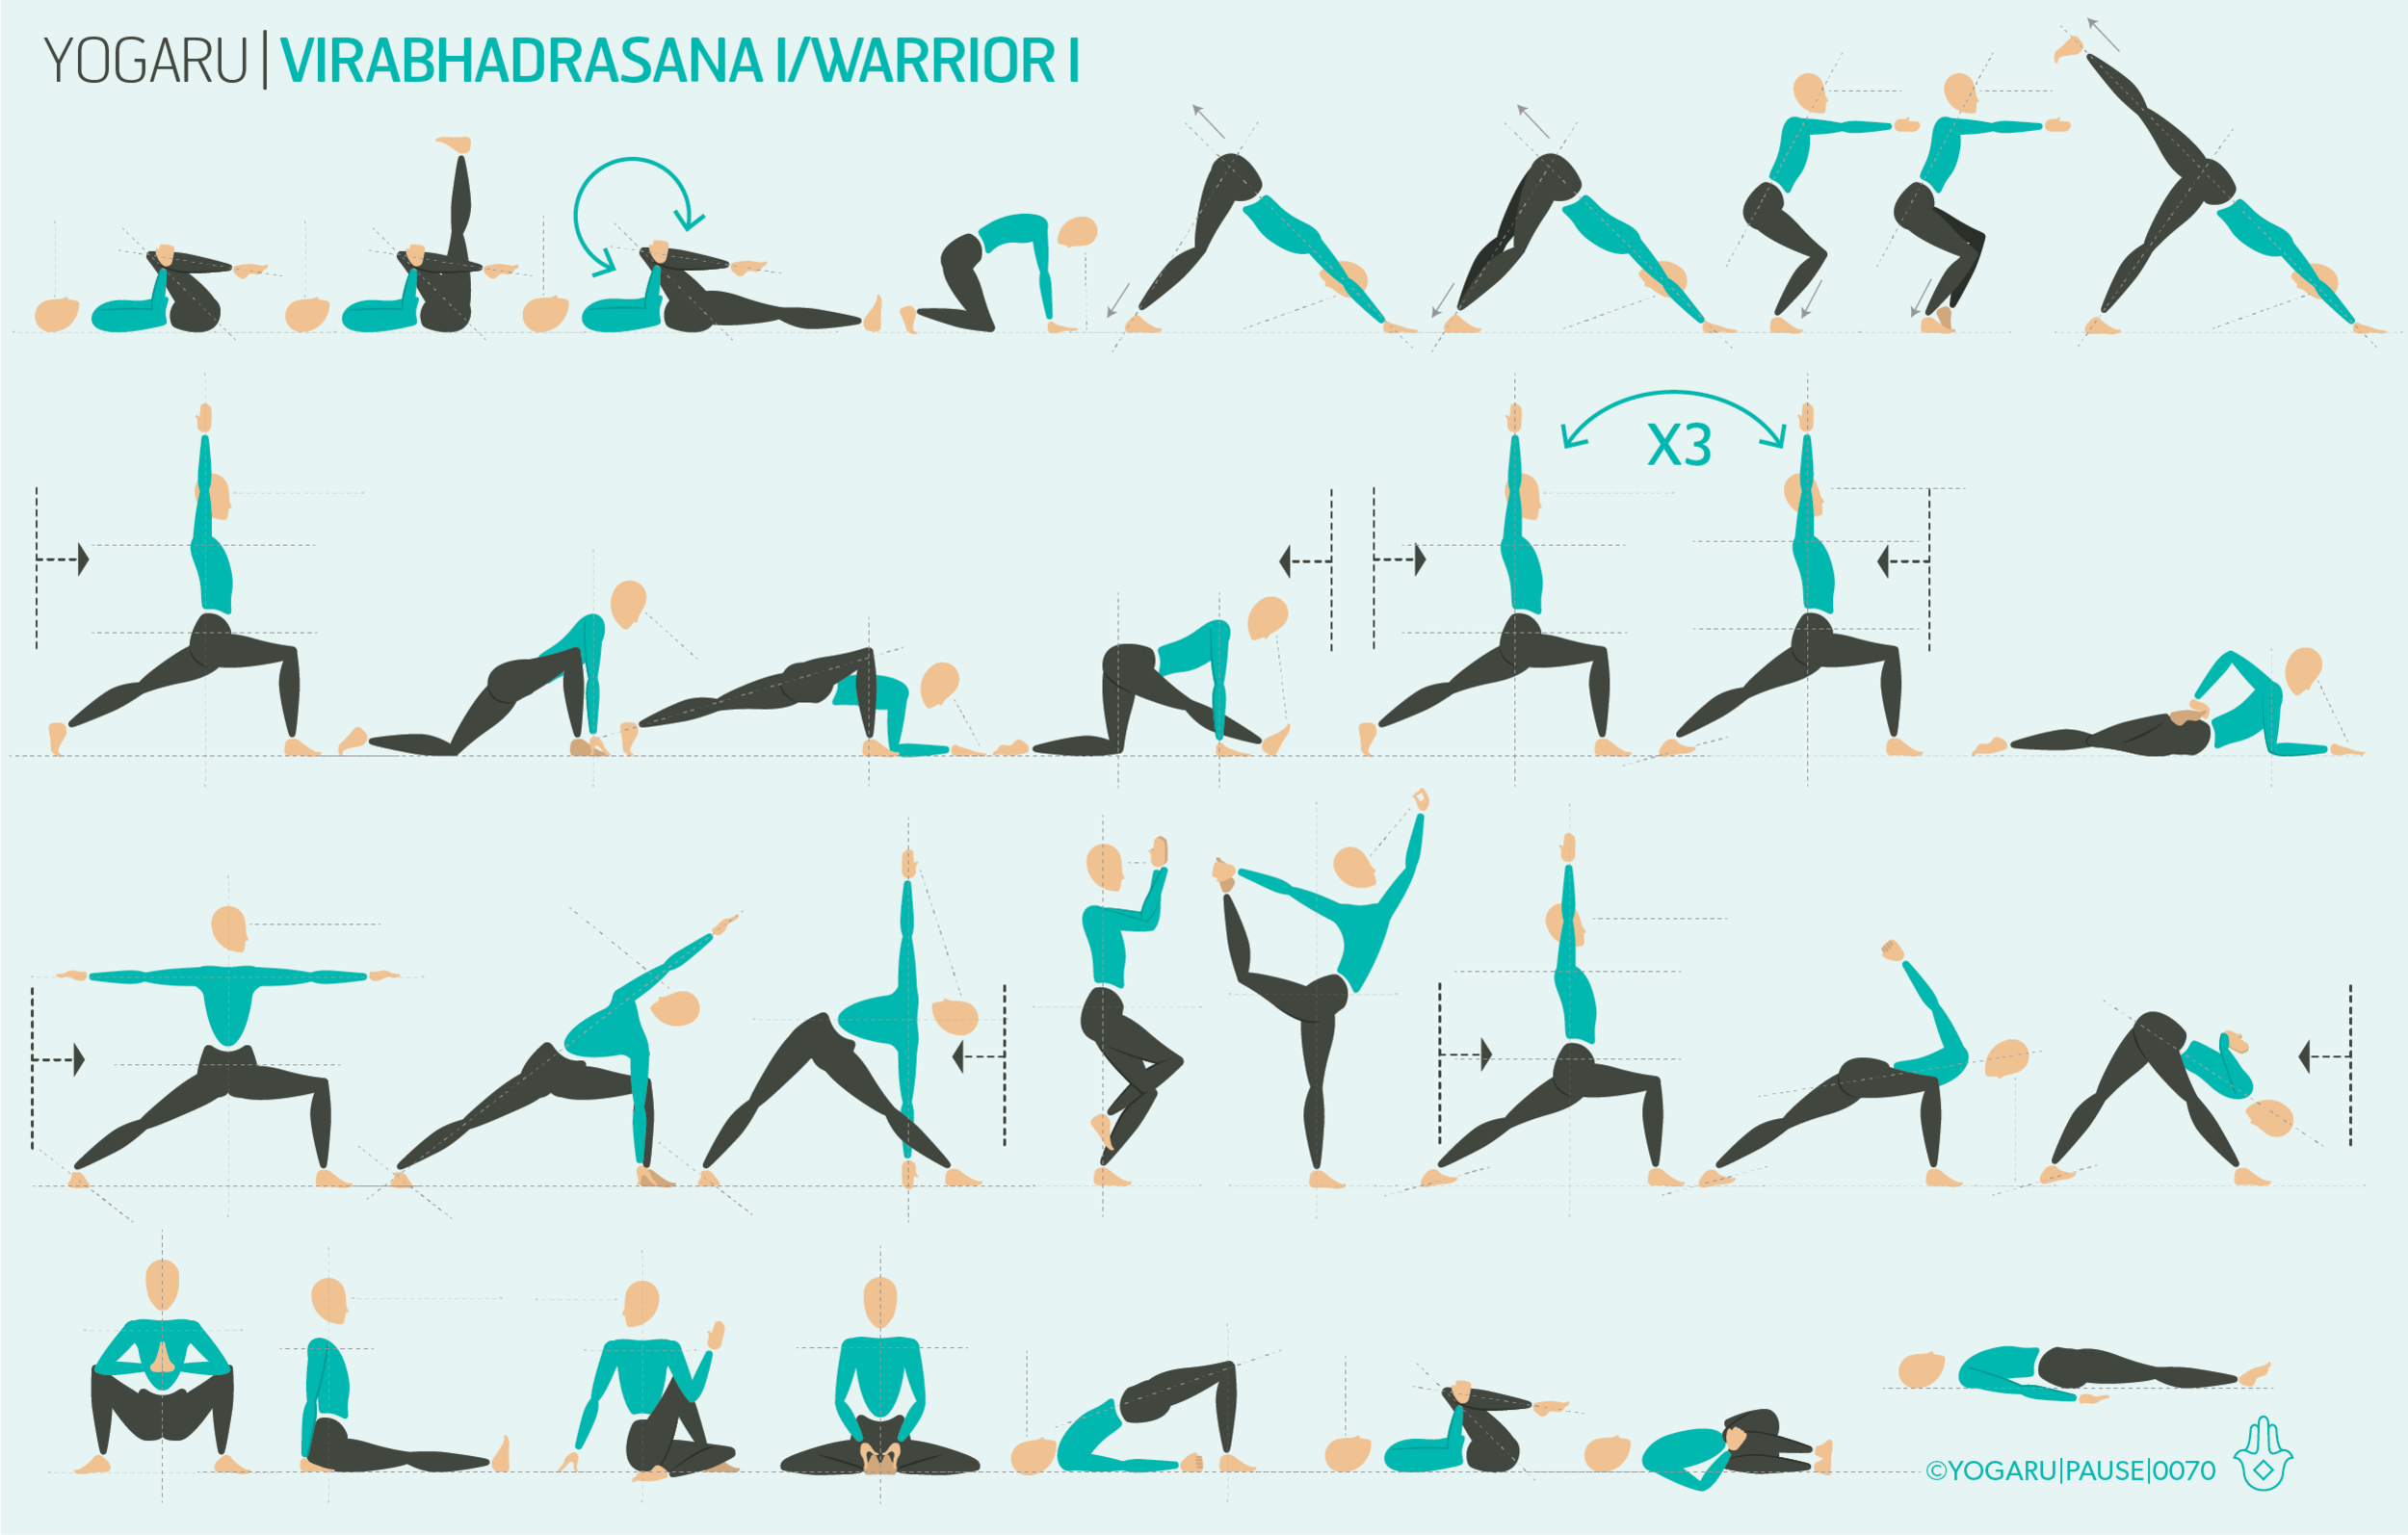
The above sequence stretches and strengthens all the appropriate muscle groups in preparation for the nuances in Virabhadrasana I/Warrior I. It also incorporates two balancing standing poses to strengthen the ankle and bring some stability to the joint which takes a lot of pressure in the pose.

In the second pose of the sequence lengthen through your whole leg, press you heel away from you and draw your toes down towards your face, until you feel a strong stretch in the calf muscle. Take some ankle circles here too before you move on to the next hip circling pose. Throughout the sequence there is specific targeted poses for the calves and hip flexors in particular. Bring your attention to these two areas – press the heel towards the ground in the standing calf stretches, and gently let your hips become heavy towards the ground in the standing hip flexor stretches.

In the Ashta Chandrasana/High Lunge to Virabhadrasana I/Warrior I flow, which you will run through three times, place your hands on your pointy hip bones and notice what needs to  change when you drop that back heel to the ground.

When you are in Virabhadrasana II/Warrior II pay particular attention to the back leg and the action of the glute muscle to open the hip out to the side. Press into the big toe mound and try to find that inner arch of your back foot.

PAUSE_0070.png

ALIGNMENT CUES
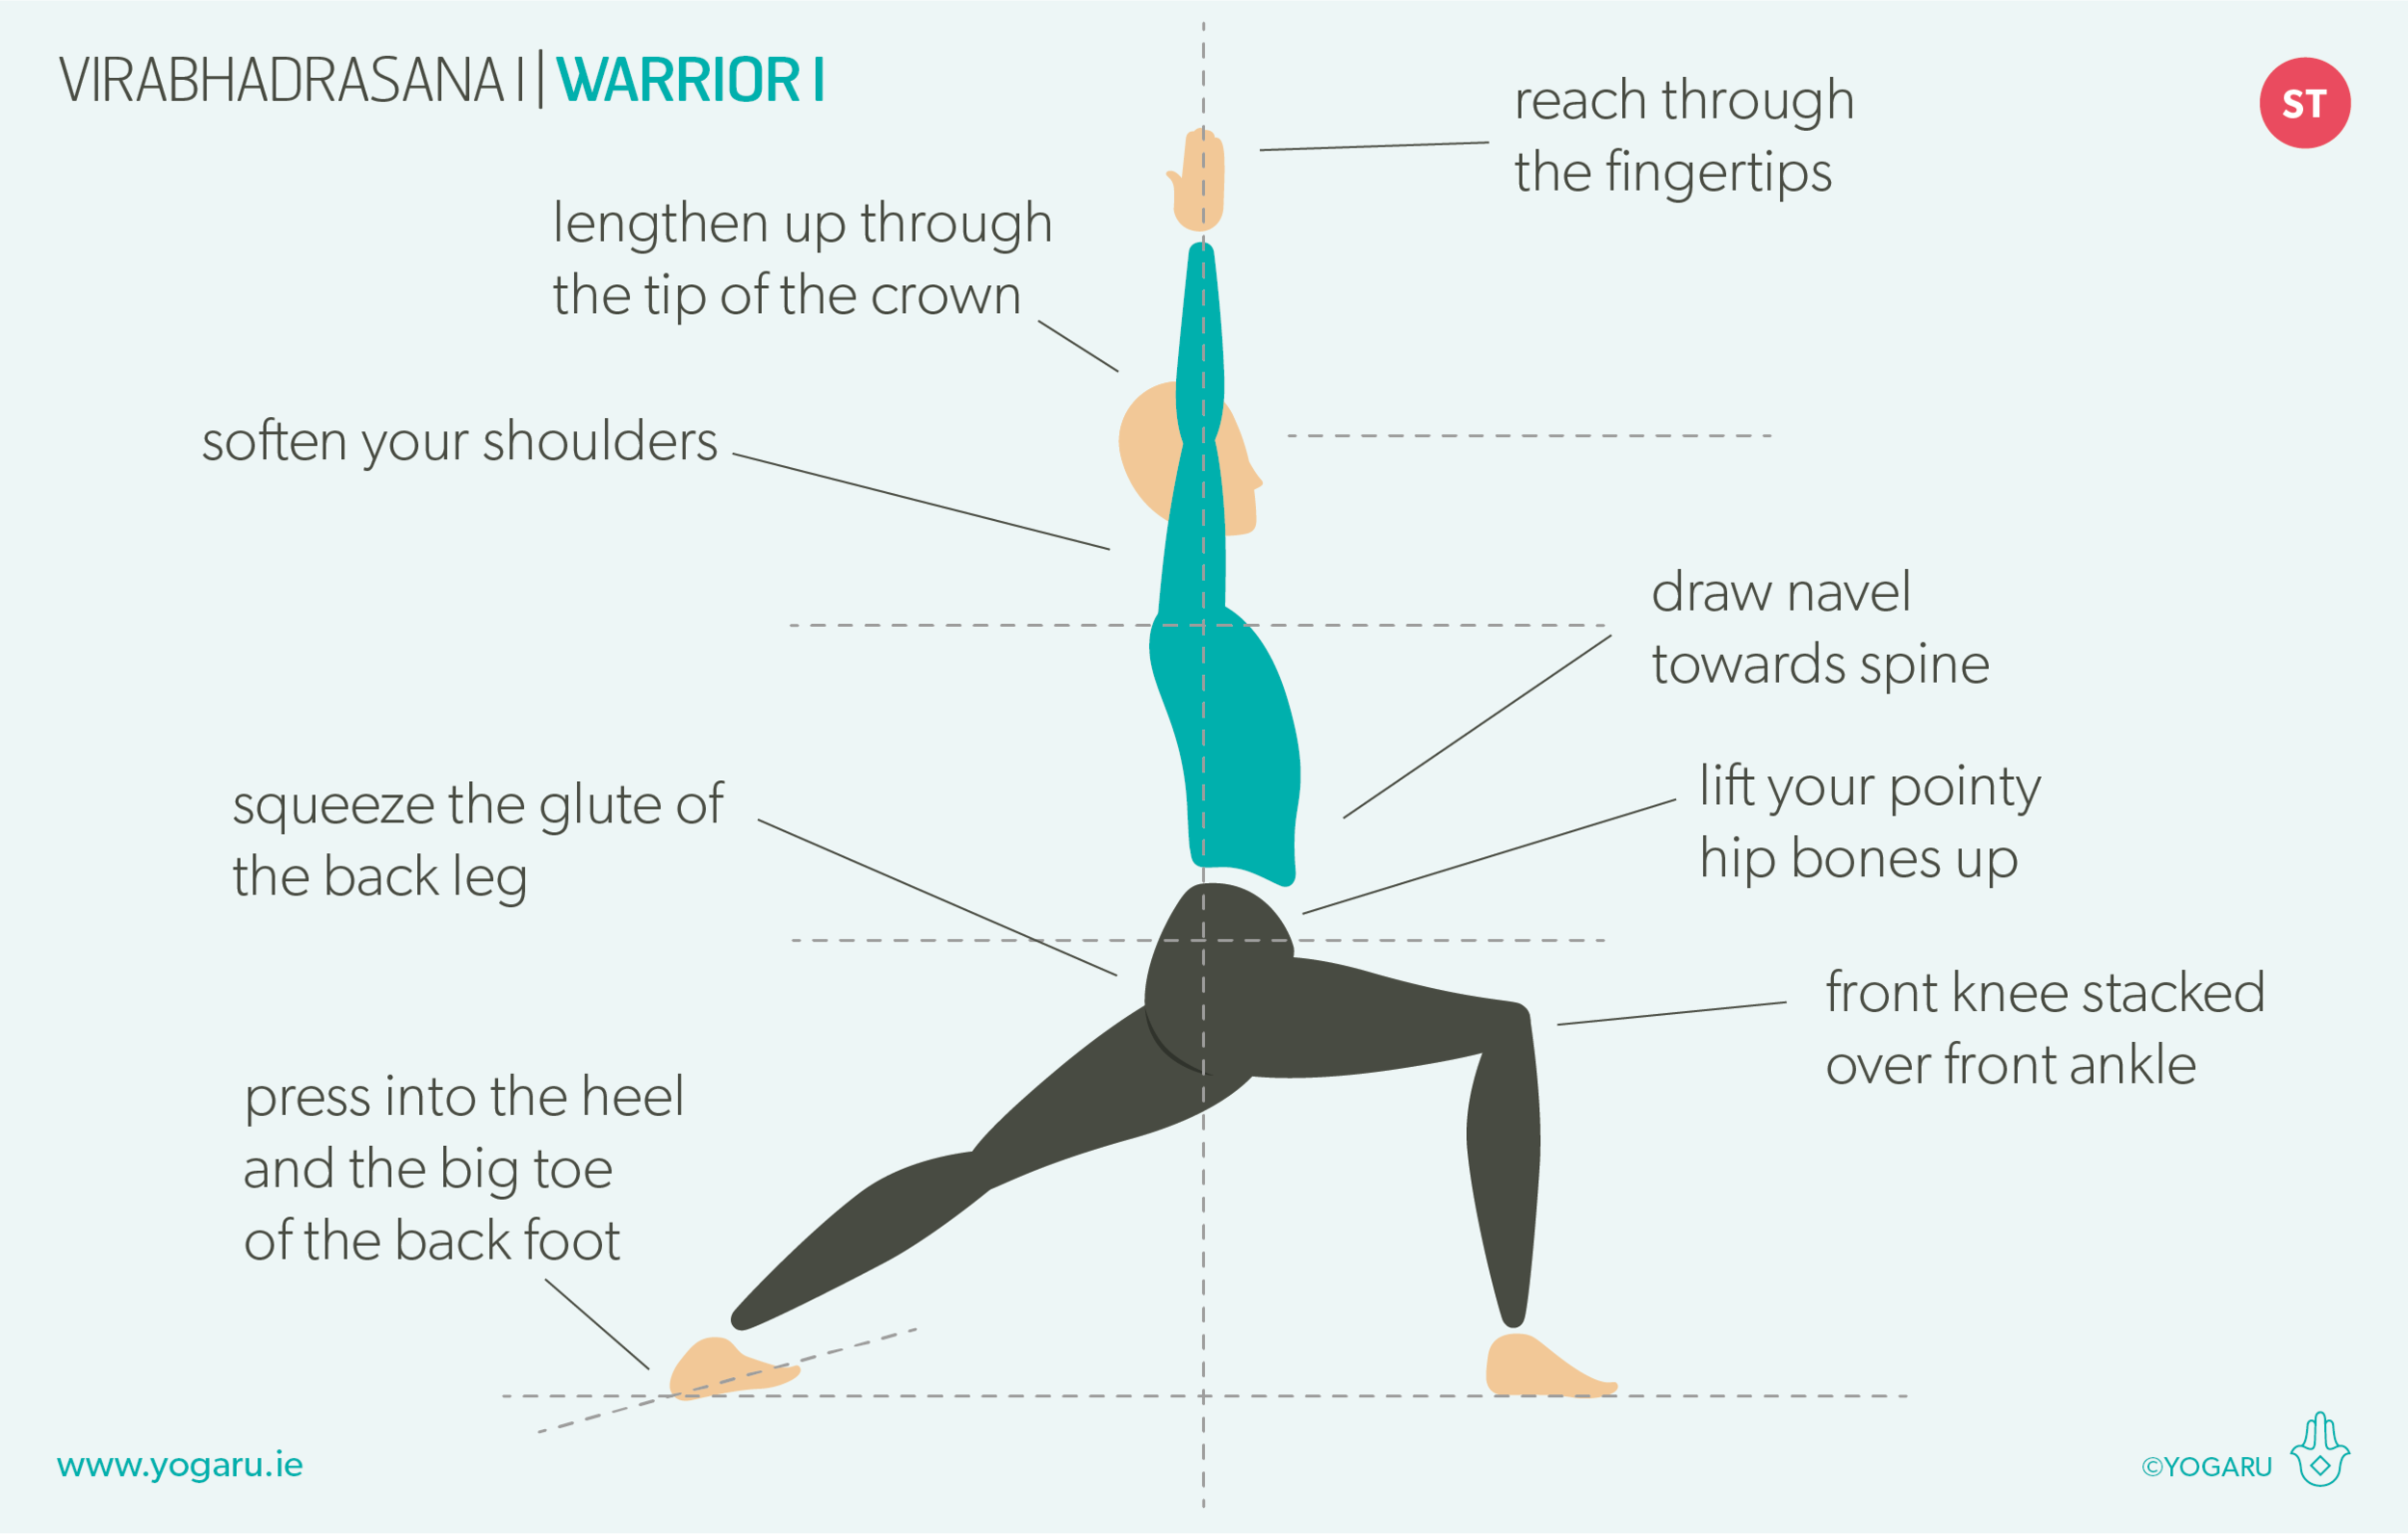
When you find yourself in Virabhadrasana I/Warrior I in this sequence consider the 'squaring of the hips' as directional action rather than a definitive end goal. Allow the hip of the back leg to be further back than the hip of the front leg if it feels kinder to the knee and sacroiliac. Spend some extra time in Warrior I and notice what your optimal alignment is, with effort and ease, for your unique body.

Print out the below tips, along with the sequence, and give Warrior I some extra time and exploration:

  • From Adho Mukha Svanasana/Downward Facing Dog, ground your left foot at a 45 degree angle.

  • Inhale, step your right foot to just inside of your right hand, check that your feet are tracking behind their hip joints to allow space for the hips to rotate forward, exhale here.

  • Inhale, place your hands on your right knee to help you come up, or draw your navel towards your spine and reach your arms forward and up.

  • Reach your arms up high, arms shoulder width apart or palms together.

  • Lift your lower ribs up from the rim of your pelvic bowl.

  • Keep your front knee bent and stack your front knee over your front ankle.

  • Press into your big toe mound of your back leg to find your inner arch.

  • Press down into your left heel to ease the left hip forward.

  • Press into your right foot to draw the right hip back.

  • Scissors your legs together and roll your right thigh down.

  • Lift your two pointy hip bones up from your right thigh and gaze forward or to your fingertips.

To save the images for personal use click and hold down the image until the ‘save image’ option appears; on Mac hold down ‘control’ and click the image to get the option box; on PC right click on the image to get the option box. Scroll down in the ‘option box’ and click ‘save image’.

Ruth Delahunty Yogaru

Pincha Mayurasana - Peacock

YOGARU_Pincha Mayurasana_PB.png

GIVING THE SHOULDER CENTRE STAGE
In yoga the legs get plenty of attention and hard work in the duration of your time on the mat – from the sensory connection to the ground with the feet; the musculature energy of the legs in standing poses; to the intricate stretching and strengthening actions in the hips. The shoulder joint gets a lot less time in the limelight, and yet, when well warmed up, we ask them to hold the full body weight in arm balancing poses and inversions. We need to bring a bit more conscious attention to the integrity of the shoulders joint to prepare them for these more challenging poses. When we break down a pose like Pincha Mayurasana/Peacock we can see the importance of shoulders strength, flexibility and stability. As with every asana the shoulders don’t work alone – the core, arms and spine need to be strengthened too. One often forgotten area, that is important for the action of getting into kick up position in balancing inversions, are the hamstrings. This was a game changer for my inversion practice. I noticed that when I spent time warming up my hamstrings, I could walk my legs in closer to my forearms, and work towards reaching my pelvis further up over my shoulders and lengthen my kicking leg up more. Pincha Mayurasana/Peacock can be a good starting point for working towards Adho Mukha Vrksasana/Handstand. It teaches the principles of kicking up, with the benefit of a wider foundation on the ground, and less distance from the ground to potentially face plant! When the backs of the shoulders are tight it makes it harder to stack them over the elbows, and as a result the lumbar lower back over flexes to compensate and help find your centre of gravity – cause the ‘banana back’ effect. This sequence will help to avoid this by preparing the whole shoulder and all the assisting muscles that are recruited for Pincha Mayurasana/Peacock.

THE BENEFITS OF PINCHA MAYURASANA/PEACOCK
Pincha Mayurasana/Peacock is a very energising inversions. It strengthens the shoulders, arms, and spine and stretches the shoulders. Whilst it is very invigorating for the brain it is also very calming and helps relieve stress tension and anxiety. As an inversion it boosts the immune system and increases circulation.

EXPLORING PINCHA MAYURASANA/PEACOCK IN YOUR PRACTICE
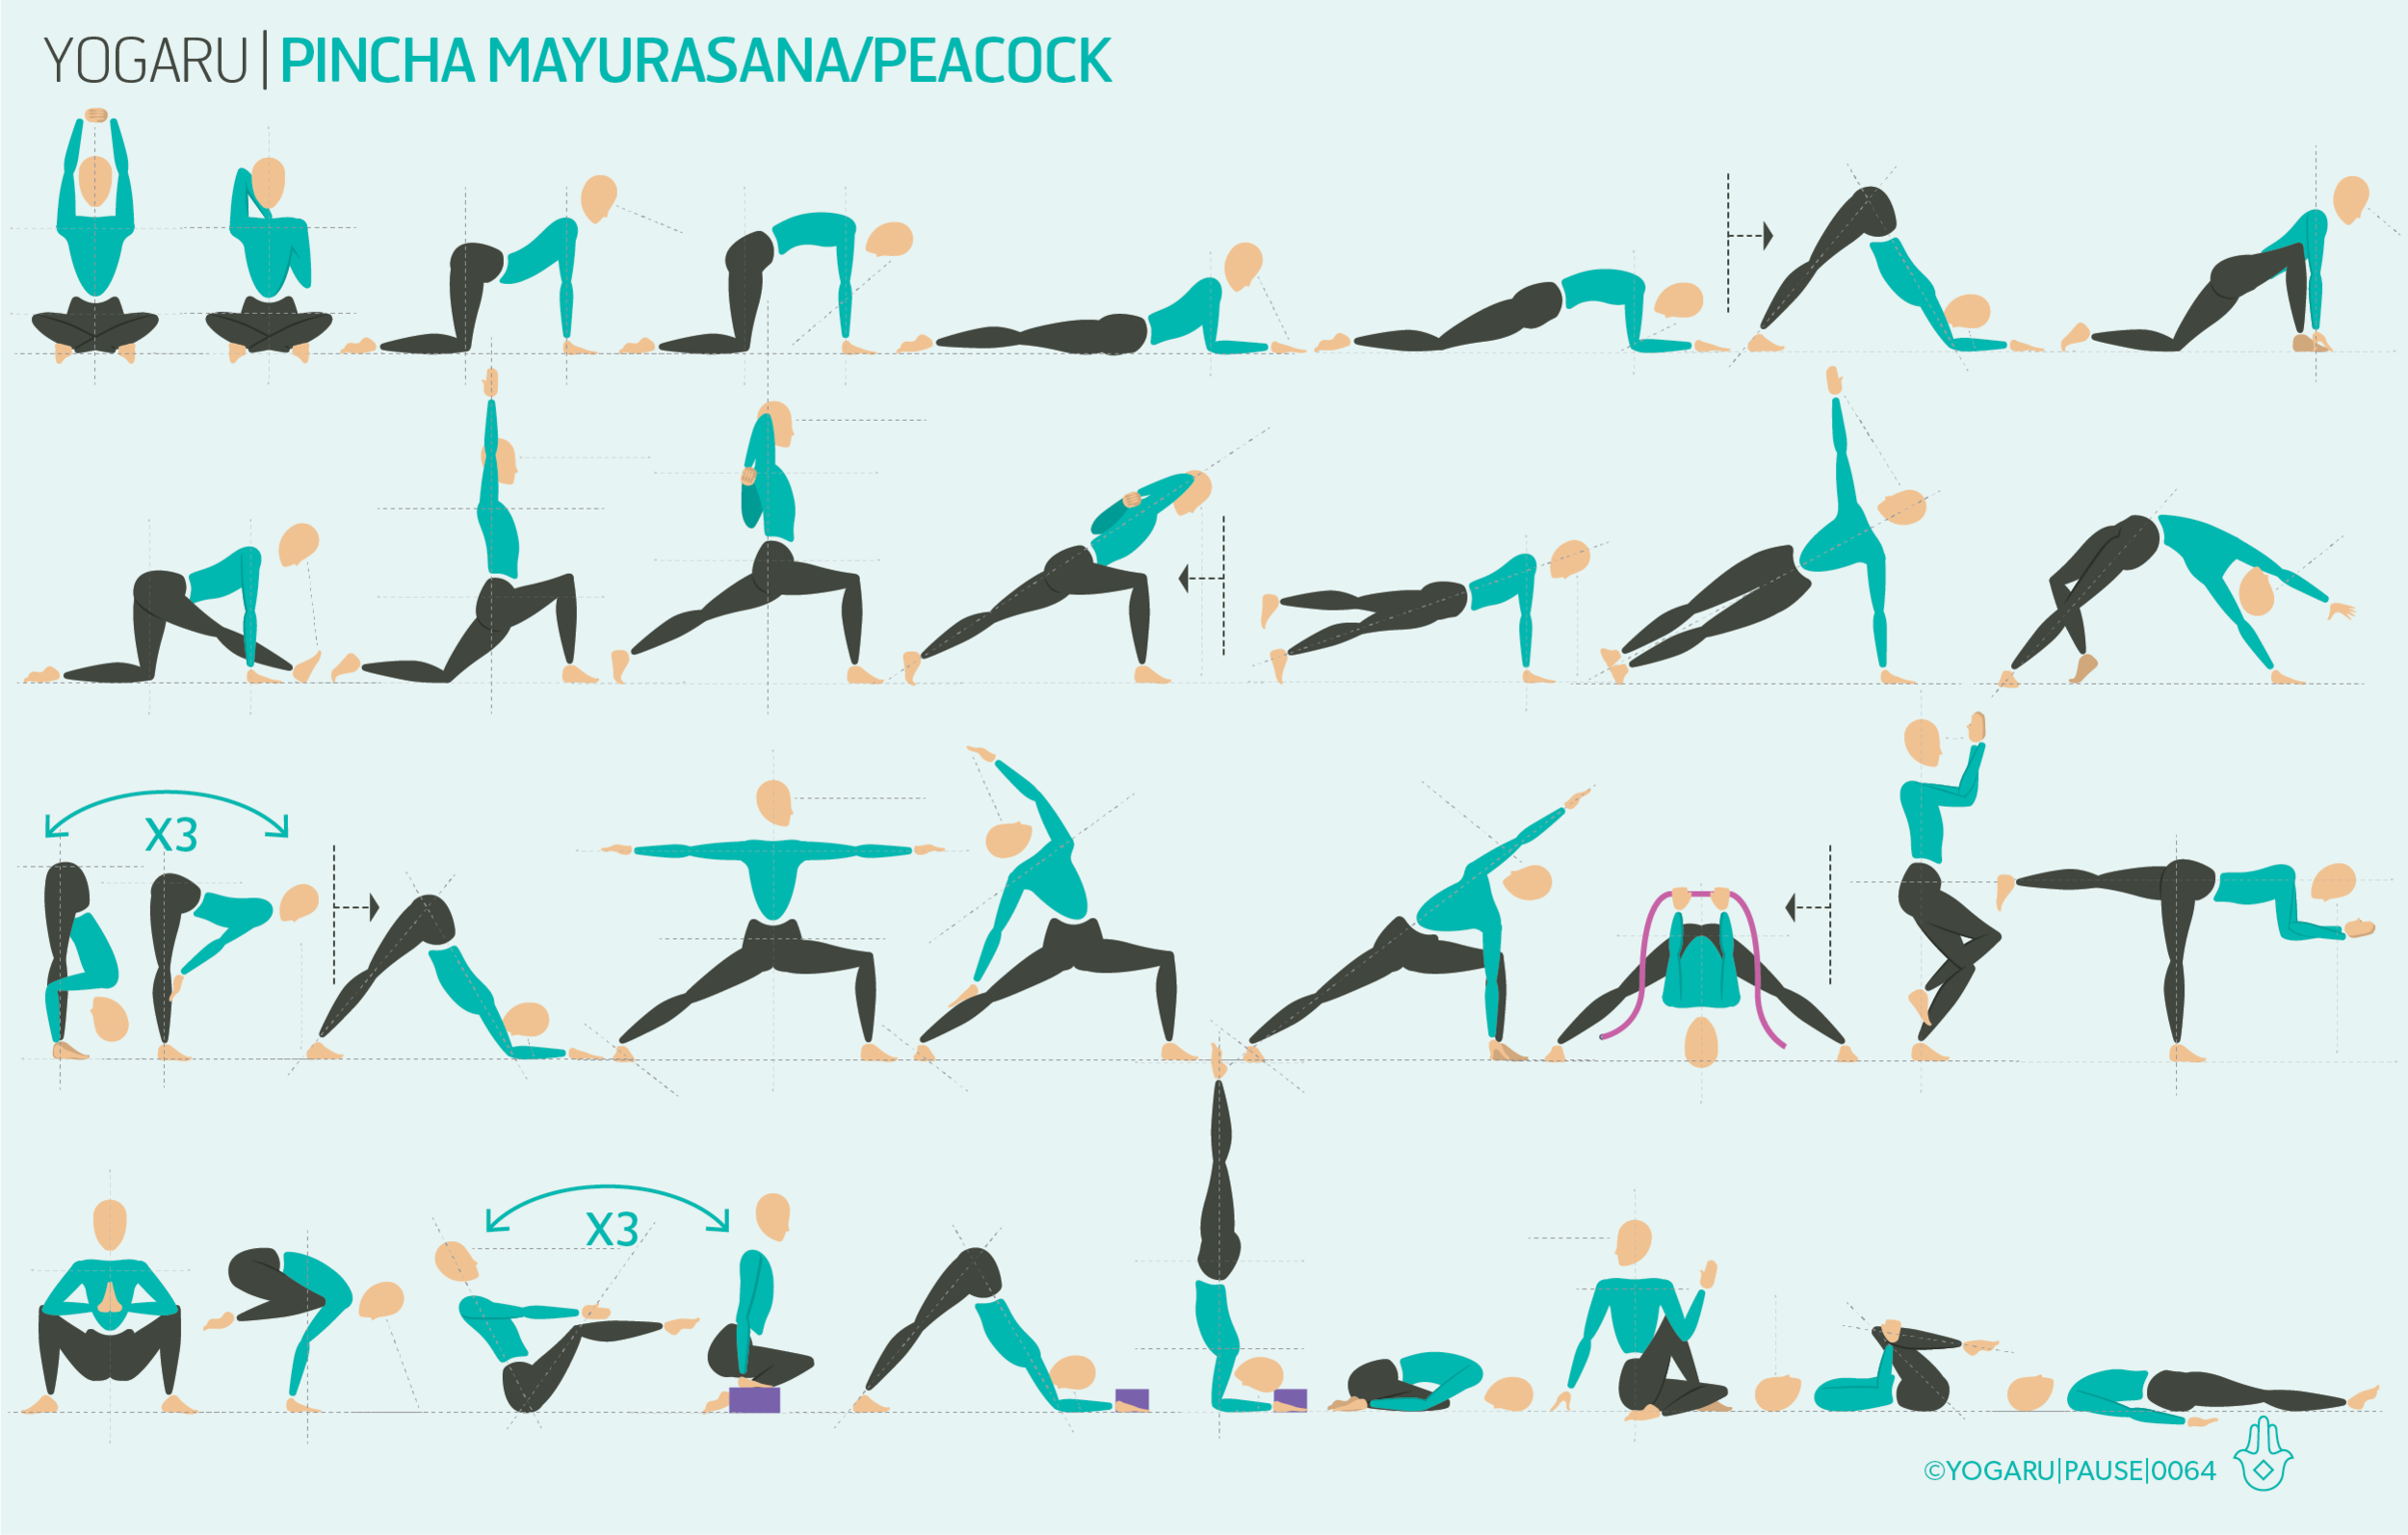
As you run through the sequence pay particular attention to your shoulders. When the arms are reaching up, they are not just reaching up, they are reaching up with intention. The lines of energy are running all the way to your fingertips. Notice if you are bringing any unnecessary tension into your shoulders when your arms are raised. Soften around the shoulder joint while still maintaining the integrity of the strength required. Throughout the sequence Adho Mukha Svanasana/Downward Dog is replaced with Ardha Pincha Mayurasana/Dolphin to help prepare the shoulders for the peak pose. This is the perfect pose to add to any practice in order to strengthen the shoulders for all arm balances and balancing inversions.

PAUSE_0064.png

ALIGNMENT CUES
The sequence will build strength and stability in the shoulders, arms and core. It will also prepare the legs to assist you if you are ready to try the kick up stage. Set your intention on strengthening your shoulders and staying within your safe limits, rather than expecting to achieve full Pincha Mayurasana/Peacock. There are two options – prep pose with hands pressing into the wall or the prop assisted full version of the pose.

Print out the below tips, along with the sequence, and spend some extra time exploring your shoulders:

HOW TO PREP FOR PEACOCK
Use this version to build shoulder strength to either build towards Pincha Mayurasana/Peacock or stay with this version fo the pose.

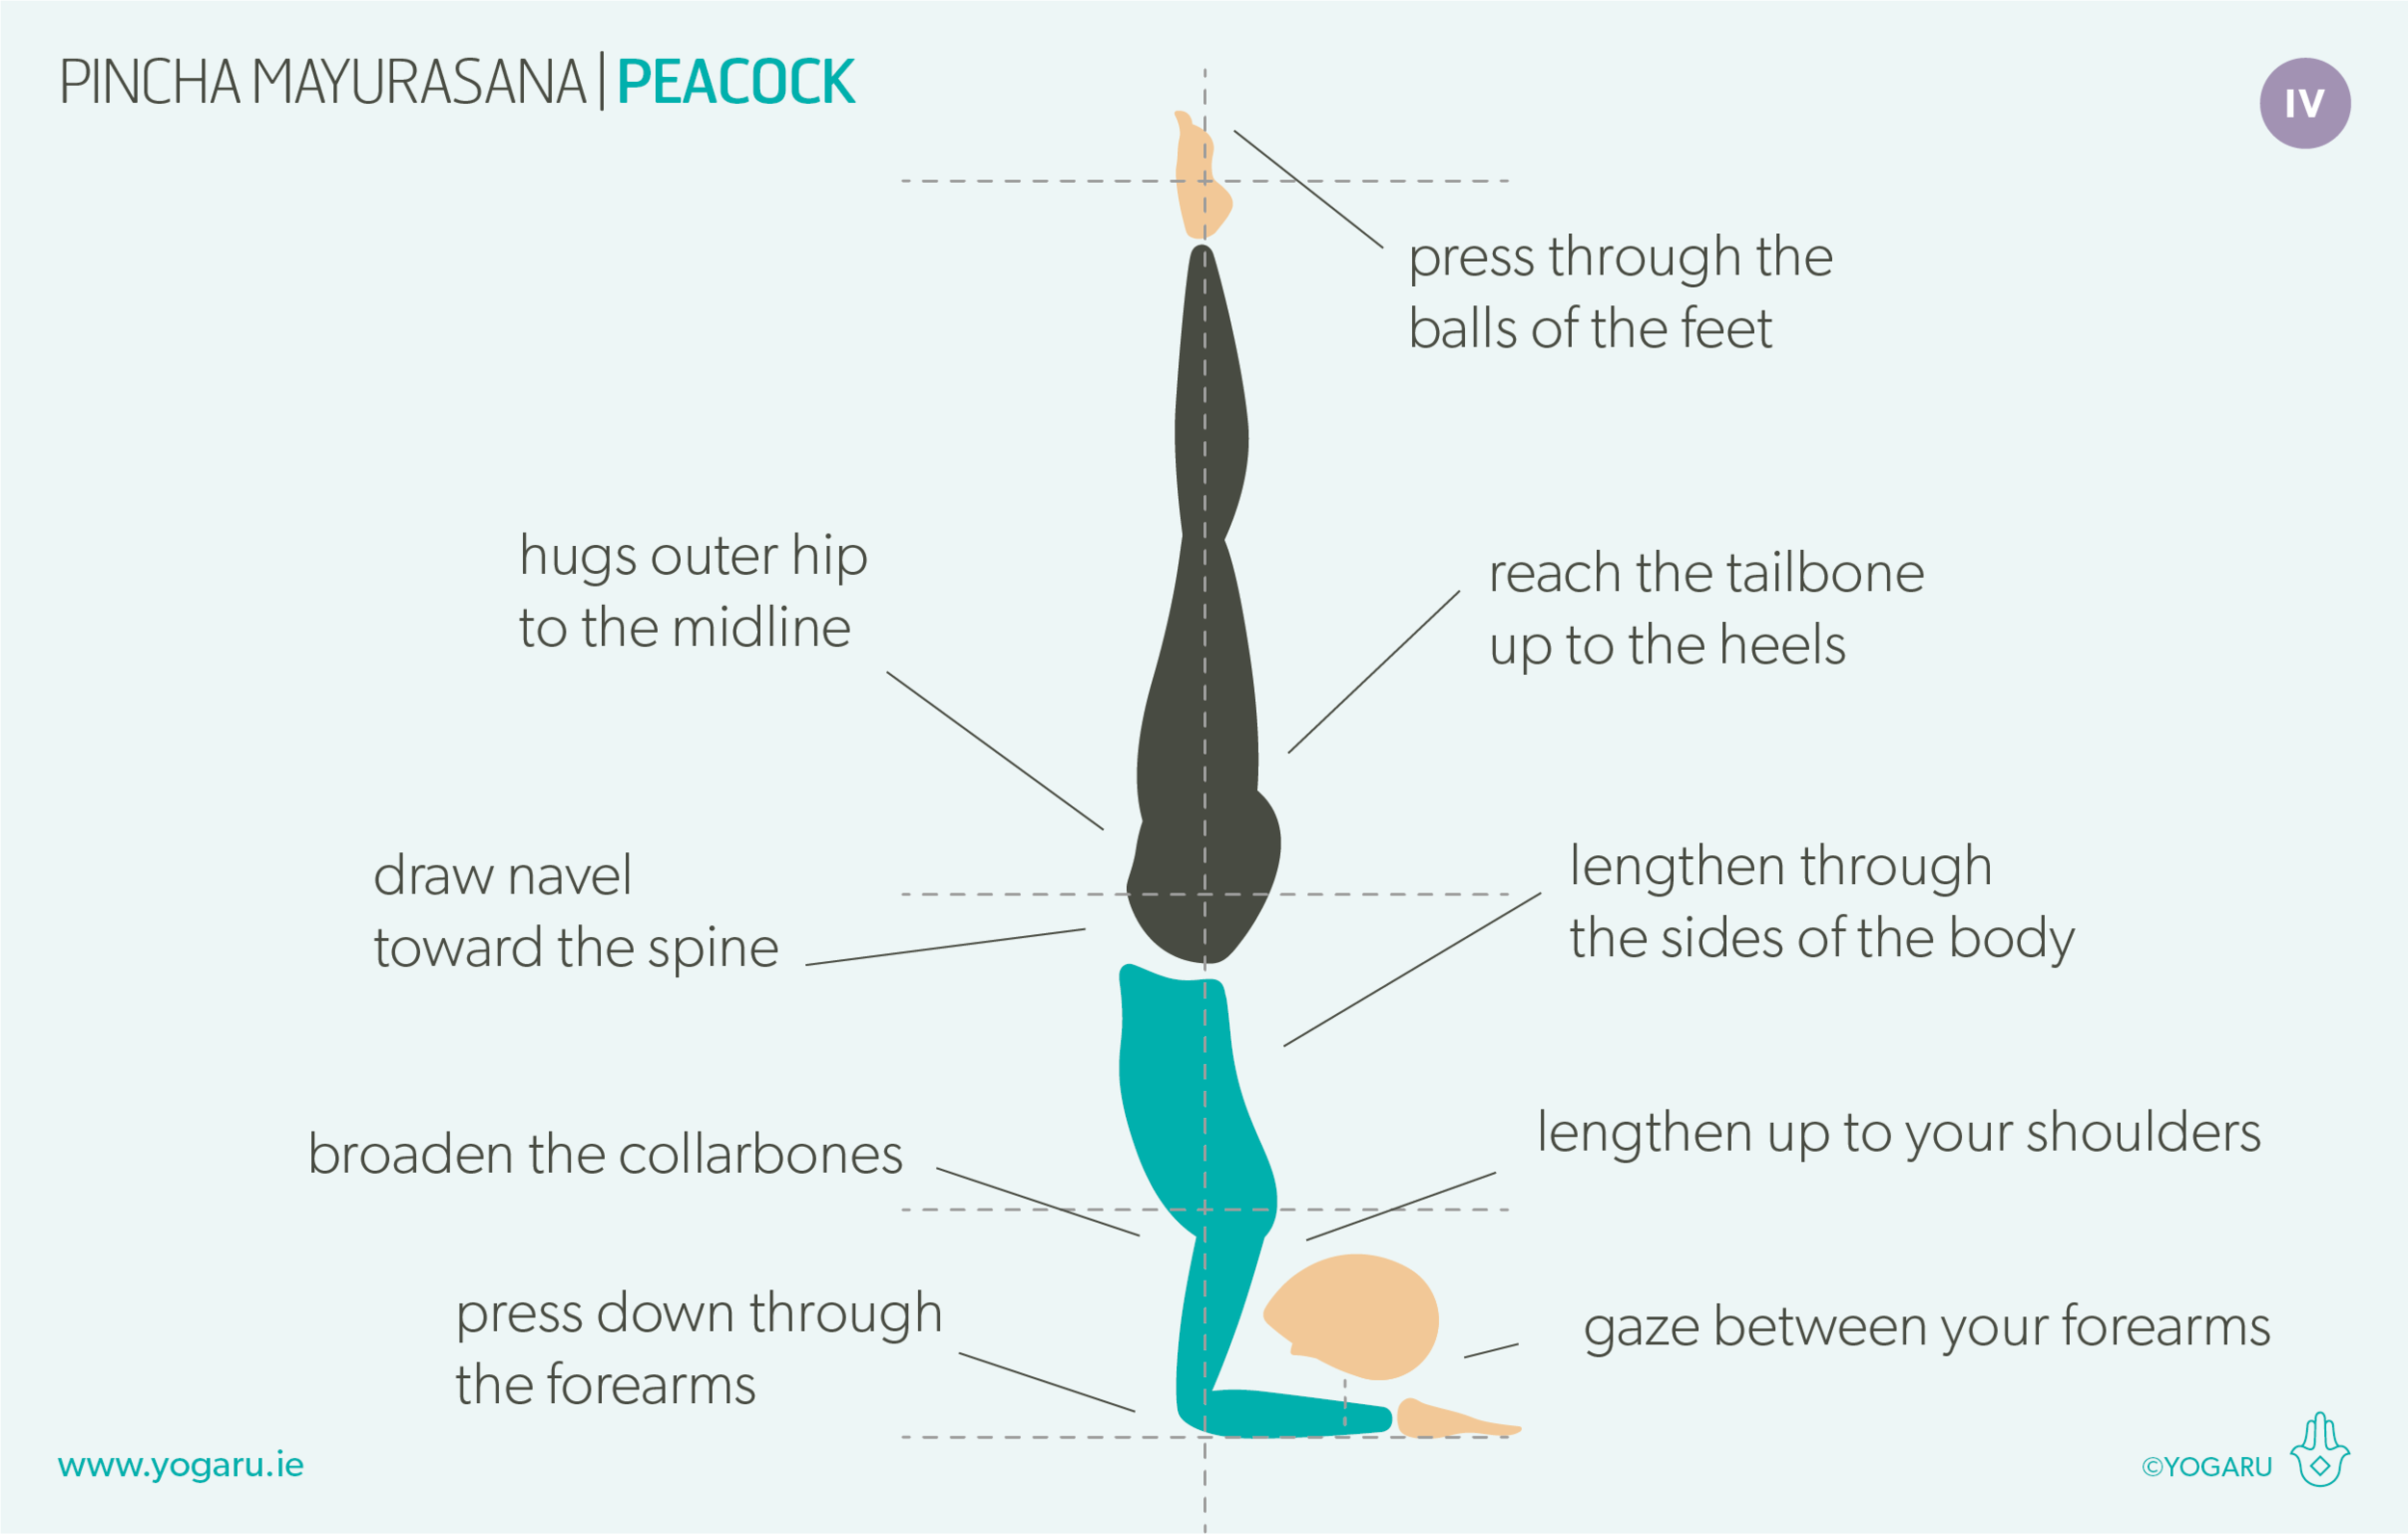
  • Set your mat short side up against a wall. From kneeling, place your forearms parallel on the ground, shoulder width apart. Place your hands at the wall fingertips reaching away from you.

  • Lift your knees and walk your feet forward. Press down through your forearms, lengthen up to your shoulders, broaden your collarbones. Gaze between your forearms.

HOW TO USE PROPS FOR PEACOCK
Once you are happy your shoulders can hold your inversion move on to this version of Pincha Mayurasana/Peacock using a brick to help you stabilise your foundation.

  • Move your forearms about two inches away from the wall. Place the long side of a brick between your hands – fingers on the short side and thumbs on the long side of the brick.

  • Press down through your forearms, lengthen up to your shoulders, broaden your collarbones. Gaze to the brick between your forearms.

  • Bend your left leg, lift your right leg up and press out through the heel. Spring your right leg up overhead, follow with the left leg, reach your legs up high, draw your navel towards your spine.

  • Hug your outer hips and inner thighs to midline, press through the balls of your feet, reach your tailbone up to your heels.

  • To come down, slowly bend your knees and lower your feet to the ground.

Enjoy turning your practice upside down, focusing on the shoulders and letting the legs look after themselves for a change.

To save the images for personal use click and hold down the image until the ‘save image’ option appears; on Mac hold down ‘control’ and click the image to get the option box; on PC right click on the image to get the option box. Scroll down in the ‘option box’ and click ‘save image’.

Ruth Delahunty Yogaru

Eka Pada Koundinyasana - One Legged Side Crow

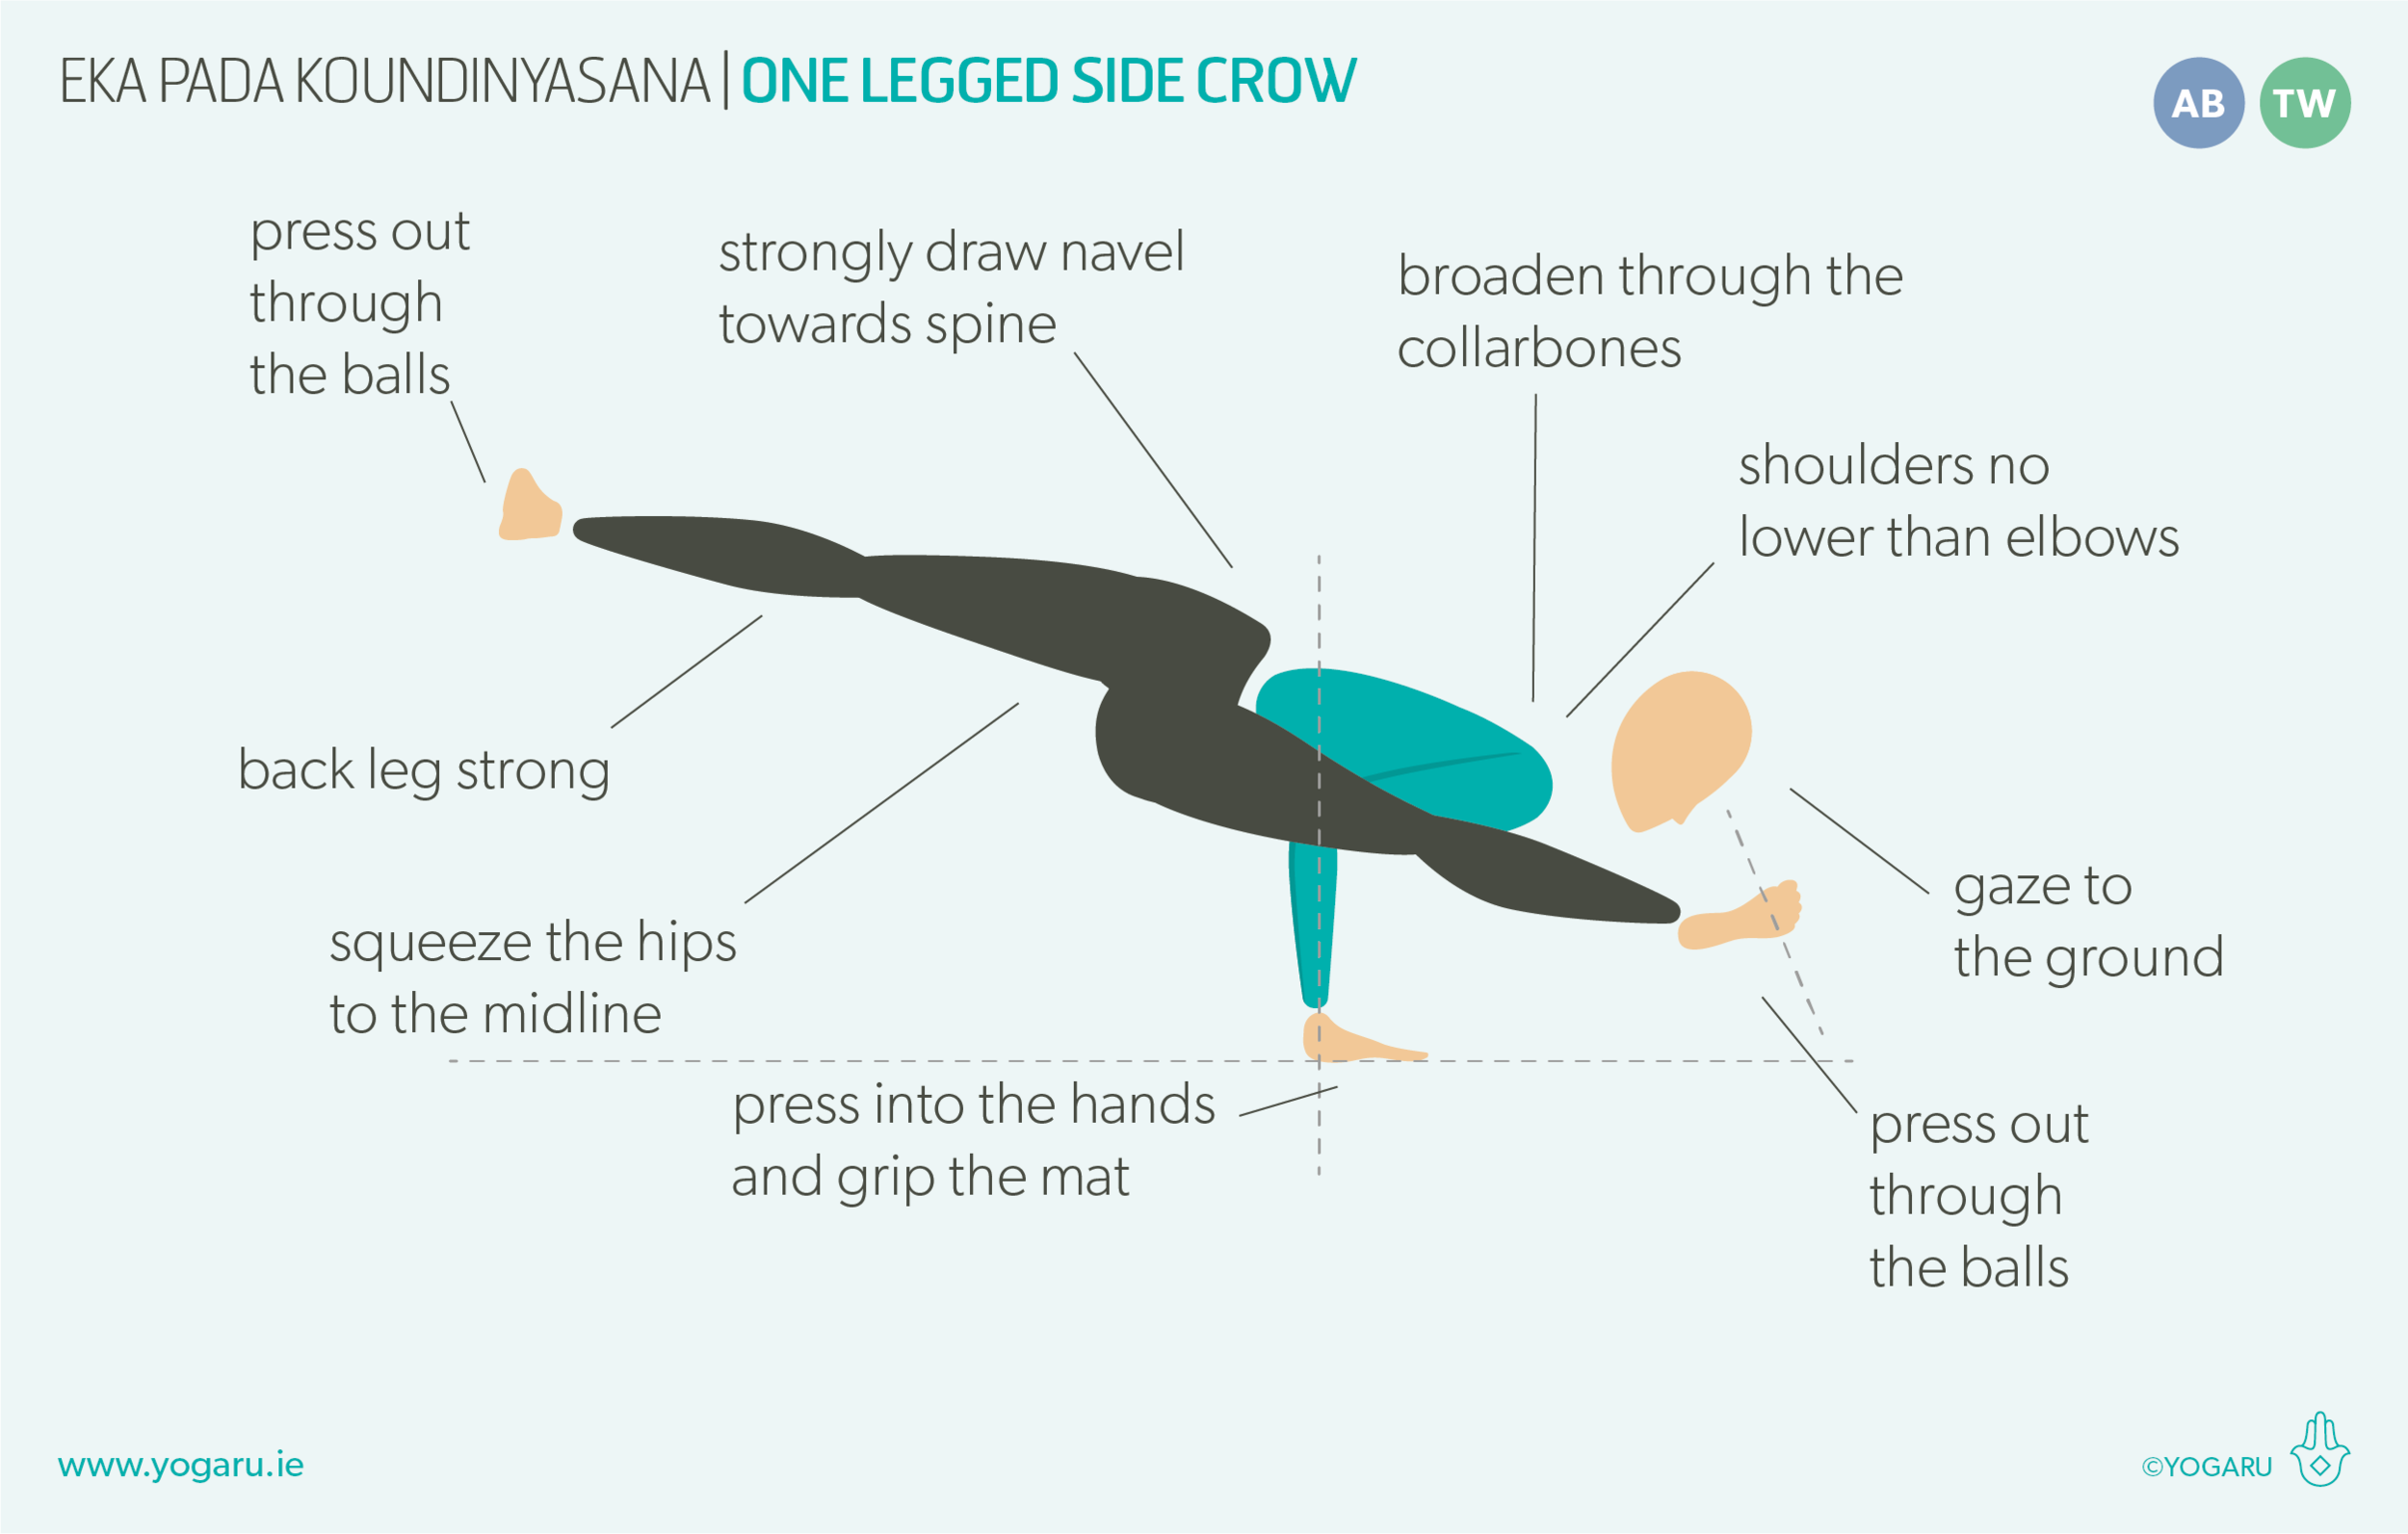
YOGARU_Eka Pada Koundinyasana_PB.png

HOME PRACTICE TO SUIT YOUR NEEDS
While writing an article for Wellfest on demystifying Crow, it reminded me how much I love to play around with arm balances in my home practice. Most weeks my practice centers around sequencing classes – ready to teach and write up the accompanying blog post for my students. This week I’m enjoying being light on classes, which has given me the opportunity to go deep into my own practice and really explore what poses I love, and what poses challenge me. There is nothing better than starting the day with a home practice that is exactly what you need for that particular day. This week I’m working on my arm balances. They tick both boxes – they are poses that I love and find challenging at the same time. Arm balances build focus, heat, strength and stamina. They are great for building self confidence when you manage to lift those toes for the first time; and teach you humility if you’re having a day when the feet just won’t budge off the ground. Your practice is not about ticking off poses as you ‘master’ them, it’s about revisiting the poses that sit well with you to find comfort in them, and practicing poses that challenge you physically and emotionally in order to tackle life off the mat too.

THE BENEFITS OF EKA PADA KOUNDINYASANA/ONE LEGGED SIDE CROW
If you’ve read a few of my previous sequence articles you’ll have noticed I’m all about gut health. Eka Pada Koundinyasana/One Legged Side Crow is also a twist which aids healthy digestion, detoxification and optimal elimination – and with a happy gut comes a happy immune system. They also ease stress, tension and anxiety. If you are feeling wound up, wind yourself up in a twist – the compression and massages the organs, and on releasing the twist you feel a loosening of the physical and emotional tension as the fresh oxygenated blood flows back into all the organs, and triggers the rest and restore parasympathetic nervous system.

EXPLORING EKA PADA KOUNDINYASANA/ONE LEGGED SIDE CROW IN YOUR PRACTICE
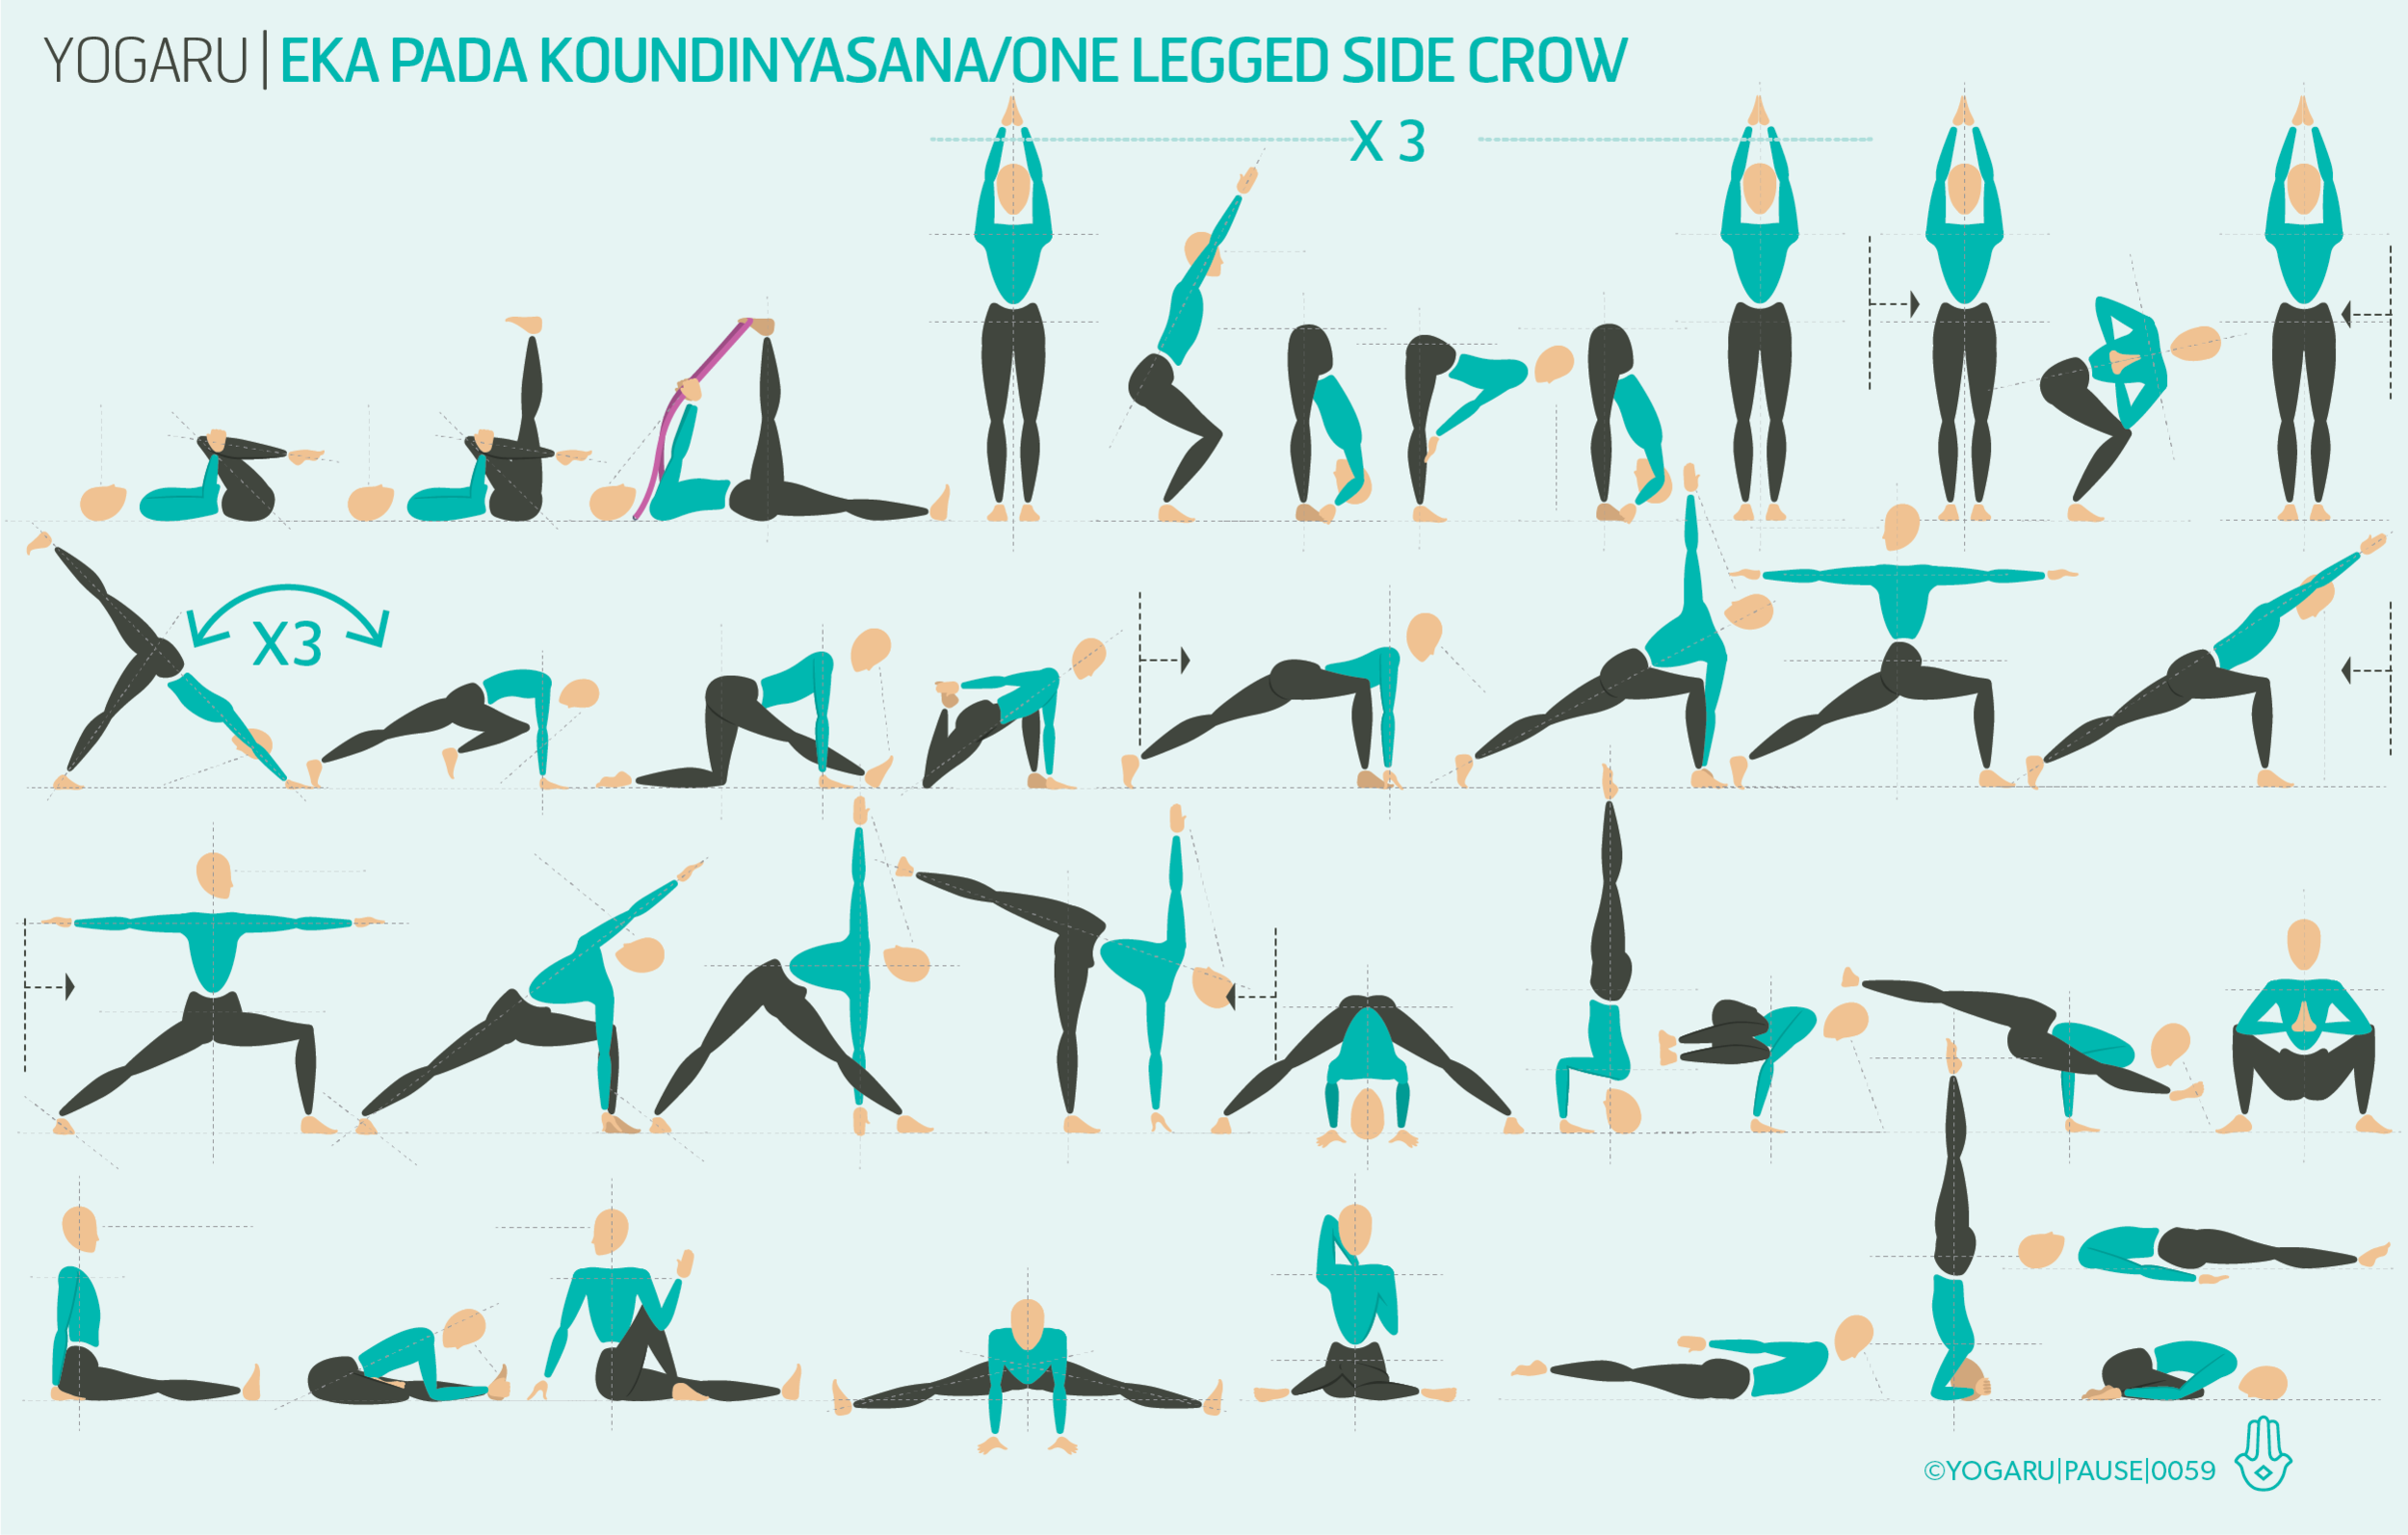
As you flow through your practice pay particular attention to your twists. Feel into the muscles that work to twist the body as they strengthen and stretch. The arm balances start with Tripod Headstand, if it is not part of your practice, skip it and go straight to Parsva Bakasana/Side Crow. If you’re finding it hard to lift up try placing your right hip on your right elbow, and your right knee on your left elbow – so that the body weight is being distributed on both elbows rather than just on your left elbow. Unlike our feet, the wrists were not made to carry full body weight, so be kind to them – rest in Balasana/Child’s Pose between Parsva Bakasana/Side Crow and Eka Pada Koundinyasana/One Legged Side Crow if your wrists need a break.

PAUSE_0059.png

ALIGNMENT CUES
The sequence is designed to warm up the core, strengthen the shoulders and wake up the hip flexors. Move slowly through the sequence and let the body warm up and be ready to play with your peak poses.

Print out the below tips, along with the sequence, and give arm balances a go with fresh eyes:

  • From Malasana, with feet together, twist to your right, place your hands on the ground to the right of your feet a little wider than shoulder width, fingers facing away from the legs

  • Bend your elbows and place your left elbow above your right knee.

  • Strongly draw your navel towards your spine, round your upper back. Lean to your right side, shift your weight into your hands.

  • Exhale, lift your feet stretch your right leg out to your left parallel to the ground, reach your left leg out behind you and press out through balls of both feet, gaze slightly forward.

Some days I’m not at my most elegant in my arm balances but it’s important to remember it’s how they make your feel inside that matters.

To save the images for personal use click and hold down the image until the ‘save image’ option appears; on Mac hold down ‘control’ and click the image to get the option box; on PC right click on the image to get the option box. Scroll down in the ‘option box’ and click ‘save image’.

Ruth Delahunty Yogaru