Virabhadrasana II - Warrior II

YOGARU_Virabhadrasana II_PB.png

EXPLORING VIRABHADRASANA II/WARRIOR II IN YOUR PRACTICE
Hip opening classes are one of the most requested and popular class themes. They release tension physically and mentally, and leave you feeling a lovely freedom of movement in the hip joint as you leave your class. When you consider a hip opening class, which asana springs to mind? Most people think of asana that stretch the outer hip muscles, for example Gomukhasana /Cow Face or Eka Pada Rajakapotasana/Pigeon Pose. For me, I feel a deeper hip opening in asana where the leg is rotated outwards, strengthening the outer hip and stretching the inner leg. Warrior II is not traditionally considered a hip opener, but there is a deep opening of the inner groin in the front leg in particular, as the outer glute is working hard to keep the inner knee from collapsing in. Asana with similar leg arrangement such as Parsvakonasana/Side Angle, Trikonasana/Triangle & Ardha Chandrasana/Half Moon will externally rotate the leg, and open the hip, in a similar way.

The hip joint is made up of several families of muscles – the hamstrings, the glutes, the quads, the groin and the hip flexors. Warrior II works all five muscle groups. Below are some alignment cues to try out in the sequence above or in your next class. As you test out some of the tips bring your attention to the muscles you are strengthening and stretching.
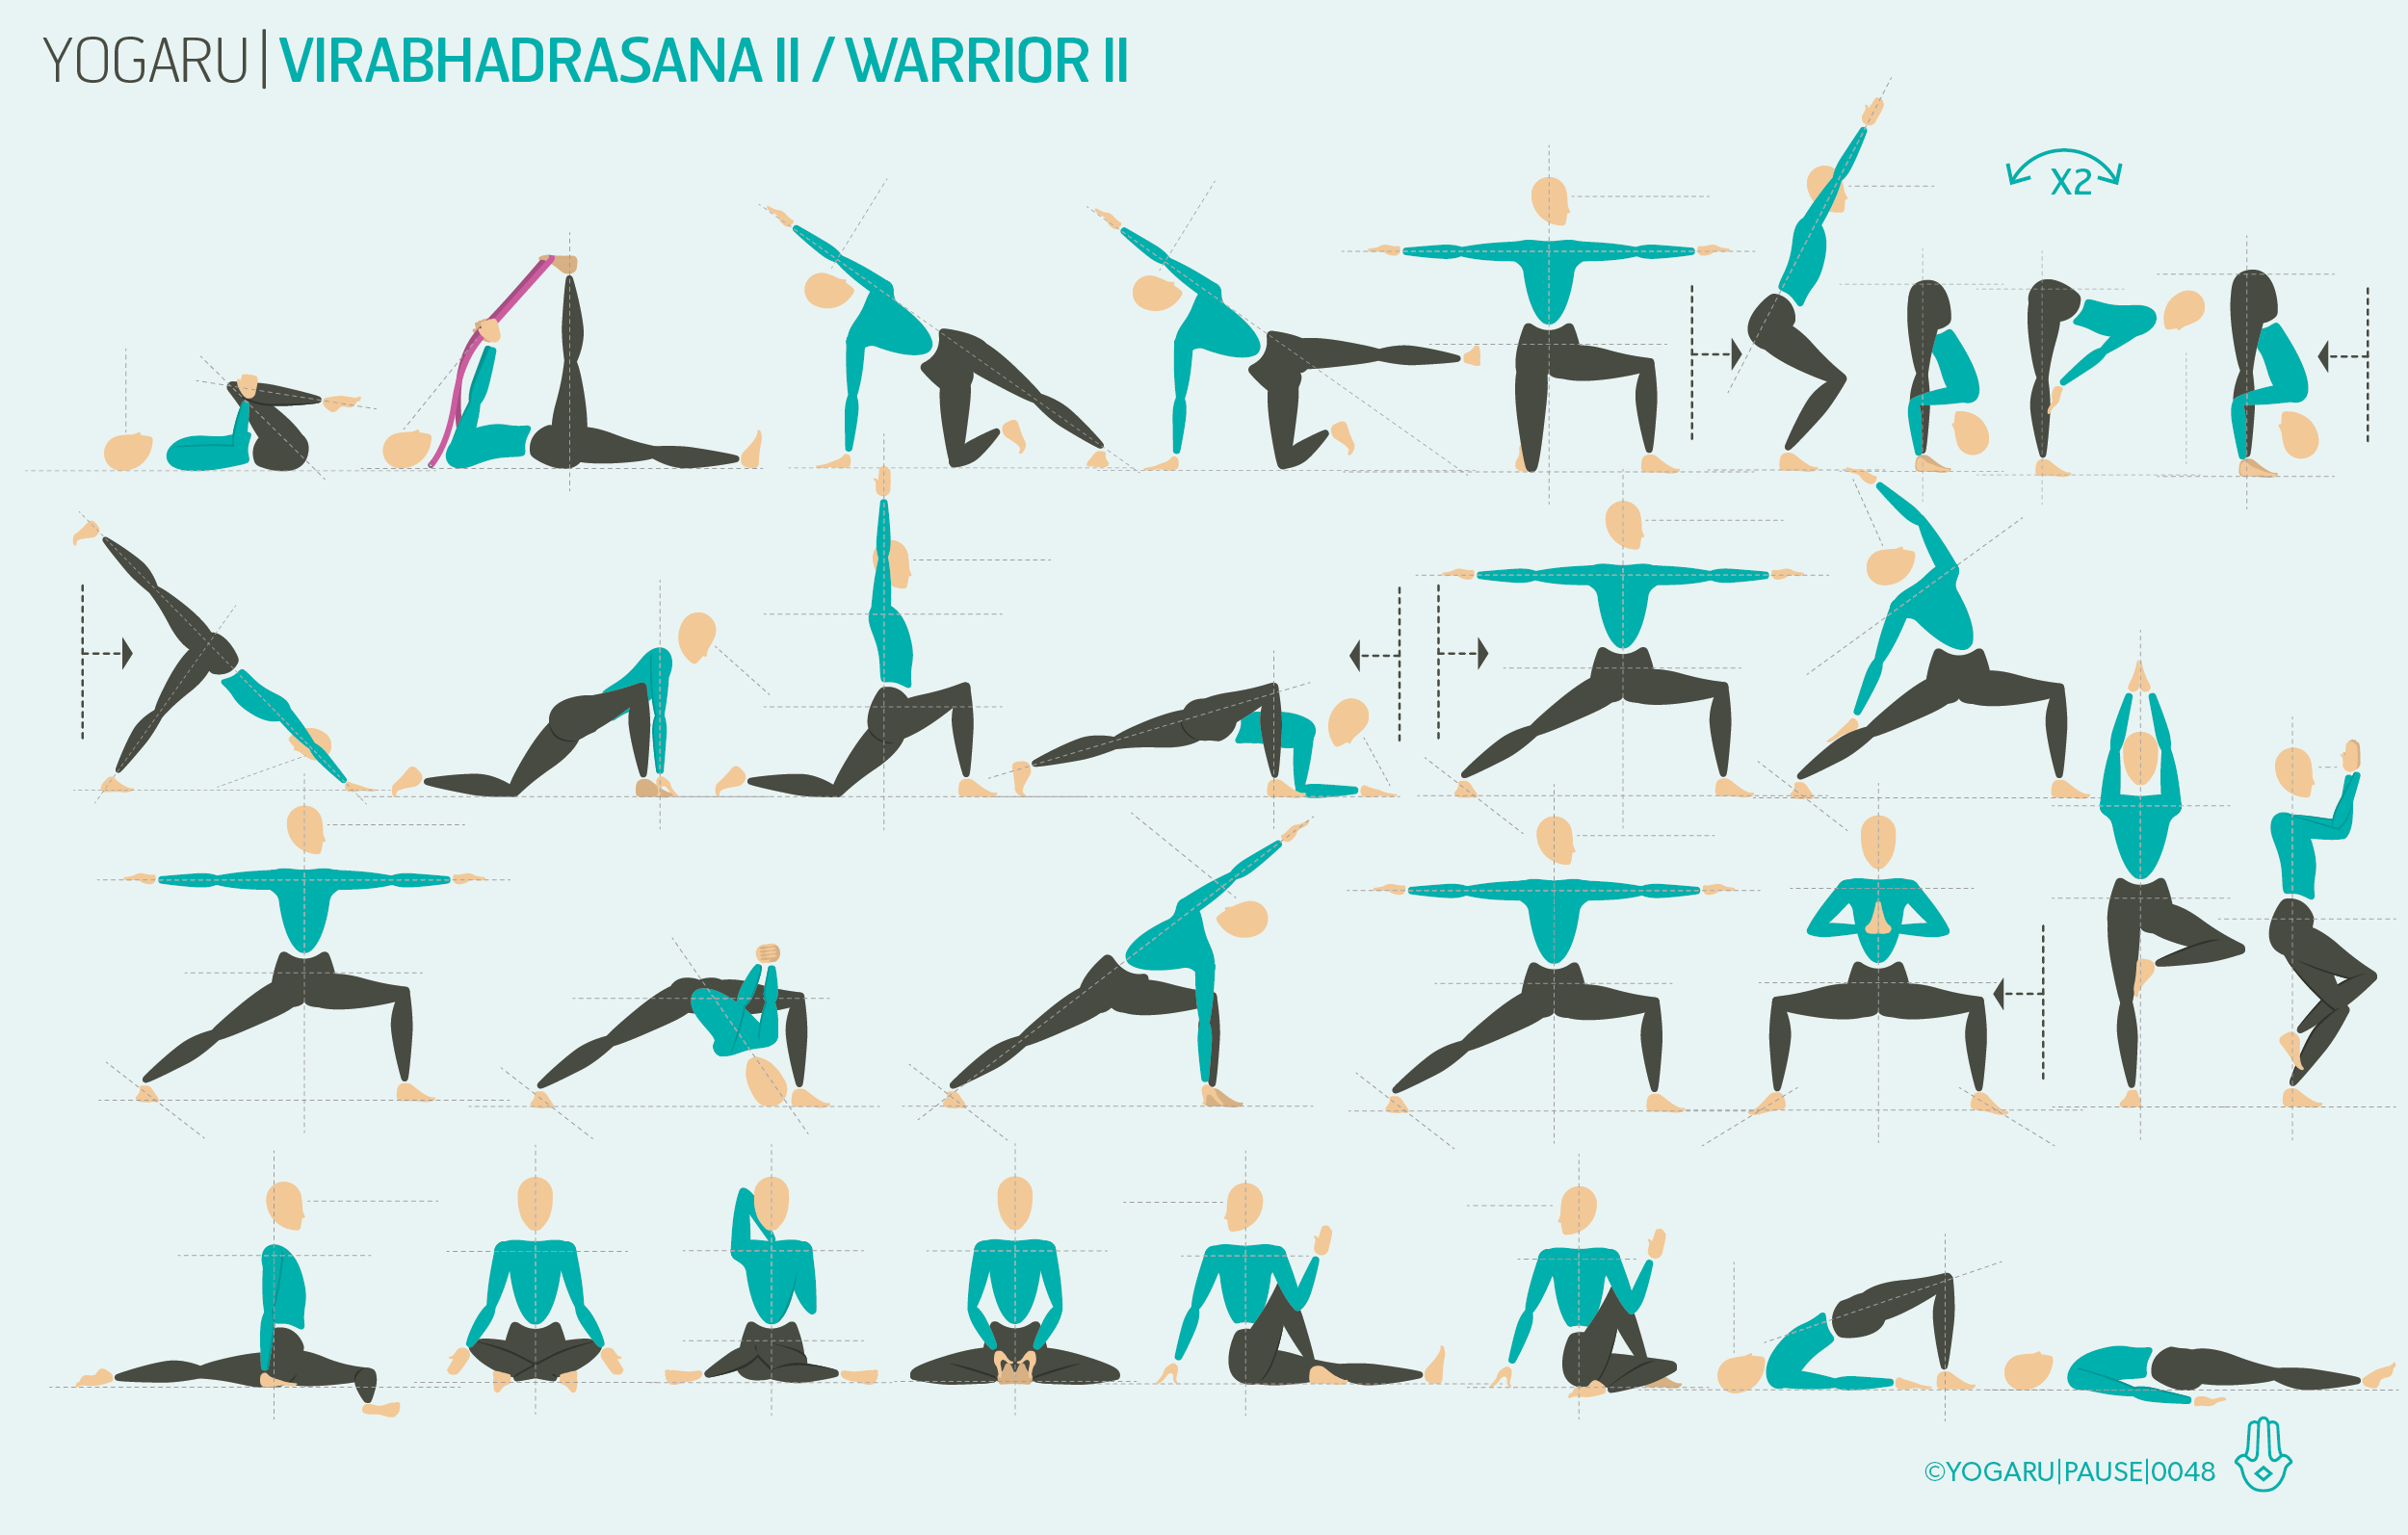
PAUSE_0048.png

ALIGNMENT CUES
The above sequence starts with Supta Padangusthasana/Reclined Hand to Big Toe to warm up and lengthen the hamstrings. After you have pressed the leg up straight, hinge the leg out to the side from the hip joint to start to open up the groin. There is also a half Warrior II kneeling version to help you find the outward rotation of the hip without the full weight of the body.

Print out the below tips, along with the sequence, and take some extra time in your Warrior II:

  • With your hips facing the side of the mat your left hip will naturally sits slightly forward of your right hip.

  • Squeeze your right outer hip muscles and press lightly into you big toe mound to track your knee over your ankle and open the groin out to the side of the mat.

  • Press into your front heel and pull it back towards you to feel the quads and hamstrings wake up.

  • As your groin starts to open see can you find more space to drop your hips down, making sure to adjust your front foot to keep the knee tracking.

  • Draw your navel in towards your spine and lengthen up through the tip of the crown, shoulders directly over pelvis.

  • With equal weight between front and back foot, press into your back heel to feel the arches of the foot lift.

To save the images for personal use click and hold down the image until the ‘save image’ option appears; on Mac hold down ‘control’ and click the image to get the option box; on PC right click on the image to get the option box. Scroll down in the ‘option box’ and click ‘save image’.

Ruth Delahunty Yogaru

The twist effect

PAUSE_0047.png

WHAT HAPPENS WHEN WE TWIST?
We have previously explored the cleansing effect of twists and twisting from the midline out. Twists massage the organs of the body – stimulating good digestion, removing toxins through the liver and kidneys, supporting the immune system, and relieving stress and tension. But what do the rotational muscles of the core need to do to facilitate these benefits?

LOOK FOR THE STRENGTH IN YOUR TWISTS
Twists stretch and strengthen the full circumference of the core and the spinal muscles. When we are twisting, we naturally notice the stretch effect in the side body, on the opposite side we are twisting to. In a twist, to every stretch effect there is a strengthen effect. The muscles on the side we are twisting to contract to facilitate this stretch. The next time you take a twist in your practice, try consciously contracting these muscles, and notice how they help you to twist a little further, and find a little more stretch, on the opposing side.

STANDING TWISTS
Aided twists, which use the help of an elbow pressing against a knee or a hand pressing into the ground, help to get a deeper stretching twist, but don’t work quite as much into the strengthening element of the twist. Unaided twists, which are twists that work without an anchor to facilitate your twist, may not feel as satisfyingly deep a twist, but are working the stretching and strengthening muscles equally. When you come to practice Parivrtta Utkatasana/Revolved Chair and Parivrtta Ashta Chandrasana/Revolved Eight Cresent Moon in the above sequence, try hovering your elbow above the knee to activate these deep twisting muscles.

SEATED TWISTS
In your seated twists explore both sit bones grounded and then allowing the opposing sit bone to lift slightly, and notice how it affects your twist. When twisting to the right, and the sit bones are grounded, you will feel a stretch coming from the base of the spine and a strong stretch in the outer left hip. When you allow the left sit bone to lift slightly, and the hips to follow the twist, it gives you a false sense of a deeper twist, but it helps you to take the spinal twist more comfortably if you have tight hips or any sacroiliac issues.

Print out the above sequence, and explore the strengthening sensations in the side you are twisting to. Click this link to get a full list of twists.

To save the images for personal use click and hold down the image until the ‘save image’ option appears; on Mac hold down ‘control’ and click the image to get the option box; on PC right click on the image to get the option box. Scroll down in the ‘option box’ and click ‘save image’.

Ruth Delahunty Yogaru

Upper back strength

WHAT MAKES GOOD POSTURE
I’ve become very aware recently of my posture. As a yoga teacher, and practitioner, I judge myself when I catch my shoulders hunching, or my lower spine rounding in a seated position. It led me to investigate which asana help to build, and maintain, good posture in the practice of yoga.

OUR EVERYDAY POSTURE
The average person, sitting for hours at their computers, are rarely in a beautifully upright position – with the pelvis perfectly perpendicular to the seat, and their shoulders stacked over their hips. Even as we move through our day, our shoulders are often leading the way, with our upper back curved forward, in a hurry to get to our next appointment. Backbends stretch the front body, open the shoulders, stimulate the nervous system and lift your spirits. All backbends stretch the front body, but backbends that use the weight of the body against gravity, to strengthen the upper back, help to maintain this chest opening beyond your time on the mat.

STRONG BACK – HEALTHY BACK
Salabhasana/Locust is not an asana you’ll see much on Instagram, and some yogis find the breath quite challenging when the diaphragm is being pressed, but there is lots happening in this unassuming asana. The whole back body is strongly working to lift the weight of the body against gravity; the weight of the body is pressing and massaging the organs of the abdomen – aiding digestion and detoxification, boosting the immune system, easing constipation, and easing mental fatigue.

Ardha Uttanasana/Half Forward Bend also uses the upper back against gravity when done with awareness. Place the palms of your hands on your upper shins, use your arms to help reach your sternum forward and up, and feel the upper back working. If you have tight hamstrings this will be a great way to warm them up before any deeper Forward Bends. Like with Salabhasana/Locust, I have found huge benefits from spending more time in these two asana in my daily practice recently.

EXPLORING UPPER BACK STRENGTH IN YOUR PRACTICE
In your next practice try coming all the way down to the ground and taking Salabhasana/Locust instead of Bhujangasana/Cobra or Urdha Mukha Svanasana/Upward Facing Dog. Print out the above sequence to get a sense for what upper back strengthening feels like in your spine.

To save the images for personal use click and hold down the image until the ‘save image’ option appears; on Mac hold down ‘control’ and click the image to get the option box; on PC right click on the image to get the option box. Scroll down in the ‘option box’ and click ‘save image’.

Ruth Delahunty Yogaru